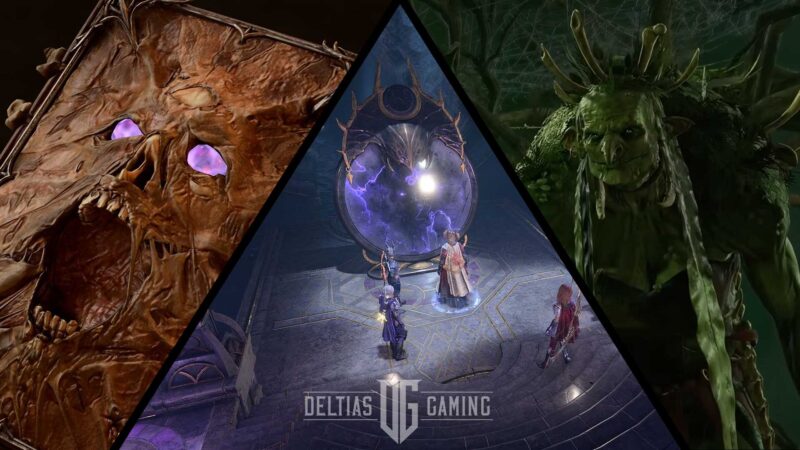
Discover strategies for how to beat 5 of the hardest bosses Baldur’s Gate 3 has to offer in the early game of Act 1!

The bosses in Act 1 of Baldur’s Gate 3 are no pushovers. Due to your lower level, they can be some of the most challenging foes you’ll face in the game. Additionally, you also won’t have access to some of the stronger spells, feats, or actions characters can use at higher levels. These beasts and constructs aren’t impossible to beat, however! Let’s take a closer look at the top 5 hardest bosses in Act 1 and the most effective strategies for how to beat them.
Top 5 Hardest Bosses in Act 1
The top 5 hardest bosses include a powerful Githyanki, a couple of constructs, a monstrous spider, and a hideous hag. Technically, you can bypass all of these bosses if you want to. However, we do not recommend avoiding these bosses. They all drop handy gear or weapons or are tied to compelling side quests and stories. Consequently, skipping over them will cost you powerful equipment, a loss of experience points, and parts of the story.
Here are the top 5 hardest bosses to beat in Act 1 of Baldur’s Gate 3:
- Inquisitor W’wargaz – use surprise, focus the outside enemies, and command drop weapon.
- Auntie Ethel – use magic missile to remove shade characters.
- Grym – stand up top and use Berserker Barbarian throw with torches.
- Phase Spider Matriarch – shoot web to drop down.
- Bernard – knock off a ledge or bypass fight with the book.
Related:
5 Bernard
Location and Rewards for Bernard:
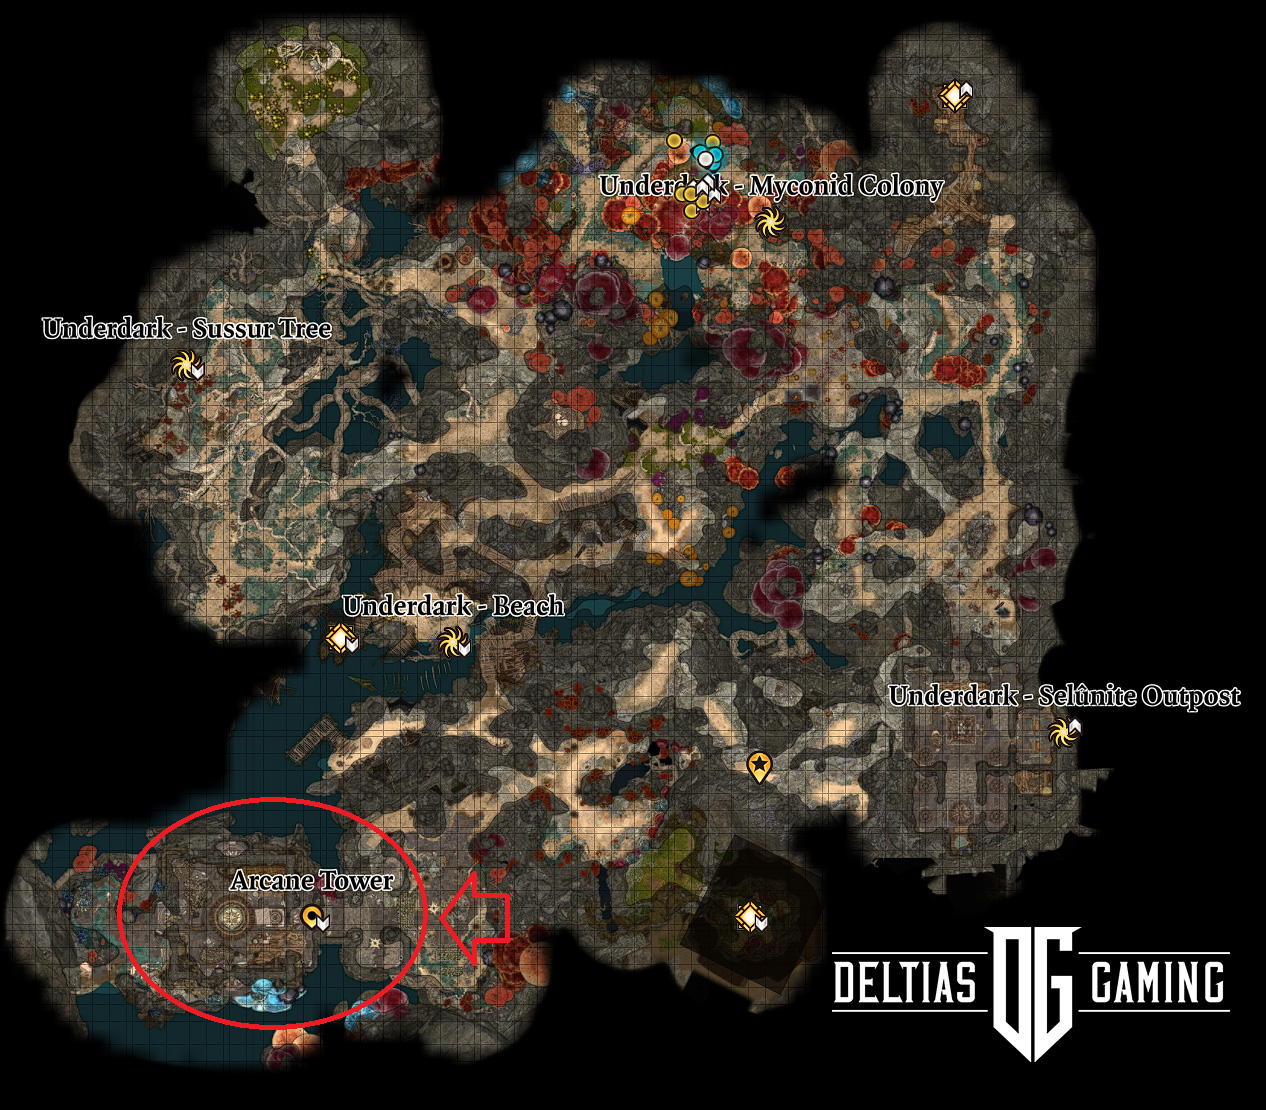
- Location: Top floor to the Arcane Tower, southwest corner of the Underdark
- Recommended Party Level: 4
- Rewards: Light of Creation and Guiding Light; then Staff of Arcane Blessing and The Sparkswall in the basement.
- Permanent Bonuses: None
Discovering Bernard in Baldur’s Gate 3 will take you into the large Underdark area available during Act 1. Much like with the Phase Spider Matriarch and/or Grym, the easiest way to find the Underdark is by going through the Whispering Depths. You can access those caverns by going down the Well in the Blighted Village. Once you’re in the Whispering Depths and have defeated the Spider Matriarch, cast the Feather Fall spell on your party. (Or use a Feather Fall potion.) Then jump into the glowing green chasm – you will safely land in the Underdark below.
You’ll land on the east side of the Underdark map, right about in the center. The Arcane Tower is down in the lower southwestern corner. However, we recommend heading to the Myconid Colony first to unlock the waypoint and pick up some quests/shop at traders. This will also make it quicker and easier to leave the Tower once you’re done.
Lastly, our How to Unlock the Arcane Tower Basement guide will give you instructions on how to get inside the tower, unlock the elevator, and make your way to Bernard at the top.
How to Beat Bernard in Baldur’s Gate 3
If you try to fight Bernard and his constructs head-on, this fight can be a struggle. However, there are two options when facing Bernard that can negate much of the difficulty of this fight.
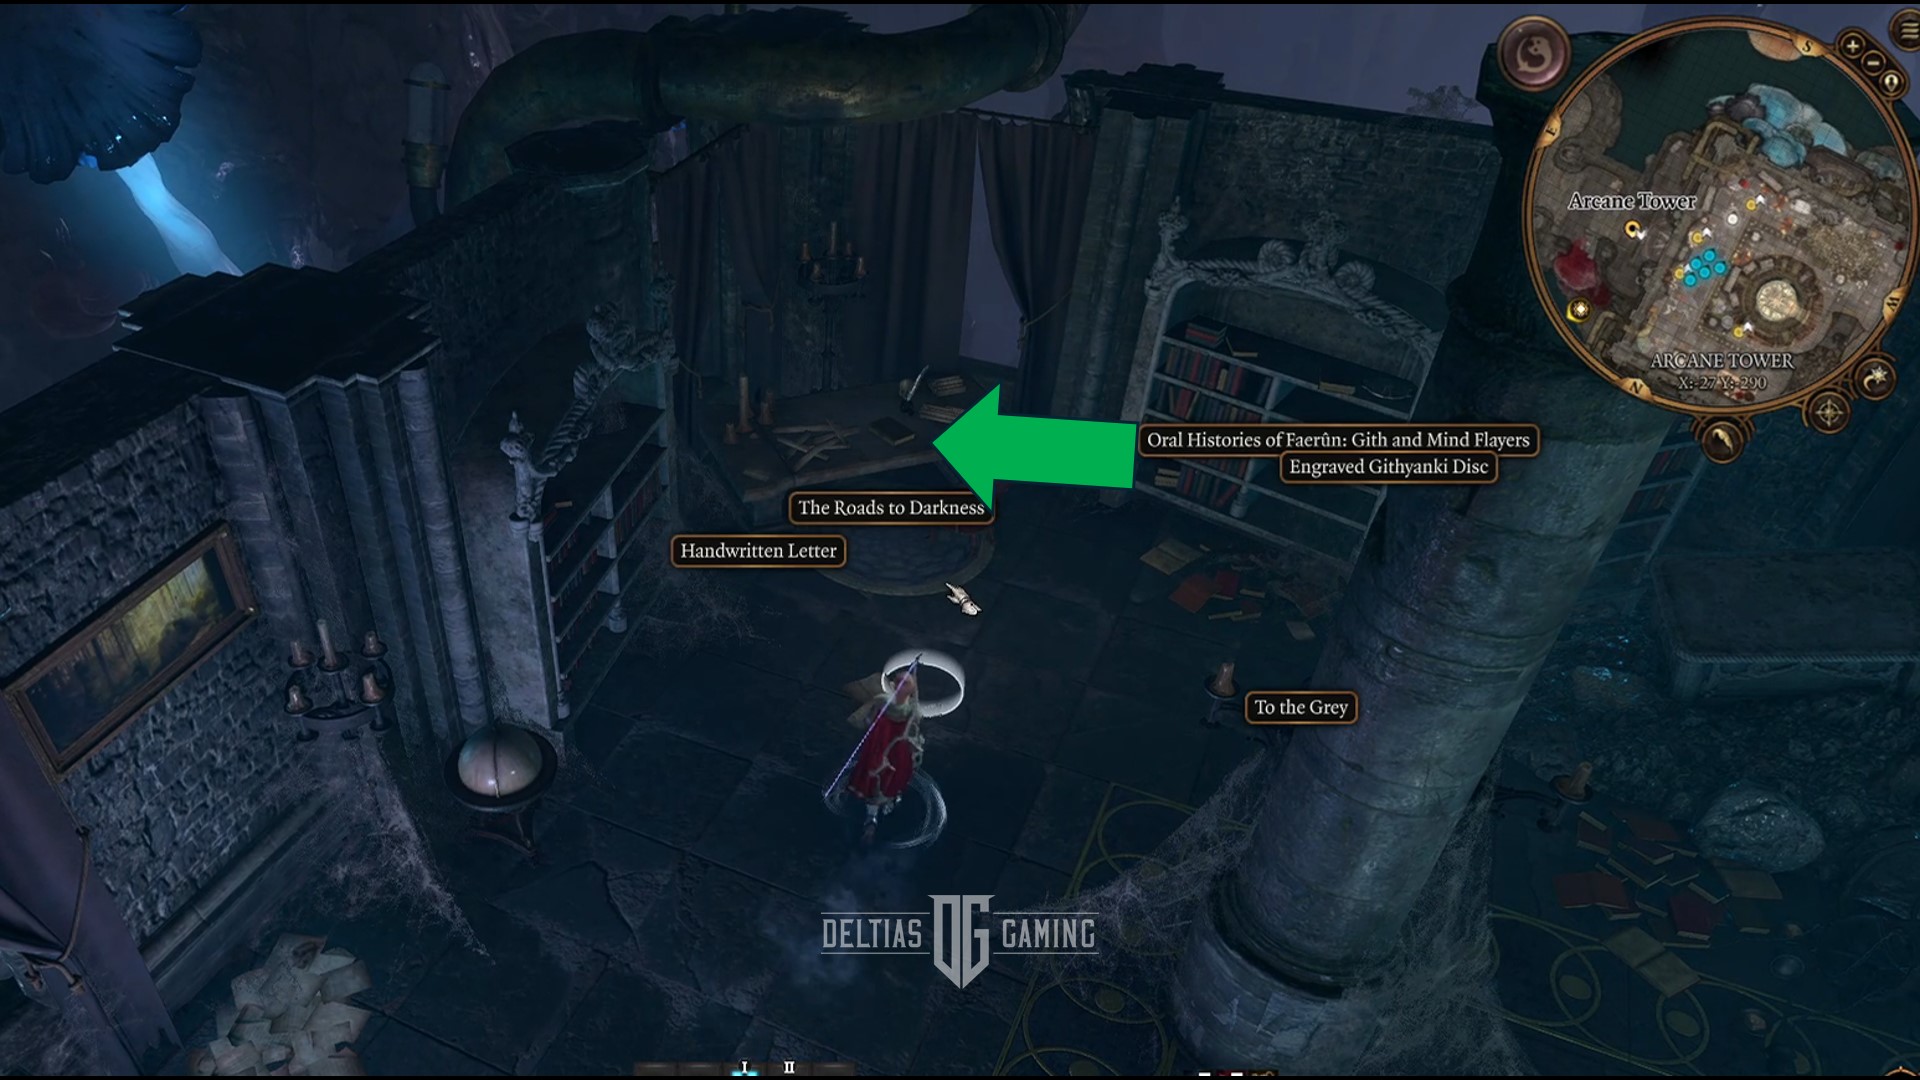
The first option requires reading a book on the floor below Bernard. You will find ‘The Roads to Darkness’ sitting on a table in the corner of the room. This will unlock new dialogue options when you speak to Bernard on the roof. When available, select these options in response to Bernard:
- “Or art thou friend, a rescue from my lonely wake?”
- “How can I trust? How will I ever know? / How can I show myself, my darkest me?”
This will keep Bernard on friendly terms and he will give you the Guiding Light, which you need to unlock the basement floor. However, not fighting Bernard means you will not get to loot Light of Creation.
Secondly, if you don’t have those dialogue options and you end up fighting with Bernard, use the anti-magic Sussur plants found around the Tower. Throw one on the ground by Bernard or equip one to your melee attacker. This will completely negate Bernard’s magic, making him much easier to deal with.
4 Phase Spider Matriarch
Location and Rewards for Phase Spider Matriarch:
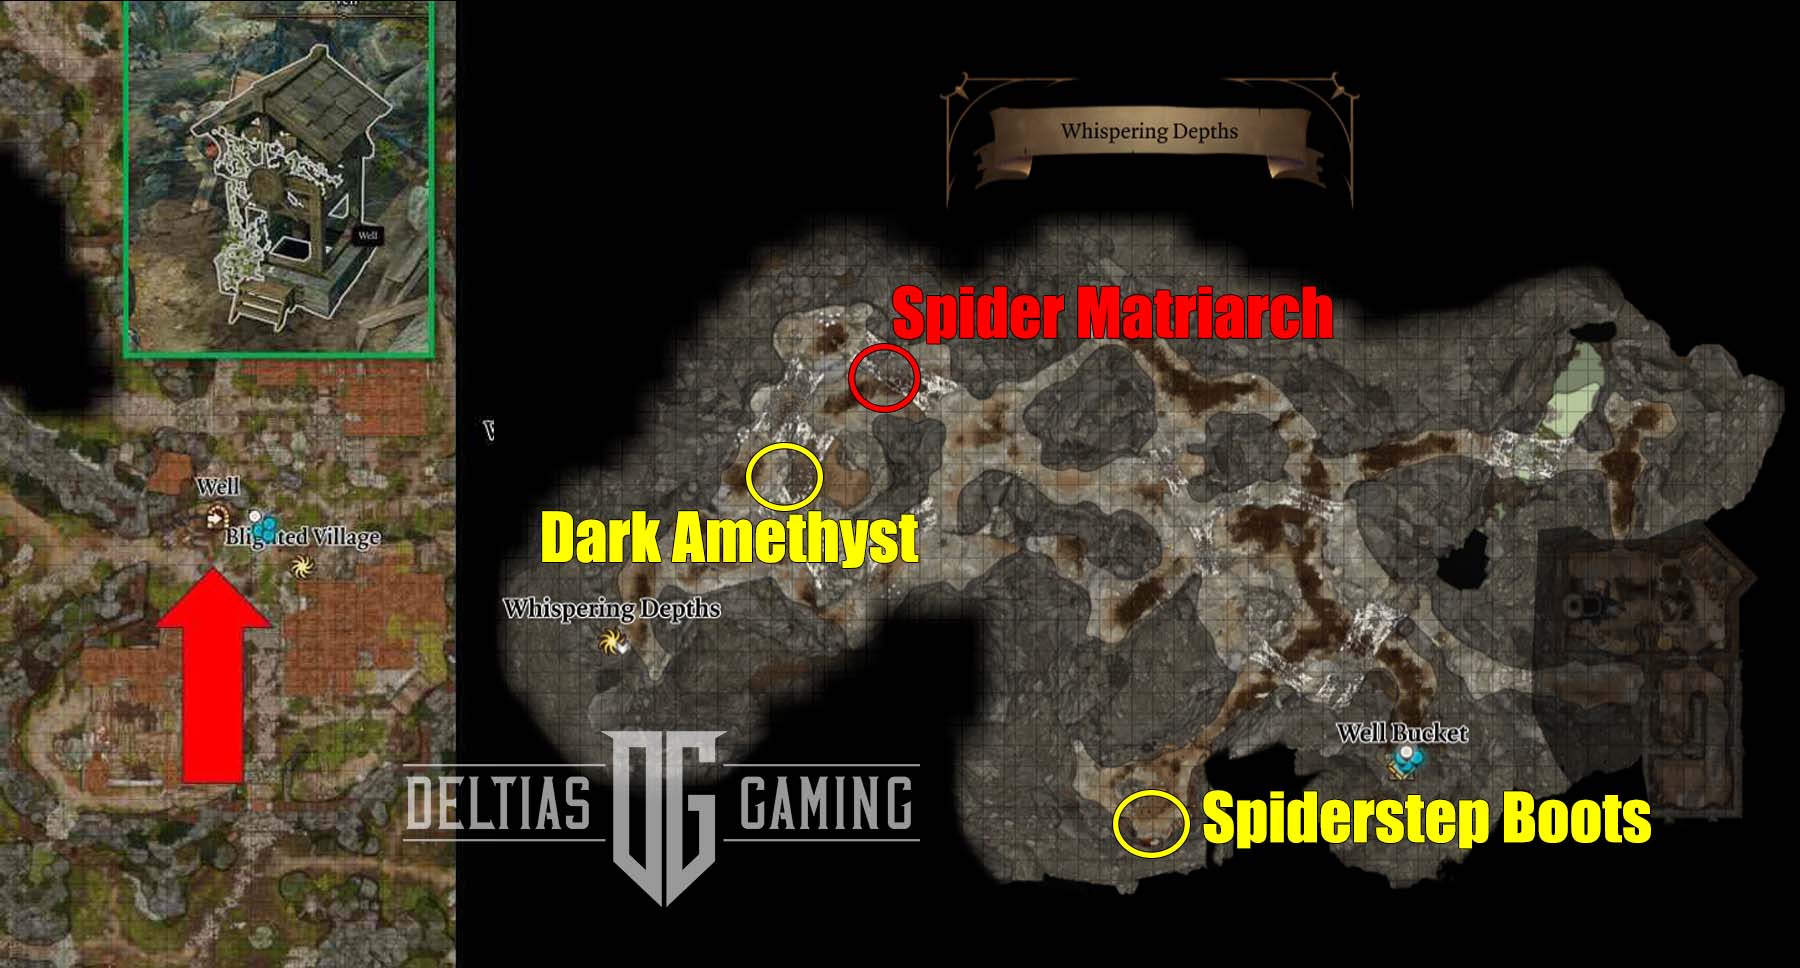
- Location: Whispering Depths, beneath the Well in the Blighted Village
- Recommended Party Level: 4
- Rewards: Poisoner’s Robe
- Permanent Bonuses: Collect the Dark Amethyst to use with the Necromancy Of Thay.
The Phase Spider Matriarch is hidden in the caverns of the Whispering Depths, which you can discover using the Well inside the Blighted Village. The Well/Whispering Depths can also be used as an access point to the Underdark. The Whispering Depths itself is a smaller area, but it is filled with lesser spider enemies so be cautious.
Before facing the Spider Matriarch, we recommend going south to get the Spiderstep Boots. These boots don’t have much application beyond this encounter, but they can greatly help one character’s mobility in the coming fight.
How to Beat Phase Spider Matriarch in Baldur’s Gate 3
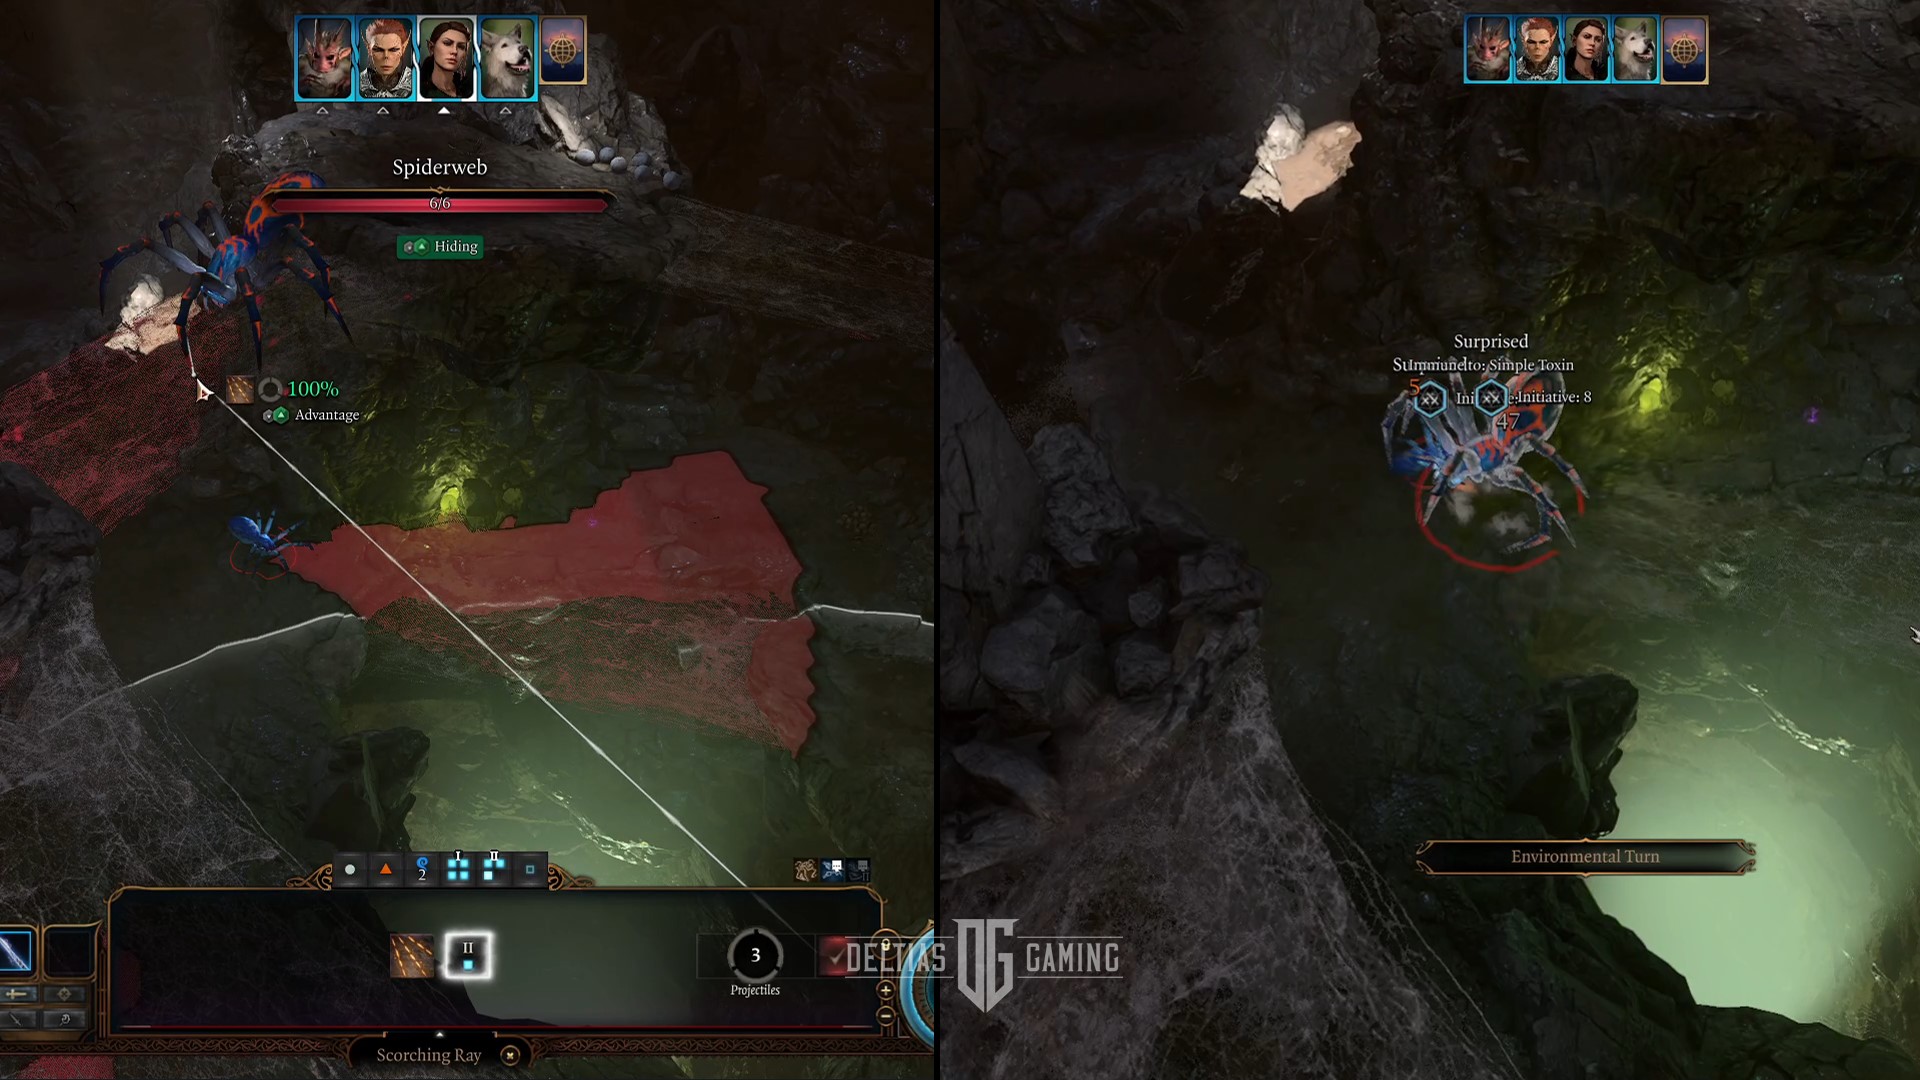
The Phase Spider Matriarch is one of the first bosses that you can find in Act 1 of Baldur’s Gate 3, but that only makes her all the more dangerous. Additionally, the difficulty is compounded when she hatches out nearby eggs and summons several spiderlings to help. Your priority is to beat her before that happens. Moreover, if you can do that, you’ll also collect the Pest Control achievement.
The easiest way to beat the Phase Spider Matriarch in Baldur’s Gate 3 is by causing her to fall into the glowing green chasm below. You can do this in one of two ways: burn the webbing she is walking on or knock her off with Eldritch Blast (Roaring Arrows, etc). To burn the webbing, you’ll need a fire spell such as Scorching Ray, a cantrip such as Fire Bolt, or a ranged attack with Fire Arrows. If you want to knock her off the edge with Eldritch Blast, you’ll need to make sure you’ve improved it with Eldritch Invocations while leveling so it has Repelling Blast.
However, if you plan to use Eldritch Blast, be strategic about your attack direction. At some angles, Eldritch Blast will push her off the outside of the webbing. She will fall into a hole and die, however, it won’t be in to the Underdark. Therefore, you will not be able to collect the gear she drops. You can only find her body and get the Poisoner’s Robe. She falls into the chasm lit with a greenish light.
Finally, before using Feather Fall and jumping into the Underdark, pick up the Dark Amethyst, which you need for the Necromancy Of Thay.
3 Grym
Location and Rewards for Grym:
- Location: Adamantine Forge within the Grymforge
- Recommended Party Level: 5
- Rewards: Grymskull Helm
- Permanent Bonuses: Two uses of the Adamantine Forge
To locate Grym, you’ll first have to track your way through several areas, including the Underdark, the Grymforge, and finally, the Adamantine Forge. The more straightforward way to access the Underdark from the overland area in Act 1 is through the Well in the center of the Blighted Village. Going this way will bring you into contact with the Phase Spider Matriarch boss, which we will go into more detail about below.
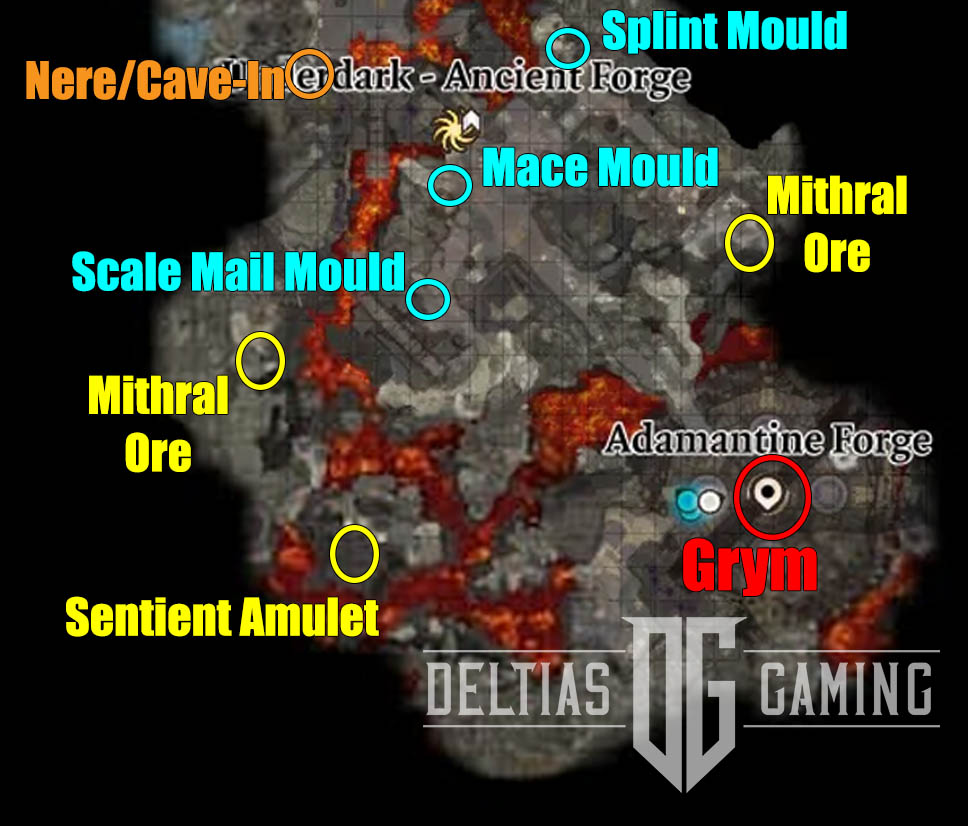
Next, once in the Underdark, there is a lot to see and do. But to find your way to the Grymforge, you’ll need to visit the Decrepit Village. There are Duergar here you will need to defeat or bargain with so you can use the boat at the docks. This boat will carry you to the Grymforge. Once there, you’ll need to find your way to the Adamantine Forge.
Along the way, make sure to mine two pieces of Mithril Ore and mold pieces for whichever weapon or armor pieces you want to craft.
How to Beat Grym in Baldur’s Gate 3
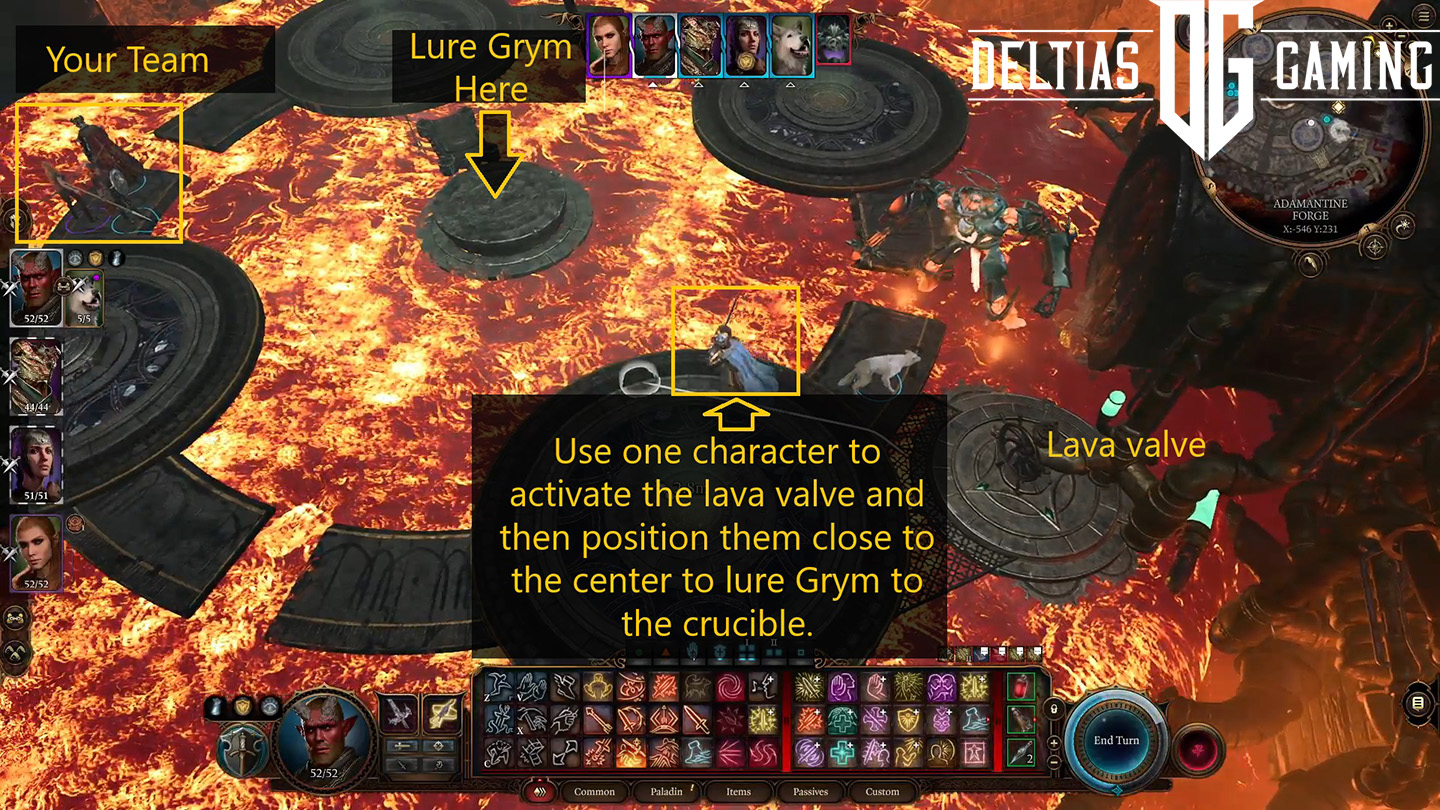
The most effective way to beat Grym is by using the Adamantine Forge itself to do massive damage to this construct. In our Top 5 Hardest Bosses in Act 1 and How to Beat in Baldur’s Gate 3 guide, we highly recommend this tactic, especially to those on an Honour Mode run. Doing this will drastically increase your chance of success and should keep most of your party alive.
The first thing you need to do in the Grym boss fight is remove his Adamantine Skin immunity. You can easily do this by turning the wheel that releases lava into the forge. Moreover, you’ll need to keep at least one party member within range of this wheel because the lava will retreat after a couple of turns and you’ll need to bring it back.
Grym will still be pretty resistant to damage even with the lava, but significantly he becomes vulnerable to Bludgeoning damage. Use a summons to lure him into the center of the forge, right under where the hammer drops. Have the character next to the lava wheel use Misty Step to the forge lever and pull it to deal massive damage to Grym!
Finally, once the fight is over, don’t forget to use the Forge, Mithral Ore, and Moulds to make two pieces of equipment before you leave.
2 Auntie Ethel
Location and Rewards for Auntie Ethel:
- Location: Riverside Teahouse in the Sunlit Wetlands
- Recommended Party Level: 5
- Rewards: Staff of Crones, Ever-Seeing Eye, Bitter Divorce (story item)
- Permanent Bonuses: Auntie Ethel’s Hair and Paid the Price
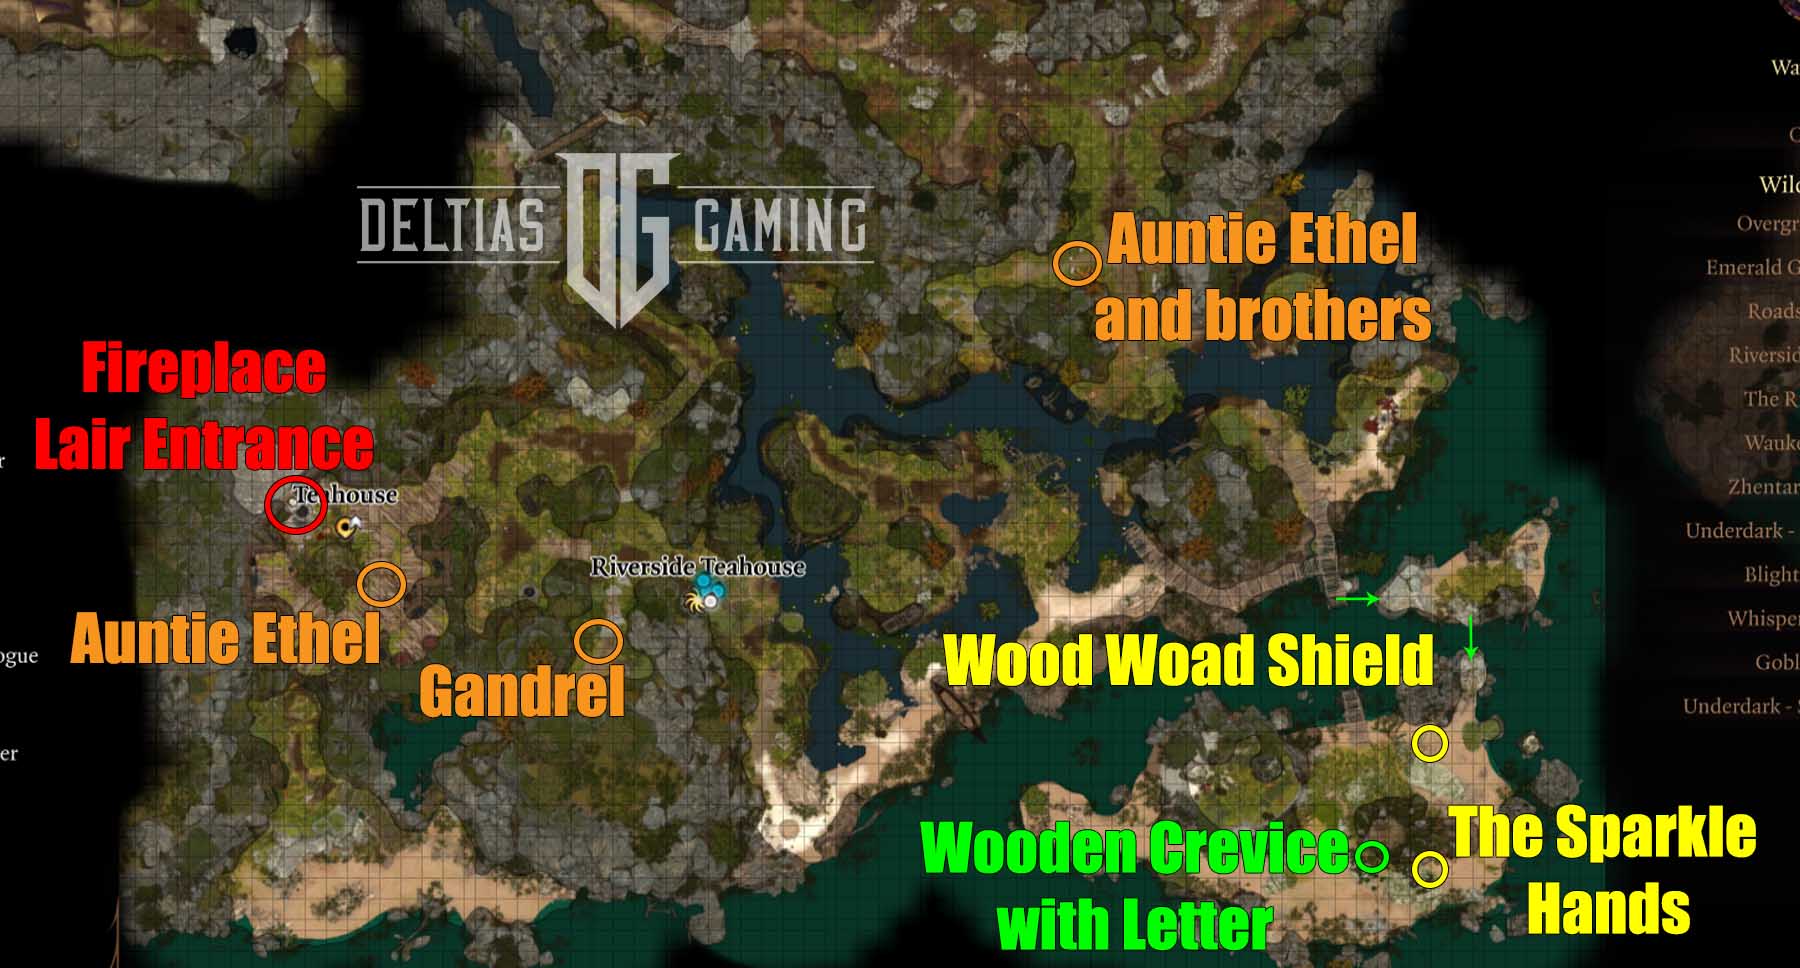
Auntie Ethel can be found first in the Hollow at the Druid’s Grove but later features more prominently in the Sunlit Wetlands. To get there, you need to travel west from the Emerald Grove Environs waypoint and then across the large bridge heading into the Blighted Village. Next, instead of going into the Village, turn left before the entrance and follow the path down around the south of the town. You’ll soon hear the voices of Auntie Ethel arguing with some brothers who are looking for their sister Mayrina. Support whichever side you like in this dialogue.
After you enter the Sunlit Wetlands, go to the far west. There, you will discover a teahouse and find Auntie Ethel inside. If you’re on friendly terms with her, during conversation she’ll offer to fix your tadpole problem. It’s unsuccessful but can get you the Paid the Price boost to Intimidation (at the cost of Disadvantage on Perception).
When ready, have your party walk near the fireplace; hopefully, one person will succeed on an Investigation check. This will trigger Ethel to become hostile, as you’ve found the entrance to her secret lair. Cautiously pass the sealed door and through the gas traps in the next rooms.
How to Beat Auntie Ethel in Baldur’s Gate 3

To beat Auntie Ethel in Baldur’s Gate 3, you should ideally have a character with the Misty Step spell (or scrolls) and a spellcaster with the Fireball spell. Additionally, even low-level casts of Magic Missile help deal with the duplicates Auntie Ethel creates of herself.
The priority in this fight is saving Mayrina. She’ll be suspended above the chasm in a cage, and on the first turn, you should send a character over to the control orb with the Misty Step spell. Interact with the orb to lower the cage, then focus your attacks on Auntie Ethel. When she duplicates herself, use Magic Missile. When she goes Invisible, use Fireball or other area-of-effect attacks.
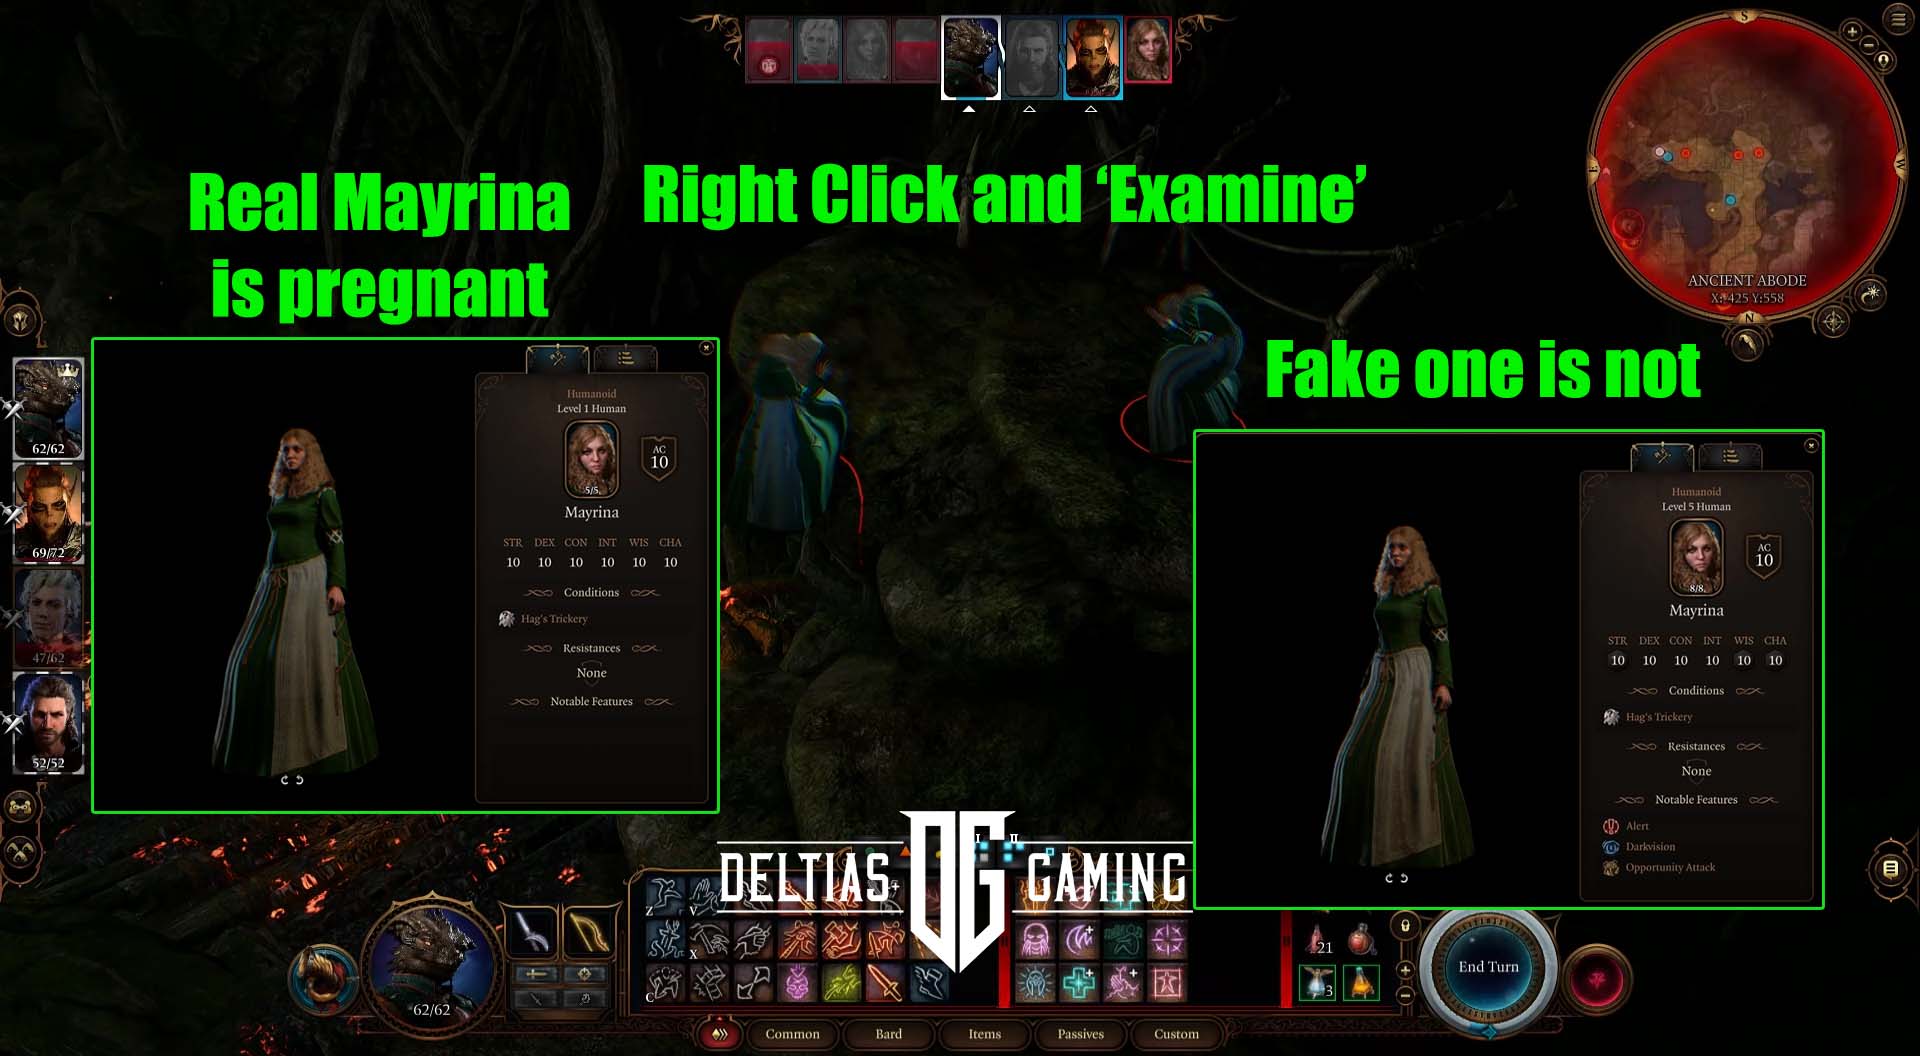
Eventually, Auntie Ethel will attempt to trick you by making duplicates of Mayrina. Click to ‘Examine’ each Mayrina. The real one will be pregnant and the fake will not have the baby bump. Now you can safely take out the false one.
Keep hitting Auntie Ethel; when her health drops low enough, she will pause the fight and offer you. Let her go, and she will give you a piece of her hair. This fantastic bonus grants you a single-use +1 boost to any ability score you choose.
Finally, after Auntie Ethel is gone, head through the door into the Acrid Workshop. Inside, you will find the Staff of Crones, a fantastic early quarterstaff for spellcasters. Additionally, take the Bitter Divorce wand before heading outside to speak to Mayrina for some interesting dialogue choices.
1 Inquisitor W’wargaz
Location and Rewards for Inquisitor W’wargaz:
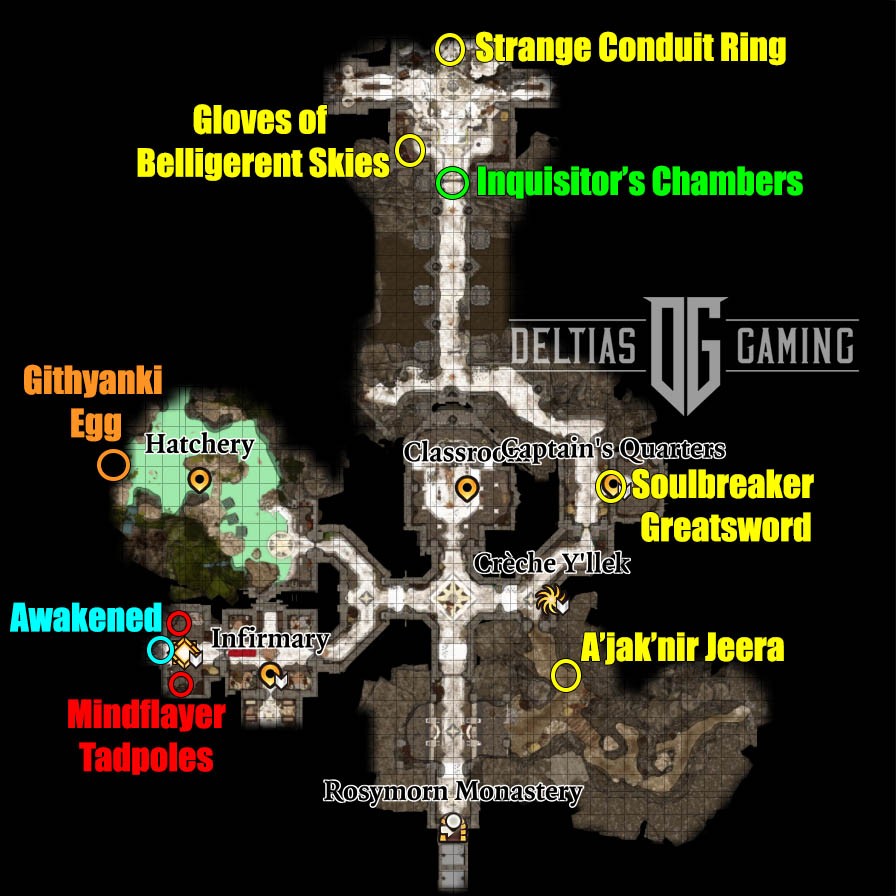
- Location: Crèche Y’llek, underneath the Rosymorn Monastery, through the Mountain Pass
- Recommended Party Level: 5
- Rewards: Circlet of Psionic Revenge, can find and unlock the Blood of Lathander after the fight
- Permanent Bonuses: While at the Crèche, use the Zaith’isk Chair to receive the Awakened bonus for your Illithid Powers
Inquisitor W’wargaz is located deep within Crèche Y’llek, a Githyanki base hidden beneath the Rosymorn Monastery on the other side of the Mountain Pass. Character dialogue and story will strongly push you toward the Crèche. Especially if you have Lae’zel at your party, she will insist that you locate it. Furthermore, if you’ve recruited Lae’zel, she will leave your party if you refuse to go there. Consequently, you can avoid W’wargaz if you want, but the events there have strong narrative ties to the main story and Lae’zel’s quest. Moreover, you cannot get one of the best Legendary weapons in the game, the Blood of Lathander, without completing the Crèche.
Once you find your way into the Crèche, visit all the other areas inside before heading north into the Inquisitor’s Chambers. A Gith Shard will unseal the barrier blocking the way forward. At the end of the next path, you will encounter Inquisitor W’wargaz. You won’t fight him immediately. First, you’ll have to play through a series of cut scenes and discover some important information. No matter the decisions you make along the way, you’ll have to fight Inquisitor W’wargaz afterward.
How to Beat Inquisitor W’wargaz in Baldur’s Gate 3
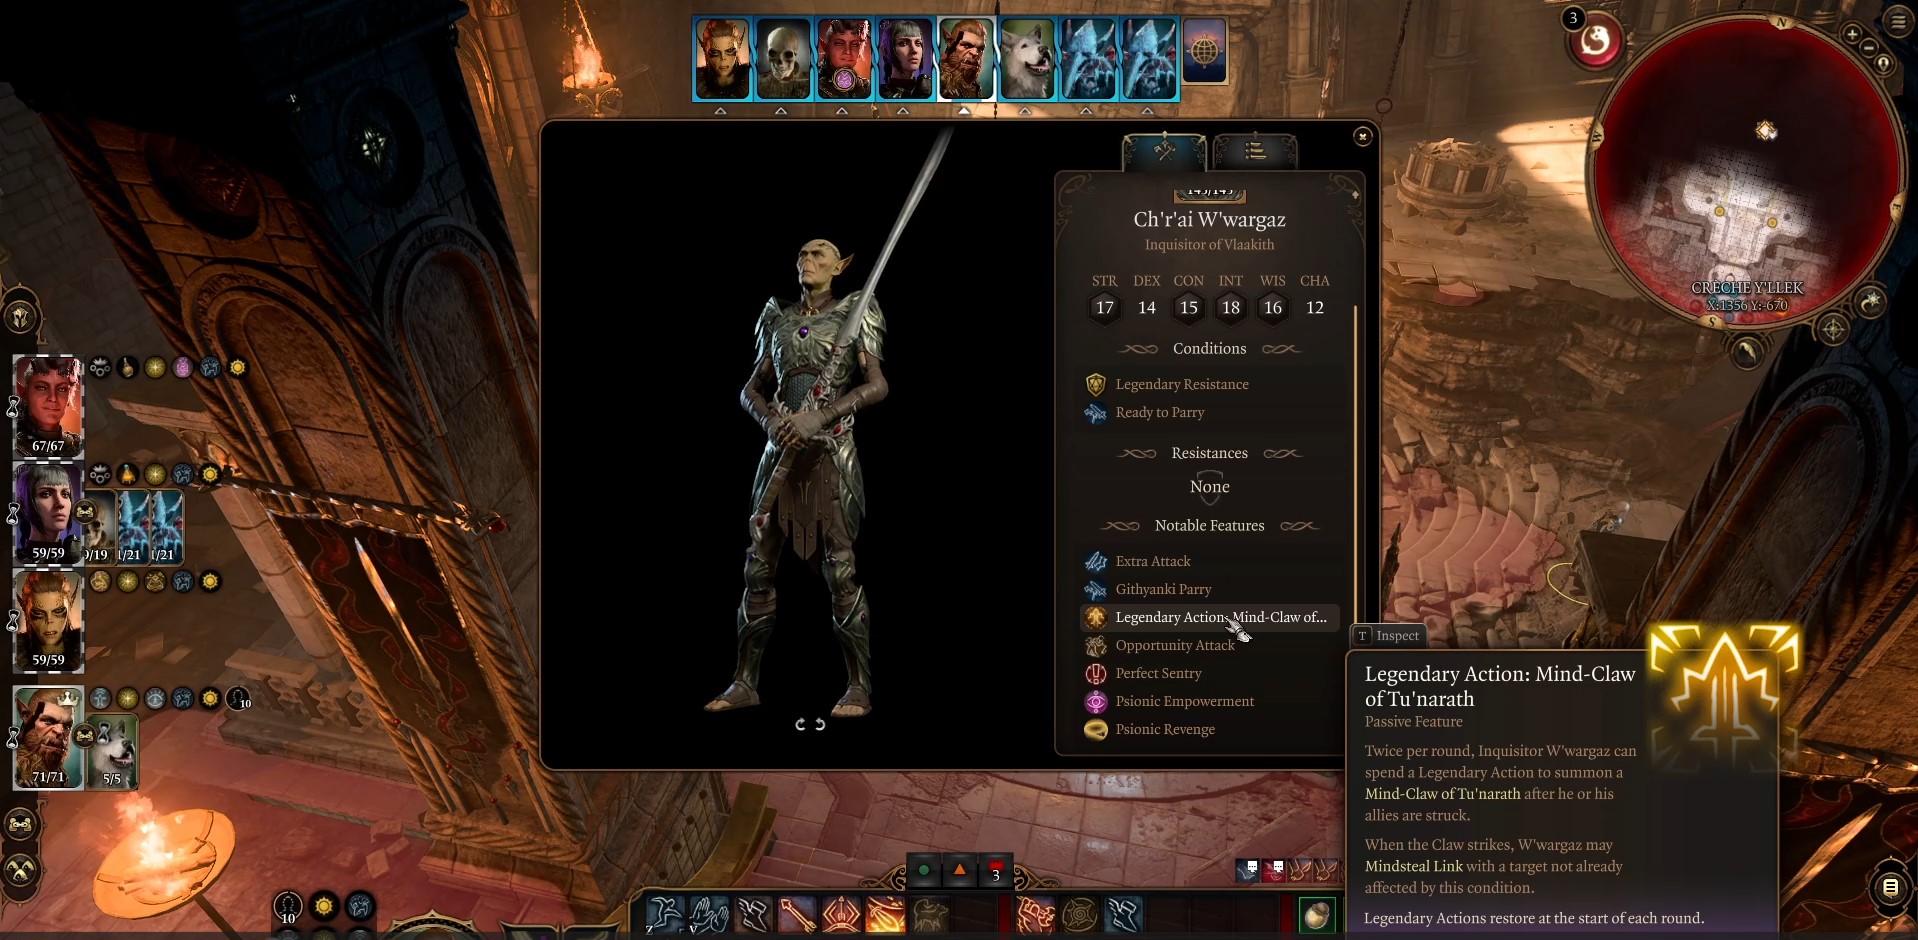
Beating Inquisitor W’wargaz boils down to two simple but essential directions: Disarm the Inquisitor and Defeat him first. When combat begins, use either a Fighter with the Disarming Attack ability or a Cleric/Paladin with the Command: Drop spell. Hopefully, you can get him to drop his weapon on the first turn. When he does, have another party member immediately pick it up. This will severely nerf the Inquisitor right out of the gate.
Additionally, W’wargaz also has an ability called Mindsteal Link. This spell could cause a lot of grief if he successfully cast it on multiple characters. It will boost his Armour Class by +1 and weaken the afflicted target by -2 AC. Moreover, if you’re playing in Honour Mode, his Legendary Action creates a summon that can initiate this Mindsteal Link, as well.
The only to get rid of the Claws and the Mindsteal Link is by killing Inquisitor W’wargaz. Knocking him unconscious will not banish the summons. Therefore, it’s best to focus him down first. Then, you can take care of the additional Githyanki around the area.
Finally, once the fighting is all done, you can complete the search for the Blood of Lathander nearby.
Looking For More About Baldur’s Gate 3?
Thank you for reading Baldur’s Gate 3: Top 5 Hardest Bosses in Act 1 and How to Beat guide. We also provide the latest news and create guides for Baldur’s Gate 3. Additionally, watch me play games on Twitch or visit my YouTube channel!