Facebook
 Reddit
 Email
Email
This guide focuses on the best Fighter build in Baldur’s Gate 3, the Eldritch Knight subclass, and includes all components to build a powerful character.

This build page has been updated for the Patch 8 version of Baldur’s Gate 3.
Everything About the Eldritch Knight Fighter Build
The Eldritch Knight subclass allows the pure physical melee Fighter class the ability to cast spells. Consequently, this new hybrid playstyle will grant you some new defensive and self-healing spells and cantrips. However, the downside to this is the Eldritch Knight will sacrifice some damage potential. Furthermore, your pool of spell slots is not very deep.
Therefore, to not cripple the raw strength of the Fighter too much we will keep our Intelligence low. You will want to use your spells to increase your Armour Class (AC) or provide a little self-healing and not as much for combat. Instead, you’ll want to rely on your physical attacks for high damage. Fighters have a high hit point pool and access to a variety of armor and weapons, making them very durable in combat.
| Fighter Class Pros | Fighter Class Cons |
|---|---|
| High Damage | Less Powerful than Battle Master |
| Good Survivability | Not good for dialogue dice rolls |
| Allows Some Spellcasting | Low on Spell Slots |
Eldritch Knight Fighter Build Changes in Patch 8 for BG3
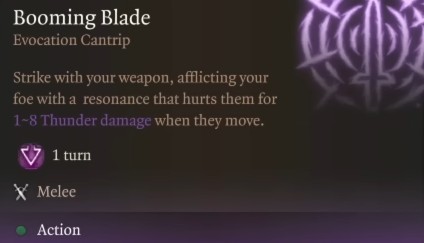
The most significant change affecting character builds in Patch 8 of Baldur’s Gate 3 is the introduction of 12 new subclasses, each bringing unique strengths and weaknesses. However, the Eldritch Knight Fighter sees a major boost in power with the inclusion of the Booming Blade cantrip. This spell enhances each of the Fighter’s actions with additional thunder damage, resulting in a noticeable overall increase in damage output.
Therefore, you can now use 11 levels of Eldritch Knight Fighter and 1 Warlock to gain even more spellcasting potential. This gives you extra utility and control when playing solo, while only sacrifcing one feat. Additionally, that one level of Hexblade Warlock adds a lot of utility with the same premise of losing one feat. To demonstrate the viability of this, we’ve provided an alternative build below.
Eldritch Knight Fighter Class Features & Mechanics
The Fighter Class features action surge, giving you an extra action, second heal, which is a self-heal and proficiencies in all armor and weapon types. Consider the Fighter a versatile martial class that is ultra simple to play and very effective. At level 5, you unlock Extra Attack allowing you two attacks in one turn, along with Action Surge for even another action.
The following list presents all the essential Eldritch Knight Fighter Class Mechanics and Features in Baldur’s Gate 3:
- Primary Ability: Strength
- Armour Proficiency: Light, Medium, and Heavy
- Weapon Proficiency: Simple, Martial, and Shield
- Health Points: 10 HP + their Constitution Modifier, and then gain 6 HP + their Constitution Modifier every level thereafter.
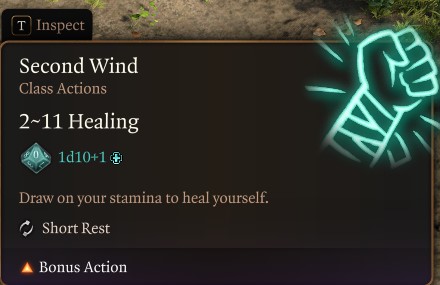
- Second Wind: heal yourself with a bonus action, gain access to this at level 1.
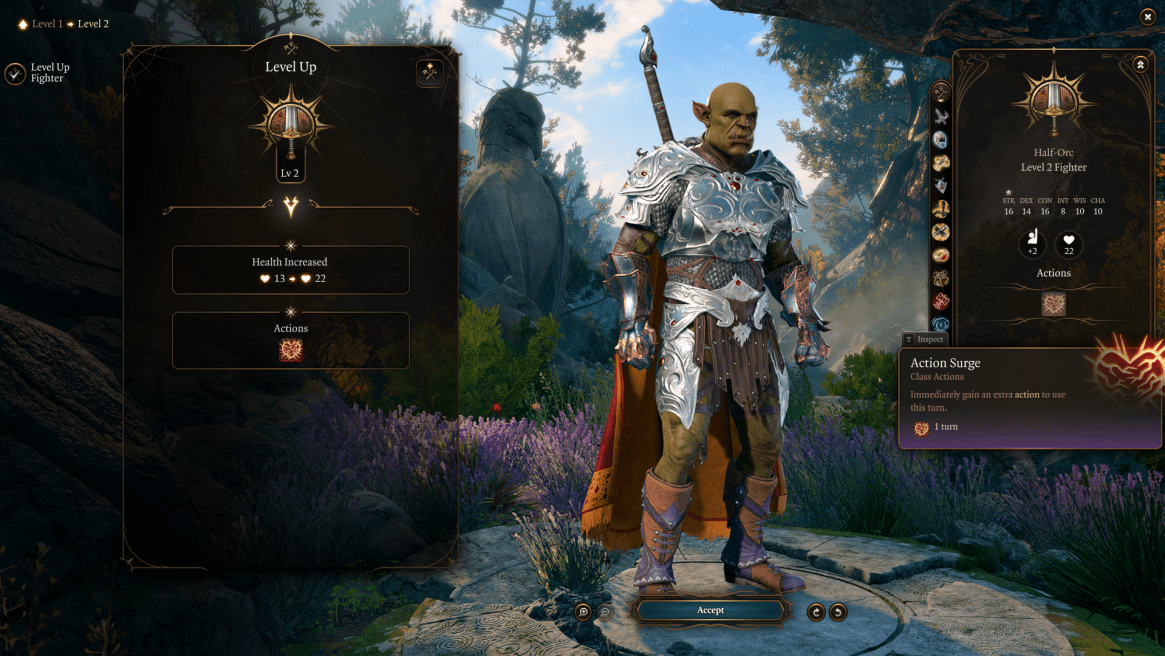
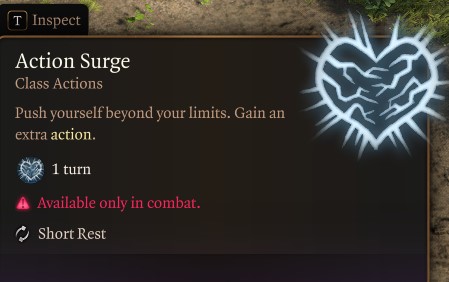
- Action Surge: Gain one additional action, acquired at level 2.
- Spellcasting: with the Eldritch Knight subclass, we will be able to cast spells at level 3.
- Extra Attack: You can make an additional free attack after making an unarmed or weapon attack.
Eldritch Knight Fighter Spellcasting Mechanics
- Cantrips: are like spells, but you can cast them infinitely, and they don’t take your spell slots.
- Spell Slots: At each level, you gain access to more usage of spells and high-tier spells but only have a finite number of spells until a long rest.
- Learned Spells: Unlike Wizards, you get opportunities at leveling up to unlearn and learn new spells.
- Concentration: is a spell mechanic that requires you to maintain concentration otherwise, the spell effect ends.
Look below in level progression for specific recommmended spells using the Best Baldur’s Gate 3 Fighter Eldritch Knight Build Guide.
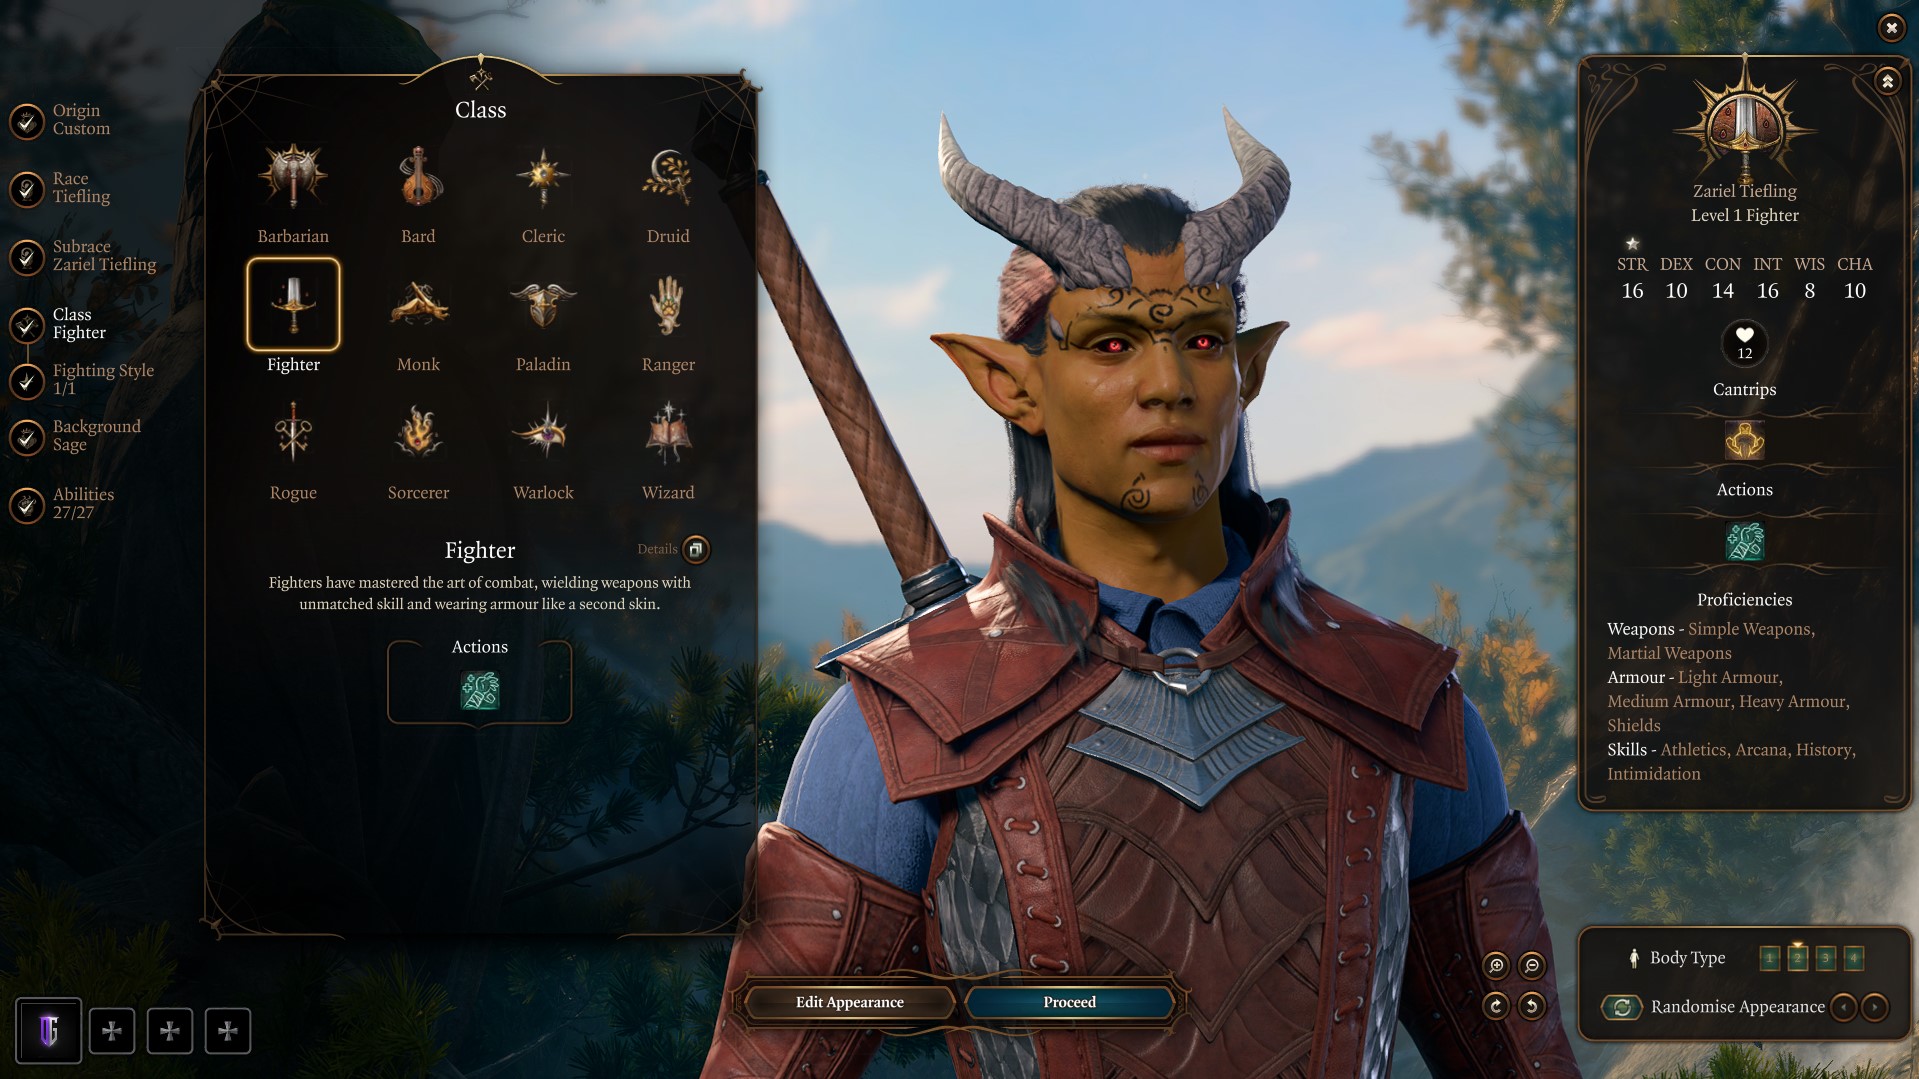
Character Creation
| Category | Selection |
|---|---|
| Character | Origin – Custom character |
| Race | Zariel Tiefling |
| Racial Bonus | Darkvision, Hellish Resistance, Thaumaturgy Cantrip |
| Class | Fighter |
| Subclass | Eldritch Knight |
| Cantrips | Thaumaturgy |
| Spells | Blade Ward Cantrip, Fire Bolt Cantrip, Shield, Protection from Evil and Good, Find Familiar, Thunderwave, Guidance Cantrip, Shield of Faith, Shatter, Darkness, Mirror Image |
| Background | Sage |
| Ability Score | STR: 16 DEX: 10 CON: 14 INT: 16 WIS: 8 CHA: 10 |
| Skill Proficiencies | Intimidation and Athletics |
Eldritch Knight Subclass
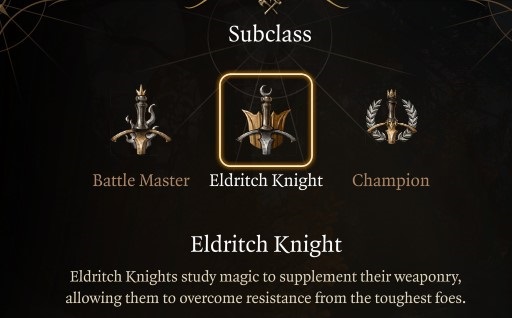
The Eldritch Knight subclass is the hybrid subclass for the Fighter in Baldur’s Gate 3 because it can cast spells. Your subclass selection will be unlocked at level 3.
Here’s the list of the Fighter’s Subclasses:
- Battle Master: is a more versatile subclass for the Fighter using superiority dice and maneuvers.
- Champion: are the most straightforward subclass for the Fighter giving a buff to critical strikes.
- Eldritch Knight: is a subclass that combines the martial prowess of the Fighter with the spellcasting ability.
Eldritch Knight will give you cantrips and spell-casting ability at level 3. As you advance in the class, you will receive additional spells and cantrips.
Recommended Backgrounds
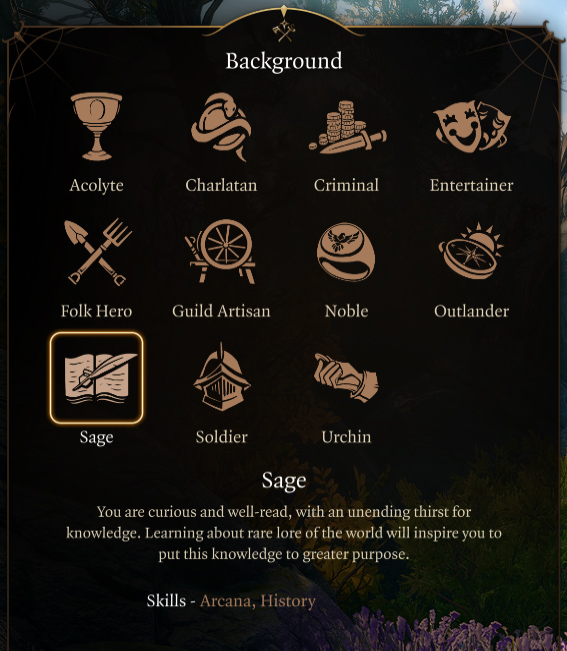
Sage is the best background for the Eldritch Knight Fighter Build because you gain two intelligence-based skills. You want to select backgrounds that give you proficiencies in your main ability score either Intelligence or Strength. This choice mostly influences roleplaying and dialogue options aspects and allows you to create unique characters. Additional background choices are:
- Sage: Proficiency in Arcana (intelligence) and History (intelligence). You are curious and well-read, with an unending thirst for knowledge. A companion who’s a Sage background is Gale.
- Acolyte: Proficiency in Insight (wisdom) and Religion (intelligence). You have spent your life serving a temple, learning sacred rites, and providing sacrifices to the god or gods you worship. Shadowheart is an Acolyte.
- Noble: Proficiency in History (intelligence) and Persuasion (charisma). You were raised in a family among the social elite, accustomed to power and privilege. A noble companion is Minthara.
Best Race Choice for Eldritch Knight Fighter Build

Zariel Tiefling is the best Race for the Eldritch Knight Fighter because you gain two Smite Spells, Darkvision, and Fire Resistance giving you powerful offensive and defensive capabilities. However, a secondary choice is the Githyanki because of their inherent mobility skills and spells, as well as skill proficiency. Half-Orc is also a good choice for those who want a melee-only build.
Here is the best race choice for an Eldritch Knight Fighter build in Baldur’s Gate 3:
| Zariel Tiefling | Githyanki |
|---|---|
| Darkvision (12m) | Astral Knowledge |
| Hellish Resistance | Githyanki Psionics |
| Searing Smite | Martial Prodigy |
| Branding Smite |
The Fighter’s racial choice will not influence ability score, as everyone should get a +2 and +1 to spend regardless. This frees your race choice up to not completely hinder yourself based on ability score, but race features. Each of these races offers unique advantages that can enhance your combat prowess, survivability, or utility. Additionally, consider the roleplaying opportunities and character concepts that resonate with you.
Related:
Best Skills for Eldritch Knight Fighter Build

Intimidation and Athletics are the best skills for the Best Baldur’s Gate 3 Fighter Eldritch Knight Build Guide because they complement your class abilities and enhance your effectiveness in various situations. In Baldur’s Gate 3, skills represent the abilities and proficiencies of your character that allow them to perform various actions and interact with the game world. Skills are associated with specific attributes and are used to determine the success or effectiveness of certain actions or abilities. They can be edited during character creation or with companions, during respec or reroll screen.
Here are the skills for the Eldritch Knight Fighter in Baldur’s Gate 3:
- Intimidation is a Charisma skill used to bully, threaten, and induce fear in dialogue situations.
- Athletics is a Strength skill that helps resist being shoved.
Best Eldritch Knight Fighter Ability Score

The best Ability Score for the Eldritch Knight Fighter Build is 16 Strength, 16 Intelligence, and 14 Constitution. Strength is used for melee builds while Intelligence is used for spellcasting as an Eldritch Knight. Constitution helps with your overall health and concentration saving throws. We leave Dexterity low since we recommend using heavy armor.
Below is the best ability score to unlock the full potential of an Eldritch Knight Fighter Baldur’s Gate 3:
| Ability | Points Goal |
|---|---|
| Strength | 16 |
| Dexterity | 10 |
| Constitution | 14 |
| Intelligence | 16 |
| Wisdom | 8 |
| Charisma | 10 |
After you choose the class, subclass, race, and background, the game will automatically distribute your abilities in the character creation abilities tab. You will need to reprioritize your Eldritch Knight stats for the chart for the Best Baldur’s Gate 3 Fighter Build. Simply use the plus-minus in the character creator and make sure you have the suggested race, or the numbers will be off.
You can increase your ability score via a quest in Act 1, Act 2, and Act 3. Make sure to check out our Permanent bonus guide on how you can boost your ability score through quests.
Best Companions for Eldritch Knight Fighter Build
Shadowheart, Gale, and Astarion make the best companions for the Fighter Build. We do not recommend additional front-line fighters and damage dealers. The idea is, that your character charges in melee range with support, range damage, or even stealth attacks. If you have multiple melee characters, 2-3, it can be troublesome in close-quarters combat.
- Shadowheart (Cleric): buffs, healing, and crowd control.
- Gale (Wizard): range magic damage, area damage, and crowd control.
- Astarion (Rogue): burst damage, lockpicking, and range if needed.
It’s important to note that party composition and synergy play a significant role in determining the effectiveness of your companions. Consider the strengths and weaknesses of each companion and how they align with your main character’s abilities and playstyle. You can go more range with Wyll or a double melee setup with Lae’zel. Also, feel free to swap out and explore different options.
Eldritch Knight Fighter Spell Slots
Here’s a chart that shows the levels and spell slots unlocked for the Eldritch Knight Fighter class in Baldur’s Gate 3:
| Fighter Level | 1st | 2nd |
|---|---|---|
| Level 1 | 0 | 0 |
| Level 2 | 0 | 0 |
| Level 3 | 2 | 0 |
| Level 4 | 3 | 0 |
| Level 5 | 3 | 0 |
| Level 6 | 3 | 0 |
| Level 7 | 4 | 2 |
| Level 8 | 4 | 2 |
| Level 9 | 4 | 2 |
| Level 10 | 4 | 3 |
| Level 11 | 4 | 3 |
| Level 12 | 4 | 3 |
Eldritch Knight Fighter Illithid Powers

Illithid Powers are unlocked later in the game when you learn more about the Mind Flayers and Tadpoles. You can gain jars of Mind Flayer Parasite Specimens, and consume them to gain one point. This is essentially another skill tree advancement with some very strong powers.
Here are the best Illithid Powers for the Best Baldur’s Gate 3 Fighter Eldritch Knight Build Guide:
| Illithid Powers | Description |
|---|---|
| Luck of the Far Realms | When you make a successful Attack Roll against a foe, you can change that hit into a Critical Hit. |
| Cull of the Weak | When you bring a creature down to fewer hit points than your number of evolved Illithid powers, it dies and all nearby creatures take 1-4 Psychic damage. |
| Psionic Backlash | When an enemy within 9m casts a spell, you can use your reaction to inflict ld4 Psychic damage to the caster per the spell’s level. |
| Blackhole | Area-based suck-in that slows targets. |
| Repulsor | Massive area knockback that can hit friendlies. |
| Charm | This is the priority power you want to obtain because you can force enemies to attack something else. |
Eldritch Knight Fighter Class Level Progression
| Level | Class | Selection |
|---|---|---|
| 1 | Fighter | Protection Fighting Style, Second Wind |
| 2 | Fighter | Action Surge |
| 3 | Fighter | Subclass: Eldritch Knight |
| 4 | Fighter | Feat: Magic Initiative: Cleric, Guidance, Produce Flam, Thunderwave, Shield of Faith |
| 5 | Fighter | Extra Attack |
| 6 | Fighter | Feat: Ability Improvement Strength |
| 7 | Fighter | War Magic, Darkness, Shatter |
| 8 | Fighter | Feat: Shield Master, Mirror Image |
| 9 | Fighter | Indomitable |
| 10 | Fighter | Eldritch Strike, Mage Hand, Gust of Wind |
| 11 | Fighter | Improved Extra Attack, Melf’s Acid Arrow |
| 12 | Fighter | Feat: Tough |
Alternative Eldritch Figher Build – Spellcaster Playstyle
For Fighters looking to expand their versatility with added spellcasting and damage potential, a one-level dip into Warlock (specifically the Hexblade subclass) at Level 12 is a strong option. Despite Warlock being a Charisma-based class, the benefits it brings outweigh the minor trade-offs. With just a single level, you gain bonus action utility, two solid spells, and a powerful ranged cantrip. This dip does come at the cost of one feat, but you can still easily reach 20 Strength and take the Great Weapon Master feat. Starting with 17 Strength at character creation allows you to hit 20 with Auntie Ethel’s upgrade in Act 1, ensuring you don’t fall behind in your core stats. This hybrid setup gives your Fighter build excellent melee damage, ranged capabilities, and added magical utility, making it both effective and flexible across a variety of encounters
| Level | Class | Selection |
|---|---|---|
| 1 | Fighter | Great Weapon Fighting |
| 2 | Fighter | – |
| 3 | Fighter | Subclass: Eldritch Knight, Booming Blade, Friends, Shield, Thunderwave, Longstrider |
| 4 | Fighter | Feat: +2 STR, Chromatic Orb |
| 5 | Fighter | – |
| 6 | Fighter | Feat: Great Weapon Master |
| 7 | Fighter | Darkness, Gust of Wind |
| 8 | Fighter | Feat: Savage Attacker, Misty Step |
| 9 | Fighter | – |
| 10 | Fighter | Firebolt, Protection from Good and Evil |
| 11 | Fighter | Scorching Ray |
| 12 | Warlock | Hexblade Subclass, Eldritch Blast, Toll of the Dead, Hexed, Hellish Rebuke |
Level 1
Level one follow our character creator to pick all correct background, race, skills, and ability distribution focusing on Strength and Constitution. Don’t expect much gameplay-wise outside of attacking with a melee weapon. Aim to pick up a One Hand Weapon and Shield. Level 3 you will get your subclass pick and a lot of utility then. Lae’zel comes equipped with very high Armour Class (AC) medium armor and this is great to use until you can upgrade to heavy chain or plate mail. Also, pick up a crossbow for ranged attacks.
- Health Points: The Fighter class will have higher health than other classes, so be aware and prepare to force fights and jump in.
- Second Wind: You will receive a very powerful self-heal immediately called Second Wind. This allows you to heal yourself using a bonus action, not an action. This is very important because you can heal and attack in one turn.
Protection Fighting Style: When a creature you can see attacks a target other than you that is within 5 feet of you, you can use your reaction to impose a disadvantage on the attack roll. You must be wielding a shield. This gives us more incentives and defense for using swords and shields with this build.
Gameplay early is very simple, just simply attack and heal yourself to survive. Use potions if you expend your Second Wind and things will pick up soon at level 3 with a lot more fun and variety.
Eldritch Knight Fighter Gameplay & Priorities
At the start of BG3, you will feel weak until level 5 where you gain Extra Attack. Your priority for the Fighter build is locating heavy armour, a two-handed Greatsword, and a Longbow or Heavy Crossbow. Lae’zel, who you meet in the prologue has powerful medium armour with 15 AC along with a Heavy Crossbow. If you don’t plan on using this companion, take her gear immediately and equip her for a big boost in overall survivability and ranged damage.
From this point, you need to hoard potions, arrows, and consumable potions. Moreover, look to acquire Elixir of Hill Giant Strength, Potion of Speed, and Oil of Accuracy consumables. These three consumables “stack” allowing for massive damage. Your overall priority with this build is the following:
- Complete Prologue
- Recruit Companions
- Unlock Withers, respec companions to proper class/ability score
- Collect the Necromancy of Thay (important in Act 3)
- Reached Hollowed City/Druid Grove
- Sell, Stock up, complete quests
- Unlock summons, Scratch, Shovel
- Progress to level 5
- Reach Underdark and Grymforge
- Check all Permanent Bonuses in Act 1 and the best Gear
- Act 1 Checklist for step-by-step completion
Following these steps ensures a strong foundation, especially if you plan on playing solo or on Honour Mode difficulty.
Level 2
Level two gives you one new skill, Action Surge. We are still one level away from our Subclass selection.
- Action Surge: gain one additional action. This allows the Fighter very early to take multiple actions, which will likely be attacked. This makes you formidable very early in the game. Moreover, you only need a Short Rest to replenish this, which can be done twice in the bottom right of your User Interface. Take a Long Rest via camp to fill Short Rest.
Gameplay you now have a way to get two attacks in one turn along with a self-heal. Play aggressively and charge in. Don’t forget to equip a bow because you want some type of range weapon when melee isn’t an option because of distance.
Level 3
Level three you get access to your subclass and for this build, we want to select Eldritch Knight.
Eldritch Knight Subclass Unlocked: gives you the ability to spell cast. We will get other subclass features at level 7 and beyond and expect a few spells at various levels for which we will have suggestions.
- Receives Spellcasting: (Subclass Feature)
- Receives Weapon Bond: (Ritually bind the weapon in your main hand. The weapon can’t be knocked out of your hand, and it automatically returns to you when Thrown.)
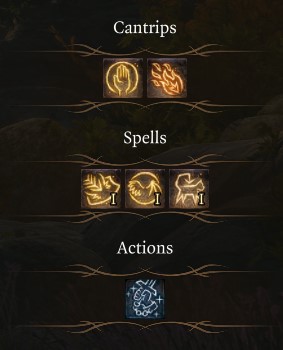
- Receives 2 Cantrips: Blade Ward, Fire Bolt
- Receives 2 Spells: Shield, Protection from Evil and Good
Cantrips
- Blade Ward: Take only half of the damage from Bludgeoning, Piercing, and Slashing attacks.
- Usage: this is a decent cantrip when expecting incoming melee damage.
- Fire Bolt: Hurl a mote of fire dealing 1d10 Fire Damage.
- Usage: we aren’t using this often as our ranged bow or crossbow will do more damage. It does help with lighting items on fire though.
Spells
- Shield: When you are about to be hit by an enemy, increase your Armour Class by 5. You take no damage from Magic Missile.
- Usage: this is a reaction, so expect it to automatically fire off. You can click your reaction tab and “ask” for the game to give you a popup. This is useful if you don’t want to consume your limited spell slots for this buff. Shield makes you extremely survivable, especially in sword and shield.
- Protection from Evil and Good: Protect an ally against the attacks and powers of aberrations, celestials, elementals, fey, fiends, and undead. The target can’t be Charmed, Frightened, or possessed by them, and when these creatures attack it, they do so at a disadvantage.
- Usage: this spell is a niche for when fighting specific enemies. You can inspect enemies and find which type they are, and it’s good to cast this when likely to be controlled by one.
- Find Familiar: Gain the service of a familiar, fey spirit that takes an animal from your choice.
- Usage: this a very helpful spell in and outside of combat. You can use different types of animals to help in combat mainly as a distraction. These critters can also access small cervices outside of combat and help with story elements.
Eldritch Knight Gameplay at Level 3
Now that you have access to spells within the Fighter’s kit, use them sparingly until you get more spell slots. Ideally Shield and Find Familiar are the two you want to run all the time. Cast Find Familiar outside of combat every long rest. Use Blade Ward when you expect you are an ally to get chunked with melee damage. Fire Bolt only to light something on fire and Protection in limited fights.
Play like a normal Fighter, aggressive, melee-using attacks up close and personal.
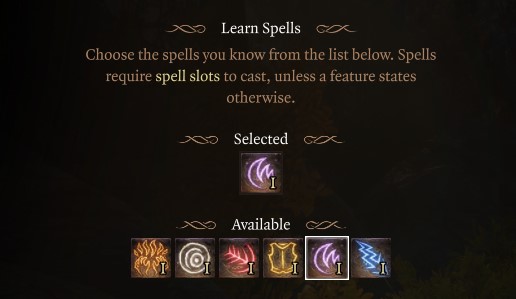
Eldritch Knight Level 3 Spells: Blade Ward Cantrip, Fire Bolt Cantrip, Shield, Protection from Evil and Good, Find Familiar.
Level 4
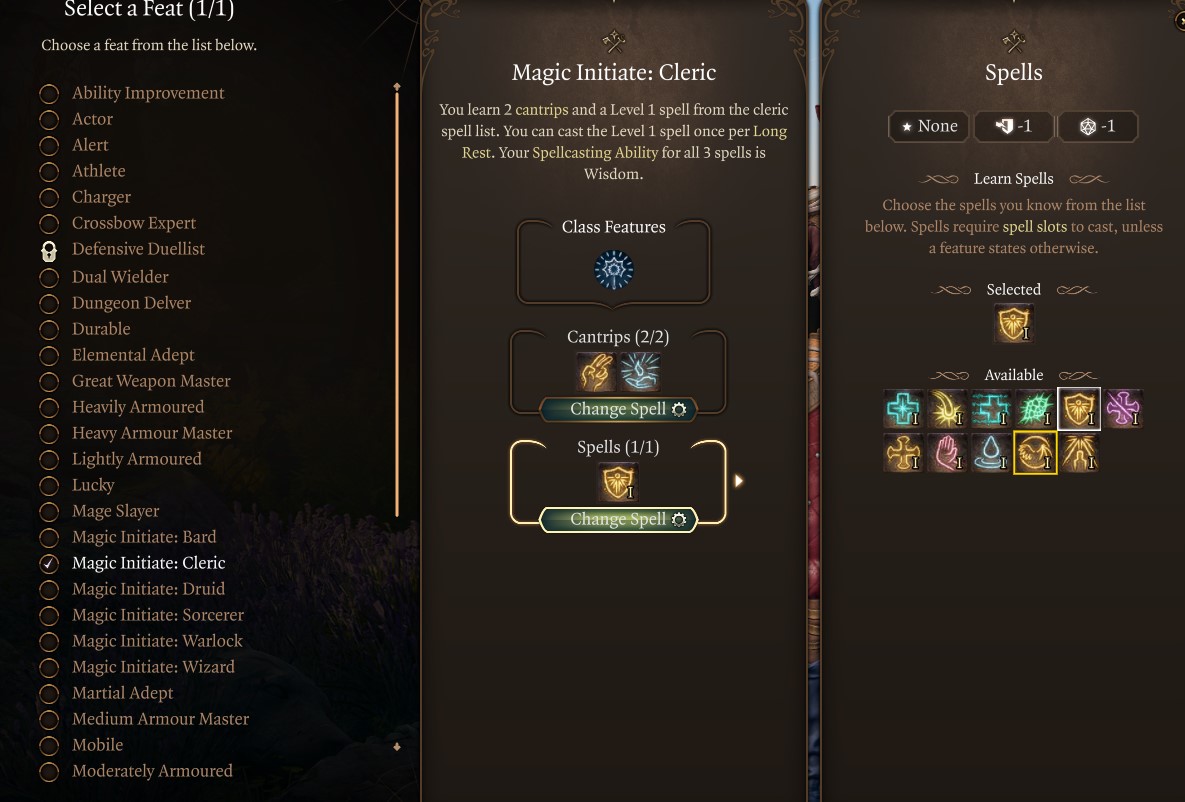
At level four as an Eldritch Knight, we get an additional level 1 spell along with a feat. This is a big choice, but we suggest Magic Initiative: Cleric. This will help in your group utility. Here are our suggestions for cantrips and spells at this level:
Cantrips
- Guidance: Bestow guidance upon an ally. They gain a +1d4 bonus to Ability Checks.
- Usage: this is an amazing outside-of-combat boost to checks. The game typically automatically casts this or you can choose so during dialogue and helps in story progression.
- Produce Flame: A flickering flame appears in your hand. It sheds bright light in a 9m radius and deals 1d8 Fire damage when thrown. Throwing the flame immediately after you conjure it does not cost an action. Extinguishing or throwing it on subsequent turns costs an action.
- Usage: This is another utility skill and you will often need light. If creatures lack Darkvision, they will receive a penalty in dark areas.
Spells
- Thunderwave: Release a wave of thunderous force that pushes away all creatures and objects dealing 2d8 Thunder damage.
- Usage: we are only using this as a knockback off ledges. This will be helpful to “peel” for an ally and knocking enemies off them or a ledge to get an instant kill. Don’t use this spell for damage.
- Shield of Faith: Protect a creature from attacks: increases its Armour Class by 2.
- Usage: this is a bonus action and requires concentration and the spell lasts until long rest. So, after a long rest you can cast this alongside your Familiar and get two buffs. Ideally, you want to use this on a target that has lower AC like a spell caster or yourself if you expect heavy damage.
Eldritch Knight Gameplay at Level 4
You will now have a lot more utility at this level. Your damage will still come from melee attacks. We also don’t select heals at this level because the scaling (how effective they will be) is determined on a lower ability. This allows the Eldritch Knight Fighter utility without sacrificing too much damage.
Eldritch Knight Level 4 Spells: Blade Ward Cantrip, Fire Bolt Cantrip, Shield, Protection from Evil and Good, Find Familiar, Thunderwave, Guidance Cantrip, Shield of Faith.
Level 5

The Fighter class starts to feel really powerful at Level 5. You will gain Extra Attack and Replace Spells at this level.
- Extra Attack: allowing you to make two attacks when you take the Attack action on your turn. This significantly boosts your damage potential in combat.
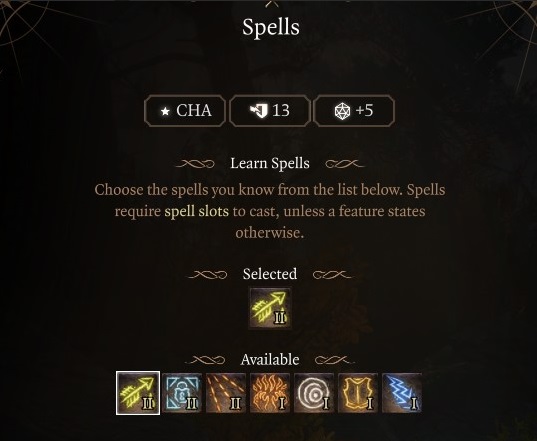
- Replace Spells: this allows you to swap in or out spells that you may have chosen in error, or experiment with new spells. Be warned, you can only do this each level or respecing your entire class.
Gameplay: most remain similar but expect more damage being able to attack twice. You can also use bonus actions for other utility spells or consumables. At this level, the FIghter starts to shine with high actions per turn.
Level 6
At level 6, the Fighter gets another feat or ability improvement. Take the Ability Improvement in order to increase Strength by +2 for a total of 18. I’ve experimented with other feats like War Caster and others. Keeping the damage high along with spells for utility is the play here.
No other gameplay changes at level 6.
Ending Act 1 as an Eldritch Knight Fighter
By Level 6, you should be close to finishing Act 1 content. Be sure to visit traders and stock up on camp and alchemy supplies. Additionally, make sure to find the best Act 1 items. Furthermore, there are also permanent bonuses to find in Act 1. Finally, the Grymforge has powerful armor and weapons (Adamantine) that can be used well into Act 3. Consider taking the time to collect and use the crafting items before moving on to Act 2, because you won’t be able to come back to this map.
Level 7
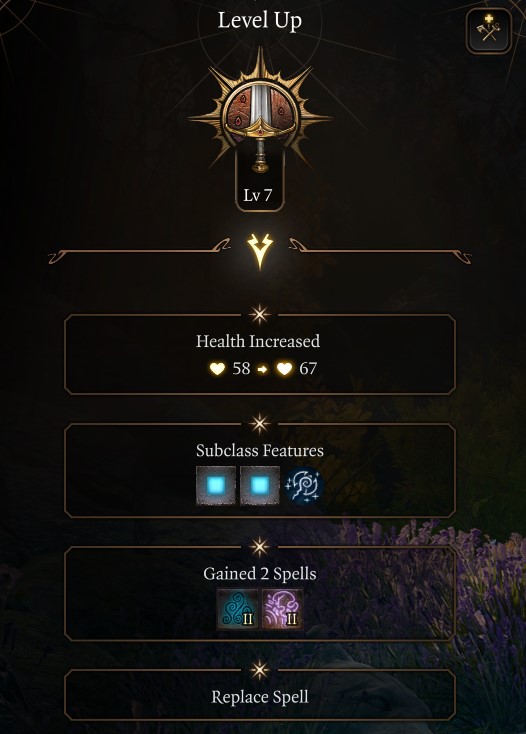
- Receives War Magic (You have honed your body and magic for war. After you cast a Cantrip, you can make a weapon attack using a bonus action.)
- 2 spells: Shatter and Darkness
- Replace Spell
At level 7 we can select two spells and War Magic is unlocked. The importance of War Magic is, it allows us to use a cantrip like Blade Ward, while still using our bonus action for attacking. This helps keep our actions per turn high rather than sacrificing one or the other. Very important to understand and makes cantrips even better.
Spells
- Darkness: Create a cloud of magical darkness that Heavily Obscures and Blinds creatures within 5m radius. Creatures cannot make ranged attacks into or out of it.
- Usage: blind is a useful status effect and can help with limiting damage within a chosen area. This can also mess with your ability to land attacks as well so be wary.
- Shatter: Damages all nearby creatures and objects. Creatures made of inorganic material such as stone have Disadvantage on their Saving Throw.
- Usage: this helps with something we lack, and that’s damage. If there are three or more enemies in a tight area, this spell can do some damage. Consider using it sparingly but having the ability to do range area damage is helpful with this build.
Gameplay: use Darkness to shutdown range targets and Shatter when you need area damage. Consider using Cantrips more regularly since you can now use bonus action for attack with War Magic.
Eldritch Knight Level 7 Spells: Blade Ward Cantrip, Fire Bolt Cantrip, Shield, Protection from Evil and Good, Find Familiar, Thunderwave, Guidance Cantrip, Shield of Faith, Shatter, Darkness.
Level 8
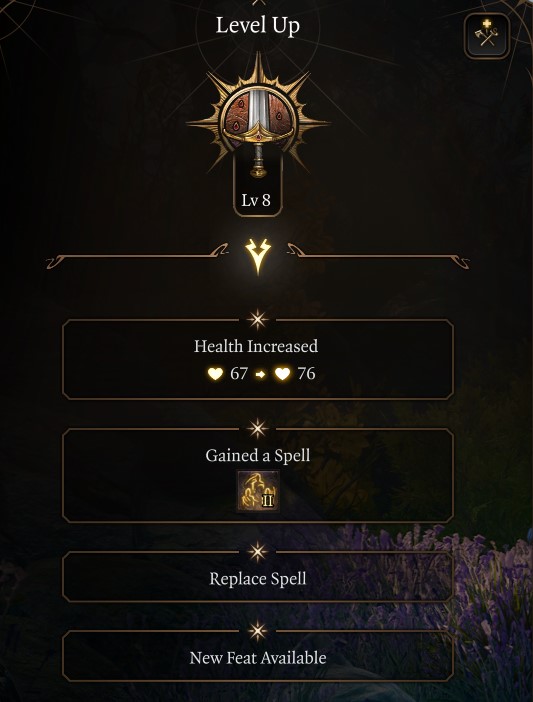
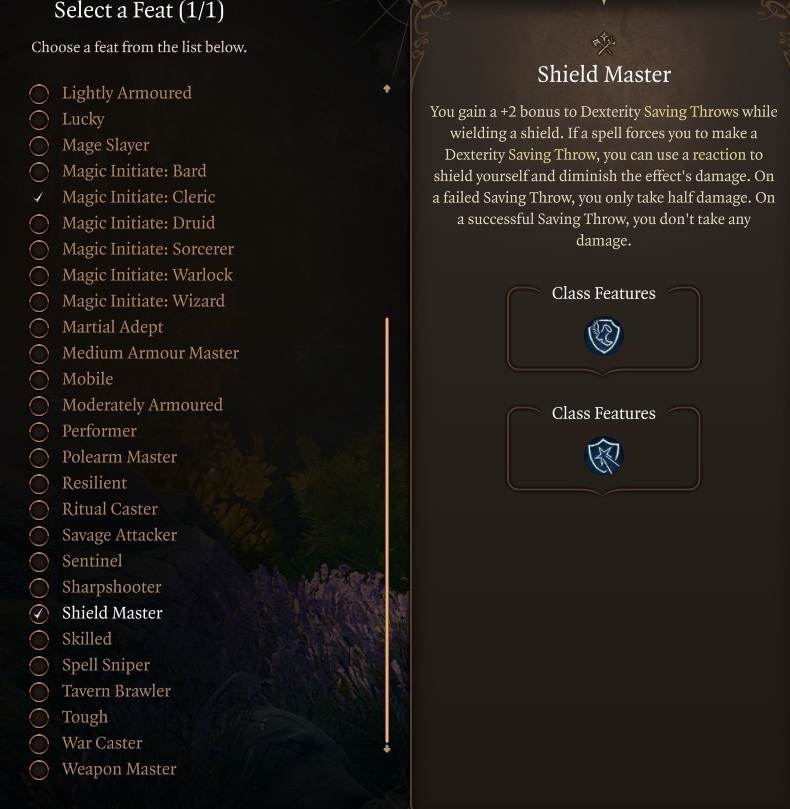
At level 8 the Eldritch Knight can select a feat and one spell. We want to take Shield Master to increase our survivability.
Shield Master Feat: You gain a +2 bonus to Dexterity Saving Throws while wielding a shield. If a spell forces you to make a Dexterity Saving Throw, you can use a reaction to shield yourself and diminish the effect’s damage. On a failed Saving Throw, you only take half damage. On a successful Saving Throw, you don’t take any damage.
Spell
- Mirror Image: Create 3 illusory duplicates of yourself that distract attackers. Each duplicate increases your Armour Class by 3. Whenever you successfully evade an attack, one of the duplicates disappears.
- Usage: this spell makes your AC incredibly high, which in turns helps avoid almost all attacks. The images will disappear each attack, but if you need super high survivability for a few turns, this is the spell for you.
Eldritch Knight Level 8 Spells: Blade Ward Cantrip, Fire Bolt Cantrip, Shield, Protection from Evil and Good, Find Familiar, Thunderwave, Guidance Cantrip, Shield of Faith, Shatter, Darkness, Mirror Image.
Level 9
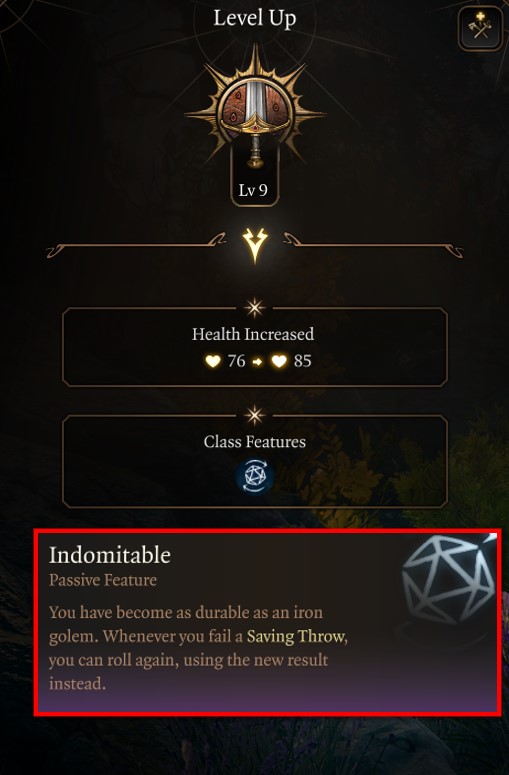

Not much happens at level 9 for the Fighter besides getting the class feature Indomitable. Indomitable: Whenever you fail a Saving Throw, you can roll again, using the new result instead. This is a simple passive feature that helps increase our survivability and requires zero action by you the player.
Level 10
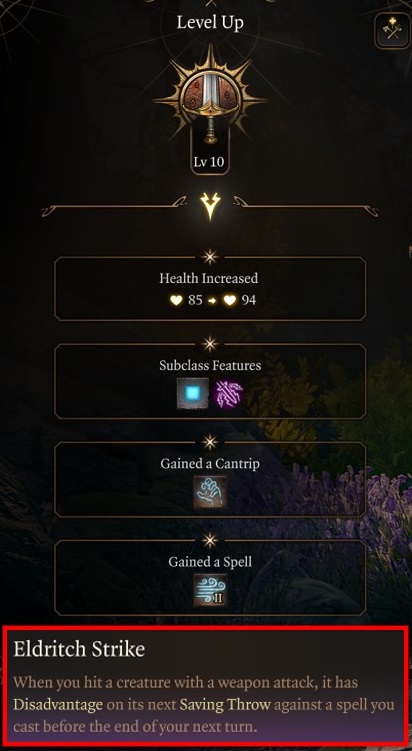
Level 10 Fighter adds one cantrip, one spell, and an Eldritch Strike Subclass feature.
Eldritch Strike: When you hit a creature with a weapon attack, it has Disadvantage on its next Saving Throw against a spell you cast before the end of your next turn.
Mage Hand Cantrip: When you cast Mage Hand, the spectral hand is invisible and can carry out additional tasks. Consider this a utility cantrip that can help with outside-of-combat actions and thievery.
Gust of Wind: Summon a strong wind that clears all sounds and pushes creatures back 5m, forcing them Off Balance. This can be helpful as a strong area knockback similar to and a bit better than Thunderwave.
The gameplay remains unchanged outside of having more utility. You can also hit multiple creatures to give disadvantage with the extra attack. This will have the enemy roll two D20 dice and select the lowest of the two. This can help when trying to burst down one or more targets who rely on saving throws for survival.
Level 11
At level 11, the Fighter receives an Improved Extra Attack and one additional spell. Improved Extra Attack: You can make two additional attacks after attacking with your main-hand weapon. This makes the Fighter the most action-heavy class and build in Baldur’s Gate 3. You get multiple actions, then two more, along with an Action Surge for another action. You can add to this effect with a Potion of Haste or a scroll of Haste.
Melf’s Acid Arrow: Shoot a green arrow that covers the target and the ground with acid. Deals 4d4 Acid damage immediately and 2d4 Acid damage at the end of the target’s turn. This is a decent ranged attack and we would use it to strip armor with acid damage rather than its ranged damage potential. Meaning, that if you have a heavily armored opponent consider this skill.
Level 12
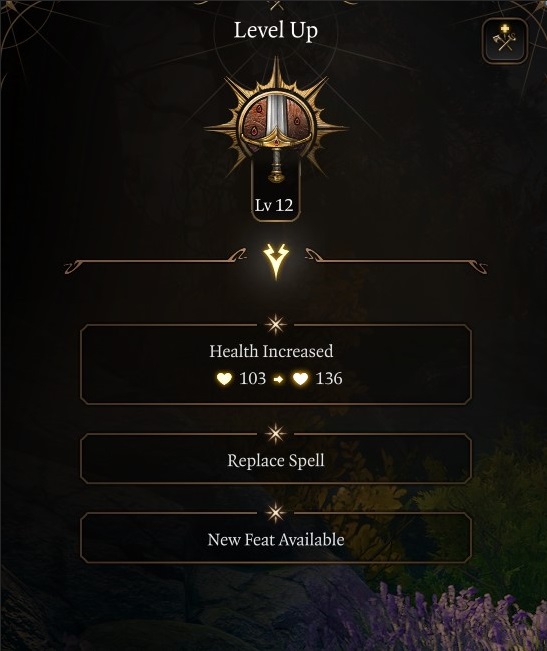
At level 12 we get a feat and the ability to replace a spell. If you wish to swap in or out any spells that are underperforming now is the time to do it. For feat, we suggest Tough.
Tough: Your hit point maximum increases by 2 for every level you have gained. This will increase our health by 24, giving us 136 health at max level. Combined with our heavy armour and high AC, we should be very hard to kill with the combination of feats and ability score.
At a max level of 12, the Eldritch Knight should be obnoxious to kill. While you can attack frequently with melee, you should have very high AC along with a lot of utility skills to help crowd control or survive. If you pair Mirror image or Shield when attacked, it will be very hard to land a shot on this build. You can supplement area damage with scrolls you can find in chests and bookcases.
Best Gear for Baldur’s Gate 3 Eldritch Knight Fighter Build
In Games like Baldur’s Gate 3, you’ll explore the world, loot chests and your enemies’ dead bodies, and complete quests and all those activities can reward you with useful items, potions, armor, weapons, scrolls, and much more. Progression and finding new gear are part of the game, and you will organically get more powerful weapons during your journeys.
Beginner: Act 1
Here’s the best beginner gear for the Best Baldur’s Gate 3 Fighter Eldritch Knight Build Guide:
| Gear Slot | Best Gear Item | Effect |
|---|---|---|
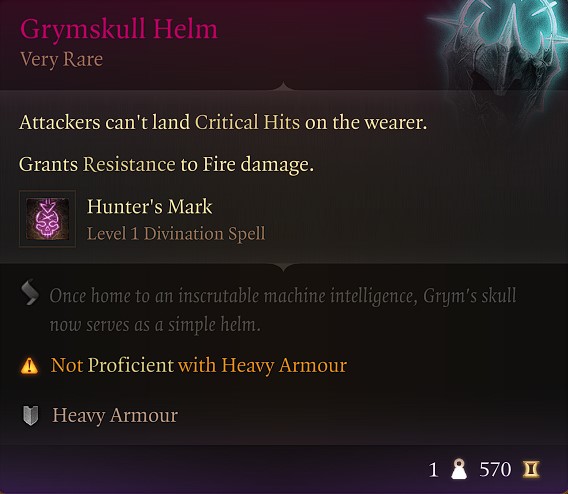
| Head | Grymskull Helm | Critical Hit Protection |
| Cape | – | |
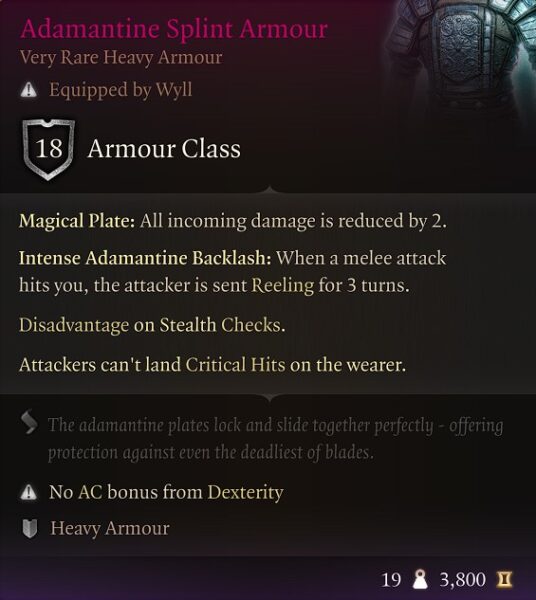
| Chest | Adamantine Splint Armour | 18 AC |
| Gloves | Gloves of the Growling Underdog | Advantage when Surrounded |
| Boots | Disintegrating Night Walkers | Mobility |
| Necklace | Amulet of Misty Step | Free Healing Spells |
| Ring | Crusher’s Ring | Increase Movement |
| Ring | The Sparkswall | Resistance to Lightning |
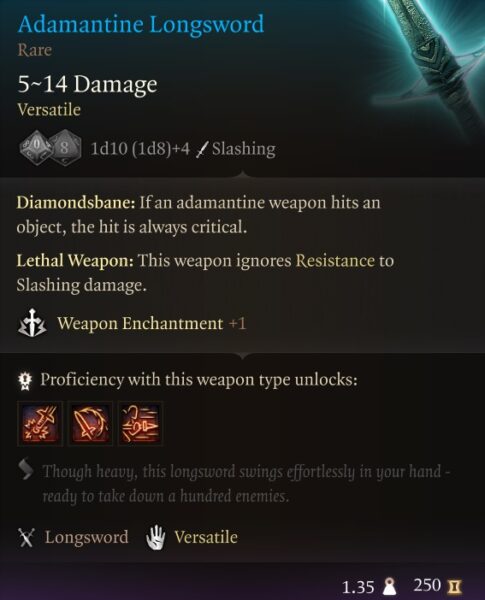
| Weapon 1 Main Hand | Adamantine Longsword | +1 Longsword |
| Weapon 2 Off-Hand | Glowing Shield | Gain HP when below 50% |
| Weapon 2 Ranged | Hunting Shortbow | Piercing Damage |
Below is a list of the best Act 1 equipment for the Eldritch Knight Fighter in Baldur’s Gate 3:
- Grymskull Helm: Defeate Grym, a construct boss at Level 8 in The Adamantine Forge (alternative Haste Helm).
- Adamantine Splint Armour: Can be crafted at The Adamantine Forge (alternatives Chain Mail +1, or Githyanki Half Plate).
- Gloves of the Growling Underdog: Chest behind Razglin’s throne room (alternatives Gloves of Missile Snaring, or Gloves of Hail of Thorns).
- Disintegrating Night Walkers: Can be taken from Nere, at the Grymforge (alternatives Boots of Striding, or Boots of Speed).
- Amulet of Misty Step: Found in a Gilded Chest (X386 Y8) in a Defiled Temple (alternatives Moondrop Pendant, or Amulet of Restoration).
- Crusher’s Ring: Can be looted or stolen from Crusher in the Goblin camp (alternative Strange Conduit Ring).
- The Sparkswall: Obtained in a chest in Arcane Tower, Underdark Act 1 (alternative Ring of Absolute Force).
- Adamantine Longsword: Crafted in the Adamantine Forge (X:-137, Y:558) (alternatives Phalar Aluve, or Githyanki Longsword).
- Glowing Shield: In a chest on a slope behind the goblin camp. (X: -54, Y: 462)(alternatives Wood Woad Shield).
- Hunting Shortbow: Sold by Dammon in the Druid Grove.
Advanced: Act 3 End-Game

The following table presents the best gear for the Best Baldur’s Gate 3 Fighter Eldritch Knight Build Guide:
| Gear Slot | Best Gear Item | Effect |
|---|---|---|
| Head | Helm of Balduran | Cannot Be Stunned |
| Cape | Mantle of the Holy Warrior | Free Crusader’s Mantle |
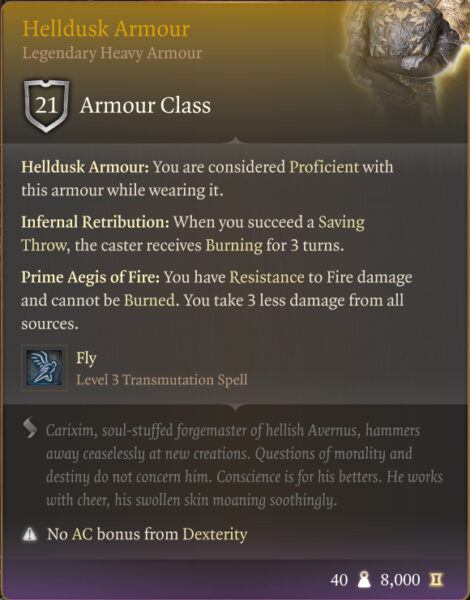
| Chest | Helldusk Armour | 21 AC |
| Gloves | Gauntlets of Hill Giant Strength | 23 Strength |
| Boots | Helldusk Boots | Cannot be Moved |
| Necklace | Amulet of Greater Health | 23 Constitution |
| Ring | Killer’s Sweetheart | Auto Critical |
| Ring | Ring Of Regeneration | Passive healing |
| Weapon 1 Main Hand | The Blood of Lathander | Sunbeam and Healing |
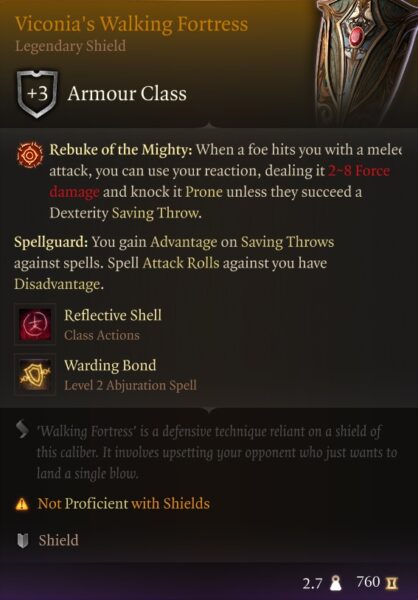
| Weapon 1 Off-Hand | Viconia’s Walking Fortress | 3 AC, Reflect Spell |
| Weapon 2 Ranged | Darkfire Shortbow | Fire & Cold Resist |
Below is the best Act 3 Armor, Weapons, and Equipment for Eldritch Knight Fighter in BG3:
- Helm of Balduran: Found on an altar next to Ansur in The Wyrmway, Act 3. (Alternative Helldusk Helmet).
- Mantle of the Holy Warrior: Sold by Vicar Humbletoes in Stormshore Tabernacle (Alternative Cloak of the Weave, or Cloak of Protection).
- Helldusk Armour: Looted from Raphael in the House of Hope (Alternative Armour of Persistence).
- Gauntlets of Hill Giant Strength: Obtained in Archive of the House of Hope (alternatives Helldusk Gloves, or Gloves of Soul Catching).
- Helldusk Boots: Chest on the top floor of Wyrm’s Rock Fortress (Alternative Disintegrating Night Walkers).
- Amulet of Greater Health: Archive in the House of Hope (Alternative Amulet of the Devout, or Spellcrux Amulet).
- Killer’s Sweetheart: Obtained from the Gauntlet of Shar in Act 2 (Alternative Ring of Protection, Risky Ring).
- Ring Of Regeneration: Sold by Rolan at Sorcerous Sundries (Alternative Ring of Free Action, Shifting Corpus Ring).
- The Blood of Lathander: The Blood of Lathander quest in Act 2 (Alternative Selûne’s Spear of Night).
- Viconia’s Walking Fortress: Looted from Viconia DeVir during Shadowheart’s companion quest in Act 3 (Alternative Shield of Devotion).
- Darkfire Shortbow: Sold by trader Damon Act 2 Last Light Inn X: -35 Y: 169 (Alternative Fabricated Arbalest).
Best Fighter Consumables, Potions, and Items
The following list represents the best individual use consumable items that will aid the Best Baldur’s Gate 3 Fighter Eldritch Knight Build Guide:
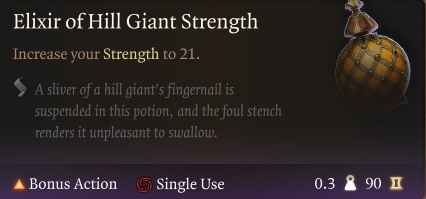
- Elixir of Hill Giant Strength: Increases Strength ability score to 21 until Long Rest.
- Elixir of Bloodlust: Once per turn when you kill a foe, you gain HP 5 temporary hit points and an additional action.
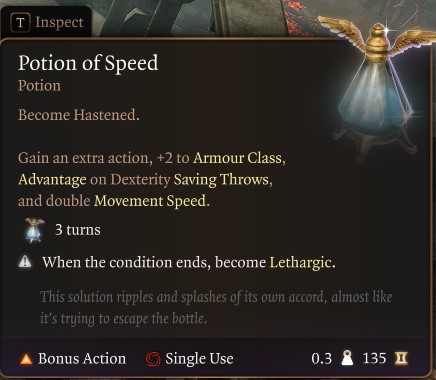
- Potion of Speed: Gain extra action, +2 AC, Advantage on Dexterity Saving Throws, and double movement speed.
- Drow Poison: Weapon poison that adds Constitution Saving Throw or becomes Poisoned and falls Asleep.
- Potion of Flying: Drink to gain a flying speed of 60ft for one hour.
- Elixir of Heroism: Gain 10 temp HP and become Blessed until a long rest.
- Potion of Greater Healing: 4d4 + 4 hit points restored.
- Oil of Accuracy: Coat Weapon. Bonus of +2 in Attack Rolls.
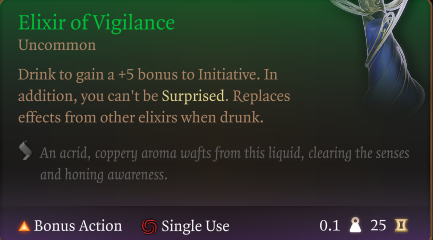
- Elixir of Vigilance: Drink to gain a +5 bonus to Initiative and you can’t be Surprised.
- Elixir of Darkvision: (only non-Darkvision race): Drink to gain the ability to see in the dark up to 12m.
Permanent Bonuses
Throughout Baldur’s Gate 3, you will have the ability to gain permanent bonuses to your character. These can grant additional spells, ability scores, and other bonuses. Permanent Bonuses are not displayed throughout the campaign but are vital to increase overall combat performance. We have all permanent bonuses here in a guide, but the most important ones for you to collect are listed below.
| Act 1 | Act 2 | Act 3 |
|---|---|---|
| Auntie Ethel’s Hair: Gain +1 to an Ability Score. | Potion of Everlasting Vigour: Gain +2 Strength. | Mirror of Loss – +2 to an Ability Score of your choice. |
| Awakened: Use illithid powers as a Bonus Action. | Slayer Form: Ability to transform into the Slayer. | Partial Ceremorphosis: Access to tier 3 illithid Powers. |
| Scratch: Gain Find Familiar Scratch. | Summon Us: Allows you to summon Us. | Sweet Stone Features: Blessed permanent. |
| Cheeky Quasit: Gain Summon Quasit Shovel. | Statue of the Gods: +2 to Saving Throws | |
| Loviatar’s Love: 30% Hit Points or less, you gain a +2 bonus to Attack Rolls and Wisdom saving throws. | ||
| Necromancy Of Thay: access to powerful spells in Act 3. | ||
| Volo’s Ersatz Eye: See Invisibility |
Best Permanent Bonuses for Eldritch Knight Fighter in Baldur’s Gate 3
Combat, Gameplay Tips, and Tricks in Baldur’s Gate 3
The Best Baldur’s Gate 3 Fighter Eldritch Knight Build uses a combination of aggression, damage, and movement speed to survive and fight. You will need to play aggressively but also use terrain, consumables, and companions to help you in combat.
Here are 10 combat gameplay tips and tricks specifically for playing an Eldritch Knight Fighter in Baldur’s Gate 3:
- Initial Turn: Make sure your initial move either puts you in melee range so you can strike or attack with range weapon.
- Bonus Action: make use of your bonus action with skills like Pommel or even shove to knock back enemies.
- Potion of Speed: use these potions to gain bigger movement and more actions in challenging fights.
- Long Rest: Make sure to rest when your spell slots are low.
- Equip Range: Find and equip a bow early because it will increase your kill potential and take advantage of Fighters weapon versatility.
- Make use of Action Surge: Action Surge is a powerful ability unique to Fighters. Save Action Surge for critical moments in combat or to gain an advantage over tough opponents.
- Action and Bonus Actions: at level 7 you can use bonus action for attack after casting a cantrip.
- Buff: consider using your buffs and damage avoidance spells on either the weakest companion or yourself when charging in.
- Familiar: Always cast this and shield of faith after a long rest because it will stay with you until another long rest.
- Crowd Control: the main source of your crowd control will come from consumables, Thunderwave and weapon skills.
Remember, this build guide serves as a foundation, and you can always adapt it to suit your preferences and the needs of your campaign. Enjoy playing as The Best Fighter Build in Baldur’s Gate 3!
Eldritch Knight Fighter Changes in Patch 7 of BG3
The Eldritch Knight subclass and Fighter class did not receive any changes to combat and gameplay with the release of Patch 7 for Baldur’s Gate 3. Furthermore, the overall focus of Patch 7 was adding mods and new endings with more honour mode boss actions.
One of the major new features of the game includes a modding toolkit and an in-game mod manager. This allows players to create and install mods directly within the game. Additionally, there have been several new cinematic endings added to the game, with most focusing on evil endings. Therefore, this best Eldritch Knight Fighter Build Guide remains unchanged, mainly in Baldur’s Gate 3 Patch 7.
Build Summary – Best Baldur’s Gate 3 Eldritch Knight Fighter Build Guide
Subclass: Eldritch Knight
Armor: Heavy
Weapons: Sword and Shield
Race – Zariel Tiefling
Background – Sage
- Strength – 16
- Dexterity – 10
- Constitution – 14
- Intelligence – 16
- Wisdom – 8
- Charisma – 10
Level Progression
- Level 1 – Second Wind
- Level 2 – Action Surge
- Level 3 – Eldritch Knight Subclass
- Level 4 – Magic Initiative: Cleric Feat
- Level 5 – Extra Attack
- Level 6 – Feat +2 Strength
- Level 7 – War Magic
- Level 8 – Shield Master Feat
- Level 9 – Indomitable
- Level 10 – Eldritch Strike
- Level 11 – Improved Extra Attack
- Level 12 – Tough Feat
Looking For More About Baldur’s Gate 3?
Thank you for reading Best Baldur’s Gate 3 Fighter Eldritch Knight Build Guide Guide. We provide the latest news and create guides for Baldur’s Gate 3. Also, watch me play games on Twitch or visit my YouTube channel!