Facebook
 Reddit
 Email
Email
This solo guide focuses on the key aspects of a Druid build in Baldur’s Gate 3 (BG3), intended to play solo without companions.
This build page has been updated for the Patch 8 version of Baldur’s Gate 3.
Best Solo Druid Build Guide
In Baldur’s Gate 3, Druids are powerful spellcasters deeply connected to the natural world. They wield a potent mix of nature-themed spells, and animalistic prowess through Wild Shape, making them powerful yet unique among the classes in BG3. This solo Druid build will lean into the Wild Shape mechanics and use shapeshifting to obtain animal forms, rather than a spellcaster, weapon users, or support build.
We’ve crafted this solo build focusing on achieving top performance in combat, particularly for those interested in playing on Honour Mode difficulty. This build avoids multiclassing, as the Wizard can prove exceptionally potent as a pure class. This build leverages shapeshifting, summons, and buffs for combat potency, all while maintaining massive hit points for survival. Let’s delve into how to effectively utilize the optimal Baldur’s Gate 3 Solo Druid Build!
Patch 8 Changes to Solo Druid for BG3
The most impactful update to the Druid class in Patch 8 of Baldur’s Gate 3 is the introduction of the Circle of Stars subclass. What makes the Circle of the Stars Druid unique is the ability to gain Guiding Bolt and increase attack rolls by 1d6 with a subclass feature. Consequently, the subclass plays more like a ranged archer with spells, taking advantage of Act 1 armor and jewelry to increase overall power. The subclass is a simple and effective way to play, especially at the start of the game. The downsides are that the power fades in later levels, especially in Act 3.
Despite the unique utility that comes with the Circle of the Stars subclass, it’s not inherently more powerful than the other subclasses. In fact, for our Solo build we still recommend sticking with Circle of the Moon subclass all the way through leveling. However, if you are interested in multiclassing, and possibly picking up the Booming Blade cantrip via the Wizard class, we’ll have an alternative recommendation below.
Solo Druid Build Features
The following list presents all the essential solo Druid Build Mechanics and Features in Baldur’s Gate 3:
- Primary Ability: Wisdom
- Secondary Ability: Constitution
- Subclass: Circle of the Moon
- Saving Throw Proficiencies: Wisdom and Intelligence
- Armour Proficiency: Light Armour, Medium Armour, Shields
- Weapon Proficiency: Clubs, Daggers, Javelins, Maces, Quarterstaves, Scimitars, Sickles, Spears
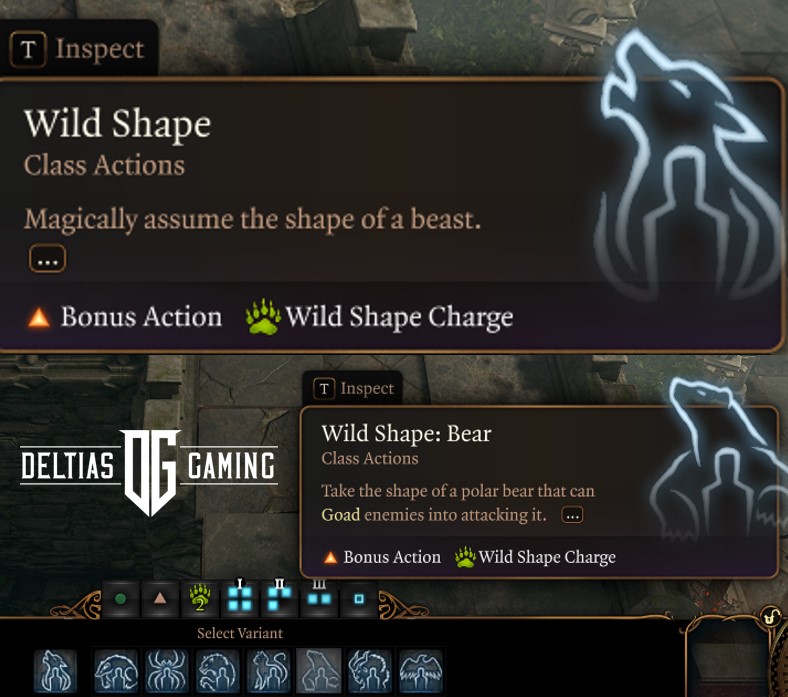
- Combat Wild Shape: As a Bonus Action, you can assume the form of a beast.
- Lunar Mend: Expend spell slots to regain hit points while wild-shaped.
- Primal Strike: While in beast form, your attacks count as magical to overcome Resistance.
- Wild Shape: creature transformation
Related:
How to Play the Druid Solo in Baldur’s Gate 3
Baldur’s Gate 3 can be played solo by either opting to disregard companions or recruiting them and later dismissing them to your camp. Although playing a Druid build solo presents a challenging experience, it is possible to complete the entire game solo on Tactician difficulty.
Below are some general tips on how to play the best Druid build in BG3 Solo:
- Stealth: Start combat in stealth if possible to trigger the Surprise status effect.
- Side Quest: Complete as many side-quests as possible to reach levels 5 and 9 where your power boosts.
- Summons: Do side quests to obtain summons and permanent bonuses like Scratch and Necromancy of Thay in Act 1.
- Resources: Make sure every turn you are spending your bonus and action and don’t let any resource go unspent.
- Loot Everything: You will need a lot of gold to buy consumables, potions, and ammunition so loot and sell constantly.
- Crafting: Elixirs and potions are vital, and you need to purchase materials when trading for crafting.
- Sell Often: Your carrying capacity will be limited so sell often, and store excessive items in your traveler’s chest.
- Consider Illithid Powers: While it can come with an altered appearance, the powers are powerful and can help you.
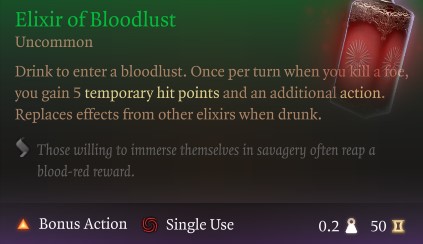
- Bloodlust: This is the most powerful elixir and persists through Wild Shape form giving you an extra action for kills.
- Persuasion: Try to avoid combat through dialogue if possible.
Wild Shape & Solo Builds
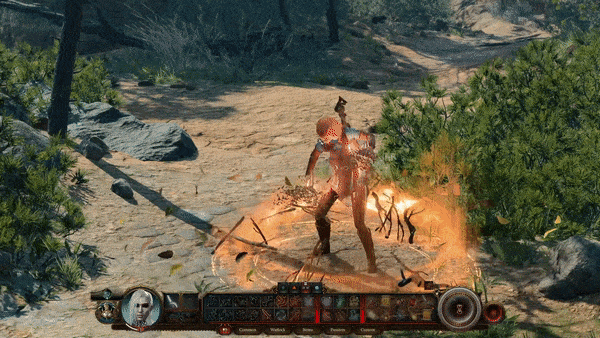
In Baldur’s Gate 3, Druids possess the Wild Shape ability, allowing them to transform into a beast form. This capability becomes accessible at level 2, and Druids have two charges of Wild Shape, which they can replenish after each short rest.
Upon Wild Shaping, a Druid adopts the game statistics of their chosen beast form, encompassing hit points, armor class, movement speed, Strength, Dexterity, and Constitution scores. They also acquire the special abilities inherent to their selected beast form, such as climbing walls, flying, or breathing underwater. Maybe most importantly for solo play, you gain the animal’s health bar, which serves as an additional survivability mechanism.
The way to squeeze the maximum amount of power out of your Druid solo build is to equip armour, weapons, and cast spells all that persist through Wild Shape. Elixir of Bloodlust, for example, provides an extra action if you kill a turn (once per round). This Elixir is essential to gaining power from the Druid while in Wild Shape. Moreover, you typically want to cast a concentration-based spell with your action on turn one, then turn into an animal with your bonus action.
Therefore, we will make recommendations on spells, gear, and wild shape forms that give the most beneficial combat power because solo at high difficulty is very hard in BG3.
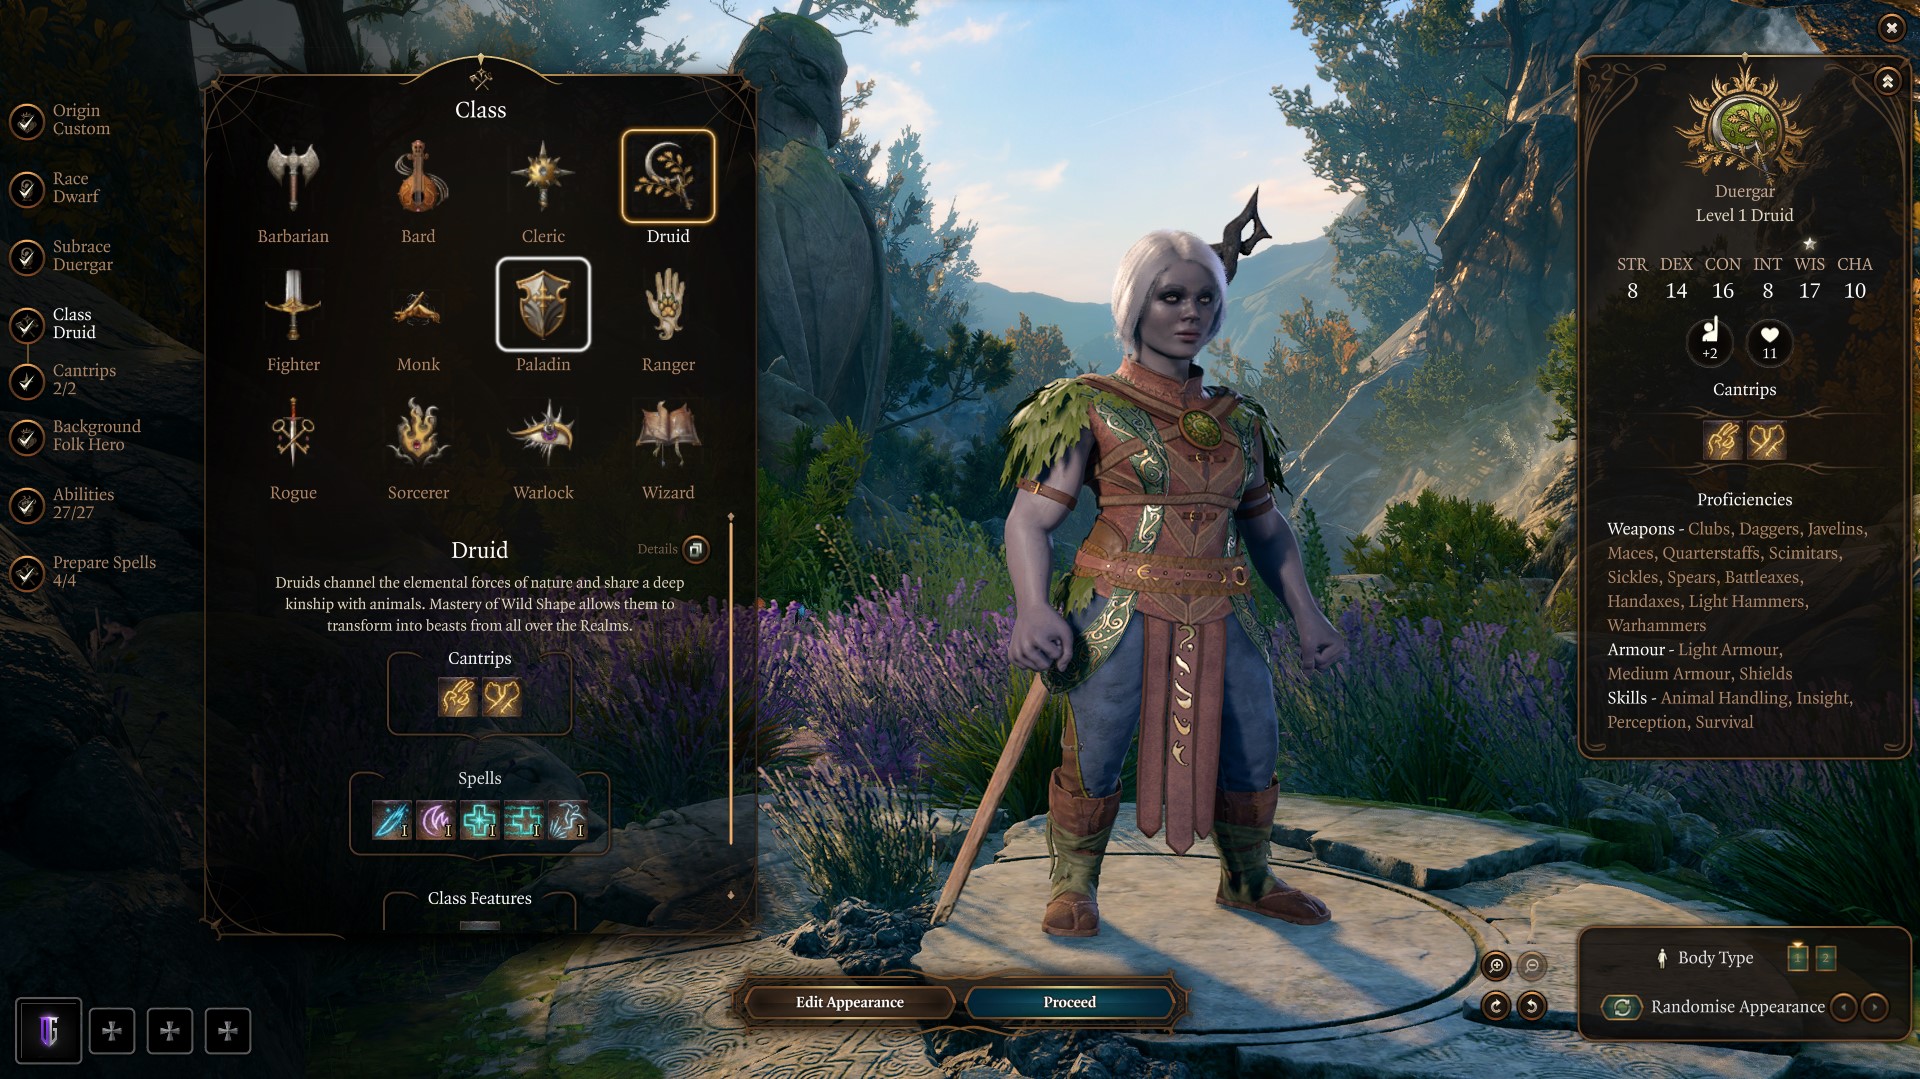
Character Creation
| Category | Selection |
|---|---|
| Character | Origin – Custom Character |
| Race | Dwarf |
| Sub Race | Duergar |
| Class | Druid |
| Subclass | Circle of the Moon |
| Cantrips | Guidance, Resistance |
| Spells | Cure Wounds, Healing Word, Ice Knife, Thunderwave |
| Background | Folk Hero |
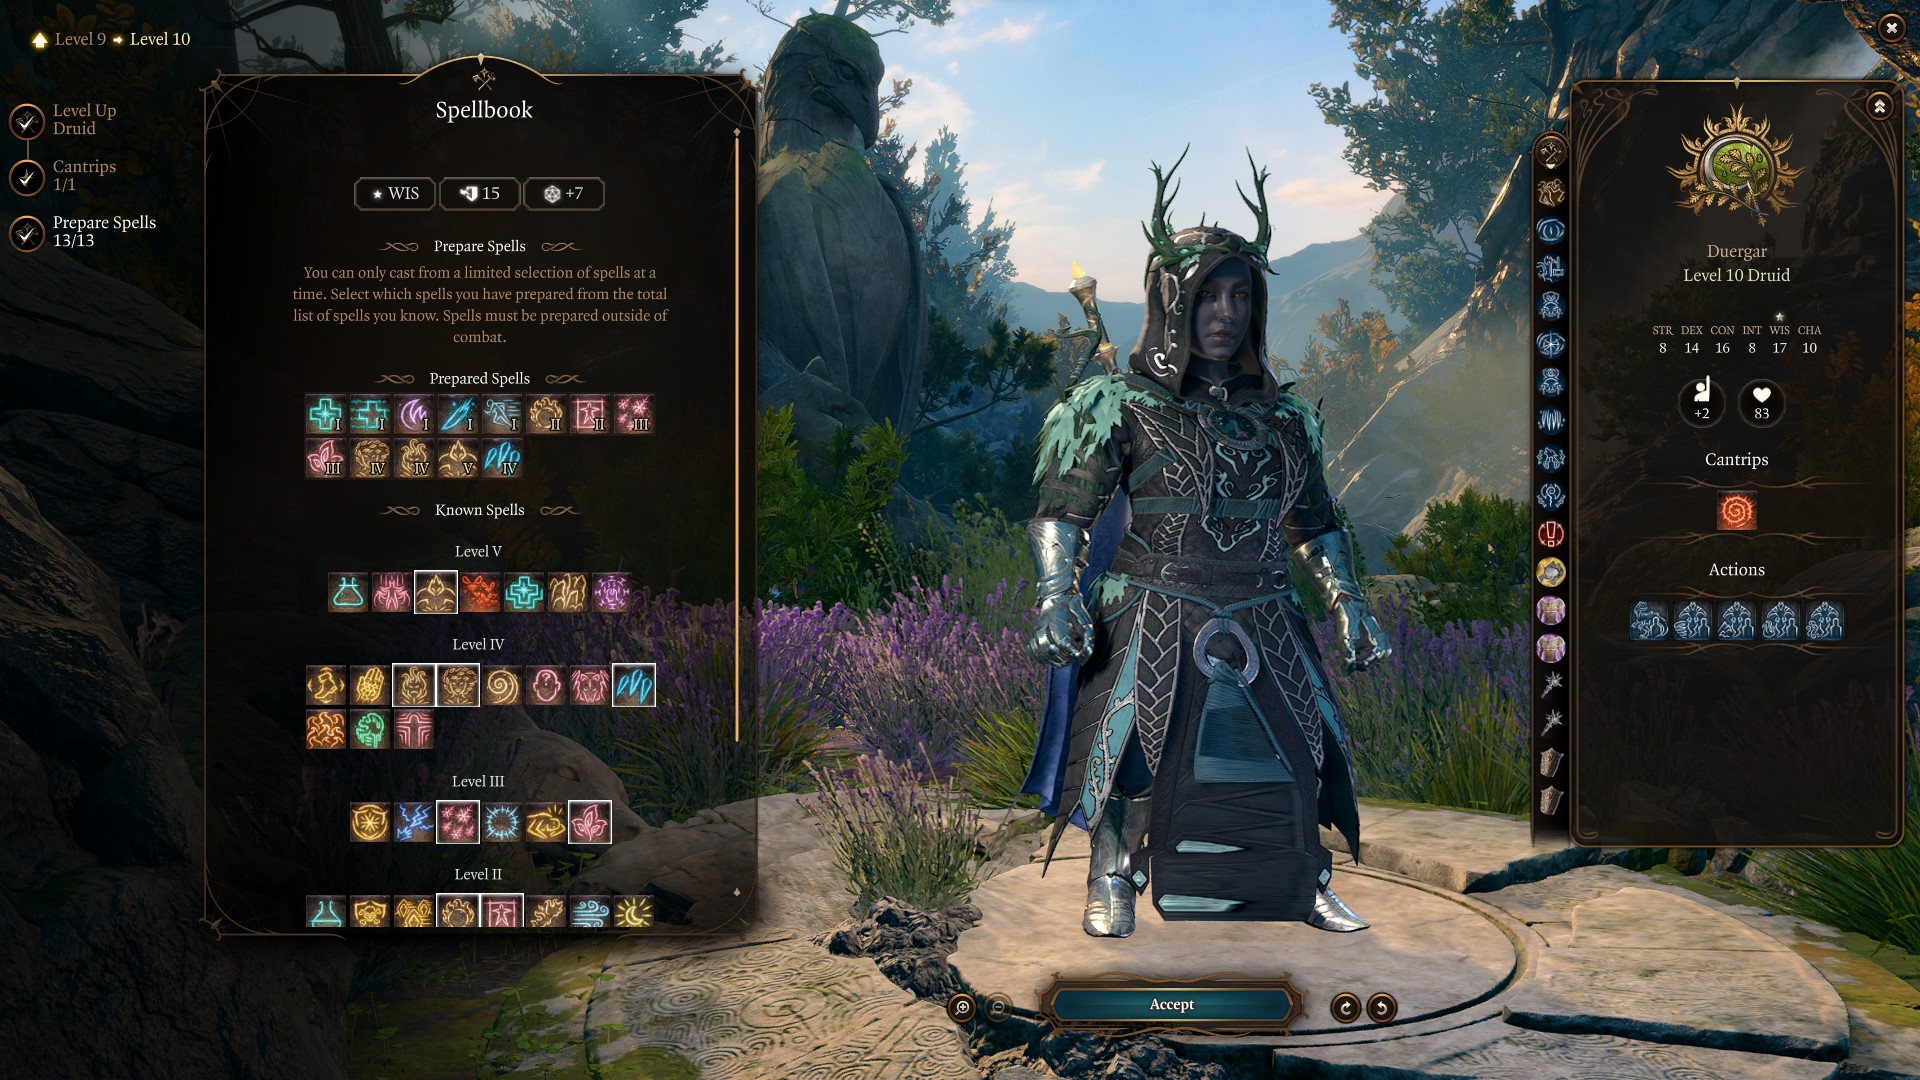
| Ability Score | STR: 8 DEX: 14 CON: 16 INT: 8 WIS: 17 CHA: 10 |
| Skill Proficiencies | Perception, Insight |
Race
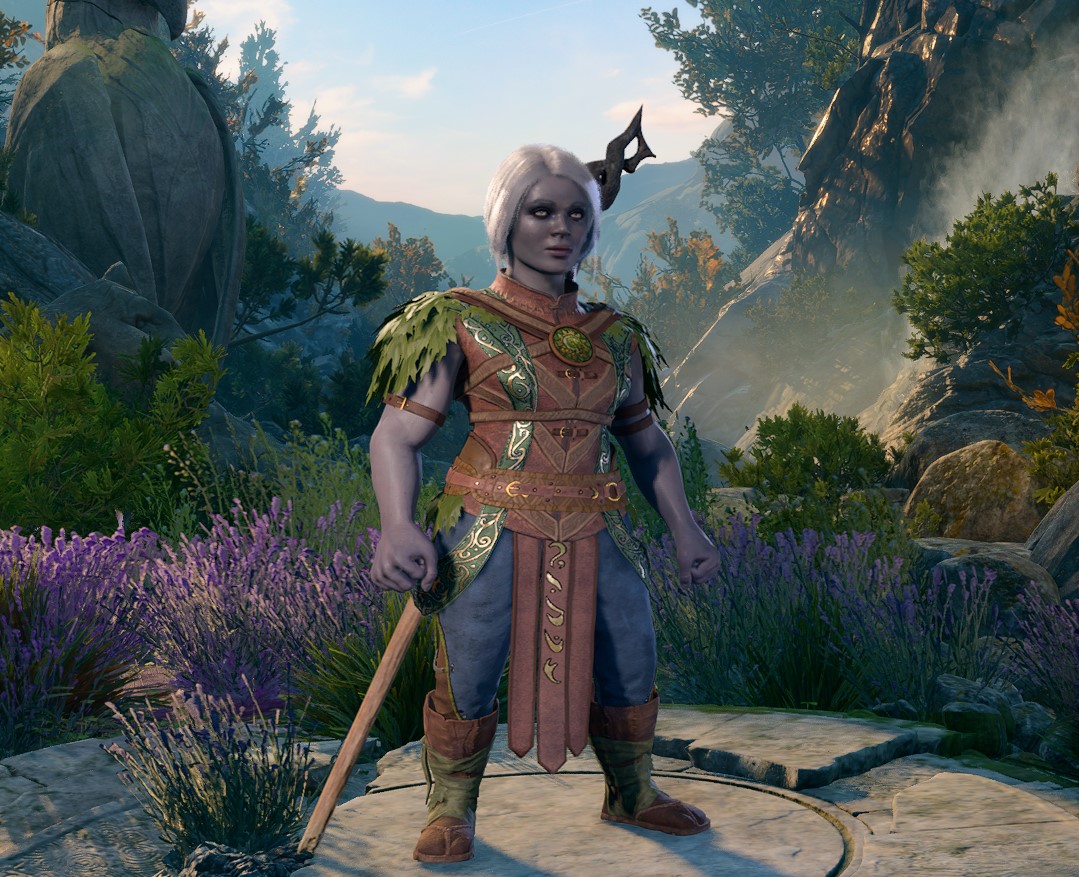
Duergar is the best race choice for a solo Druid because you gain Enlarge and Invisibility spells. In particular, Enlarge persists through wild shape form, while Invisibility is a critical survivability and exploration skill. The next best options are Wood Elf or Wood Half-Elf. Each grants a 10.5-meter movement speed per turn and aids in your mobility.
Here is the best race choice for a solo Druid build in Baldur’s Gate 3:
| Duergar Dwarf | Wood Elf |
|---|---|
| Enlarge Spell | Fleet of Foot (10.5m movement) |
| Invisibility Spell | Fey Ancestry |
| Superior Darkvision (24m) | Darkvision (12m) |
| Duergar Resilience | Stealth Proficiency |
Ability Score
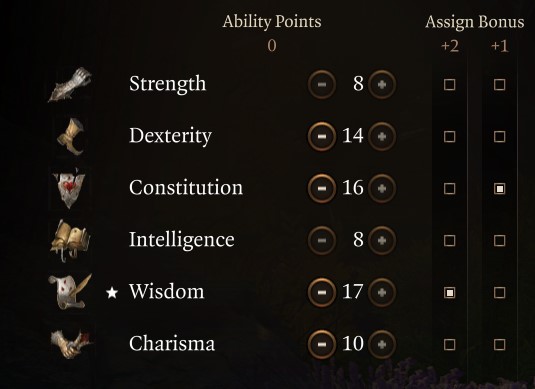
The Best Ability Score for solo Druid Build is 17 WIsdom, 16 Constitution, and 14 Dexterity. Wisdom is your ability modifier for spells, increasing the amount you can learn, the damage, and the chance to land. Constitution is health and also your ability to maintain concentration saving throws. Lastly, Dexterity is important while using Medium Armour and having a high initiative so you can go sooner in combat.
Below is the best ability score for a solo Druid in Baldur’s Gate 3:
- Strength – 8
- Dexterity – 14
- Constitution – 16
- Intelligence – 8
- Wisdom – 17
- Charisma – 10
This selection assumes you will complete the Act 1 permanent bonus with Auntie Ethel, who if you negotiate with, grants a +1 to any ability score. Combine the at bonus with an ability improvement, you will reach 20 Wisdom at the max level. If you are unfamiliar with the Auntie Ethel bonus, follow our guide, or lower Wisdom by 1 and increase Intelligence for better exploration skill options.
Background & Skills
The best Background for a solo Druid is Folk Hero because you gain proficiency in two Wisdom-based skills, Animal Handling and Survival. Backgrounds in Baldur’s Gate 3 are a way to represent your character’s backstory and give them some starting skills and abilities.
The best skills to select are Perception and insight. These two often reveal hidden doors, buttons, and treasure chests. For lore and roleplay purposes, you could choose Nature but would sacrifice an important exploration in the process.
Solo Druid Illithid Powers

Illithid Powers are unlocked later in the game when you learn more about the Mind Flayers and Tadpoles. You can gain jars of Mind Flayer Parasite Specimens, and consume them to gain one point. This is essentially another skill tree advancement with some very strong powers. If you decide to advance this skill line, these are the choices we suggest.
Here are the best Illithid Powers for the Solo Druid Build:
| Illithid Powers | Description |
|---|---|
| Luck of the Far Realms | When you make a successful Attack Roll against a foe, you can change that hit into a Critical Hit. |
| Cull of the Weak | When you bring a creature down to fewer hit points than your number of evolved Illithid powers, it dies and all nearby creatures take 1-4 Psychic damage. |
| Psionic Backlash | When an enemy within 9m casts a spell, you can use your reaction to inflict ld4 Psychic damage to the caster per the spell’s level. |
| Blackhole | Area-based suck-in that slows targets. |
| Repulsor | Massive area knockback that can hit friendlies. |
| Charm | This is the priority power you want to obtain because you can force enemies to attack something else. |
Best Solo Druid Build – Level Progression in Baldur’s Gate 3
| Level | Class | Selection |
|---|---|---|
| 1 | Druid | Cantrips: Guidance, Resistance Prepared Spells: Cure Wounds, Healing Word, Ice Knife, Thunderwave |
| 2 | Druid | Subclass: Circle of the Moon Prepared Spells: Lunar Mend |
| 3 | Druid | Flaming Sphere |
| 4 | Druid | Cantrip: Shillelagh Prepared Spell: Hold Person Feat: War Caster |
| 5 | Druid | Sleet Storm |
| 6 | Druid | Plant Growth |
| 7 | Druid | Conjure Woodland Beings |
| 8 | Druid | Prepared Spell: Conjure Minor Elemental Feat: Alert |
| 9 | Druid | Conjure Elemental |
| 10 | Druid | Ice Storm |
| 11 | Druid | Heroes Feast |
| 12 | Druid | Prepared Spell: Freedom of Movement Feat: Ability Improvement +2 WIS |
Alternative Solo Druid Build
For our alternative Solo Druid Build we’ll be offering an option that multiclasses into Wizard at Level 8. This build focuses on creating a high-impact spellcasting Druid by combining the Circle of Spores subclass with a multiclass into Evocation Wizard. The result is a devastating caster capable of unleashing powerful area-of-effect spells that won’t harm allies, thanks to Evocation’s Sculpt Spells feature. Choose this build if you’re looking for a unique, damage-oriented twist on the traditional Druid, one that prioritizes massive magical firepower over healing and shapeshifting.
| Level | Class | Selection |
|---|---|---|
| 1 | Druid | Shillelagh, Thorn Whip, Ice Knife, Thunderwave, Cure Wounds, Healing Word |
| 2 | Druid | Subclass: Circle of the Spores, Wild Shape, Bone Chill, Speak with Animals |
| 3 | Druid | Flaming Sphere, Blindness, Detect Thoughts |
| 4 | Druid | Feat: War Caster, Poison Spray, Heat Metal |
| 5 | Druid | Wild Strike, Animate Dead, Gaseous Form, Sleet Storm |
| 6 | Druid | Fungal Infestation, Call Lightning |
| 7 | Druid | Conjure Woodland Beings, Ice Storm, Blight, Confusion |
| 8 | Wizard | Minor Illusion, Mage Hand, Blade Ward, Fire Bolt, Shield, Find Familiar, Chromatic Orb, Tasha’s Hideous Laughter, Magic Missile, Feather Fall |
| 9 | Wizard | Subclass: Evocation, Burning Hands |
| 10 | Wizard | Misty Step, Scorching Ray |
| 11 | Wizard | Feat: Ability Improvement Wisdom, Light, Mirror Image, Invisibility |
| 12 | Wizard | Fireball, Counterspell, Conjure Minor Elemental |
Level 1
At level one, you should follow our character creation steps. Select the correct background, race, skills, and ability score focusing on Wisdom and Constitution. You pick a subclass at level 2, so expect a slow start in terms of performance. At level one, you will select the ideal Cantrips and Spells. You can select two cantrips and four spells. Below are our overall selections at this level for solo Druid:
- Guidance (cantrip selection): The target gains +1d4 bonus to Ability Checks.
- Resistance (cantrip selection): Target gains +1d4 bonus to Saving throws. — Select Shillelagh if you want to use Quarterstaff weapon attacks.
- Cure Wounds (spell selection): Touch a creature to heal it.
- Healing Word (spell selection): Heal a creature you can see.
- Ice Knife (spell selection): Throw a shard of ice that deals 1d10 Piercing damage.
- Thunderwave (spell selection): Release a wave of thunderous force that pushes away all creatures and objects in an area, while also dealing Thunder damage.
- Longstrider: Increase a creature’s Movement Speed by 3 meters.
Solo Druid Gameplay
The first level with the solo Druid will be rough because you have very limited tools for damage, and mainly support skills which won’t be used frequently. Guidance is helpful in non-combat situations and you won’t be able to rely on companions for this buff. Resistance can be cast outside of combat and is a good defensive concentration cantrip at level 1. Cure Wounds uses an action while Healing Word uses a bonus action to heal. Most likely, you will be Wild Shape most of the time, however, having two options to heal is preferred.
When it comes to damage, you will rely on Ice Knife for range piercing and cold. However, your spell slots will be limited so try to equip a weapon. Depending on your racial choice, you may gain access to range weapons which can be helpful at the start with nearly zero range options. Thunderwave is a helpful knockback, though you mainly want to use it to knock off ledges for fall damage. Lastly, cast Longstrider after every long rest because it drastically increases your movement and lasts until a long rest without requiring concentration!
Solo Druid Armour and Weapons
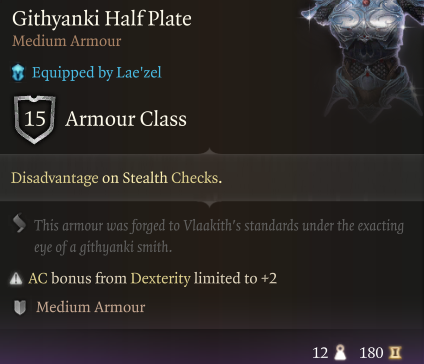
The most important consideration when equipping the Solo Druid is that your ability score (stats) does not carry over into Wildshape. Thus, you want to use medium armour until you reach Act 3 where you can obtain Druid-specific gear. This will give you a high Armour Class (AC) allowing you to avoid attacks. We will list suggested gear with options that either give you powerful spells, help with movement, or grant buffs that persist through Wildshape.
At the start of the game, equip a Quarterstaff or one-handed weapon of your choice and a shield. During the Prologue, grab the Githyanki Half-Plate from Lae’zel and equip it. This will give you a great start gear setup that will last until level 3 or so on.
Solo Druid Progression
Your overall priority with this build is the following:
- Complete Prologue
- Recruit Companions
- Unlock Withers, respec companions to proper class/ability score
- Collect the Necromancy of Thay (important in Act 3)
- Reached Hollowed City/Druid Grove
- Sell, Stock up, complete quests
- Unlock summons, Scratch, Shovel
- Progress to level 5
- Reach Underdark and Grymforge
- Check all Permanent Bonuses in Act 1 and the best Gear
- Act 1 Checklist for step-by-step completion
Level 2
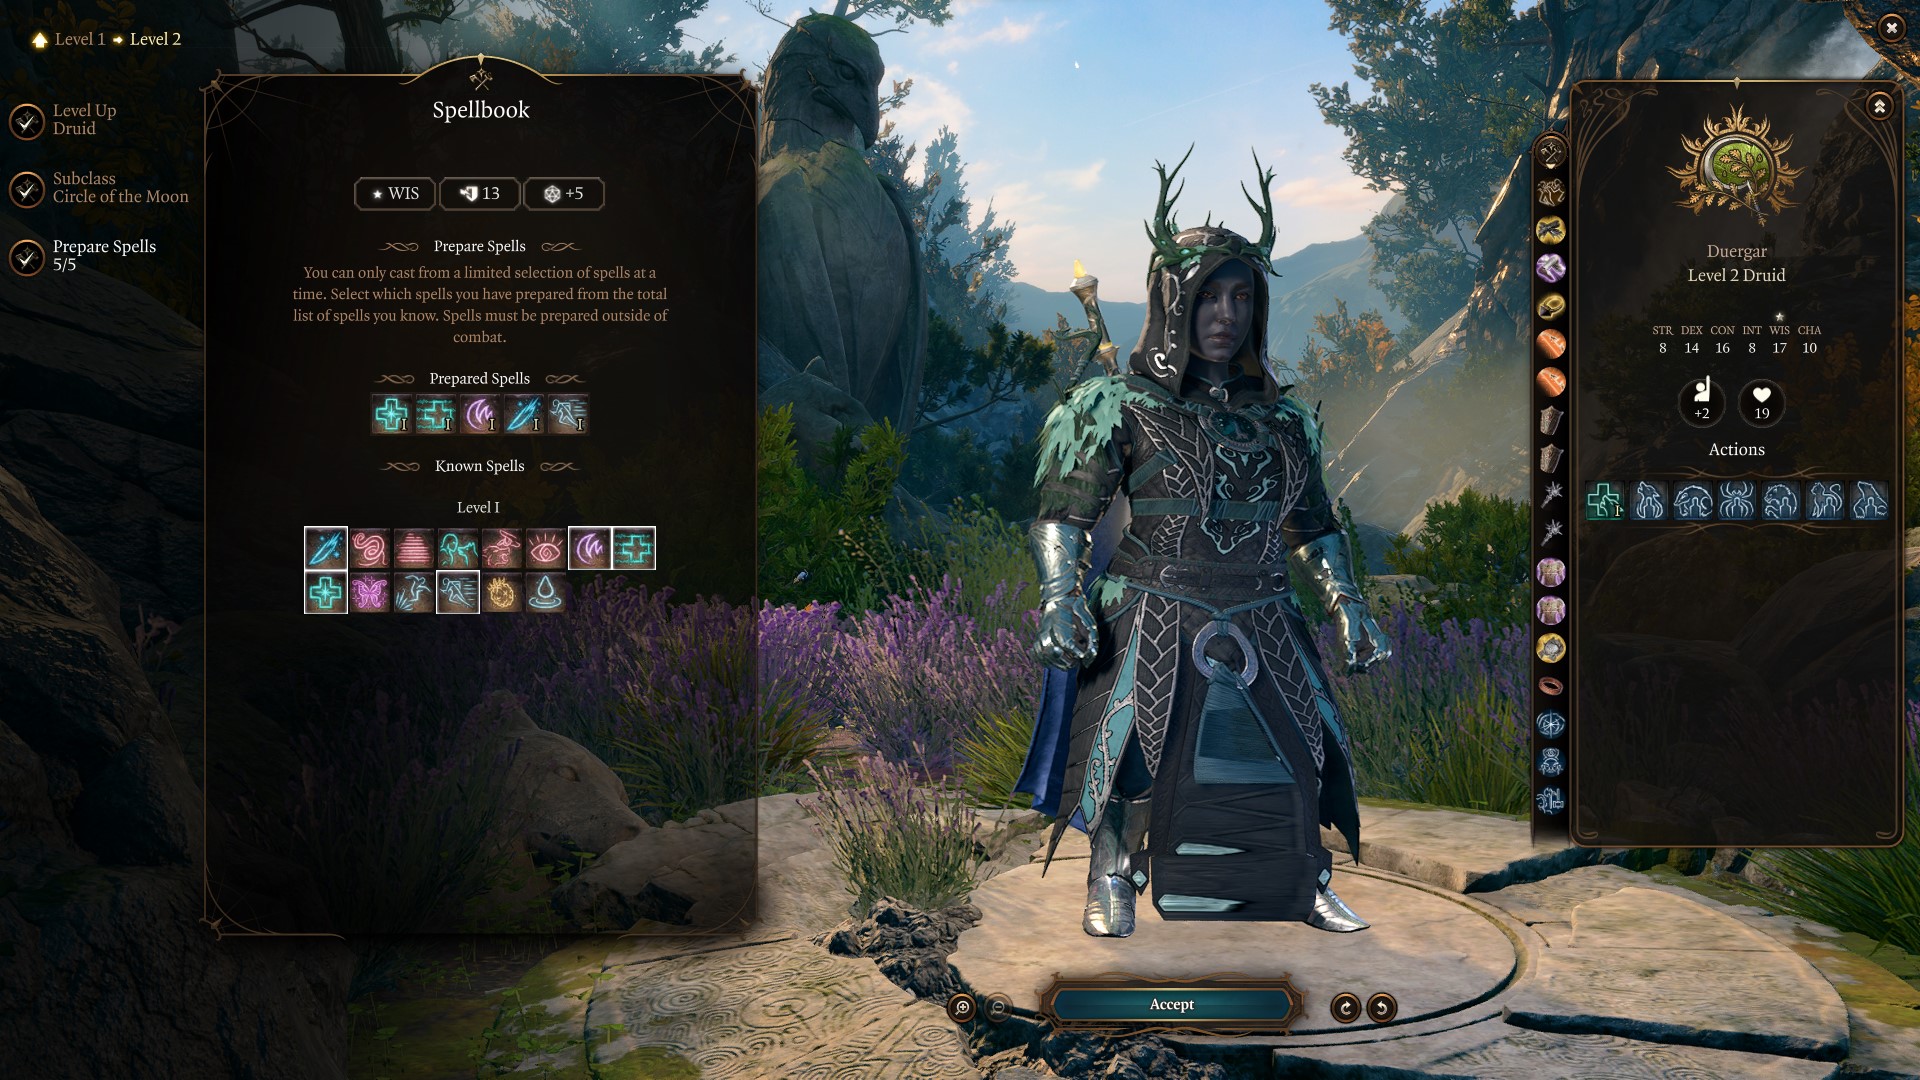
At level two the Druid will be able to select a subclass. We recommend the Circle of the Moon subclass for solo gameplay. Below are all the unlocks at this level selecting the Moon subclass:
- Combat Wild Shape: use a bonus action to assume the form of a beast.
- Lunar Mend: Expend spell slots to regain hit points while wild-shaped. You regain 1d8 hit points per level of the spell slot.
- Wild Shape Charges: 2
- Unlock 4 Wild Shape Forms:
- Badger – Take the shape of a giant Badger that can burrow into the ground.
- Cat – Take the shape of a ragdoll Cat that can avoid attention and meow to distract your enemies.
- Spider – Take the shape of a giant Spider that can shoot webs to entangle enemies.
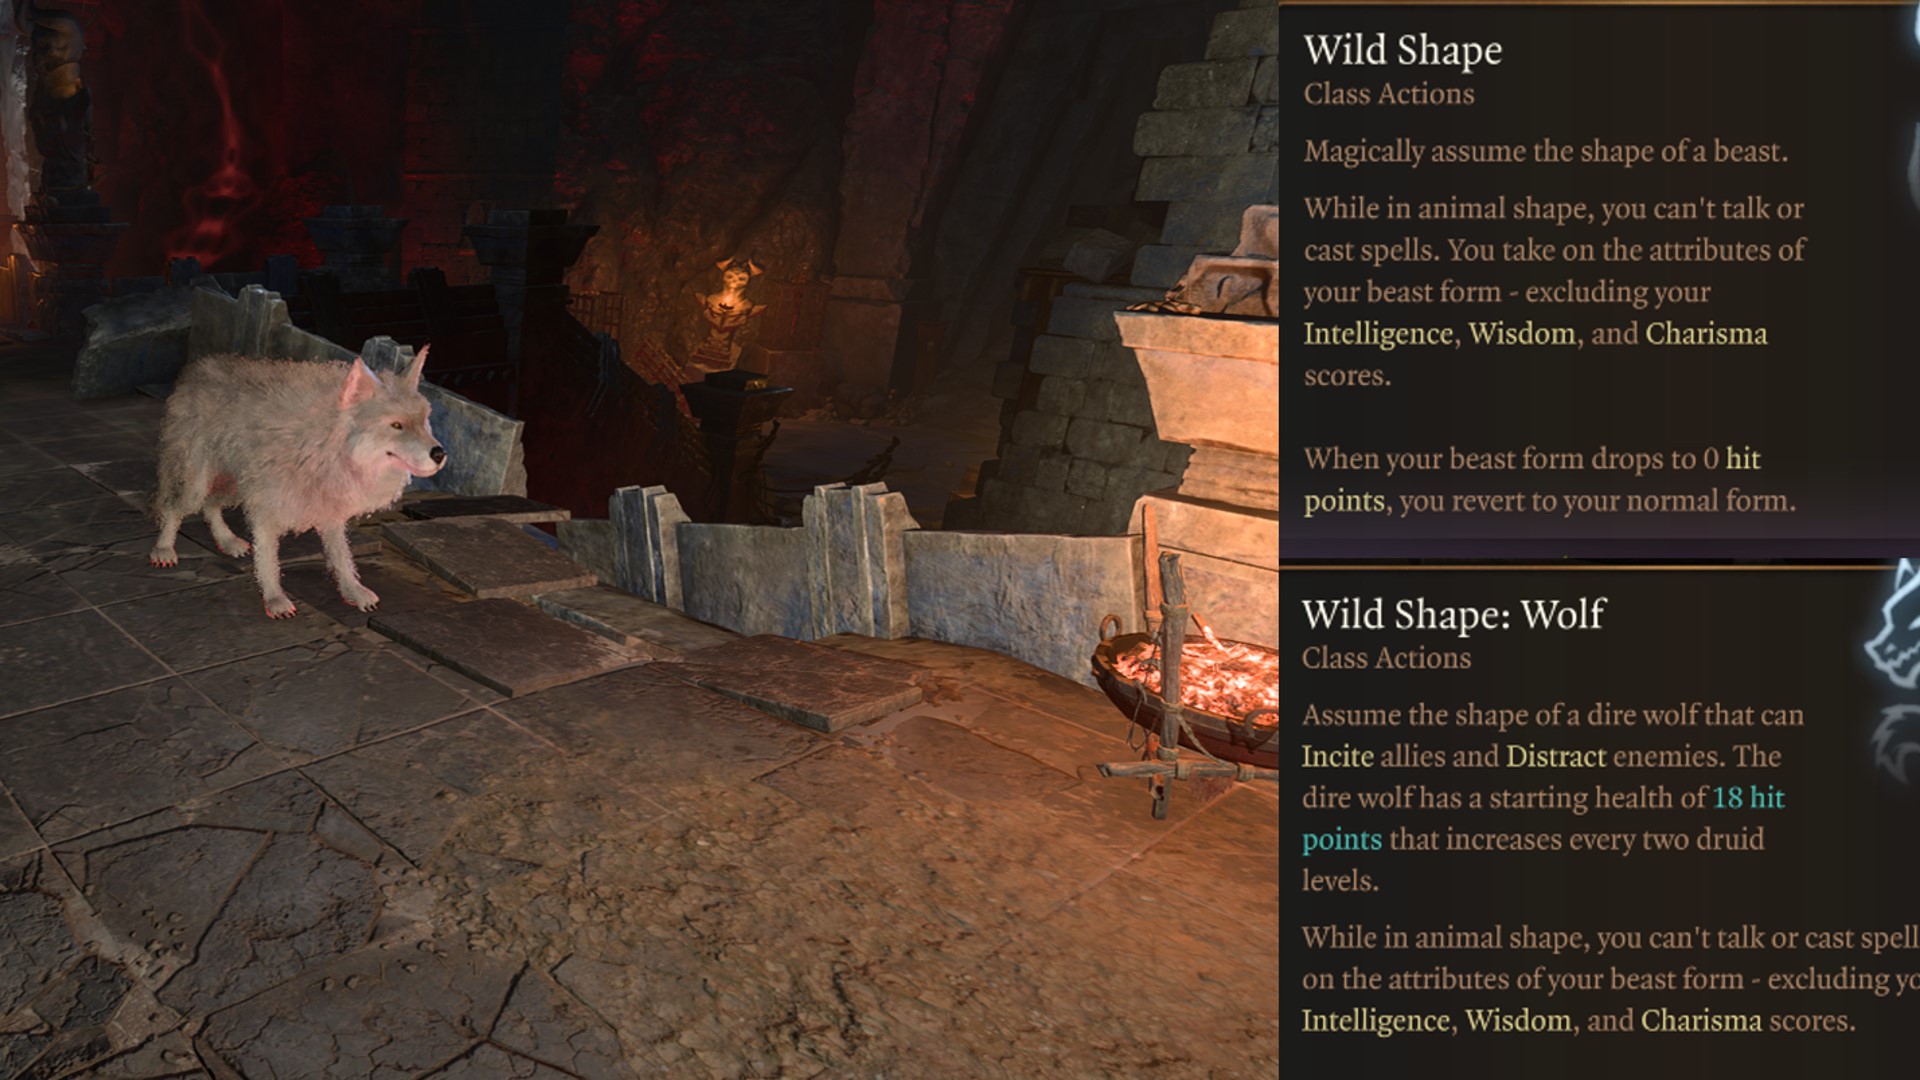
- Wolf – Take the shape of a Wolf that can leave enemies open to Critical Hits and increase allies’ Movement Speed.
Using Wildshape
With this build setup and subclass, you will have two charges of Wild Shape, which will transform you and use a bonus action rather than an action. Thus, you can cast a powerful spell with an action and wildshape in the same turn. Most likely, your mobility will be weak, so let the enemies come to you on turn one, and if they are in striking range then attack with Wild Shape.
Our favorite shape at this level is the Wolf. It plays in the melee range but has high damage and an 18 HP base, which increases every two druid levels. Remember that when you assume a Wild Shape form, your stats will be that of the animal including your health! Therefore, you can use Wild Shape as an additional health bar, which comes in handy when combat. Make sure to short rest after every combat engagement to recharge Wild Shape because you can use it twice in one combat battle, and playing solo, this will happen frequently.
Continue to use range attacks, close the distance, wild shapes, and attack with your favorite animal. We will start getting access to the powerful summons that aid in combat and make the build fun, unique, and powerful!
Level 3
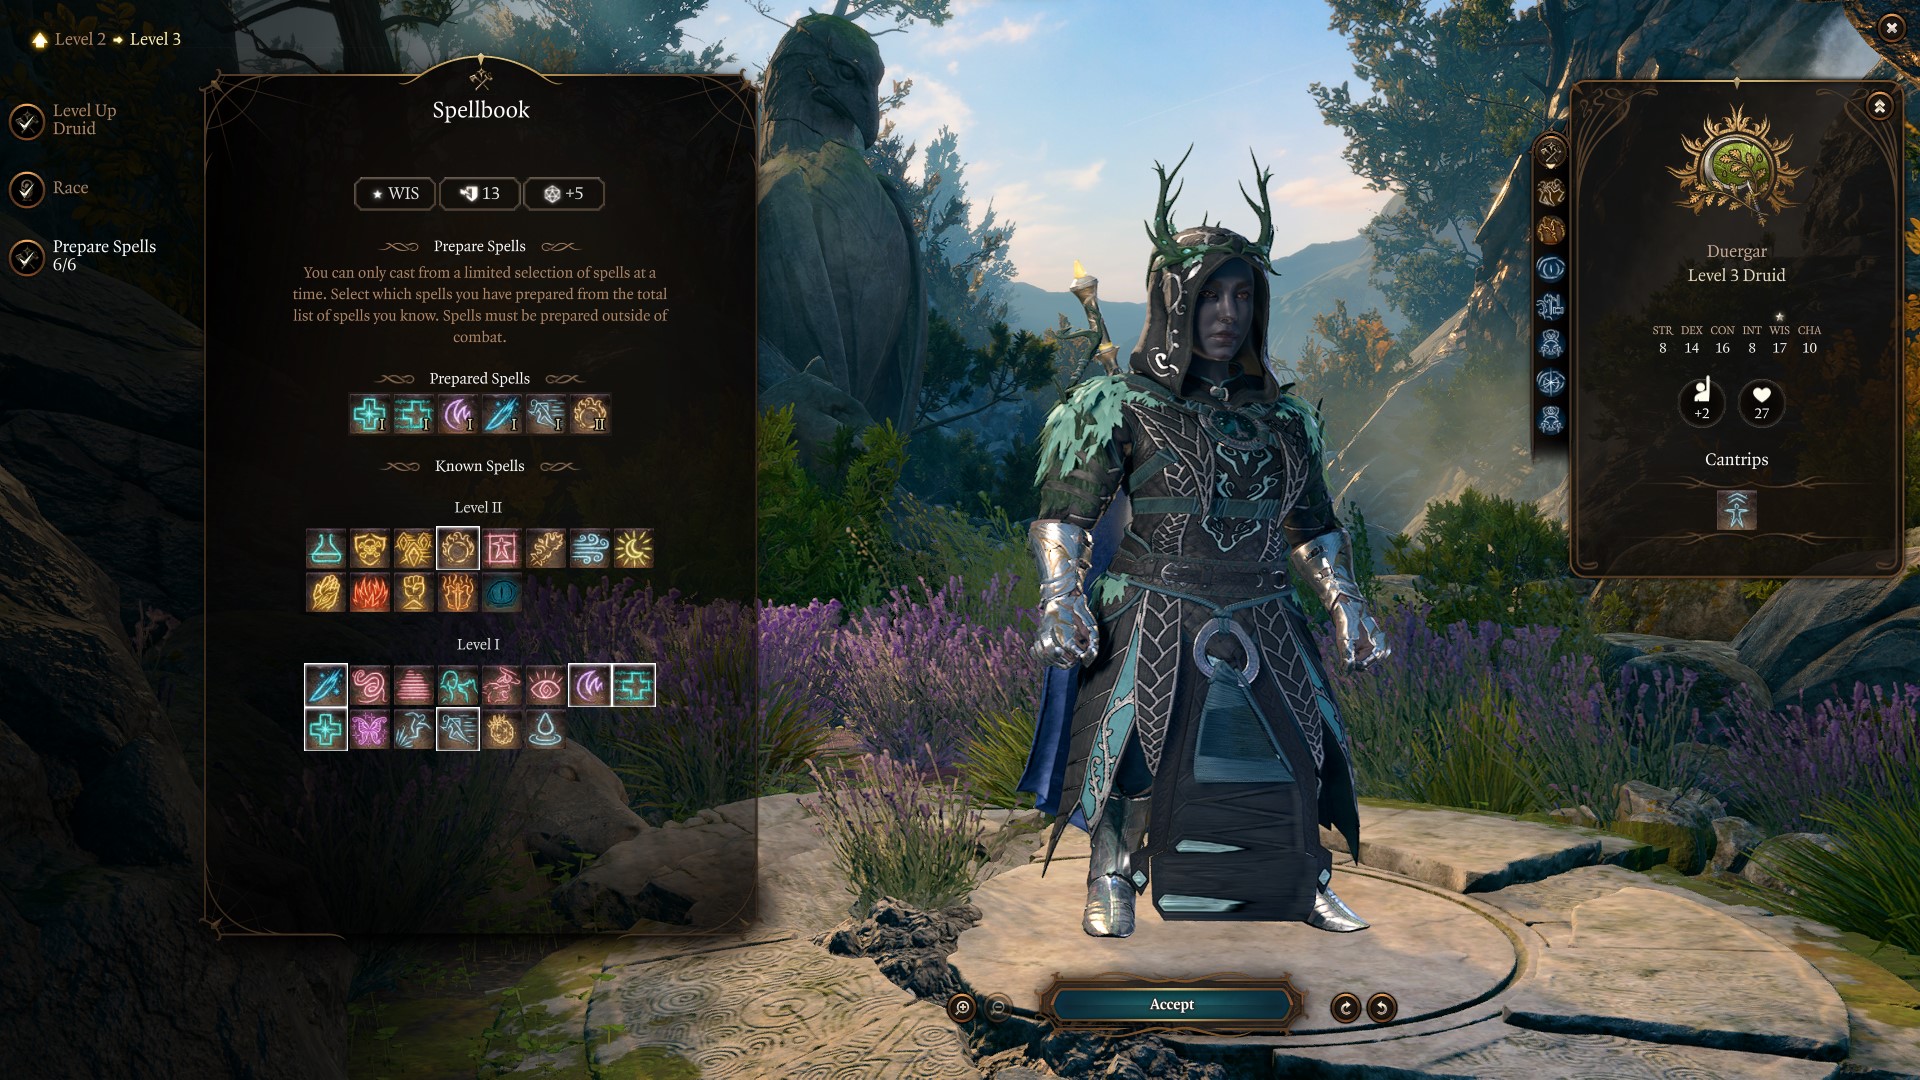
The Druid at level three unlocks the ability to cast level 2 spells along with more slots for level 1. You want to select the spell Flaming Sphere: Summon a flaming sphere that damages nearby enemies and objects.
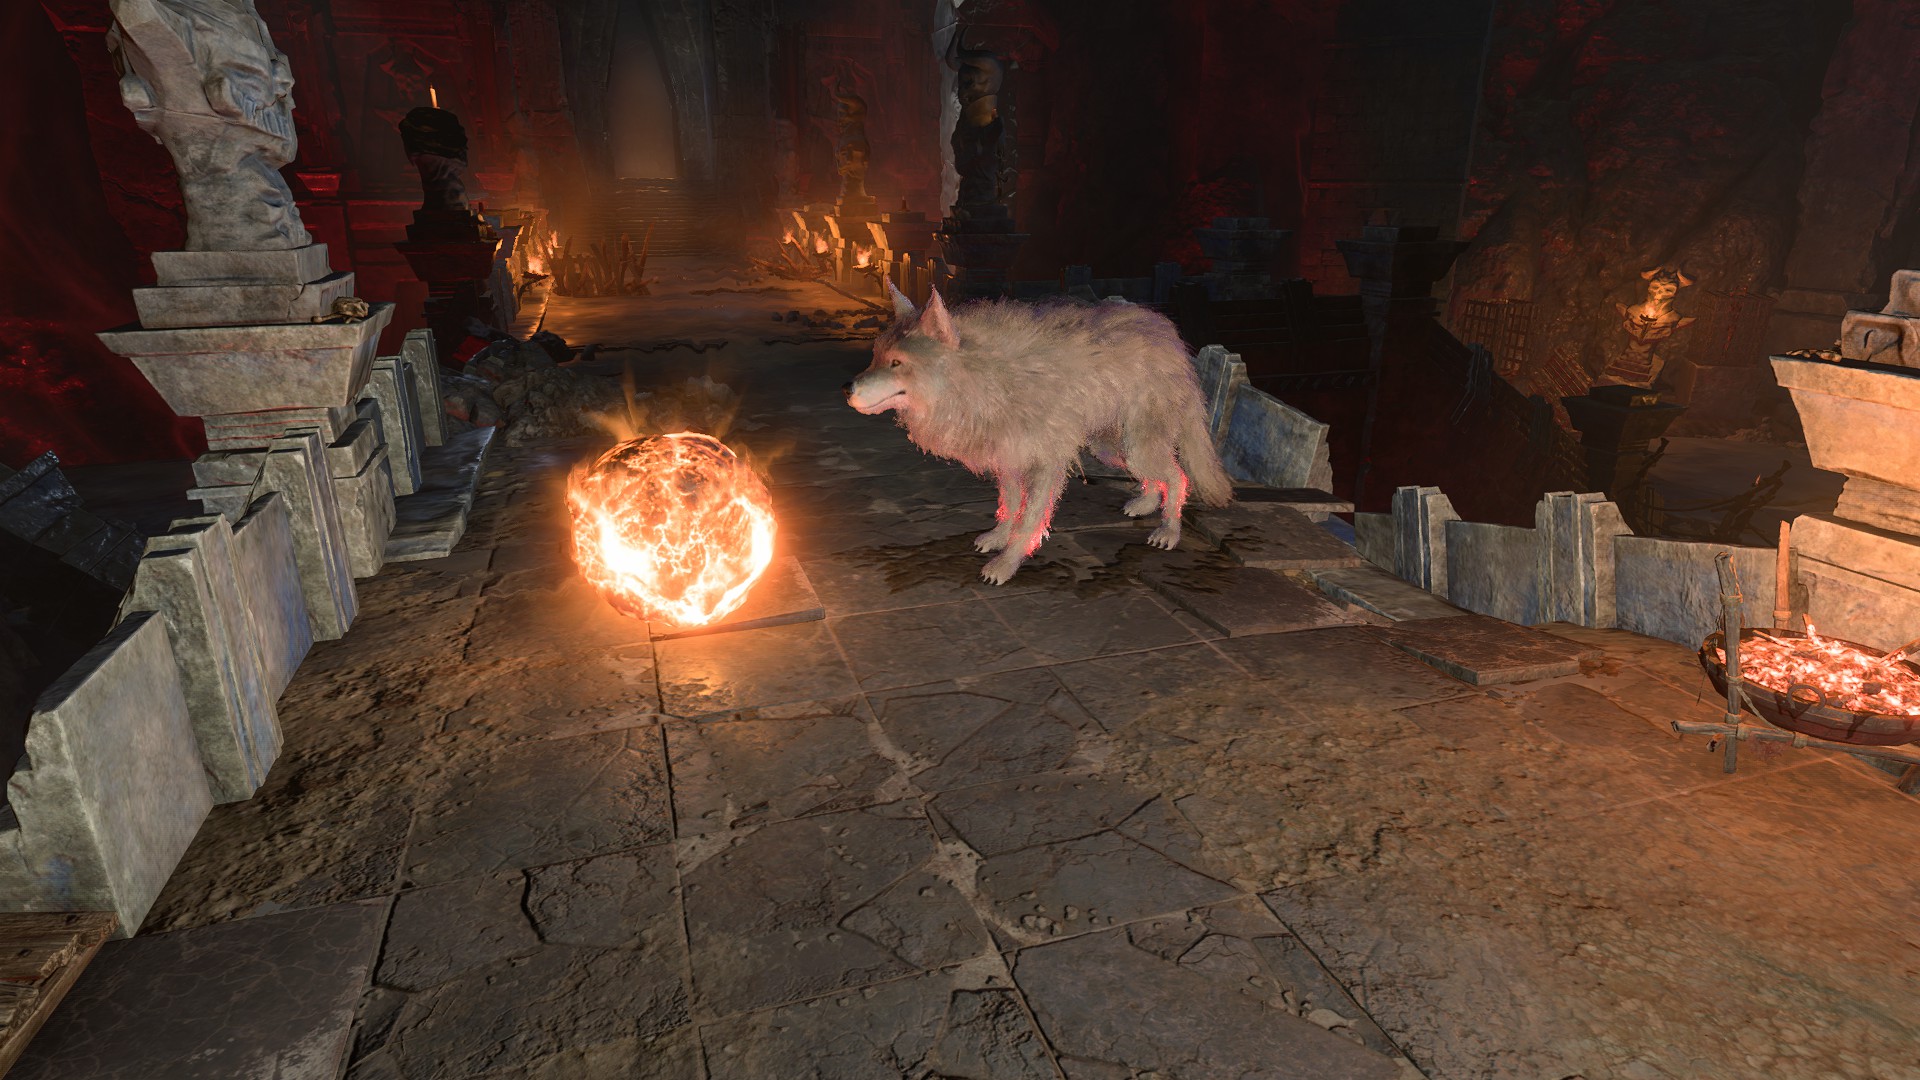
While Flaming Sphere doesn’t look impressive, it helps distract enemies and does a bit of damage itself. The sphere lasts 10 turns so you want to cast it outside of combat in turn base mode. Then, engage to get the maximum usage from its damage and health.
The Flaming Sphere spell also requires concentration, which you can only have one spell active at a time. Your concentration can be broken as well taking damage, which is based on your constitution score. At level 4, we will take a feat to aid in concentration saving throws because this summon is very helpful and should be your primary source of level 2 spells at the start of the game.
Lastly, this spell “stacks” with other summons we will unlock at later levels. Meaning, you can have multiple summonses very early and late in BG3. Early, you can have Scratch, Shovel, Flaming Sphere, and yourself for a solo build. This is helpful in challenging fights and is recommended.
Enlarge Duergar
If you choose the Duergar Dwarf subrace, you will gain the Enlarge spell. Weapons deal an extra 1d4 damage. It has an Advantage on Strength Checks and Saving throws. This can be helpful to use outside of combat though it does require concentration.
Level 4
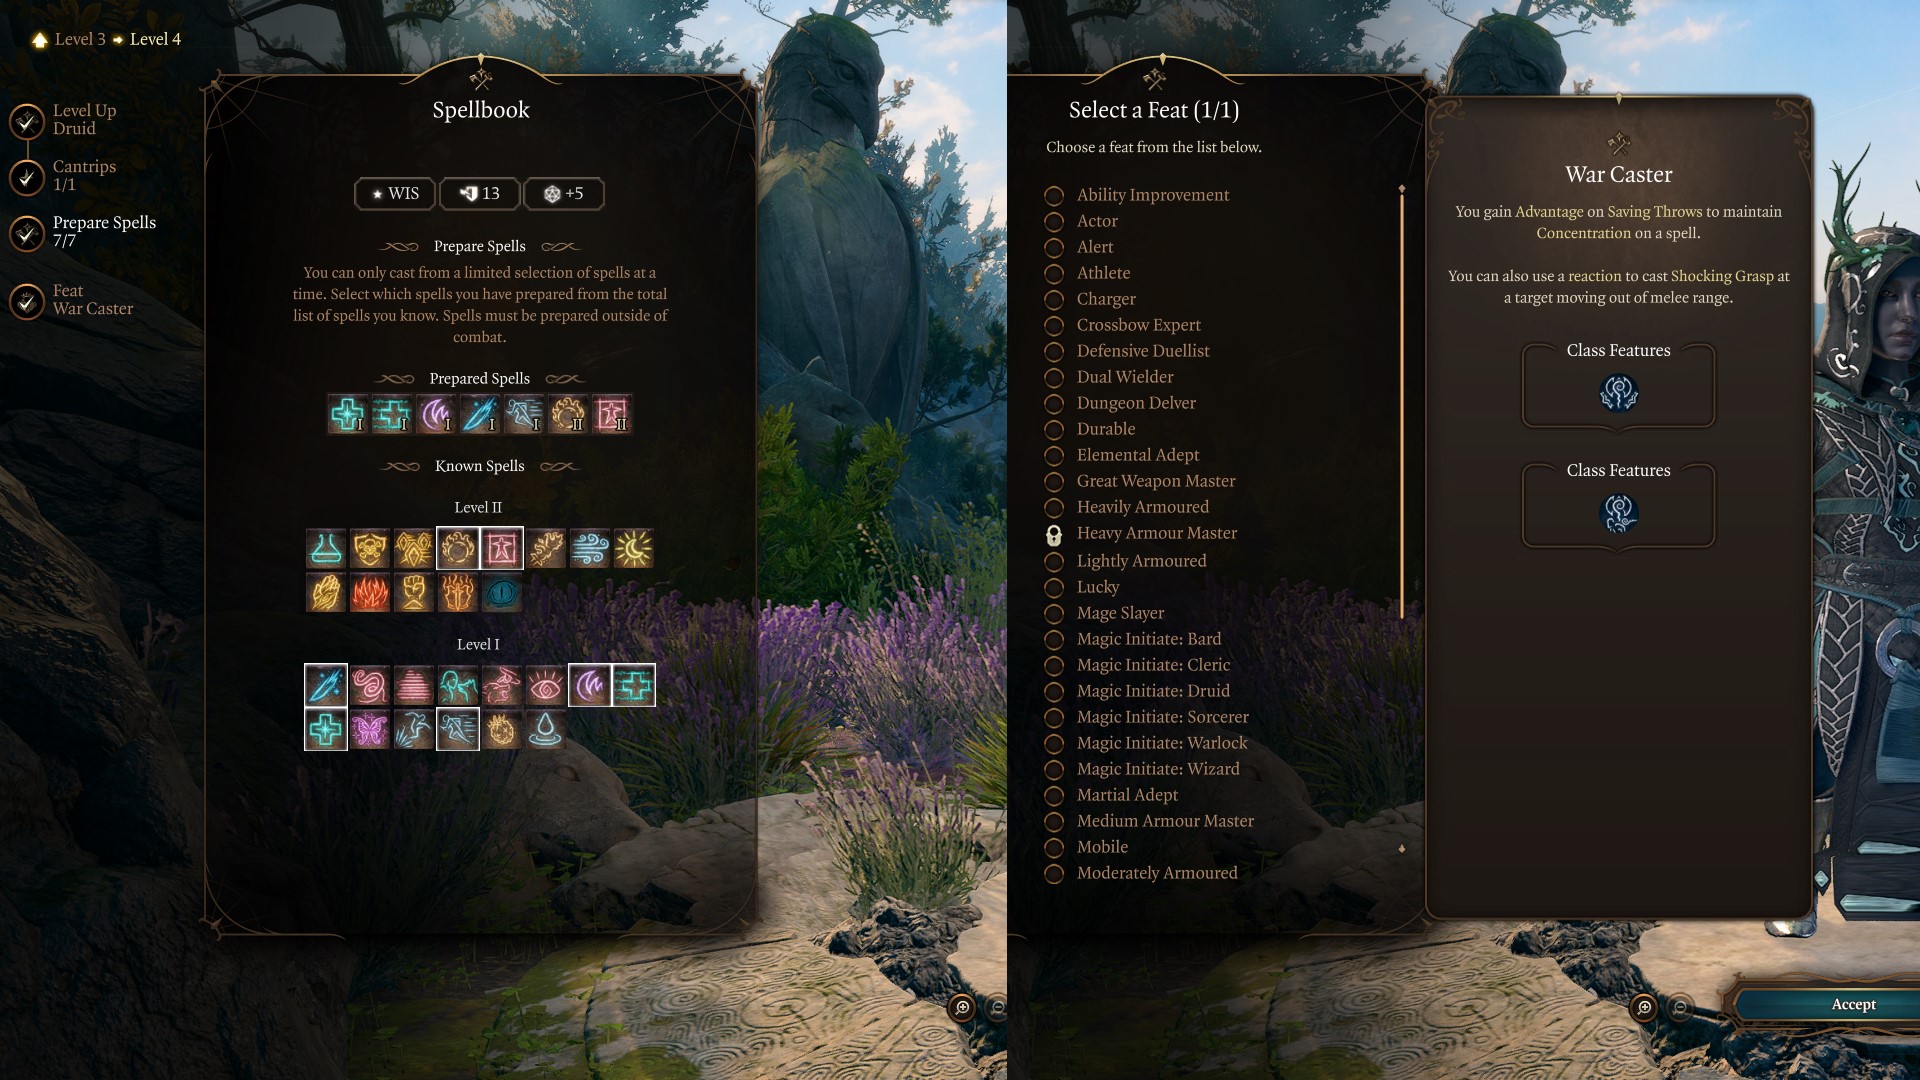
At level 4, the solo Druid will gain one cantrip, one new prepare spell, and select a feat. Below are our recommendations:
- Deep Rothé Wild Shape: Take the shape of a Deep Rothé that can charge and impale enemies.
- War Caster (feat selection): You gain an Advantage on Saving throws to maintain Concentration on a Spell. You can also use a Reaction to cast a Shocking Grasp at a target moving out of melee range.
- Hold Person (spell selection): Hold a humanoid enemy still. They can’t Move, Act, or React.
- Shillelagh: Your staff or club deals 1d8 + Wisdom Modifier Bludgeoning damage, and uses your Spellcasting Ability for Attack rolls.
Druid At Level 4
Level four is a big jump in power due to feat and new wild shape. Deep Rothe is your primary Wild Shape form now and what makes it powerful is the ability to stun targets with Charge ability. This is helpful to close the distance and also strip an enemy of a turn by knocking them prone.
War Caster feat helps keep concentration saving throws and is vital to our builds success. One spell in particular, Haste, which we can obtain through gear sets gives an additional action. However, if concentration is broken with Haste, you skip a turn and are likely to die or become near death.
Hold Person is a helpful single target stun when against humanoid enemies. Use this when facing someone who is high damage, and eliminate the other targets while they stay stationary. Lastly, Shillelagh allows you to use a Quarterstaff or Club for weapon damage using your Wisdom modifier. This is helpful at level 1, but won’t be a primary means of damage when we have wild shape.
Level 5
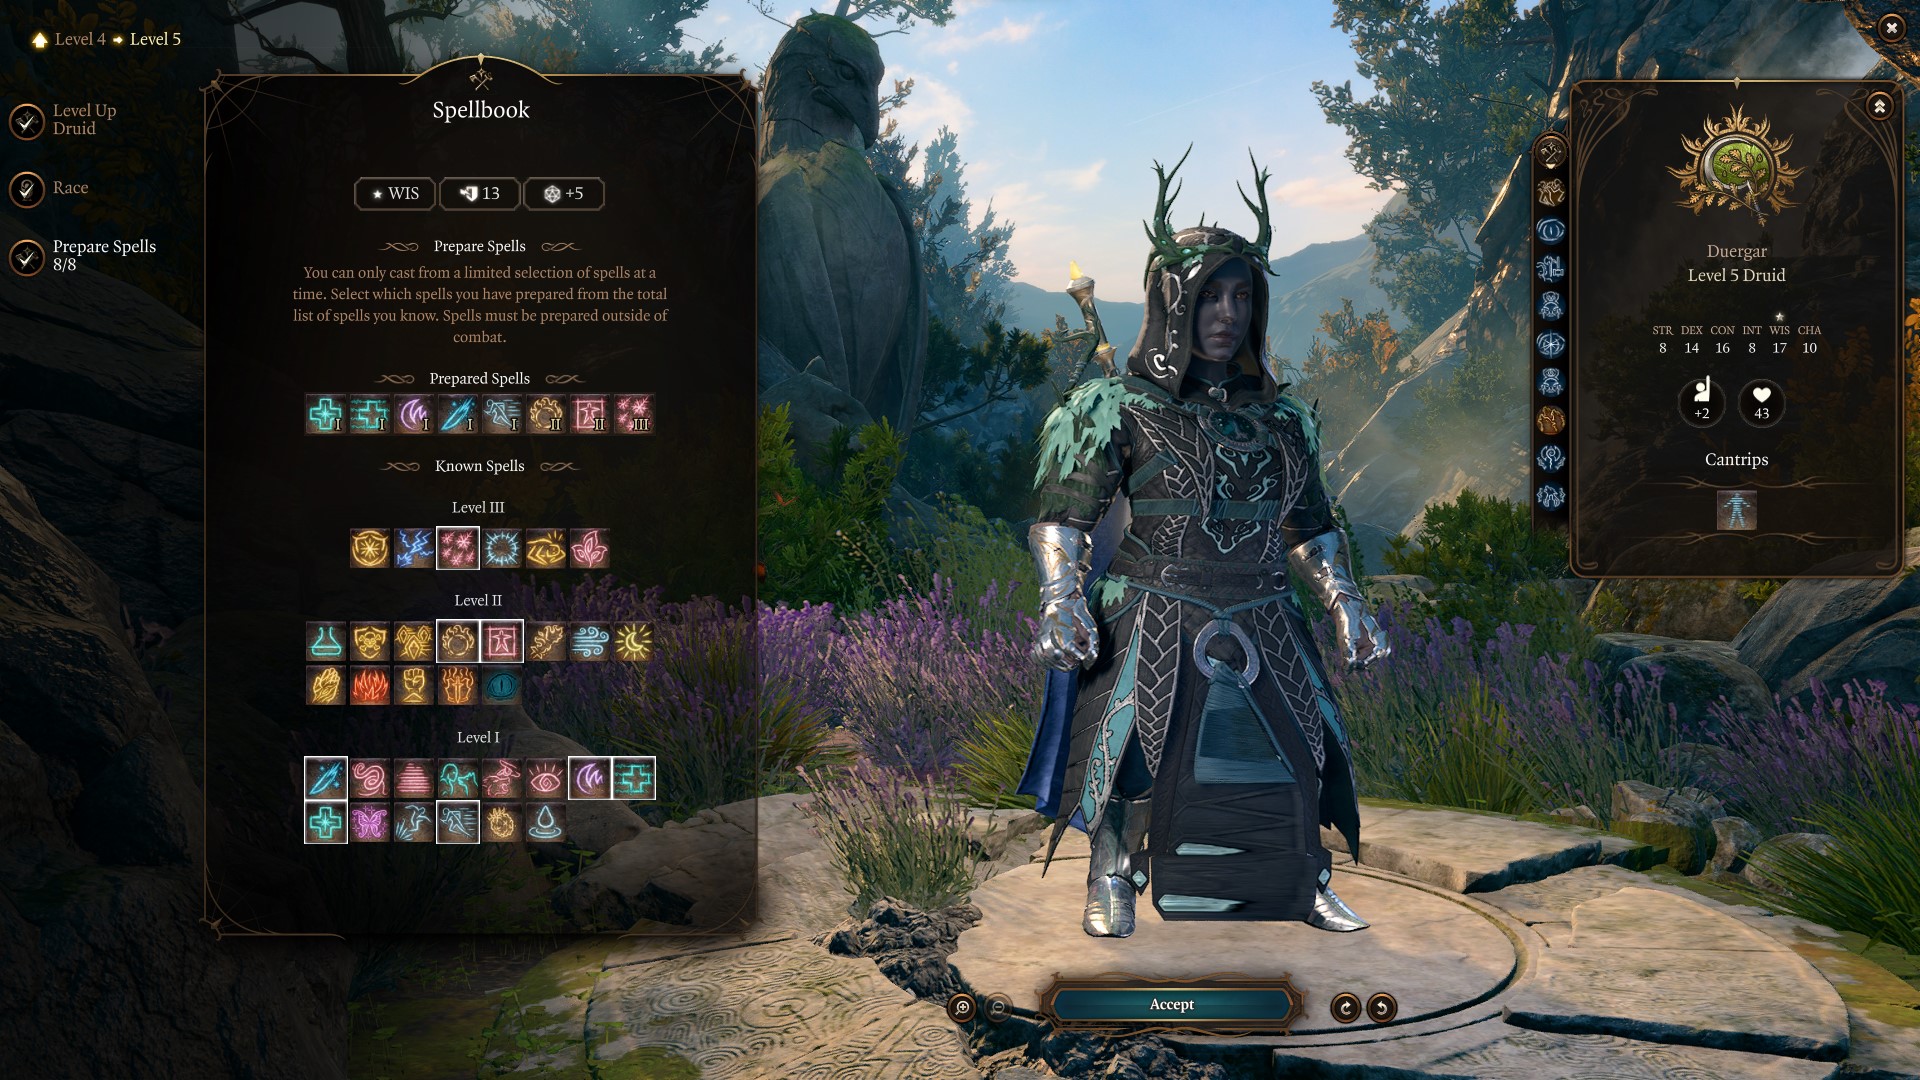
At level 5, you gain access to Wild Strike and level 3 spells.
- Sleet Storm (spell selection): Call forth a storm of sleet that douses fires, creates an ice surface, and disrupts the concentration of spellcasters
- Wild Strike: make an additional attack after making an unarmed strike while in Wild Shape.
For spell selections, Sleet Storm is the preferred choice due to its massive radius and stun potential with Ice/Prone status effect. Call of Lighting is useful on metal creatures and in particular fights, while both require concentration. Thus, it’s a good habit to cast one of these spells or Flaming Sphere on turn one. Moreover, Flaming Sphere should still be helpful at this level, but soon its power will fade so experiment with damage or crowd control spell.
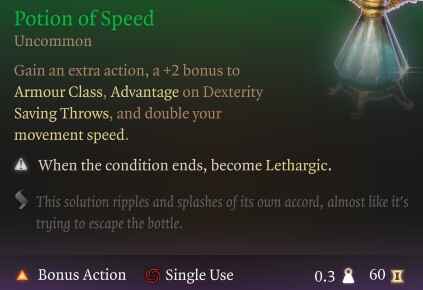
Gaining Wild Strike essentially gives you two attacks with one action. In challenging fights, make sure to consume Elixir of Bloodlust and Potion of Speed or Haste spell. This can give you up to 3 actions per turn, each with multiple attacks. This combination and stacking actions will radically increase your solo Druid’s combat power.
Duergar Invisibility
If you choose the Duergar Dwarf subrace, you will gain an invisibility spell. You can use this after exiting Wild Shape to space, or reposition though it does require concenration.
Level 6
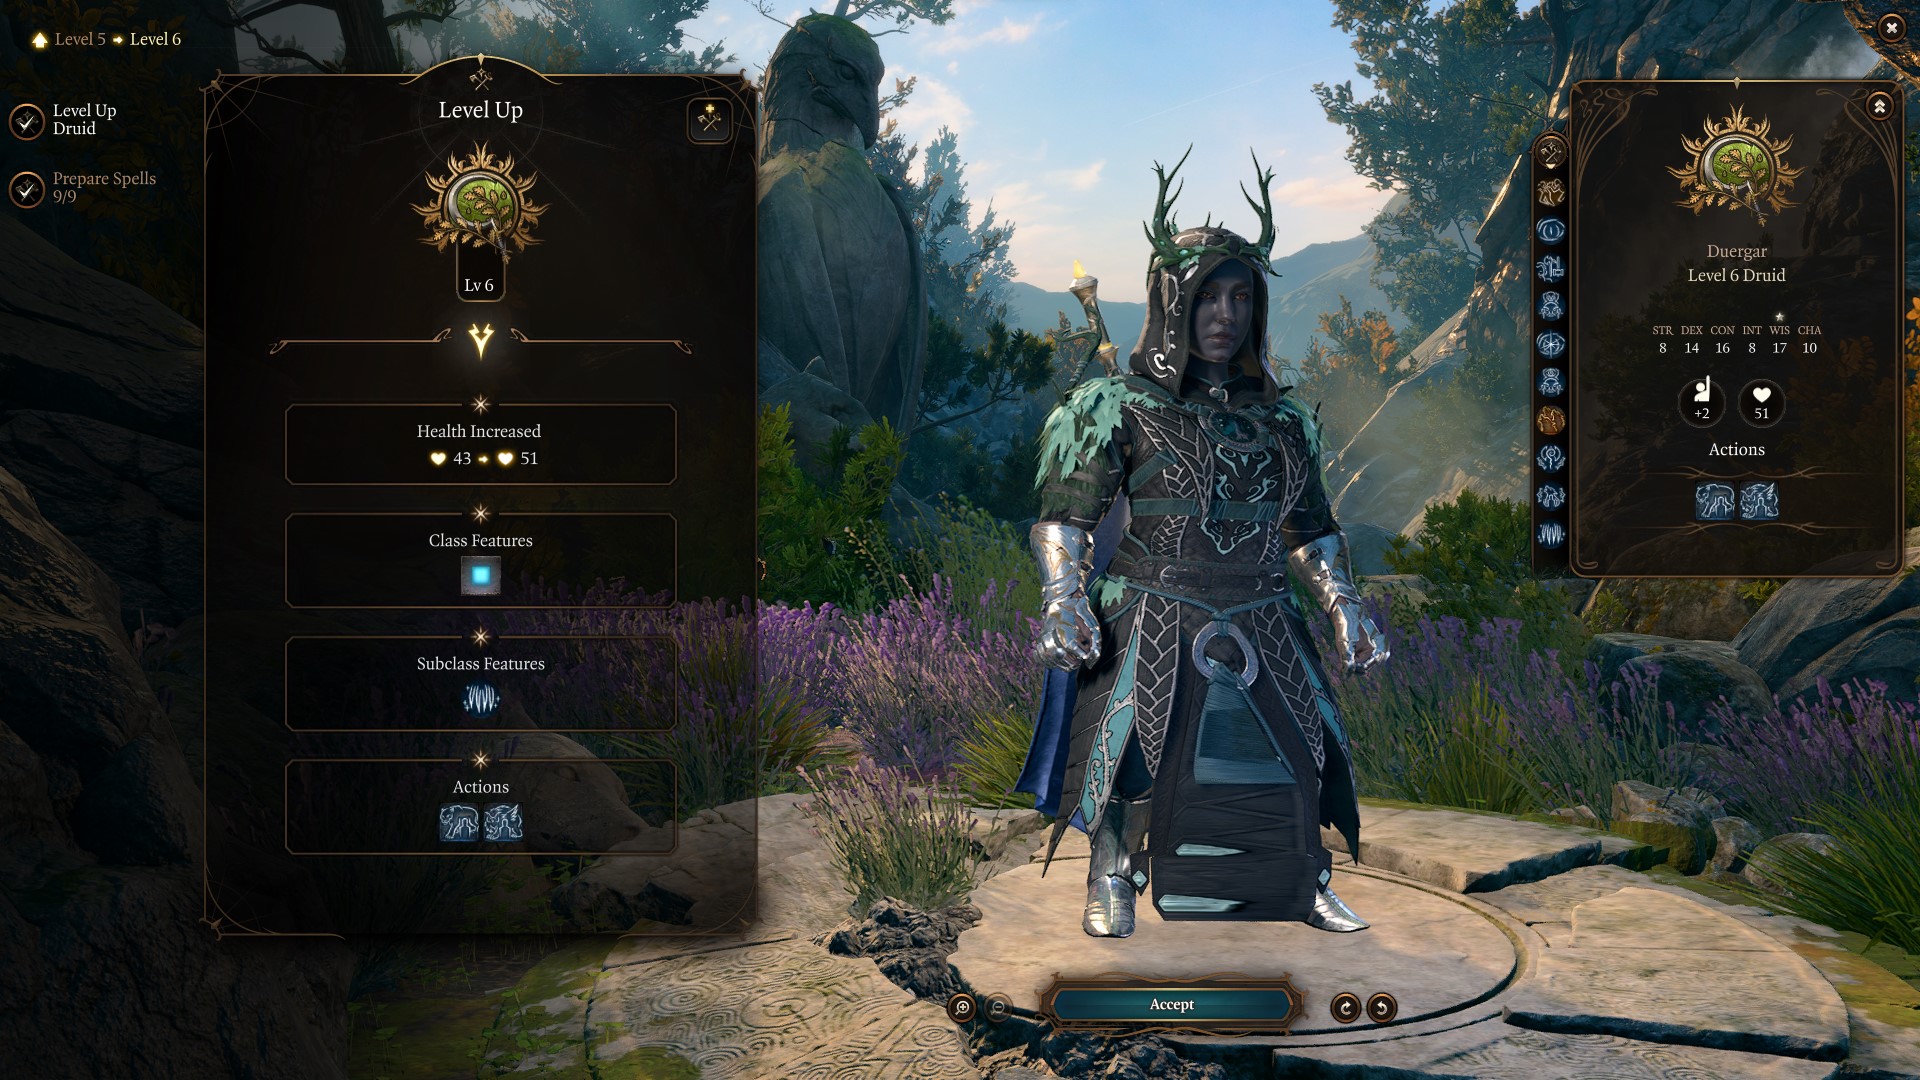
At level 6 you get one additional spell and two new forms.
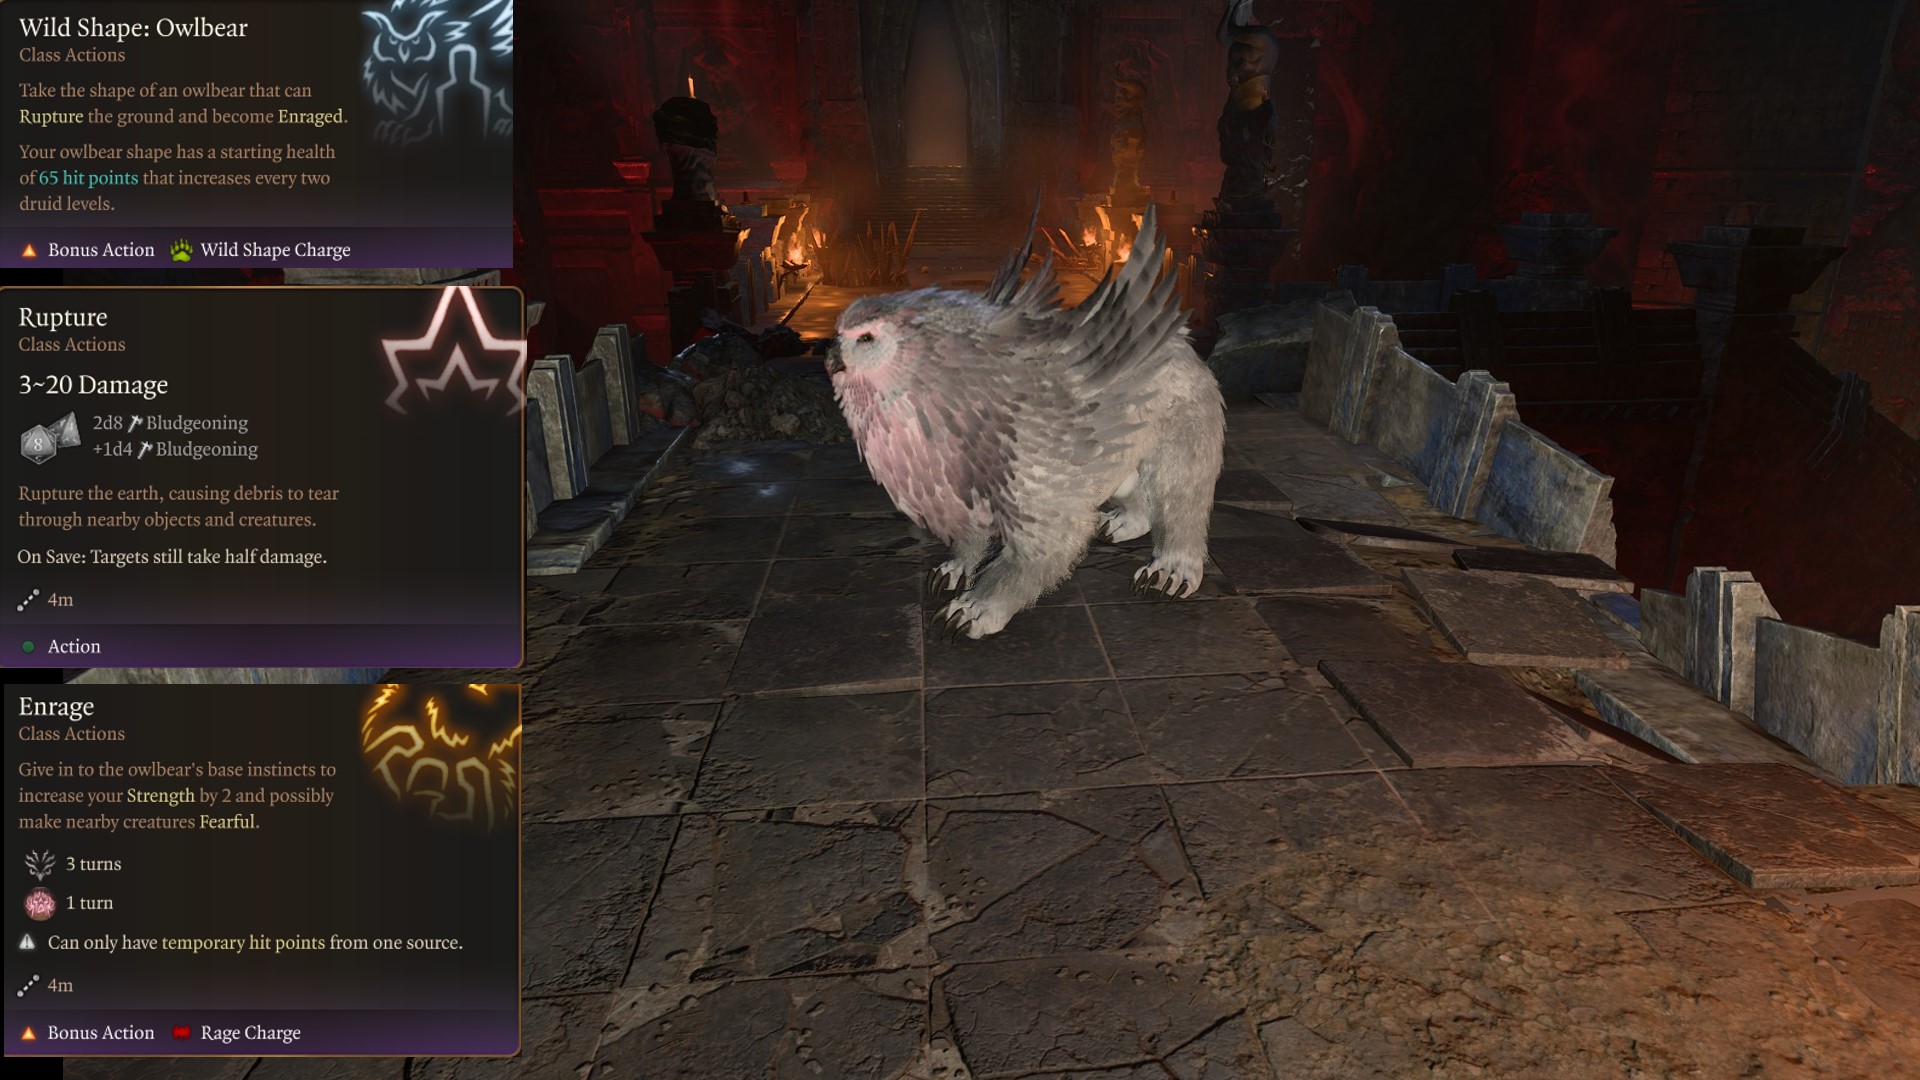
- Panther Wild Shape – Take the shape of a Panther that can prowl around invisibly.
- Owlbear Wild Shape – Take the shape of an Owlbear that can rupture the ground and become enraged.
- Primal Strike: While in beast form, your attacks count as magical for the purpose of overcoming resistance and immunity to non-magical damage.
- Plant Growth (spell selection): Make weeds burst from the ground and smother the area. Creatures moving through the weeds have their Movement Speed quartered.
You now gain access to two powerful Wild Shape forms. The Panther is ideal when trying to trigger the surprise status effect while invisible. You can Wild Shape outside of combat, enter turn base mode, and then go invisible with the Panther. You can then sneak through areas or attack your prey and possibly skip their first turn.
Owlbear acts as a powerful high health tank-type animal. You gain Crushing Flight which is a gap closer that can knock enemies prone in a massive area. Outside of stealth gameplay, Owlbear is our favorite due to its raw survivability, crowd control, and damage.
Level 7
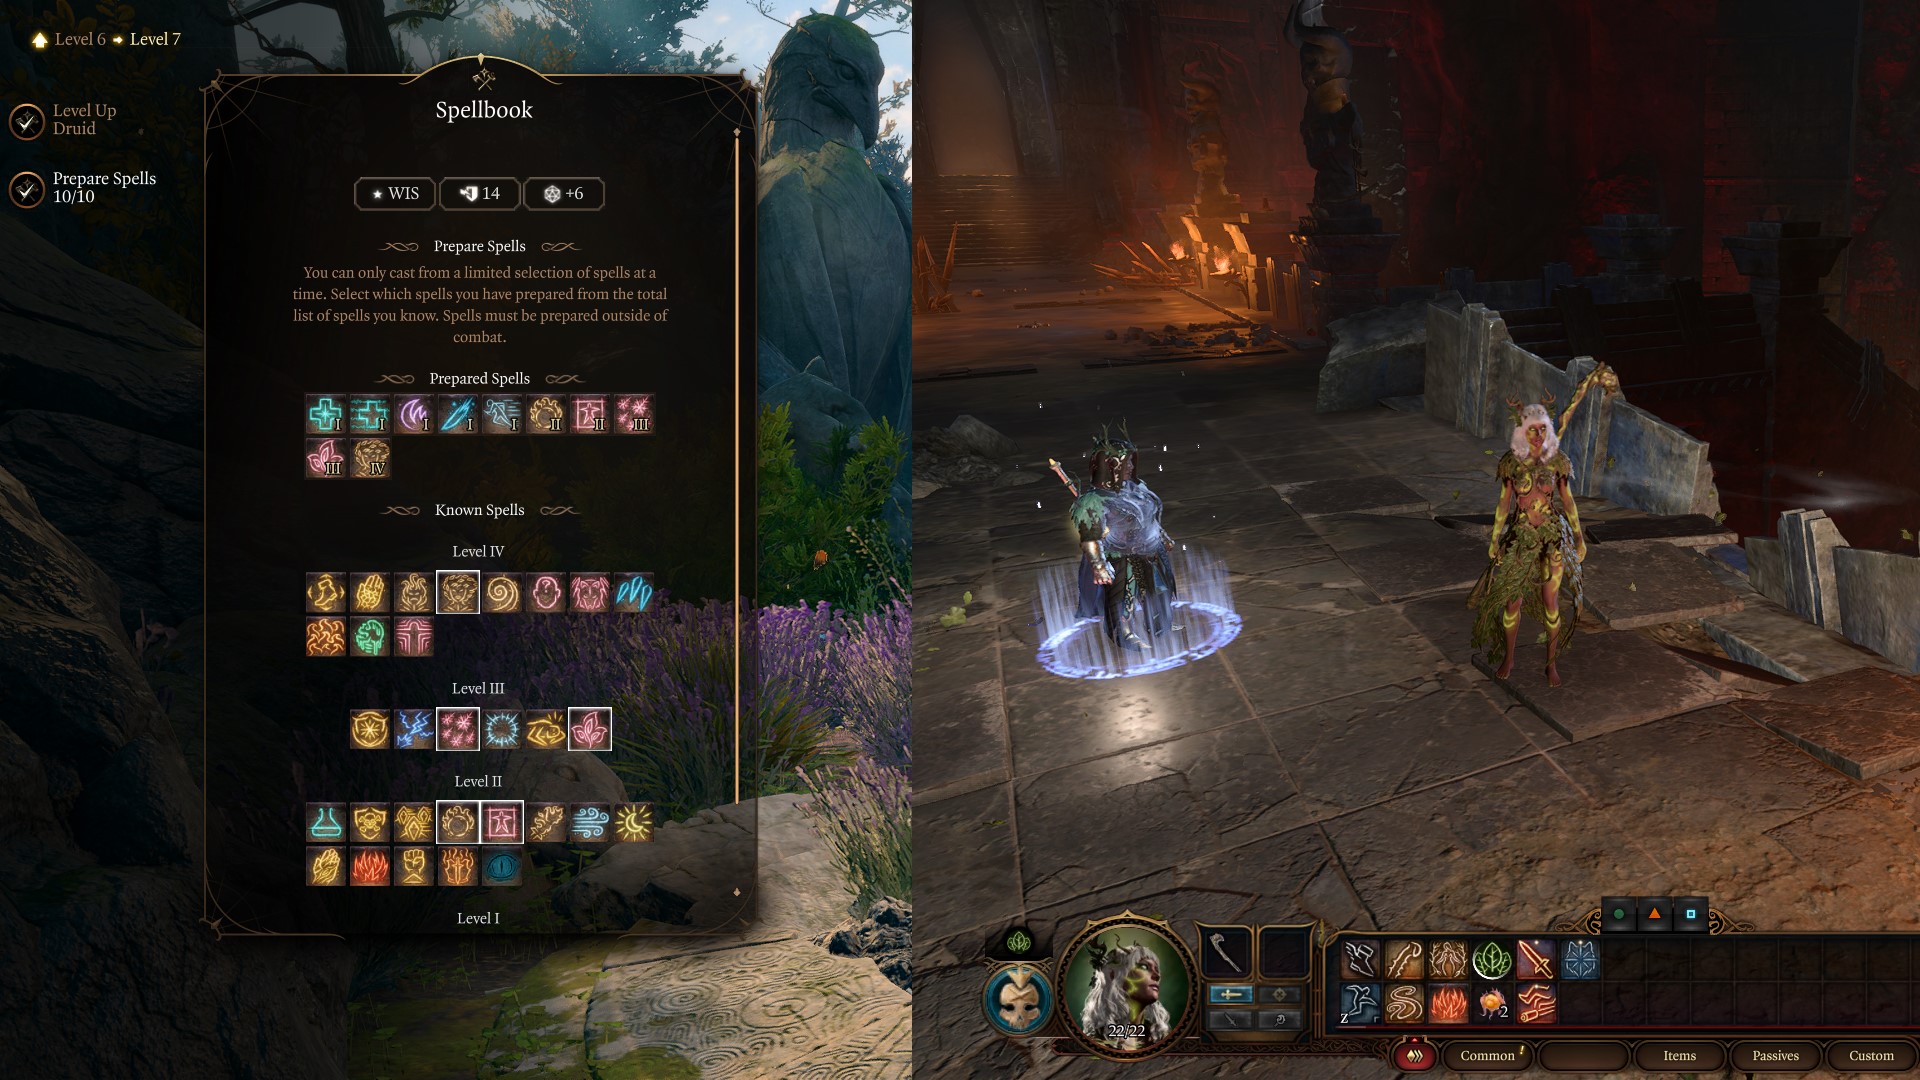
At level 7, look to select the spell Conjure Woodland Beings: summons a fey creature friendly. You can now begin stacking summoning creatures that aid you in combat. This spell is helpful because it persists while in Wild Form and aids you in combat along with creating a distraction. If you wish, you can skill cast Flaming Sphere as well in addition to this summon.
The Conjure spells in particular are useful because they do not require concenreation and last until a long rest. Thus, after every long rest, cast as many as you have to summon an army of allies at your disposal. If you don’t like using summons, take Ice Storm instead.
Level 8
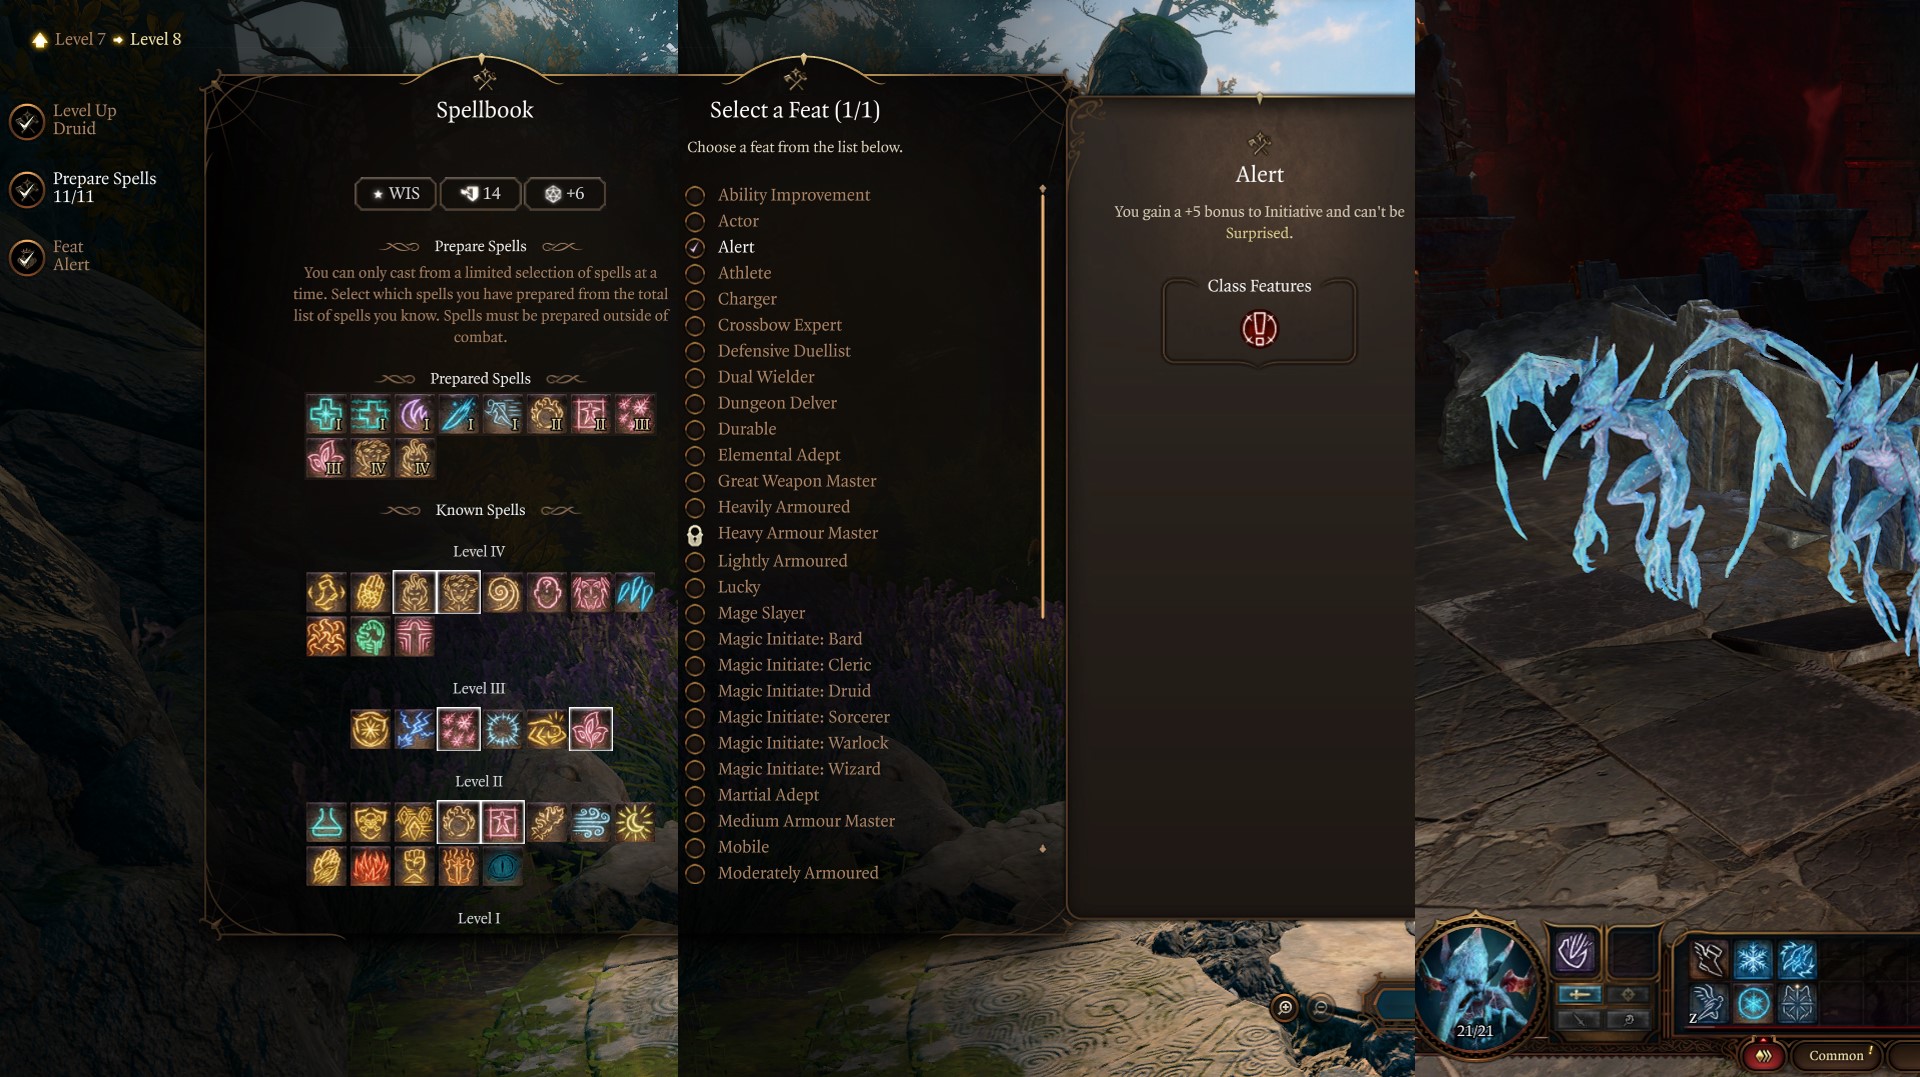
At level 8, the Solo Druid build unlocks another Wild Shape, feat selection, and spell.
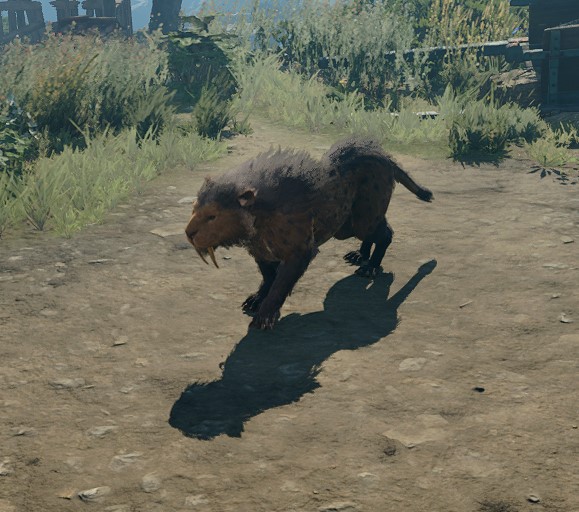
- Sabre-Toothed Tiger Wild Shape – Take the shape of a saber-toothed tiger that can Shred Armour and regenerate hit points.
- Alert (feat selection) – You gain +5 to Initiative and can no longer be surprised.
- Conjure Minor Elemental (spell selection) – Conjure a minor elemental to fight alongside you. Can select Azer, Ice Mephits, or Mud Mephits
Level 8 is another massive jump in power for the Solo Druid build. You gain Saber Tooth Tiger which is a higher damage-producing version of the Panther. Consider using this when you feel your survivability is high and don’t need crowd control of the Owlbear. The Alert feat seems weak, and you can choose Wisdom increase if you wish. However, in Act 2, you are constantly surprised which can end your game if playing honour mode when you cannot take a turn for two turns. Moreover, you are much more likely to go first and can cast spell wild shapes and eliminate enemies.
Lastly, you gain another summons and Minor Elemental our favorite is the Ice Mephits. These critters can stun enemies and create icy surfaces which is helpful crowd controlling enemies. Moreover, you can ram them into enemies and self-destruct for huge damage.
Level 9
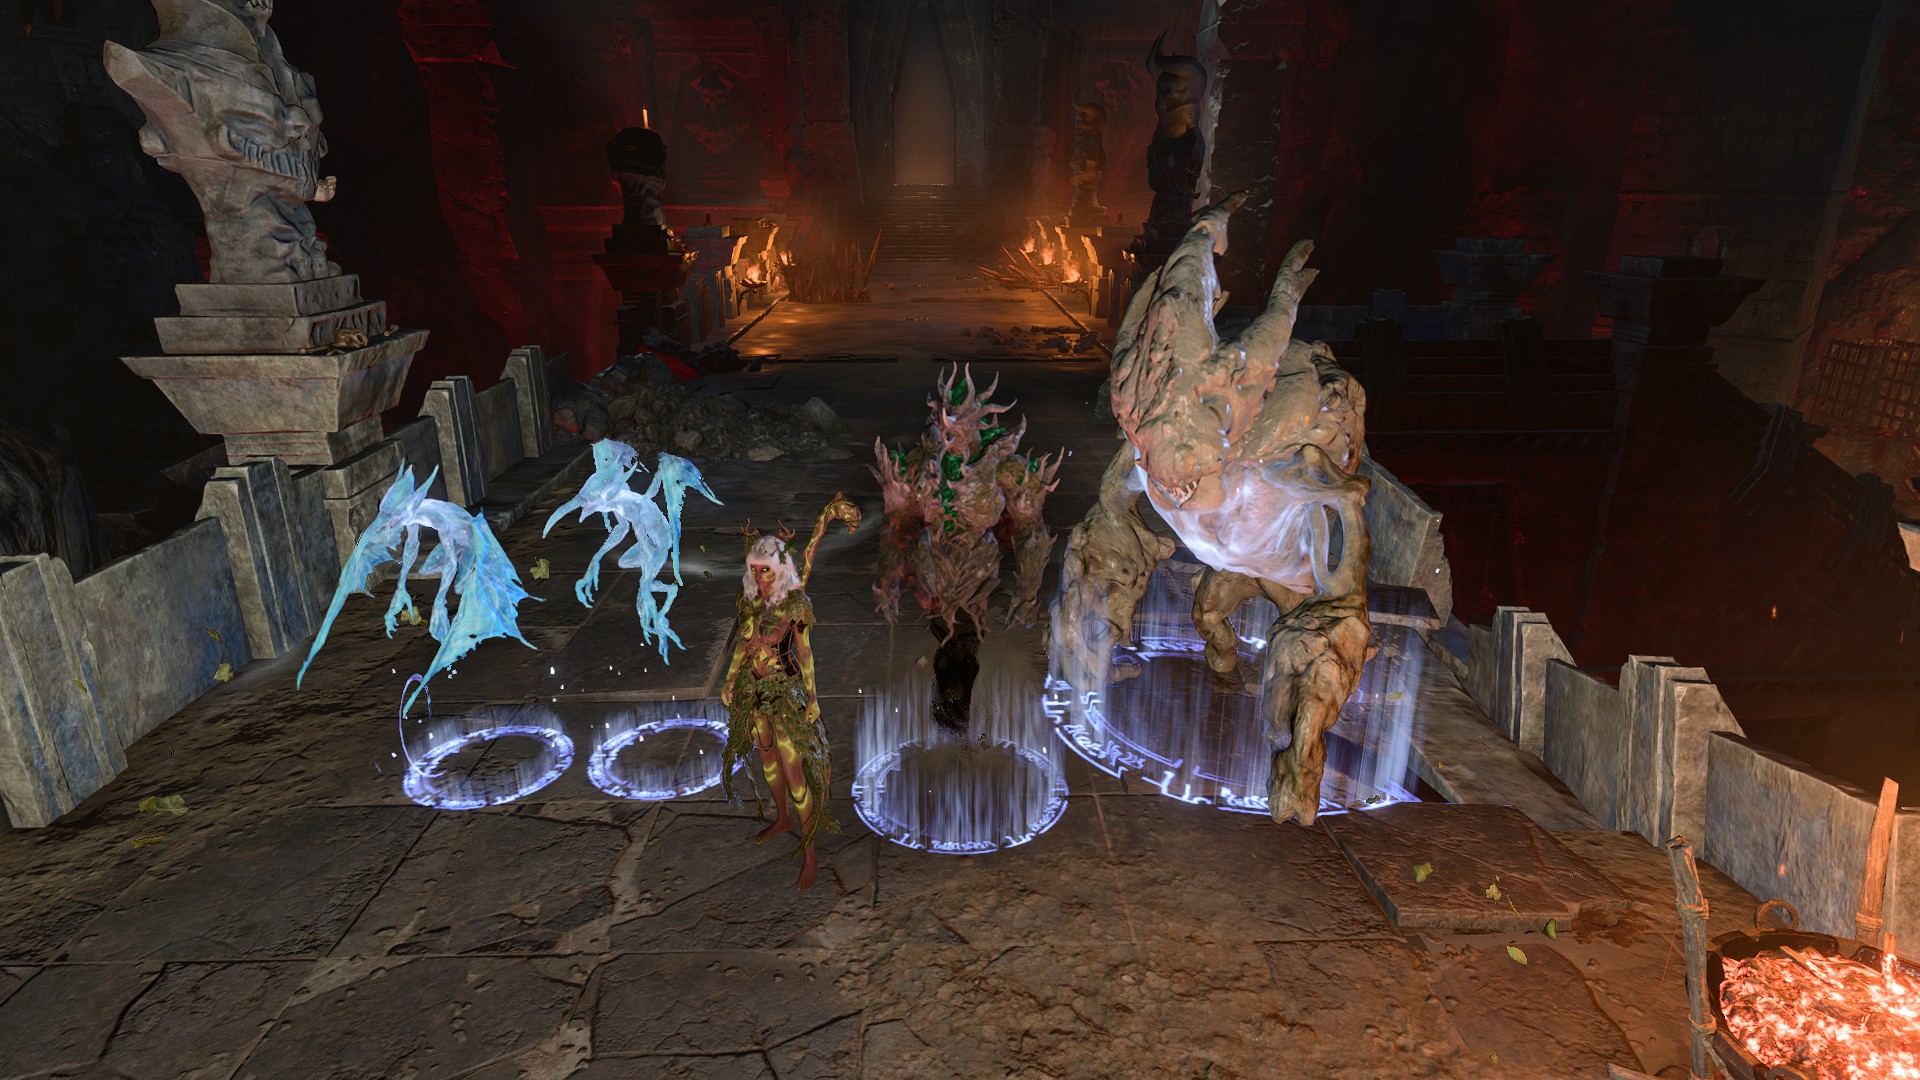
Level 9 features yet another conjuration spell, this time select Conjure Elemental: Bend the barrier between the Planes until they disgorge an elemental ally to follow and fight for you. This spell can be upcast as a level 6 spell and gain access to even more powerful summons. However, at this level, here are your choices:
- Earth Elemental: The earth elemental can use Seismic Strike, Soil-Clogged Slam, and can create sludgy mud surfaces while walloping your foes.
- Fire Elemental: The fire elemental can use Smouldering Touch, Erupting Cinder, and can make your foes Burn.
- Water Elemental: The water elemental can use Winter’s Breath, Slam, and can mete out cold punishment upon foes with its fists.
- Air Elemental: The air elemental can use Primordial Gales, Gushing Air, and can Shock your foes.
Elementals
The combat context determines which elemental you should summon. Overall, the Ice or Water elementals can help freeze and stun enemies. Fire is flashy, but the main enemies have fire resistance. Air is great overall and has strong abilities. Earth is the tank out of the bunch has a lot of health and makes a great distraction. We suggest using Earth if you are unfamiliar with a specific encounter to avoid elemental resistance.
Additionally, you can now summon 3 creatures to aid you in combat all lasting until a long rest!
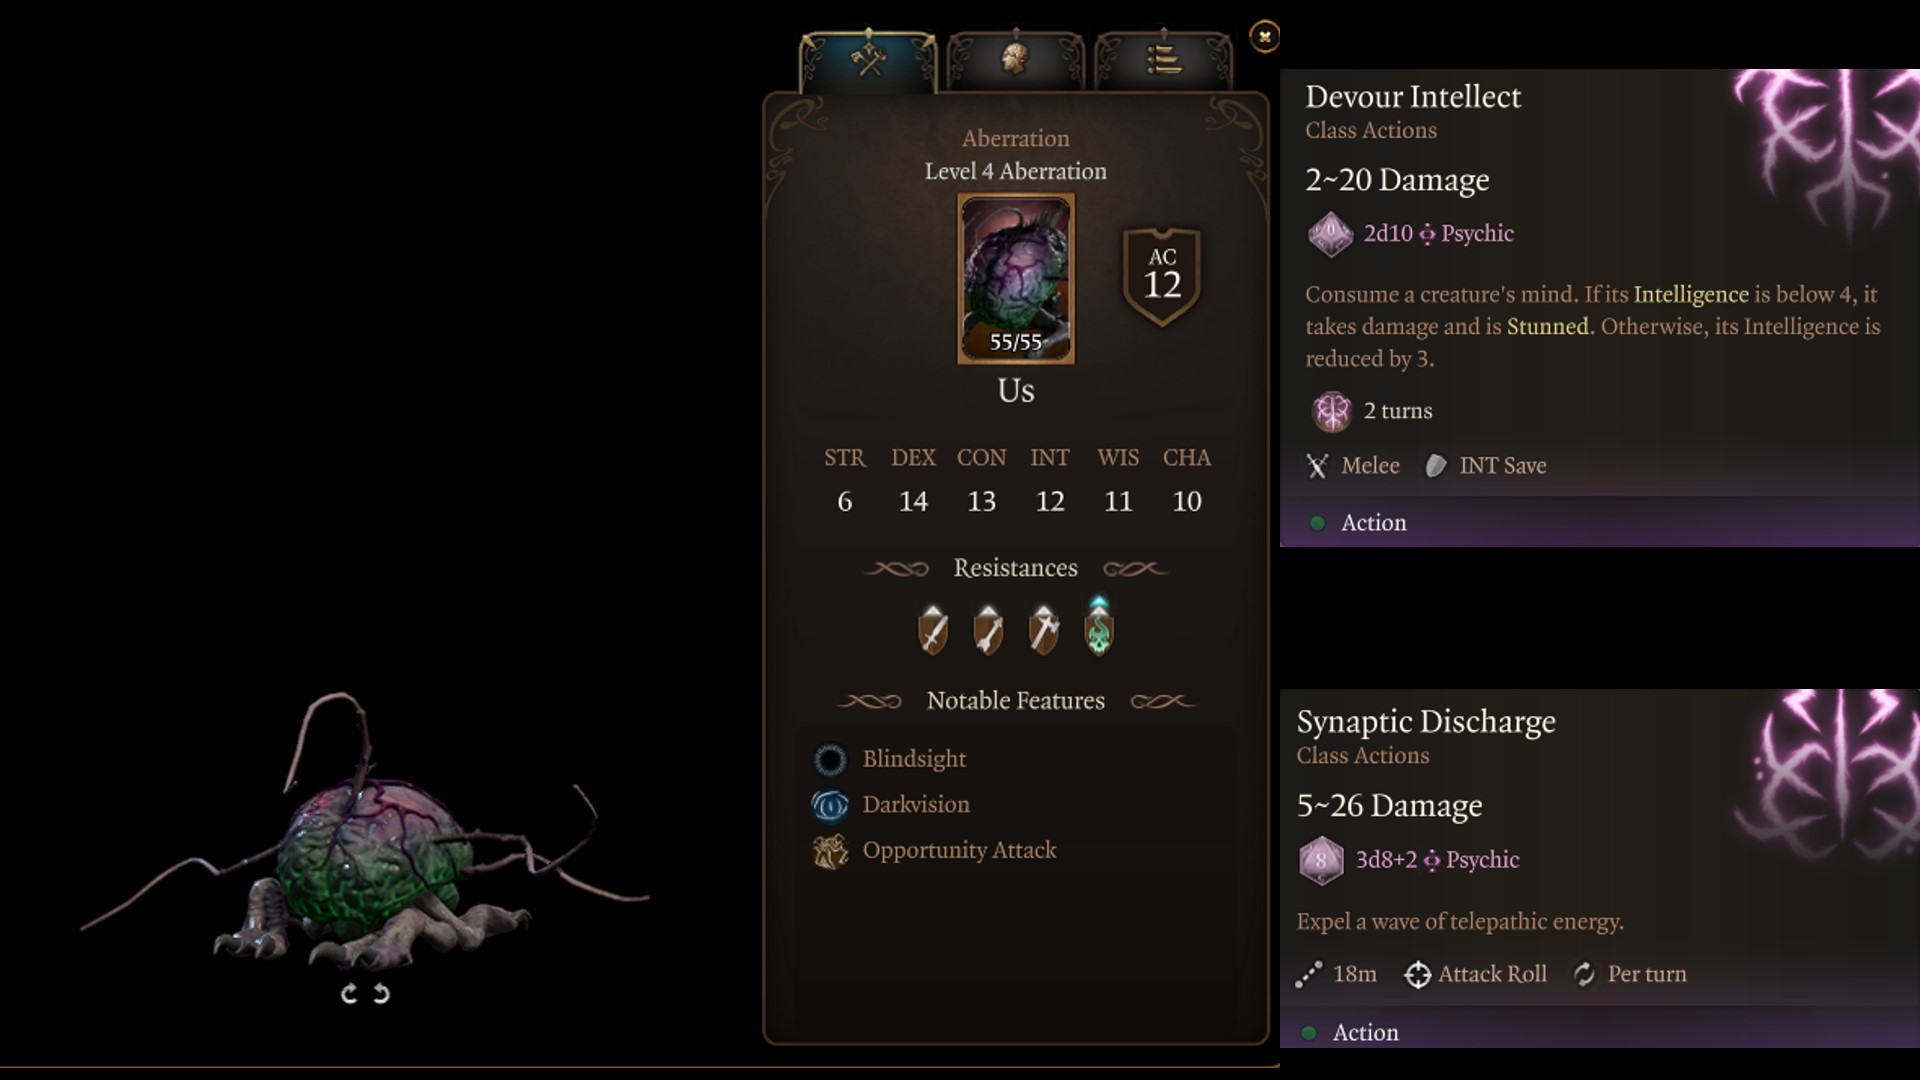
Level 10
At level 10, the Solo Druid gains their final Wild Shape form, Myrmidon. Also, select Ice Storm for a powerful area-based damage spell.
Myrmidon Wild Shape – choose between one of four Myrmidon elementals; Air, Earth, Fire, and Water.
- Air Myrmidon – Your air myrmidon shape has a starting health of 90 hit points. It can cast Invisibility, Electrified Flail, and Raging Vortex.
- Earth Myrmidon – Your earth myrmidon shape has a starting health of 103 hit points. It can cast Muck to Metal, Sludgy Sling, and Burrow.
- Fire Myrmidon – Your fire myrmidon shape has a starting health of 90 hit points. It can cast Scorching Strike, Myrmidon’s Immolation, and Cinderous Swipe.
- Water Myrmidon – Your water myrmidon shape has a starting health of 90 hit points. It can cast Hiemal Strike, Healing Vapours, and Explosive Icicle.
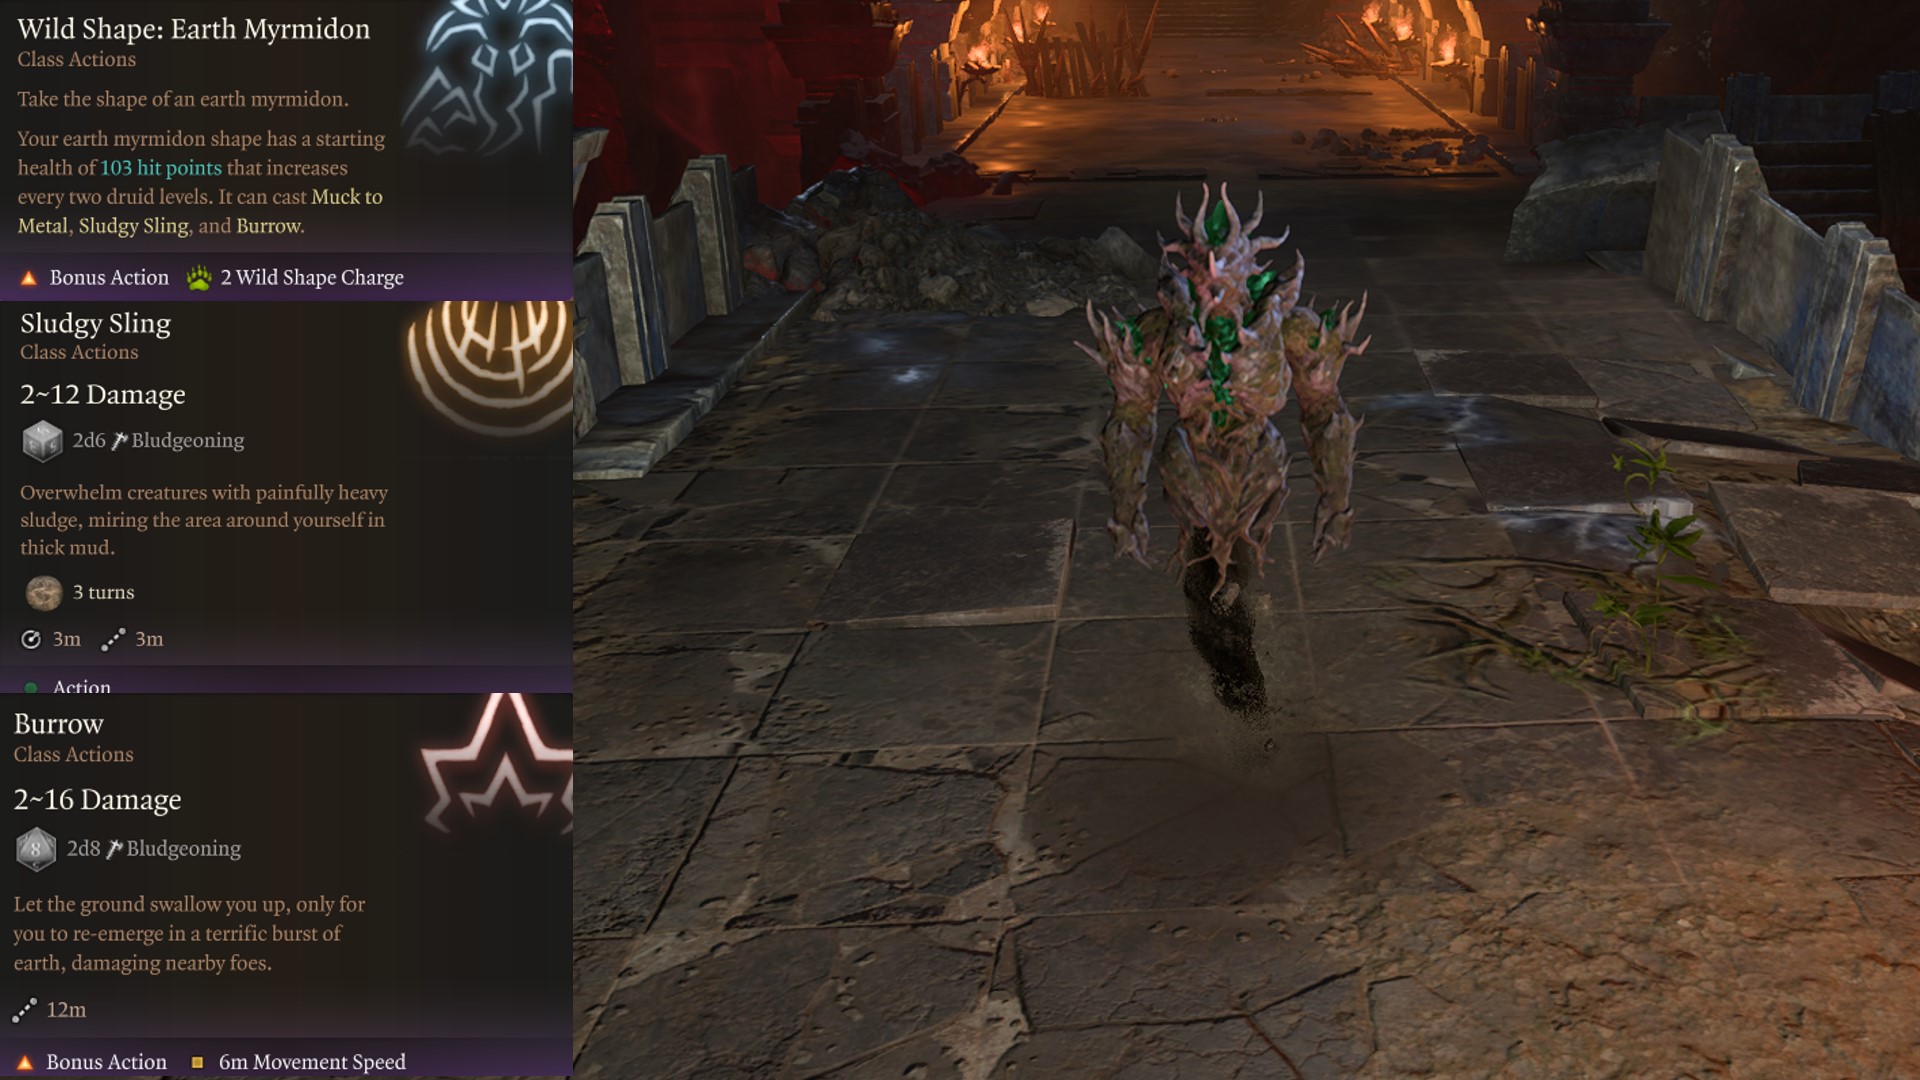
Similar to our suggestion at level 9, the type of Myrmidon will be determined by the enemies you intend to face, if they have resistances, or if you are familiar with them. The Earth Myrmidon is the safest due to its high health and area damage abilities. Water is a secondary choice due to its healing and stunning ability. Air is powerful because you can use Invisibility and start combat off by surprising the enemies. Fire can be good if the enemy doesn’t have resistance.
Level 11
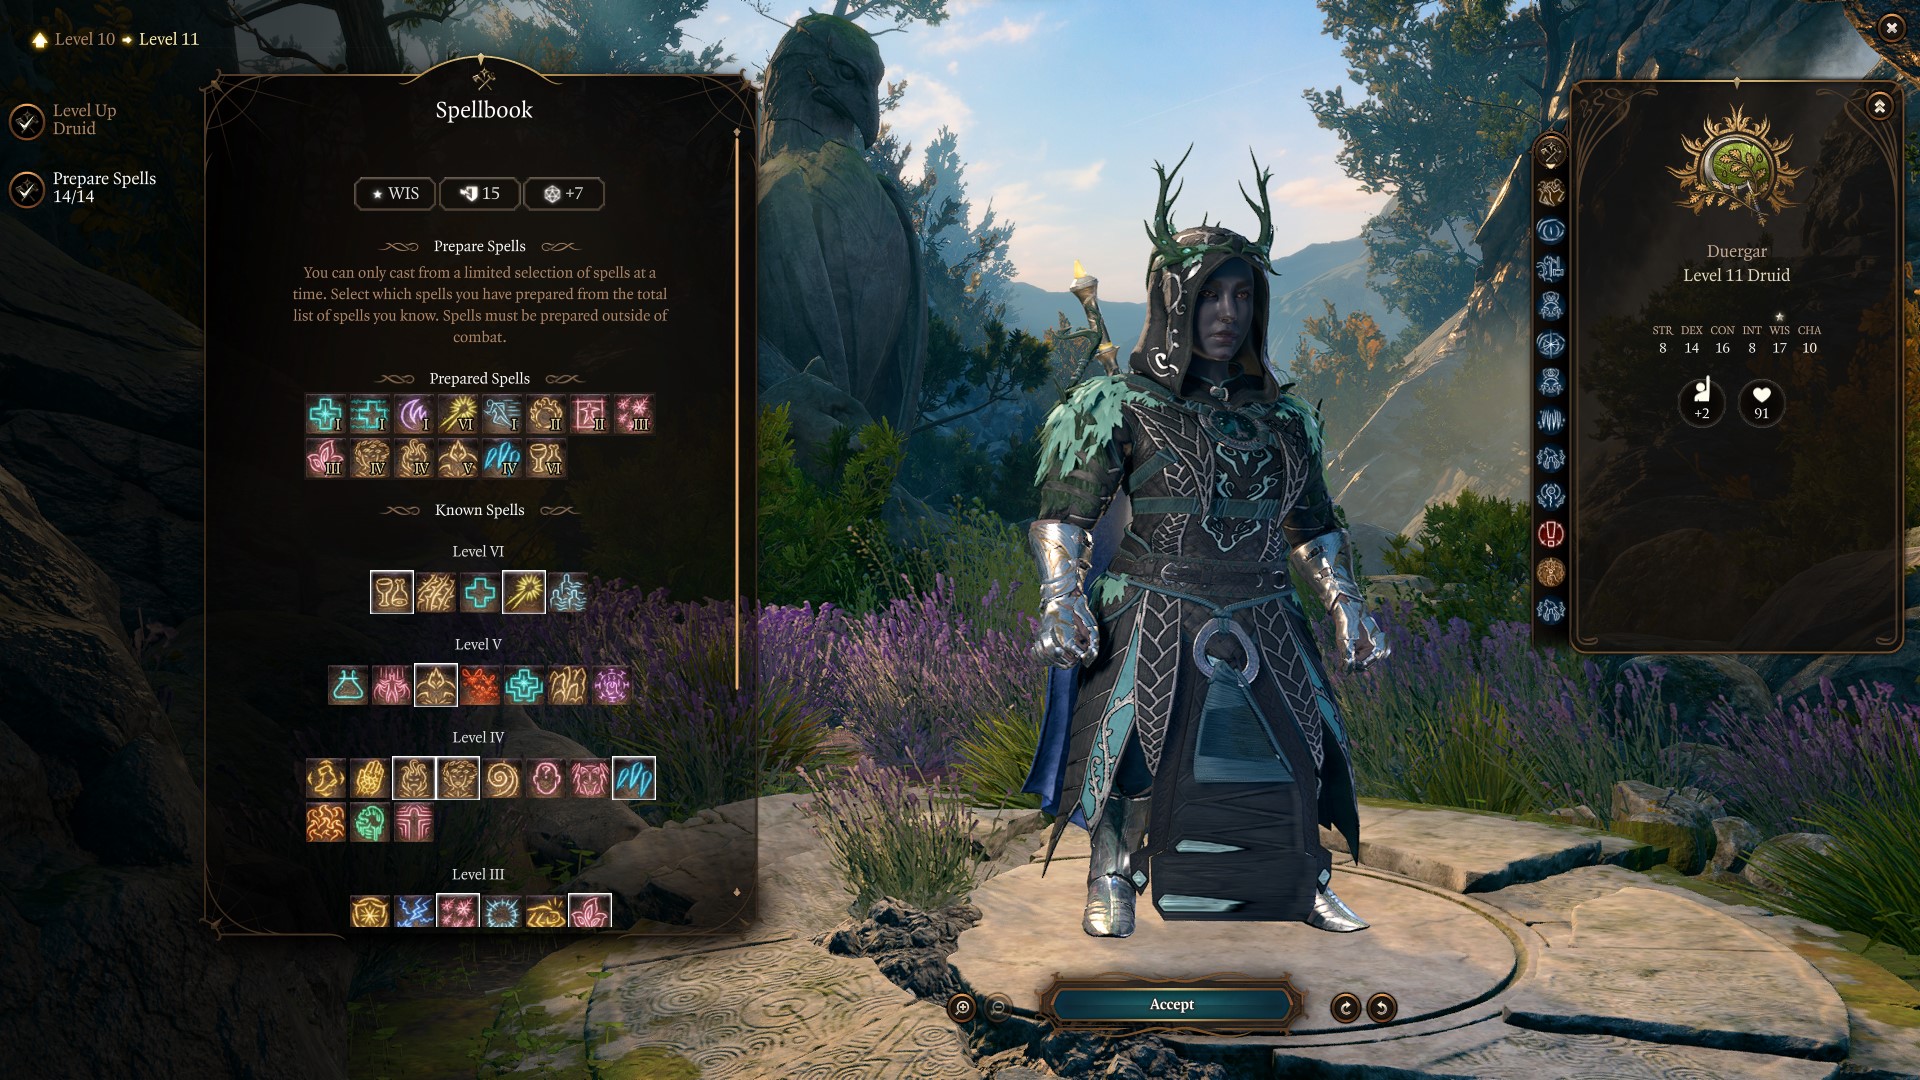
At level 11, the Solo Druid build gains access to level 6 spells. Select Heroes’ Feast and Sunbeam.
- Heroes’ Feast: You cannot be Poisoned, Diseased, or Frightened. Everyone’s maximum Hit Points increase by 12, and they make Wisdom Saving throws with Advantage.
- Sunbeam: A beam of brilliant light sears and Blinds all creatures in its path dealing 6d8 Radiant Damage.
With level 6 spells, you get only one spell slot and will not gain an additional spell slot. There are two Quarterstaves that bypass this issue in Act 3: the Staff of Spellpower or Markoheshki. With either of these quarterstaves, you can negate a spell slot, essentially cheesing two level 6 spell slots. Moreover, an Act 2 necklace, Spellcrux Amulet will do the same thing.
Thus, you can cast Heroes’ Feast to gain 12 HP, then use Sunbeam in combat or upcast Conjure Elemental. If you upcast Conjure Elemental you can summon a Myrmidon rather than an elemental giving you a strong team. Moreover, both of these things can be done outside of combat.
Level 12
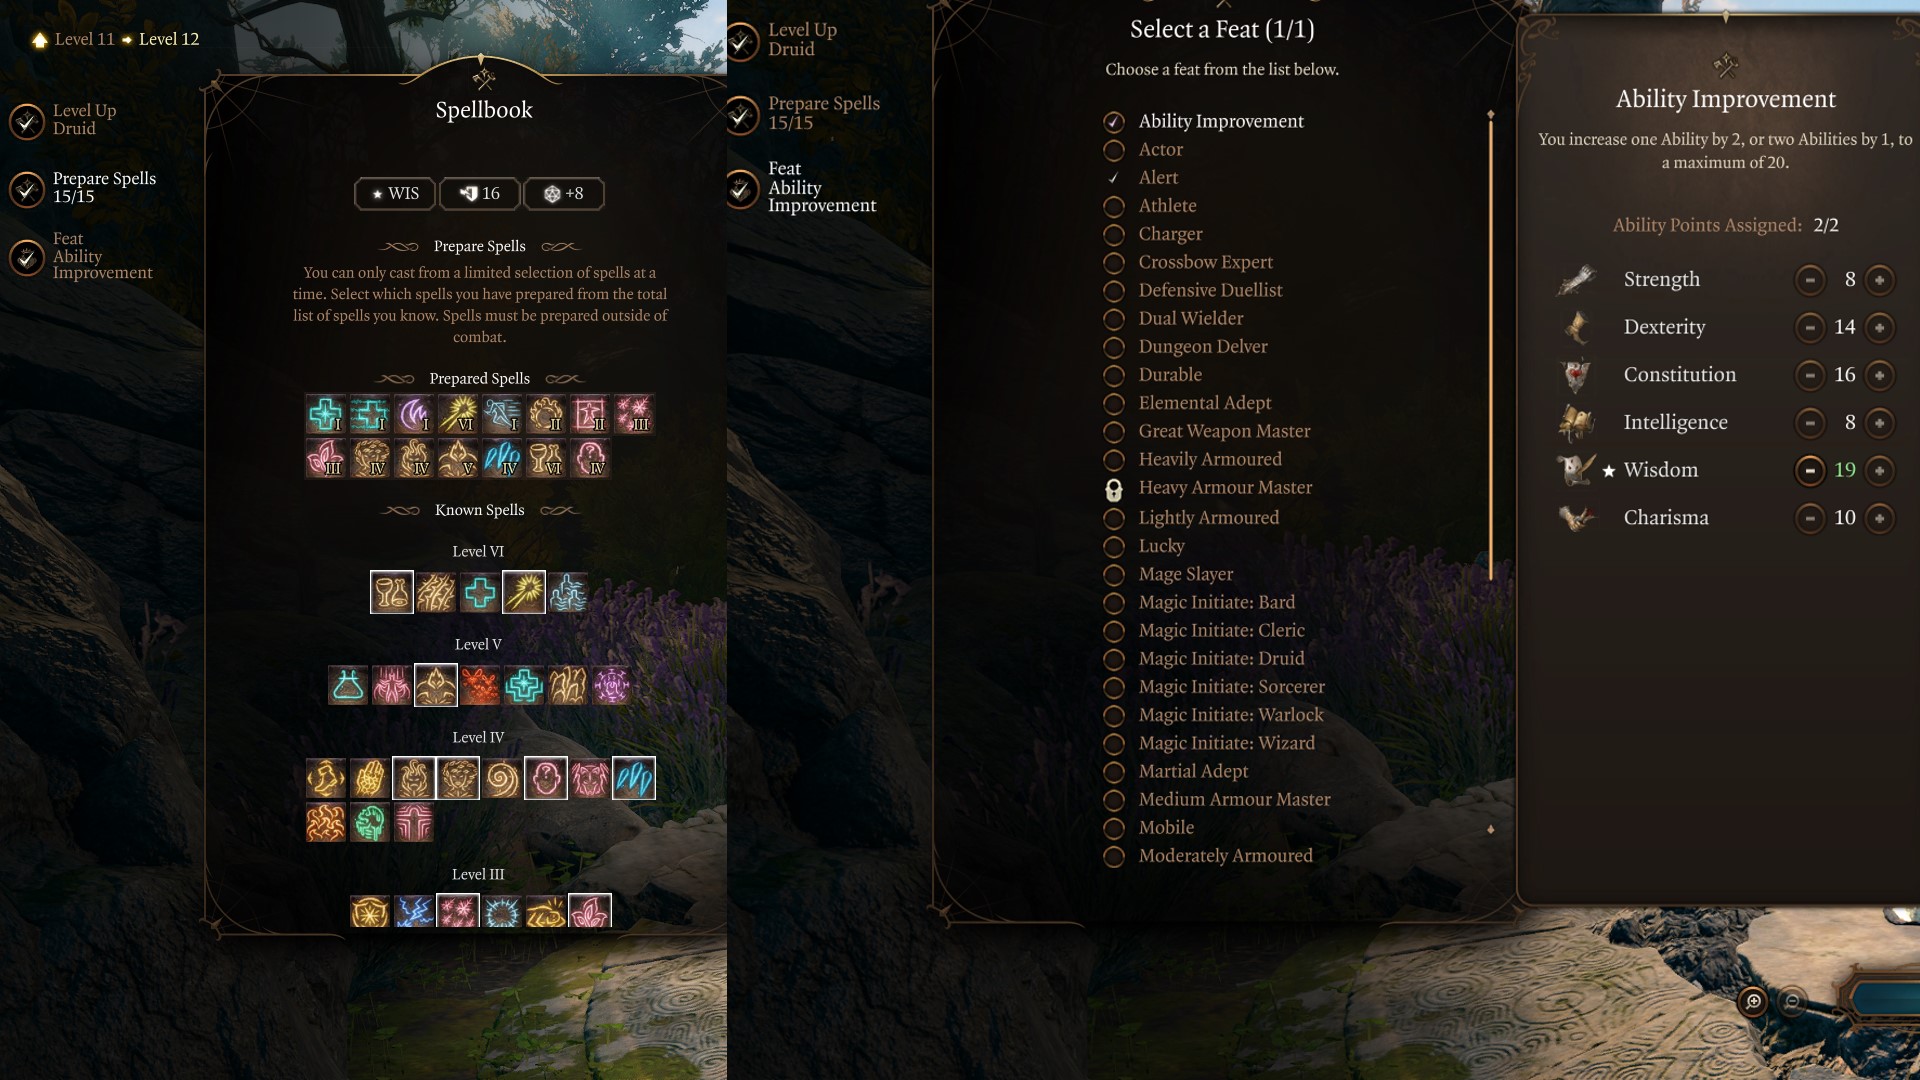
Congratulations on reaching the maximum level with the Best Baldur’s Gate 3 solo Druid Build! At this level, take +2 ability improvement to Wisdom. If you completed the permanent bonus section, you should reach 20. If you complete the Mirror of the Loss, you can gain 22 Wisdom! For spell selections, consider taking something that can be cast outside of combat like Freedom of Movement or any spell that seems helpful. Confusion is another helpful crowd-control spell at this level. Below we will share recommended gear suggestions for Acts 1 and 3.
Related:
Best Gear for Baldur’s Gate 3 Solo Druid Build
In Games like Baldur’s Gate 3, you’ll explore the world, loot chests and your enemies’ dead bodies, and complete quests and all those activities can reward you with useful items, potions, armour, weapons, scrolls, and much more. There are three Acts in BG3, and Best Baldur’s Gate 3 solo Druid Build Guide includes suggested sets and alternatives for Act 1 and Act 3.
Beginner: Starting the Game
Here’s the best beginner gear, items, and equipment for the best Solo Druid Build in Baldur’s Gate 3:
| Gear Slot | Best Gear Item | Effect |
|---|---|---|
| Head | Circlet of Blasting | Free Scorching Ray |
| Cape | – | |
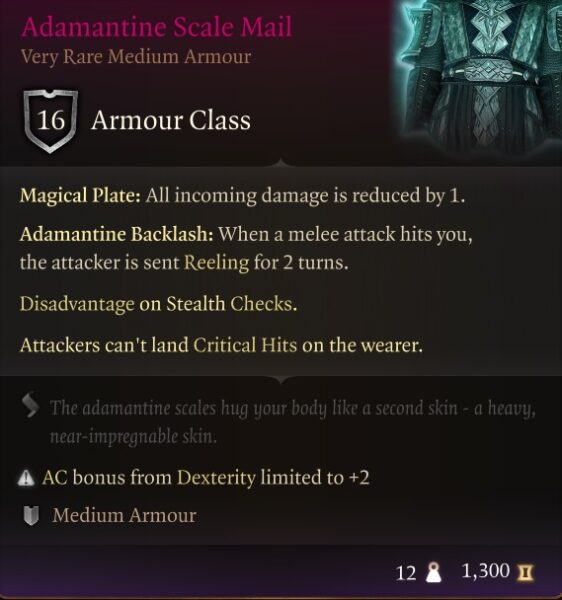
| Chest | Adamantine Scale Mail | 16 AC Medium |
| Gloves | Gloves of Belligerent Skies | Debuffs Enemies |
| Boots | Disintegrating Night Walkers | Free Mobility |
| Necklace | Amulet of Misty Step | Misty Step Spell |
| Ring | Crusher’s Ring | Increase Movement |
| Ring | Fetish of Callarduran Smoothhands | Invisibility Spell |
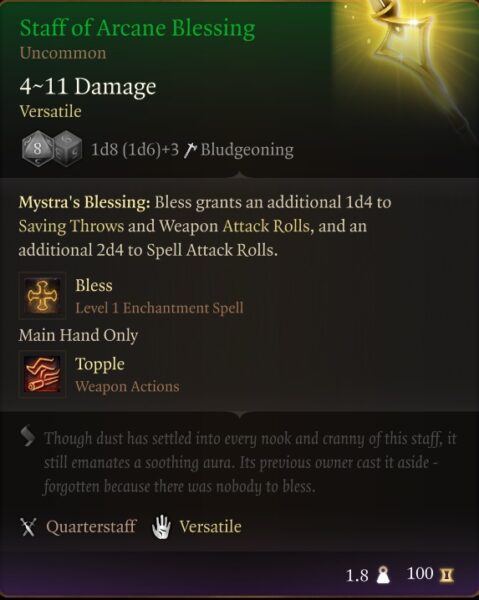
| Weapon 1 Main Hand | Staff of Arcane Blessing | Free Blessed Spell |
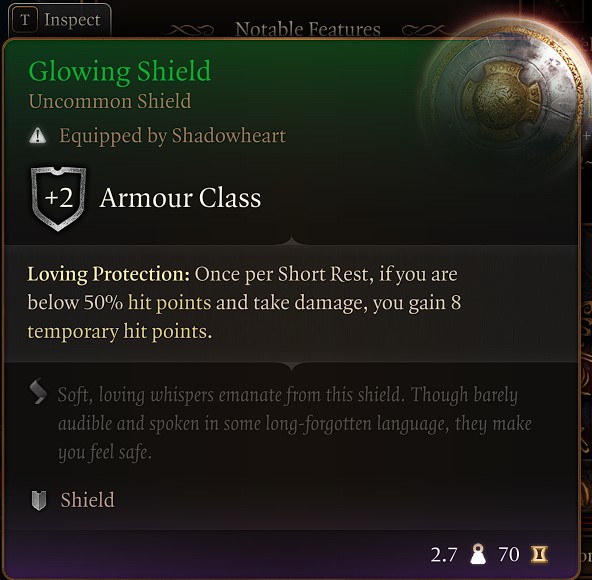
| Weapon 1 Off-Hand | Glowing Shield | HP When Low |
| Weapon 2 Ranged | Bow of Awareness | +1 Initiative |
- Circlet of Blasting: Sold by Blurg in the Myconid Colony (Alternatives Shadow of Menzoberranzan, or Haste Helm).
- Adamantine Scale Mail: Complete Adamantine Forge Quest (Alternative Hedge Wanderer Armour or Githyanki Half Plate).
- Gloves of Belligerent Skies: Found in Inquisitor’s Chamber of Crèche Y’llek (Alternatives Gloves of Missile Snaring, orHellrider’s Pride).
- Disintegrating Night Walkers: Found in Underdark (Alternative Boots of Speed or Boots of Aid and Comfort).
- Amulet of Misty Step: Found in a Gilded Chest in a Defiled Temple (Alternatives Amulet of Branding, Amulet of Restoration, or Moondrop Pendant).
- Crusher’s Ring: Can be looted or stolen from Crusher in the Goblin camp (Alternatives Strange Conduit Ring, or Ring of Absolute Force).
- Fetish of Callarduran Smoothhands: Looted from dead gnomes in Grymforge X: -610 Y: 408 (Alternatives The Sparkswall, or Crusher Ring).
- Staff of Arcane Blessing: Obtained in Arcane Tower (Alternatives Melf’s First Staff, Staff of Crones, or Spellsparkler).
- Glowing Shield: Found in a chest on a slope behind the goblin camp. (X: -54, Y: 462) (Alternative Adamantine Shield, or Wood Woad Shield).
- Bow of Awareness: Sold by Vendor Roah Moonglow in the Shattered Sanctum. You can use it even without proficiency for extra initiative!
Advanced: Endgame
Here’s the best endgame Act 3 gear, items, and equipment for solo Druid Build in Baldur’s Gate 3:
| Gear Slot | Best Gear Item | Effect |
|---|---|---|
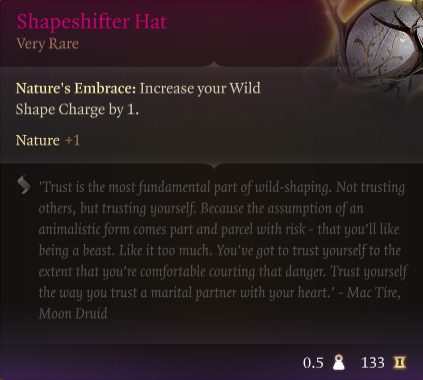
| Head | Shapeshifter Hat | +1 Wild Shape |
| Cape | Cloak of Protection | +1 AC |
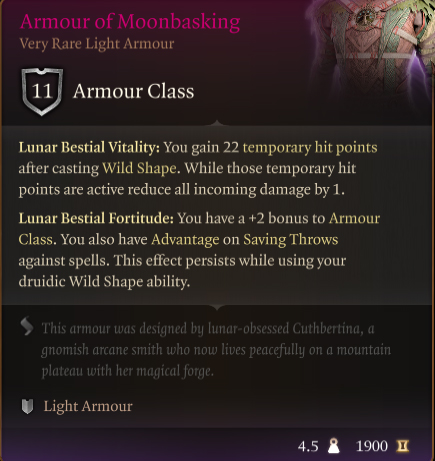
| Chest | Armour of Moonbasking | HP On Wild Shape |
| Gloves | The Reviving Hands | Healed Gain Blade Ward |
| Boots | Boots of Persistence | Freedom of Movement |
| Necklace | Amulet of Greater Health | 23 Constitution |
| Ring | Crypt Lord Ring | Free Create Undead |
| Ring | Killer’s Sweetheart | Auto Critical |
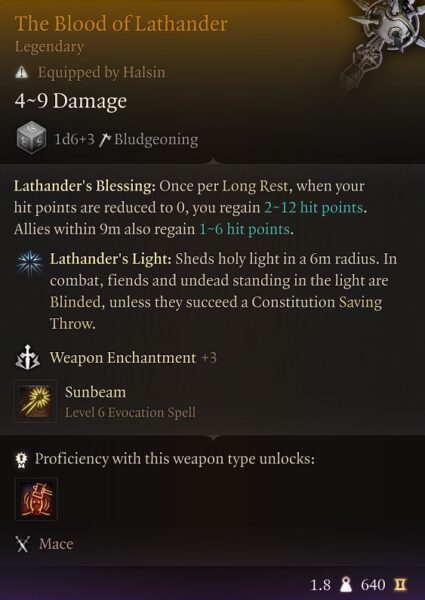
| Weapon 1 Main Hand | The Blood of Lathander | Sunbeam and Healing |
| Weapon 1 Off-Hand | Viconia’s Walking Fortress | 3 AC, Reflect Spell |
| Weapon 2 Ranged | Darkfire Shortbow | Free Haste Spell |
- Shapeshifter Hat: Sold by Helsik at the Devil’s Fee (Alternatives Helm of Balduran, Helldusk Helmet).
- Cloak of Protection: Purchase from Quartermaster Talli at Last Light Inn (Alternative Cloak of the Weave).
- Armour of Moonbasking: Sold by Voiceless Penitent Bareki in Act 3 (Alternatives Helldusk Armour, Adamantine Scale Mail, Flame Enamelled Armour).
- The Reviving Hands: Sold by Vicar Humbletoes (Alternatives Gloves of Soul Catching, or Jhannyl’s Gloves)
- Boots of Persistence: Sold by Dammon in Lower City Baldur’s Gate (Alternatives Disintegrating Night Walkers, or Helldusk Boots).
- Amulet of Greater Health: Archive in the House of Hope (Alternatives Surgeon’s Subjugation Amulet, Periapt of Wound Closure, or Spellcrux Amulet).
- Crypt Lord Ring: The Mystic Carrion’s Servant quest (Alternatives Shifting Corpus Ring, Ring of Regeneration, Ring of Free Action).
- Killer’s Sweetheart: Obtained from the Gauntlet of Shar in Act 2 (Alternatives Ring of Protection, Risky Ring).
- The Blood of Lathander: The Blood of Lathander quest in Act 2 (Alternatives Selûne’s Spear of Night, or Markoheshkir).
- Viconia’s Walking Fortress: Looted from Viconia DeVir (Alternative Shield of Devotion).
- Darkfire Shortbow: Sold by Dammon Last Light Inn Act 2 (Alternative Hellrider Longbow).
Best Consumables, Potions, Ammunition, and Items

The following list represents the best individual use consumable items that will aid in the Best Baldur’s Gate 3 Solo Druid Build:
- Elixir of Bloodlust: Once per turn when you kill a foe, you gain HP 5 temporary hit points and an additional action.
- Potion of Speed: 3 turns of an increased action via the Haste condition.
- Elixir of Vigilance: gain +5 bonus initiative and you cannot be surprised (ingredients sublimate of bloodstained hook, any ashes).
- Potion of Invisibility: Become invisible for 1 minute. Attacking or casting spells ends the status.
- Potion of Flying: 10 turns of flying.
- Potion of Angelic Slumber: fall asleep for two turns, then restore all spell slots, hit points, and abilities.
- Elixir of Peerless Focus: gain advantage on concentration saves (ingredients Sublimate of Belladona, and any ashes).
- Superior Elixir of Arcane Cultivation: gain a level 3 spell slot (ingredients Solution of Night Orchid, any Vitriol).
- Elixir of Viciousness: increase your critical hit chance (ingredients Vitriol of Shadowroot Sac, any Ashes).
- Elixir of Universal Resistance: gain resistance to all damage (ingredients Vitriol of Divine Miasma, any Sublimate).
Also Check:- BG3 Map
Permanent Bonuses
Throughout Baldur’s Gate 3, you will have the ability to gain permanent bonuses to your character. These can grant additional spells, ability scores, and other bonuses. Permanent Bonuses are not displayed throughout the campaign but are vital to increase overall combat performance. We have all permanent bonuses here in a guide, but the most important ones for you to collect are listed below.
| Act 1 | Act 2 | Act 3 |
|---|---|---|
| Auntie Ethel’s Hair: Gain +1 to an Ability Score. | Potion of Everlasting Vigour: Gain +2 Strength. | Mirror of Loss – +2 to an Ability Score of your choice. |
| Awakened: Use illithid powers as a Bonus Action. | Slayer Form: Ability to transform into the Slayer. | Partial Ceremorphosis: Access to tier 3 illithid Powers. |
| Scratch: Gain Find Familiar Scratch. | Summon Us: Allows you to summon Us. | Sweet Stone Features: Blessed permanent. |
| Cheeky Quasit: Gain Summon Quasit Shovel. | Statue of the Gods: +2 to Saving Throws | |
| Loviatar’s Love: 30% Hit Points or less, you gain a +2 bonus to Attack Rolls and Wisdom saving throws. | ||
| Necromancy Of Thay: access to powerful spells in Act 3. | ||
| Volo’s Ersatz Eye: See Invisibility |
Solo Druid Build Changes in Patch 7 for BG3
The release of Patch 7 for BG3 brought with it no significant combat, gameplay, or build-related change for the Solo Druid Build. The main focus of this update was the final narrative additions, mostly centered around evil endings, along with official modding tools and adjustments to honor mode.
Furthermore, the game now features a modding toolkit and an in-game mod manager, allowing players to create and install mods directly within the game. Consequently, this update is intended to hand over creative control to the community. It enables players to produce unique content and continue the story in new ways.
Best Baldur’s Gate 3 Solo Druid Build Summary
Subclass: Circle of the Moon
- Medium in Acts 1 & 2
- Light in Act 3
Weapons: One Hand & Shield
Background: Folk Hero
- Strength – 8
- Dexterity – 14
- Constitution – 16
- Intelligence – 8
- Wisdom – 17
- Charisma – 10
Solo Druid Level Progression
- Level 1 – Ice Knife
- Level 2 – Moon Subclass
- Level 3 – Flaming Sphere Spell
- Level 4 – War Caster
- Level 5 – Sleet Storm
- Level 6 – Plant Growth
- Level 7 – Conjure Woodland Being
- Level 8 – Alert Feat
- Level 9 – Conjure Elemental
- Level 10 – Ice Storm
- Level 11 – Heroes’ Feast
- Level 12 – Confusion
Looking For More About Baldur’s Gate 3?
Thank you for reading the best Baldur’s Gate 3 Solo Druid Build Guide. We provide the latest news and create guides for Baldur’s Gate 3. Also, watch me play games on Twitch or visit my YouTube channel!