Facebook
 Reddit
 Email
Email
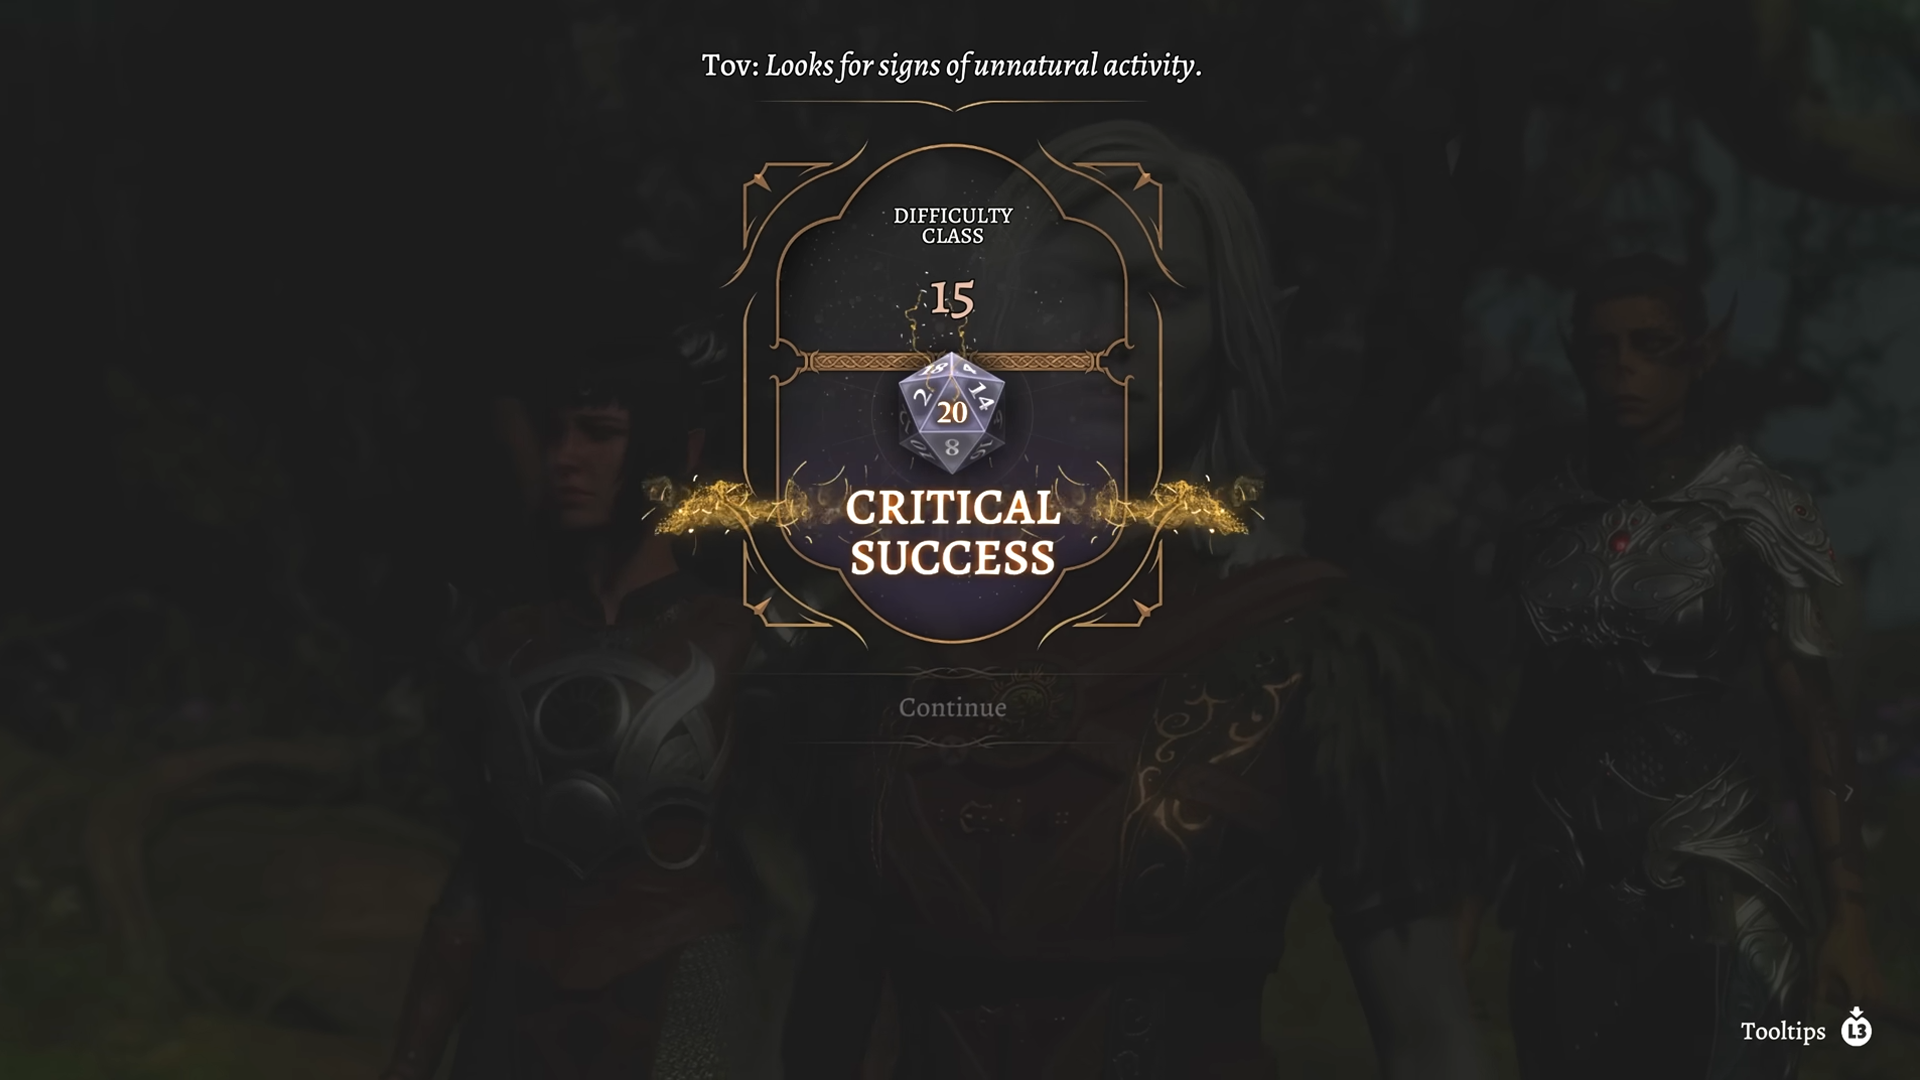
Master the strategies in Baldur’s Gate 3 Act 1 Boss Fights, with our comprehensive guide encompassing How to defeat all encounters tailored specifically for Honour Mode difficulty.

Bosses in Baldur’s Gate 3 are crucial enemies with unique abilities, skills, and spells. In this article, Baldur’s Gate 3 Act 1 Boss Fights, we explain each of the 9 bosses in BG3 Act 1, and how to Defeat them in Honour Mode. Honour Mode is a unique difficulty setting that gives bosses Legendary Actions and the player’s campaign ends on the death of all party members. In this guide, we explain how to beat each boss in Act 1, their mechanics, legendary actions in Baldur’s Gate 3 Honour Mode or any difficulty.

Related:
How to Defeat Owlbear in Baldur’s Gate 3?
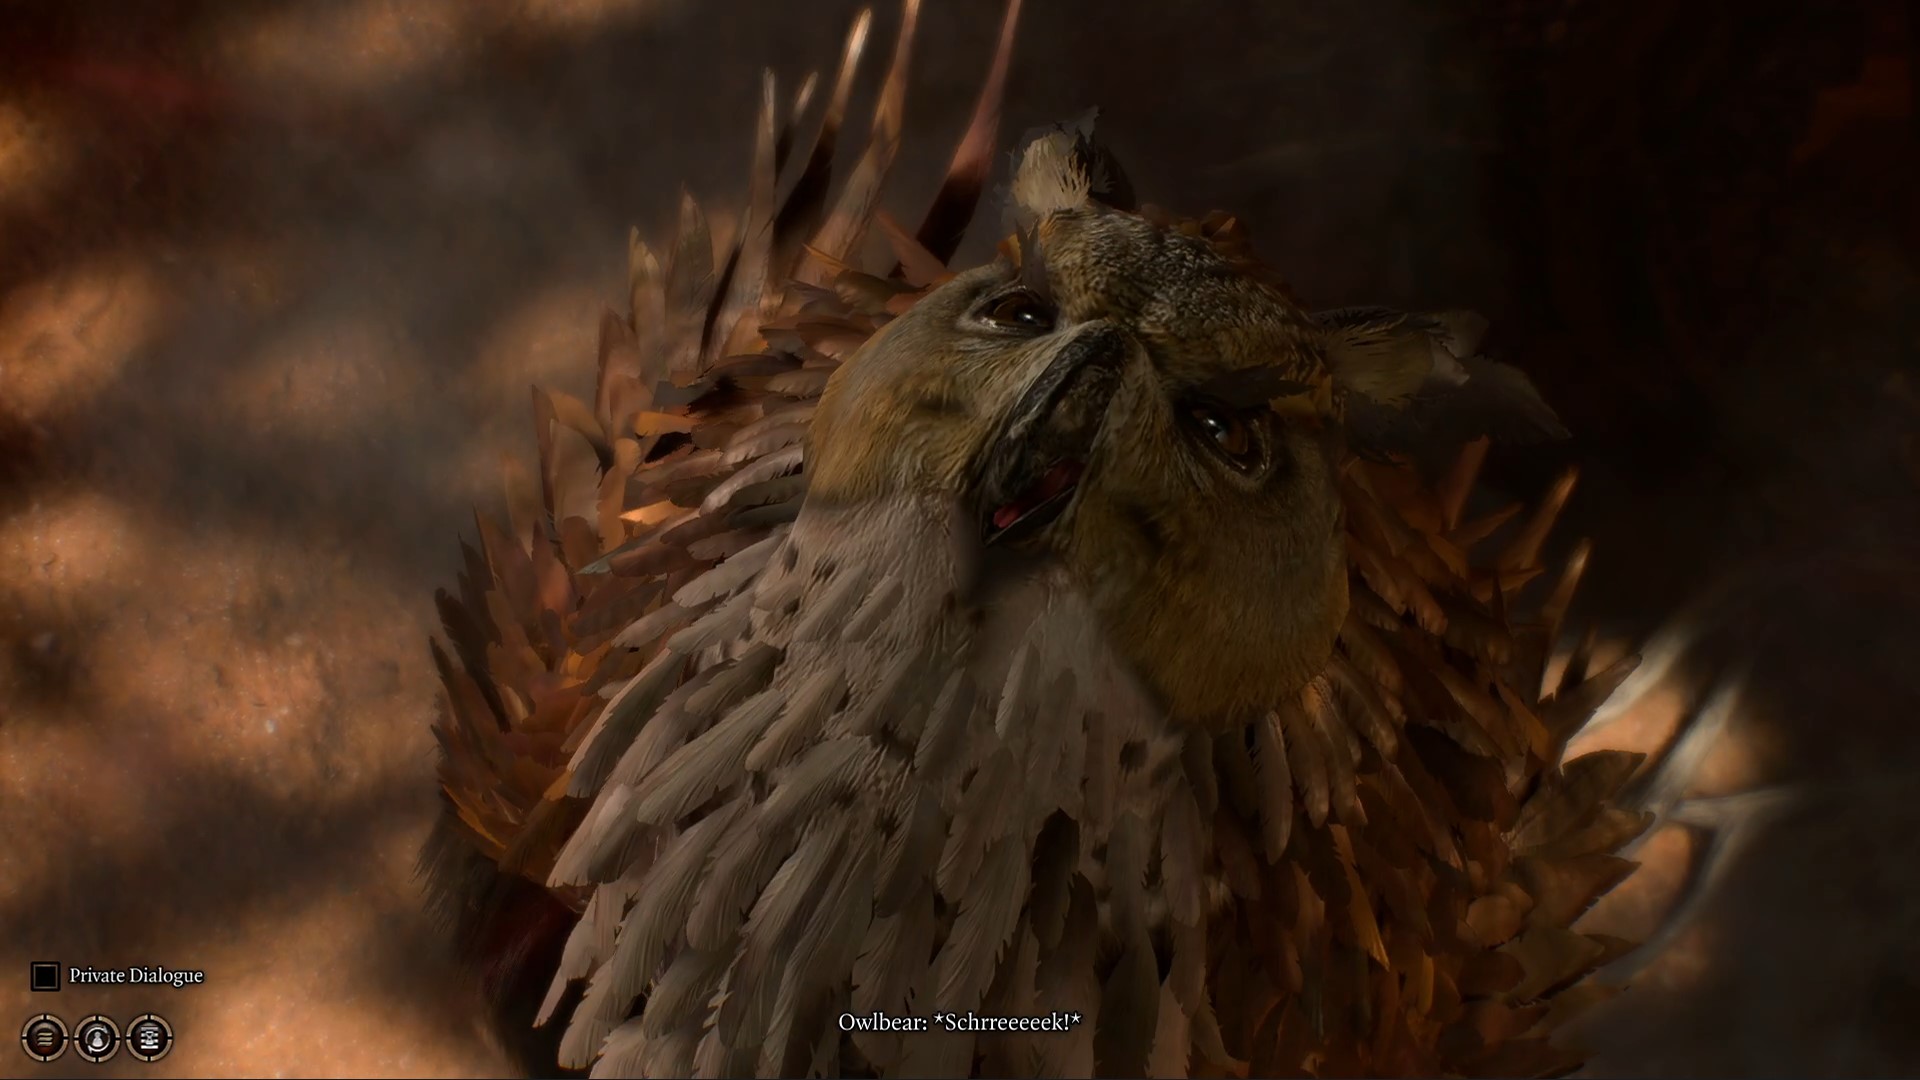
The best way to defeat the Owlbear in Baldur’s Gate 3 is by using ranged attacks from atop the ledge behind the creatures while stunning the beast with the prone status effect. Additionally, players can recruit True Soul Cultisit outside the cave by using their Illithid powers to convince them to help them. The Owlbear nest is near the Forest and Blighted Villiage in Act 1, at coordinates X: 86 Y: 448.

Upon arriving in the cave, you can speak with Owlbear and pass an animal handling, survival, or intimidation check and avoid the fight. However, you can destroy the Owlbear and free the Owlbear Cub that can be used in later parts of the game. Therefore, enter the cave in stealth and sneak up to the ledge which allows increased range damage. Start combat out from stealth to surprise the Owlbear and get one free turn of damage. Then, crowd control the Owlbear with stuns like Command Grovel, Ice Arrows, and others. The setup is the most important part of the Owlbear fight and your initial position. Let us explain this Owlbear fight on Honour Mode and how you can defeat this Baldur’s Gate 3 boss in Act 1.
Owlbear Tips and Tricks on Honour Mode Difficulty?

Below are Owlbear’s Stats and features in Baldur’s Gate 3:
- Level: 3
- HP: 91 balanced, 118 honour mode
- AC: 13
- STR: 20
- DEX: 12
- CON: 17
- INT: 3
- WIS: 12
- CHA: 7
- Race: Beast
- Resistances: None
- Legendary Action Call Consort: Once per round, the Owlbear mother can spend a Legendary action to summon her mate when she is attacked.
In Honour Mode, the Owlbear fight includes the Call Consort Legendary Action, which brings a secondary Owlbear with 118 HP. This legendary action is triggered once attacked and will result in a difficult fight. However, the mate Owlbear comes from the opposite end of the cave. Thus, it should give you time to destroy the first Owlbear while the other travels towards your position.
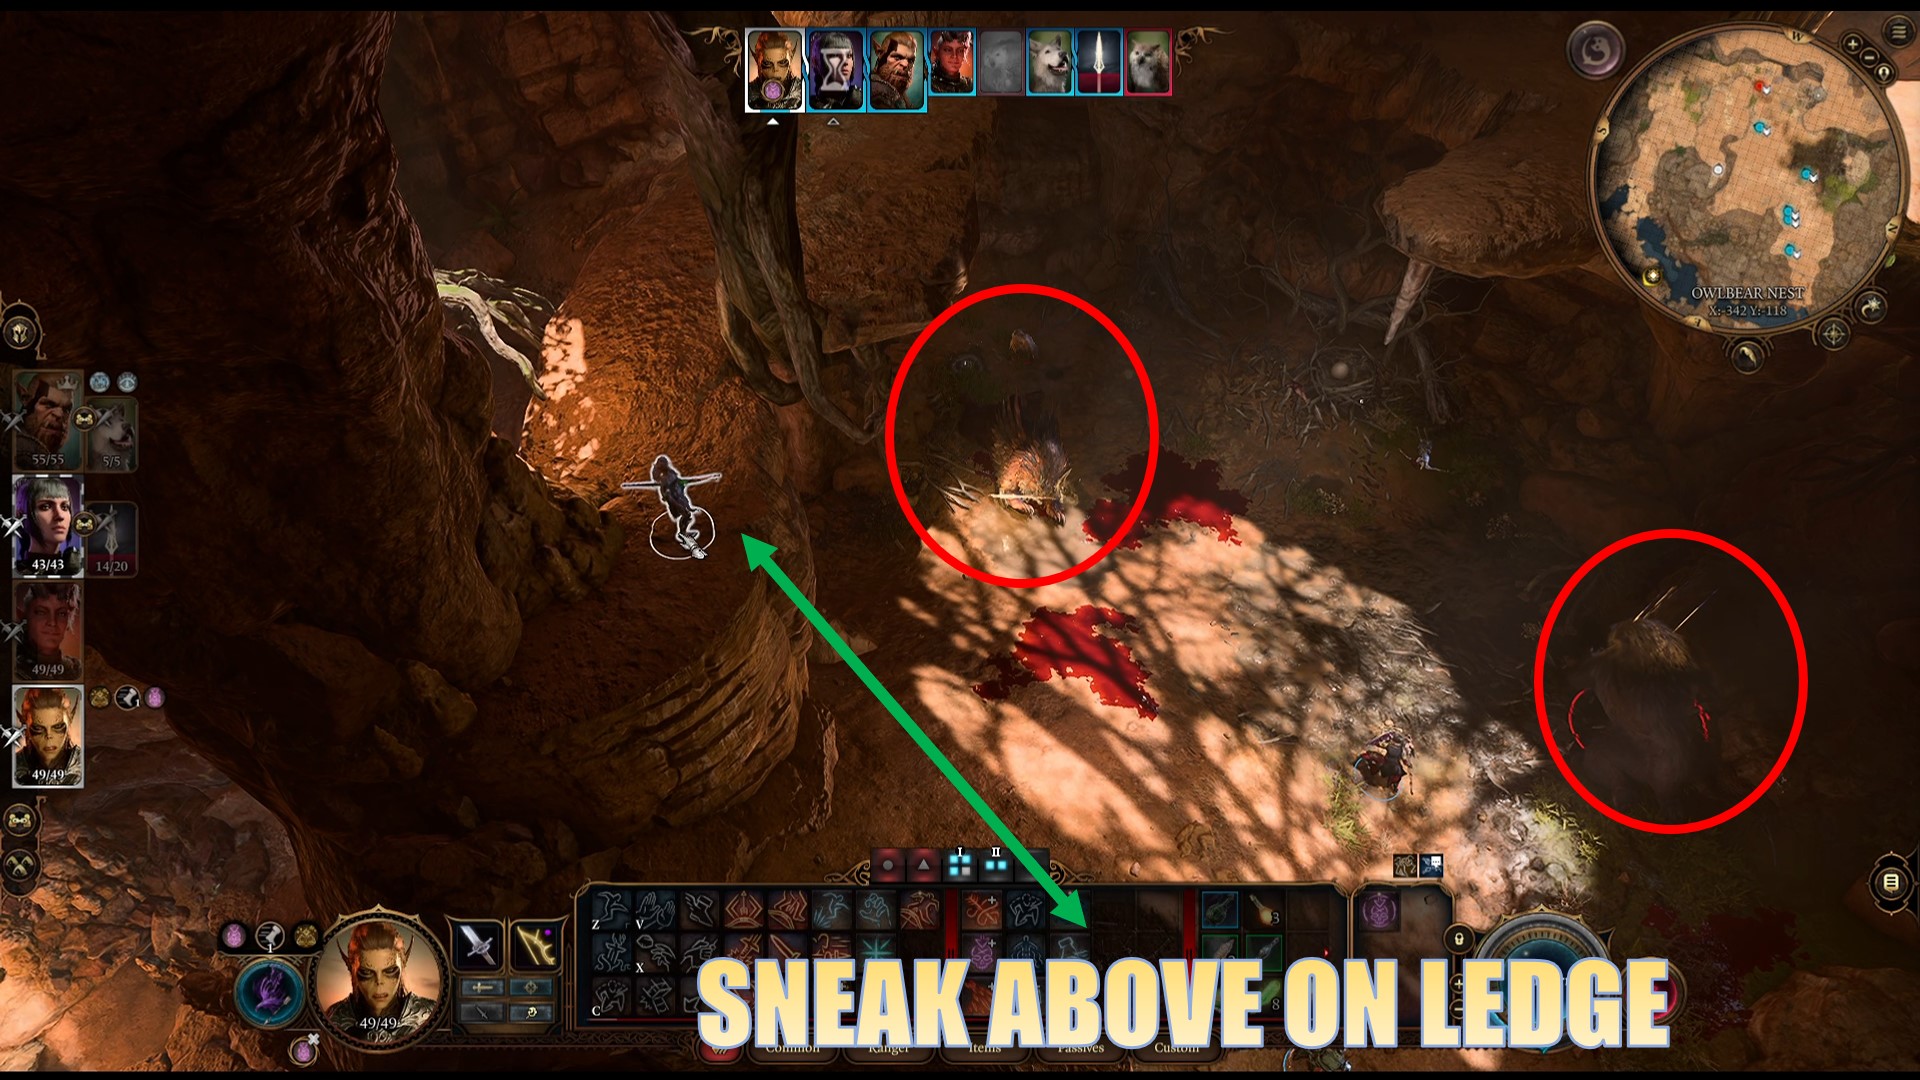
Each Owlbear does a devastating leap attack that stuns and does massive damage. You can bait the Owlbears by summoning creatures like Scratch, Shovel, Spiritual Weapon, or Flaming Sphere. Leave them to soak up the damage, while your range damage dealer sits high on the ledge firing off spells and arrows to crowd-control the targets. The tricks for beating this boss are destroying the first Owlbear on turn one, then crowd-controlling the second from range and distracting it with the summons. Do these tricks, and you should defeat this boss on Honour Mode and progress further in Act 1 of Baldur’s Gate 3.
How to Defeat Phase Spider Matriarch in Baldur’s Gate 3?

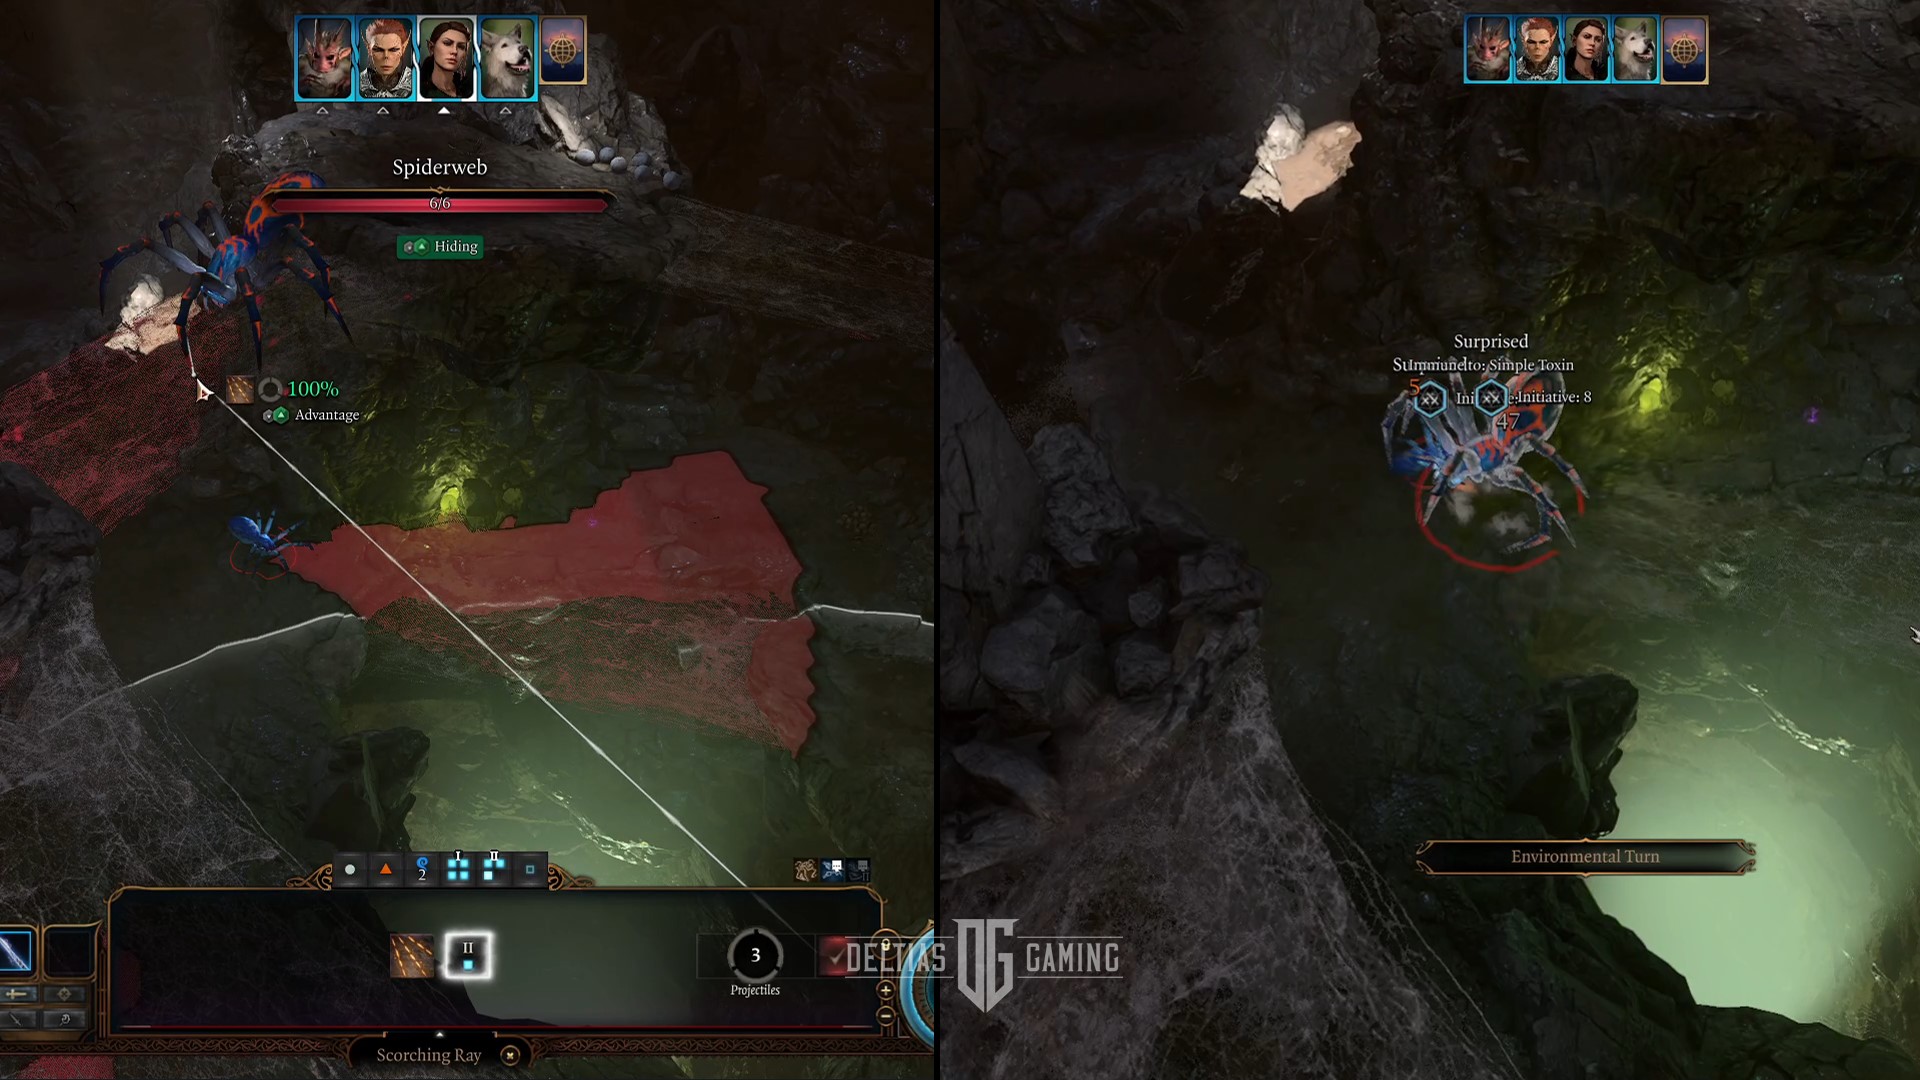
The best way to defeat the Phase Spider Matriarch boss is to destroy her three spiderling eggs before the fight and destroy the webbing she stands on when travelling. This will result in her falling to the ground, doing around 45 points of damage, and knocking her prone. If you are the first to attack from stealth, this will surprise the Phase Spider Matriarch, thus giving you an extra turn of damage for free. The Phase Spider Matriarch boss can be found in the Whispering Depths, inside the Blighted Village, at coordinates X: 541 Y: 354.

As you enter the fighting area, make sure to use our tips and tricks to destroy the Spider Eggs first. There are three locations, two on the top and one on the bottom. You can use the spell Minor Illusion to draw the spider away and avoid detection. This can award you the achievement of Pest Control! Next, pre-buff with elixirs like Hill Giant Strength, Heroism, coating your weapons, and blessed (avoid detection). Wait for the Spider to travel on the webbing and fire with damage like Magic Missle so it 100% lands. This will knock her down to the ground and give a lot of damage, and one free round of extra damage due to the Surprise Status effect.
Make sure to collect the Poisoner’s Robe which pairs well with Melf’s Quarterstaff and the Dark Amethyst used for Necromancy Thay permanent bonus.
Phase Spider Matriarch Tips and Tricks on Honour Mode Difficulty?
Below are Phase Spider Matriarch’s Stats and features in Baldur’s Gate 3:
- Level: 4
- HP: 125 Balanced, 162 Honour Mode
- AC: 16
- STR: 16
- DEX: 19
- CON: 14
- INT: 6
- WIS: 12
- CHA: 6
- Race: Phase Spider
- Resistances: Poison
- Legendary Action Gossamer Tomb: Once per round if her offspring is attacked, the Phase Spider Matriarch can spend a Legendary Action to use Gossamer Tomb. This creature is entombed in Infested Infested spider silk, and cannot move or take action. Unless the silk is removed with Acid or Fire damage, it will explode, dealing 8d10 Poison to the entombed creature.
In Honour Mode, the Phase Spider Matriach boss fight has the legendary action Gossamer Tomb which acts as a crowd control effect if you attack the offspring. Gossamer Tomb will deal poison damage and can be removed with Acid or Fire damage. Thus, it’s critical to destroy the spider eggs before combat. Additionally, the Spider Queen’s Wrath is an ability that triggers when the Spider is below 50% health. This gives her more strength and Armour Class. Thus, she becomes much harder to hit.
Tips and tricks for defeating this boss on honour mode are attacking the bridge or knocking her into the chasm leading to the Underdark. You will still be able to loot her body, but this will instantly kill her or negate her abilities. Moreover, Elixir of Poison Resistance can help you reduce poison damage by 50% and is likely the key to surviving an incoming attack. Spells like Mirror Image before combat are helpful to increase your spellcaster AC dramatically and avoid attacks.
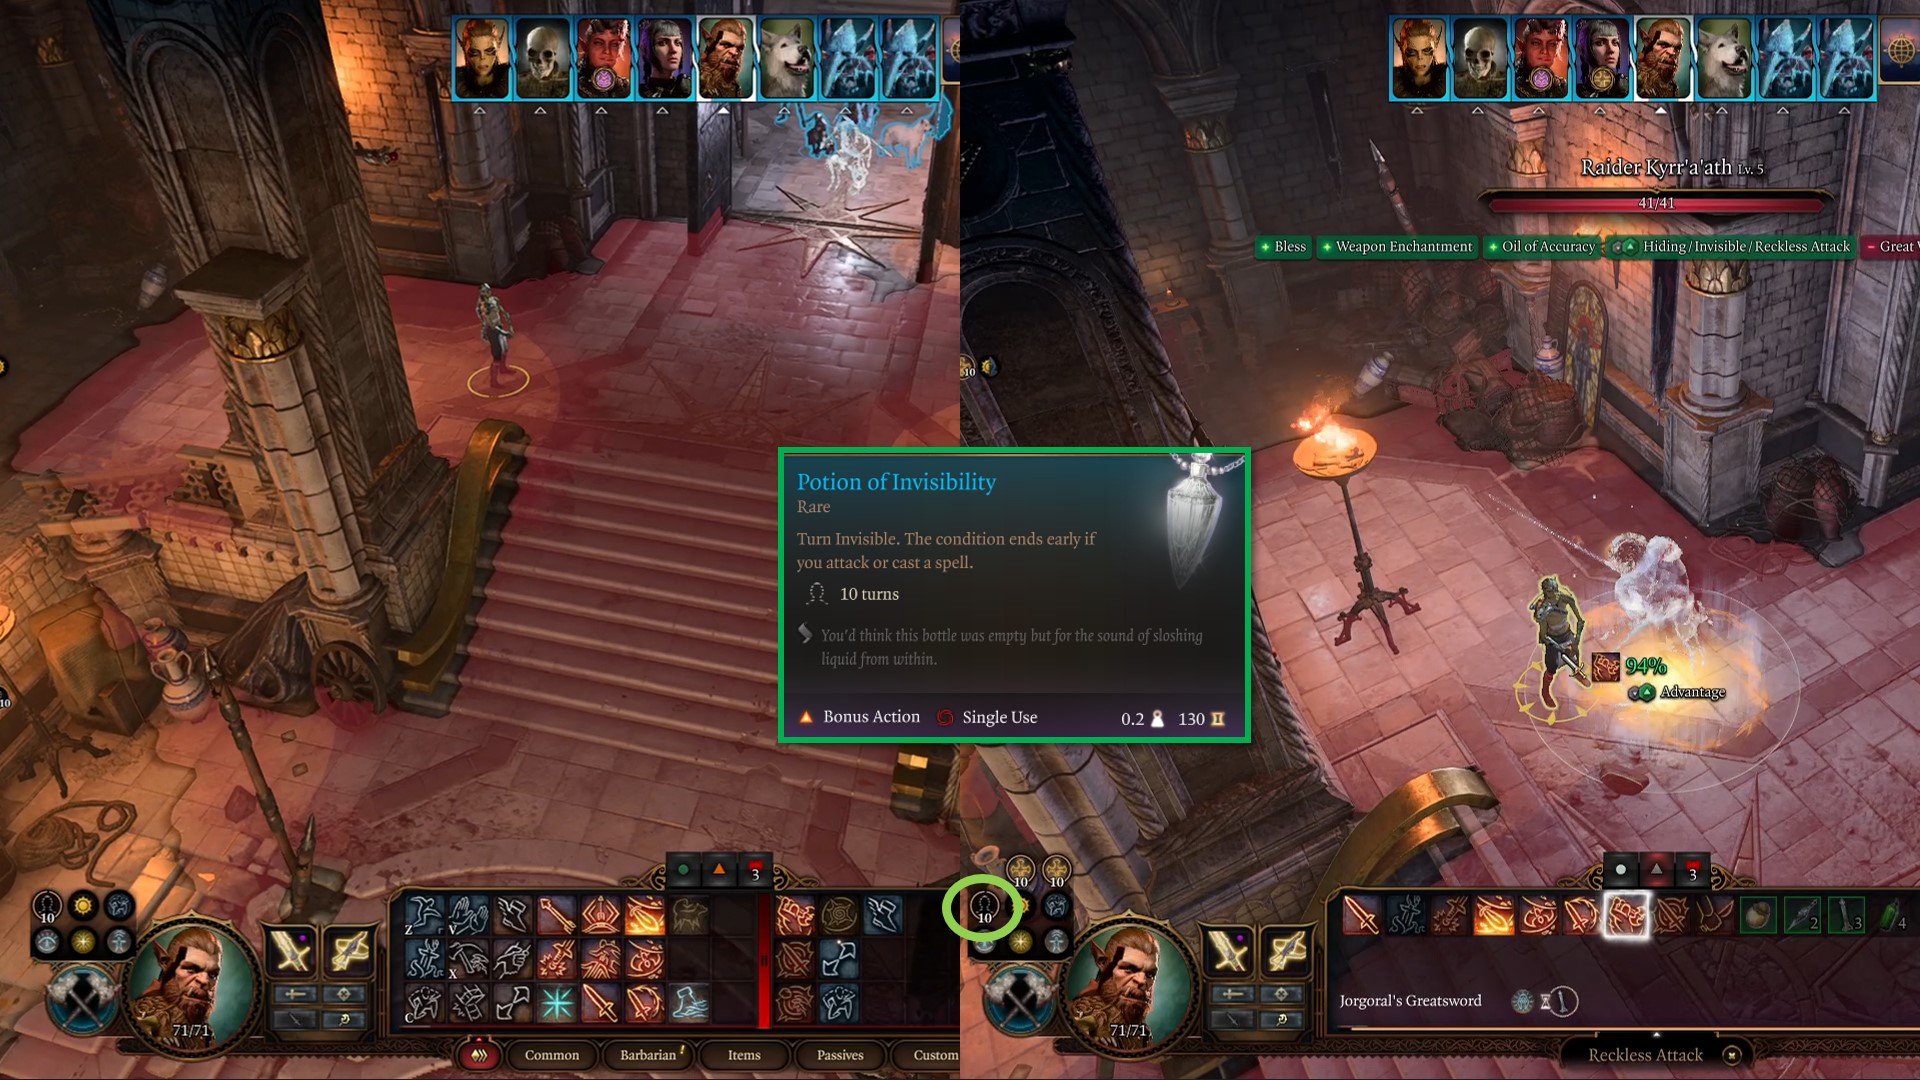
Invisibility and Escape
Lastly, make sure to keep an invisibility potion handy if the fight gets out of hand. Use one to retreat to safety and reset the fight. If you’re playing the Dark Urge build, take advantage of the Deathstalker Mantle which grants invisibility on kills. You can use this to kill a small spider and then retreat to reset combat. Be aware she has see invisibility so keep your distance, and you should have no problem beating this boss on Honour mode in Act 1 for Baldur’s Gate 3.
Also Check:- BG3 Interactive Map
How to Defeat Dror Ragzlin in Baldur’s Gate 3?

The best way to defeat Dror Ragzlin in Baldur’s Gate 3 is by sneaking up the stairs before entering climbing onto the scaffolding and shooting down arrows and spells from range. Dror Ragzlin and his many enemy allies are mostly melee damage dealers, and will spend multiple turns chasing you up the scaffolding, and will likely die before ever reaching you. You can find the boss Dror Ragzlin in the Shattered Sanctum in Act 1 at coordinates X: 297 and Y: 30. Dror Ragzlin can be negotiated within the dialogue and avoid combat if you choose, though you will lose out on a Mind Flayer specimen and gear.
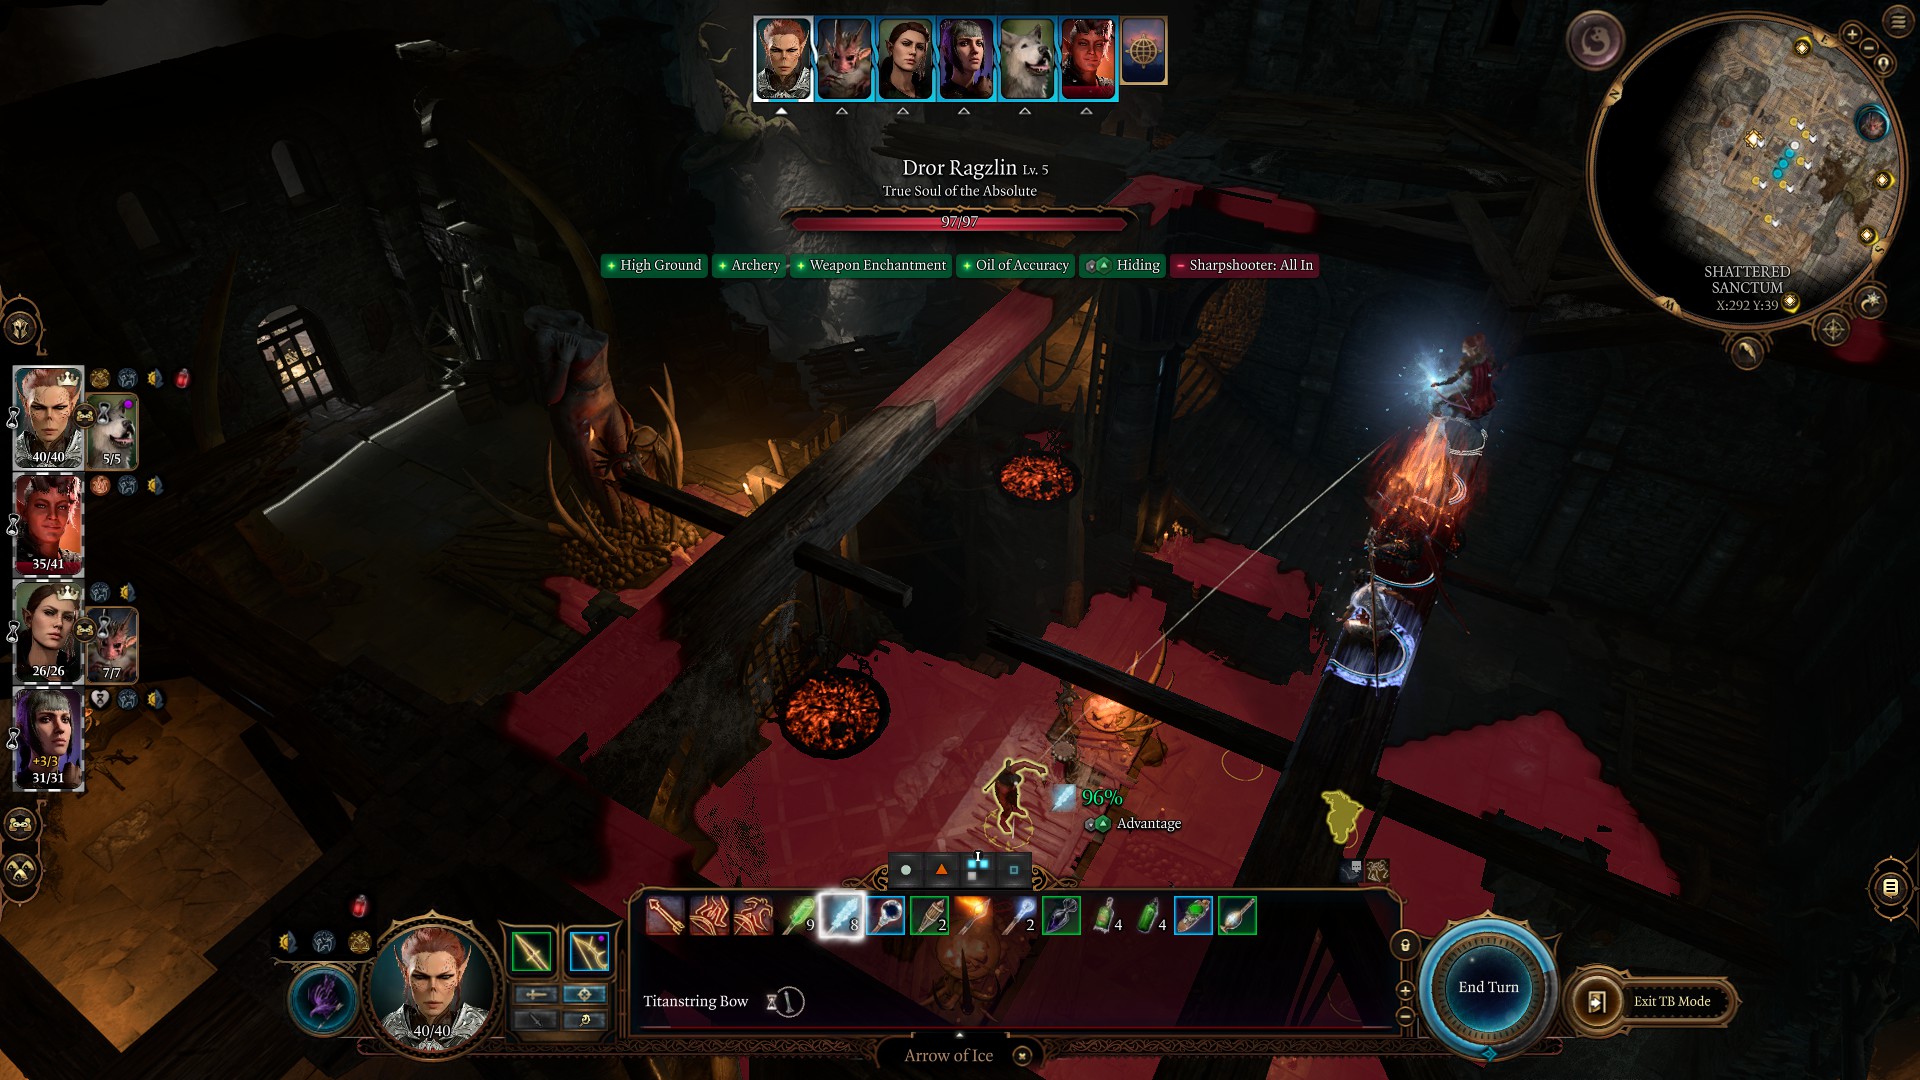
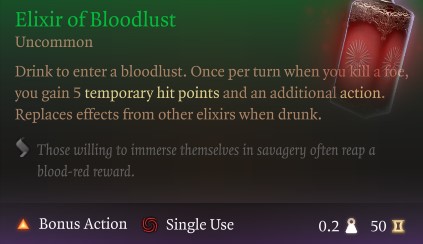
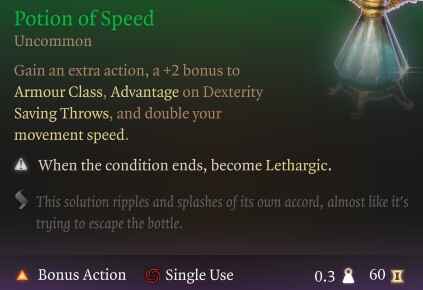
The best tip and trick for beating Dror Ragzlin is having a Ranger build on the top level using Ice Arrows to trigger the prone status effect. Moreover, you want to equip an Elixir of Bloodlust and be at level 5. This Ranger will have Extra Attack and every kill be able to use an additional action. Lastly, use a potion of speed with your bonus action on turn one to have three actions on the initial turn!
Keeping at least one companion or player on the first floor is advised. Be aware, the NPC will try to kick you into the spider den and trap you downstairs. Moreover, there is a War Drum near the east on the first floor. Destroy with force damage to prevent additional enemies from approaching. Additionally, the secondary target should be the enemy Booygah because they can cast a Hold Person spell.
Make sure to pick up the Mind Flayer Parasite Specimen and use the key to unlock the treasure chest in the back containing Gloves of the Growling Underdog and Springstep Boots.
Dror Ragzlin Tips and Tricks on Honour Mode Difficulty?
Below are Dror Ragzlin’s Stats and features in Baldur’s Gate 3:
- Level: 5
- HP: 75 balanced, 97 honour mode
- AC: 14
- STR: 18
- DEX: 12
- CON: 16
- INT: 12
- WIS: 10
- CHA: 15
- Race: Hobgoblin
- Resistances: None
- Legendary Action Devoted Galvanism: Once per round when an enemy targets their ally with an ability, Dror Ragzlin can use a Legendary Action to Galvanise Absolutists within 5 meters, granting them Action Surge.
The Honour Mode boss Dror Ragzlin has the Legendary Action Devoted Galvansim which grants ally absolutist with Action Surge. Action surge gives anyone an additional action per combat, but can be entirely negated by eliminating most targets on turn one. Simply climb up the steps in the rear of the room near the companion Minthara. Jump over the ledge to the scaffolding and initiate combat in stealth to trigger the surprise status effect. This gives your party one free turn of damage before the enemy can take action or move.
Next, use movement-impairing spells like Grease, Chromatic Orb Ice, or Web. Moreover, you can send Scratch, Shovel, or summon like spiritual weapon and flaming sphere on the first floor to distract and impede enemies’ progress. To defeat the boss Dror Ragzlin, keep him stunned and eliminate the secondary Cultist, specifically the Booygah who can knock you off ledges and stun with Hold Person. If enemies climb the scaffolding, use Thunderwave or Roaring Arrow to knock them off and instantly kill them. After a few rounds, you should eliminate all enemies and an easy boss fight on honour mode in Act 1 for Baldur’s Gate 3.
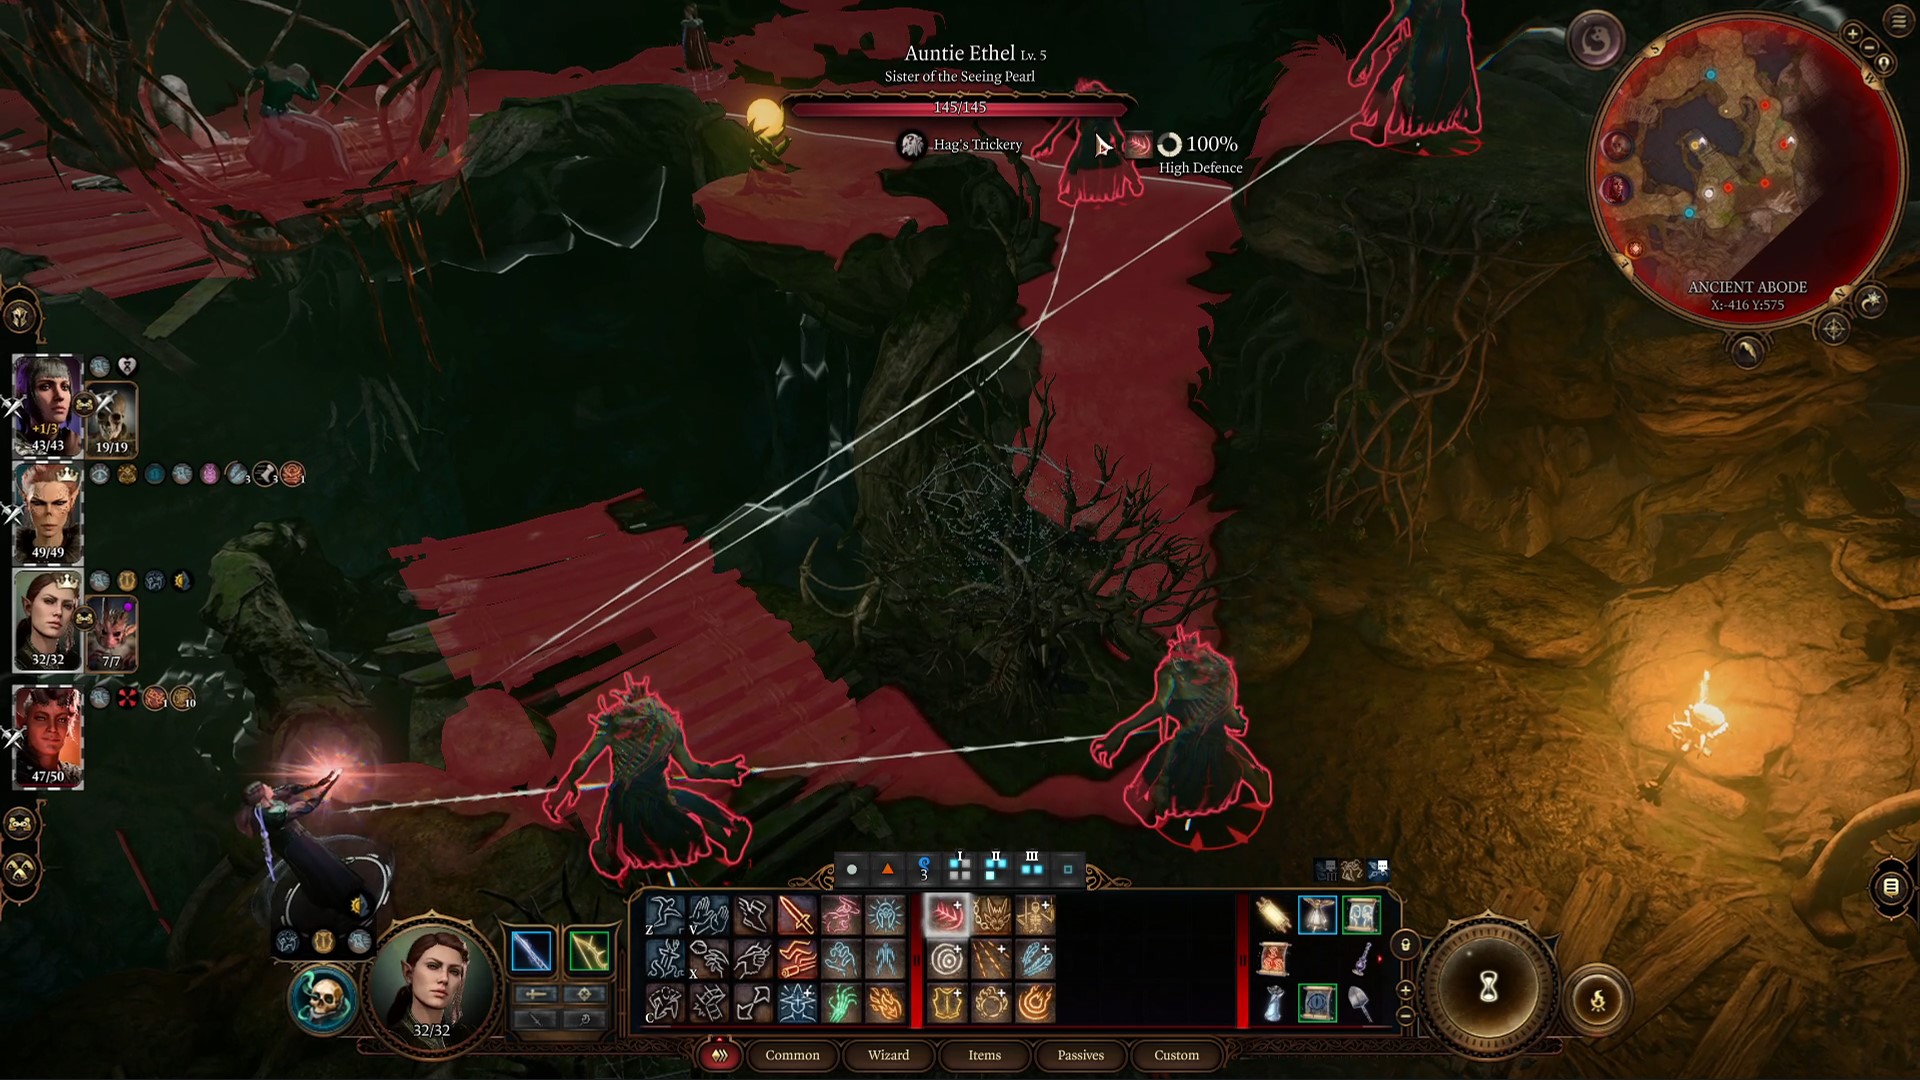
How to Defeat Auntie Ethel in Baldur’s Gate 3?

The best way to defeat Auntie Ethel in Baldur’s Gate 3 is by lowering her health to 30 on turn one and avoiding her duplicate images. Auntie Ethel’s boss fight is done in two phases. Phase one is at the Teahouse in the swap south of the Blighted Village. Here, you can eliminate Auntie Ethel in a single turn by stunning her and doing massive damage. However, this will remove the possibility of obtaining Auntie Ethel’s Charm, which unlocks a +1 ability score permanent bonus. Thus, we recommend doing damage at the Teahouse and forcing her to retreat. Once she retreats, you need to move through invisible doors and fight some other NPCs within the Overgrown Tunnel.
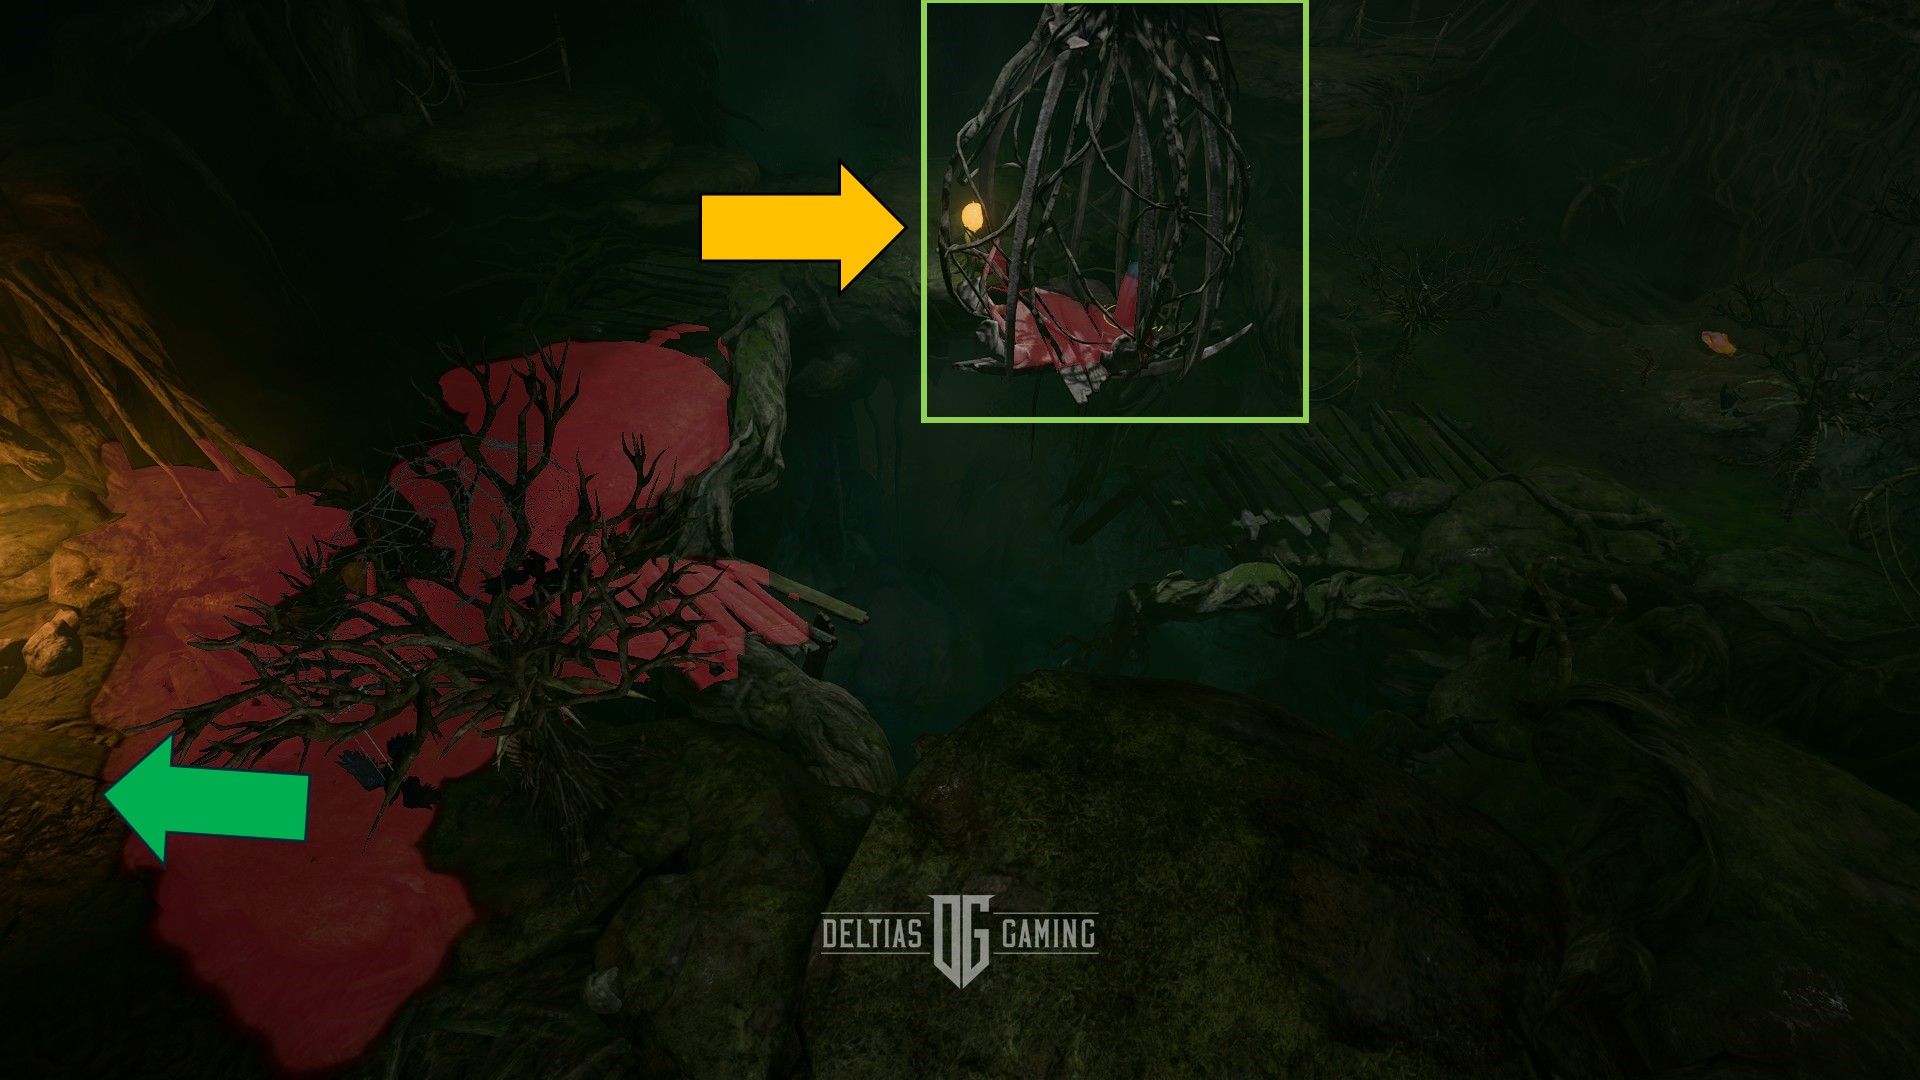
Make your way through the tunnel until you get to the start of Auntie Ethel Fight part two. Using Fly Potion, Featherfall, and Enhanced Jump can help you avoid the traps. Stealth to reach the start of the fight where you see a cage, a yellowish orb and a potential starting location for Auntie Ethel (hidden). The yellowish orb lowers the cage which contains Mayrina and requires the player or NPC to touch and interact to save her. Meanwhile, Auntie Ethel will be hidden and difficult to trigger the surprise status effect. Try to Misty Step and avoid detection near the Orb and use area-based spells to knock boss Auntie Ethel out of stealth.
Combat with Boss Auntie Ethel
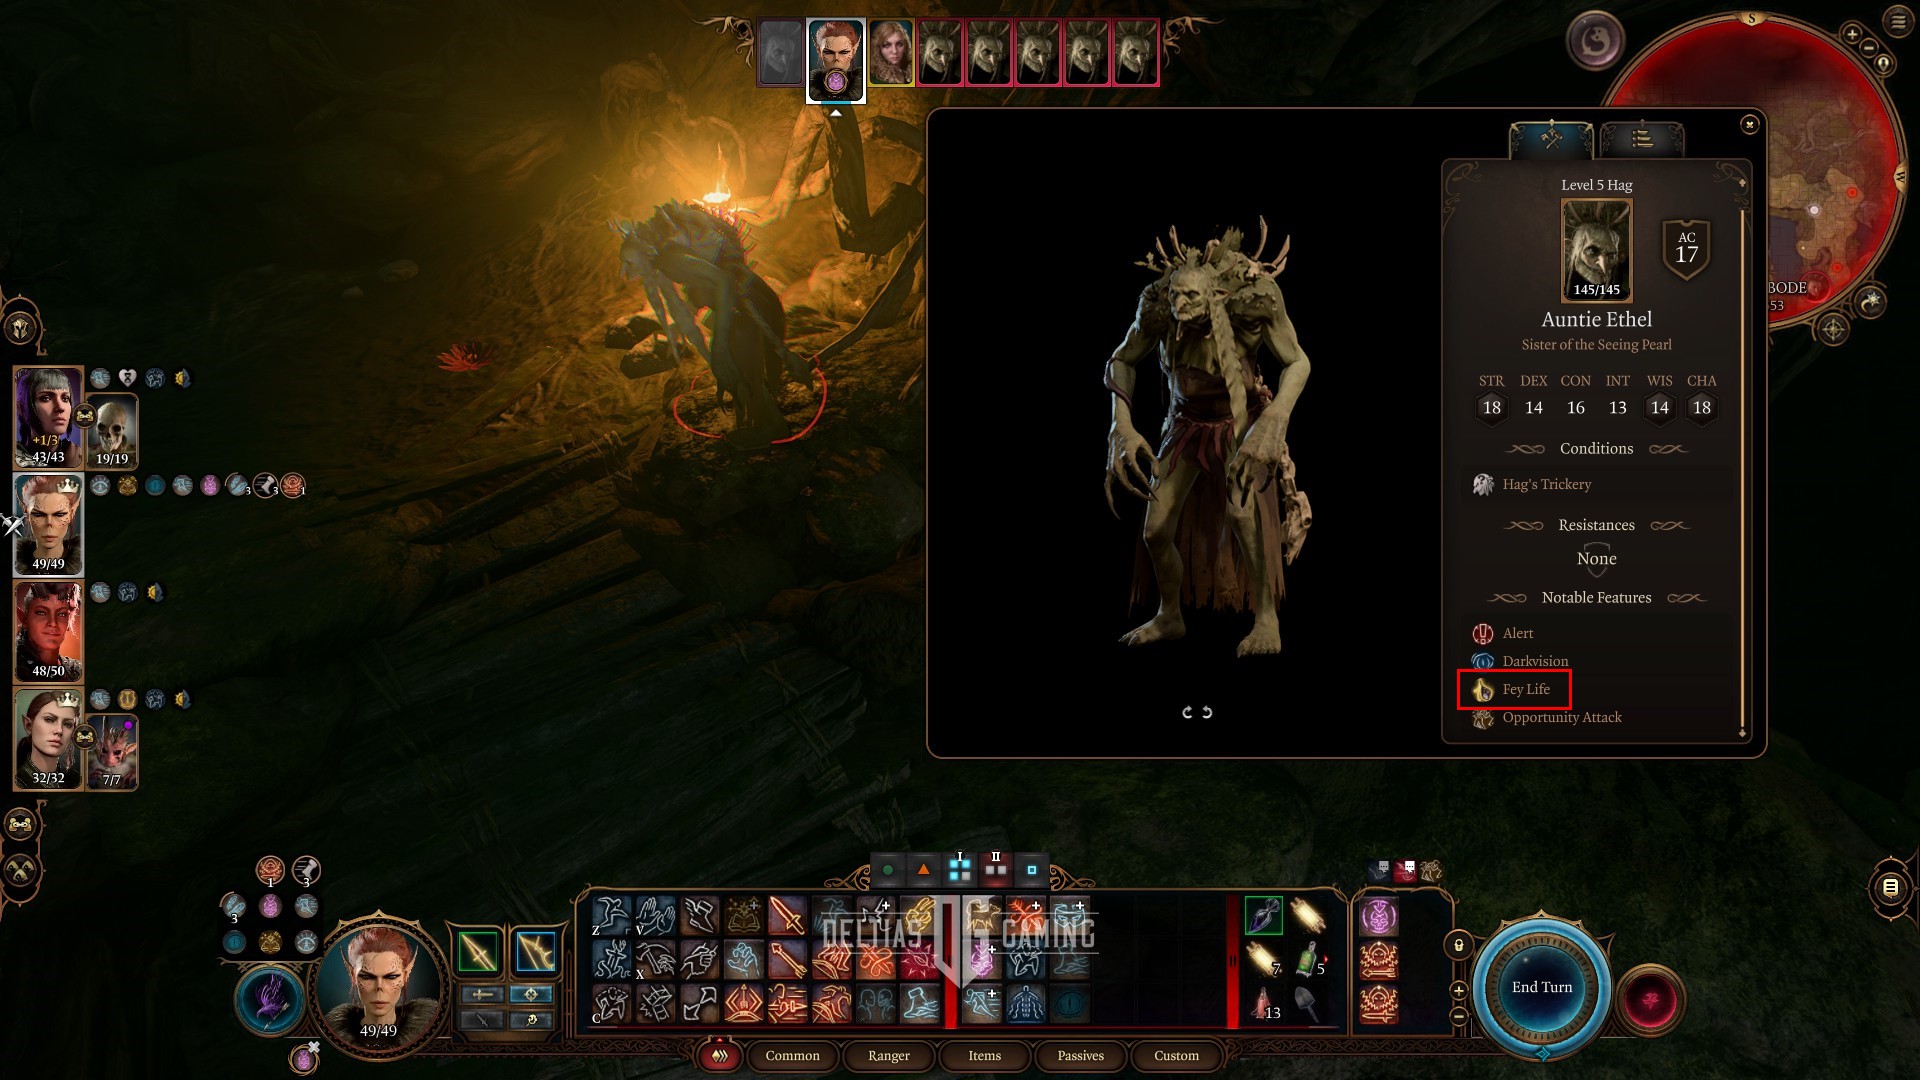
Once combat has started, Auntie Ethel will summon 5 additional illusions of herself. You can tell the real enemy by examining and looking for the buff “Fey Life.” This buff is due to an item she wears, and won’t be found on any of the duplicates. Thus, you can attack the right target. Moreover, you can eliminate the duplicates by doing 1 point of damage. We recommend using Magic Missile and upcasting the spell to hit as many targets and possibly eliminating all the illusions on turn one.
The tips and tricks are to get Auntie Ehtel to 30 health, without killing her. There she will enter into dialogue allowing for the player to receive a permanent bonus.
Auntie Ethel Tips and Tricks on Honour Mode Difficulty?
Below are Auntie Ethel’s Stats and features in Baldur’s Gate 3:
- Level: 5
- HP: 112 balanced, 145 honour mode
- AC: 17
- STR: 18
- DEX: 14
- CON: 16
- INT: 13
- WIS: 14
- CHA: 18
- Race: Hag
- Resistances: None
- Legendary Action Weird Magic Surge: Create illusory duplicates immediately after a spell is cast.
The Honour Mode boss Auntie Ethel uses Weird Magic Surge which can trigger illusion duplicates of her after a spell is cast. Weird Magic Surge can be used as a reaction during the player’s turn and one each turn. Wird Magic Surge can also be triggered during dialogue by Guidance so be careful post-fight. However, Auntie Ethel is susceptible to Silence, which eliminates spellcasting abilities. The item Sussur Dagger that comes from the Masterwork Weapon quest can trigger silence on hit and is a perfect counter using a Rogue build.
Your priority in this Honour Mode boss fight is sneaking into the fight and getting in position. Have one character focus on silence, another character eliminate illusions, while the others use every resource to burst her down on turn one. Consider the Elixir of Bloodlust and Potion of Speed combination here for the player eliminating the duplicates. This will give you much more burst damage potential making a troubling boss fight easy. Clear this collect Auntie Ehtel’s hair and move forward in Baldur’s Gate 3 Act 1 onto other bosses.
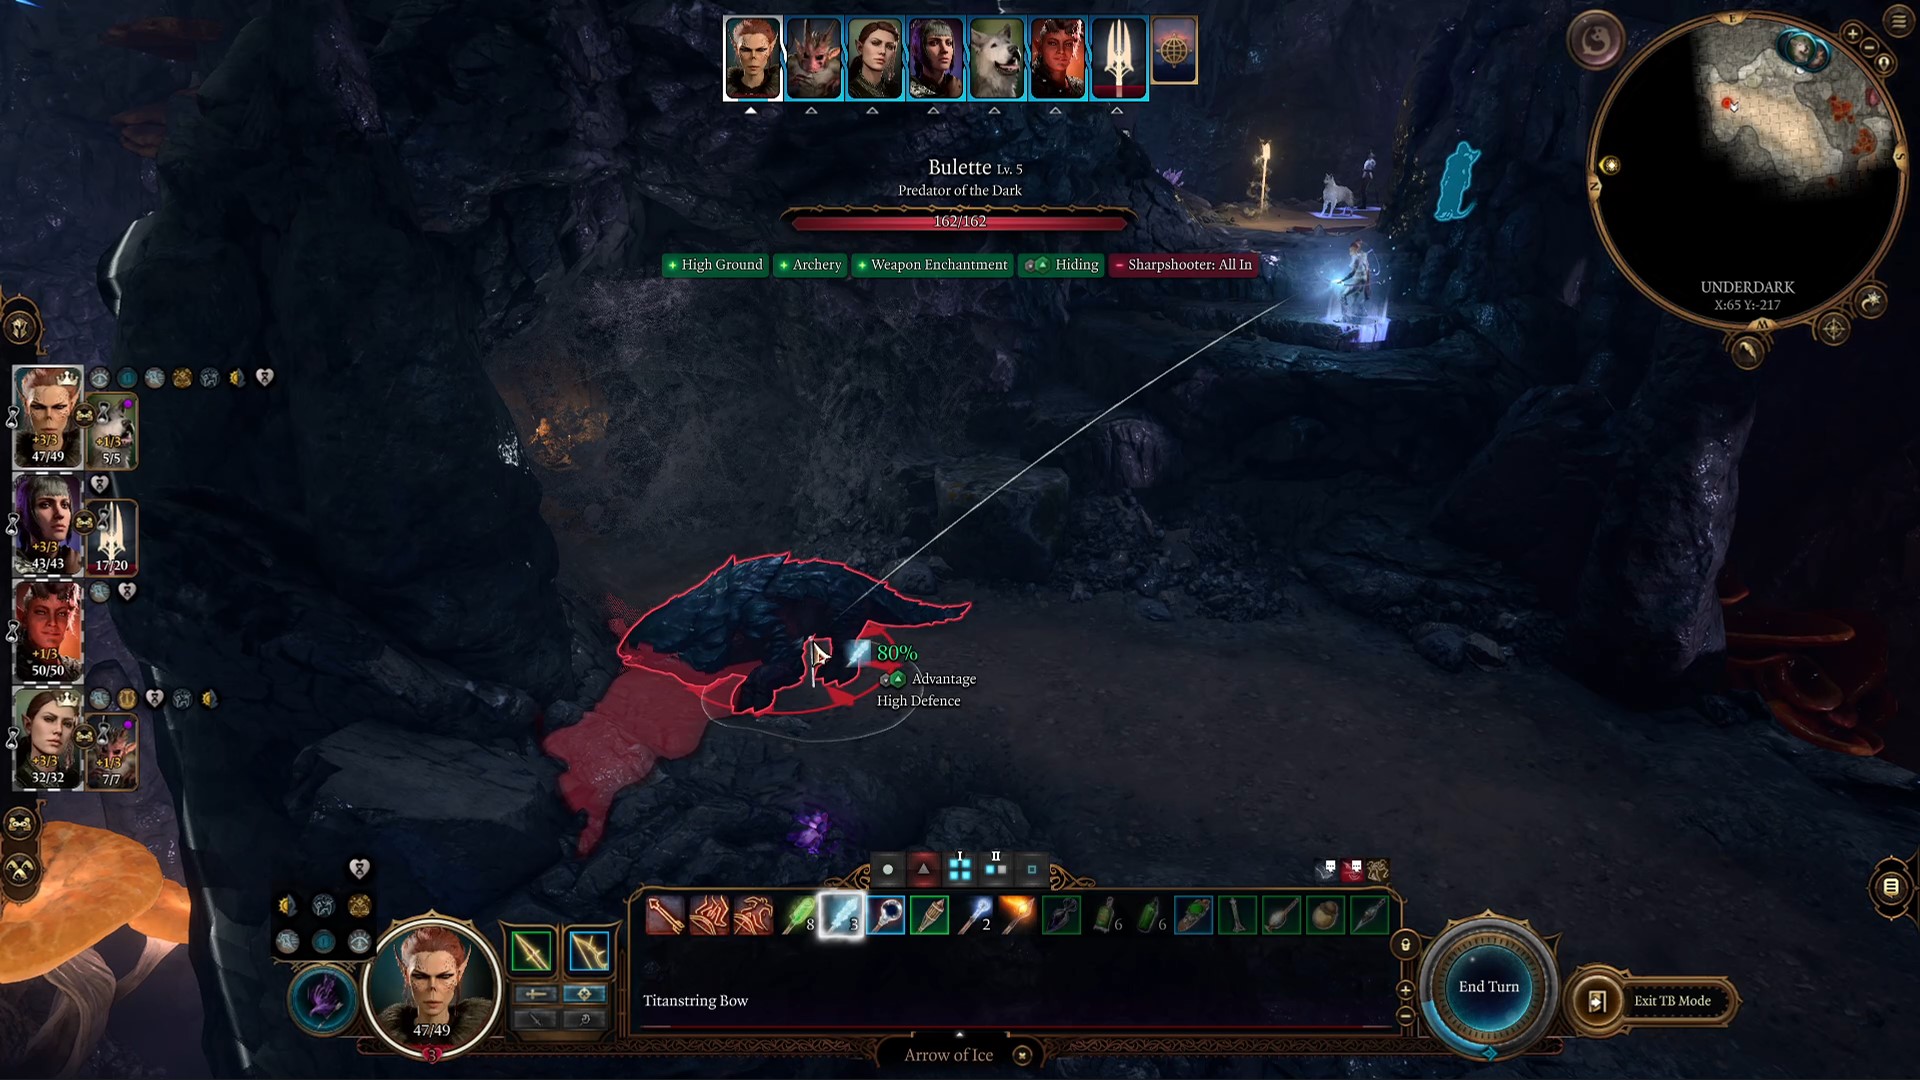
How to Defeat Bulette

The best way to defeat Bulette boss in Baldur’s Gate 3 is by using crowd-controlling effects knocking it prone, and single target spells. The Bulette is a monstrosity of a creature that can be controlled with Command spells, Ice Arrows, and many other crowd-control effects. Its most devastating attack is Deadly Leap, which knocks you back and stuns you with prone.
The Bulette is encountered in the Underdark as you explore. The ground will tremble and a pile of rocks will begin to move. A tip and trick is to enter turn-based combat and prepare by spreading out your party and placing an ice arrow or chromatic orb ice on the pile. This can knock the boss into prone possibly. Consider equipping your party composition with spellcasters vs. weapon damage dealers as their damage will be cut in half. Spells like Scorching Ray, Magic Missile, and Grease are effective at dealing with damage and controlling the boss.
Once controlled on each turn, stay spread to avoid multiple allies dying or becoming stunned, and have each player crowd control the boss to prevent damage. After the boss has been defeated, make sure to grab the Barbarian-specific Bloodguzzler Garb.
Bulette Tips and Tricks on Honour Mode Difficulty?
Below are Bulette’s Stats and features in Baldur’s Gate 3:
- Level: 5
- HP: 125 balanced, 162 honour mode
- AC: 17
- STR: 19
- DEX: 11
- CON: 21
- INT: 2
- WIS: 10
- CHA: 5
- Race: Monstrosity
- Resistances: Slashing, Piercing, Bludgeoning, Acid
- Legendary Action Shredding Scales: Gain Diamon Scales condition granting 100 temporary hit points, expel crystalline scale outward causing bleed damage, and any damage lower than 15 will not affect Bulette.
The Honour Mode boss Bulette uses the Legendary Action Shredding Scales, which boost the creature’s temporary hit points by 100, and any damage lower than 15 will not affect it. Thus, you will need to do high damage with spells like Fireball, Glyph of Warding, Lighting Bolt, and Guiding Bolt. Your melee or range weapon-based builds should focus on crowd control. Fighters can use manoeuvres, Barbarians using Enraged Throw, Paladin’s Thunderous Smite, and Rangers using Ice Arrows.
Next, use a Sorcerer or Wizard for a high burst single target spell. You won’t be able to kill another target in the area, so make sure to equip a Battlemage Elixir instead of a Bloodlust Elixir. The trick and tip for killing the Bulette on honour mode is doing as much damage on turn one as possible. Otherwise, the boss will react with the legendary action, gaining hit points and repeating the process. Ideally, you should be level 5 or higher to unlock Extra Attack or Level 3 spells. Control burst, and focus on high single target damage to beat the Bulette Honour Mode boss in Act 1 of Baldur’s Gate 3.
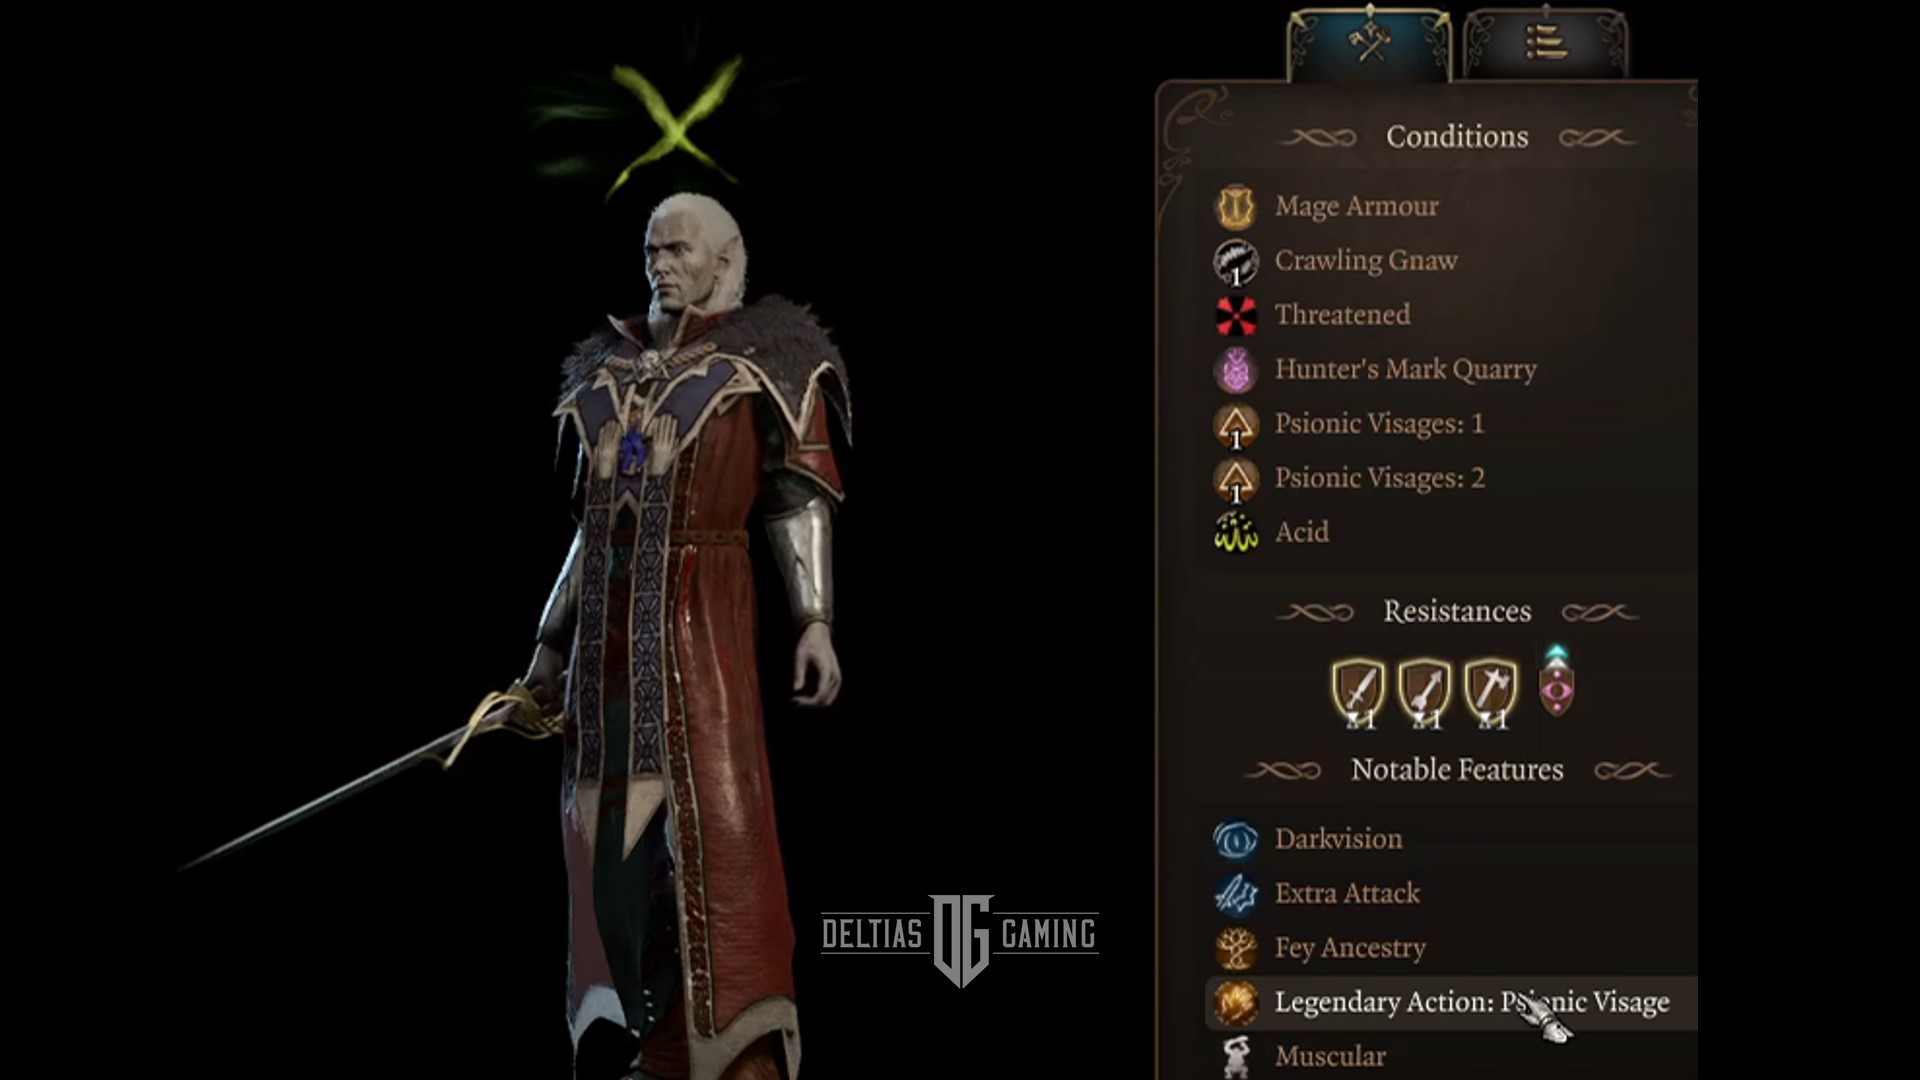
How to Defeat Nere in Baldur’s Gate 3?

The best way to defeat Nere boss in Baldur’s Gate 3 is to position yourself on top of the bridge leading to the Grymforge with a ranged damage dealer and shoot arrows at Nere. Moreover, you can position the rest of your party to the west on top of the ledge and start combat with one ally on the first floor. We suggest pre-buffing with Mirror Image, Bless, and Elixir of Bloodlust for your range damage dealer and have a potion of speed on hand for extra actions. Nere can be found at the entrance to the Grymforge near coordinates X: -632 Y: 325.
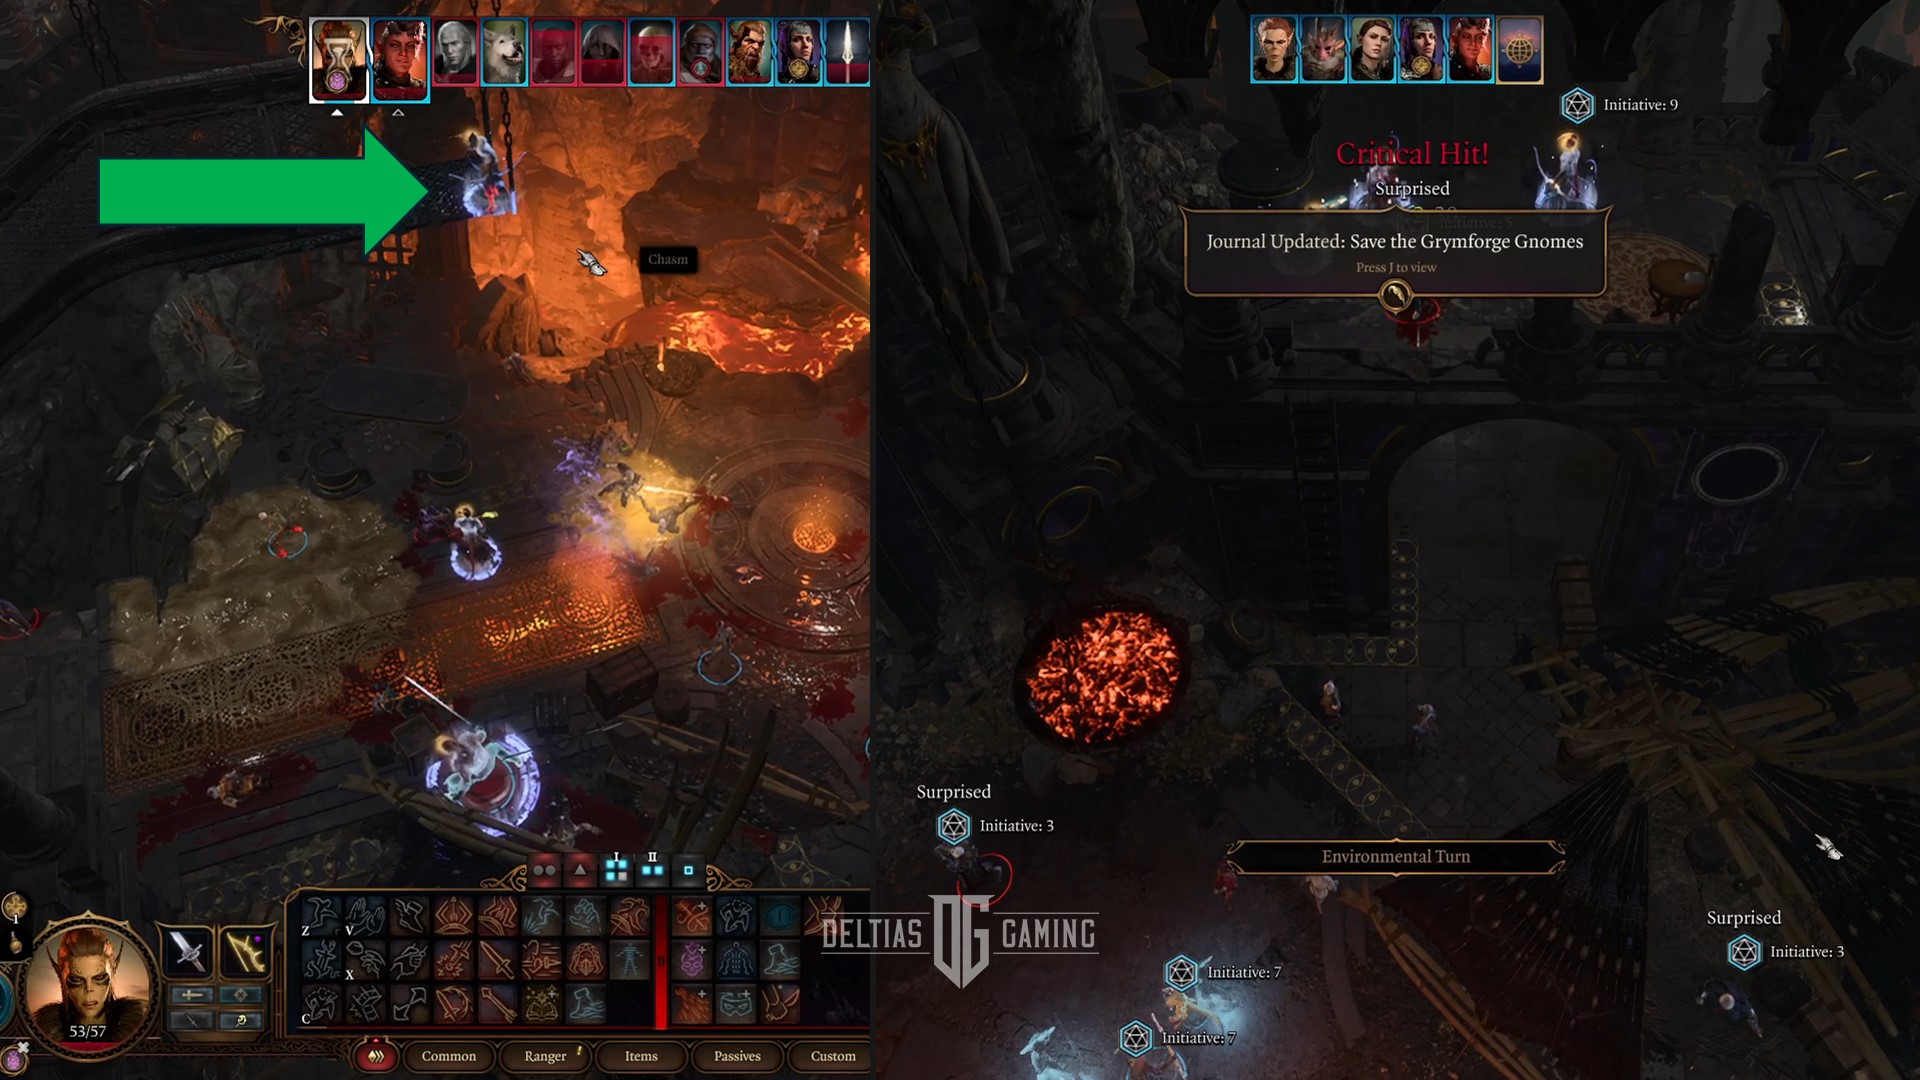
To initiate Nere’s combat encounter, first, complete the Free True Soul quest or Free the Gnomes quest and obtain a Smokepowder Satchel for the cave. Lob this atop the rubble and use Fire Bolt to ignite a fuss. This will bring Nere out of the cave for a discussion which you can decide to aid or destroy. Make sure each of your other characters not in dialogue is in stealth and positioned on the upper floor.
While in dialogue, swap to your archer atop the platform leading to the Grymforge and initiate combat with range damage. This will trigger the surprise status effect giving you a free turn of damage. Next, prioritize the enemies Mind Master Fonmara, and Mind Master Dunnol who can cast a powerful crowd control spell on your team. Additionally, continue to wither down the NPC enemies from range and prevent them from coming up the stairs with Grease and Ice.
Nere Tips and Tricks on Honour Mode Difficulty?
Below are Nere’s Stats and features in Baldur’s Gate 3:
- Level: 5
- HP: 78 balanced, 101 honour mode
- AC: 12
- STR: 17
- DEX: 15
- CON: 15
- INT: 18
- WIS: 13
- CHA: 18
- Race: Drow
- Resistances: Psychic
- Legendary Action Psionic Visage: When attacked, Nere can cast Psionic Visage to protect himself from Physical damage with 3 psionic copies of himself. When he is struck, the visage will detonate directly over the attacker.
The boss Nere’s Legendary Action is Psionic Visage which shields himself from physical damage with three copies and does damage when attacked by nearby enemies. The best tips and tricks to counter his Psionic Visage is by using NPC allies and summons to absorb the damage. Scratch, Shovel, Animate Dead Corpses, Flaming Sphere, etc., all soak up the copies which then allows you to do free damage to Nere without retaliation. Moreover, you can use Magic Missile with three attacks and remove all the copies freeing up damage dealers.
Lastly, consider completing the quest Blind the Absolute which starts with Elder Brithvar near the cave-in room at coordinates X: -626 Y: 354. This will have you deal with the Scrying Eye which can summon more enemies in combat. Additionally, make sure to grab the best boots in Act 1, Disintegrating Night Walkers.
How to Defeat Bernard in Baldur’s Gate 3?

The best way to defeat Bernard in Baldur’s Gate 3 is by using anti-magic Sussur plants found in the Underdark to negate his magic. You can find multiple blooms of Sussur outside the Arcane Tower basement. Simply place these on the ground or equip them on your melee damage dealer attacking Bernard.
In the event you didn’t bring these, the tips and tricks to defeat Bernard Boss are to keep him at a distance. He is susceptible to stuns, ice, and Grease. While stunned, eliminate the other NPC enemies then focus your attention on Bernard at range if possible. After you destroy Bernad, collect the Light of Creation, Guiding Light right, and Hill Giant Strength Club nearby. You can then equip the Guiding Light ring to access the bottom floor of the basement.
Skipping the Bernard Fight
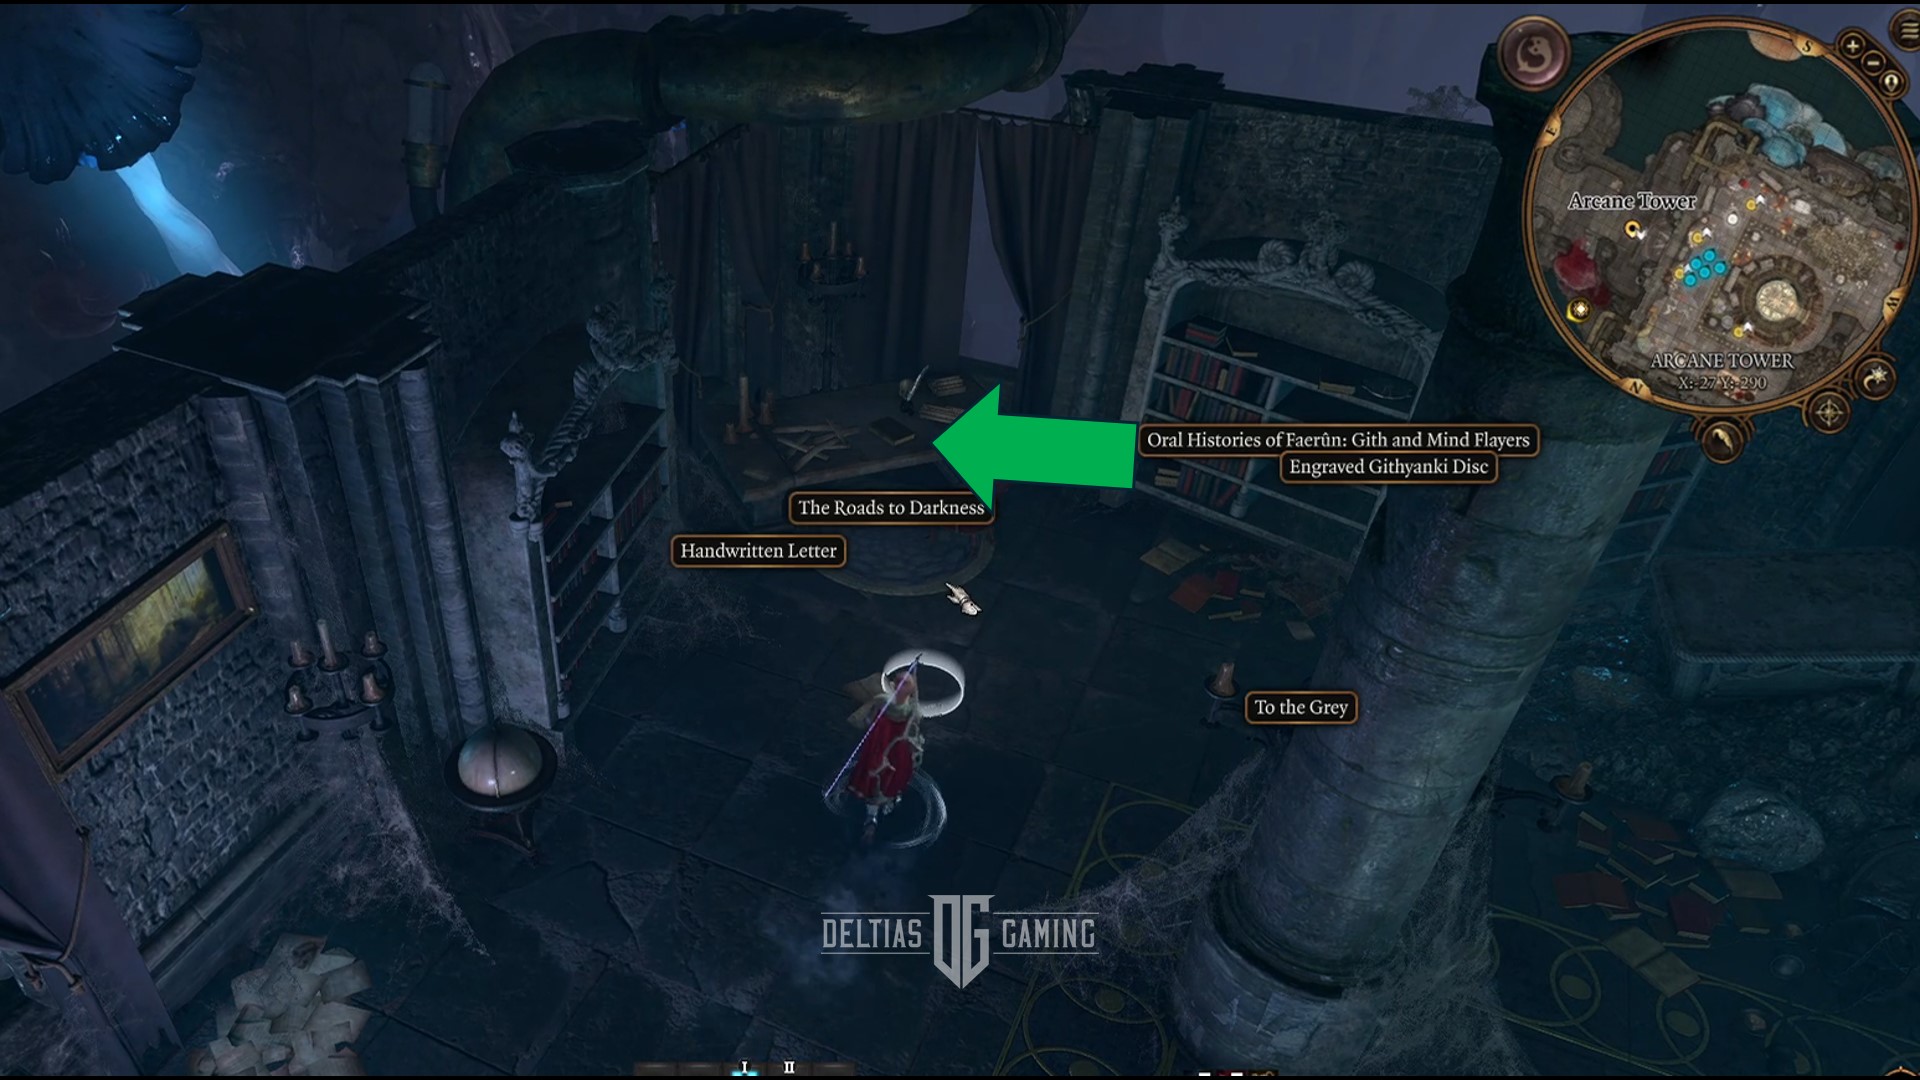
To skip the Bernard fight, locate the book The Roads to Darkness on the floor just below the top of the Arcane Tower. Read the book which will unlock dialogue options for Bernard. Once you ascend to the top, Bernard will respond to new dialogue, and here are the best options to skip this boss fight:
- “Or art thou friend, a rescue from my lonely wake?”
- “How can I trust? How will I ever know? / How can I show myself, my darkest me?”
Selecting these options in order rewards the player with Guiding Light which is used to enter the bottom floor of the Arcane Tower. Unlike other boss fights, there’s little point in fighting Bernard because you gain very little for defeating him. However, below are Honour Mode strategies and tips if you are unable to load your game. Therefore, let us explain Bernard’s fight on Honour Mode and how you can defeat this Baldur’s Gate 3 boss in Act 1.
Bernard Tips and Tricks on Honour Mode Difficulty?

Below are Bernard’s Stats and features in Baldur’s Gate 3:
- Level: 5
- HP: 70 balanced, 91 honour mode
- AC: 19
- STR: 18
- DEX: 14
- CON: 16
- INT: 8
- WIS: 10
- CHA: 6
- Race: Construct
- Resistances: Slashing, Piercing, Bludgeoning, Fire, Lightning, Psychic, Poison
- Legendary Action Leaping Static: Strike an attacker with lightning, dealing 3d8 Lightning. Three more bolts will leap from the target, electrifying as many as three other characters within 6 meters.
In Honour Mode difficulty, the Bernard Boss uses the Legendary Action Leaping Static which does lighting damage within 6 meter radius. The best way to defeat Bernard on Honour Mode is by using the Sussur Flower Antimagic Field either on a melee character or by throwing in his area. This can help negate his magic, and unlike other bosses, Bernard cannot be surprised due to the Alert feat.
The Sparkle Hands gloves found in the Sunlit Wetlands give attackers an advantage while attacking against metal constructs. This works well against Bernard and the Gyrm boss in Act 1. Additionally, you can lure Bernard to the edge of the platform and knock him off with Roaring Arrow or Thunderwave if he’s proving difficult. In summary, negate his magic, keep him at a distance, stun him with crowd control, and knock him off the ledge in the event he’s a problem.
How to Defeat Inquisitor W’wargaz in Baldur’s Gate 3?

The best way to defeat Inquisitor W’wargaz in Baldur’s Gate 3 is by killing the additional enemies surrounding him, and then crowd-controlling the Inquisitor while doing damage. The entrance to the boss fight has multiple Githyanki enemies that can be avoided by using an invisibility potion. Then, you can sneak up and attack a nearby one to trigger the surprise status effect. With W’wargaz won’t be surprised, this gives you one turn of free damage on the enemies outside the area and ideally kill most of them.
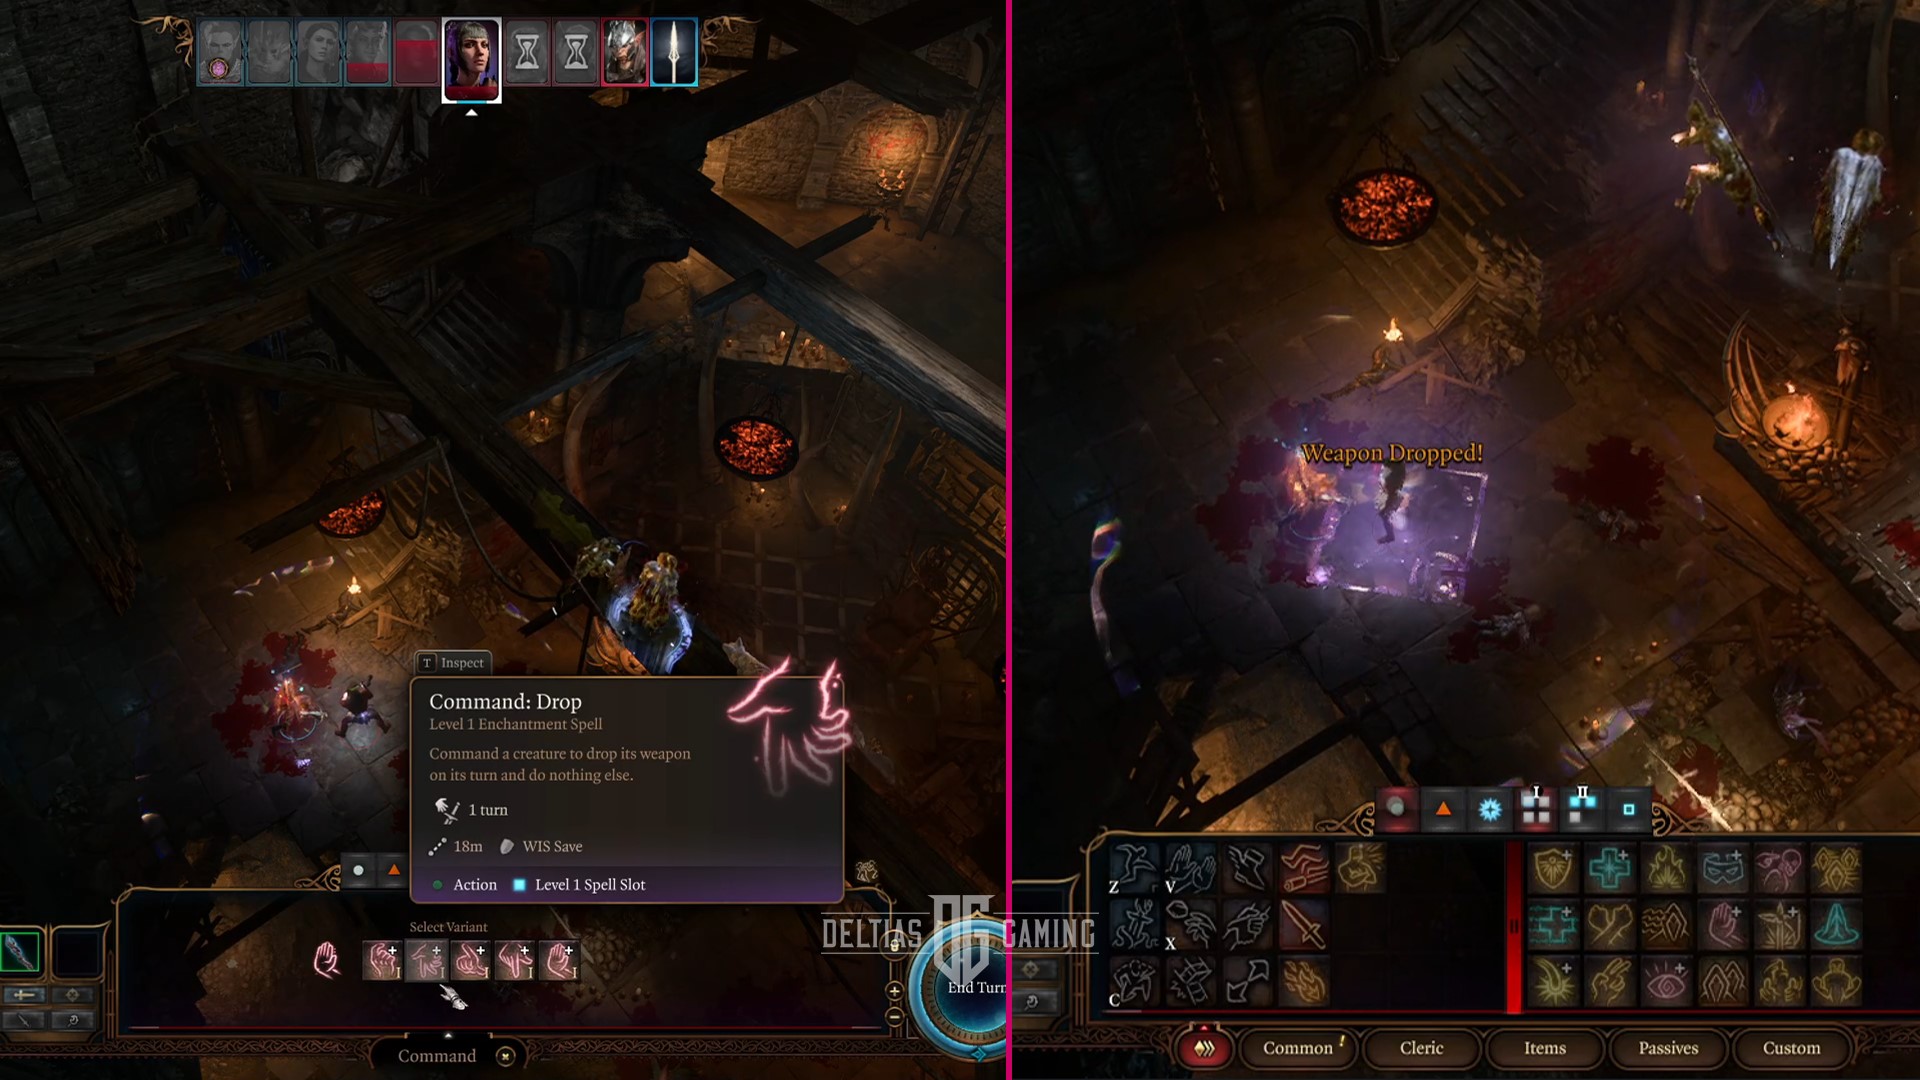
Additionally, W’wargaz will cast the ability, Mindsteal Link. This spell attaches a psychic beam to your allies and team, draining AC and making you Vulnerable to Psychic damage. You’ll want to destroy the enemies and focus on W’wargaz who is easy by himself. Use spells that can stun him and force him to drop his weapon with Command Drop. Pick up his weapon, which will render him useless and not a threat. Once the boss uses the Mindsteal link spell, he will have a high Armour Class. Make sure to use Bless and area-based damage spells if you have trouble hitting him.
Inquisitor W’wargaz Tips and Tricks on Honour Mode Difficulty?
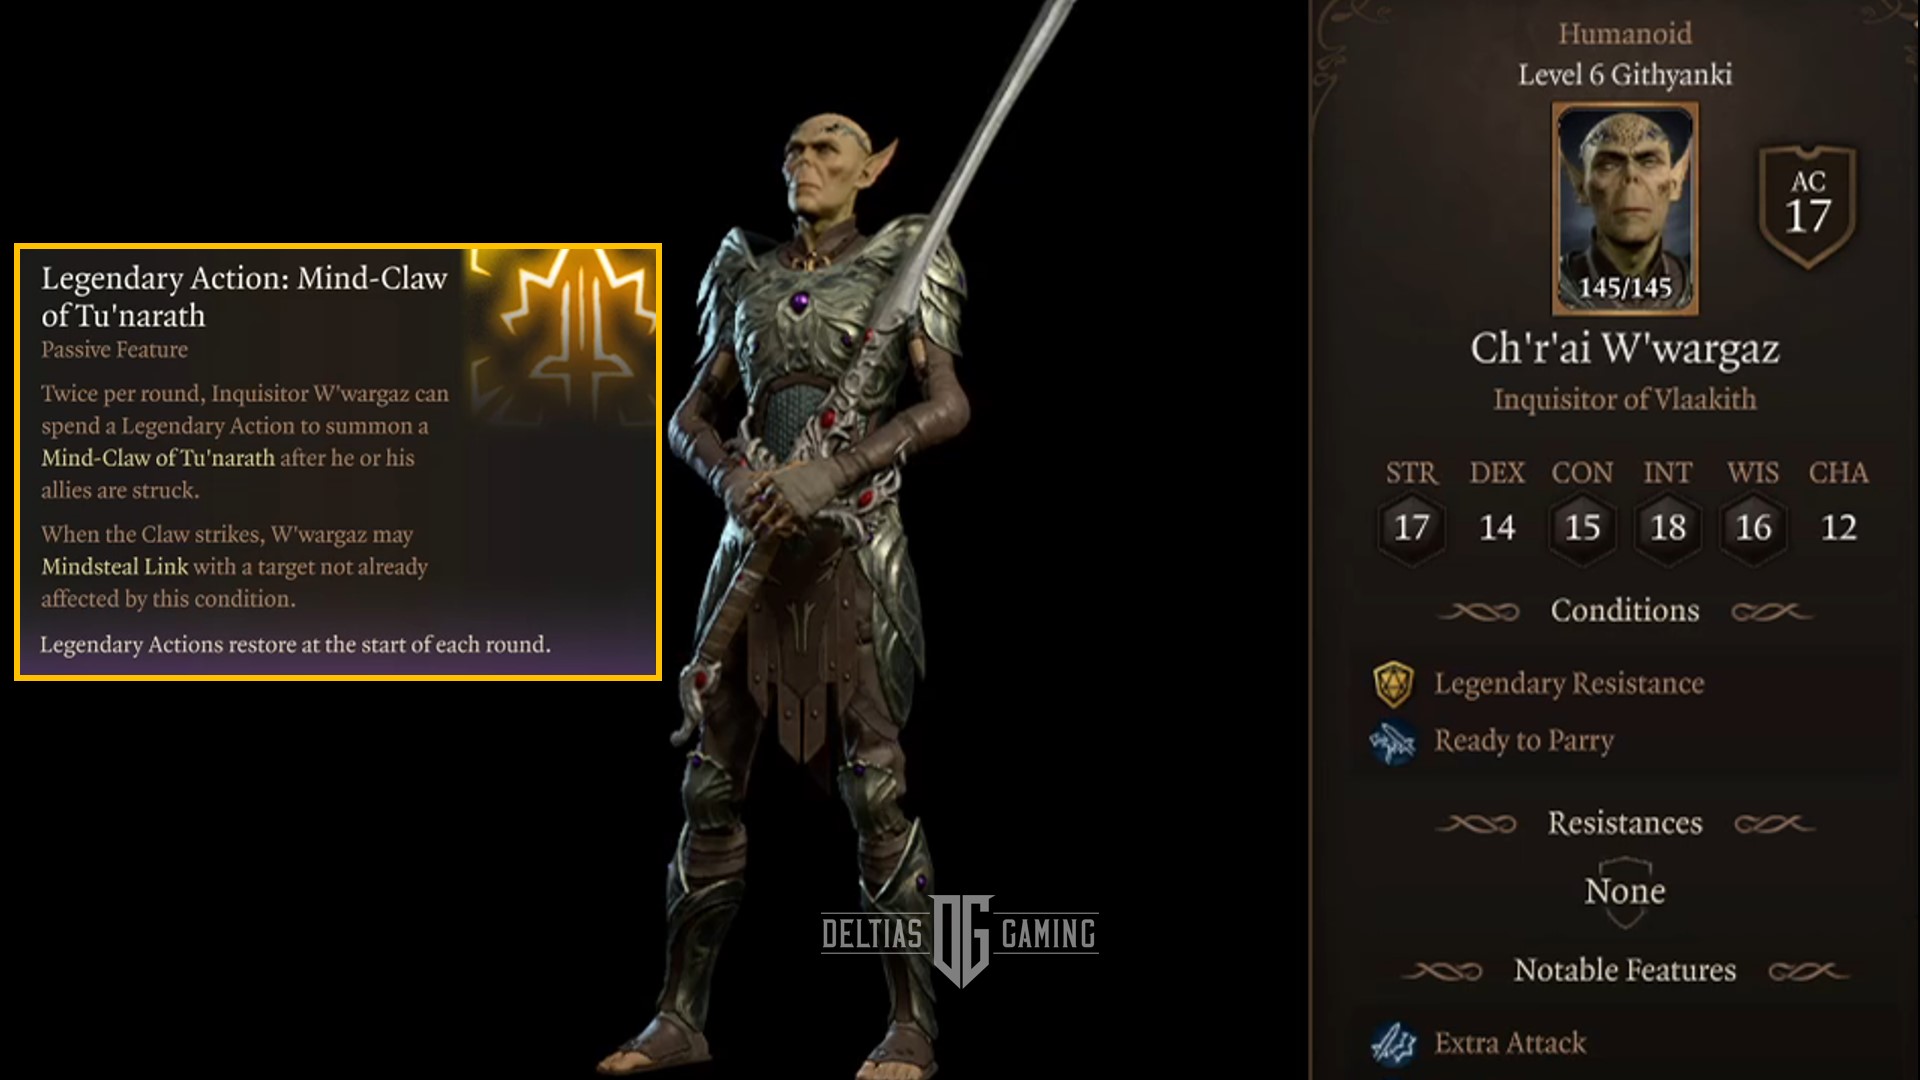
Below are Inquisitor W’wargaz’s Stats and features in Baldur’s Gate 3:
- Level: 6
- HP: 112 balanced, 145 honour mode
- AC: 17
- STR: 17
- DEX: 14
- CON: 15
- INT: 18
- WIS: 16
- CHA: 12
- Race: Githyanki
- Resistances: None
- Legendary Action Mind-Claw of Tu’narath: Temporary summon Mind-Claw of Tu’narath. The mind-claw is a manifestation of Vlaakith’s rage in the form of a psionic blade.
In Honour Mode, Inquisitor W’wargaz’s uses the Legendary Action Mind-Claw of Tu’narath which summons temporary mind-claw enemies that use a psionic blade. The best tip to dealing with these Mind-Claws is avoiding them and dealing direct damage to the boss because they will despawn once he’s dead. The reaction will be triggered based on who attacks the boss, and thus place a blade on the ally who initiated the attack. This is important to know because you can use an ally like Scratch or Shovel to trigger the legendary action and avoid having your main damage dealer deal with the blade.
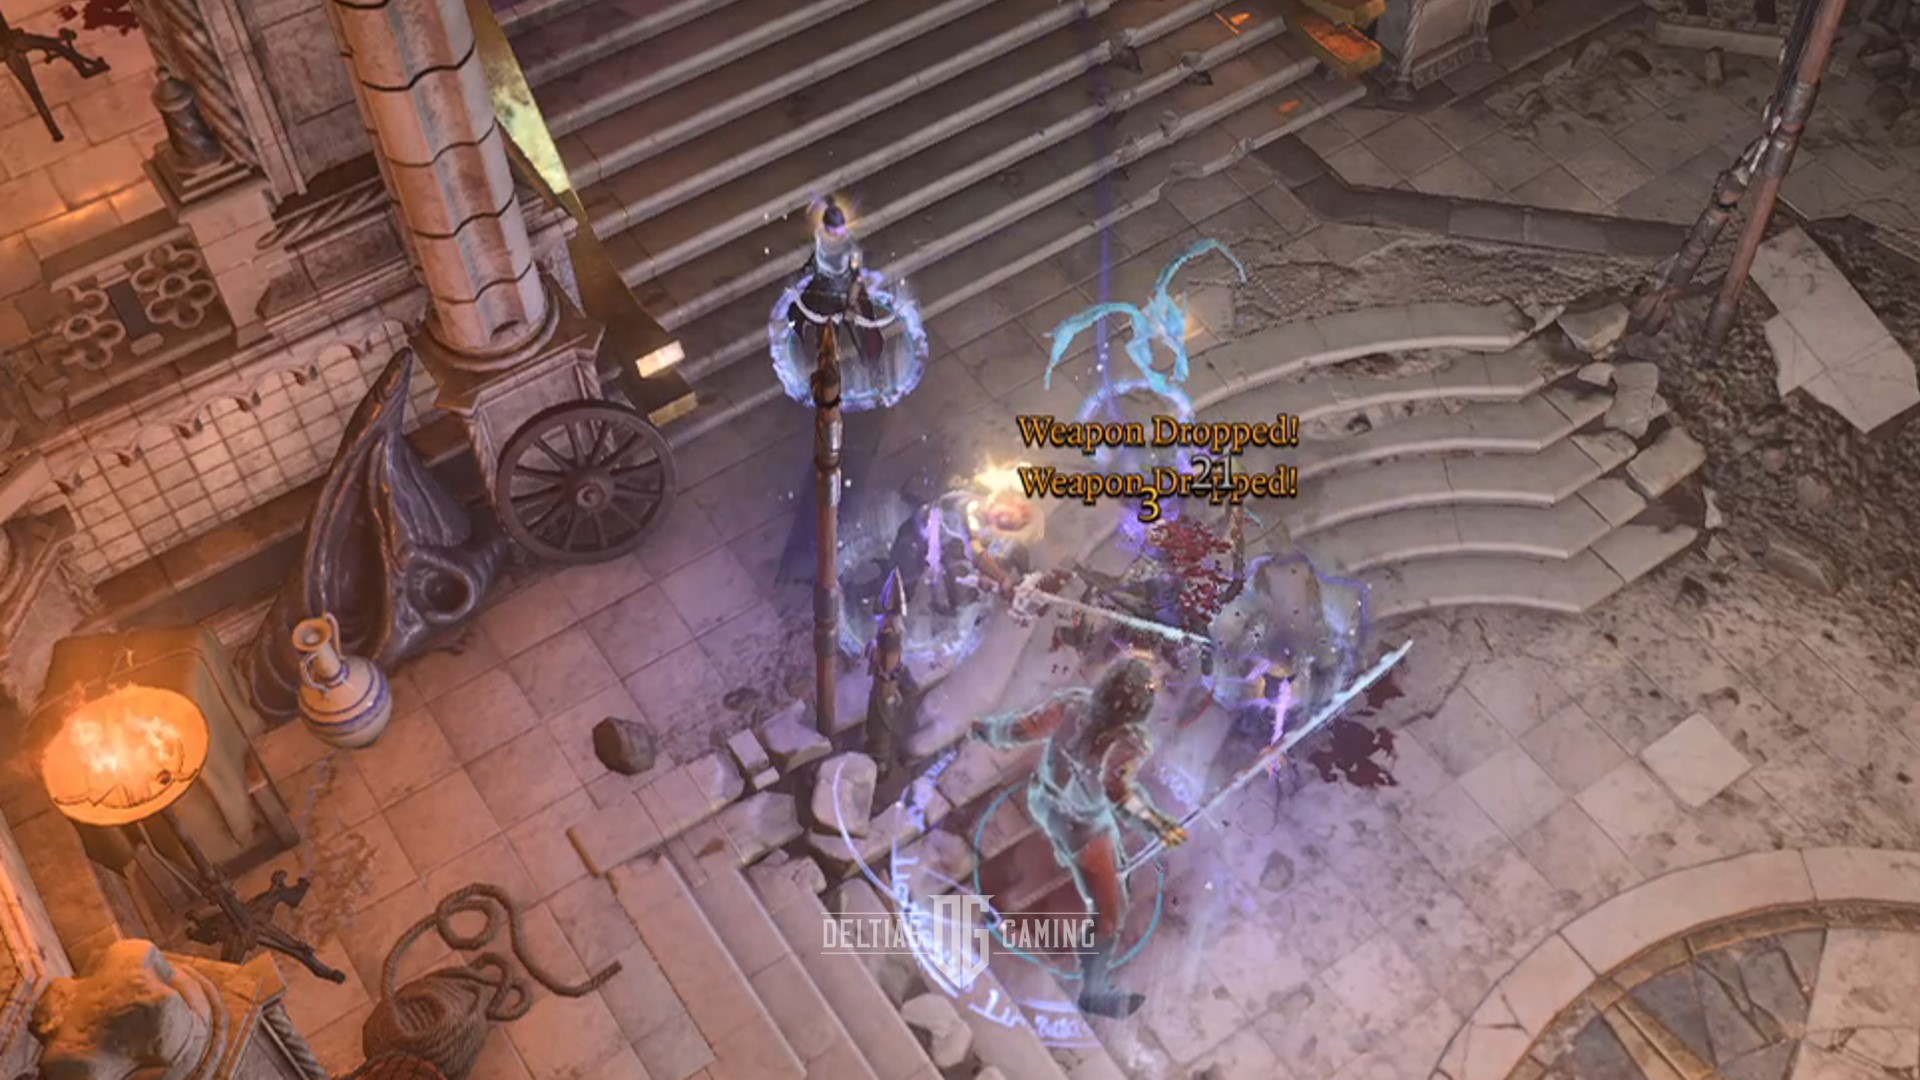
The best way to defeat Inquisitor W’wargaz on Honour Mode is to trigger surprise, eliminate enemies and disarm his weapon. The Fighter can use Disarming Attack and Clerics and Paladins can use Command Drop. Once he drops his weapon, pick it up which will eliminate most of the damage he can impose. Next, continue to hit him with high-probability spells and attacks and expect his Armour Class to be very high with Mind-Link Active. Disarming him and defeating his allies on turn one or two is the key to beating this boss in Act 1 for Baldur’s Gate 3.
How to Defeat Grym in Baldur’s Gate 3?

The best way to defeat Grym is by activating the Adamantine Forge, and then taking the higher ground platforms above using range attacks. With this strategy, you can avoid additional enemies, fire damage, and any damage coming from Grym the Eternal Protector of the Forge. During the fight with Grym, he initially starts immune to all the damage! To remove Grym’s damage immunity, you need to position him in the lava.

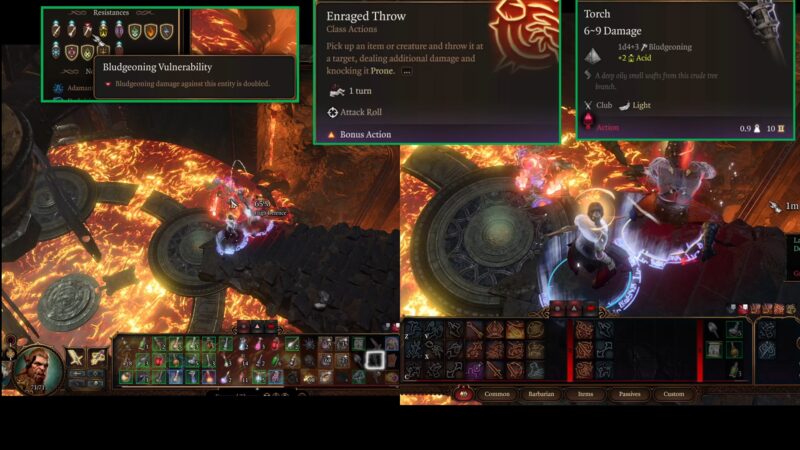
Once positioned in the lava, Grym receives a two-turn debuff called Superheated. Grym then becomes resistant to Slashing, Piercing, Cold, Thunder, Acid, and Force. What’s most important, however, is that Grym becomes vulnerable to Bludgeoning damage. Vulnerable means the target takes twice the damage from that source. Thus, you want bludgeoning-based damage like Mauls.
In summary, have one player who can fly or use Misty Step to enter the bottom area and flip the levers. The rest of your party remains on the top of the platform elevated away from damage. Ideally, bring a Berserker Barbarian who can throw torches for double the damage. If Grym moves out of position, put him back in the lava with a summon like Spiritual Weapon or Flaming Sphere and repeat to beat him easily.
Grym Tips and Tricks on Honour Mode Difficulty?
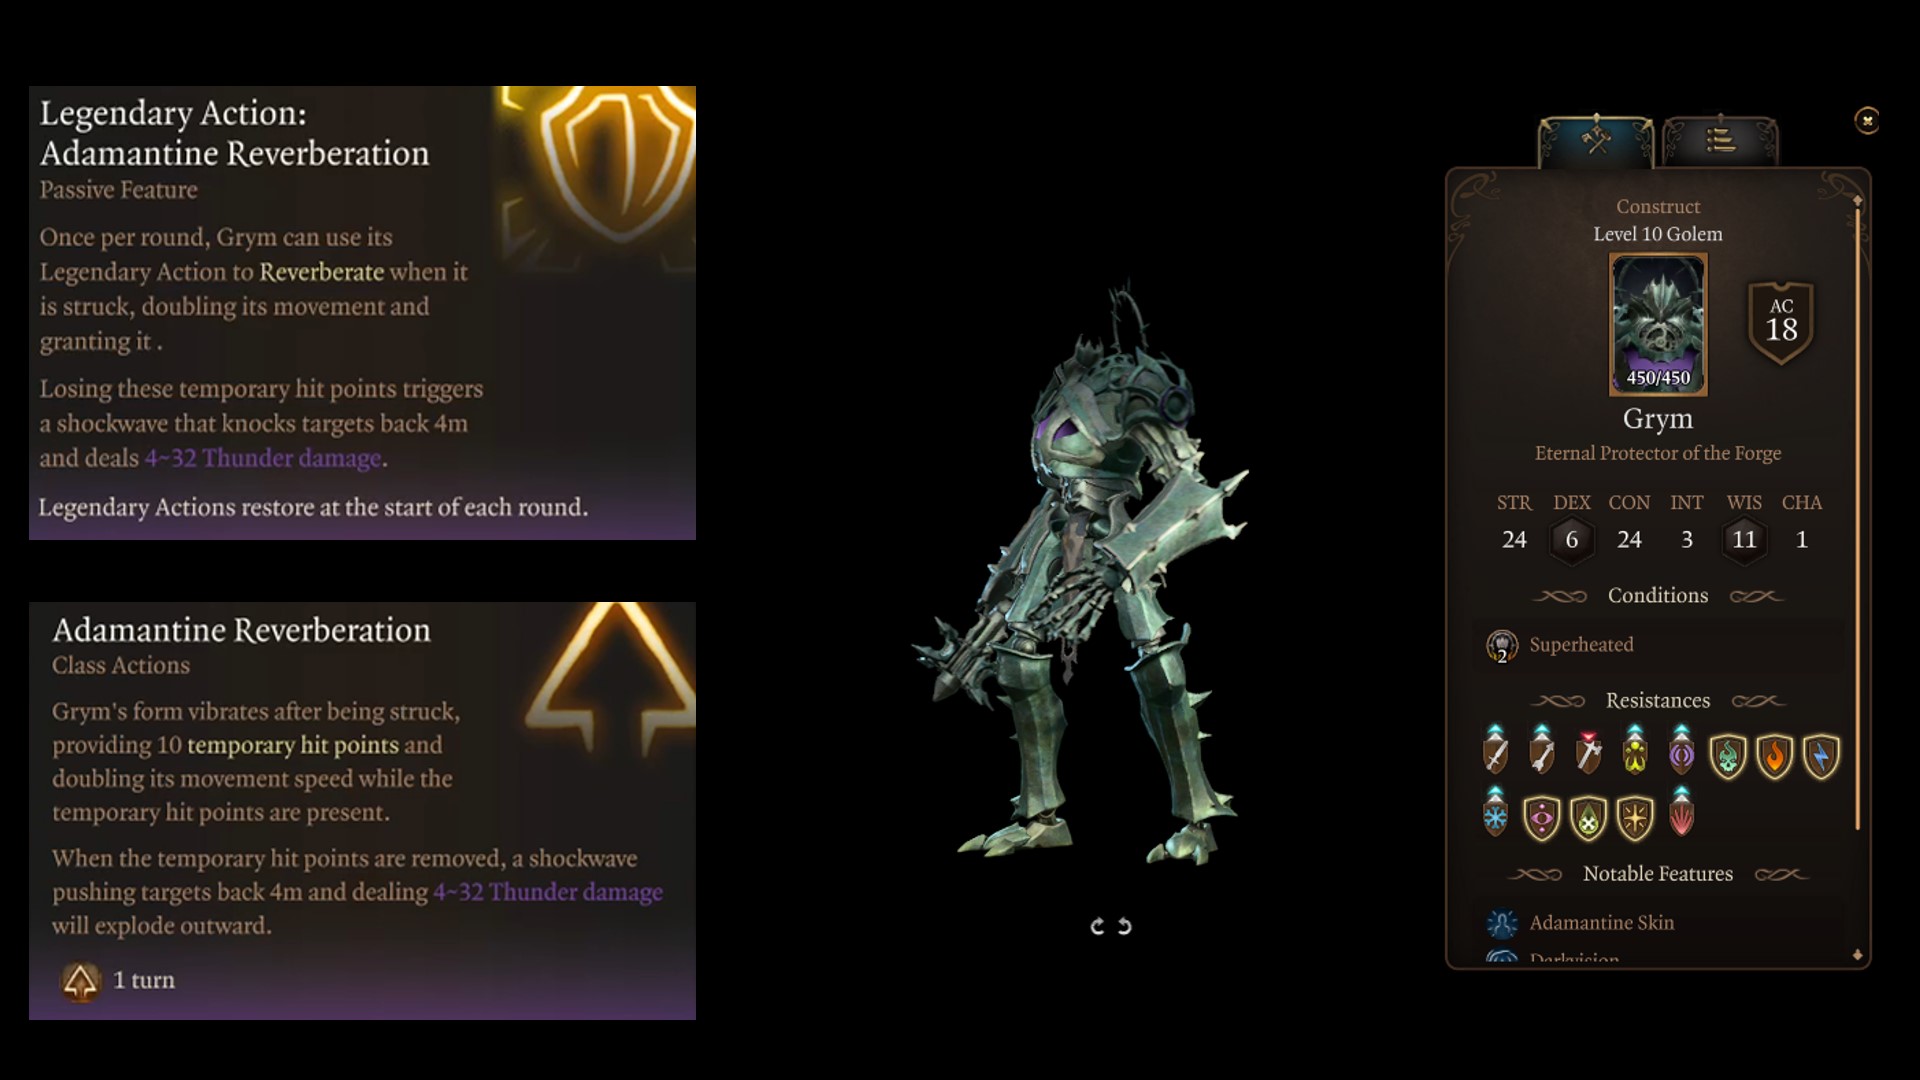
Below are Grym’s Stats and features in Baldur’s Gate 3:
- Level: 8
- HP: 300 balanced, 450 honour mode
- AC: 18
- STR: 24
- DEX: 6
- CON: 24
- INT: 3
- WIS: 11
- CHA: 1
- Race: Golem
- Resistances: Slashing, Piercing, Bludgeoning, Acid, Thunder, Necrotic, Fire, Lightning, Cold, Poison, Psychic, Radiant, Forced
- Legendary Action Adamantine Reverberation: Once per turn when struck by an attack, Grym reverberates, granting 10 temporary hit points and doubled movement speed until the temporary hit points are depleted.
In Honour Mode difficulty, Grym uses the Adamantine Reverberation Legendary Action once per turn to increase hit points and double movement speed. To beat this boss, equip either Bludgeoning damage or move to the top of the platform and throw torches.
Moreover, The Sparkle Hands gloves found in the Sunlit Wetlands give attackers an advantage while attacking against metal constructs. This combined with the Act 1 Maul, Hamarhraft can produce massive damage with a high-strength melee build. Employee this strategy if you cannot load or reach the top of the platform. This strategy will award the A Grym Fate achievement for not using the hammer. That should complete the guide for Baldur’s Gate 3 Act 1 Boss Fights and How to Defeat on Honour Mode.
Looking For More About Baldur’s Gate 3?
Thank you for reading Baldur’s Gate 3 Act 1 Boss Fights: How to Defeat on Honour Mode Guide. We provide the latest news and create guides for Baldur’s Gate 3. Also, watch me play games on Twitch or visit my YouTube channel!