Facebook
 Reddit
 Email
Email
Don’t miss a single vital companion, location, or piece of gear in our Baldur’s Gate 3 Act 3 Checklist: All Things to Complete guide!

In Baldur’s Gate 3, the ongoing conflicts, story, character arcs, and more culminate in a very dense Act 3. Once you make your way into the city of Baldur’s Gate, the game opens up, letting you, the player, make choices about where to go and what to do first. Consequently, the sheer number of possible places to visit, NPCs to meet or reunite with, and quests to pick up and complete can be very overwhelming. Our Baldur’s Gate 3 Act 3 Checklist: All Things to Complete guide is here to provide you with some direction so you don’t miss any of the essentials along the way!
This guide has been updated for the Patch 8 version of Baldur’s Gate 3.
All Things to Complete in Act 3 of Baldur’s Gate 3
The most important things to do in Act 3 are to wrap up all your companion quests, collect the strongest end-game gear, and unlock the final permanent bonuses. Moreover, you’ll want to do all this before advancing the main story quest too far. Otherwise, at a certain point, the game will rush you along to the final conflict.
After the events at the end of Act 2, you should now know that your ultimate enemies are Gortash, Orin, and the Elder Brain. The main story goal presented to you shortly before reaching the city is the necessity of killing both Gortash and Orin so that you can claim their netherstones. You will encounter both of these antagonists as you make your way into and around the city.
Ultimately, you can kill one of them without triggering the end game in Baldur’s Gate 3. Killing the second will mean that the Elder Brain is now free of their control, and it will become very difficult to do anything in the game other than move towards the final confrontation.
This Baldur’s Gate 3 Act 3 Checklist divides the map into the important named areas/locations and provides you with all the information for the vital companions, quests, and gear you’ll want to find.
Baldur’s Gate 3 Act 3 Major Locations List:
- Rivington
- Circus of the Last Days
- Open Hand Temple
- Wyrm’s Crossing
- Danthelon’s Dancing Axe
- Sharess’ Caress
- Wyrm’s Rock Fortress
- Wrym’s Rock Prison
- The Wyrmway
- Baldur’s Gate Lower City
- Counting House
- Devil’s Fee
- Elfsong Tavern
- Forge of the Nine
- House of Grief
- Iron Throne
- Steel Watch Foundry
- Sorcerous Sundries
- Szarr Place
- The Blushing Mermaid
- Sewers
- Lower City Sewers
- Undercity Ruins
- Rivington
- Circus of the Last Days
- Open Hand Temple
- Fraygo’s Flophouse
- Sharess’ Caress
- Danthelon’s Dancing Axe
- Wyrm’s Rock Fortress
- Wrym’s Rock Prison
- The Wyrmway
- Lower City Vendors
- The Guildhall
- The Counting House
- Lower City Sewers
- Elfsong Tavern
- Sorcerous Sundries
- Philgrave’s Mansion
- Old Garlow’s Place
- The Blushing Mermaid
- The Lodge
- House of Grief
- Elerrathin’s Home
- Szarr Palace
- Devil’s Fee
- House of Hope
- Water Queen’s House
- Flymm Cargo
- Iron Throne
- Steel Watch Foundry
- Return to Wyrm’s Rock Fortress
- Candulhallow’s Tombstones
- Murder Tribunal
- Undercity Ruins
- Temple of Bhaal
- Morphic Pool
- The High Hall
- Baldur’s Gate 3 Finale
Related:
Rivington
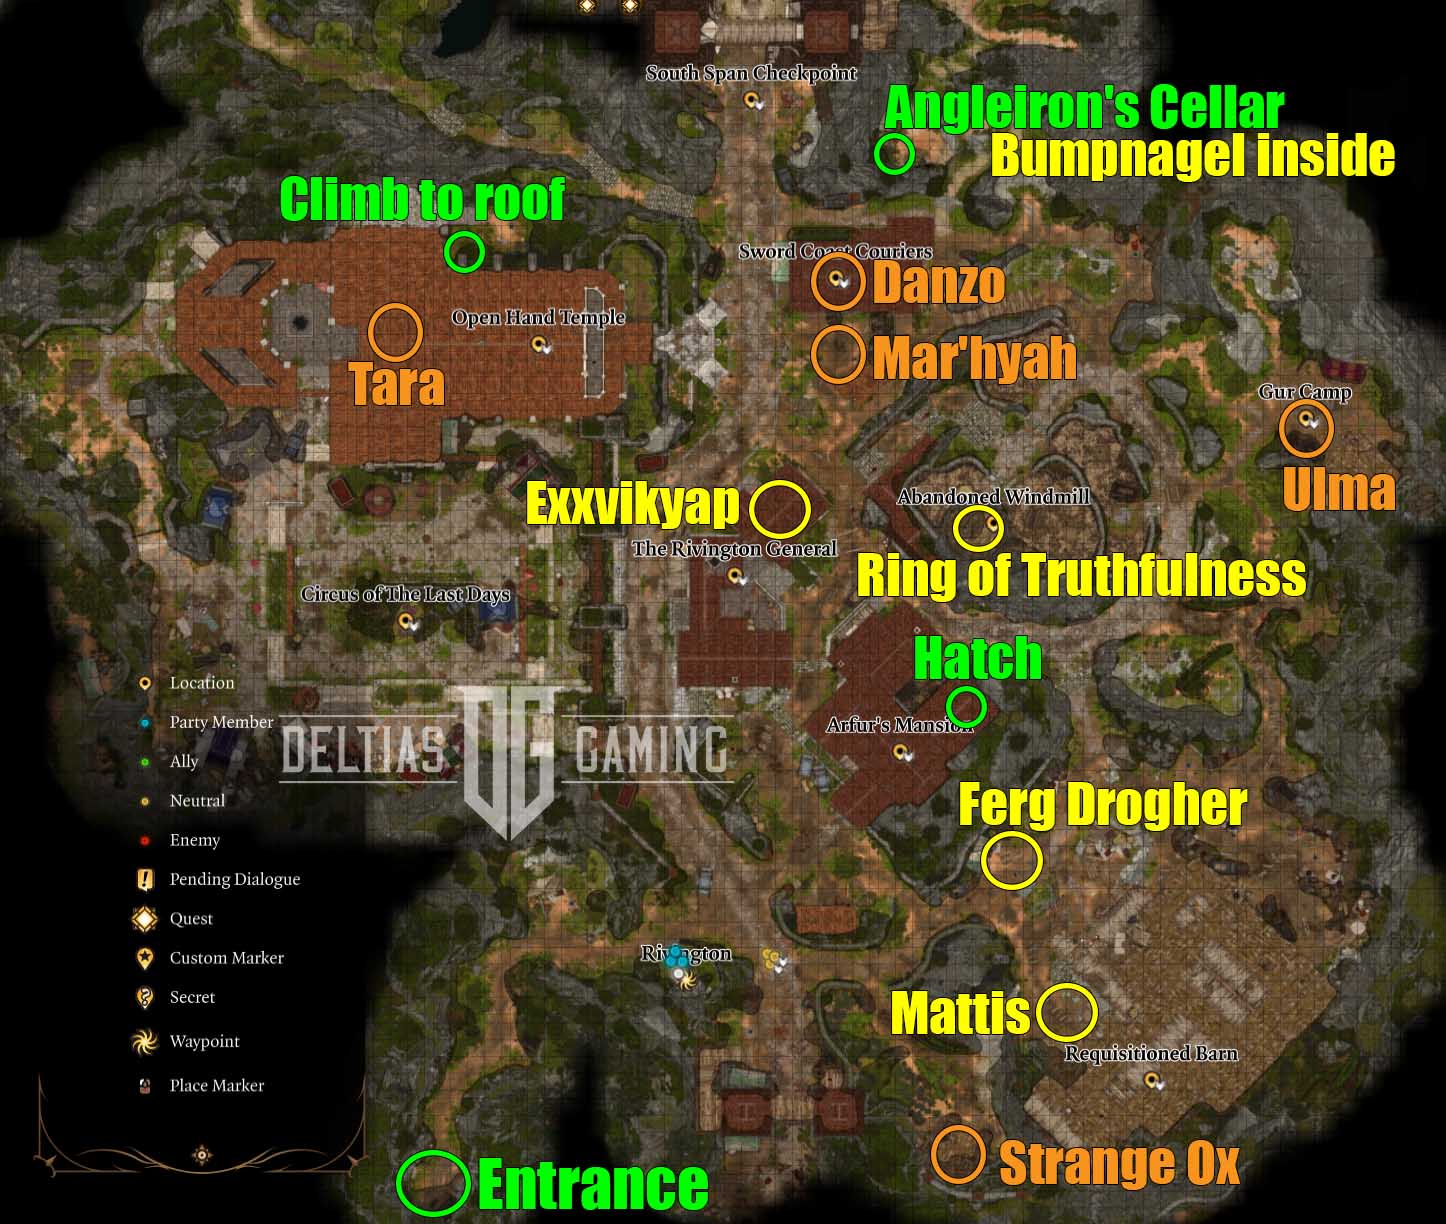
This initial area of Act 3 in our Baldur’s Gate 3 Act 3 Checklist is the town of Rivington, which is located just outside the guarded entrance to the city of Baldur’s Gate. In the main part of town, there is a Circus and a large Monk Temple which will be covered in sections below. Much of the rest of the area is taken up by a few homes and businesses which have become surrounded by the refugees seeking to escape the Absolute’s army.
We recommend going around this area starting to the right/east and going counter-clockwise. Before you head over to the Requisitioned Barn, if you have a Selunite-aligned Shadowheart in your party switch her out for someone else. A Shadowheart devoted to Shar, or no Shadowheart at all, can potentially unlock a particular vendor there.
Quests
- Help the Devilish Ox: If you’ve spoken with, but not antagonized the Strange Ox into a fight in the previous Acts, you’ll locate him in a barn to the far south in Act 3. Speak with him and he’ll ask you for help getting into the city. You can say no without starting a fight. If you agree he will change into an apple you carry in your pocket.
- Investigate the Suspicious Toys: You can start this quest at Arfur’s Mansion. Approach the home and Arfur is standing outside trying to deal with refugees who have taken over the house. Deal with this situation any way you want. Discover the locked basement hatch inside the home and break in. Watch out for all of the traps downstairs, and make your way to the back to uncover the blackmail letter.
Requisitioned Barn
- Investigate the Suspicious Toys: Speak to Manip Nestor outside the barn. Choose the first dialogue option: “Donations for what?”. Then, use the Persuasion option to tell him there may be something dangerous inside. Locate the chest full of suspicious toys in the back of the barn. Return and speak to Arfur again and Intimidate him into telling you all he knows.
- Ferg Drogher: This sketchy trader is a Sharran in disguise. If you approach him with a Selunite Shadowheart, he will not let you browse his wares. If she isn’t there, you can pass a Persuasion check to see his special stock. If a Sharran Shadowheart is with you, then you don’t have to pass the check at all.
Gur Camp
- The Pale Elf: If you have Astarion in your party, it can be worth it for his story to stop by the Gur Camp. Their leader Ulma will recognize him and ask you and the party to rescue their children, who have been kidnapped by Cazador Szarr. This will initiate the Investigate Cazador’s Palace quest.
Angleiron’s Cellar
- Avenge the Ironhands: Enter the gnomes’ hideout and you can find Wulbren and Barcus if they survived Act 2. Wulbren blames the Gondian gnomes and their Steel Watchers for the current woes of Baldur’s Gate. Accepting his plan will direct you investigate to the Steel Watch Foundry in the city.
- Disable the Steel Watch: A separate quest from Avenge the Ironhands, but similar in direction and goal. Destroying the Steel Watchers is a vital way to weaken Gortash, and it’s recommended you do so before eventually fighting him.
Sword Coast Couriers
- Find the Missing Letters: Speak to Postmaster Danzo and inquire about the problems with the post. Agree to search for the missing pigeons and head upstairs to speak to the surviving pigeons. This will lead you to the nearby Open Hand Temple rooftop, where you should bring Gale to meet his old friend Tara.
- Find a way into Wyrm’s Rock Fortress: The guards at the entrance to Wrym’s Rock will have to be convinced to let you in, and this is an easy way to get by. Detect and steal the ‘Urgent Report for Duke Ravengard’ in the main room. Presenting this at the gate will get you inside.
- Angry Mar’hyah: Just outside to the south, you will locate the kennels where Scratch is originally from. The woman running the operation is quite unpleasant, both to the dogs and to the boy helping. Summon Scratch if you’d like to discover more. Know that there are no in-game consequences if you should choose to get permanently rid of Mar’hyah.
Gear
- Hellrider Longbow: Incredibly high initiative, meant for use with non-Ranger or Rogue build to go sooner in combat. Sold by Ferg Drogher.
- Nymph Cloak: Helpful due to the extra spell slot. Sold by Ferg Drogher, special stock.
- Robe of Supreme Defences: A great robe for defensive-minded cloth wearers. Sold by Ferg Drogher, special stock.
- Scabby Puglist Circlet: Helm choice for Monk players. Sold by Mattis
- Ring of Truthfulness: Found on a weak mind flayer in the basement under the Abandoned Windmill. Looted from mind flayer in the basement of the Abandoned Windmill.
- Martial Exertion Gloves: One of the best gloves in the game because it gives you extra action for taking some damage. Sold by Bumpnagel.
- Thunderpalm Strikes: Another set of monk gloves with Thunderwave spell. Sold by Bumpnagel.
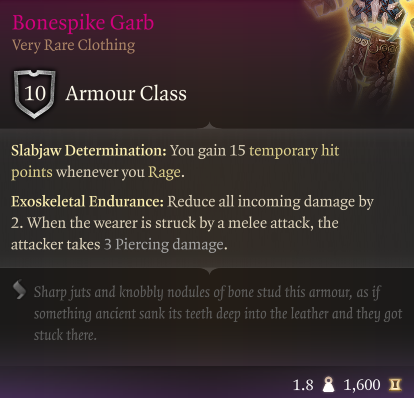
- Bonespike Garb: Barbarian-specific end-game cloth. Sold by Exxvikyap.
- Ambusher: A shortsword that gives +1 initiative. Sold by Exxvikyap.
Circus of the Last Days
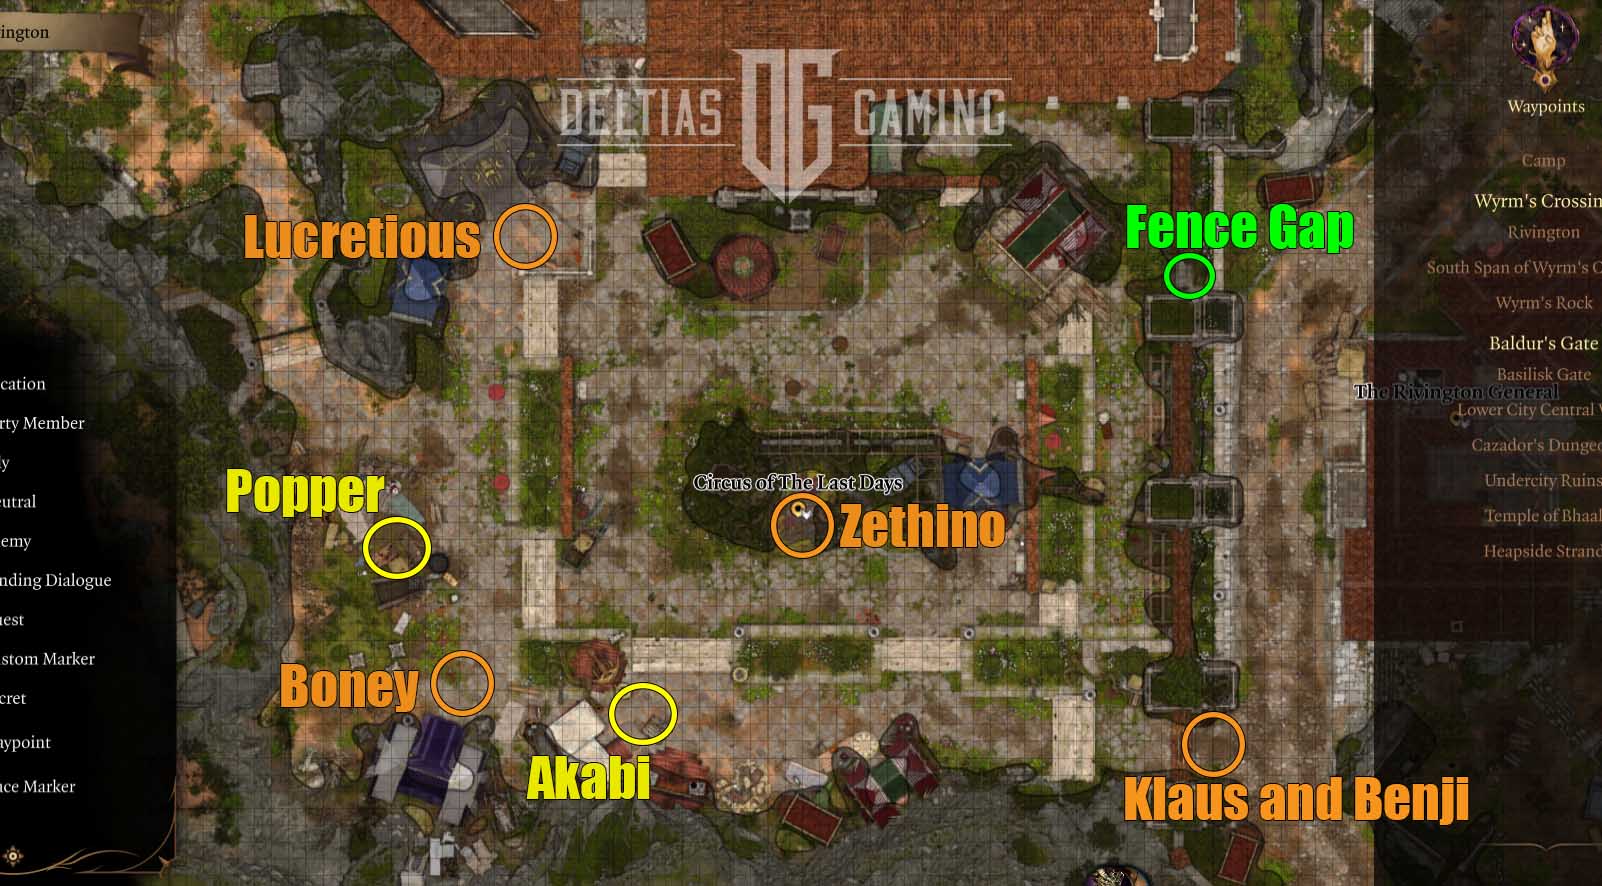
The Circus of the Last Days has set up shop in Rivington, but with all of the murders currently occurring, they’re being extra cautious about who they let inside. At the entrance, you’ll meet Klaus and Benji, and you’ll have to pass a Persuasion or Deception check to get in. If that doesn’t work, you can use the gap in the fence just north of the entrance to sneak in.
There are several vendors or events in here which aren’t strictly necessary to see, but are still fun to trigger and experience.
Quests
- Find Dribbles the Clown: This quest ties into searching for Orin and is given to you by the Ringmaster Lucretious. However, you can locate Orin another way. Additionally, finding all of the dismembered pieces of Dribbles is a lot of work for a reward you can get by simply pickpocketing Lucretious. If you are dedicated to finding all of the pieces, the Clown’s Severed Hand is over on a table behind Popper.
- Zethino: This dryad doesn’t have a standard quest, but if you have a romance going with a companion, put them in your party and approach Zethino. You’ll be asked three questions you’ll need to correctly answer to demonstrate how much you know your love. Answering correctly grants approval points and gives you further insight into your romance partner.
- Akabi: The djinni runs a spin-the-wheel game where you can never win the main prize. Send Astarion or another sneaky character to pickpocket the Djinni Ring off him first. Spin the wheel again and win. Furious, Akabi will teleport you to a small Jungle zone. Make your way out and claim the legendary trident Nyrulna on the way.
Gear
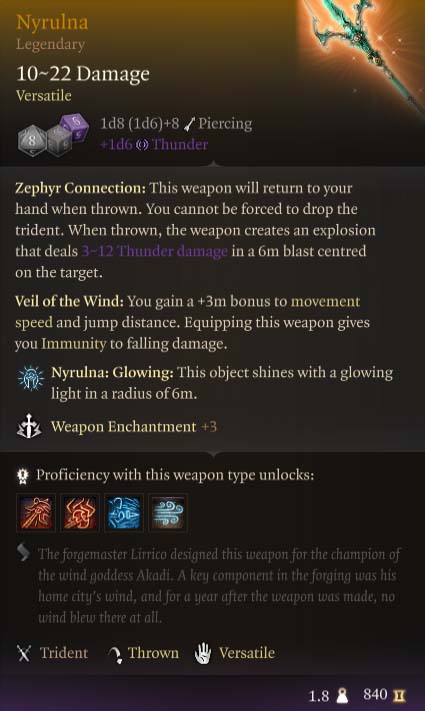
- Nyrulna: A powerful thrown weapon that automatically returns to the user. Used in combination with Bhaalist Armor for one of the best melee builds. Locked in a chest in the Jungle Akabi teleports you to, next to the portal out.
- Spellmight Gloves: You can deal additional damage in exchange for a penalty to the Attack Roll. Rewarded for completing Find Dribbles the Clown. It can also be looted for pickpocketed off of Lucretius.
- Dark Displacement Gloves: A good set of back-up gloves for Barbarians or Rogues due to their bonuses to throwing and stealing. Sold by Popper.
- Band of the Mystic Scoundrel: After a weapon attack, cast an illusion/enchantment spell as a bonus action. Looted from a backpack found in the far southwest corner of the Jungle.
Also Check:- BG3 Interactive Map
Permanent Bonus
- Sweet Stone Features: Purchase a statue of yourself for 5,000 gold and inspect it at your camp. This will apply the Sweet Stone Features condition to you which grants you a +1d4 bonus to Attack Rolls and Saving Throws.
Open Hand Temple

Next in our Baldur’s Gate 3 Act 3 Checklist is the Open Hand Temple, which can be found just north of the Circus of the Last Days. It’s here you can pick up a major quest in the search for Orin. ‘Solve the Open Hand Temple Murders’ will introduce you to a new NPC, Investigator Valeria, a Hollyphant. The quest will lead you into the cellar area beneath the temple, turning into a crypt space and leading into a deeper cave.
Furthermore, before you head inside you’ll want to make sure that you can cast the Speak with Dead spell a couple of times.
Quests
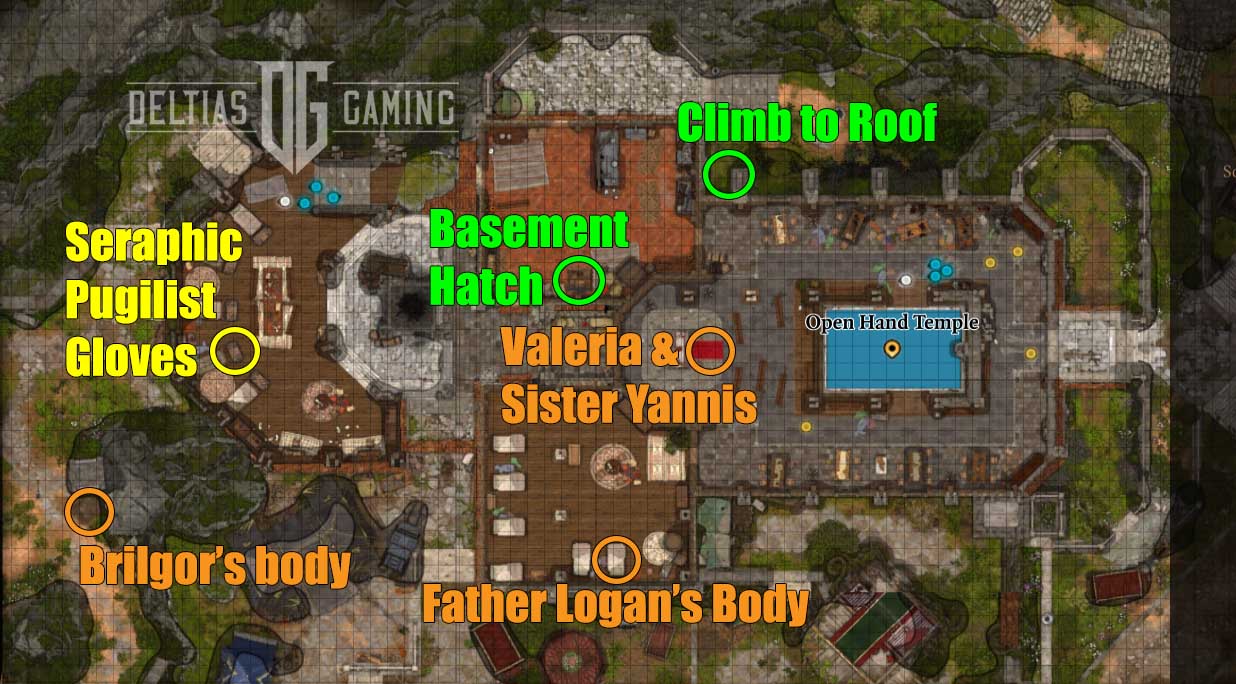
- Find the Missing Letters: You likely just picked this quest up at the Sword Coast Couriers. To discover the culprit, put Gale in your party, make your way around the north exterior of the Temple, and climb up on the roof. You’ll locate a Tressym named Tara up here, and you can have Gale ask her not to eat any more pigeons. After she’s flown away, grab the Ring of Blink (and the missing letters!) out of the nest.
- Solve the Open Hand Temple Murders: Approach the central dais in the temple and you’ll see Valeria speaking to Sister Yannis about a recent murder. Engage with Yannis after Valeria leaves and agree to do some extra investigating. Next, use Speak with Dead to quest both Father Logan and Brilgor’s bodies. Then use the Basement Hatch in the kitchen to reach the temple cellar. You’ll discover the Flower Key on Zomm’s body after defeating some doppelgangers in the caves below. This key will open up doors upstairs in Fraygo’s Flophouse.
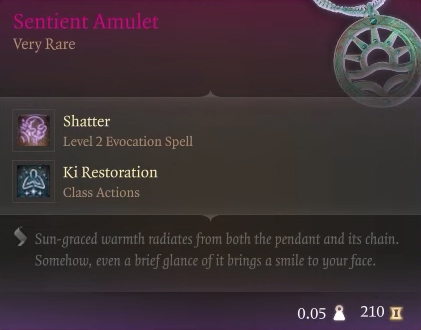
- Help the Spirit of the Amulet: If you found the Sentient Amulet back in the Grymforge during Act 1 and agreed to help the spirit, this is where that quest finally pays off. When you venture into the temple cellar, you can locate the sarcophagus of the spirit’s granddaughter, Shirra. The spirit will now ask if you would be willing to bear the curse in her stead. You can gain access to Tasha’s Hideous Laughter spell. However, you’ll have to pass difficulty checks which can permanently lower your Wisdom score. See more details below.
Gear
- Ring of Blink: Cast the Blink spell once per Long Rest. Found on the roof of the Open Hand Temple, in Tara the Tressym’s nest.
- Sentient Amulet: This can be upgraded to the Very Rare version if you refuse to bear the Monk’s curse and are forced to fight him.
- Seraphic Pugilist Gloves: Good for a Monk build using unarmed attacks. Found in a chest at the foot of a bed in the Temple living quarters.
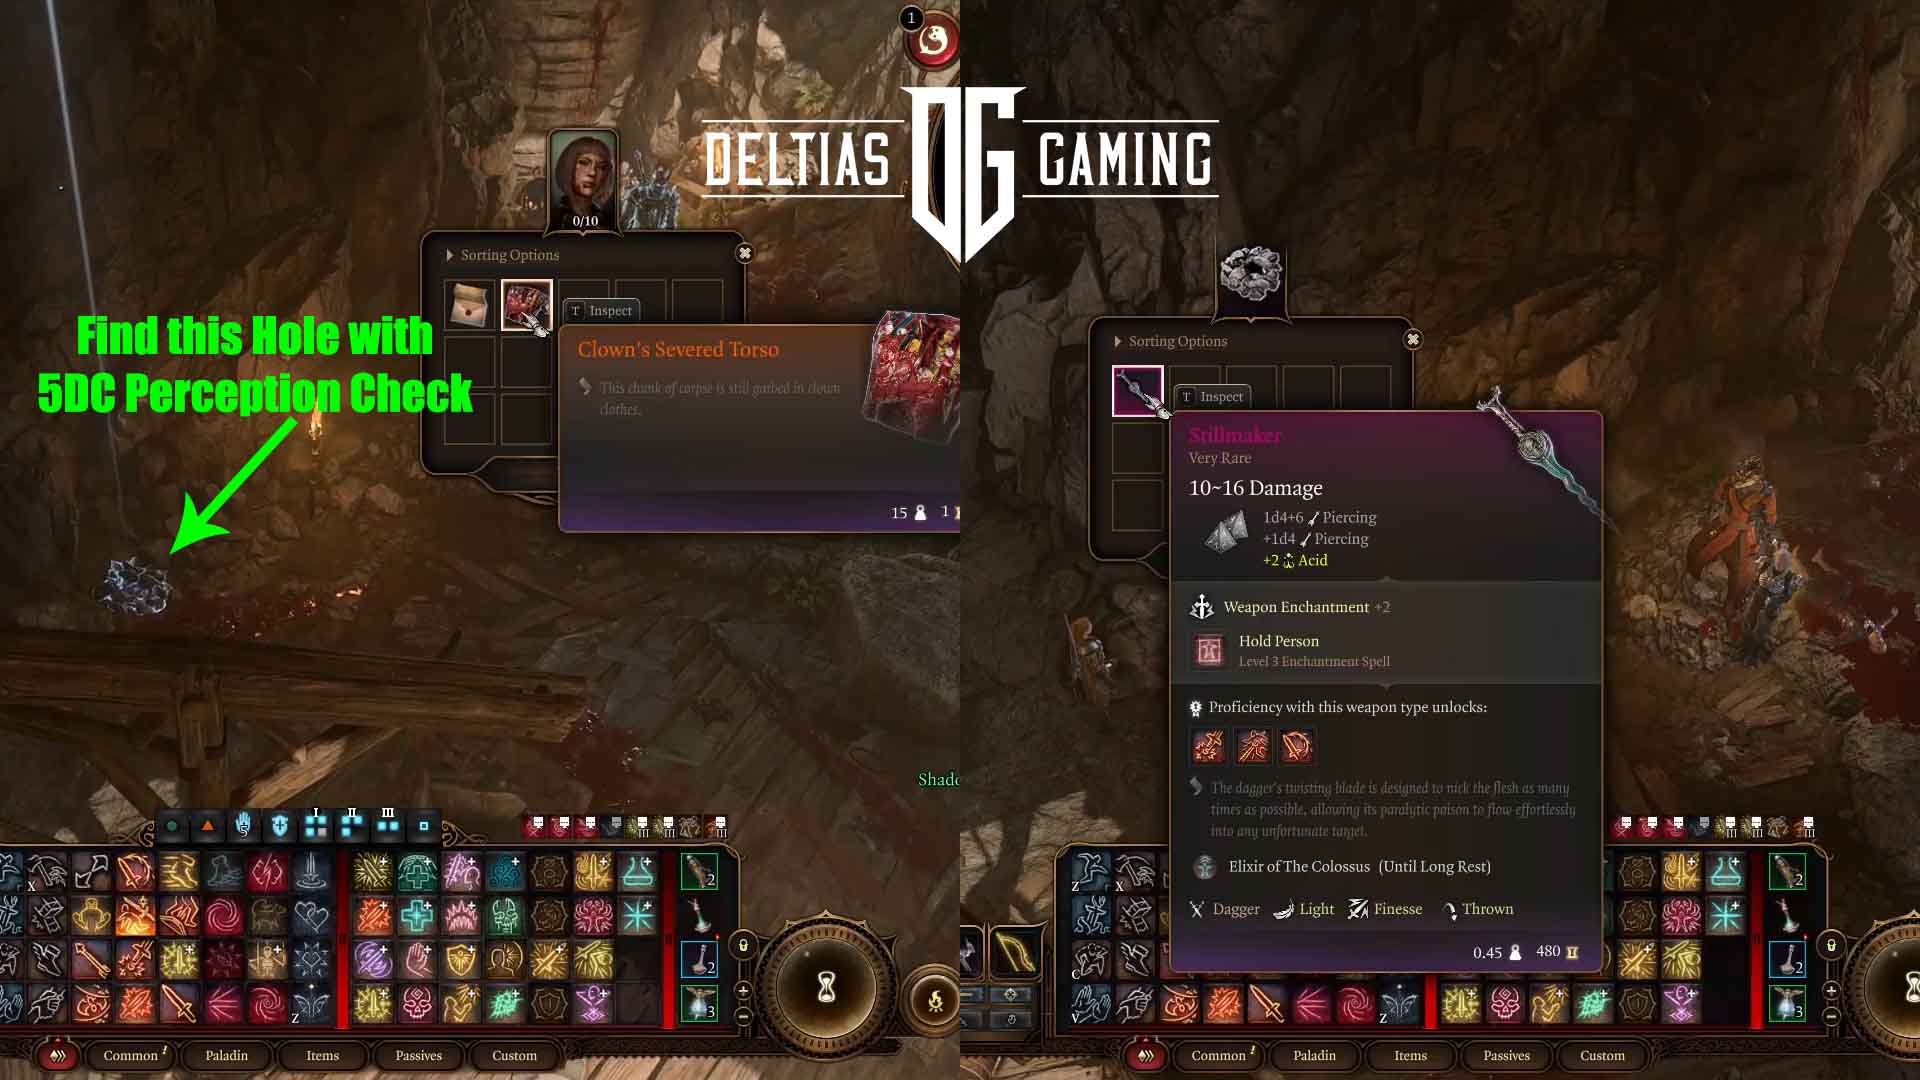
- Stillmaker: Murder evidence and also a good place-holder/backup dagger for dual-wielders. Hidden in a hole deep underneath the Open Hand Temple.
Permanent Bonus
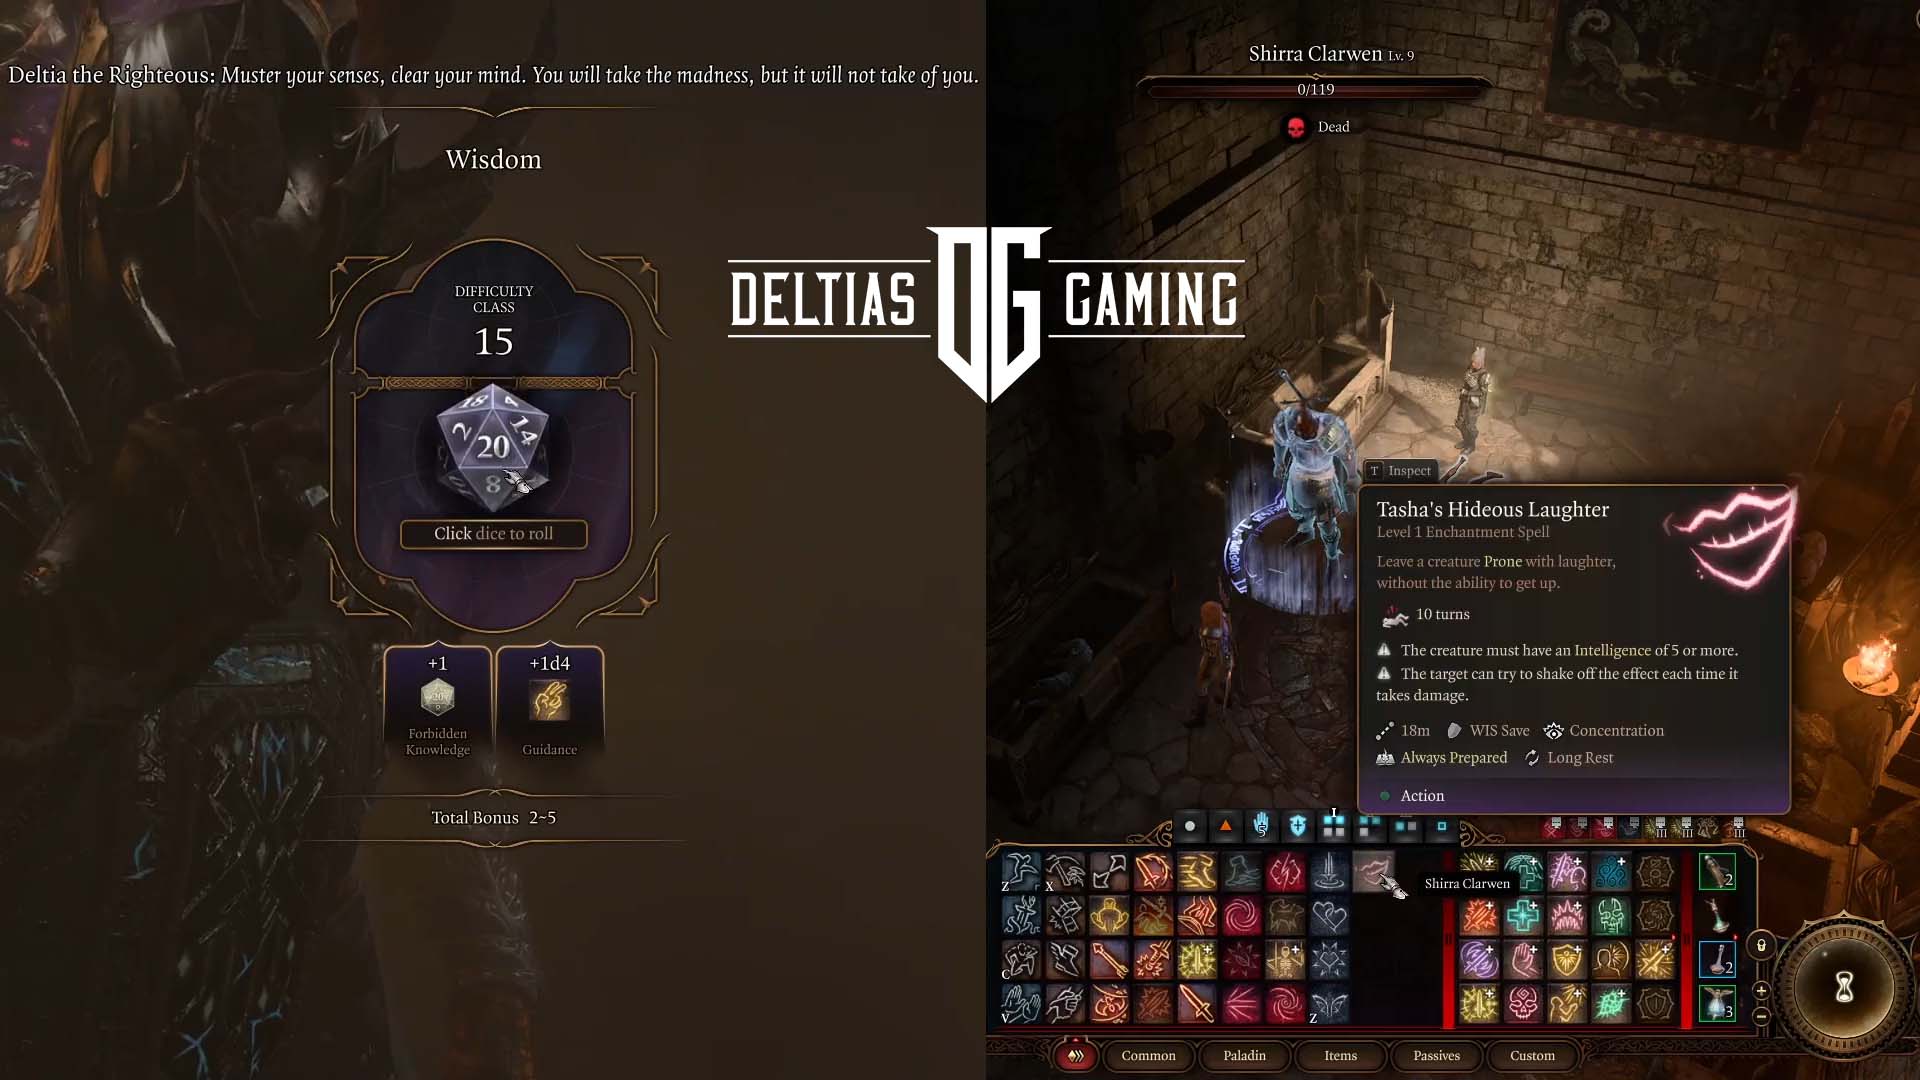
Completing the ‘Help the Spirit of the Amulet’ quest presents you with a choice, each of which can give you a permanent upgrade. If you choose to bear the spirit’s curse, you can earn the Monk’s Hideous Laughter bonus/spell. However, you will have to pass two 15-DC dialogue choices. Moreover, if you fail either of them, you will permanently lose -1 Wisdom. If you’re attempting this, it’s best to save right before.
The arguably better bonus, especially if you have a Monk in the party, is to refuse to accept the curse. This will anger the spirit, and you will have to fight the three corpses he raises. Defeating them, however, will upgrade the Sentient Amulet itself.
Fraygo’s Flophouse
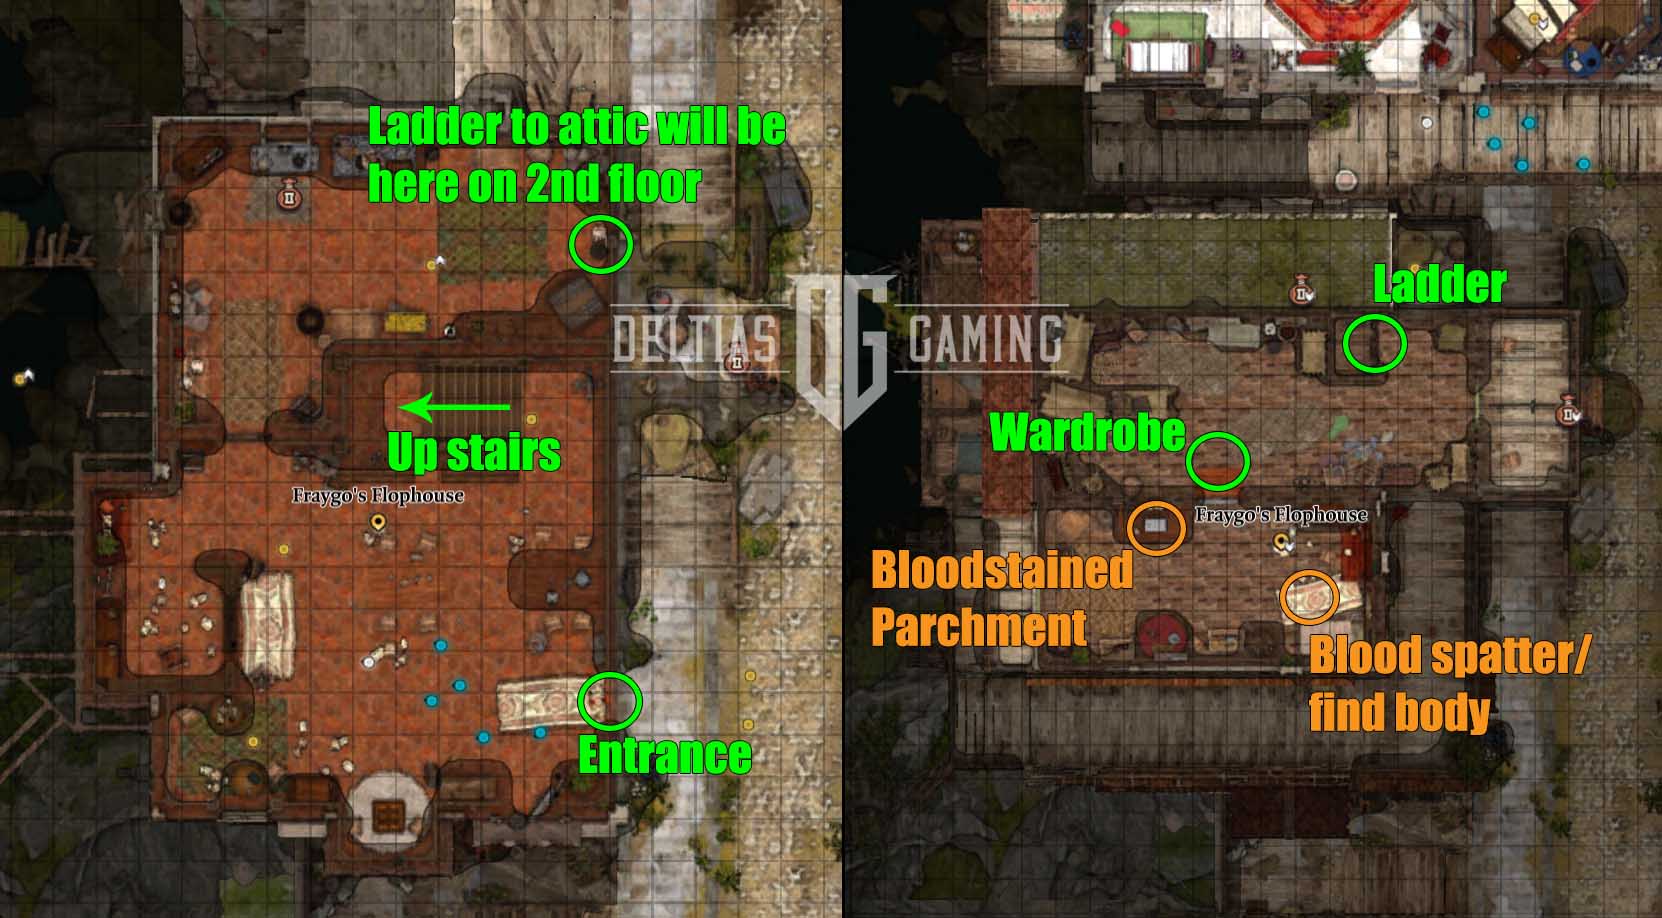
Now that you’re finished in the Rivington area in our Baldur’s Gate 3 Act 3 Checklist, you’ll need to get past the guards at the South Span Checkpoint to get to the area of shops beyond. If you rescue Wulbren in Act 2, as you approach the guards, the gnomes should come out and make a sneak attack, damaging the Steel Watchers and allowing you to enter. If you didn’t, you’ll have to pay a fee/bribe of 200 gold and be scanned by a Steel Watcher.
The first stop on this side of the bridge should be Fraygo’s Flophouse, where you can follow up on the Solve the Open Hand Temple Murders quest.
Quests
- Solve the Open Hand Temple Murders: Climb a ladder into the attic on the second floor. Next, identify the red wardrobe, which can be opened with the Flower Key you looted earlier. Head over to the bed, and hopefully, you can pass a 10DC Perception and Investigation check to find the body. Case Speak with Dead to ask questions. Next, look around the room for other clues. Discover and read the bloody parchment on the table, which you need to progress the quest to the next step.
Sharess’ Caress
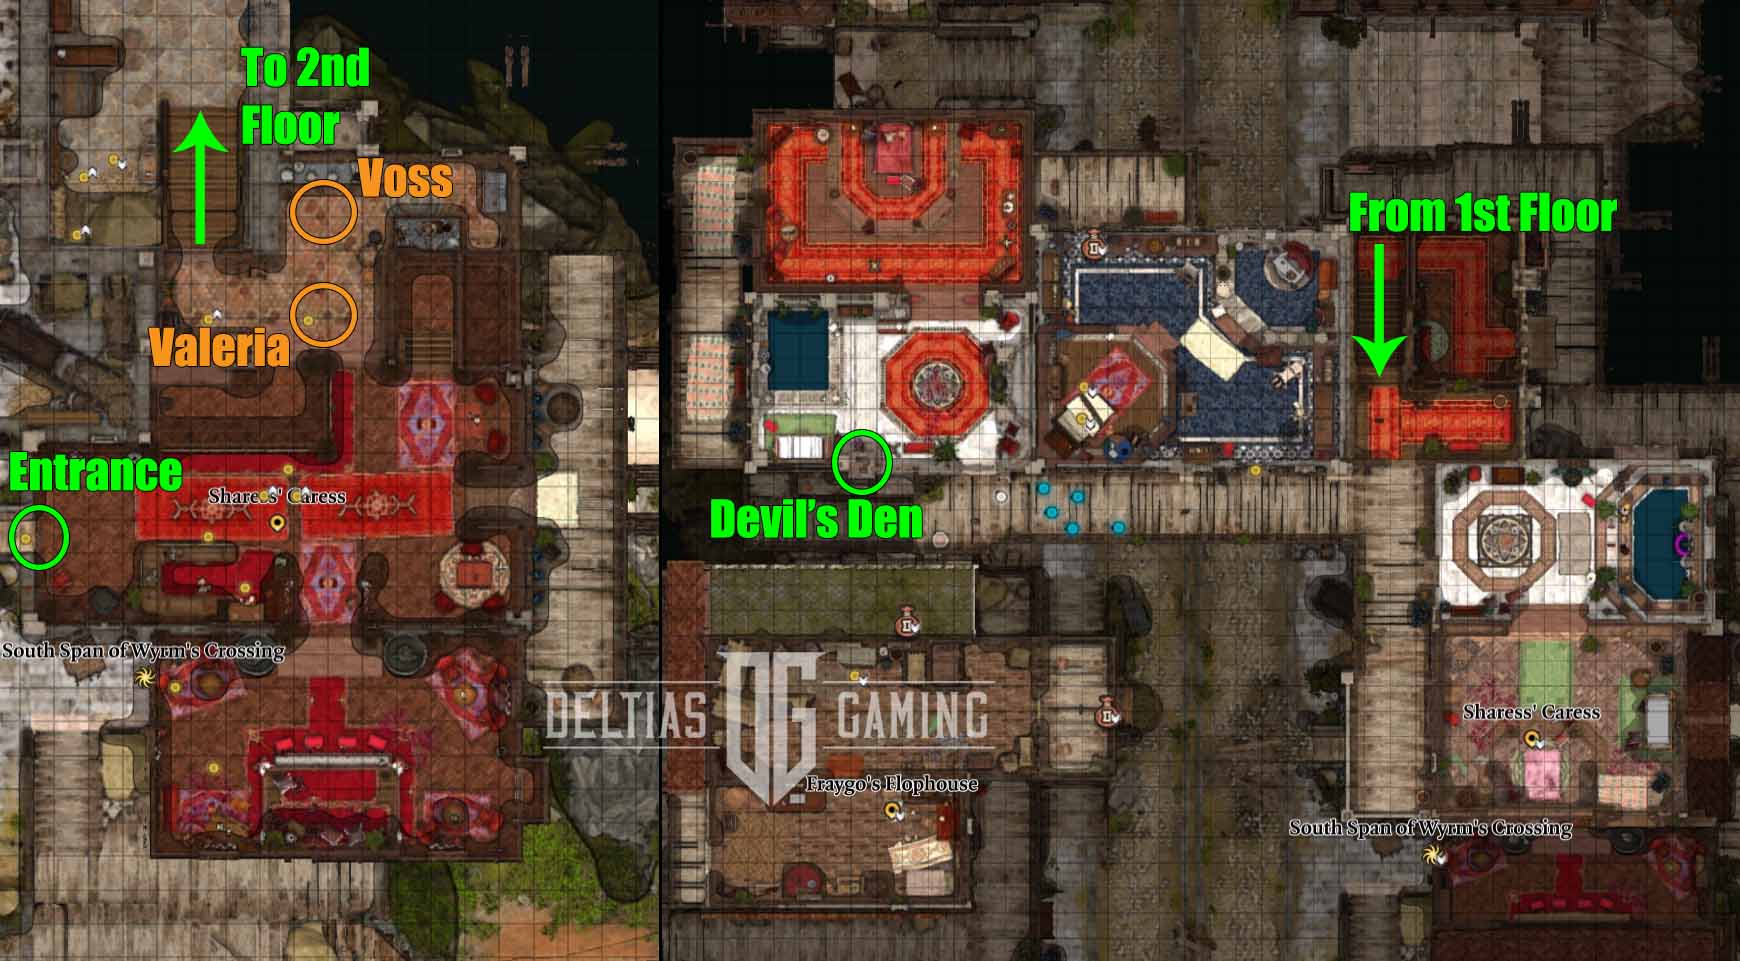
Your second stop on Wrym’s Crossing will be right across the street at Sharess’ Caress. This brothel is an important step in continuing one quest and picking up another that is very important for Lae’zel’s personal story. Additionally, you can explore a few other events and rooms for fun, although they are omitted here since they aren’t vital to the story.
Unfortunately, there is no gear of note in this establishment. However, quest importance means you will not want to skip this location.
Quests
- Solve the Open Hand Temple Murders: Head up the stairs and locate Investigator Valeria. Ensure the person speaking to her has the bloody parchment and Stillmaker in their inventory. Then, you can present both as evidence to her. Valeria should then point you toward a constable found at the Elfsong Tavern within the city.
- Deal with the Devil: You can discover Raphael in the ‘Devil’s Den’ room on the top floor of Sharess’ Caress. You’ll walk out on a balcony area to get there; this room is at the very far end. Raphael is speaking to Voss but denies the Githyanki the item he seeks. Voss leaves, and now Raphael offers that very item to you. The catch is that you must agree to give Raphael the Crown of Karsus should you defeat the Brain. If you accept the deal, you can later try to break the contract. If you reject the deal, you can still get the item you need.
- Help Kith’rak Voss: After speaking with Raphael, you can find Voss waiting for you back downstairs. He’ll be upset if you have refused the deal, and he will relocate to a spot in the sewers. Should you steal/recover the hammer, you can return to speak with him there.
Danthelon’s Dancing Axe
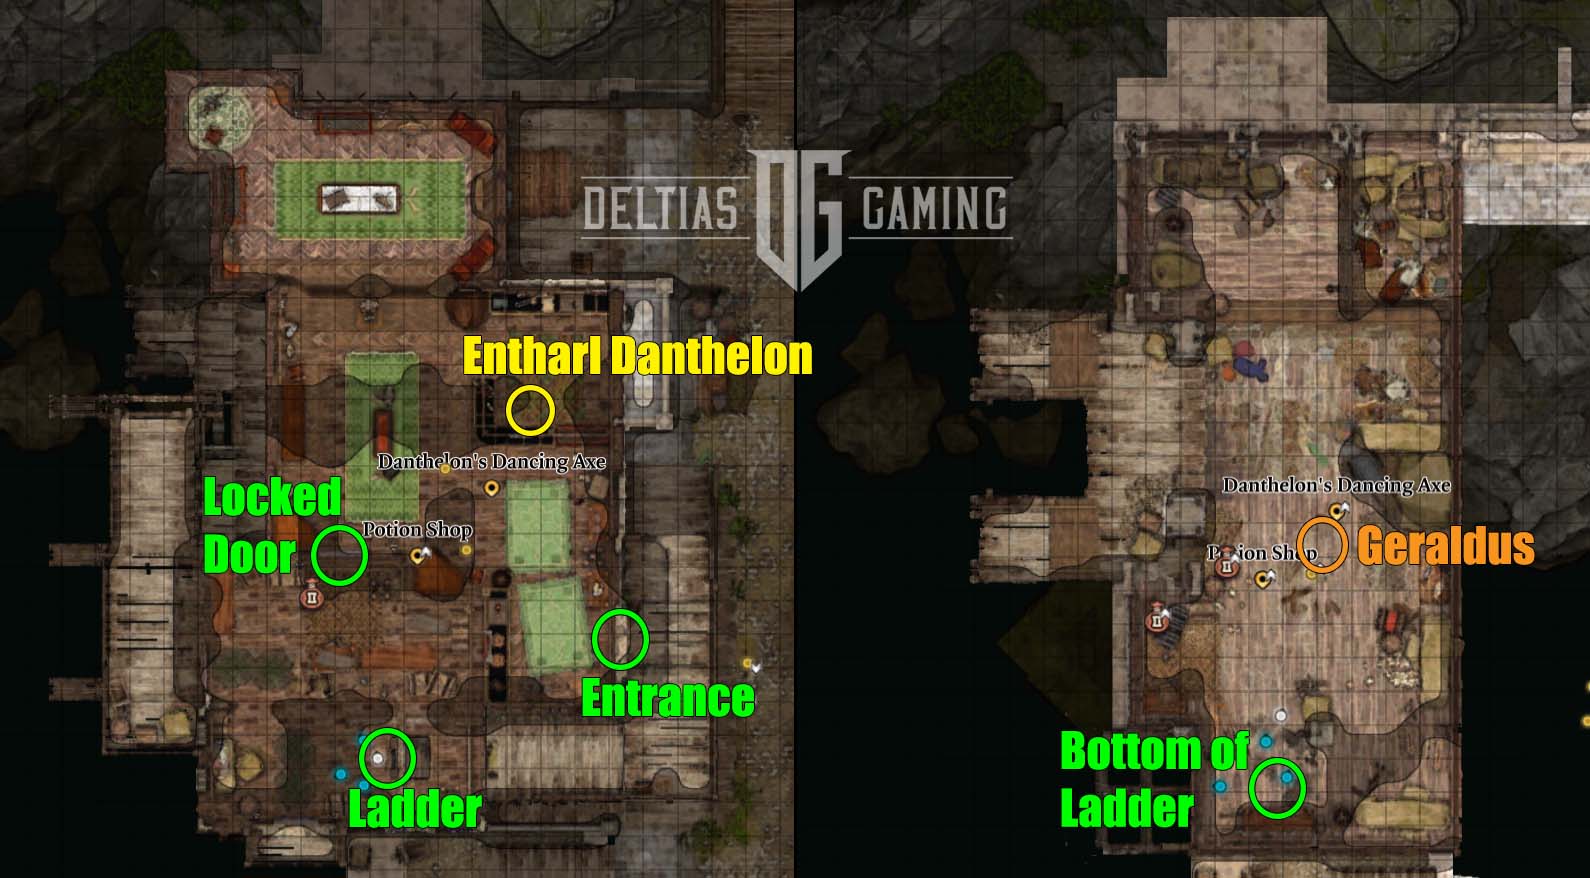
While there are other shops you can visit and explore in Wrym’s Crossing, the third location of note is Danthelon’s Dancing Axe. You can locate this at the other end of the street on the left/west side. Head up a flight of stairs and you’ll find the store entrance.
Inside there is a decent gear vendor, where you can pick up some good pieces to start the end-game with.
Quests
- The High Harper: If you recruited Jaheira at the end of Act 2, she would have told you about this location. It’s best to bring her along in your party here, as it will make the secret location easier to get into. Down the ladder, you will discover a Harper hideout. Unfortunately, these Harpers have been compromised and four of them are doppelgangers. If you pass some insight checks when talking to Geraldus, you can discover this before they attack. After defeating them, Jaheira will reveal more of her motives and then asks for time to think.
Gear

- Horns of the Berserker: A great helm for melee damage dealers. Sold by Entharl Danthelon.
- Blightbringer: A good shortbow for Thief builds that don’t use longbows. Sold by Entharl Danthelon.
- Cloak of Displacement: A decent defensive cloak. Sold by Entharl Danthelon.
- Garb of the Land and Sky: An amazing Monk chest item. Sold by Entharl Danthelon.
- Harmonic Dueller: A good rapier for Bards or Warlocks. Sold by Entharl Danthelon.
Wyrm’s Rock Fortress
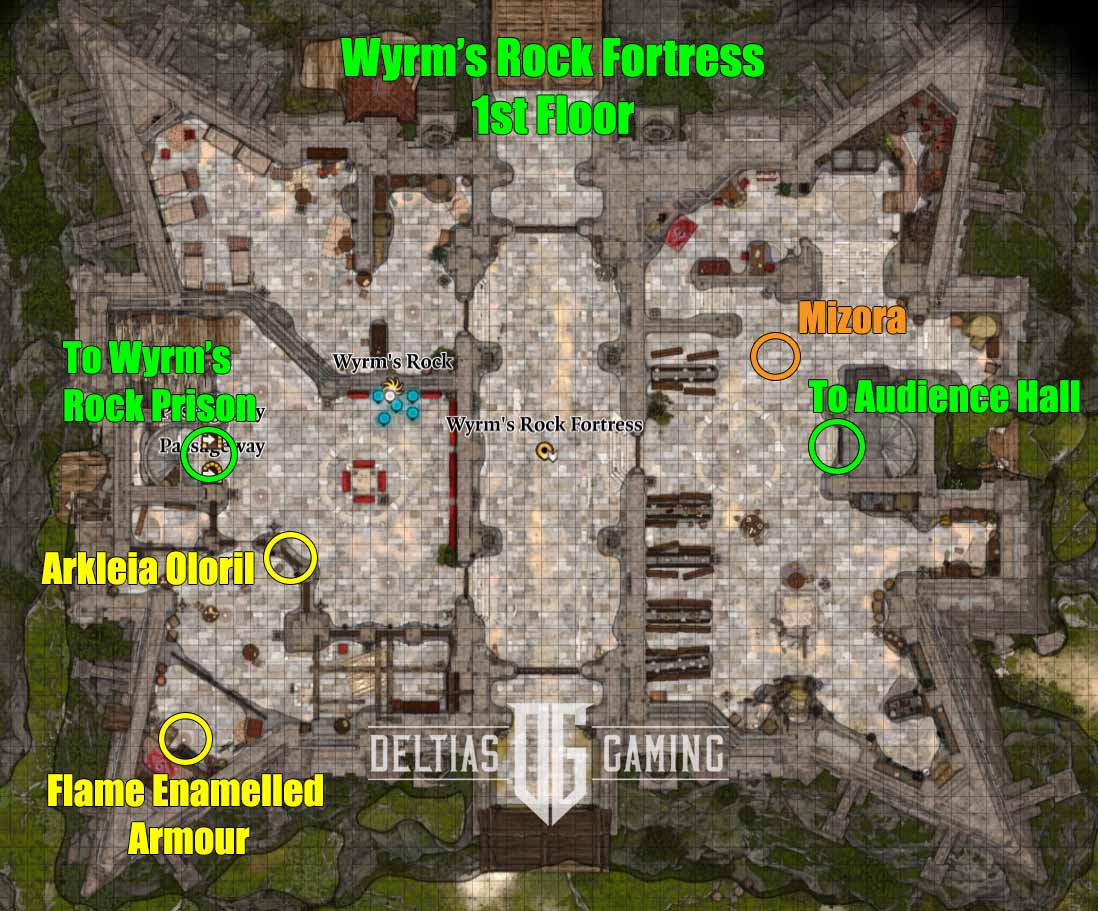

Wyrm’s Rock Fortress is a pivotal point in Baldur’s Gate 3 Act 3 Checklist, where you first meet Gortash. He is surprisingly less hostile than Orin and even offers you a truce agreement to consider. Moreover, the events in the audience hall are essential to two of your companions, Wyll and Karlach. You’ll have extra dialogue options from both if you include them in your party. Additionally, after the coronation, Mizora will show up, offering another contract for Wyll.
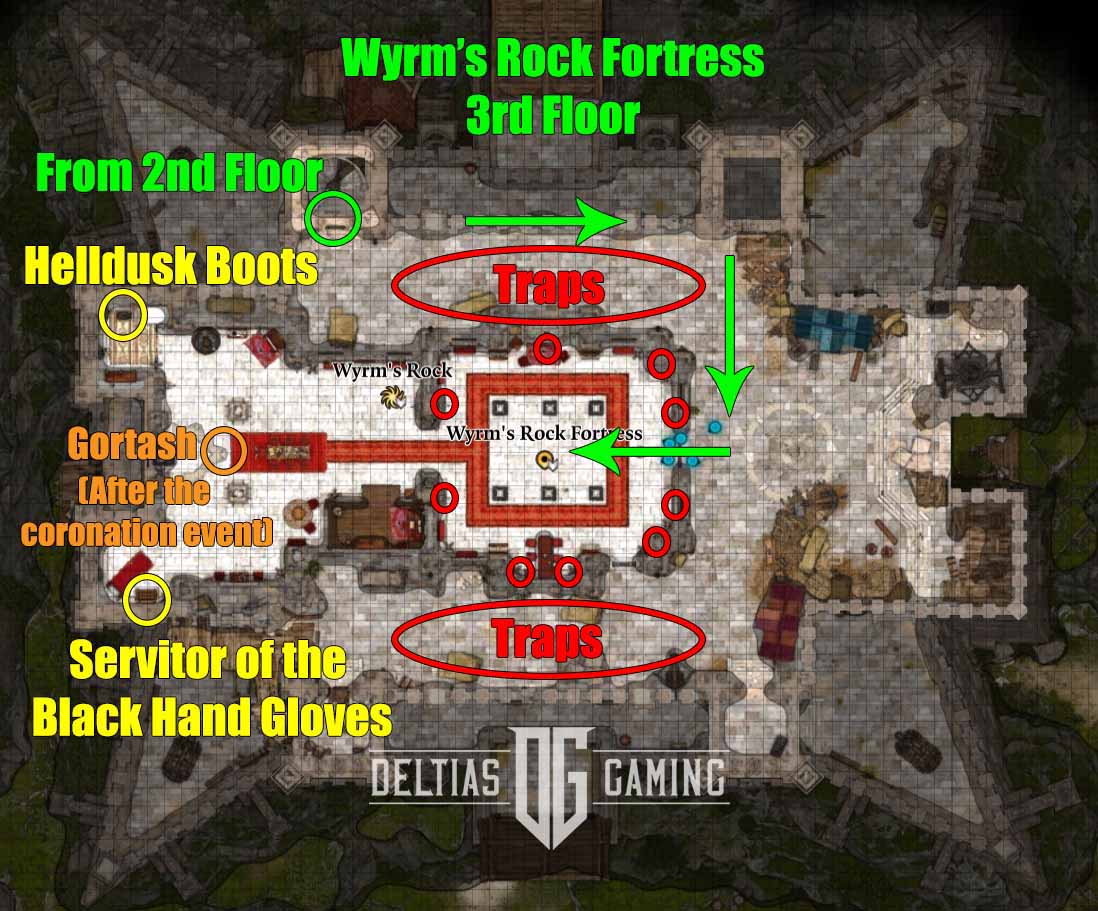
Significantly, there are also some good gear pieces up on the third floor. Usually, you wouldn’t be able to claim them until after you defeat Gortash. However, when you first arrive, there is a small window of opportunity where you can claim them. After going to the Audience Hall, a cut scene and conversation with Gortash will play out. Also, speak to the Duke for Wyll.
Afterward, head to the door in the northwest corner of the room. There will be a Steel Watcher right next to it, which will be outlined in red. Stand right in front of it and cast the Darkness spell. Open the door and click to walk up the passageway. There will be Steel Watchers up on the third floor, and you must fight, but Gortash will not be here yet. Defeat the Watchers, and you can go inside Gortash’s chambers to open the chests. Be careful of traps, both outside and in the room, however.
You MUST do this immediately after the coronation while Gortash is still in the Audience Hall. If you leave the Fortress, the next time you return, he will be in his chambers. If you come back without first defeating Orin, he will be hostile and automatically trigger a fight.
Companions
- Our Fiery Friend: Bringing Karlach to the audience hall finally allows her to see Gortash in the flesh again. You may have to hold her back from starting a fight. You’ll get some interesting dialogue and should consider bringing her along if you ultimately confront Gortash. However, it’s best to wait and do that later in the game.
- The Grand Duke: As seen at the end of Act 2, the Duke is now under the control of the Absolute. He oversees Gortash’s swearing-in and remains standing beside him on the dais. Speak to him immediately after the cut scene ends, and you can potentially connect with his parasite.
- The Blade of Frontiers: Mizora will appear twice in Wyrm’s Rock Fortress. First, she encourages you to attend Gortash in the Audience Hall. Then, she will appear again after the event. She will offer Wyll another deal, for which she will help save his father. You can reject the deal and still attempt to save Duke Ravengard. However, Mizora will complicate the rescue.
Quests
- Consider Gortash’s Bargain: Gortash will speak with you before the ceremony in the Audience Hall. He offers you the possibility of an alliance, saying that so long as the party does nothing to harm him, the Steel Watchers will leave you alone. An Insight check on this dialogue can reveal the sincerity of this proposal. You can reject, agree to, or say you’ll consider the offer. When saying you’ll consider it, Gortash and the Watchers behave much as if you have agreed.
- Gather Your Allies: This is a chain quest that starts your ability to recruit people to your side for the final confrontation with the Elder Brain. You will be able to summon these allies during the final fight. Essentially, it can make the final fight in the game much easier, and more rewarding as you can see your previous allies in battle.
Gear
- Flame Enamelled Armour: A decent medium armor chest at the start of Act 3. Can be stolen from a locked and guarded chest on the 1st Floor.
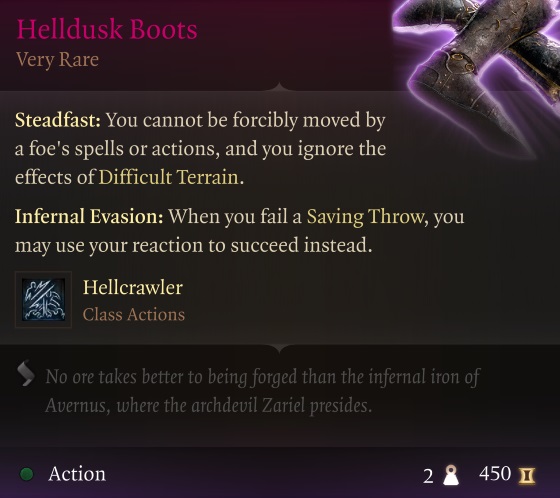
- Helldusk Boots: One of the best boots in the game, must-have footwear. Chest in Gortash Chambers on the third floor.
- Servitor of the Black Hand Gloves: Extra Force damage on unarmed attacks. Chest in Gortash Chambers on the third floor.
- Arrow of Dragon Slaying: This can only be used against dragons, and does double damage. Sold by Quartermaster Arkleia Oloril if you can convince her to open her stock.
Wrym’s Rock Prison
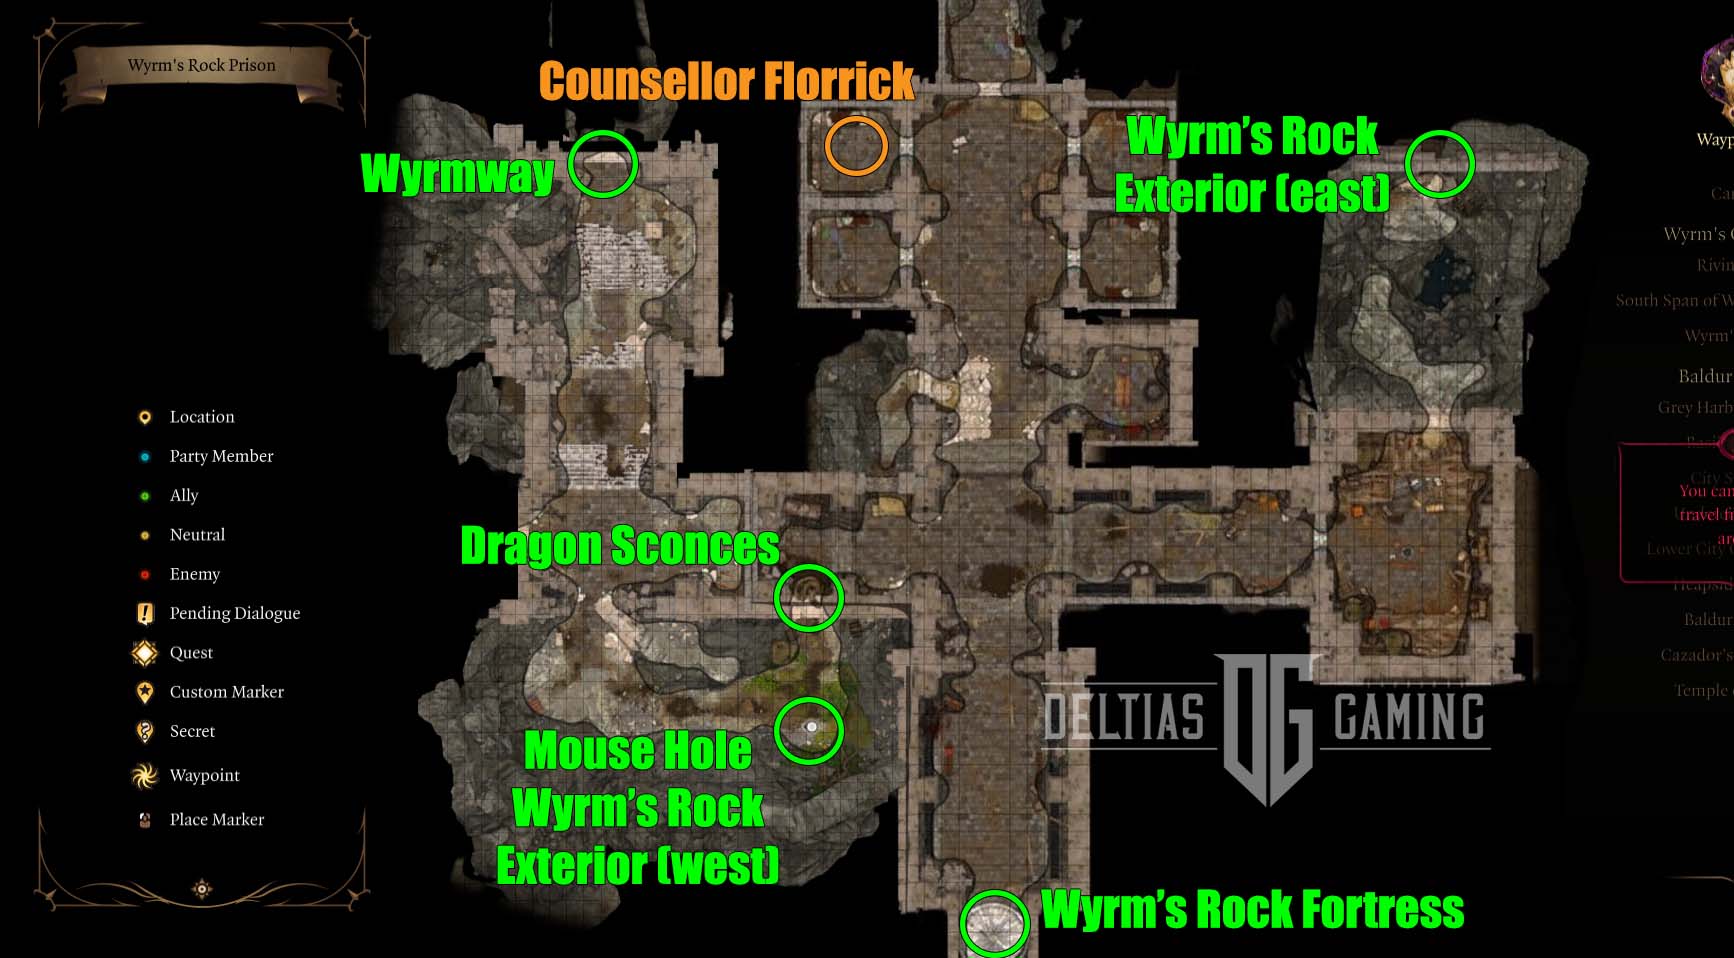
At first glance, the Wyrm’s Rock Prison won’t appear to have much interest inside it, except for Counsellor Florrick. However, a secret entrance here will lead to the Wyrmway. It’s easy to miss, but story events here can reveal some fascinating backstory for the Emperor. In-game Counsellor Florrick or Duke Ravengard can give you clues about this location.
You can get into Wyrm’s Rock Prison in several different ways. There is an exterior entrance/crack in the wall around the east side of Wrym’s Rock itself. You can get there by standing on the edge of Wyrm’s Rock Crossing and casting Feather Fall so your whole party can jump safely onto the rock below.
The more straightforward way is through the official passageway in Wyrm’s Rock Fortress. You can Intimidate or Persuade the sleeping guard at the entrance to let you through.
Quests
- Free Counsellor Florrick: Speak to Counsellor Florrick in her cell and convince her to escape. You can preemptively kill all of the guards in the prison without seeming to rouse the rest of the Fortress. Or you can cast Invisibility on her and lead her to the exterior exit on the east. Once you’re outside, speak to her again, and she will become an official ally.
The Wyrmway
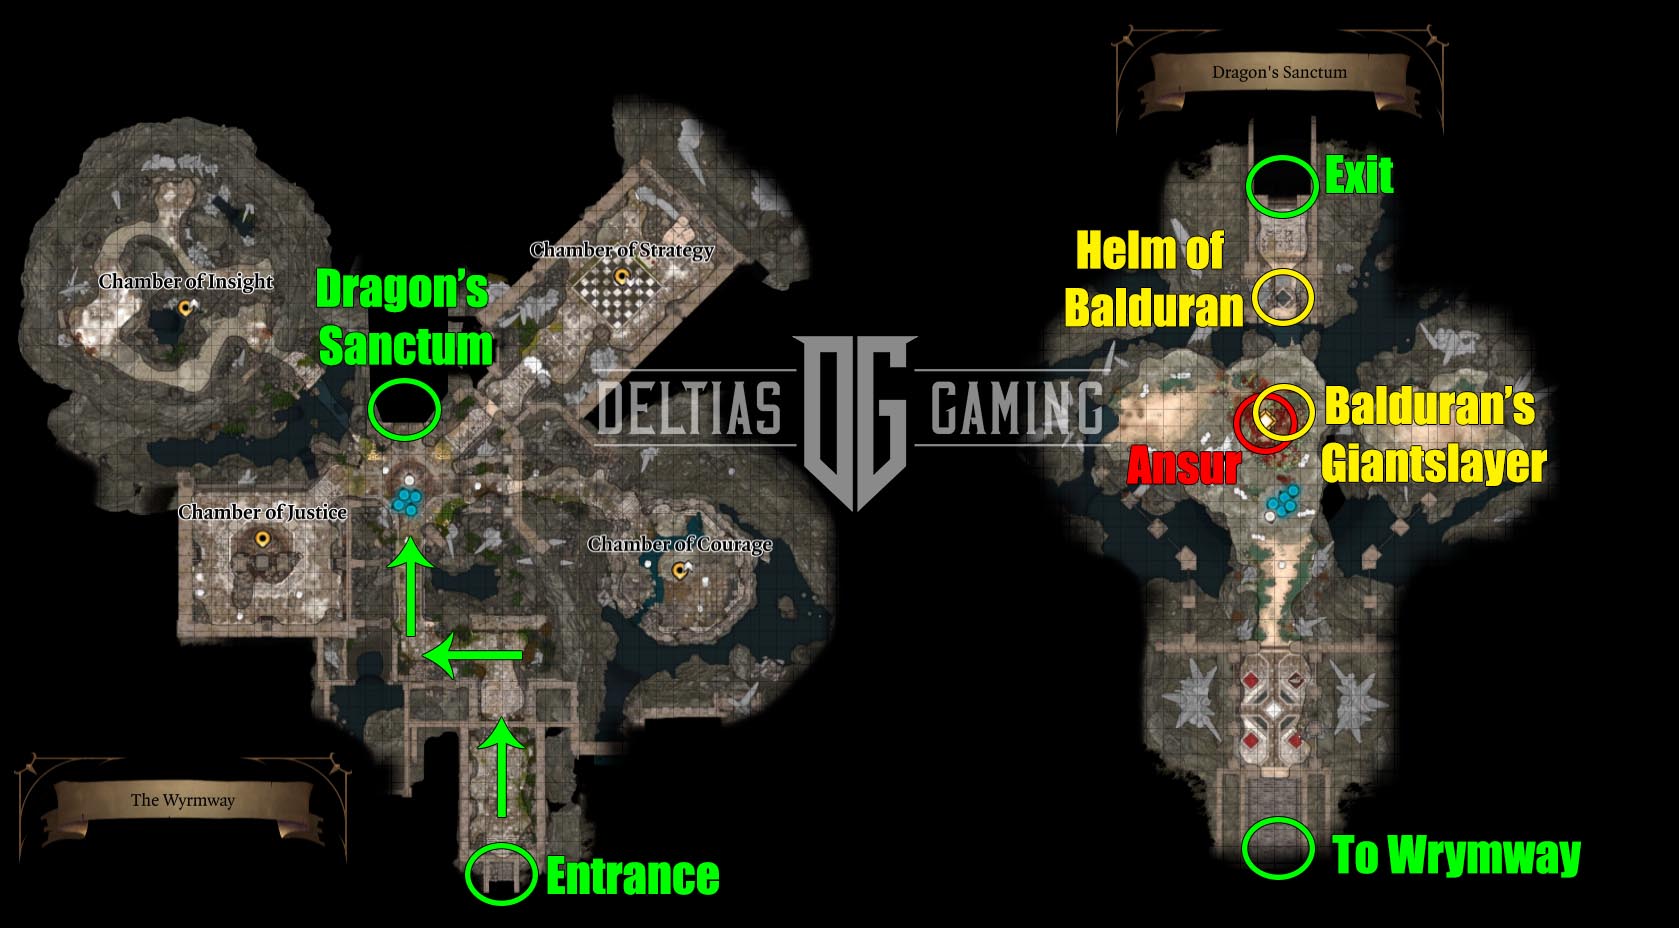
Within the Wyrmway,, you must complete four Trials to open the door leading to the Dragon’s Sanctum. There, you will meet the dragon Ansur, and consequently, quite a bit of backstory will be revealed. It will also cause an unavoidable fight with Ansur, and he is a powerful foe who shouldn’t be taken lightly. We highly recommend for our Baldur’s Gate 3 Act 3 Checklist that you wait until you are at least Level 11 before attempting this fight. Moreover, if you’re playing the game in Honour Mode, it would be best to wait until Level 12.
Quests
- The Wyrmway Trials: There are four trials or tests within the Wrymway which you must pass. There is a separate door/chamber for each trial, and within each is a statue of Balduran you can interact with that will frame the challenge. For a full walkthrough, check our How to Complete the Wrymway guide. After you pass the trials, the large central door will open, and you can enter the Dragon’s Sanctum to face Ansur.
Gear
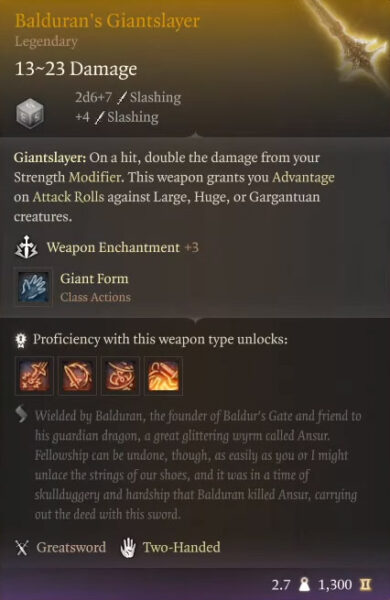
- Balduran’s Giantslayer: The best medium armour helmet in Baldur’s Gate 3. Looted from Ansur.
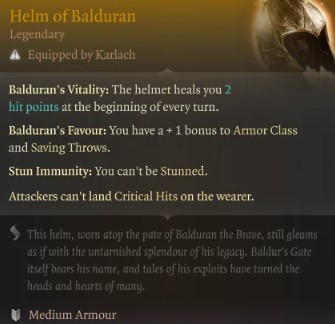
- Helm of Balduran: The best overall weapon in Baldur’s Gate 3. Found on an altar north of where you fight Ansur.
Lower City Vendors
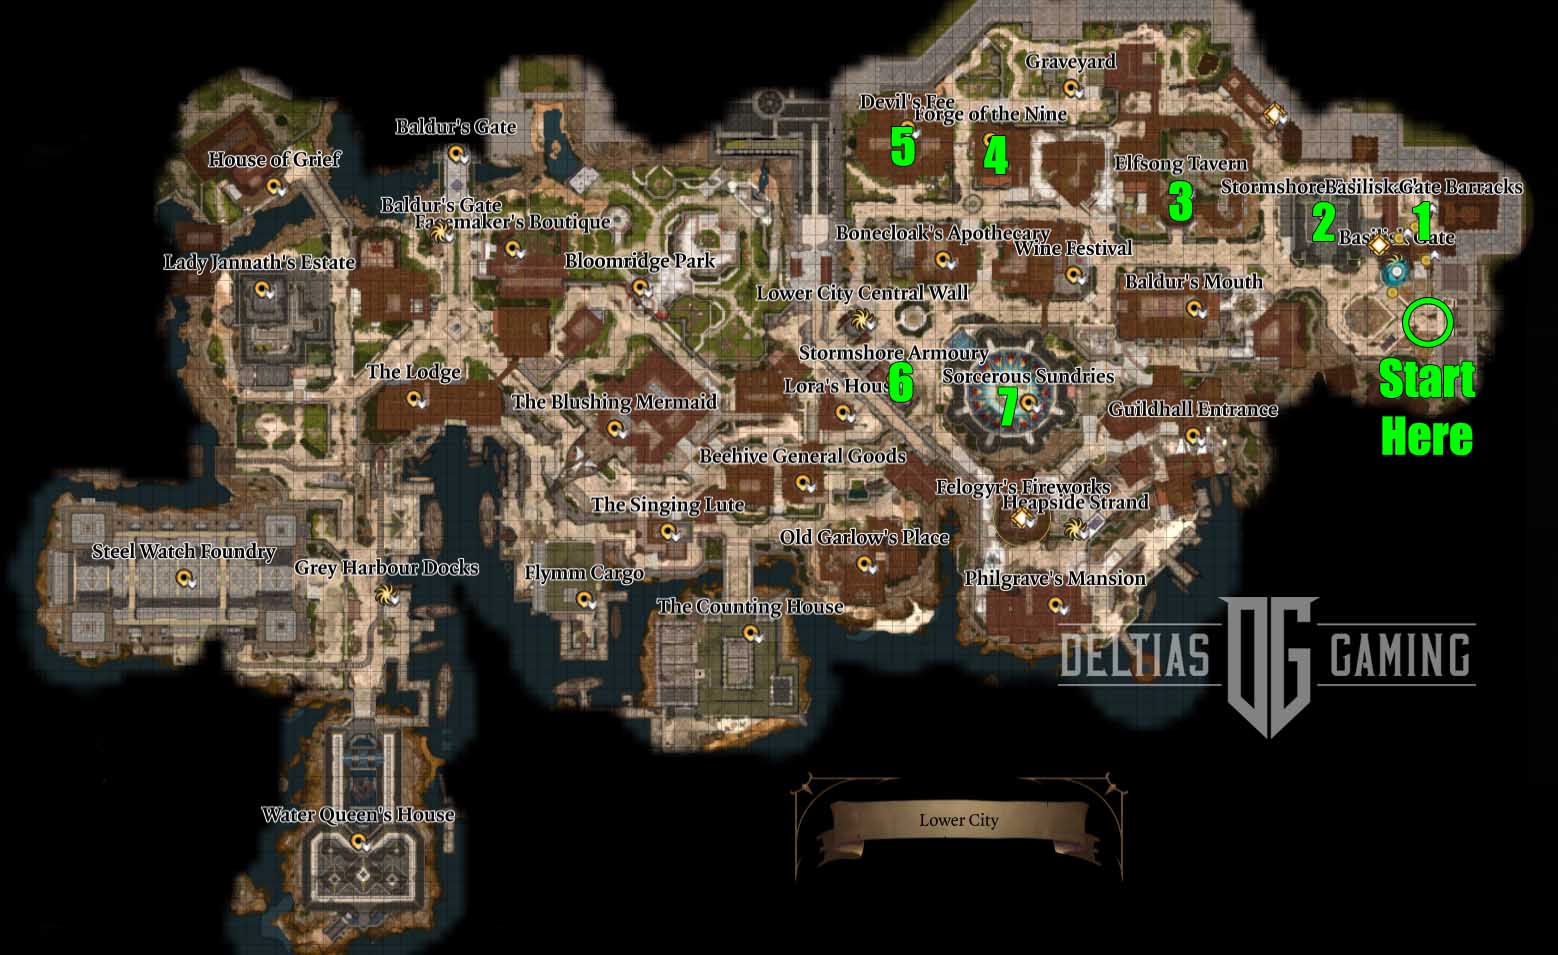
At this point, your party can enter the Lower City of Baldur’s Gate, which has many different locations to visit, NPCs to meet, and quests to pick up and/or complete. This is where Act 3 can become overwhelming because there is so much to do that it is hard to choose which direction to head in.
We recommend you visit all of the easy-to-find merchants in the city first to quickly pick up some good end-game gear before tackling the harder quests and fights. Additionally, this is a low-pressure way to start uncovering some of the maps.
Some of these locations have larger, more involved quests, which may start during your initial visit. We’ll cover those in more detail in their sections (Sorcerous Sundries, Elfsong Tavern, and Devil’s Fee specifically) below. If at any point you wish to go ahead and do those quests, or if you decide to go in a different direction, you can always jump ahead in the guide to locate the information you need.
Vendors
- Basilisk Gate Barracks: Not a vendor, but you should step inside and pick up the ‘Save Vanra’ quest from Lora. Completing this will ultimately earn you a legendary Rapier.
- Stormshore Tabernacle: Vicar Humbletoes serve as both the temple guardian and merchant. Additionally, an amulet is in the basement if you’re willing to endure the gods’ disapproval to get it.
- Elfsong Tavern: No gear to buy here, but it’s an easy stop. Speak to the innkeeper, and you can rent the room on the second floor. I agree, and that location will now become your ‘campsite’ on Long Rests.
- Forge of the Nine: If you’ve rescued the Tieflings throughout the last two acts, this is where you will now find Dammon.
- Devil’s Fee: Helsik will only have basic stuff for sale when you first visit. Walk around her store to look, and several Arcana checks will automatically roll. Pass a few, and a new dialogue option will appear. This will allow you to see her good stuff.
- Stormshore Armoury: Two vendors located in the same spot. One sells weaponry and the other armor.
- Sorcerous Sundries: Bring Gale with you if you plan to tackle the larger quest chain here. However, you’ll want to stop at the front desk and look at their items for sale.
At this point, we’ll break the rest of the locations into larger individual sections. If we’ve skipped over something on the map, it doesn’t mean you shouldn’t check it out! There are many exciting things to discover in the city, but our guide aims to cover the essentials in detail. Don’t be afraid to go off the beaten path and return to the Baldur’s Gate 3 Act 3 Checklist when needed.
Gear
- Mantle of the Holy Warrior: Spell grants a Radiant damage buff to allies. Sold at Stormshore Tabernacle.
- The Reviving Hands: Medium armor piece that grants a ward buff on heal. Sold at Stormshore Tabernacle.
- The Sacred Star: Strongest morningstar in the game, with additional Radiant damage. Sold at Stormshore Tabernacle.
- Armour of Persistence: Best heavy armor set until you get Helldusk Armor. Sold at Forge of the Nine.
- Boots of Persistence: Good medium armor boots that boost mobility. Sold at Forge of the Nine.
- Gemini Gloves: Can cast a single target cantrip at two targets once per short rest. Sold at Devil’s Fee.
- Cloak of the Weave: Best end-game cloak for spellcasters. Sold at Devil’s Fee.
- Shapeshifter Hat: Best headpiece for Druids increases Wild Shape Change by 1. Sold at Devil’s Fee.
- Spellseeking Gloves: Allows Sorcerers to spend Sorcery Points to gain Advantage. Sold at Devil’s Fee.
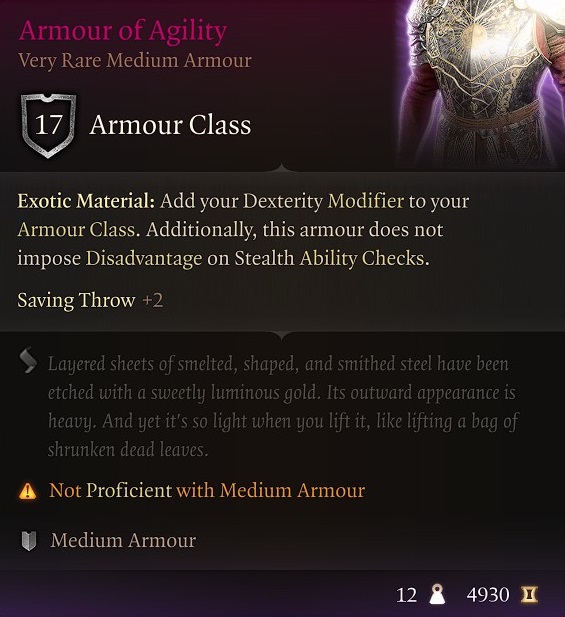
- Armour of Agility: Best medium armor set in BG3. Sold at Stormshore Armory.
- The Dead Shot: A great bow if you don’t plan on using the Legendary version from the Steel Watcher area. Sold at Stormshore Armory.
- Vest of Soul Rejuvenation: Good end-game clothing for a Monk or Barbarian. Sold at Sorcerous Sundries.
- Birthright: A two-point boost to Charisma is great for Bards or Warlocks. Sold at Sorcerous Sundries.
- Quickspell Gloves: Cantrips can be bast as a Bonus Action. Sold at Sorcerous Sundries.
The Guildhall

The entrance to the Guildhall is to the east and a bit south of Sorcerous Sundries. It’s a good place to start your quest/story journey in the city of Baldur’s Gate because it can lead you to the final companion: Minsc. A side quest that runs parallel to this will eventually reward you with the best light armor set in the game by following our Baldur’s Gate 3 Act 3 Checklist.
If you successfully recruited Jaheira at the end of Act 2, take the time to put her into your party here. She has some unique dialogue with the guild leader, and you will want to have her with you to recruit Minsc.
Quests
- The High Harper: With Jaheira in the party, mention that she is the High Harper when the guards at the door challenge you. Inside, there is a lot of open space you can venture around, but your goal is to be in the office of guild leader Nine Fingers Keene. She and Jaheira have a history, and she refuses to reveal her plans. Within this office space, you can search for a note from the Head Banker, which will point you toward the Counting House.
- Find Mol: Mol can finally be found here in the Guildhall, working for the fetcher. She won’t say much about how she escaped Moonrise and will tell you to see her associate, Sticky Dondo if you want to buy anything.
- Aid the Underduke: It will run concurrently with The High Harper and focus on resolving the conflict between the Guildhall and the Stone Lord. Completing one will complete the other.
Gear
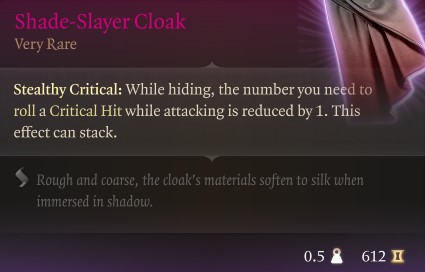
- Shade-Slayer Cloak: Reduces the number necessary to crit while Hiding. Sold by Sticky Dondo.
- Drunken Cloth: If you enjoy running a Barbarian build while the character is drunk, then this piece of clothing is for you. Sold by Severn at the bar.
The Counting House

You can locate the Counting House right along the southern coast, and we recommend heading there next in our Baldur’s Gate 3 Act 3 Checklist. Bring a bunch of Misty Step scrolls and/or Arrows of Transposition if you want to loot the vaults inside. There are a couple of different ways you can get into the vaults:
- Succeed on Insight and Persuasion checks (18DC) when talking to Head Clerk Meadhoney to persuade him to give you a Bank Pass.
- Steal a Bank Pass from the first room upstairs. While you’re there, read a note on the desk about something that happened in 1356. This is the code number for a later vault door you must get past.
You’ll have to pass another set of guards farther down to get to the first set of vaults. These vaults have 20 DC or 25 DC Slight of Hand checks, so give your Rogue all of your Misty Step scrolls and start unlocking.
To get inside the High Security Vaults beyond, you’ll need to step on each numbered plate in the order of 1-3-5-6.

Quests
- Aid the Underduke: Make your way down into the High-Security Vaults. There will be a cut scene, and then you’ll be thrown into a fight with some cultists. They can become invisible and cast Sanctuary frequently, so come prepared with area-of-effect spells like Chain Lightning or Faerie Fire.
- The High Harper: Again, keep Jaheira in your party throughout this quest chain. After the fight in the vaults, she’ll be determined to track Minsc down. Look around the broken vault to discover some mud from the sewers.
- Return Rakath’s Gold: After the fight, but before you leave, pick up this quest by talking to Rakath. He says that Minsc and the cultists have stolen all of the gold in the vaults. Won’t you please locate and return the gold to him? The reward for this is the Elegant Studded Leather, and since you’ll be tracking down Minsc anyway, it’s well worth the extra trouble.
For a complete, in-depth walkthrough following the thread of all three of these quests, check out our How to Get Elegant Studded Leather guide.
Gear
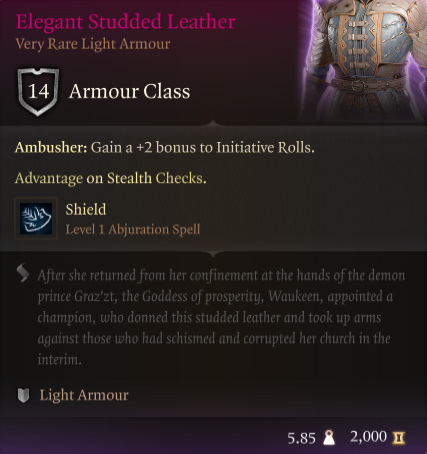
- Elegant Studded Leather: Best light armour set in Baldur’s Gate 3. Found in High-Security Vault n°9. You must complete Return Rakath’s Gold to get the key.
Lower City Sewers
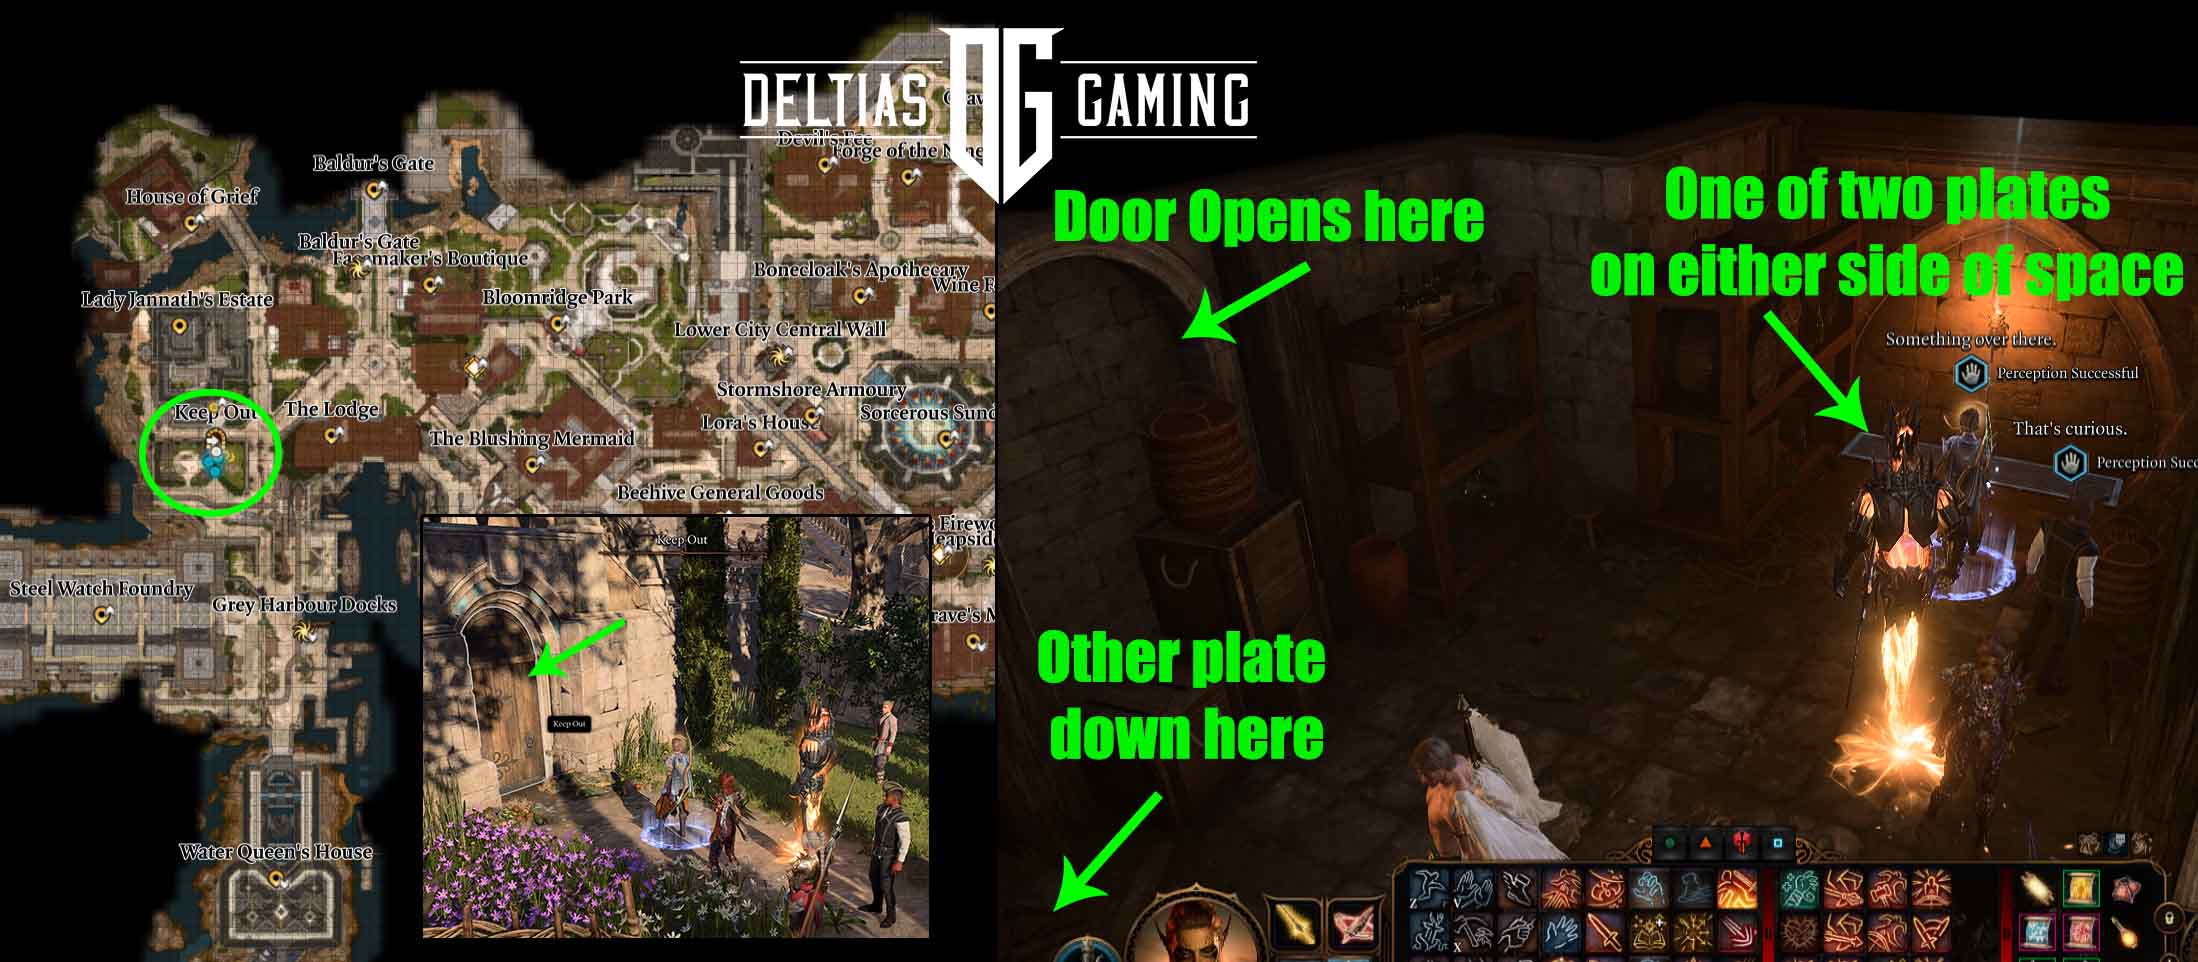
Next up in our Baldur’s Gate, 3 Act 3 Checklist is the extensive Sewer system below the city. Several access points into the Lower City Sewers include a manhole cover down an alleyway back by the Basilisk Gate Barracks. However, from the Counting House, the most efficient way to locate Minsc is to head northwest to a little garden area. You will find a wooden door with a ‘Keep Out’ sign that you should ignore. Inside, you will discover two plates—one on either side of the room. Split your party and have one member stand on each plate to open a secret door.
Quests
- Return Rakath’s Gold: Watch for a bag of gold being passed to a Zhentarim contact. When the next fight begins, try to kill that character before they can escape. Then, you can take the bag of gold directly from them and return it to Rakath. Otherwise, you’ll first have to return to the Guildhall and fight the Zhentarim there to get it back.
- Aid the Underduke/The High Harper: After you locate Minsc, a cut scene will play out, and then a fight will begin. Most importantly, if you want to recruit Minsc, you must knock him out with a non-lethal hit only! After the fight, you’ll have to convince the Emperor to extend the Prism’s protection to Minsc. This can be done more quickly if Jaheira is at the party.
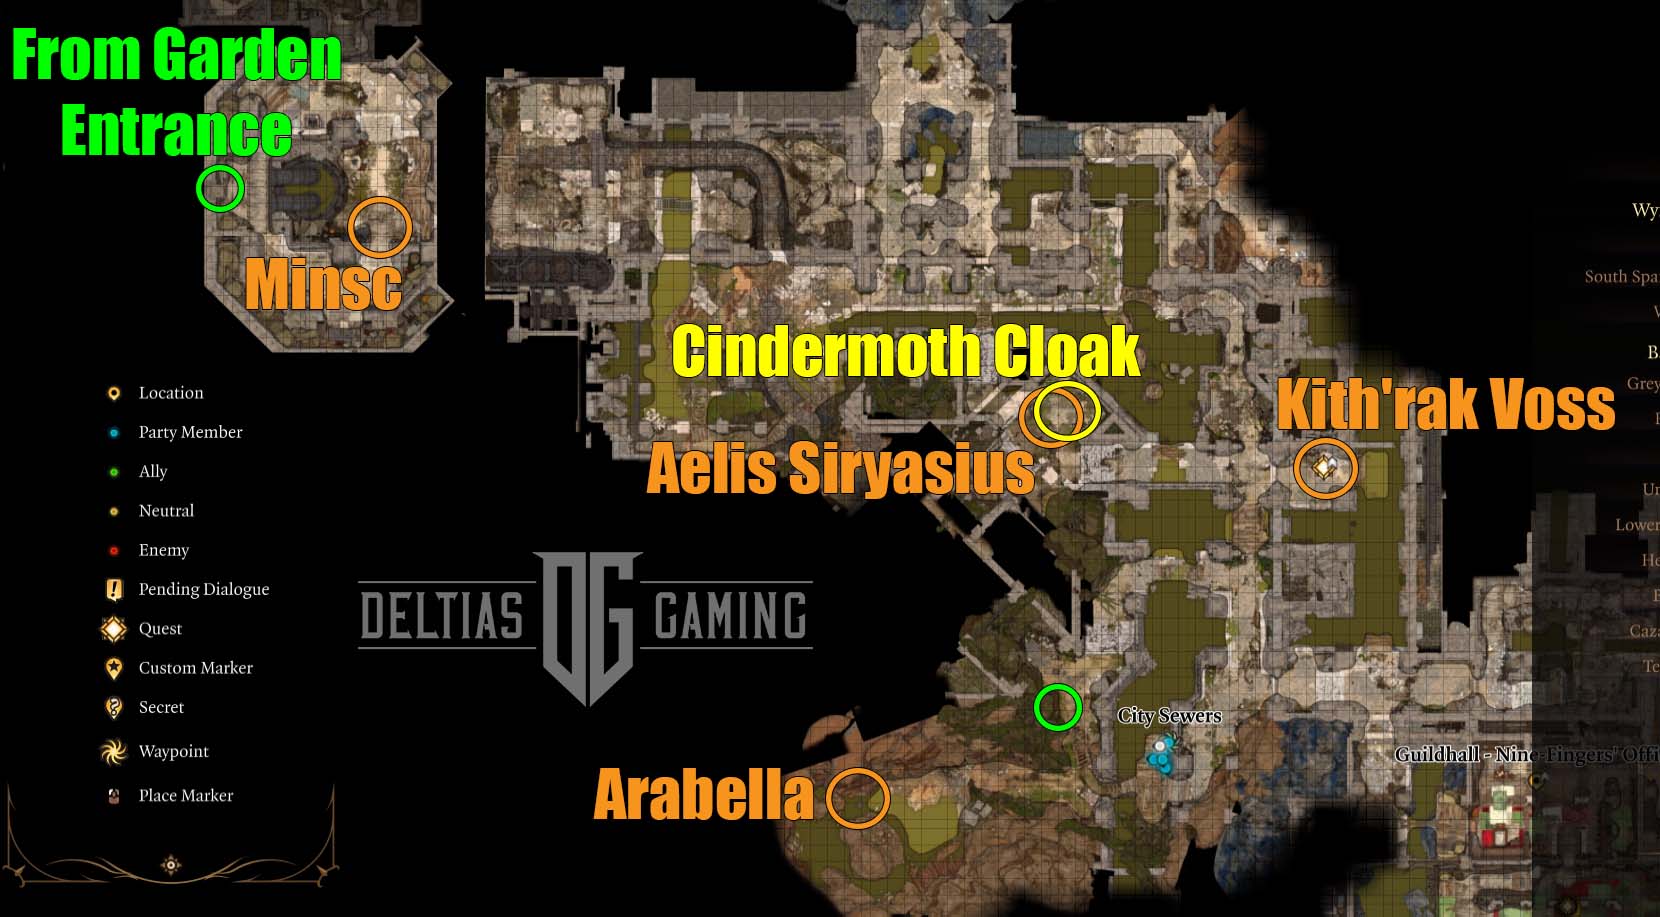
- Arabella: She’s no longer connected to a quest, but you can locate her down in the sewers not far from the waypoint. If you pass an Arcana check, you can get insight into her actions.
- Kith’rak Voss: Once you have collected the Hammer, you can inform Voss who is located in the sewers.
Gear
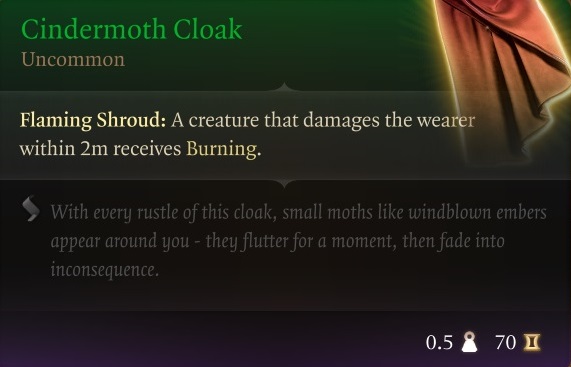
- Cindermoth Cloak: Inflicts Burning on attackers. Looted from Aelis Siryasius (X: -144 Y: 835).
Elfsong Tavern
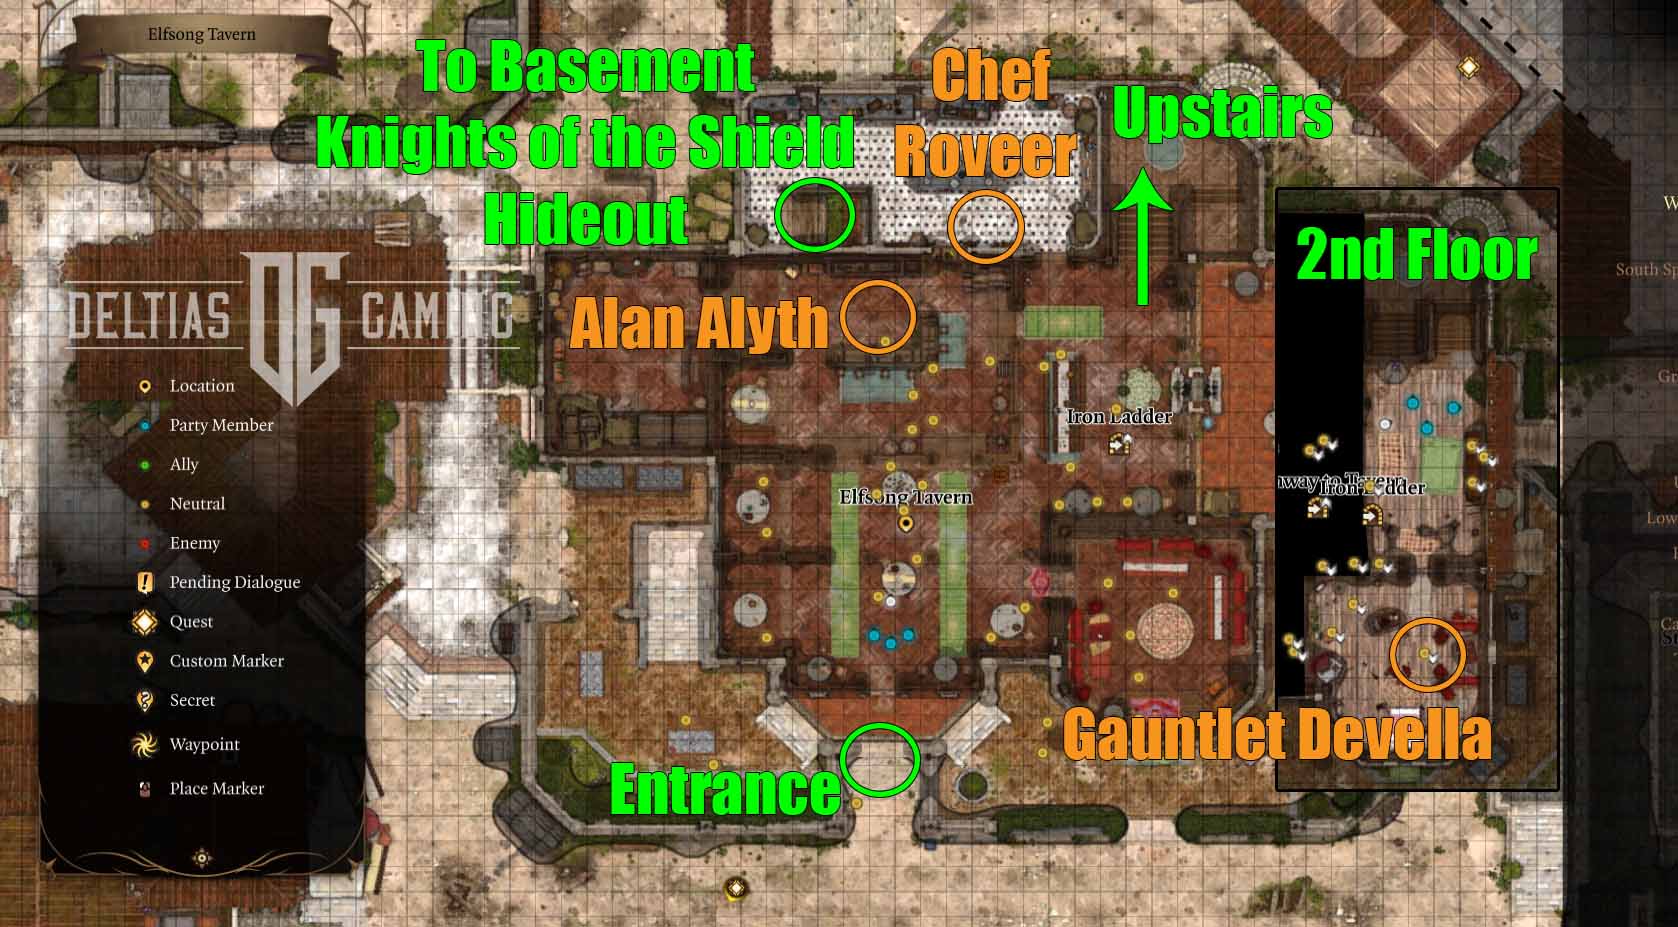
The Elfsong Tavern is where your party can exchange their campsite and tents for actual beds and where you can take the next step in investigating the murders. Duke Belynne Stelmane has been killed, and in her room on the second floor, you can locate Gauntlet Devella overseeing the crime scene. Furthermore, if you haven’t been here before, speak to Alan Alyth and rent the upstairs room.
Additionally, this location has connections to the Emperor, and you can discover his old hideout by finding a secret passage in the basement.
Quests
- Investigate the Murders: As Valeria suggested back at Sharess’ Caress, a new investigator named Devella Fountainhead is here to meet. She’ll be upstairs in the room of the murdered Duke Belynne Stelmane. Speak to her and convince her that you can be of help. She’ll ask you to locate and warn the other potential victims on the list you found.
- Cora Highberry At the Wine Festival southwest of the Elfsong Tavern.
- Figaro Pennygood: Inside Facemaker’s Boutique.
- Chef Roveer: In the kitchen of the Elfsong Tavern.
- Nesha Leesha: Outside of the Blushing Mermaid.
- Roveer’s Storehouse: You can immediately attempt to warn Chef Roveer, but he won’t want to listen until he’s had help with the rats in the basement. Use the stairs in the kitchen to take care of the infestation, and then he’ll finally listen to what you have to say.
- Visit the Emperor’s Old Hideout: You can return to the basement to discover a secret passage leading to the Knights of the Shield Hideout (see Sword of the Emperor guide for details). Fight the Githyanki and then press the button behind the statue on the far wall. Walk around this new room and several mementos will prompt the Emperor to reminisce.
Gear
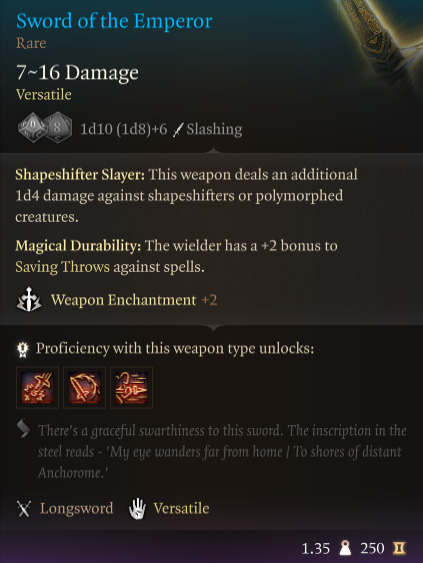
- Sword of the Emperor: Deals extra damage against shapeshifters. Found in the Emperor’s Old Hideout.
- Cerebral Citadel Armour/Cerebral Citadel Gloves: Gives a boost if your character has consumed tadpoles. Found in a wardrobe in the Emperor’s Old Hideout.
Sorcerous Sundries
Sorcerous Sundries’s significant location is near the center of the city, and it’s easy to spot on the map due to its colorful roof design. It will play an important role in Gale’s personal story, and you should have him at your party when you’re ready to visit. Additionally, if you saved the Nightsong during the events of Act 2, then Dame Aylin will also have some connection to the quests here.
You can explore two named areas within Sorcerous Sundries: Ramazith’s Tower and the Sorcerous Vault. You can learn how to access and fully explore these areas by referencing our Sorcerous Sundries Vault Guide.
Finally, by fully exploring the Tower following our Baldur’s Gate 3 Act 3 Checklist, you can earn two permanent bonuses. This includes a new spell and a temporary health boost that gets reapplied each Long Rest.
Quests
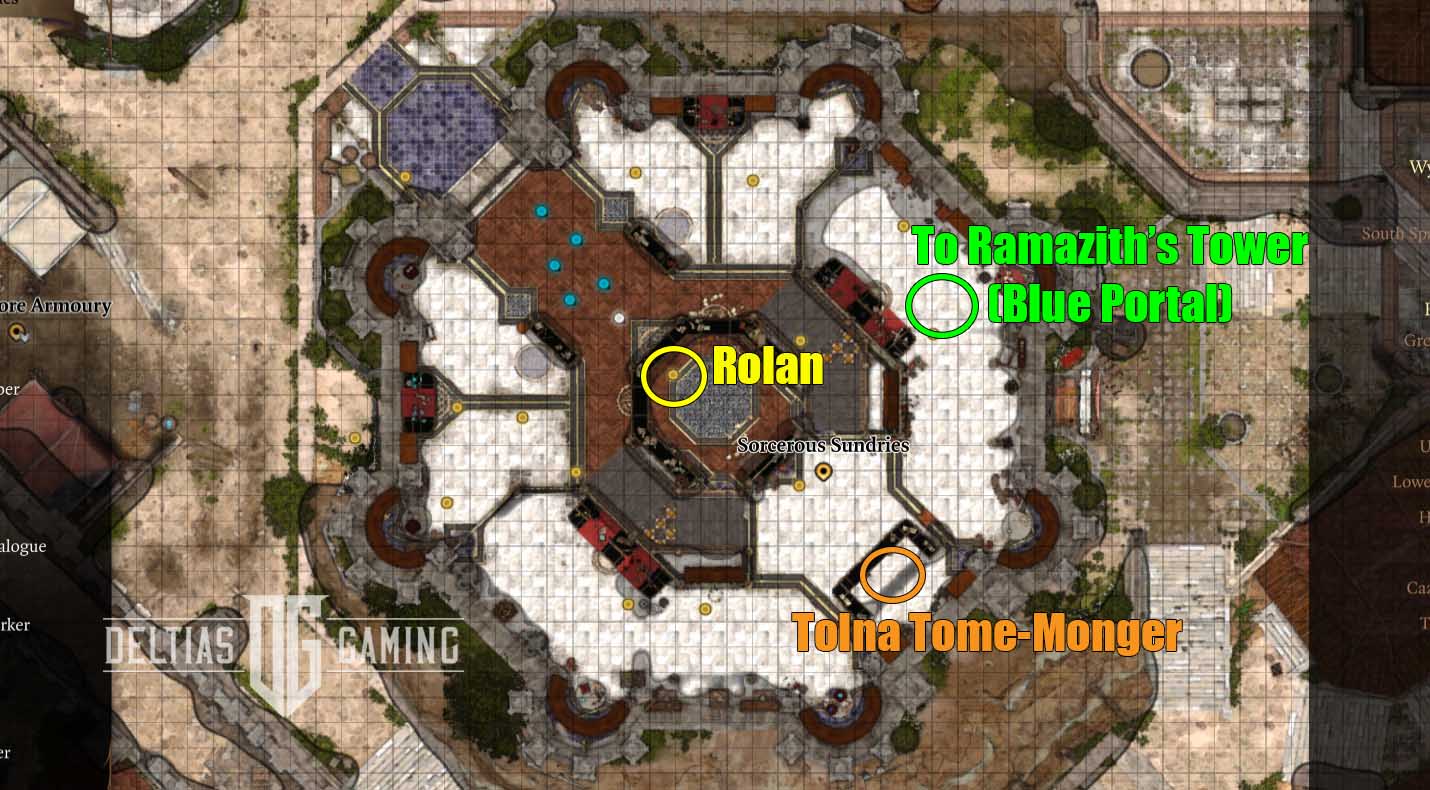
- The Wizard of Waterdeep: With Gale in your party, speak to Tolna Tome-Monger on the bottom floor and ask if she has any books on the Netherese Crown. She will tell you of a book locked away in a vault. Follow our full Sorcerous Sundries Vault Guide to have Gale read the Folly of Karsus. When you leave Sorcerous Sundries, Elminster will stop you and say that Mystra would like a word. Seek out her statue back at the Stormshore Tabernacle.
- Find the Nightsong: You’ll discover that Lorroakan, the owner of Sorcerous Sundries, has been recruiting others to hunt for the Nightsong relic. Go up the stairs and through the blue portal at the left end to meet with him. He’ll ask you about the Nightsong, and you can choose to lie. However, if Aylin is alive and at your camp, if you tell her about Lorroakan, she’ll be furious and ask for your help fighting him. Return to the Tower and join the fight. You can pick either side at this point. Either Lorroakan or Aylin will become your ally in the final fight should you help them win against the other.
- Unlock the Ancient Tome: After finding it in Act 1, you can fully unlock the secrets of the Necromancy of Thay here in Act 3. You’ll need the Tharchiate Codex, which is found in the Elminster section of the Vault. Again, you can follow our Sorcerous Sundries Vault Guide to find out how to enter and unlock this vault.
Gear
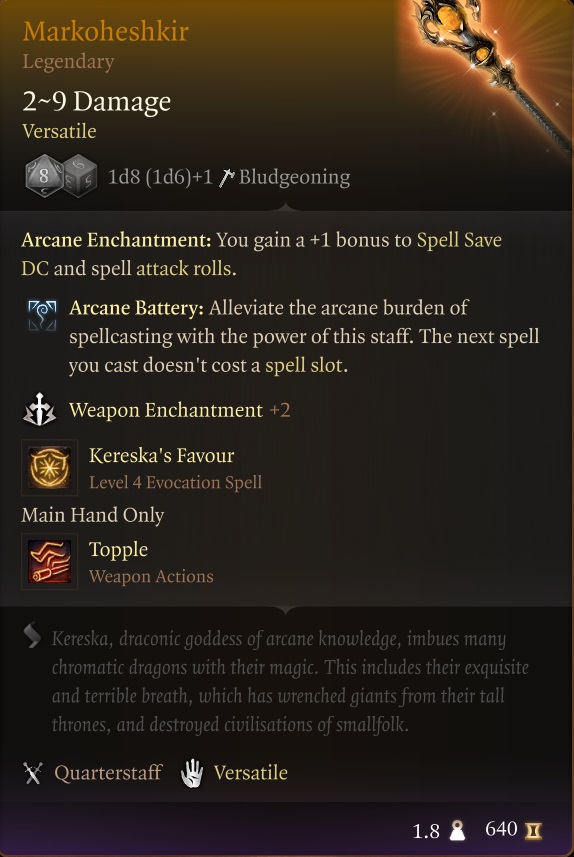
- Markoheshkir: The best staff in the game, a must-have for any spellcaster. Located inside a Globe of Invulnerability in Ramazith’s Tower.
- Robe of the Weave: A great spellcaster robe. Located inside a Globe of Invulnerability in Ramazith’s Tower.
- Shelter of Athkatla: A decent robe for a secondary spellcaster. Looted from Lorroakan.
- Despair of Athkatla: Boosts spell save and attack. Looted from Lorroakan.
Permanent Bonus
You can unlock two permanent bonuses at Sorcerous Sundries if you still have the Necromancy of Thay from Act 1. The Dance Macarbe is a new spell that can create 4 ghouls that fight alongside you. The Tharchiate Codex: Blessing is a condition that grants you 20 temporary hit points after a Long Rest. Details for unlocking both are available in our full Sorcerous Sundries Vault Guide.
Philgrave’s Mansion
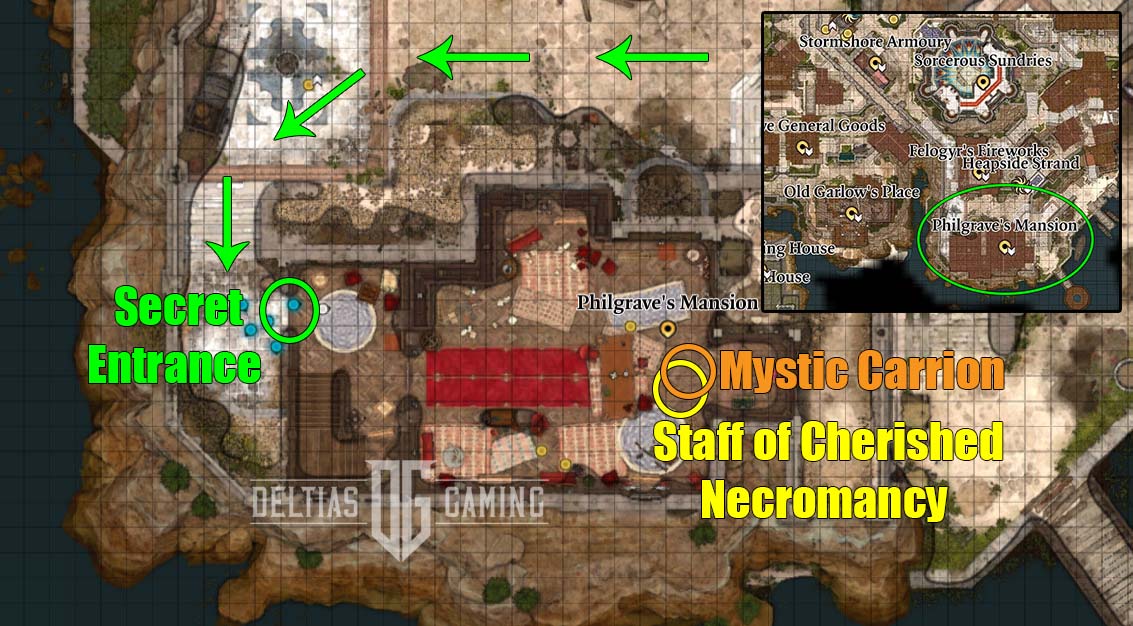
Directly south of Sorcerous Sundries, along the coast, you’ll see a large home with the front entrance blocked off and locals complaining of a foul smell. To get inside, head past the front door to the west side of the house. At the bottom of the stone stairs, you will see an outline of a doorway. A successful Perception check will highlight the area. You can click to lockpick the stone wall, and hopefully, you have a Rogue on hand to clear the 25 DC Sleight of Hand dice roll.
Inside, you’ll meet the Mystic Carrion, a Mummy lord with a potential side quest and a very nice inventory of goods for sale.
Quests
- Find Mystic Carrion’s Servant: Ask if there is anything you can help Mystic Carrion with and he will ask you to find his servant Thrumbo. You can locate Thrumbo hiding at a nearby home, and he asks for your help in defying the mummy lord. You’ll have to choose whether to bring him back to Mystic Carrion or to defy the mummy lord. We recommend the extra effort of the latter because killing Mystic Carrion means you can loot his good staff.
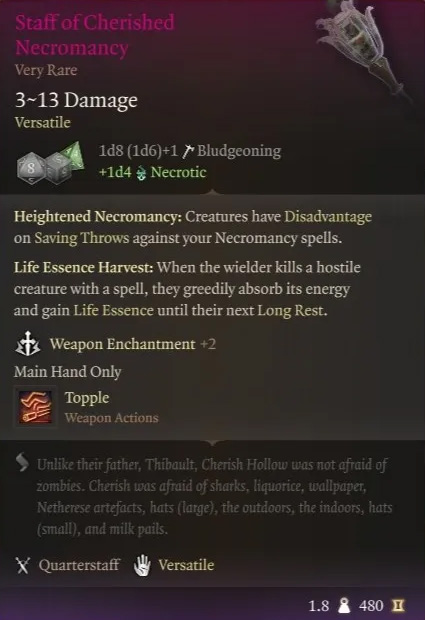
- Defeat Mystic Carrion: This is the follow-up quest, which will start if you agree to side with Thrumbo. You’ll not only get the Crypt Lord Ring but can then loot the Staff of Cherished Necromancy after defeating Mystic Carrion. Completing this one will first involve a lot of searching and destroying of Funerary Jars, and you can locate all of them by following this guide.
Gear
- Armour of the Sporekeeper: Must have armor piece for Circle of the Spore Druids. Purchase from Mystic Carrion.
- Hood of the Weave: Great end-game headpiece for a spellcaster. Purchase from Mystic Carrion.
- Staff of Cherished Necromancy: Excellent for spellcasters, but especially Necromancy Wizards.
- Crypt Lord Ring: Free Level 6 Necromancy spell. Quest reward for completing Find Mystic Carrion’s Servant.
Old Garlow’s Place

If you’ve seen any of the Anti-Hag Support Group posters, you may have already discovered the group was evicted from their original meeting location. You can encounter them at Old Garlow’s Place, a dilapidated old home along the coast by the Counting House. To enter, you’ll have to go around the west side and break down a bookcase, blocking a hole in the wall.
Quests
- Help the Hag Survivors: After entering, you must convince the group that you mean no harm. They’ll tell you about Mayrina (you may remember her from Act 1), who has been hexed by a hag and needs help. Follow this guide to find and destroy the doll upstairs.
- Avenge the Hag Survivors: After completing Help the Hag Survivors, they’ll tell you they are hunting a Hag. At this point, the quest will parallel Save Vanra, which you should have picked up while at the Basilisk Gate Barracks. The next step will be visiting the Blushing Mermaid, which we’ll cover next in our Baldur’s Gate 3 Act 3 Checklist.
- Hag’s Bane: Completing the Help the Hag Survivors should also unlock a recipe for Hag’s Bane. Before heading to the Blushing Mermaid, craft some. Using Alchemy, combine Ashes of Dried Fey Flower and any Essence.
Gear
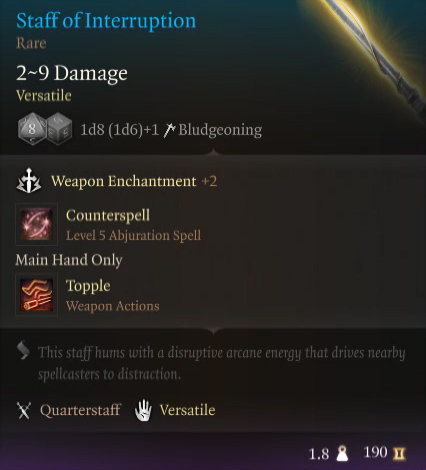
- Staff of Interruption: Not the best staff in the game, but provides a free Counterspell, which could make this good for a backup spellcaster. Reward for Help the Hag Survivors.
The Blushing Mermaid
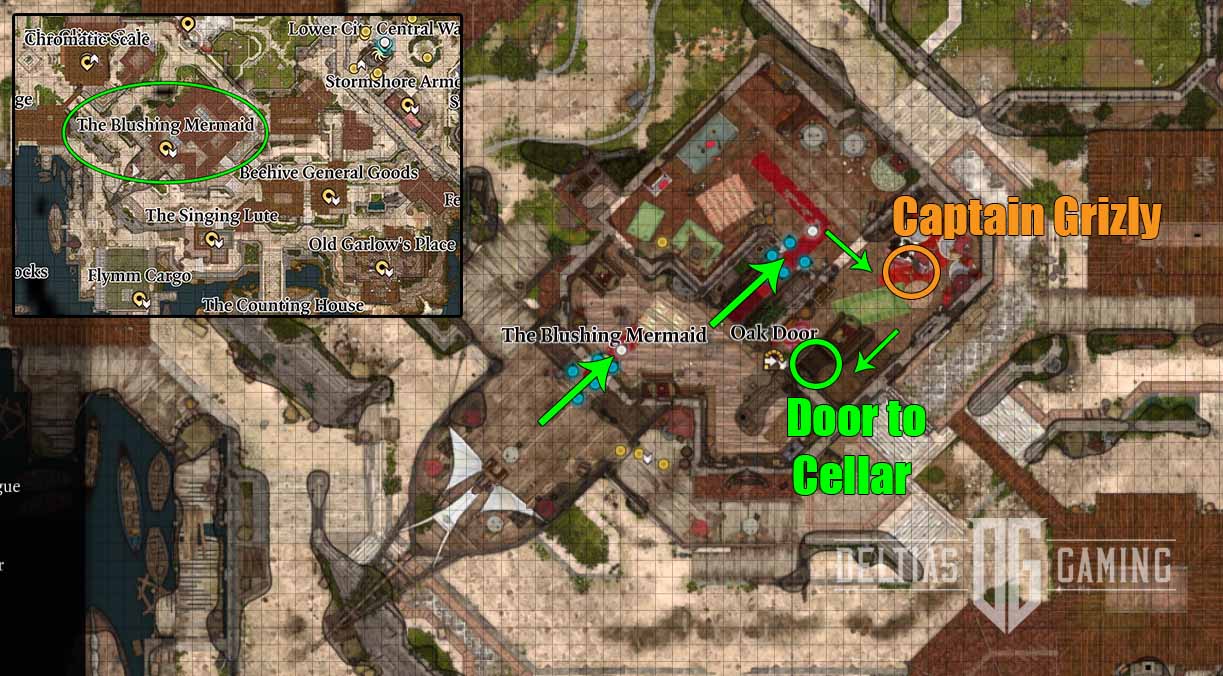
The Blushing Mermaid can be found north and a bit west of the Counting House. You can speak to and warn (or kill, if you’re playing an evil character) one of the murder victims outside the tavern. Inside, you can simultaneously continue the Save Vanra and Avenge the Hag Survivors quests.
Quests
- Investigate the Murders: Before anything else, when you first arrive, locate Nesha Leesha outside. She is one of the murder victims on the list, and you should warn her.
- Save Vanra: Head inside the tavern and speak to Captain Grisly about Vanra’s disappearance. Grisly claims that Lora is mad and has made the whole thing up. She goes so far as to offer 3,000 gold to kill Lora. Unless you’re on a Dark Urge run or want to be evil, we don’t suggest this, as doing so will lock you out of Lora’s final legendary rapier reward. If you tell Grisly a flat no, she’ll reveal her true self.
- Avenge the Hag Survivors: Now that the Hag has been revealed, Ethel tells you that she ate Vanra to create a new hag, and would you be so kind as to leave her alone while she’s pregnant? If you reject her deal, she’ll disappear into her lair, and several tavern patrons will turn into redcaps, and you’ll have to fight.
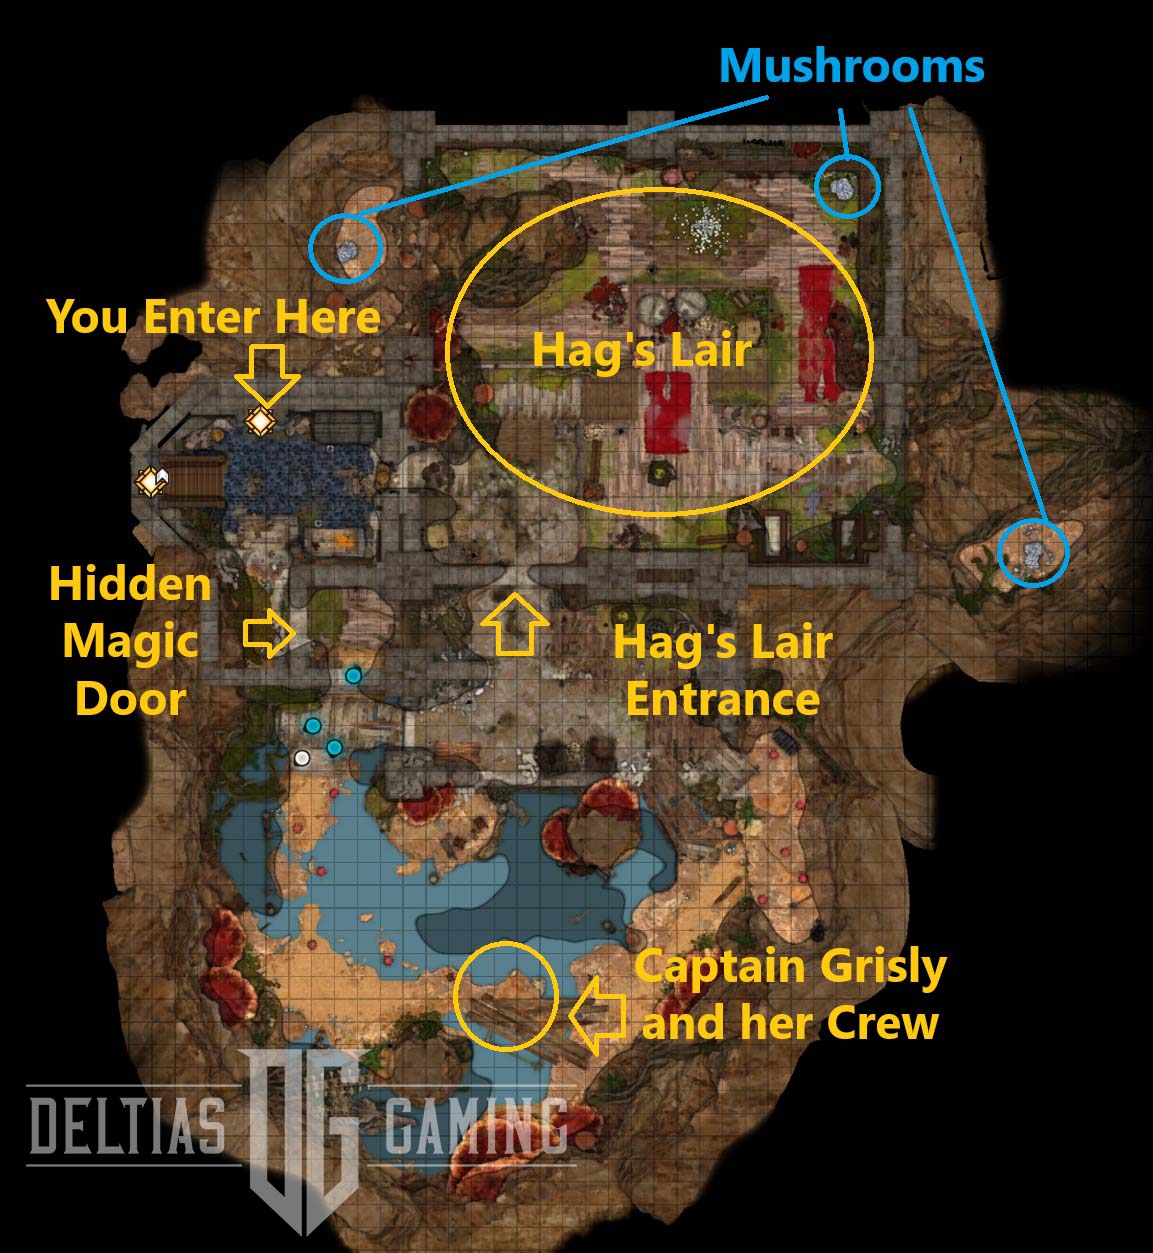
- Hag’s Lair: Ethel has established a new lair in the basement of the Blushing Mermaid. Follow our guide for how to discover the hideout and defeat Ethel. Don’t forget to throw a bottle of Hag’s Bane at Ethel, so that she throws up Vanra and you can get the major reward for the Save Vanra quest.
Gear

- Duellist’s Prerogative: Best weapon in the game for Bards or Warlocks. Rewarded for the Save Vanra quest. Locate Lora’s House on the other side of the wall from Stormshore Armory to claim it.
- Amulet of Windrider: Gain Ride the Winds and Gust of Wind spells. Also a reward for the Save Vanra quest.
- Fey Semblance Amulet: Advantage on Intelligence, Wisdom, and Charisma saving throws. Reward for Avenge the Hag Survivors. Return to Old Garlow’s Place to receive this from Mayrina.
The Lodge
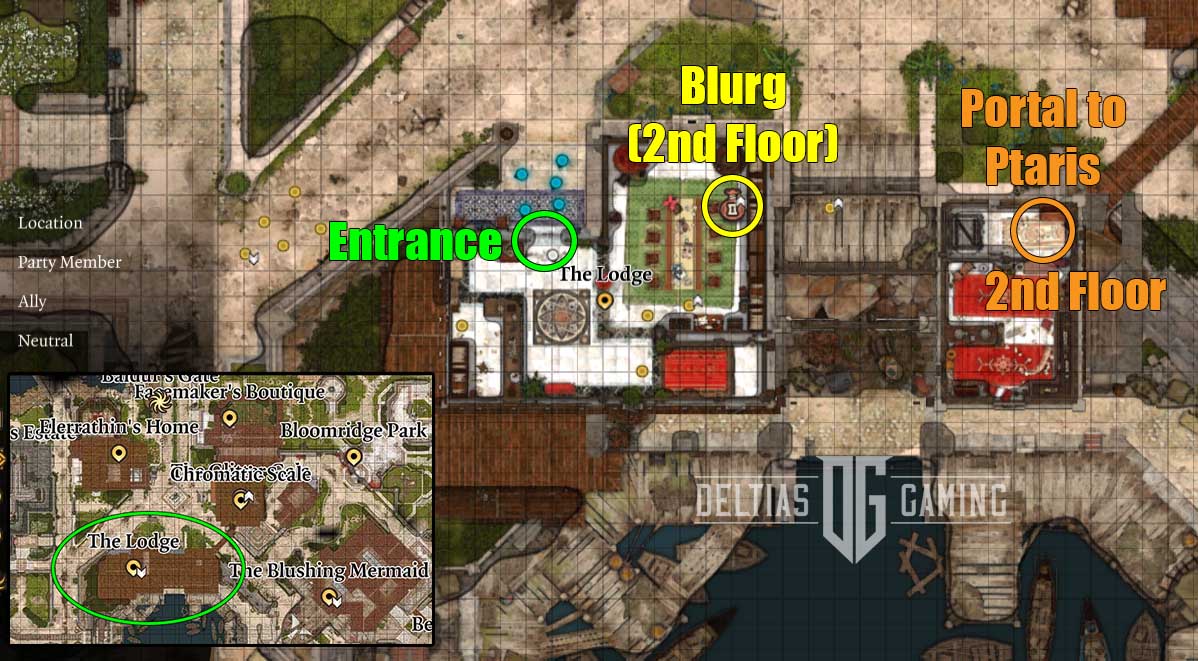
The Lodge serves as the headquarters of the Society of Brilliance, an organization you first heard of when meeting the hobgoblin Blurg in the Underdark during Act 1. You can meet him here up on the second floor, and he’s still a trader, but unfortunately, his inventory hasn’t changed. However, you’ll want to speak to him because he’ll give you an update on his mind-flayer friend Omeluum, which will start another side quest.
However, if you stole the Githyanki egg and gave it to Lady Ester in late Act 1, then you won’t encounter Blurg or any other members of the Society alive. You’ll discover why by heading through the portal upstairs.
Quests
- Steal a Githyanki Egg: Unfortunately, if you gave the Githyanki egg to Lady Ester in Act 1, when you enter the Lodge during Act 3, you will not find anyone left alive. You can follow a trail of blood leading upstairs to a portal, which you can use to find the grown Githyanki named Ptaris.
- Retrieve Omeluum: Should the Society members all be alive, you can meet Blurg on the second floor. He will tell you that Omeluum has gone missing. He will ask you to search the mind flayer, although at this point you won’t have any idea where it is. We’ll pick up his trail later.
House of Grief
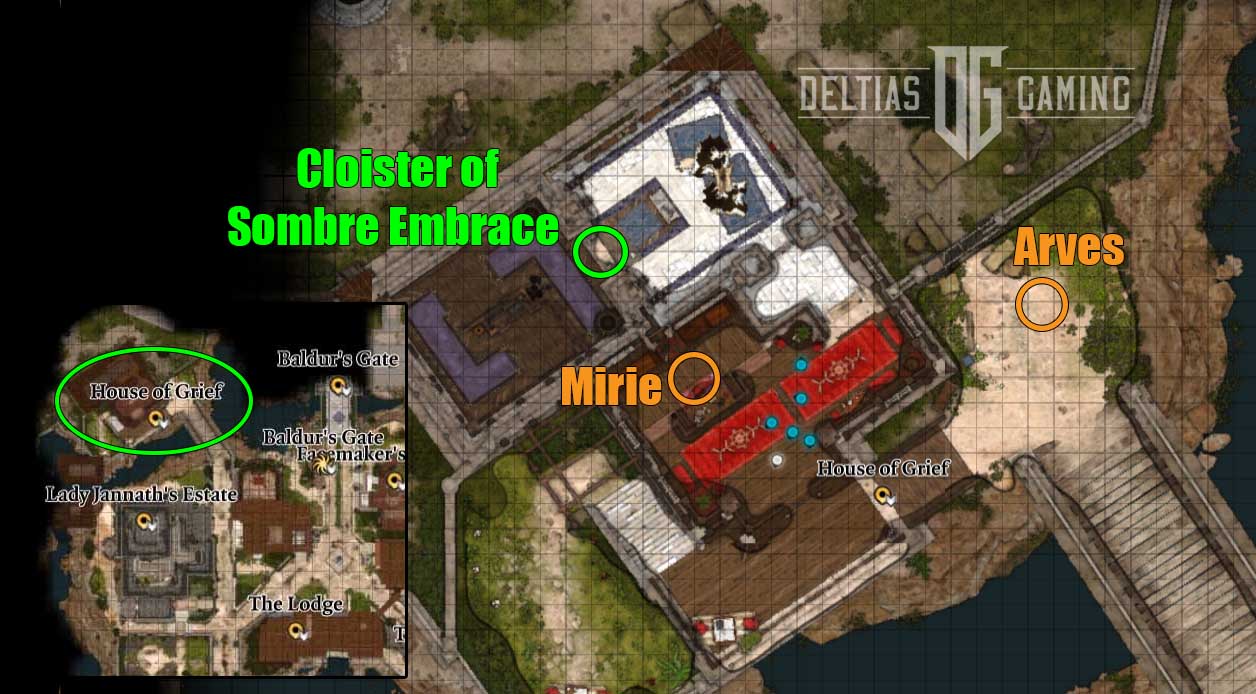
The House of Grief is found in the far northwestern corner of the Baldur’s Gate Lower City map. We recommend going here next in our Baldur’s Gate 3 Act 3 Checklist. Furthermore, this location is vital to resolving Shadowheart’s quest. No matter what choice she made while facing the Nightsong in Act 2, you will want to make sure you put Shadowheart in your party and bring her to this house of Shar worshipers.
Moreover, the events at the House of Grief will ultimately culminate in a battle with the current leader of the Sharrans.
Quests
- Investigate the House of Grief: Outside of the House of Grief, you’ll come across a man named Arves who seems confused. Speak with him, and then head inside the nearby House of Grief. Bring Shadowheart, and her presence (even if she rejected Shar) will make getting inside the Cloister of Sombre Embrace much easier.
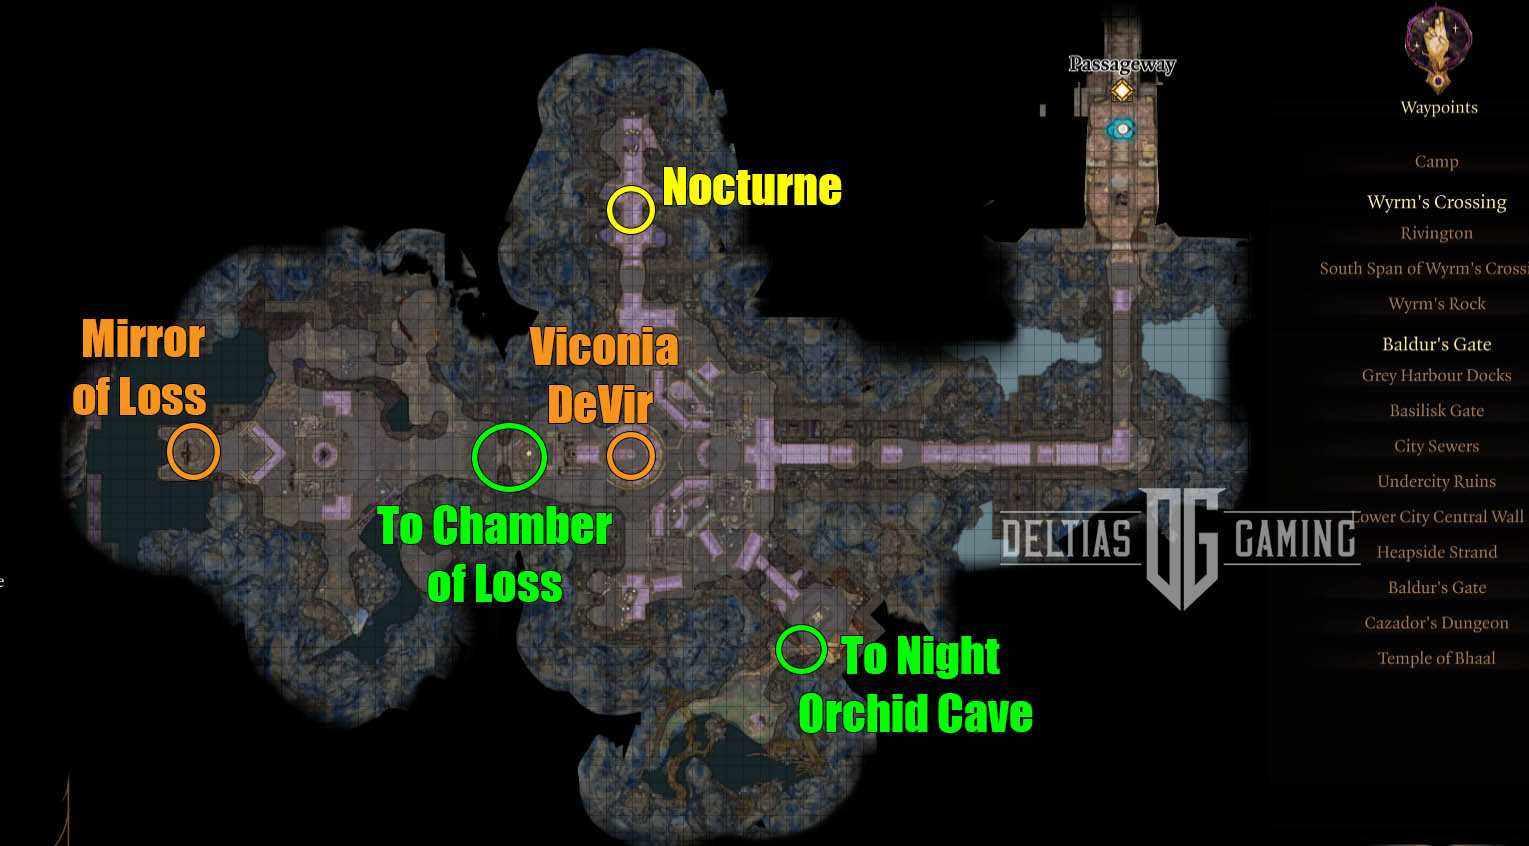
- Daughter of Darkness: No matter Shadowheart’s decision regarding the Nightsong in Act 2, she must visit the House of Grief to resolve her past. You’ll speak to the Sharran leader, Viconia DeVir, inside the Cloister of Sombre Embrace, and most choices will lead to a fight with Viconia and the other Sharran followers. You’ll also have the option to turn Shadowheart over to Viconia, committing Viconia to become your ally in the final battle. However, this is probably the least interesting (and most devastating) ending for Shadowheart, and we don’t recommend it. You’ll also lose out on the good gear that Viconia drops.
- A Familiar Face: After the confrontation with Viconia, head up into the dormitories and speak with an old friend of Shadowheart’s, Nocturne. Nocturne also serves as a trader, though her inventory selection is limited mostly to consumables.
- Chamber of Loss: When the fight with Viconia is over, make sure that you visit the Chamber of Loss deeper within. There will be more of Shadowheart’s storyline to experience here. Additionally, the Mirror of Loss can offer your party an impressive permanent bonus.
Gear
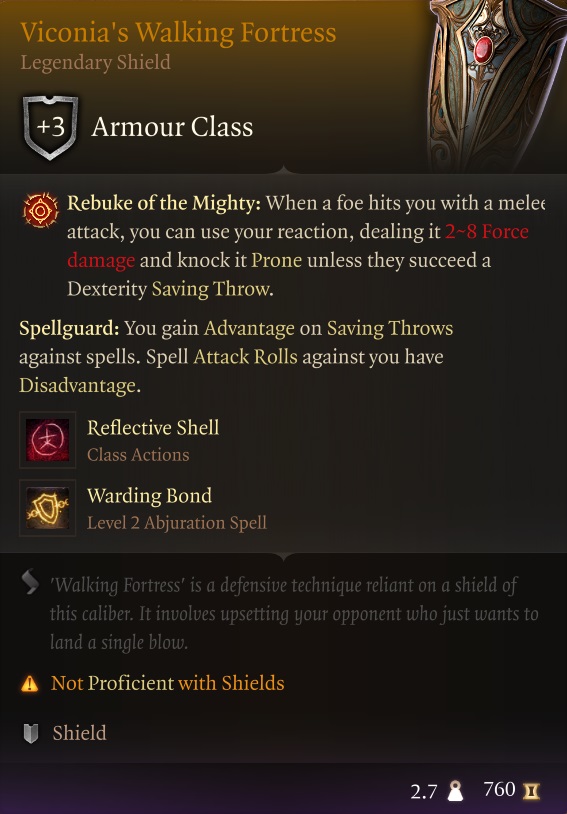
- Viconia’s Walking Fortress: The best shield in Baldur’s Gate. Looted from Viconia DeVir.
- Viconia’s Priestess Robe: Grants a +2 to all saving throws. Looted from Viconia DeVir.
- Handmaiden’s Mace: Boosts the user’s Strength stat to 18. Looted from Viconia DeVir.
Permanent Bonus
Mirror of Loss: This can be found in the final area inside the House of Grief, called the Chamber of Loss. The Threshold of Loss can only be entered if Shadowheart is a Sharran who has defeated Viconia or you have the silver key which opens the door. This key can be found on the body of Sharran Fidelian Lamona after the fight.
Using the Mirror of Loss will grant the user a permanent bonus to one ability score of your choice. This will inflict you with a penalty, but it is only temporary. Furthermore, every single party member can use the mirror to gain this permanent bonus. It will require passing some very high DC rolls, however, so you may have to take the time to change classes for some. For a full walkthrough, see our Mirror of Loss guide.
Elerrathin’s Home
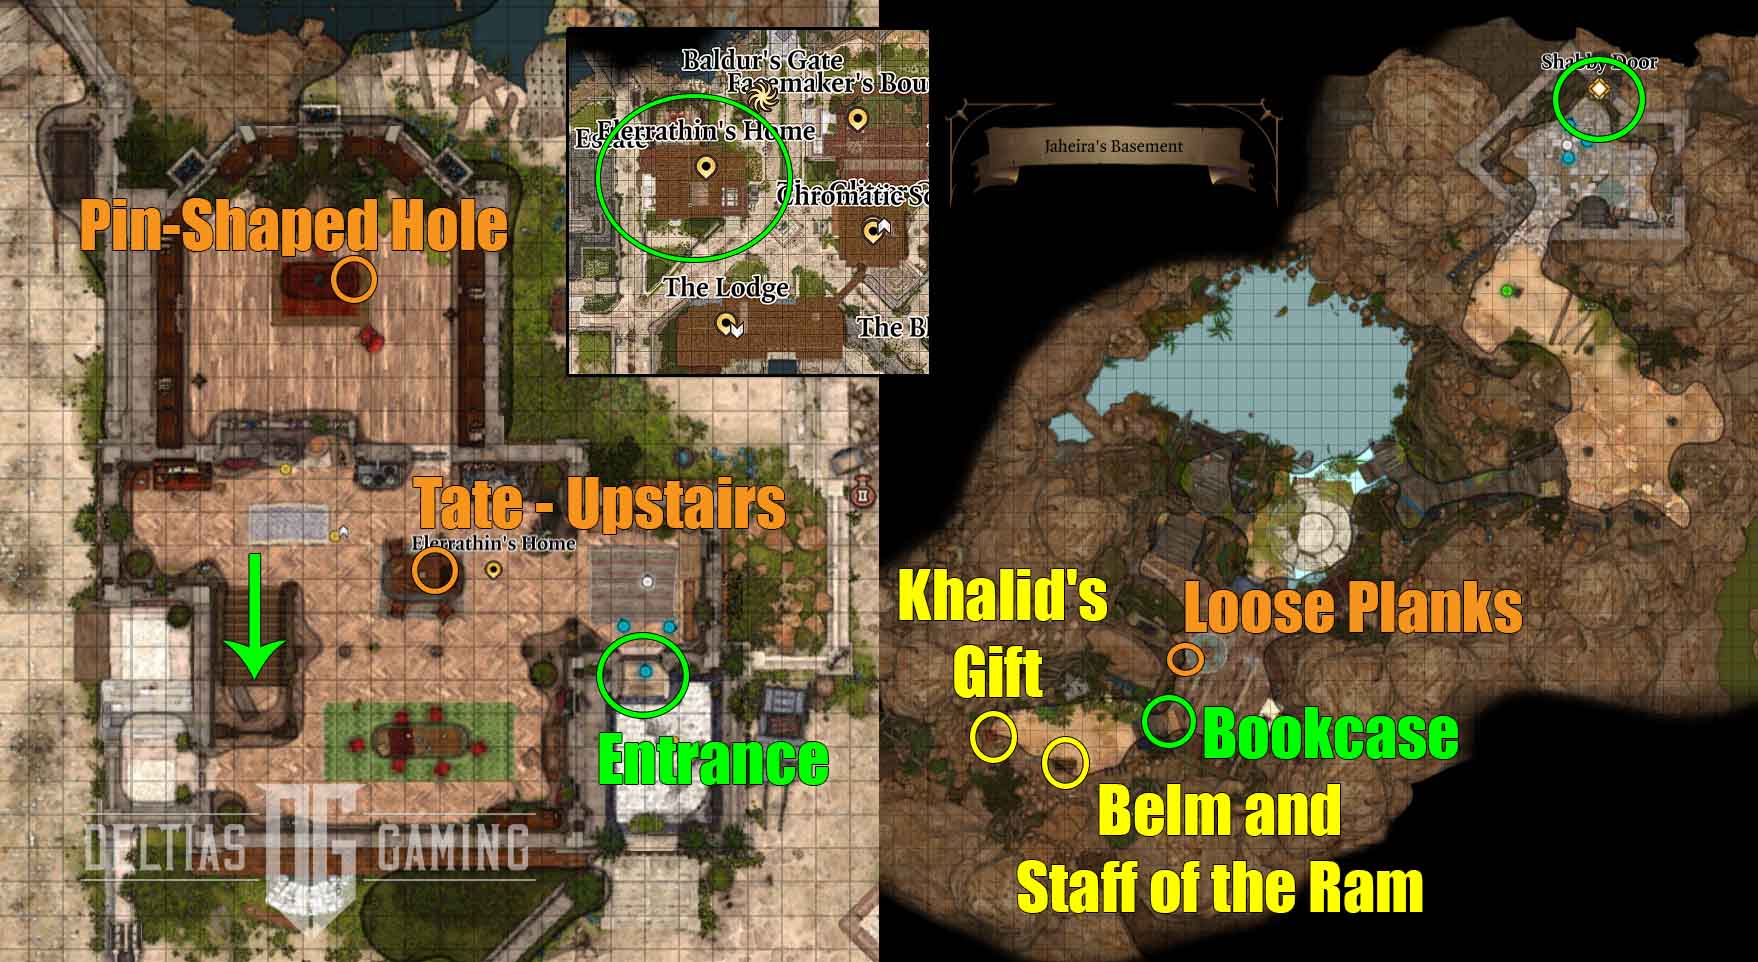
Just to the southeast of the House of Grief, you’ll find the Elerrathin Home, the home of Jaheira and her wards. This is the next stop in our Baldur’s Gate 3 Act 3 Checklist. You’ll want to put Jaheira (and possibly Minsc) in your party before you approach since she has a lot of unique dialogue with the people within. While visiting the Elerrathin Home isn’t technically part of Jaheira’s quest, The High Harper, you will discover a lot more information about her by visiting with her family.
Additionally, you can use the Harp-Shaped Pin given to you by speaking to Tate upstairs to open up Jaheira’s secret basement entrance. There is a pin-shaped hole in her desk that you can place the pin into, and this unlocks the entrance. In the basement, uncover a hidden key underneath some loose planks, and you can use that to open up the secret entrance behind the bookcase.
Gear
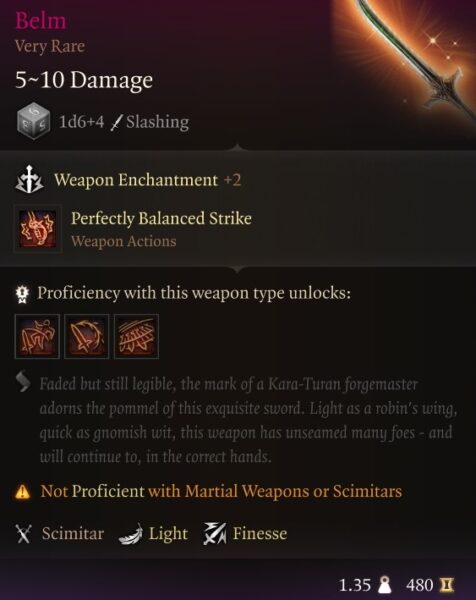
- Belm: The best scimitar in the game and one with personal history for Jaheira. Found in an Opulent Chest in Jaheira’s Basement.
- Khalid’s Gift: Another item with personal significance to Jaheira, it boosts Wisdom by +1 and will prevent Jaheira alone from being Cursed. Found inside the display case in Jaheira’s Basement.
- Staff of the Ram: Has a chance to knockback and stun once per turn. Found in an Opulent Chest in Jaheira’s Basement.
Szarr Palace
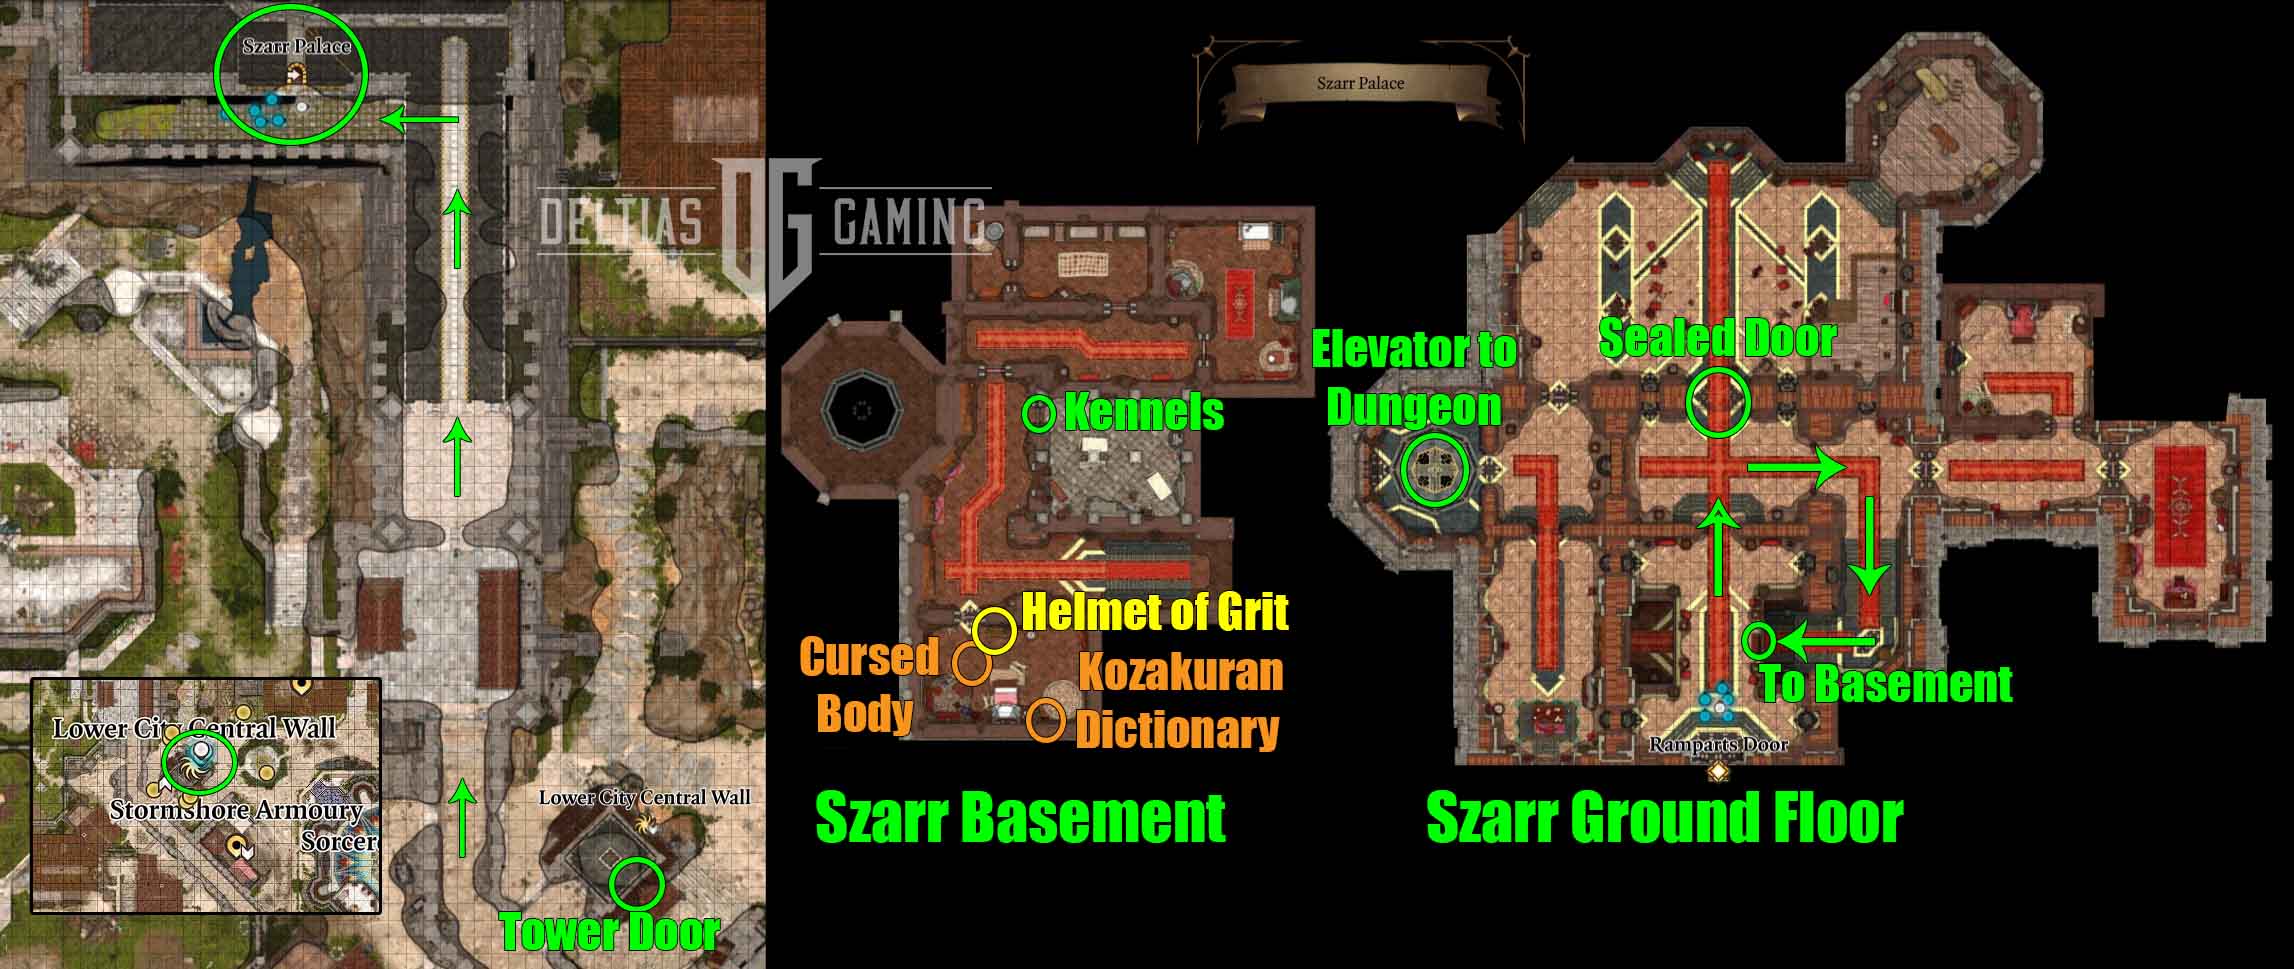
The Szarr Palace, where Astarion’s quest will conclude, is not a prominent location on the map. So our Baldur’s Gate 3 Act 3 Checklist will show you the way! First, you’ll want to find the Lower City Central Wall waypoint. It can be found just north of Stormshore Armory if you haven’t unlocked it yet. The waypoint sigil is on the side of the tower you will need to climb. Head inside and climb up the wooden steps. At the top, you will find yourself on a walkway above the wall. A couple of guards are patrolling, but they should leave you alone if you don’t bother them.
Head north and keep moving forward. You’ll run into some actual guards, but there are Intimidation and Deception dialogue choices you can use to get by them. The path will generally keep moving north until a turn to the left. Down this pathway and on the right, you will find the entrance to the Szarr Palace.
Quests
- The Pale Elf: If you recruited Astarion back in Act 1 and learned about the ritual Cazador plans in Act 2, you’ll want to bring your vampire friend along as you confront his master. Astarion will have a lot of commentary about what you see in the Szarr Palace and his life as a spawn. Following your final confrontation with Cazador, you’ll have to convince Astarion to either stop the ritual or complete it and ascend.
- Investigate Cazador’s Palace: You can move freely after entering. You’ll find a large seal covering a door near the entrance, and you’ll need to find a way to open this to proceed forward. Your first goal is to discover the cursed body in the bedroom, which you can clear by casting Remove Curse. Then, find the Kozakuran Dictionary inside and read it. Next, you need to find the Szarr Family Ring inside the Kennels. Use these to unlock the seal, fight the enemies on the other side, and find your way to the Dungeon. For a full walkthrough, see our Rhapsody guide.
- Cazador’s Dungeon: Down here, you’ll find two cells filled with people, and you should go over and speak with both groups. One will contain all of the Gur children Ulma asked you to find and rescue back at the camp in Rivington. There is no way to open these cells. Make your way forward to another sealed door. You can already open this using the same ring as before. Inside, you’ll find Cazador beginning the ritual and can speak to him before initiating combat.
Gear
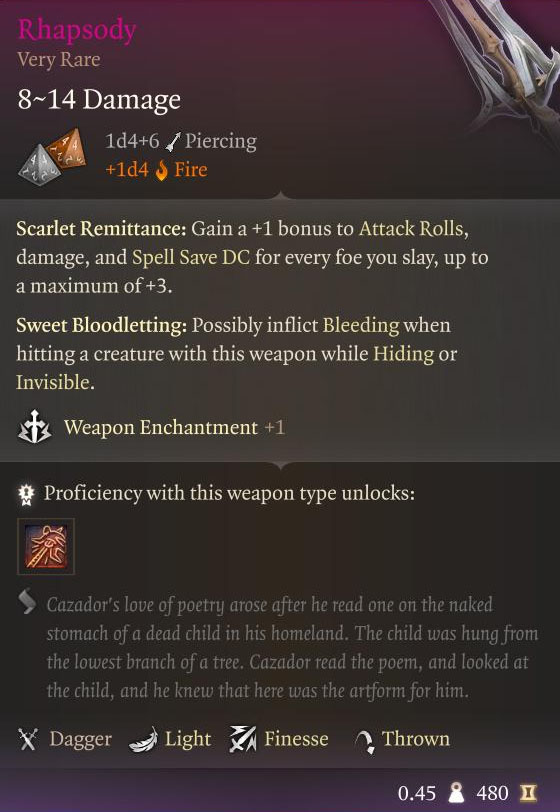
- Rhapsody: One of the best daggers in the game. Dropped by Cazador Szarr.
- Woe: Quarterstaff that gives a bonus to spell save and attack. Dropped by Cazador Szarr.
- Helmet of Grit: Grants an additional bonus action when HP is low. Looted from the chest in the cursed room.
- Pelorsun Blade: Rapier that grants Advantage against the undead. Useful in the fight against Cazador. Found in a trapped casket on the lower level of the dungeon.
Permanent Bonus
Ascended Astarion: Once Cazador has been eliminated, Astarion has the choice of either stopping the ritual or completing it and becoming the Vampire Ascendant. This choice will have repercussions on Astarion’s character and story, but it can also affect his combat abilities. He will acquire two new class actions if ascended: Ascendant Bite and Misty Escape (Vampire Ascendant).
Ascendant Bite is a more powerful version of the Vampire Bite bonus action Astarion has had throughout the game. Additionally, it does not replace Vampire Bite. Instead, Astarion will have access to both. Misty Escape (Vampire Ascendant) is a unique version of Gaseous Form, which allows Astarion to easily escape or fit through small spaces.
Finally, as the Vampire Ascendant, Astarion will also deal a bonus 1d10 Necrotic damage with all weapon and unarmed attacks.
Devil’s Fee
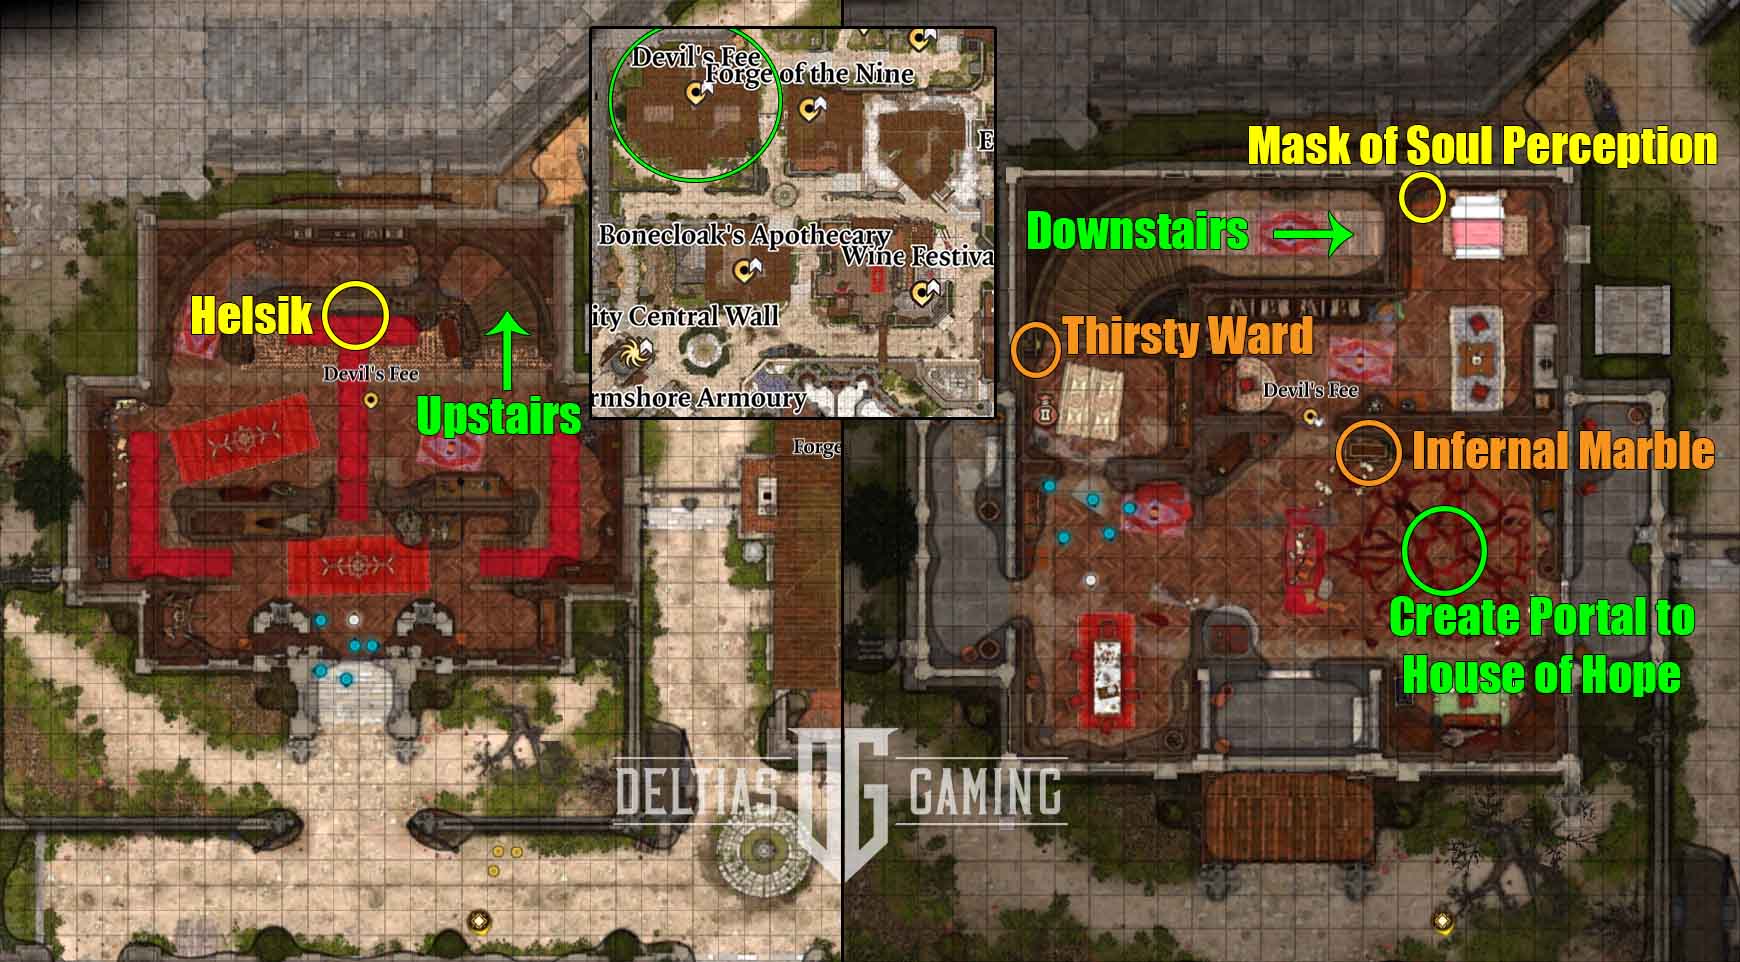
The Devil’s Fee can be found on the city’s north side, in about the center of the map, just to the west of the Forge of the Nine. When you first visit the owner, Helsik will only have basic items for sale. Take the time to walk around her expansive shop, and Arcana checks will automatically roll. I succeeded in a few of these and then went back to Helsik. (You can also put Karlach at the party, and she’ll bypass the need for checks.) There now should be new dialogue options, including an 18 DC Persuasion check to discover that she is a diabolist.
Purchase any items you wish to have, and then head upstairs. Give the Thirsty Ward water at the top of the stairs, and you can bypass the glyph trap. Inside these rooms, you’ll find a ritual circle you can use to enter Raphael’s House of Hope.
Quests
- Free Orpheus: Upon discovering that Helisk is a diabolist, you have a way into Hell. Helsik will say she can send you into Raphael’s domain, but it will cost you 20,000 gold. Alternatively, you could offer to bring her back the Gauntlets of Hill Giant Strength in exchange. However, you can also steal the items needed to complete the ritual and open the portal yourself. Check out our How to Enter the House of Hope guide for step-by-step instructions. Make sure you are well-prepared before you go through the portal, for Raphael will not be pleased once he discovers you.
Gear

- Cloak of the Weave: Best end-game cloak for spellcasters. Unlock Helsik’s special stock for this and other good items mentioned in the Low City Vendors section above.
- Mask of Soul Perception: Boosts damage and Initiative rolls, great for Monks, Barbarians, Paladins, or Fighters. Inside a locked Gilded Chest on the second floor of Devil’s Fee (X: -33 Y: 20).
House of Hope

The House of Hope can only be entered through the ritual portal summoned in the upstairs room of the Devil’s Fee. It is located in the realm of Avernus, and the party cannot venture out of its confines. If you disagree with Raphael, make sure you steal the Hammer last. Taking the hammer will set off many alarms, and you will have to leave immediately.
There is an incredible amount of good gear inside the House of Hope, and if you follow our Baldur’s Gate 3 Act 3 Checklist, you can get away with all of it.
Quests
- Free Orpheus: Your ultimate goal will be to steal the Hammer of Orpheus. It is on the central pedestal in the Archives. Stealing it will trigger alarms, and you’ll be attacked, and ultimately, when you try to leave, you’ll have to fight Raphael. We recommend you take the time to search for the rest of the space before you take the Hammer.
- Acquire the Gauntlets for Helsik: The Gauntlets of Hill Giant Strength are in the Archives, in the northern alcove. Split your party and steal them while you steal the Hammer. Again, take the time to search the rest of the House of Hope and collect the other items first, then follow this guide to steal the three artifacts in the Archives.
- Save Hope: You’ll meet Hope shortly after arriving. She is trapped here, and only the Hammer of Orpheus can release her. Convince her that you can help, and she will appear as you explore the House to help guide you. Finally, after you decide to steal the Hammer, run across the House and into Hope’s ‘cell.’ Free her before going back to the portal to leave. This doesn’t complete the quest, however. Raphael appears before you can exit, and you must defeat him and keep Hope alive to receive the quest reward.
- Find Mol: You can find Mol’s Contract with Raphael within the room locked by an Inert Infernal Gem. Taking it and bringing it back to Mol will impress her, and she’ll agree to be your ally in the final fight only if she does NOT know about Raphael’s death.
- Help Kith’rak Voss: After escaping the House of Hope, you can return to Voss in the sewers and show him the hammer.
Gear
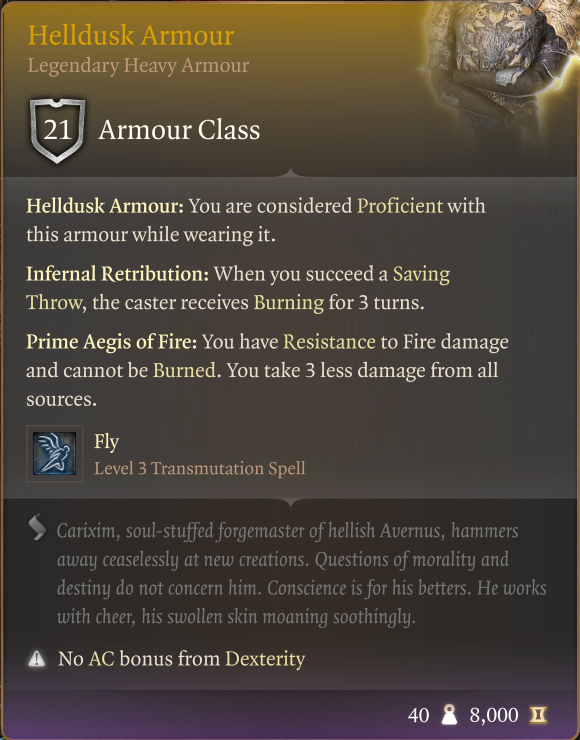
- Helldusk Armour: The best heavy armour in BG3 and grants proficiency automatically. Looted from Raphael.
- Gloves of Soul Catching: The best gloves for monk builds. Rewarded for the Save Hope quest. She must live through the combat encounter with Raphael.
- Staff of Spellpower: A lesser version of the Mark legendary quarterstaff, good for a secondary spellcaster. Found in the vault across from the entrance to the Boudoir.
- Helldusk Helmet: One of the best helmets in BG3. Also found in the vault across from the entrance to the Boudoir.
- Helldusk Gloves: One of the best glove sets in BG3. Looted from Haarlep in the Boudoir.
- Amulet of Greater Health: The best necklace for Constitution builds and saving throws. Stolen from the Archive.
- Gauntlets of Hill Giant Strength: The best gloves for melee strength builds. Stolen from the Archive.
- Orphic Hammer: A legendary hammer that has more story significance than combat utility. Stolen from the Archive.
Water Queen’s House
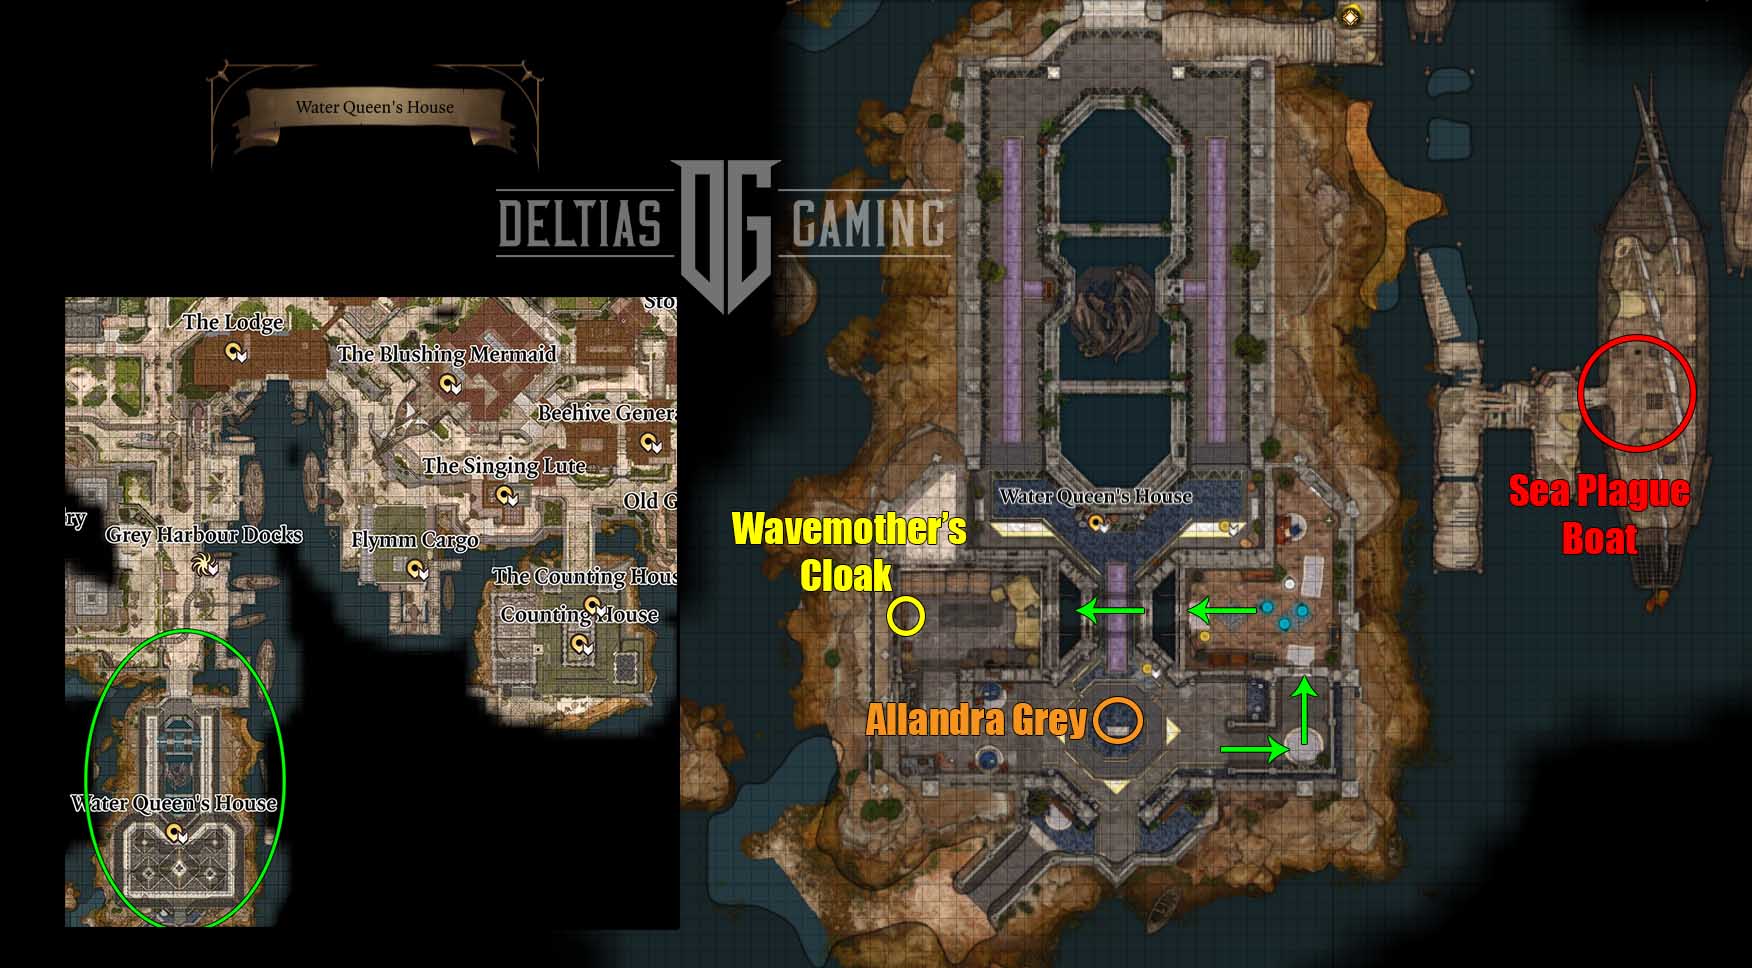
The Water Queen’s House is far to the bottom left or bottom west of the Lower City map. At the same time, the location doesn’t have any significance to the main story. You can pick up a side quest, leading you to bigger and more impactful story arcs. Additionally, you can pick up a couple of pieces of equipment here. While these items aren’t best-in-slot for any builds, they are popular due to their appearance.
Quests
- Avenge the Drowned: Head inside the Water Queen’s House and discover the funeral taking place within. Speak to Flood Tide Allandra Grey and she will ask for your help in finding the killer. You must return to the docks and speak with the fisherman, Gowlan. He’ll provide helpful information pointing you toward Flymm Cargo across the dock. That’s the next stop in our Baldur’s Gate 3 Act 3 Checklist.
Gear
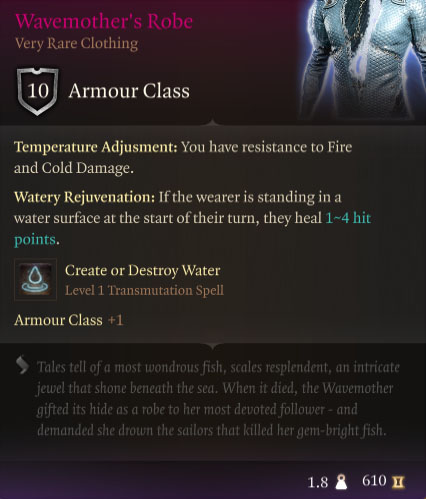
- Wavemother’s Robe: Resistance to Fire and Cold, heals when standing in water. Quest reward for Avenge the Drowned.
- Wavemother’s Cloak: Once per turn the cloack provides Water Layer Protection until the wearer takes damage. Looted from an Opulent Chest in Flood Tide Allandra Grey’s quarters.
Flymm Cargo
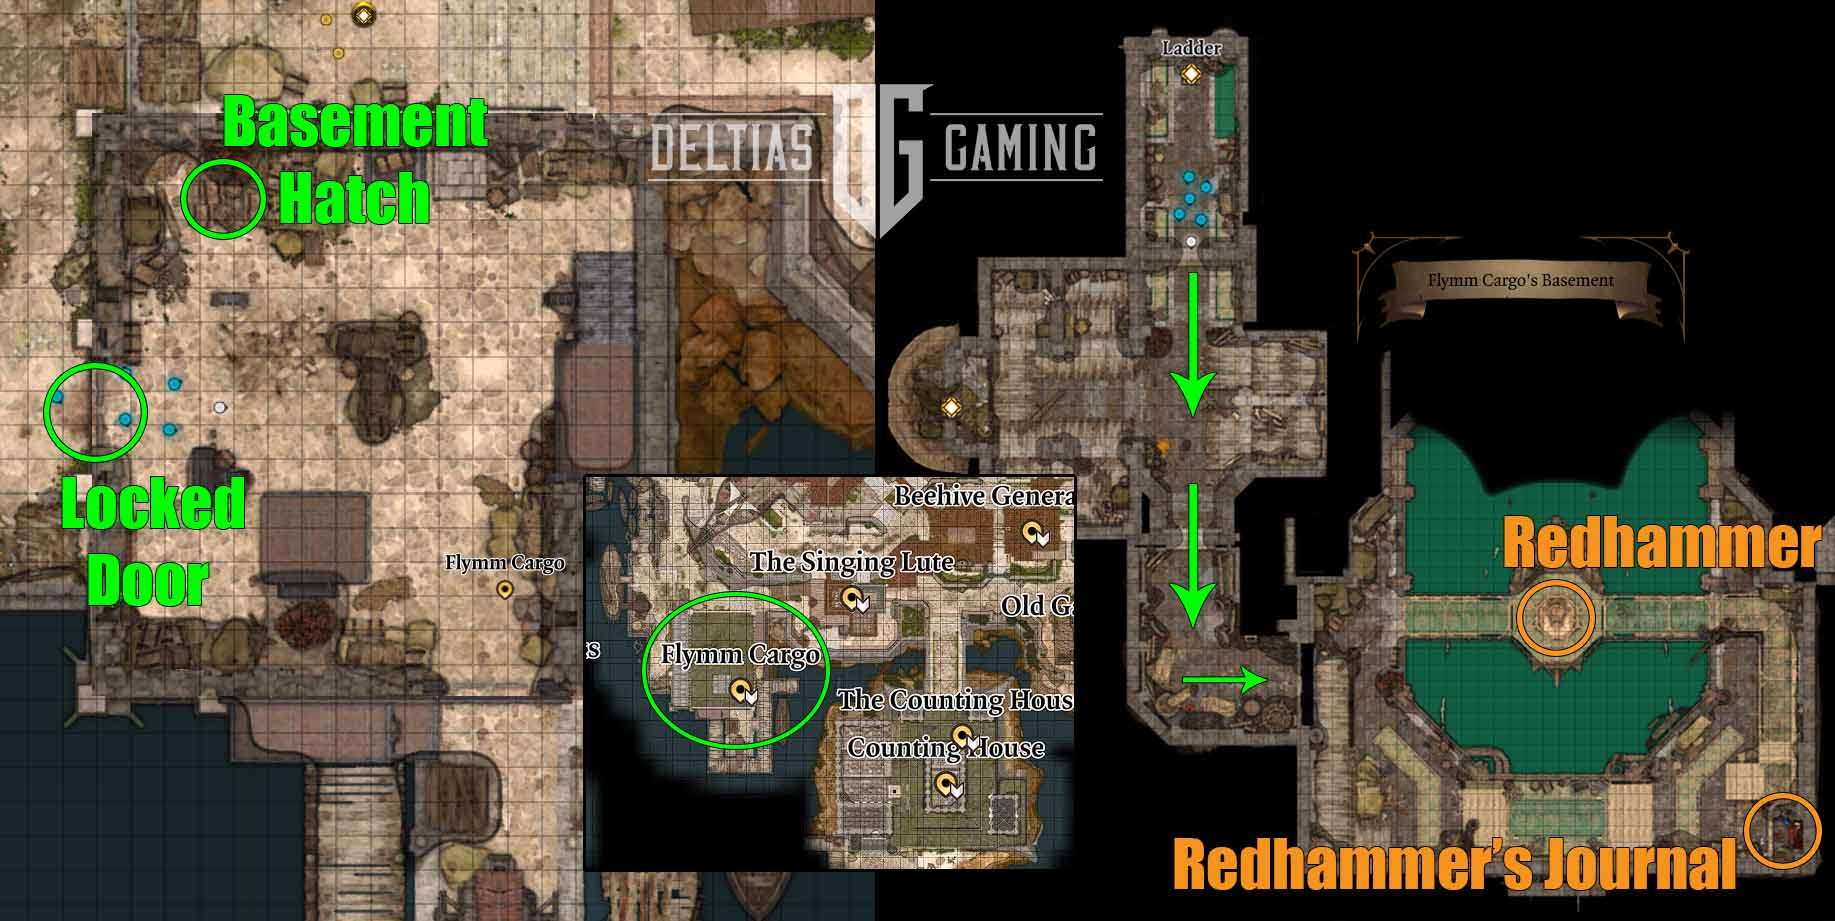
To reach Flymm Cargo you’ll have to walk around the docks from the Water Queen’s House. The building is on the coast just south of The Blushing Mermaid. You can enter by picking the lock on the double doors on the west side of the building. After you enter, you will need to fight and defeat some loose worgs. Then, you can use the hatch in the northwestern corner of the building (it’s hidden underneath boxes) to reach the basement.
Next, within the basement keep heading forward, and proceed through a door labeled ‘Machine Parts Storage’. Inside this space, you’ll discover a dwarf named Redhammer standing over the entrance to a submarine.
Before approaching him, we recommend taking a moment to put Wyll in your party if he isn’t already there. Additionally, make sure you’re stocked up on Misty Step and Haste scrolls and fully rested. Then, speak to Redhammer and you’ll discover that this vehicle provides the only passage between the Lower City and a prison known as the Iron Throne.
Quests
- Avenge the Drowned: After finding Redhammer, you’ll want to be careful of your dialogue choices when speaking with him. Depending on how you want to roleplay or what reward you want may influence how you speak to him. If you want the Wavemother’s Robe as the quest reward, you must kill Redhammer or eventually hand him over to the Umberlees. You can side with the Dwarf but will lose out on the Robe, and he only gives you a few hundred gold. Additionally, you can convince Redhammer to take you to the Iron Throne himself. However, you can pilot the submarine if you kill him before that.
NOTE: Going to the Iron Throne and attempting to rescue the prisoners will make Gortash hostile to you and your party. Consequently, on your return, that means that the Steel Watchers will attack on sight. Disabling them will be next on our Baldur’s Gate 3 Act 3 Checklist after the Iron Throne, however. Once that’s done they shouldn’t give you any more trouble while you’re traveling.
Iron Throne
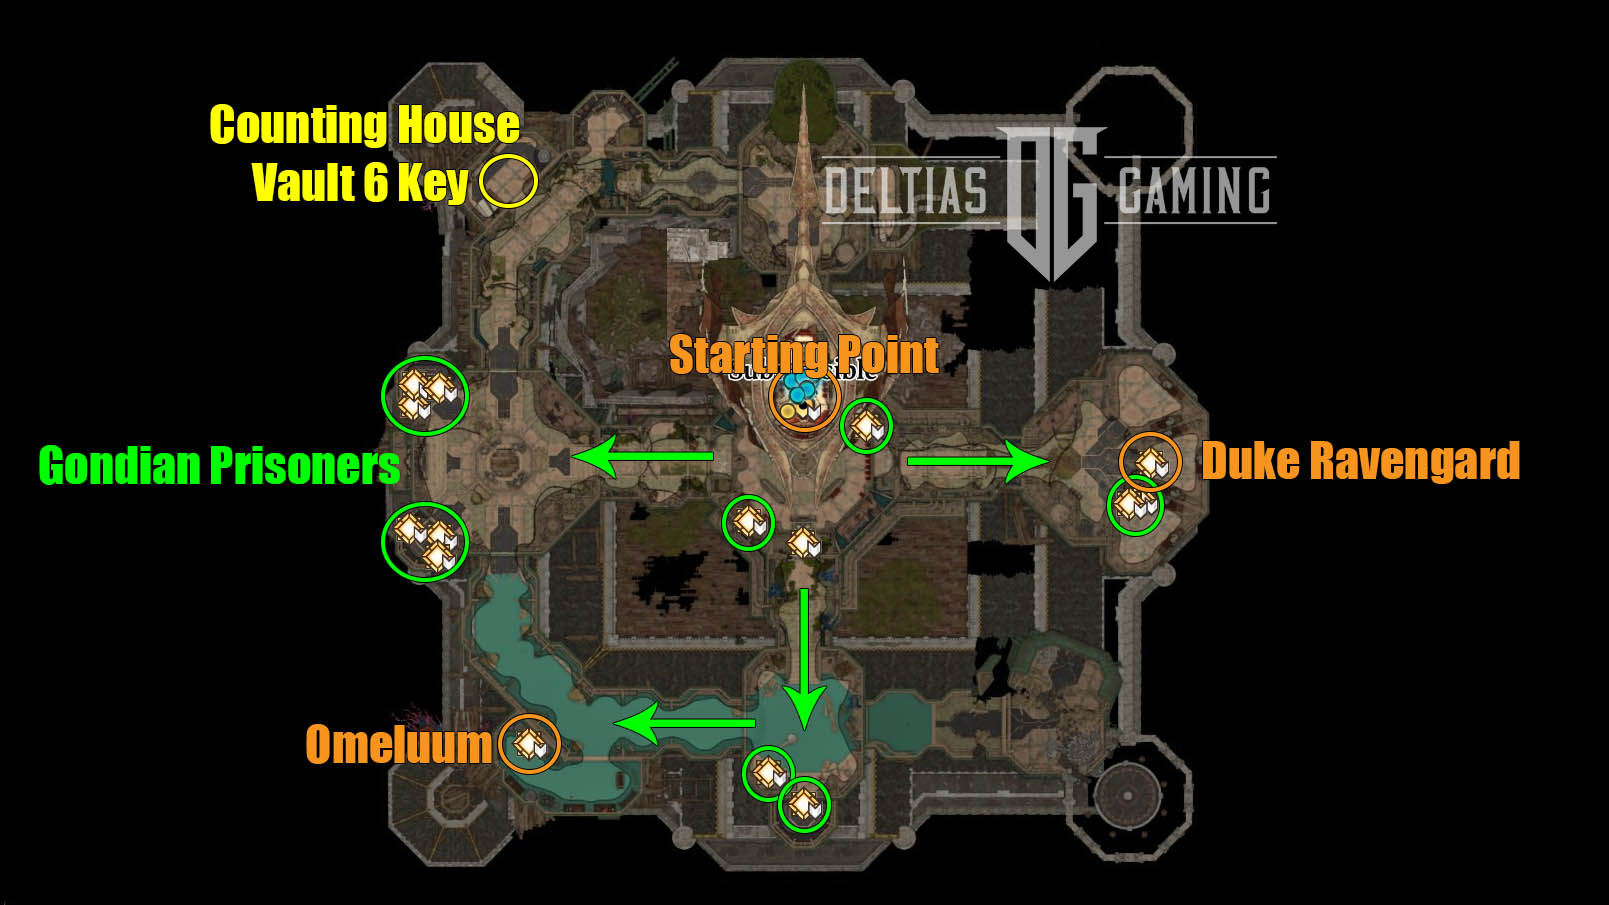
The Iron Throne is a location where several different quests converge, and it can provide a major challenge if you want to rescue all of the prisoners inside. There are two individuals, and then a group of gnomes you can set free. This includes Wyll’s father Duke Ravengard, Omeluum, and 12 Gondian gnomes. In all, these prisoners are spread out between 8 cells (and one Gondian strapped to a chair). You’ll also have to deal with Sahuagin enemies that spawn throughout the entire encounter.
Furthermore, Gortash becomes aware of your trip to the Iron Throne and in retaliation floods the prison. Therefore, rescuing the prisoners will be a timed event. If playing on Explorer difficulty you will have 8 turns to free everyone and return to the submarine, 6 on Balanced, and only 5 on Tactician.
Quests
- Rescue the Grand Duke: The Iron Throne is where you can finally rescue Wyll’s father. Depending on what decision you made when Mizora offered Wyll a new contract, she will either help you out or interfere. He can be found in one of the cells to the east of the ladder you climbed down. If Mizora is interfering, as soon as you get him out of the cell, she will summon multiple exploding spiders to try and kill the Duke.
- Save the Gondians: The Gondians are spread out across the Iron Throne, including two conveniently located right next to the ladder. The only direction you won’t find prisoners in is north of the ladder, so don’t waste time sending any of your party in that direction.
- Retrieve Omeluum: Omeluum is in a cell in the southwestern corner of the Iron Throne. The nice thing about the mind flayer is that once you get to it inside the cell and free it from the chair, Omeluum can teleport itself and its rescuer immediately back to the sub.
Gear
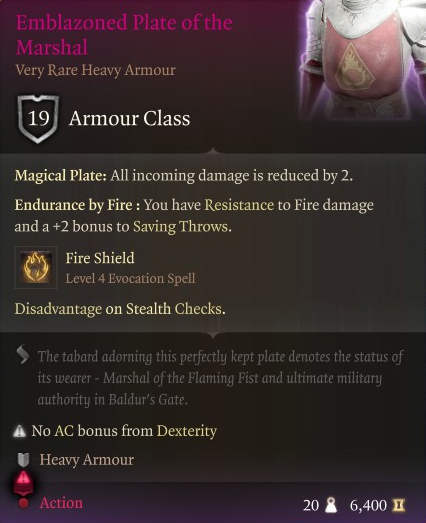
- Emblazoned Plate of the Marshal: Reduces all damage by 2 and grants Fire Resistance. Looted from Duke Ulder Ravengard. Can only be taken from him if he dies, which may or may not be a sacrifice you wish to make. You can rescue him and then kill him at camp later, but doing so turns the entire party hostile if they see you.
Steel Watch Foundry
When you get back to the city from the Iron Throne, Gortash and the Steel Watchers will now be immediately hostile to you. Your next best step in our Baldur’s Gate 3 Act 3 Checklist is to disable the Steel Watchers so you can move around the city freely again. The Steel Watch Foundry can be found on the other side of the docks, and you can quickly use the Grey Harbour Docks waypoint to get there.
There are a few different ways of getting inside the Steel Watch Foundry, but the best two options are:
- Through the front iron gate. You’ll have to lock pick the gate and then wait until the patroling Steel Watcher has gone around the corner to go up and into the front door.
- Fly up onto the roof and descend into the Foundry through a hatch.
Quests
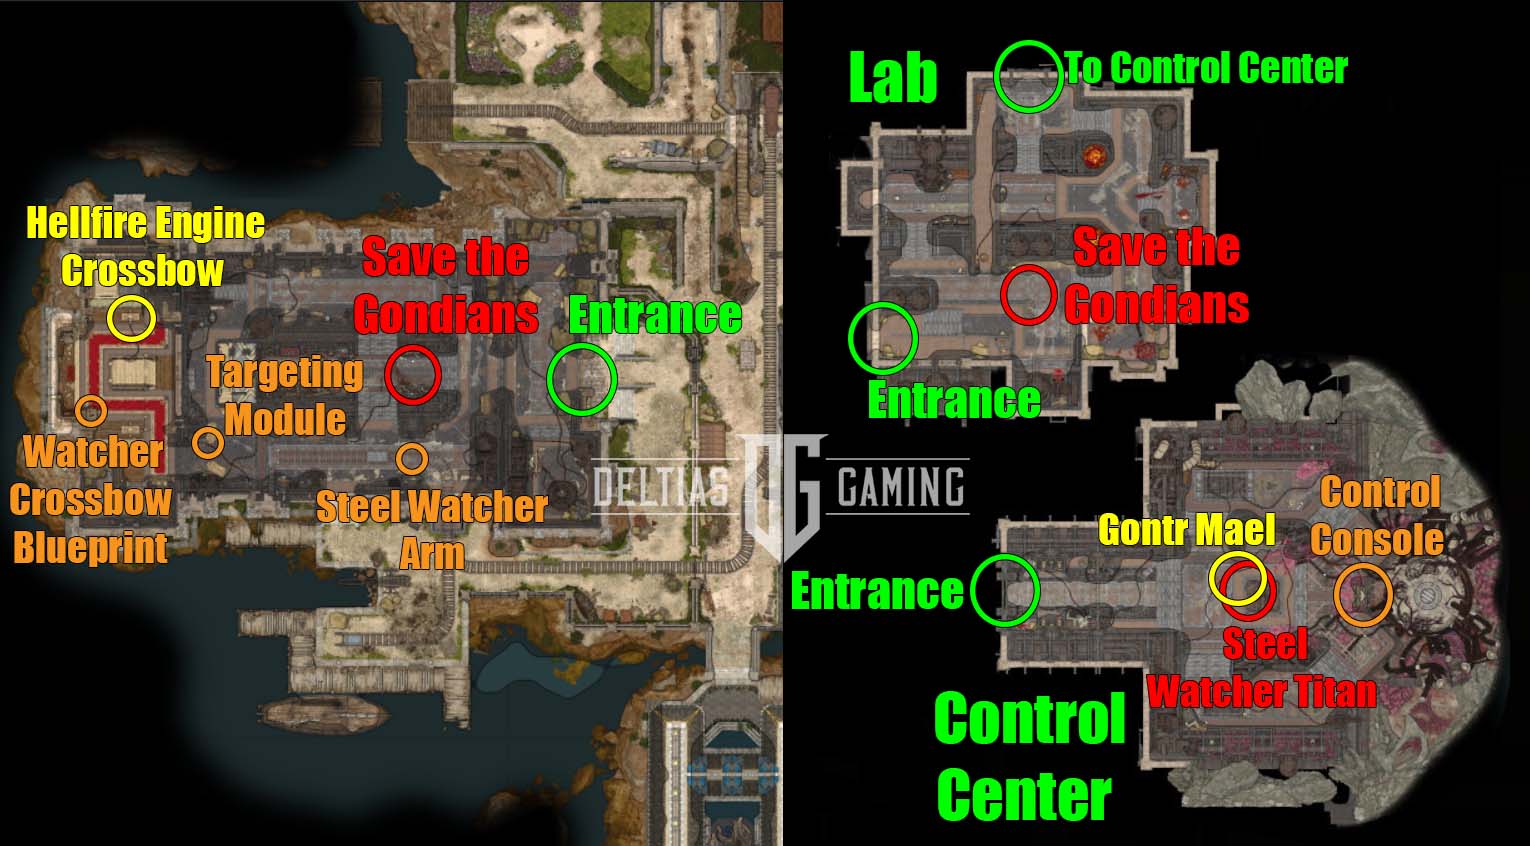
- Save the Gondians: Presuming you have followed our guide and have already rescued the Gondian prisoners from the Iron Throne, the Gondians will immediately start attacking the cultists upon arrival. The ultimate goal here is to try again and keep the Gondians alive. This means focusing on destroying the Motivators, which will kill the collared Gondians if they aren’t deactivated. Afterward, you’ll want to talk to Zanner. He will ask about his daughter, and if she didn’t make it out of the Iron Throne alive, you’d want to lie and convince him she’s safe. Otherwise, he won’t help you.
- Disable the Steel Watch: If Zanner didn’t survive the fight, you can use Speak with Dead to get the code to destroy the Foundry. If he’s alive, he’ll come with you to the Lab Level. There will be another fight down here, along with another couple of Motivators you need to pick up and deactivate. When the fight is done, head through the doors into the Control Centre. In here you’ll be fighting three Level 11 Hellfire Watchers and one Level 12 Steel Watch Titan.
- Avenge the Ironhands: After this last battle you can finally approach the control panel and Zanner will ask if you are ready to destroy the Foundry. Agree, and a cut scene will show your party running out to safety. Wulbren and the Ironhand Gnomes will show up and he insists that the Gondians must be killed. Barcus will interject, and chastise Wulbren. You can choose to try and Persuade Barcus to become the new leader of both groups. If successful, the Gnomes will become one of your allies.
Gear
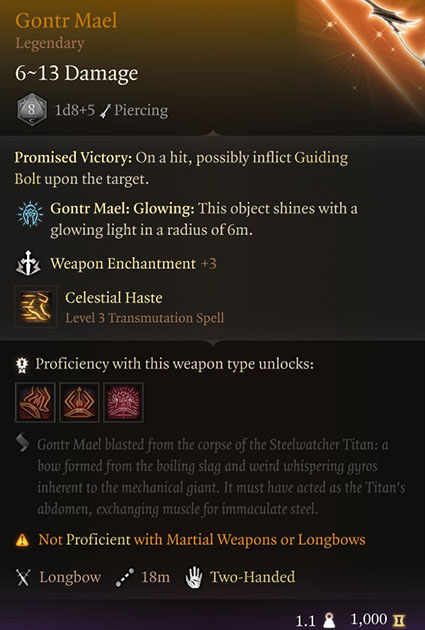
- Gontr Mael: The best bow in BG3. Looted from the Steel Watcher Titan in the basement.
- Hellfire Engine Crossbow: A great endgame crossbow. Crafted at a table in the north end of the Security Office.
Return to Wyrm’s Rock Fortress
With the Steel Watchers now defunct, Gortash is significantly more vulnerable. Now would be a good time to attack him and take his Netherstone unless, for some reason, you wished to defeat Orin first. We recommend doing Gortash first in this Baldur’s Gate 3 Act 3 Checklist, but if you prefer the latter, proceed to the next section.
When you’re ready to face Gortash, use the Wrym’s Rock Fortress waypoint to return quickly. There will likely be guards you need to fight as you return to the third floor. However, since you’ve disabled the Steel Watch, these fights will not be as difficult.
Moreover, Gortash will not be alone on the third floor. He’ll have a few guards with him that you’ll want to take out first. Additionally, it’s better to destroy the traps lining the walls in the first room, attack the enemies at range, and draw them back into that room. It’s easier to fight in there than to deal with the additional traps on the walls inside the second room on top of the humanoid enemies. When the battle is over, loot Gortash and take his hand to make finding Orin easier.
Gear
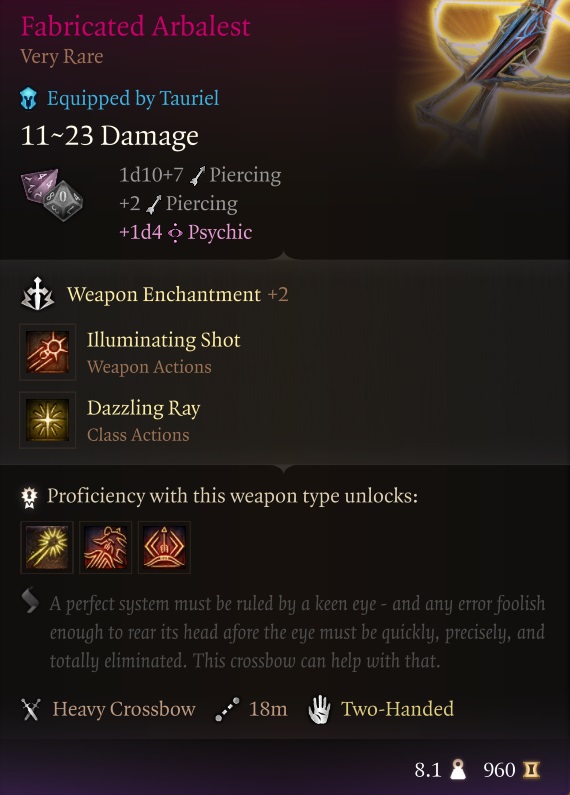
- Fabricated Arbalest: The top-tier Heavy Crossbow in Baldur’s Gate 3. Looted from Enver Gortash.
- Cloth of Authority: Provides Advantage on Intimidation checks. Looted from Enver Gortash.
- Gauntlet of the Tyrant: Boost to unarmed attacks and provides the Command spell. Looted from Enver Gortash.
Candulhallow’s Tombstones
Once Gortash is defeated, the only remaining major goal in the game is to find and confront Orin. As mentioned previously, killing Orin will hasten the final segments of Baldur’s Gate 3, so now is a really good point in the game to explore any other areas of the map you wish.
If you’ve killed Gortash first, visit your camp at some point to receive a note Orin left for you. She’ll congratulate you on your victory and say a rather curious line: “Remember: Sicarius!” This is a password you’ll need to find the next important location.
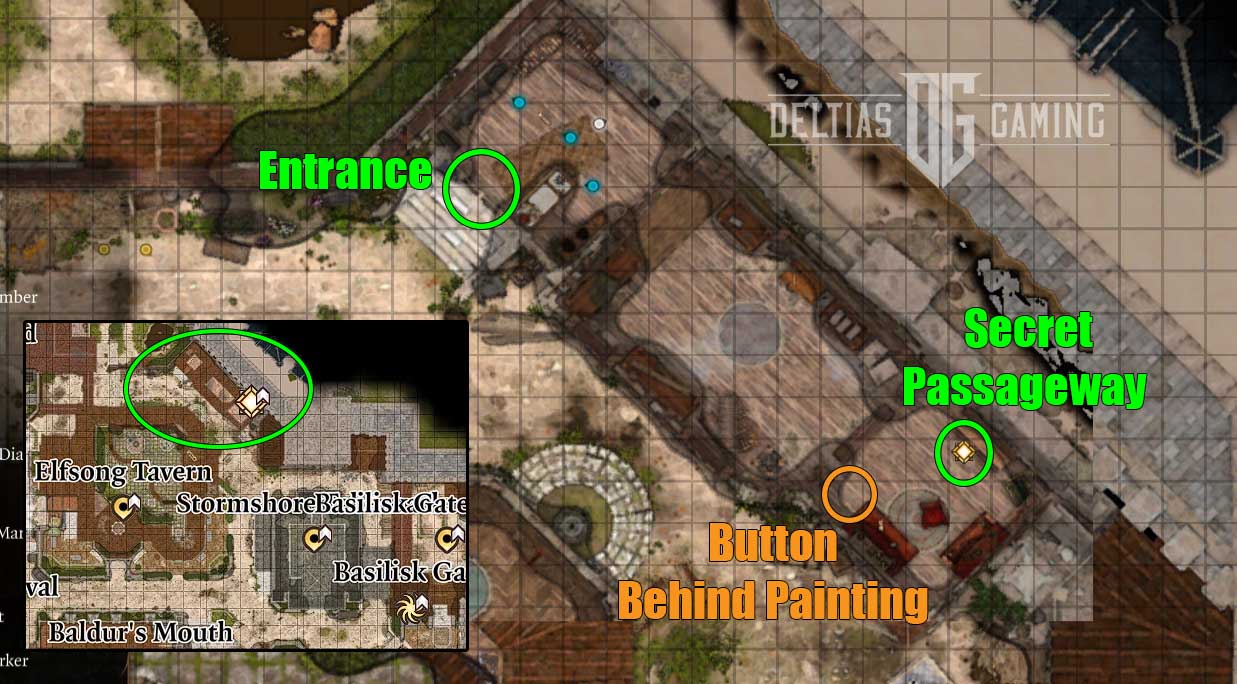
To get there, you first need to go to Candulhallow’s Tombstones, which is in the northeastern portion of the city. Use the Basilisk Gate waypoint; you’ll find it just behind the Elfsong Tavern. Pick the lock to get inside and head into the back office room. There is a button hidden behind a painting on the wall. Pressing it will move the bookcase to the opposite wall, revealing a secret door. Use the password ‘Sicarius,’ and the door will open for you.
Quests
- Investigate the Murders: If you kill Gortash first, then there is no need to find all of the potential murder victims from this quest. Once Gortash is dead, Orin will give you the password herself. However, if you want to kill Orin first, then you will need to warn (or kill) all of the potential victims. Eventually, you will either confront the real murderer and find the password on a note in his things, or you will be given the password by one who is watching the killings.
- Cora Highberry At the Wine Festival southwest of the Elfsong Tavern.
- Figaro Pennygood: Inside Facemaker’s Boutique.
- Chef Roveer: In the kitchen of the Elfsong Tavern.
- Nesha Leesha: Outside of the Blushing Mermaid.
- Impress the Murder Tribunal: You must kill to gain further access to the Murder Tribunal. If you’ve already killed Gortash, simply bring his hand. Otherwise, you will Dolor’s ‘bag of hands’ or the hand of a murder victim you have slain will suffice.
Murder Tribunal
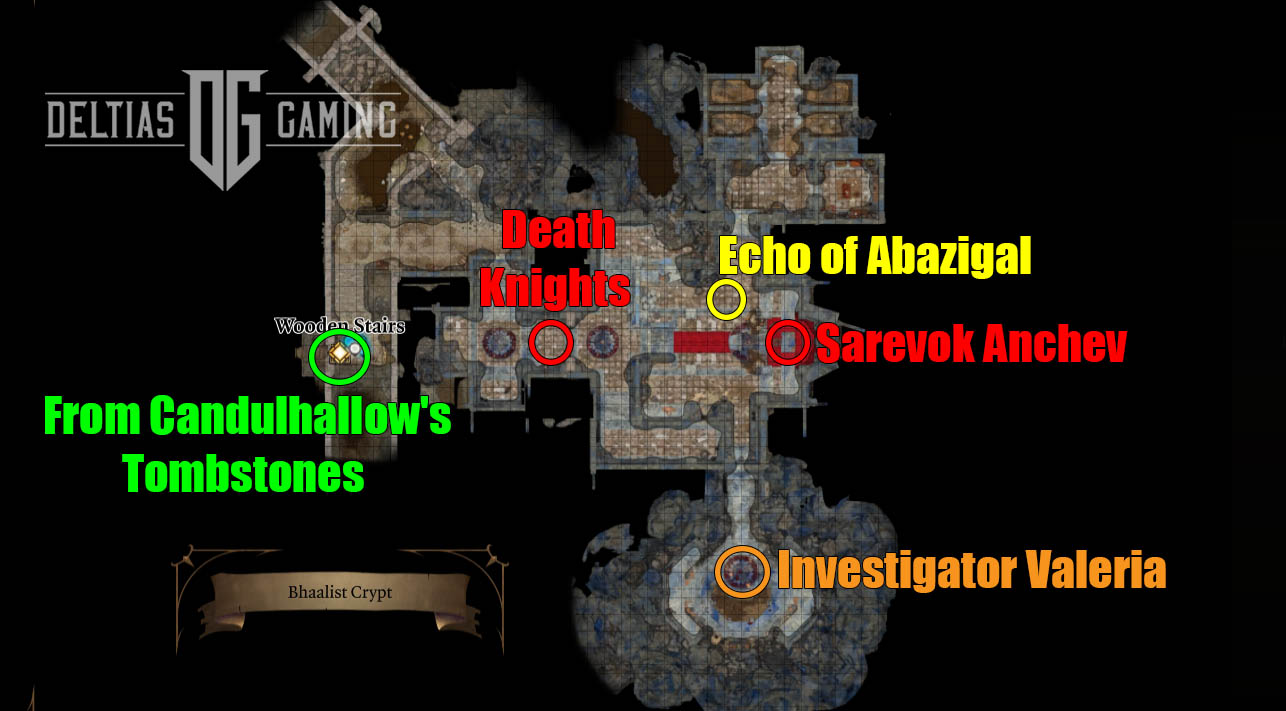
You will discover the Murder Tribunal behind the secret door in Candulhallow’s Tombstones following our Baldur’s Gate 3 Act 3 Checklist. If you’d like to see some unique dialogue inside, you should bring Jaheira and/or Minsc.
There is only one path forward, and this will bring you to an antechamber where three guards will stop and ask for proof you have killed. Present your victim’s hand and they will open the doors. However, if you are roleplaying a good character, it will make an upcoming fight much easier to close the doors and then attack and kill the guards out here. If you don’t, they will join the other fight later.
Inside, you will find Sarevok Anchev, who is none too pleased to see his former enemies standing with you. If you’re running an evil character, you can offer to sacrifice Jaheira/Minsc to appease him, or you can even Intimidate/Persuade them to kneel to Sarevok. If you are good-aligned, then you’re in for a fight.
Quests
- Impress the Murder Tribunal: Present the guards with the hand of a murder victim to get inside. There, Sarevok Anchev will present you with the opportunity to ascend and become an assassin of Bhaal. He will summon the ghost of one of your victims to ‘testify’ and, if you agree, will take you into another chamber to prove yourself by killing Investigator Valeria. Accepting Bhaal’s offer will also unlock a new vendor, the Echo of Abazigal. If you reject Bhaal, you will have to fight and kill Sarevok and everyone else in the room, and then you can free Valeria.
Gear
- Amulet of Bhaal: A good amulet for bleed builds. Also necessary to enter the Temple of Bhaal. Looted from Sarevok Anchev.
- Sword of Chaos: A powerful non-legendary that grants healing on hit. Looted from Sarevok Anchev.
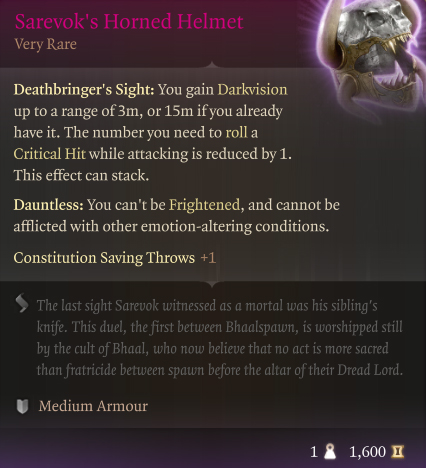
- Sarevok’s Horned Helmet: A high damage helmet granting Darkvision, perfect for Githyanki melee build. Looted from Sarevok Anchev.
- Shield of the Undevout: A decent shield for spell casters. Looted from That Which Guards.
Echo of Abazigal Merchant (only available if you side with Bhaal)
- Bhaalist Gloves: Helpful for +1 attack roll and spell.
- Bhaalist Armour: The best offensive bonuses armour in BG3.
- Assassin of Bhaal Cowl: Gives initiative bonus and allows you to see in the dark.
Undercity Ruins

The Undercity Ruins can be accessed from the Lower City sewers by walking north through a stone arch. When you first visit, it won’t look like there is much besides the silent merchant Voiceless Penitent Bareki and a new waypoint. However, near the waypoint, look above, and you will see a hanging corpse. Shoot at the corpse with a ranged weapon, and the spilled blood will cause a doorway to the east to open.
Before you travel down this path, ensure your party is healed up and ready for a fight. About halfway down the hill, you will encounter an ambush. Several assassins will attack from a distance and use Invisibility or Sanctuary. Be prepared to use area-of-effect spells such as Call Lightning. For a full walkthrough of the fight, check out our Bonespike Gloves guide.
Quests
- Get Orin’s Netherstone: After unlocking the door next to the Undercity Ruins waypoint, you’ll have to pass a trial before going to the Temple of Bhaal and Orin. An ambush will attack as you are about halfway down the hill to the bridge. Take out the enemies there, then cross the bridge quickly. At the top of the tower and the end of the bridge is the Farslayer Of Bhaal, Gislev. Defeat him and the others, then look for a metal doorway to the north. Use the Amulet of Bhaal, and you can pass through.
- Path to the Temple: The path beyond the doorway winds, ultimately heading north and east. North will lead you to the Morphic Pool, which is a ‘no turning back’ area that will start the end game of Baldur’s Gate 3. For now, keep heading east until you reach the Temple of Bhaal.
Gear

- Armour of Moonbasking: Best-in-slot chest piece for Wild Shape Druid builds. Sold by Voiceless Penitent Bareki.
- Bonespike Helmet: Great for Barbarian builds. Sold by Voiceless Penitent Bareki.
- Bonespike Gloves: Also a matching set of good Barbarian gloves. Dropped by Strangler Luke. You must loot during combat because all enemy bodies disappear afterward.
Temple of Bhaal
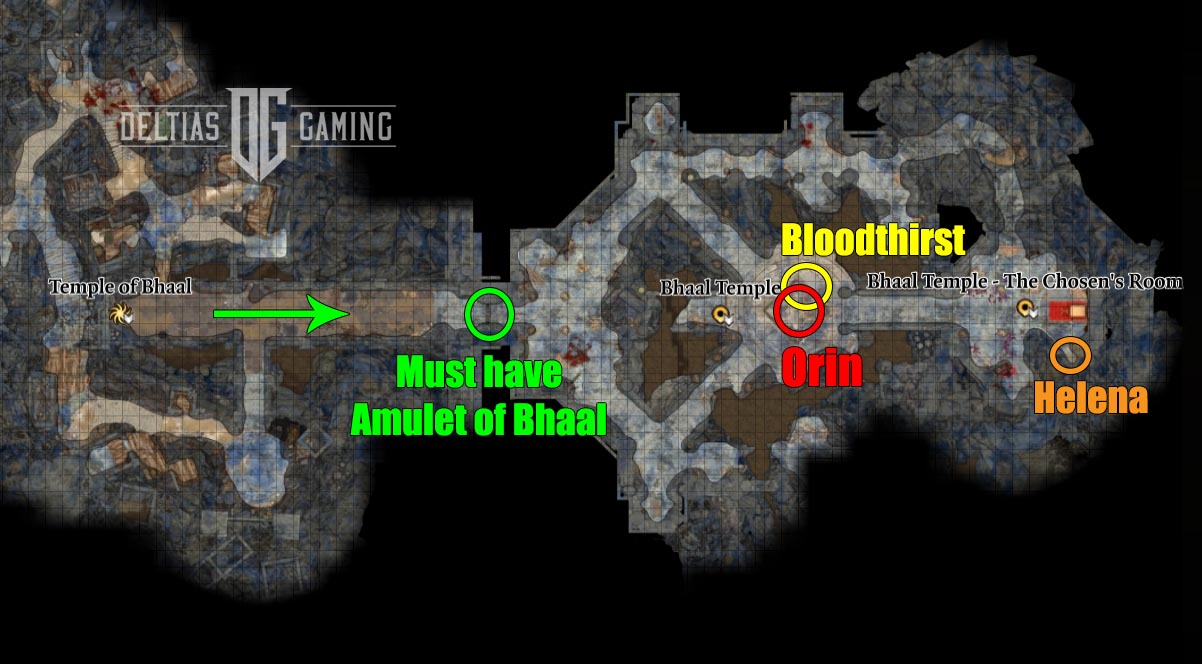
The Temple of Bhaal is the next stop in our Baldur’s Gate 3 Act 3 Checklist. It is found to the east of the Undercity Ruins, and you cannot enter it at all unless you’ve brought the Amulet of Bhaal with you. Inside, the cultists are not immediately hostile. You can approach Orin in the center without having to fight your way through.
After confronting Orin, you can do a little bit of exploring and make your way back into Orin’s room. There’s nothing special back there in the way of loot, but you can pick up some interesting tidbits of backstory about her.
Quests
- Rescue Orin’s Victim: When you arrive at the Temple, Orin’s kidnapped victim will be chained to the table in the center. Even if you pursue her before killing Gortash, she does not appear to kill your companion in retaliation immediately. However, when you initiate dialogue with her, you must pass a 25 DC roll on a Deception, Intimidation, or Persuasion option to save the victim. Alternatively, you can skip the dialogue and initiate combat immediately. Additionally, if a party member can lockpick the chains during the fight, the victim can join.
- Get Orin’s Netherstone: Like Gislev, Orin also has the Unstoppable condition. Moreover, it resets every turn. Therefore, you have to get more than 7 hits in on her to start doing damage every turn. Use the Haste spell, Potions of Speed, and Magic Missile to get as many hits on her as possible. It’s typically best to focus Orin down and ignore her assassins until she has fallen.
Gear
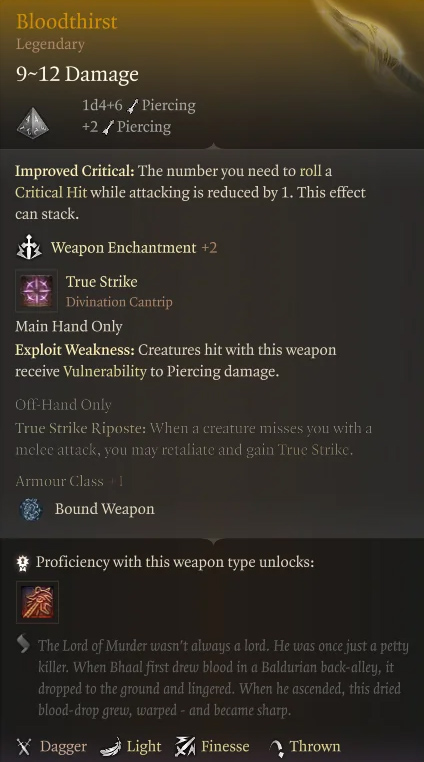
- Bloodthirst: The best in slot dagger in Baldur’s Gate 3. Looted from Orin.
- Crimson Mischief: The best in slot shortsword. Looted from Orin.
- Mutilated Carapace: Orin’s unique outfit, is more for looks than for function. Looted from Orin.
Morphic Pool
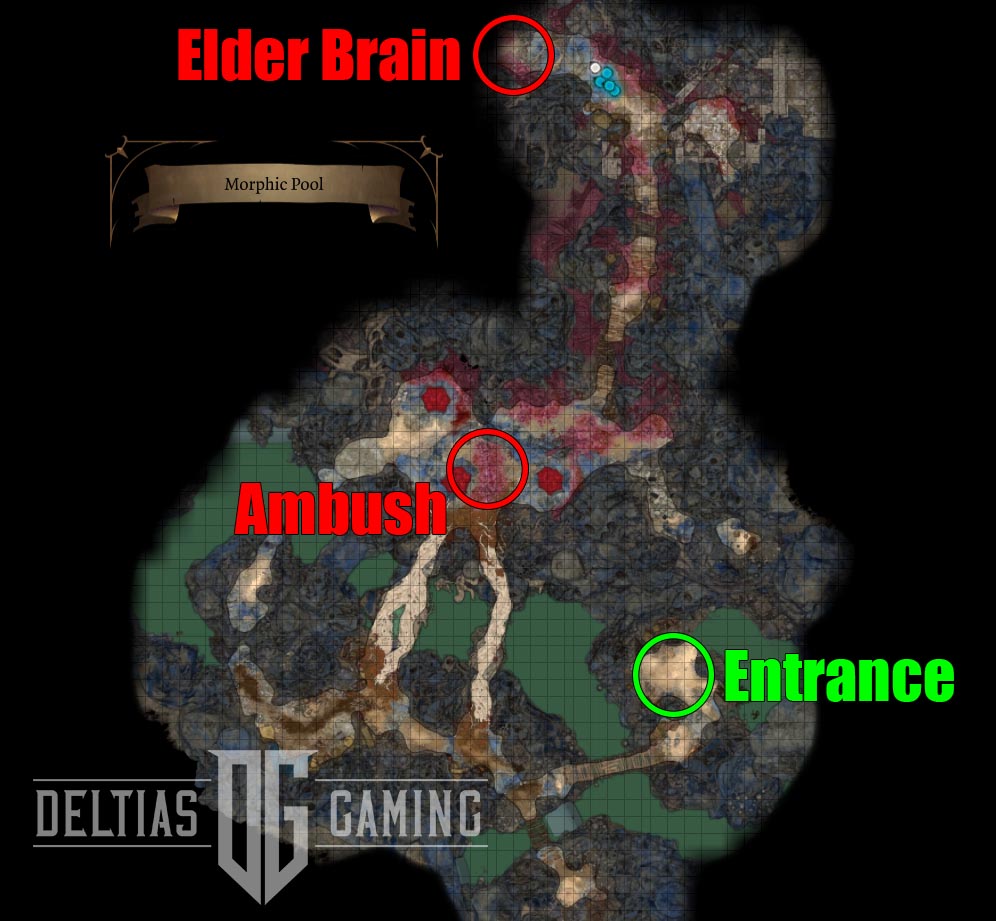
Once both Orin and Gortash are dead, the Elder Brain starts to have a stronger effect on the city of Baldur’s Gate. We’re heading into the end game in our Baldur’s Gate 3 Act 3 Checklist. At this point, it’s best to get prepared: rest to heal your party to full, craft/buy potions, stock up on scrolls, etc. When you’re ready, take the northern path in the Undercity Ruins to reach a small dock at the far end. There are a bunch of rats hanging around, but they can be ignored and walked around. Taking the boat will officially start the end game and there is no turning back.
The Morphic Pool is a smaller area that has one location where you’ll be ambushed by a bunch of Intellect Devourers and Intellect Gluttons. As usual, the Intellect Devourers aren’t very strong, but the Gluttons are annoying because they will explode with Brine which causes Acid damage to anyone nearby.
Quests
- Confront the Elder Brain: Keep heading north until you reach the edge of the Pool. A cutscene will automatically trigger, and you will be thrown into your first confrontation with the Elder Brain. You will have to roll four separate times to dominate the Brain. Each roll becomes increasingly harder, rising from 20 DC to 25 DC to 30 DC to 99 DC. You are not meant to succeed at these rolls, so don’t waste any Inspiration points. Ultimately, the Emperor will pull you away to safety into the Astral Prism.
- Free Orpheus: In the Prisim, the Emperor will explain that things are more dire than he realized. The Elder Brain has evolved into a Netherbrain. What happens next will require you to make some major end-game story choices. Save here if you want to come back and play things out a different way.
The High Hall
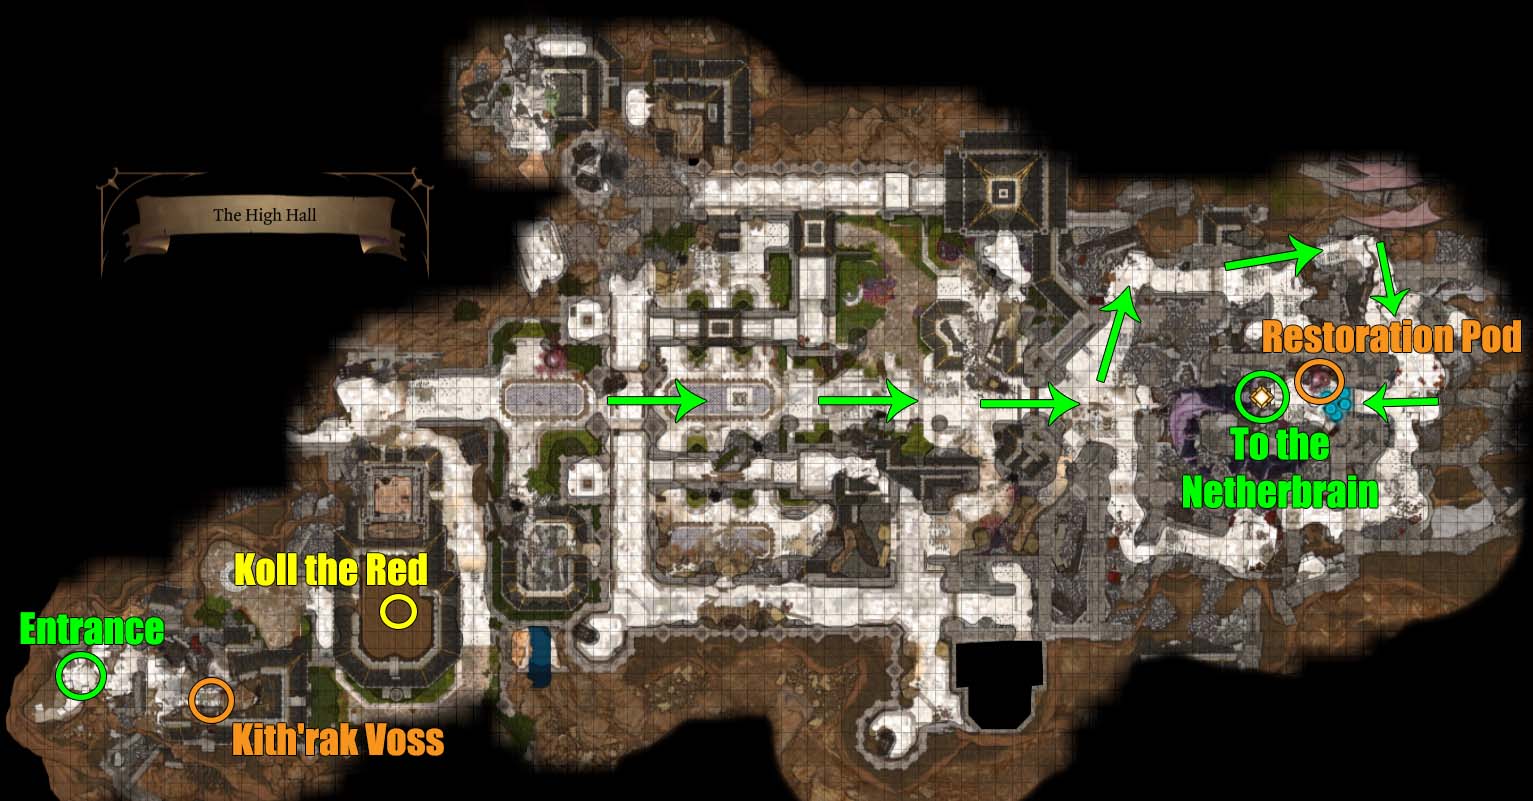
After deciding and leaving the Astral Prism, you’ll arrive at The High Hall in the Upper City. You’ll run into Kith’rak Voss, and depending on your choices in the Prism, he will respond accordingly. You may end up in a fight, but after that, you will move into a room where all your allies wait. This is where you will see whomever you were able to recruit in Gather Your Allies. There will be a speech, and you can speak to individuals after. Additionally, a vendor will be there where you can stock up on any last-minute items.
For the final confrontation, we highly recommend stocking up on Invisibility spell scrolls and potions and ensuring at least one character has the Glove of Invulnerability spell. Additionally, the Hold Monster spell and scrolls can be useful, and be sure to bring along Potions of Speed/Misty Step scrolls for the very last combat potion against the Netherbrain.
Quests
- Confront the Elder Brain: Now you enter the Courtyard, where you must fight through a gauntlet of enemies to get into the tower. Send at least one party member up on the battlements on each side to take out the range and spell attackers. If you’re having trouble, use the Summon Allies ability to call for aid.
- Once you reach the tower, you’ll have to climb to the top while dealing with enemies and dodging shots from a nearby Nautiloid. Head to the left/west, and there will be a path up. Don’t worry too much about hoarding all of your spell slots for the final fight. Right before you climb to the final confrontation, there is a Restoration Pod you can use.
- At the very top, you will face a large group of Illithids, Tentacles, and a Dominated Dragon. The goal is to get your whole party across the space and up to the Crown of Karsus. The character holding the netherstones will have Kasus’ Compulsion ability, which they must use on the Crown. This will take at least a couple of turns, and a portal will open.
- The best way to approach this fight is not to fight! Cast Invisibility on your party at the start and dash forward until you are at the Crown. If anyone loses Invisibility, recast it and keep going. Use the Globe of Invulnerability spells right at the spot in front of the Crown if needed. Additionally, the Hold Monster spell can keep the dragon at bay.
- Inside the portal, it’s just your party against the Netherbrain. It will continually break the platforms you stand on, so use those Potions of Speed and Misty Step spells to stay mobile. Bring your whole party in, and hack away!
Baldur’s Gate 3 Finale
Congratulations on defeating the Netherbrain! The game will now give you some time to spend with your companions, both at the end of events and later on with a follow-up epilogue. Maybe now you want to re-roll with a new character to follow new paths? Feel free to swing back around to our Act 1 Checklist! Our thanks for using this guide, we hope you found the Baldur’s Gate 3 Act 3 Checklist helpful!
Looking For More About Baldur’s Gate 3?
Thank you for reading Baldur’s Gate 3 Act 3 Checklist: All Things to Complete guide. We provide the latest news and create guides for Baldur’s Gate 3. Also, watch me play games on Twitch or visit my YouTube channel!