Facebook
 Reddit
 Email
Email
The Blood of Lathander is a legendary mace in Baldur’s Gate 3, and you can get it from Rosymorn Monastery in Act 1 – This short Guide Explains everything you need to know about the Blood of Lathander in BG3.
The Blood of Lathander is an extremely powerful legendary mace that is found in Act 1 of Baldur’s Gate 3. Acquiring this mace requires several steps, but is ultimately worth it, as it has some overpowered abilities that make it a powerful weapon for any wielder. It can grant instant healing, excellent damage, and even a powerful spell to its wielder. In this guide we will walk you through what you need to do to acquire the Blood of Lathander in Baldur’s Gate 3, going over where it’s found, how it can be gotten, and why you should use this powerful artifact for your character.
This page has been updated for the Patch 8 version of Baldur’s Gate 3.
Related:
- Blood of Lathander Abilities and Effects
- How to Get the Blood of Lathander in Baldur’s Gate 3
- Find Rosymorn Monastery in the Mountain Pass
- Ceremonial Weapons and Dawnmaster’s Crest Puzzle
- How to Get Ceremonial Battleaxe
- How to Get Ceremonial Warhammer
- How to Get Ceremonial Mace
- Where to Find the Blood of Lathander Plaque
- How to Deactivate Barrier to reach the Inquisitor Chambers
- How to Turn the Lathander Statues in the Inquisitor’s Chamber
- Get Blood of Lathander from the Secret Chamber in Baldur’s Gate 3
- Making a Choice for the Blood of Lathander Mace
- How to Use The Blood of Lathander in BG3?
- Tips and Tricks of The Blood of Lathander in BG3
- FAQs for Gauntlets of Hill Giant Strength in Baldur’s Gate 3
What is The Blood of Lathander in BG3?
In Baldur’s Gate 3 (BG3), the Blood of Lathander is a valuable weapon obtainable in Act 1. Crafted to enhance the effectiveness of a one-handed weapon and shield combination, this mace is ideal for the Bard, Cleric, and Druid classes.
Once per Long Rest, when your hit points are reduced to 0, you regain 2d12 hit points. Furthermore, this divine boost extends to your allies within a 9-meter radius, granting them 1d6 hit points and healing weakened party members. Also, the Blood of Lathander unlocks the powerful Sunbeam Spell for its bearer, which Blinds all creatures in the beam’s path. Remarkably, you can recast Sunbeam without expending a spell slot.
Additionally, the mace emanates a radiant halo in a 6-meter radius, bathing the battlefield in holy light. In combat, fiends and undead creatures standing within this aura are Blinded, unless they succeed in a Constitution Saving Throw. Even if they manage to resist the blinding light, they still suffer half the damage. This radiant protection persists for 10 turns and requires concentration to maintain.
Blood of Lathander Abilities and Effects
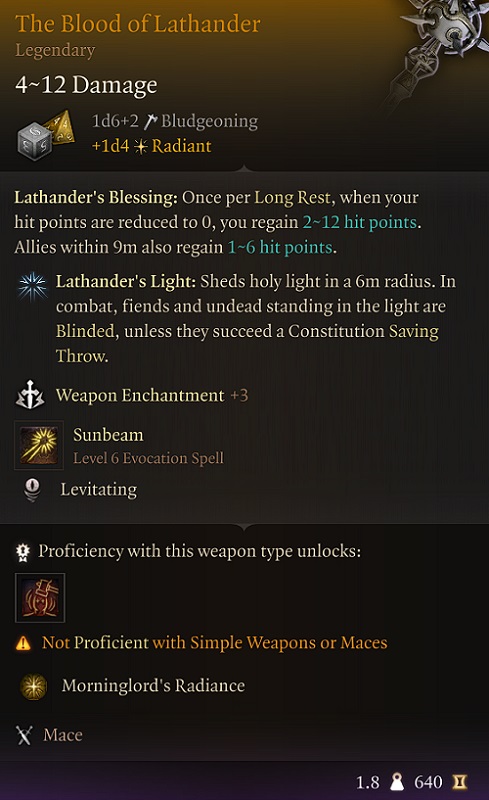
The Blood of Lathander features in BG3:
- Weapon Type: Mace, One-Handed
- Damage: 1D6 +3 Bludgeoning
- Requirements: Simple Weapons Proficiency
- Weight: 1.8 kg
- Value: 640
- Rarity: Uncommon
- Location: Dropped by Mother Superior Viconia DeVir, House of Grief, Act 3
- Bonuses:
- Lathander’s Blessing: Once per Long Rest, when your hit points are reduced to 0, you regain 2d12 hit points. Allies Within 9m also regain 1d6 hit points.
- Lathander’s Light: Sheds holy light in a 6m radius. In combat, fiends and undead standing in the light are Blinded, unless they succeed a Constitution Saving Throw. On Save: Targets still take half damage. 10 turns. Requires Concentration.
- Gain Sunbeam Spell: A beam of brilliant light sears and Blinds all creatures in its path. Until the spell ends, you can recast Sunbeam without expending a spell slot.
- Classes with Simple Weapons Proficiency: Bard, Cleric, Fighter, Ranger, Rogue, Warlock, Paladin
- Companions Who Can Use This Weapon: Astarion, Shadowheart, Lae’zel, Minthara, Wyll, Minsc
How to Get the Blood of Lathander in Baldur’s Gate 3
Blood of Lathander can be obtained by solving the Ceremonial Weapons and Dawnmaster’s Crest Puzzle in the Creche Y’llek under Rosymorn Monastery in the Mountain Pass area after Act 1.
Here is a short overview of how to get Blood of Lathander in BG3(details below):
- Travel to Mountain Pass (X: 60; Y: 20): After completing Act 1, go to the Mountain Pass area.
- Access Rosymorn Monastery: Climb vines at the main entrance courtyard (X: 66; Y: 22), or break through wooden planks just above the fast travel portal. (X: 33; Y: 20).
- Solve Ceremonial Weapons Puzzle (X: 72; Y: 78): Find ceremonial weapons and place them on the correct stone pedestals.
- Ceremonial Battleaxe Location (X: 102; Y: 44): In the east room next to the golden guardian.
- Ceremonial Warhammer Location (X: 79; Y: 40): In the eagle’s nest at the top of the Monastery. Climb vines to reach it.
- Ceremonial Mace Location (X: 44; Y: 29): On the ground floor in the vine cellar, obtained from Kobolds.
- Enter Creche Y’llek (X: 109; Y: 22): Jump down the damaged stairs on the east side of the Monastery.
- Explore this area for NPCs, loot, and quests.
- Enter Inquisitor Chambers (X: 1330; Y: -660)
- Move the statues to the correct position in the west room of the Inquisitor’s chambers.
- Enter the secret stairway.
- Deactivate the First Energy Field (X: -660; Y: -665): Destroy Cristal. Disarm Dawnbreaker Trap
- Pass the Second Barrier: Destroy two crystals and disarm the trap.
- Insert the Dawnmaster Crest into the Crest Panel
- Now you can get the Blood of Lathander in BG3.
Find Rosymorn Monastery in the Mountain Pass
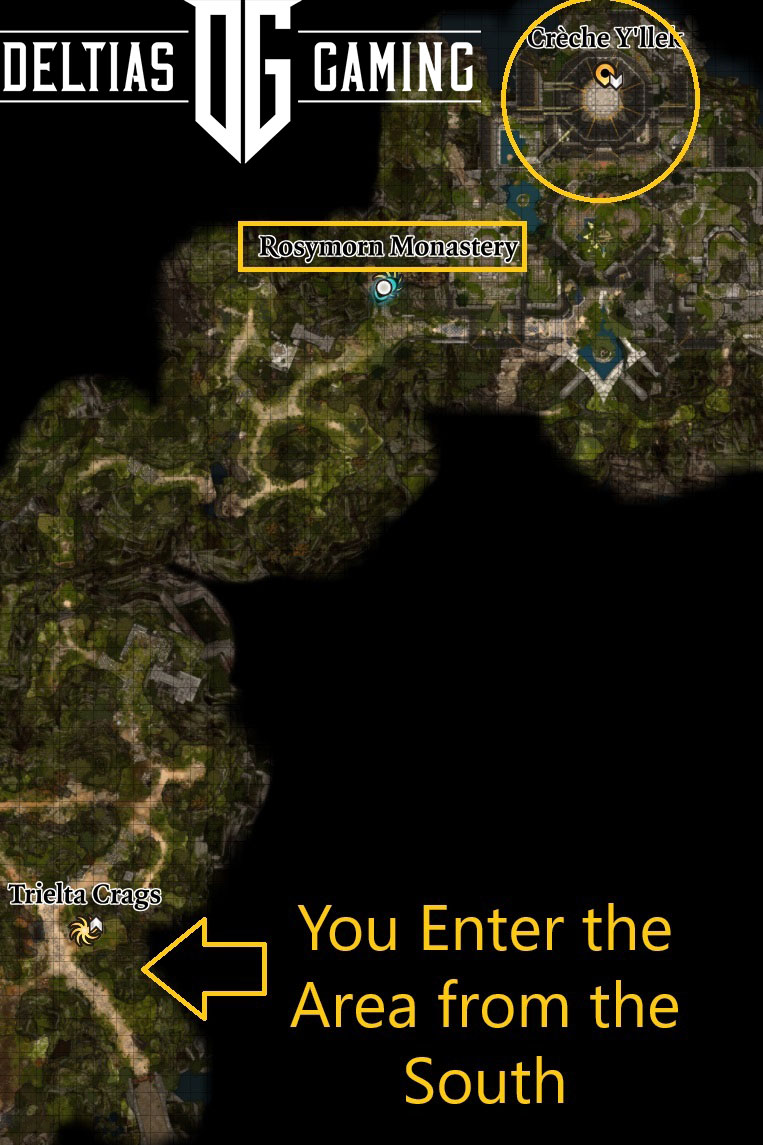
Before you can claim the powerful Blood of Lathander Legendary mace in BG3, you will need to solve a weapon puzzle and statue puzzle and survive a corridor full of traps and magical barriers. It’s located in the Rosymorn Monastery (X: 60; Y: 20) within the Mountain Pass area. Accessible after Act 1, acquiring this mace is highly recommended before venturing into the Shadow Cursed Lands during Act 2. The Mountain Pass serves as a transition area between Acts 1 and 2.
Those who choose to travel to Shadow Cursed lands via the Underdark, ensure you first head to the far northwest corner of Act 1 Area, where you can get another fantastic early-game legendary weapon, Silver Sword of the Astral Plane, and then enter Mountain Pass by passing the stone bridge where Blood of Lathander awaits.
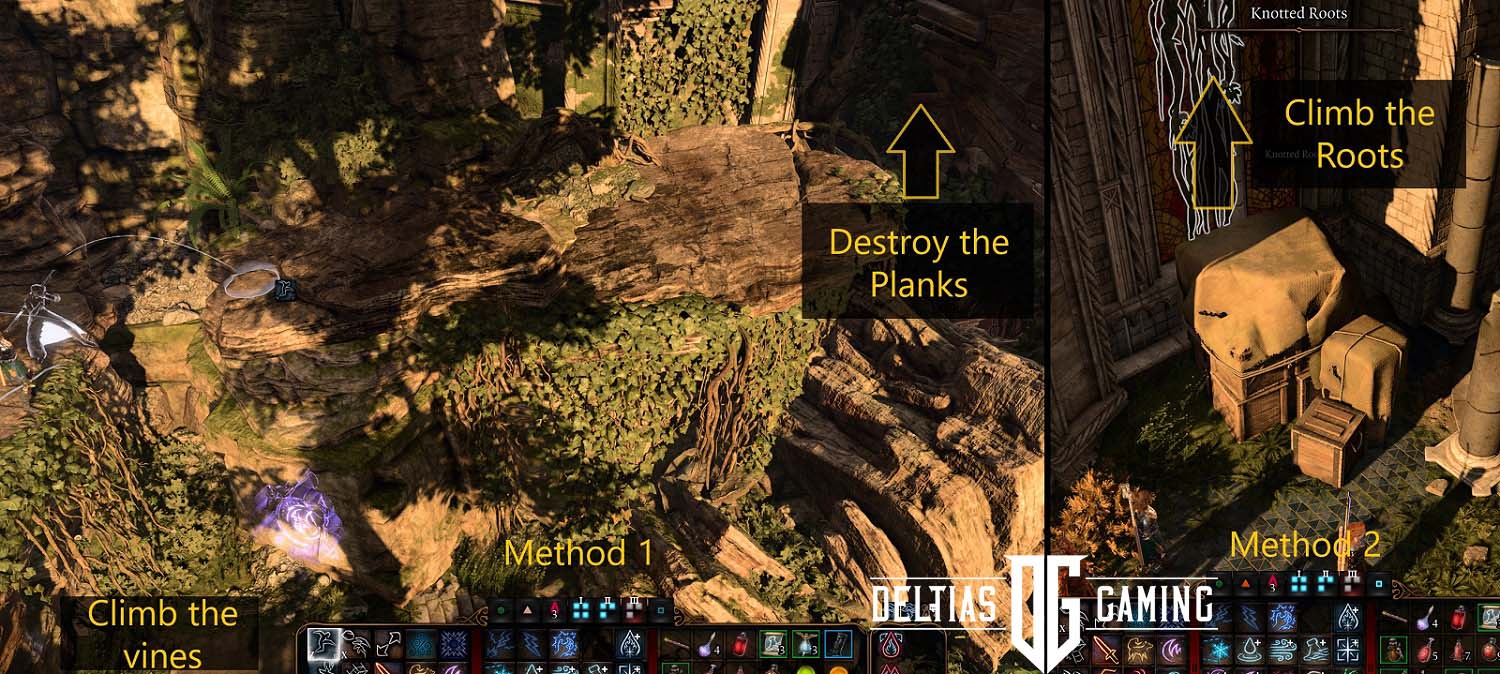
The Rosymorn Monastery is located on the far north side of the map, and there are two entrances to the monastery (check the picture above for reference.) You can climb the rocky shelf just above the fast travel portal and eliminate the wooden barricade obstructing your path (X: 33; Y: 20). Be aware the fight will start as soon as you jump inside. Alternatively, you can choose to climb the vines (X: 66; Y: 22) at the main entrance courtyard in the main entrance courtyard.
Ceremonial Weapons and Dawnmaster’s Crest Puzzle
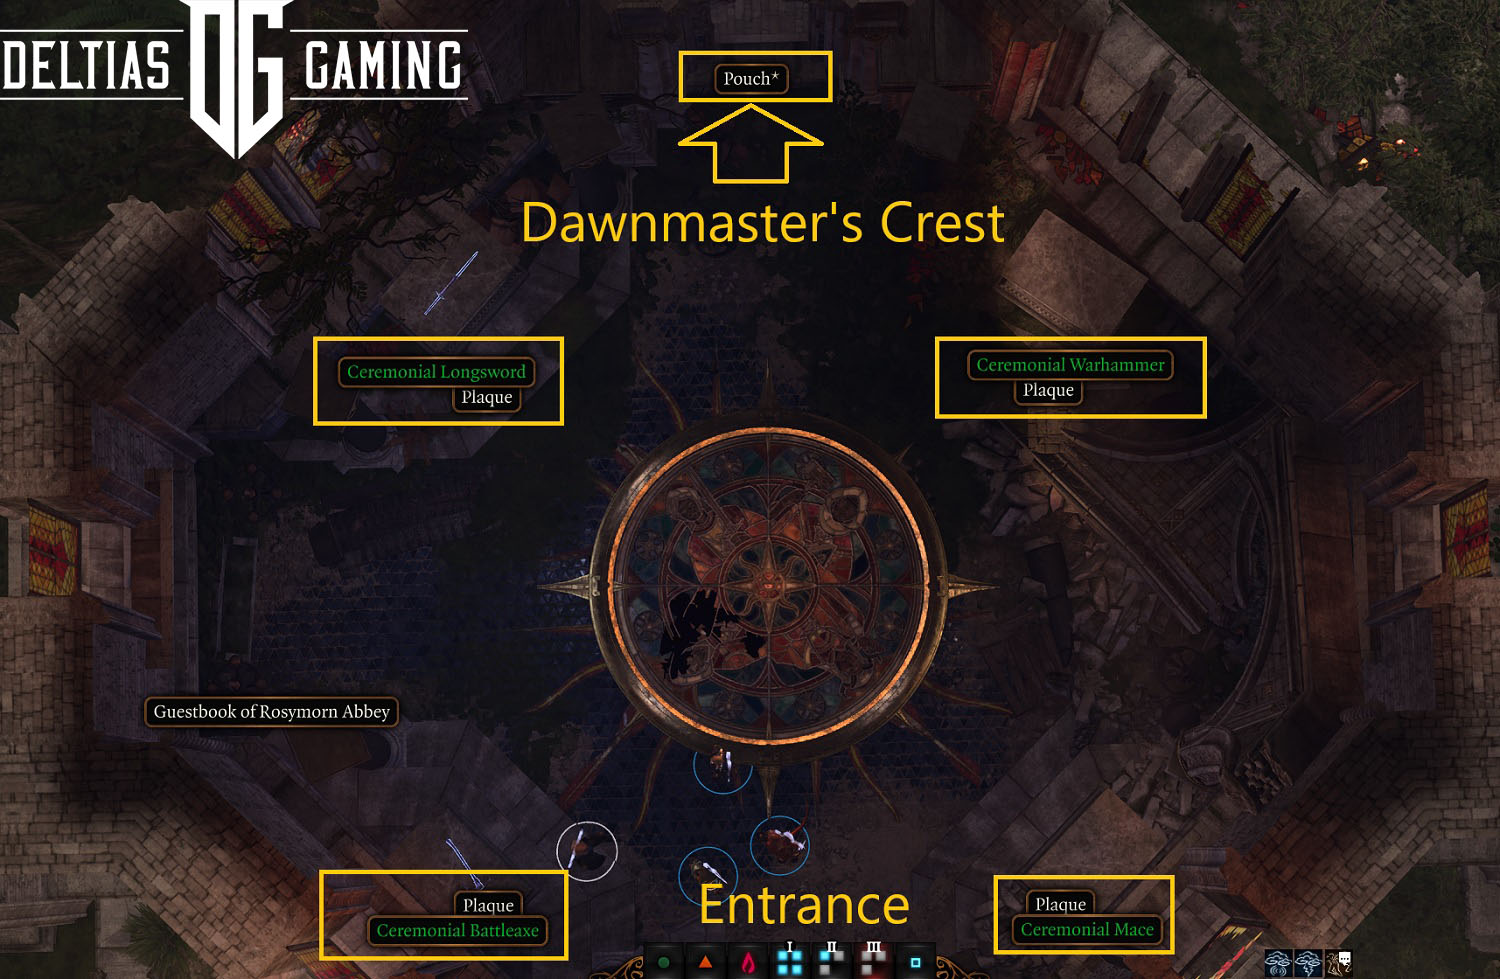

Regardless of the path you choose, you’ll find yourself on the second floor of the Rosymorn Monastery. Head to the central chamber on this level to get to the room with four pedestals and mosaics on the floor (X: 72; Y: 78). You can interact with the various objects in the room to glean additional insights. Your primary objective is to obtain a Dawnmaster’s Crest, securely locked away behind a door in front of the entrance. To access it, you’ll need to solve a ceremonial weapon puzzle. Fortunately, the Ceremonial Longsword is already placed correctly on one of the stone pedestals, and you should notice the crystals and the weapon itself emitting a faint glow.
So, your next task is to locate three additional weapons in the area and position them on the corresponding pedestals, as illustrated in the image above. Take a moment to read the Plaque to learn which pedestal corresponds to each Dawnmaster and then align them with the solution provided below.
All ceremonial weapons and their correct pedestals:
- Ceremonial Battleaxe: Found on the second floor next to the guardian – Dawnmaster Vaseid
- Ceremonial Warhammer: In the Eagle’s Nest on top of the Monastery – Dawnmaster Seed
- Ceremonial Mace: Dropped by drunk Kobold on the first floor of the monastery – Dawnmaster Stockhold
- Ceremonial Longsword: Already placed – Dawnmaster Welkinglory
Once you get all the items, place them on the correct stone pedestals and loot the Dawnmaster’s Crest from the pouch. With this Crest in your backpack, you’ve completed your tasks above ground. Now, venture below the Monastery to get the hidden Blood of Lathander.
How to Get Ceremonial Battleaxe
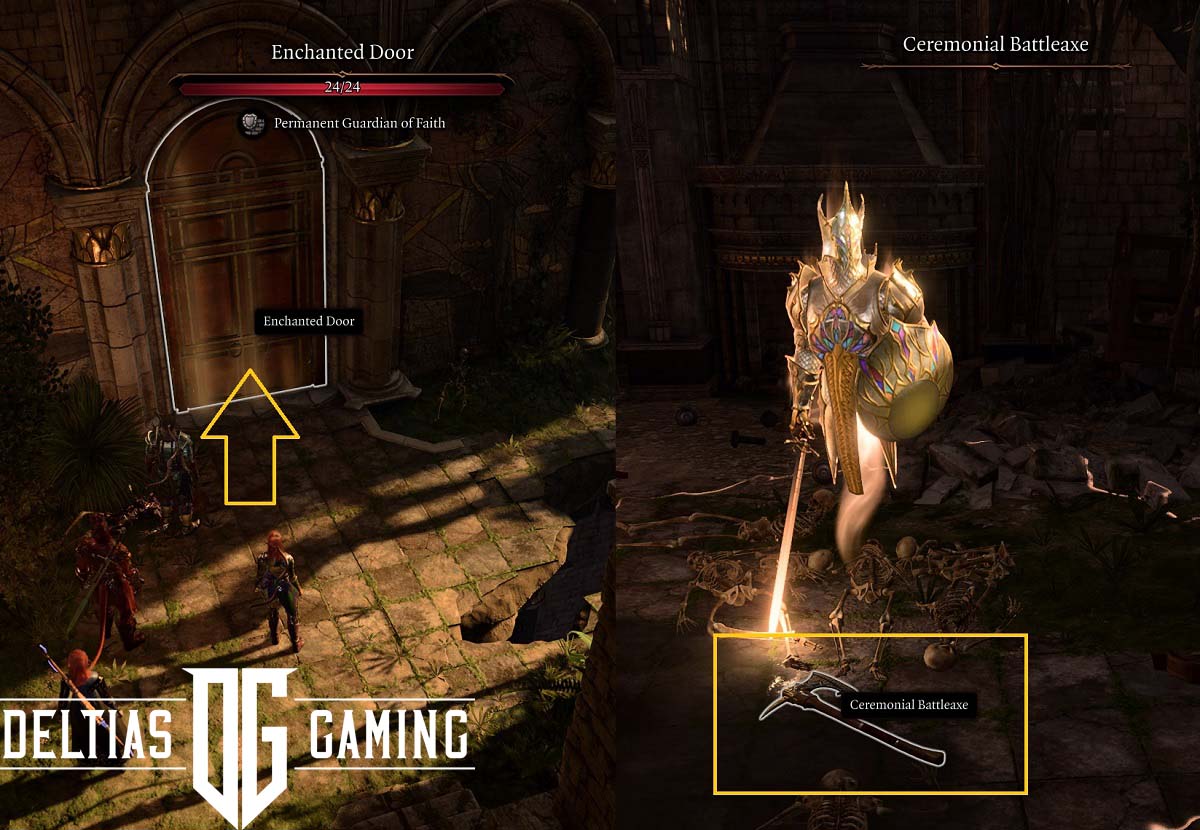
The Ceremonial Battleaxe can be found on the second level, east room, near the golden guardian. Gain access by lockpicking the glowing door or destroying the south wall. After defeating the guardian, collect the Ceremonial Battleaxe (X: 102; Y: 44) from the floor.
How to Get Ceremonial Warhammer

The Ceremonial Warhammer is found in an eagle’s nest just above the room where you discovered the Ceremonial Battleaxe. Climb the vines nearby to reach the top of the Rosymorn Monastery, where you’ll encounter Giant Eagles. Defeat them to obtain the Ceremonial Warhammer (X: 79; Y: 40) from their nest. If you have a character with high Animal Handling skill and Wisdom in your party, you can attempt to calm the birds.
How to Get Ceremonial Mace
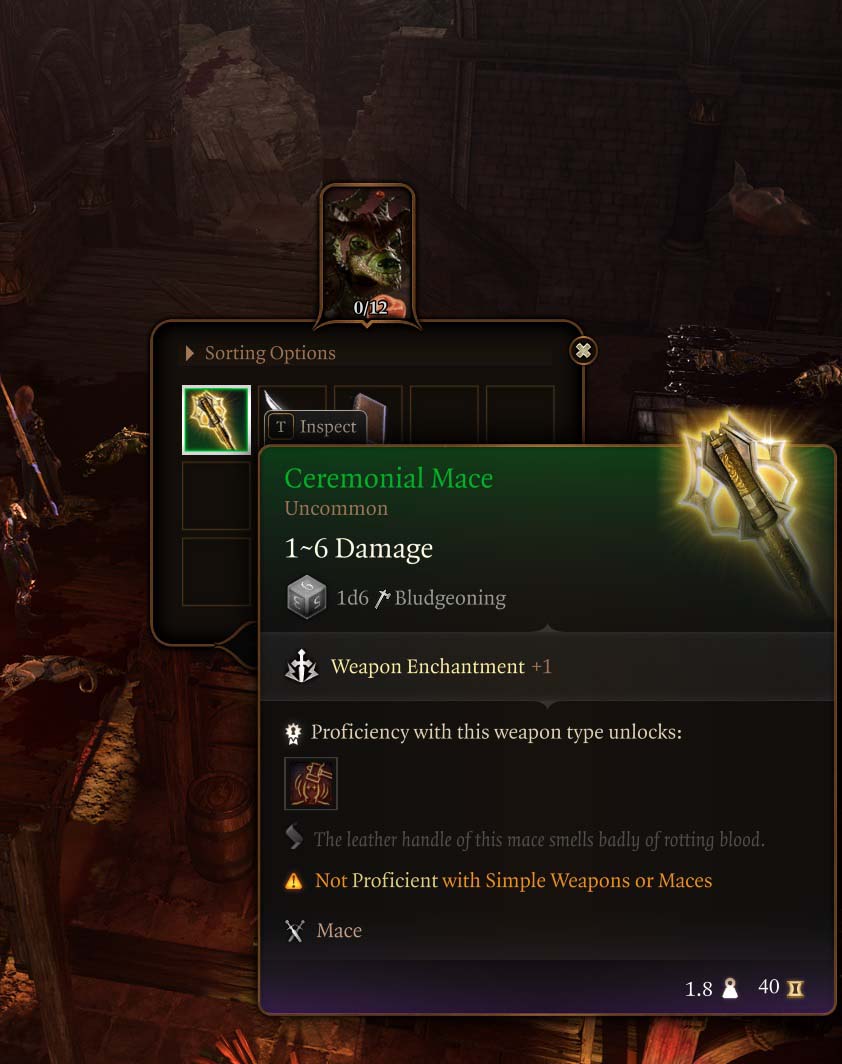
The Ceremonial Mace is found in the vine cellar on the west side of the Monastery ground level, where a group of Kobolds is enjoying Monastery wine. These low-health enemies are drunk, making them easy to defeat. One of them will have the Ceremonial Mace (X: 44; Y: 29) in their inventory. After obtaining it, you can return to the room with the pedestals and mosaic to collect the Dawnmaster’s Crest.
Where to Find the Blood of Lathander Plaque
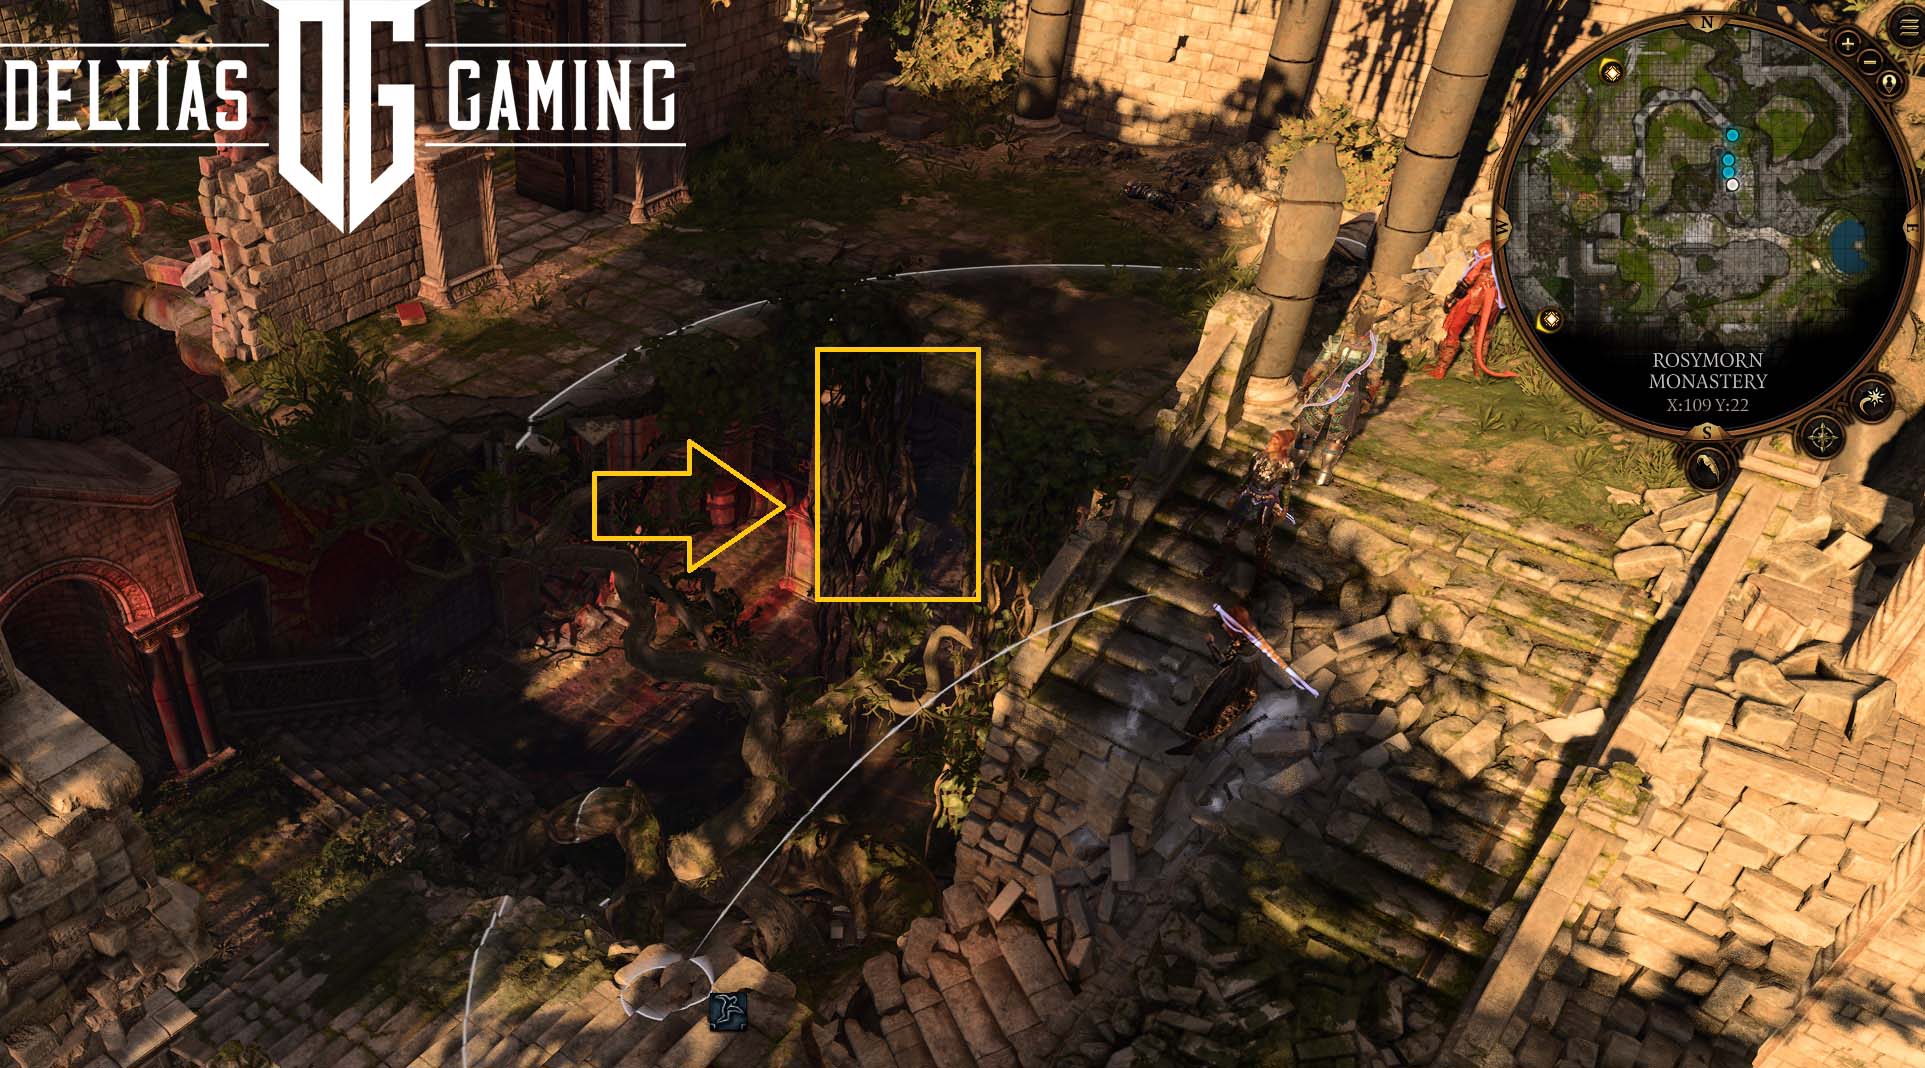
Reading the Blood of Lathander Plaque in Baldur’s Gate 3 is an optional way to start the quest to find this Legendary BG3 mace. After you’ve completed your exploration of the area and are prepared to enter Creche Y’llek, you can leap down (X: 109; Y: 22) from the damaged stairs on the east side of the Monastery. Below, you’ll discover another set of stairs leading to a new location and the Creche itself.
Before you go down the stairs and enter the Creche, you will find a large statue of Lathander himself covered in vines. If you read the plague at the bottom of his feet, it will mention the Blood of Lathander mace and that it has been kept at the Monastery. Consequently, this will trigger a pop-up message telling you that your Journal has been updated with the Find the Blood of Lathander quest.
Creche Y’llek is home to NPCs, valuable loot, merchants, and potential side quests. Regardless of your choices, your next objective is to proceed to the Inquisitor Chambers, which is also a part of the Lae’zel, and Remove Tadpole quests lines.
How to Deactivate Barrier to reach the Inquisitor Chambers
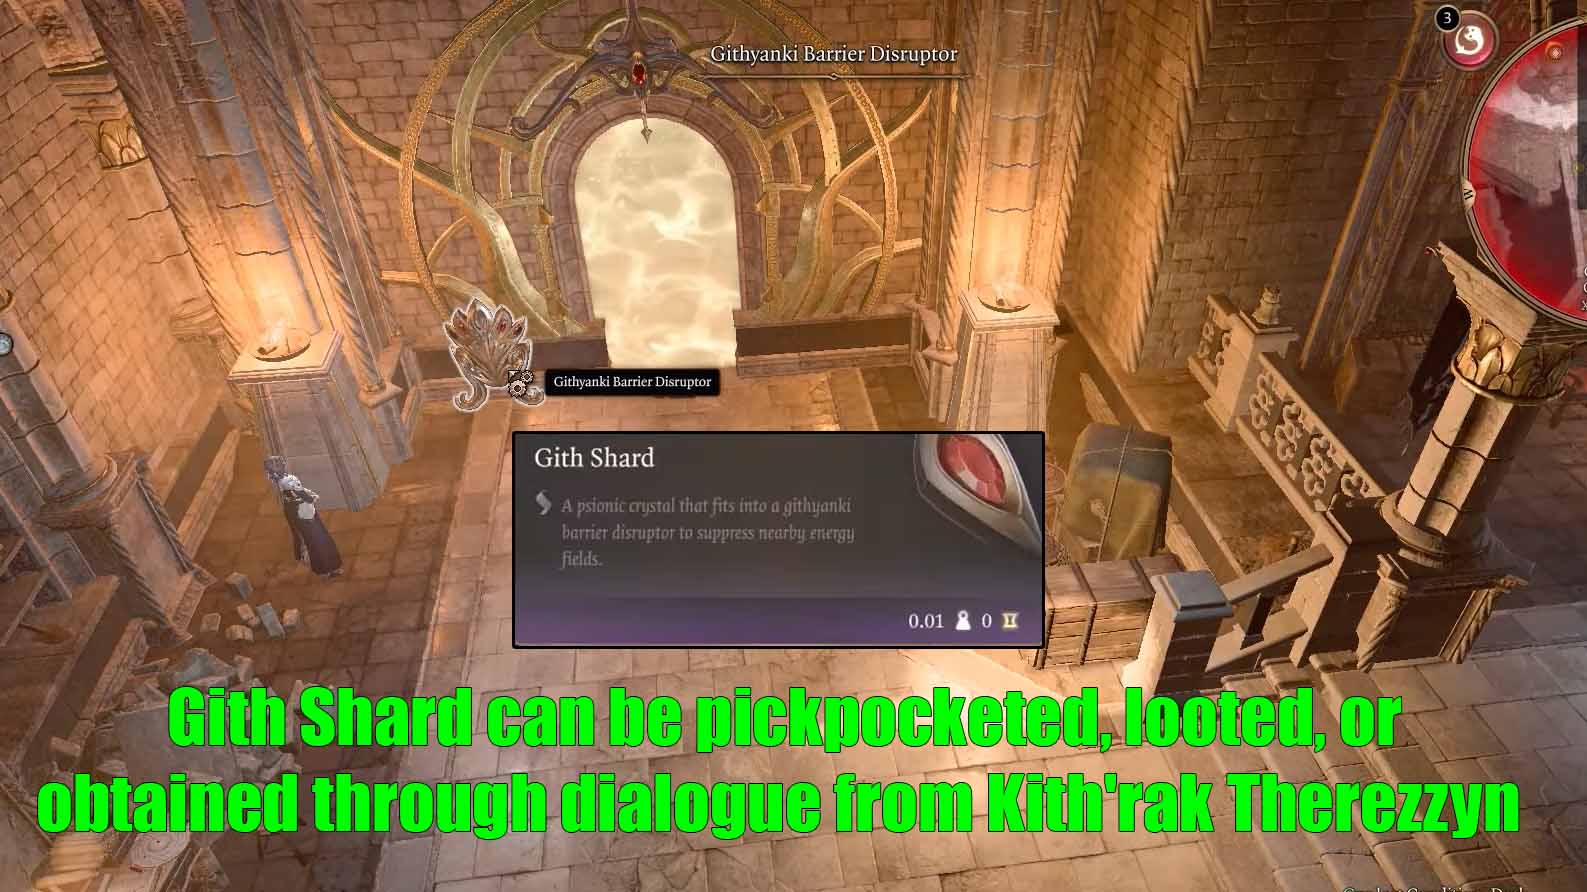
To get inside the Inquisitor’s Chambers you will have to bring down the energy barrier blocking your passage through the archway. You have a few options for disabling this energy field, one of which involves attempting to steal the red gem from the Githyanki commander and discreetly inserting it into the device. Alternatively, you can inform her about the artifact, and she will direct you to meet the Inquisitor. Rest assured, even if you reveal that you possess the artifact, they won’t be able to take it from you.
Additionally, after entering the Inquisitor’s Chambers make sure to speak to Ch’r’ai W’wargaz first. If you ignore him he won’t allow you to proceed to the Blood of Lathander. You need to progress the major story event here before you are free to move on.
Finally, after dealing with Vlaakith and the Githyanki, head to the small room on the west.
How to Turn the Lathander Statues in the Inquisitor’s Chamber
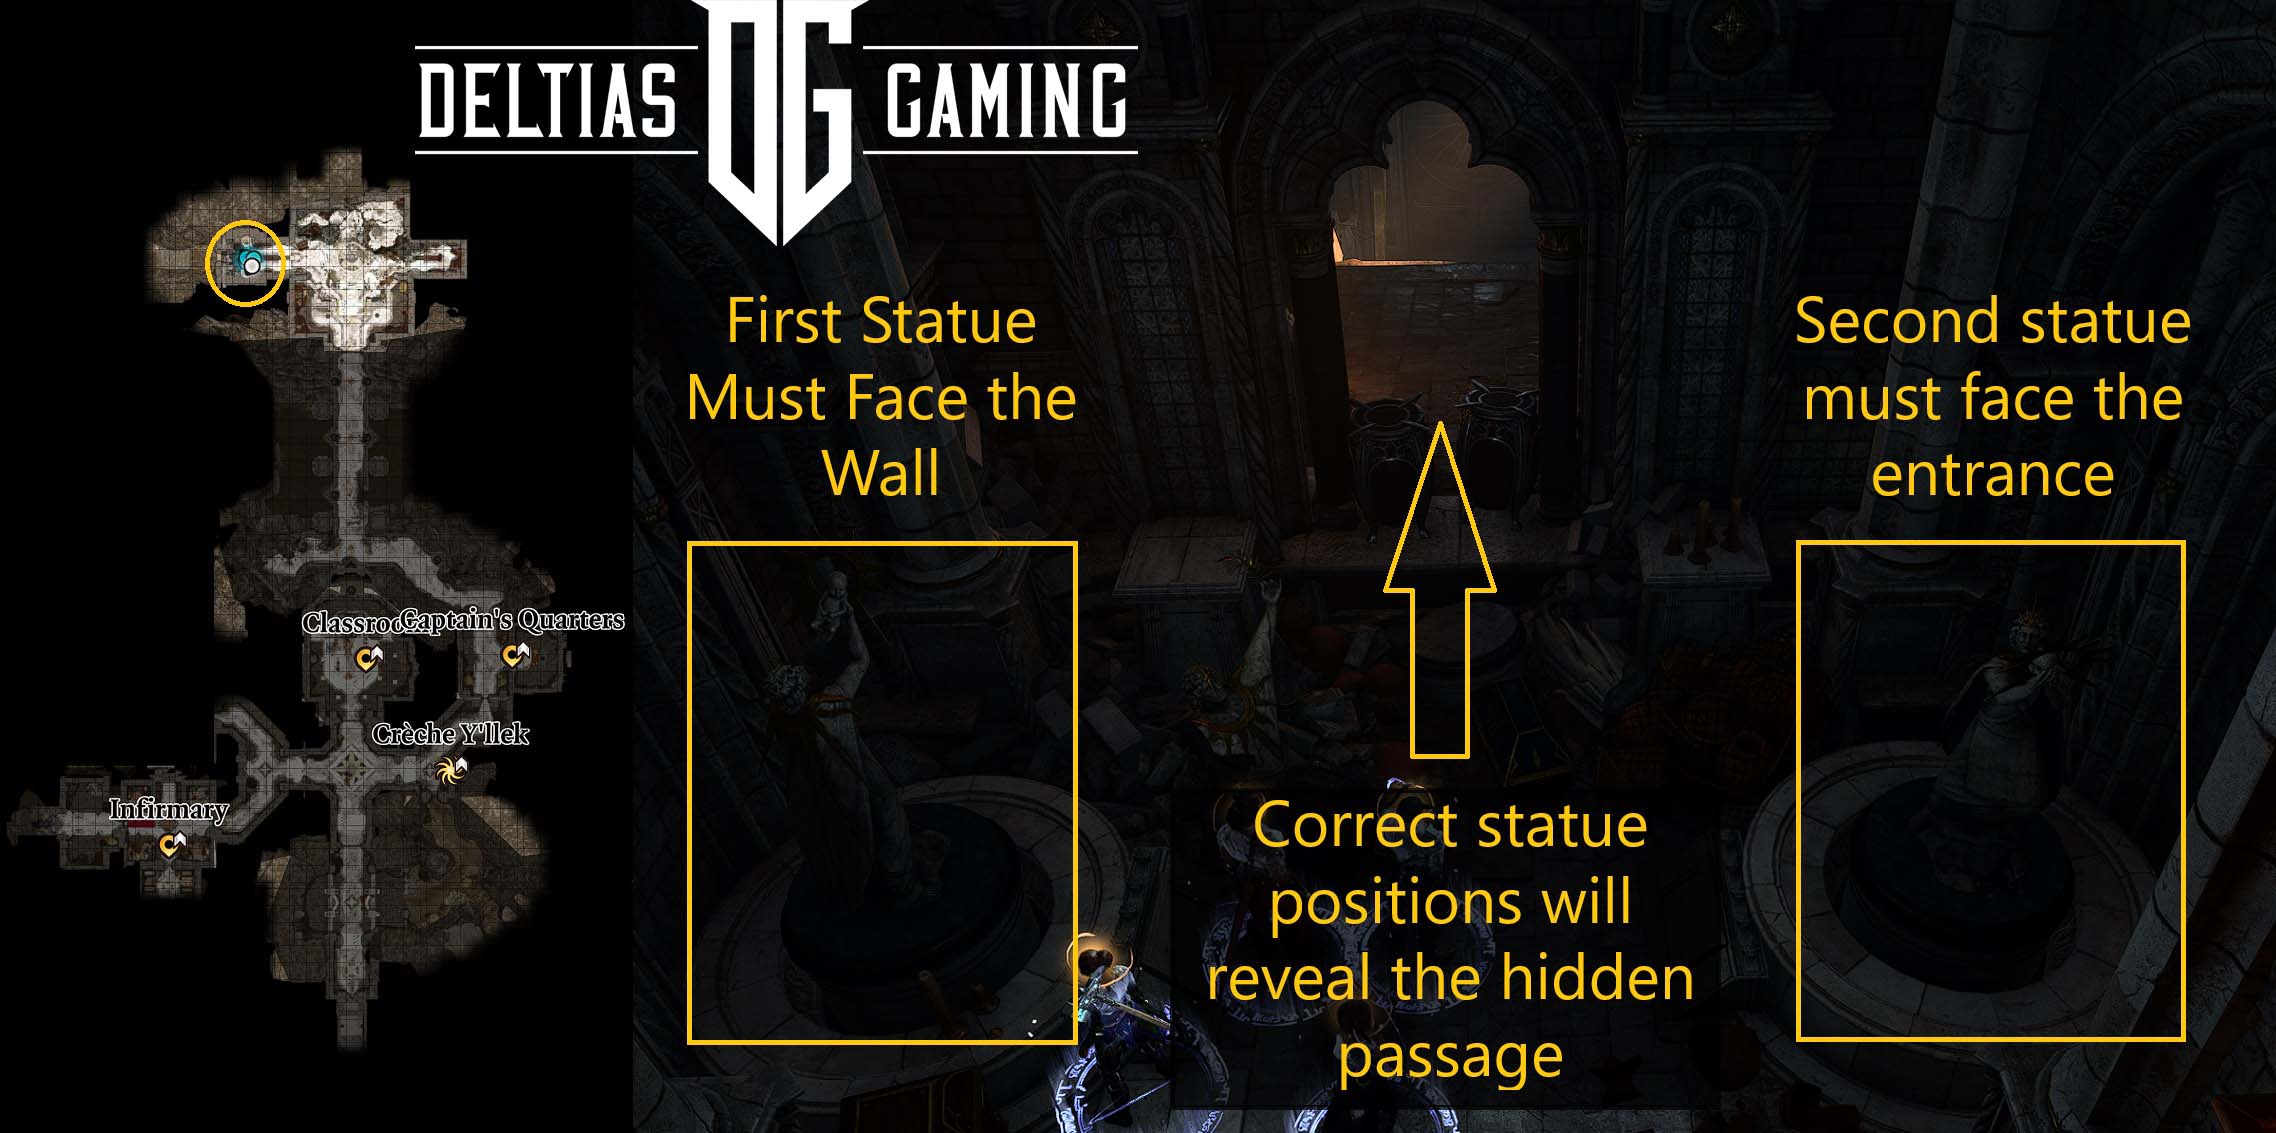
To turn the statues in the Inquisitor’s Chambers in BG3 you will need to pass a 25 DC Athletics check, which means you will want to use a character with a high Strength ability score to do the job. The statue on the left must be turned to face the back wall and the statue on the right must be turned to face the opposite direction towards the entrance.
After you deal with Inquisitor and Vlaakith, to the west is a small room with two statues. You will need an Athletics skill check to move it and pass the automatic strength ability check. Rotate the statues until the right one faces the wall and the left statue faces the entrance. This will reveal a hidden passage.
If the mechanism becomes stuck, you can free it with a melee attack, but be cautious because accidental destruction of the statue will prevent you from opening the door. Proceed further into the revealed passage, ensuring you have at least one ranged weapon or any damage cantrip (e.g. the Fire Bolt) and a character with high dexterity to disarm the traps in the next area accessible through the secret stairway.
Get Blood of Lathander from the Secret Chamber in Baldur’s Gate 3
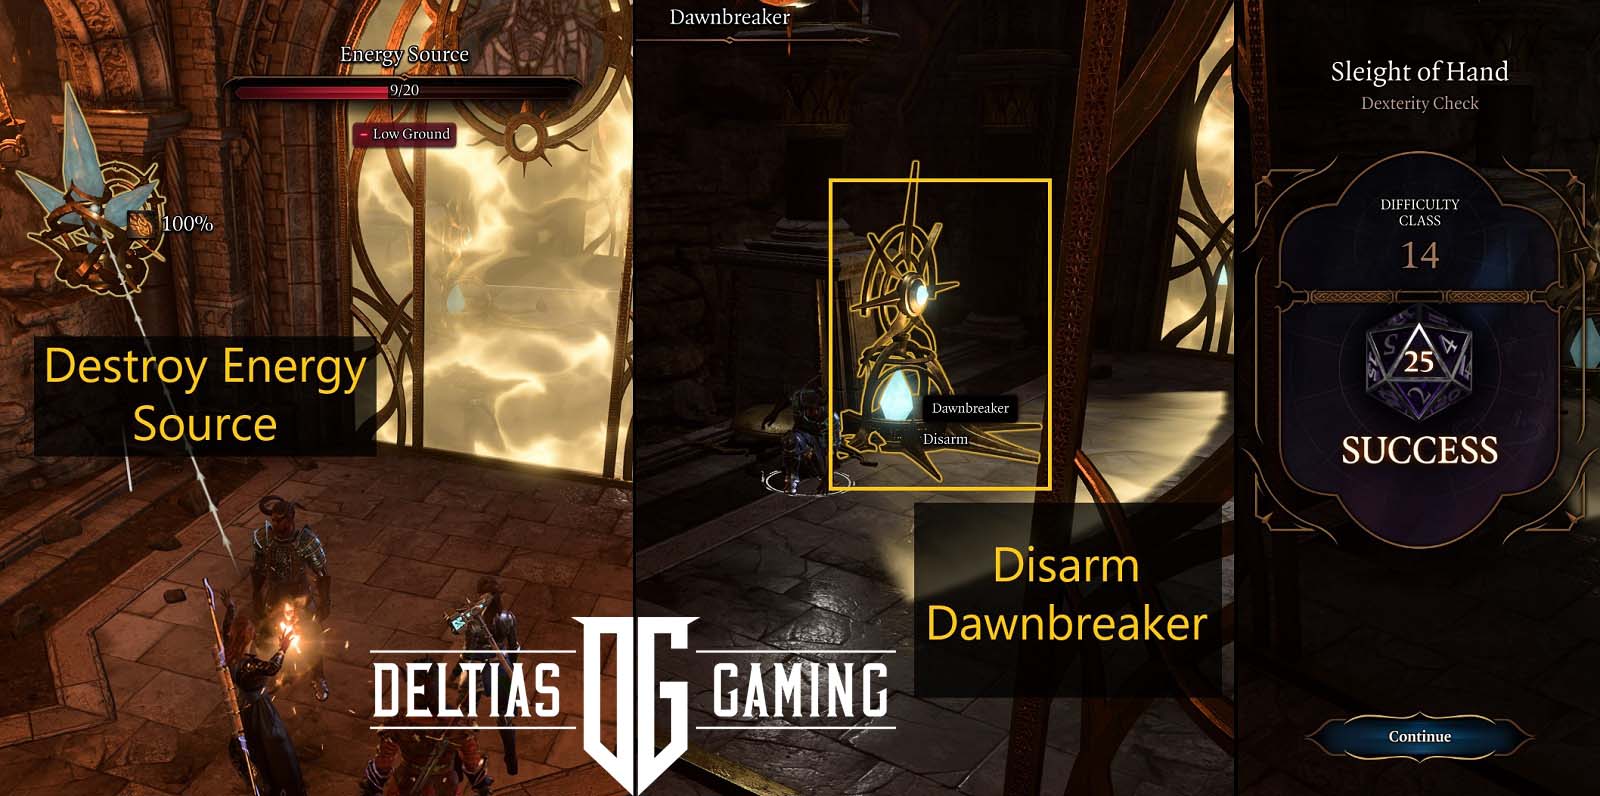
To deactivate the first energy field, destroy the crystal next to it, which serves as its energy source. Beware, as Dawnbreaker is a trap located behind the field that can instantly kill your character. Activate the sneak action, approach it from the side, and cautiously disarm it by successfully passing the DC 14 Dexterity skill check.

To pass through the second barrier, you need to take the hidden path to the left behind it, where you’ll encounter another energy source and Dawnbreaker trap. Finally, destroy the crystal hidden in the chasm wall to disable the last energy field.
Making a Choice for the Blood of Lathander Mace
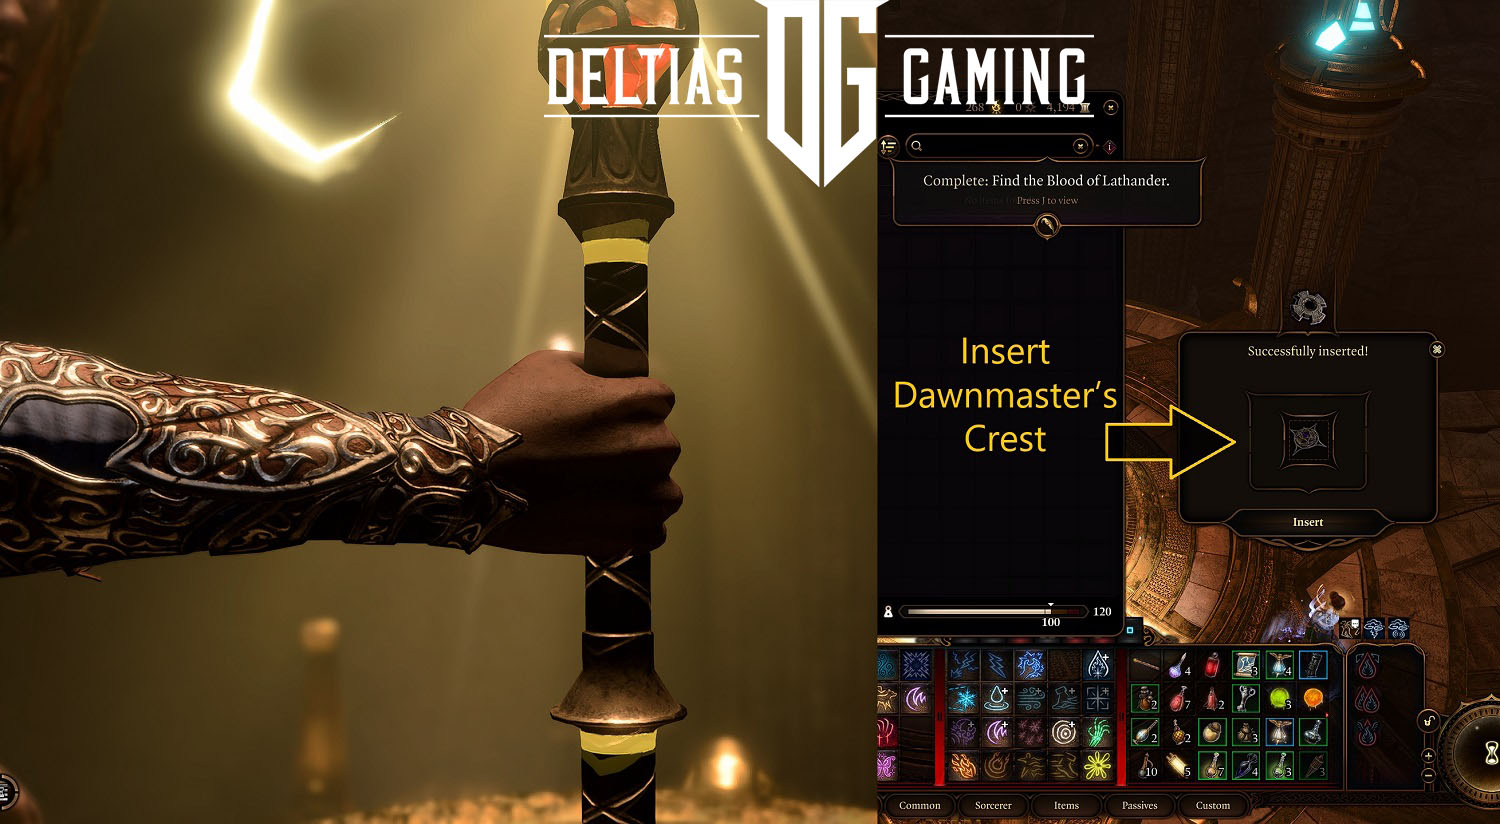
Now that you have reached the secret chamber holding the Blood of Lathander you have to make a choice on how to claim it that could result in the destruction of the Creche and possibly your whole party. If you have been following our guide, you should have the Dawnmaster Crest in your inventory. Therefore, you can choose to insert the Dawnmaster Crest into the Crest Panel. This will allow you to claim the Blood of Lathander in Baldur’s Gate 3 without any repercussions.
However, if you do not have the Dawnmaster Crest, then taking the mace will trigger secret traps protecting the weapon. These mechanisms will begin to power the massive weapon at the top of the Monastery and if you don’t stop them they will destroy the Creche below. Your goal is to destroy the Lathander Solar Machines with all the ranged spells you can throw at them. Ranged arrows are less effective because the mechanisms are resistant to Piercing damage.
How to Use The Blood of Lathander in BG3?
The Blood of Lathandar elevates the role of a support character, especially when paired with a shield. Lathander’s Blessing helps your survivability on the battlefield, granting a lifeline when your hit points are depleted and aiding your nearby allies. Additionally, the ability to cast Sunbeam, a level 6 spell, gives you a strong damage spell in the game’s later stages. This makes the legendary mace an exceptional choice for those who want to take the support role of healer and tank in Baldur’s gate 3 (BG3). The Blood of Lathander unlocks the powerful Sunbeam Spell for its bearer, which sears and Blinds all creatures in the beam’s path. Remarkably, you can recast Sunbeam without expending a spell slot.
You can equip it to your character’s main hand weapon slot in the inventory, providing additional bonuses and buffs. The user needs Simple weapon proficiency or suffers penalties while wearing the weapon. You can equip it on any class, companion, or character that has Simple Weapon Proficiency.
Tips and Tricks of The Blood of Lathander in BG3
While most players may look at its survivability and spell casting options as the main draw of the weapon, the Lathander’s Light passive is also very powerful and can be used to your advantage in many situations. For instance any effects, such as the damage from the Callous Glow Ring, that require the target to be illuminated are enabled. The passive counts as sunlight to trigger the Sunlight Hypersensitivity of certain undead such as vampires. Note that it does not count as sunlight for Sunlight Sensitivity.
Avoid using this weapon around Neutral undead as that may make them hostile due the nature of the sunlight it generates from Lathander’s Light.
FAQs for Gauntlets of Hill Giant Strength in Baldur’s Gate 3
1. Question: Do you need the Dawnmaster’s Crest to get The Blood of Lathander?
Answer: No, you can still get the Blood of Lathander without getting the Dawnmaster’s Crest. However, this does activate a trap which will destroy the Githyanki Creche unless you destroy the Solar Machines.
2. Question: Does taking The Blood of Lathander make the Githyanki hostile?
Answer: Certain Githyanki will become hostile as you move through the monastery to acquire the mace, but only those Githyanki will. Every Githyanki in the Creche will become hostile if you take the Blood of Lathander without the Dawnmaster’s Crest.
Looking For More About Baldur’s Gate 3?
Thank you for reading How to Get the Blood of Lathander in Baldur’s Gate 3 – Legendary Mace BG3 Guide. We provide the latest news and create guides for Baldur’s Gate 3. Also, watch me play games on Twitch or visit my YouTube channel!