Facebook
 Reddit
 Email
Email
Performing a clean installation of Windows 11 is the best way to set up your PC. It cleans the system of all junk and unnecessary items.
Are you building a new PC and need to install Windows? Or are you just tired of all the issues in Windows and want to start fresh? Whatever your issue is, chances are a clean and fresh installation of Windows 11 should fix almost everything. However, performing a clean installation of Windows is not as easy as it sounds, especially if you are not familiar with the process.
You could end up with no OS on your system. That’s why we created a simple but efficient guide explaining how to freshly install Windows 11 on your PC. Read on to find out how.
Note: Some aspects of this article are subjective and reflect the writer’s opinions. Performing a Clean Installation of Windows will wipe all your data, so back up your data.
Prerequisites for Performing a Clean Installation of Windows 11
Here are some of the prerequisites you will need before you can begin the clean installation of Windows 11:
- First of all, you must back up your entire system, including all files, documents, pictures, game saves, and any other data you need. That’s because they will all be deleted during the clean installation process.
- Next, visit your motherboard or laptop’s support site page and download all the required drivers, including networking, chipset, serial IO, and more. If you have a dedicated GPU, visit AMD, Nvidia, or Intel’s website to download the driver. Keep them in a single folder so they are easy to find. We will need them during the preparation process.
- Download the latest Windows 11 ISO and Rufus Utility program, and keep them ready.
- You must have a USB flash drive with at least 8 GB of storage.
- Keep the Windows 11 activation key ready. If your PC came pre-installed with Windows, then the activation key is embedded in the hardware. In that case, it will activate automatically.
Once everything is ready, we can begin preparing the installation media drive.
Preparing the Windows 11 Installation Media
Follow these steps to prepare the Windows 11 Installation Media:
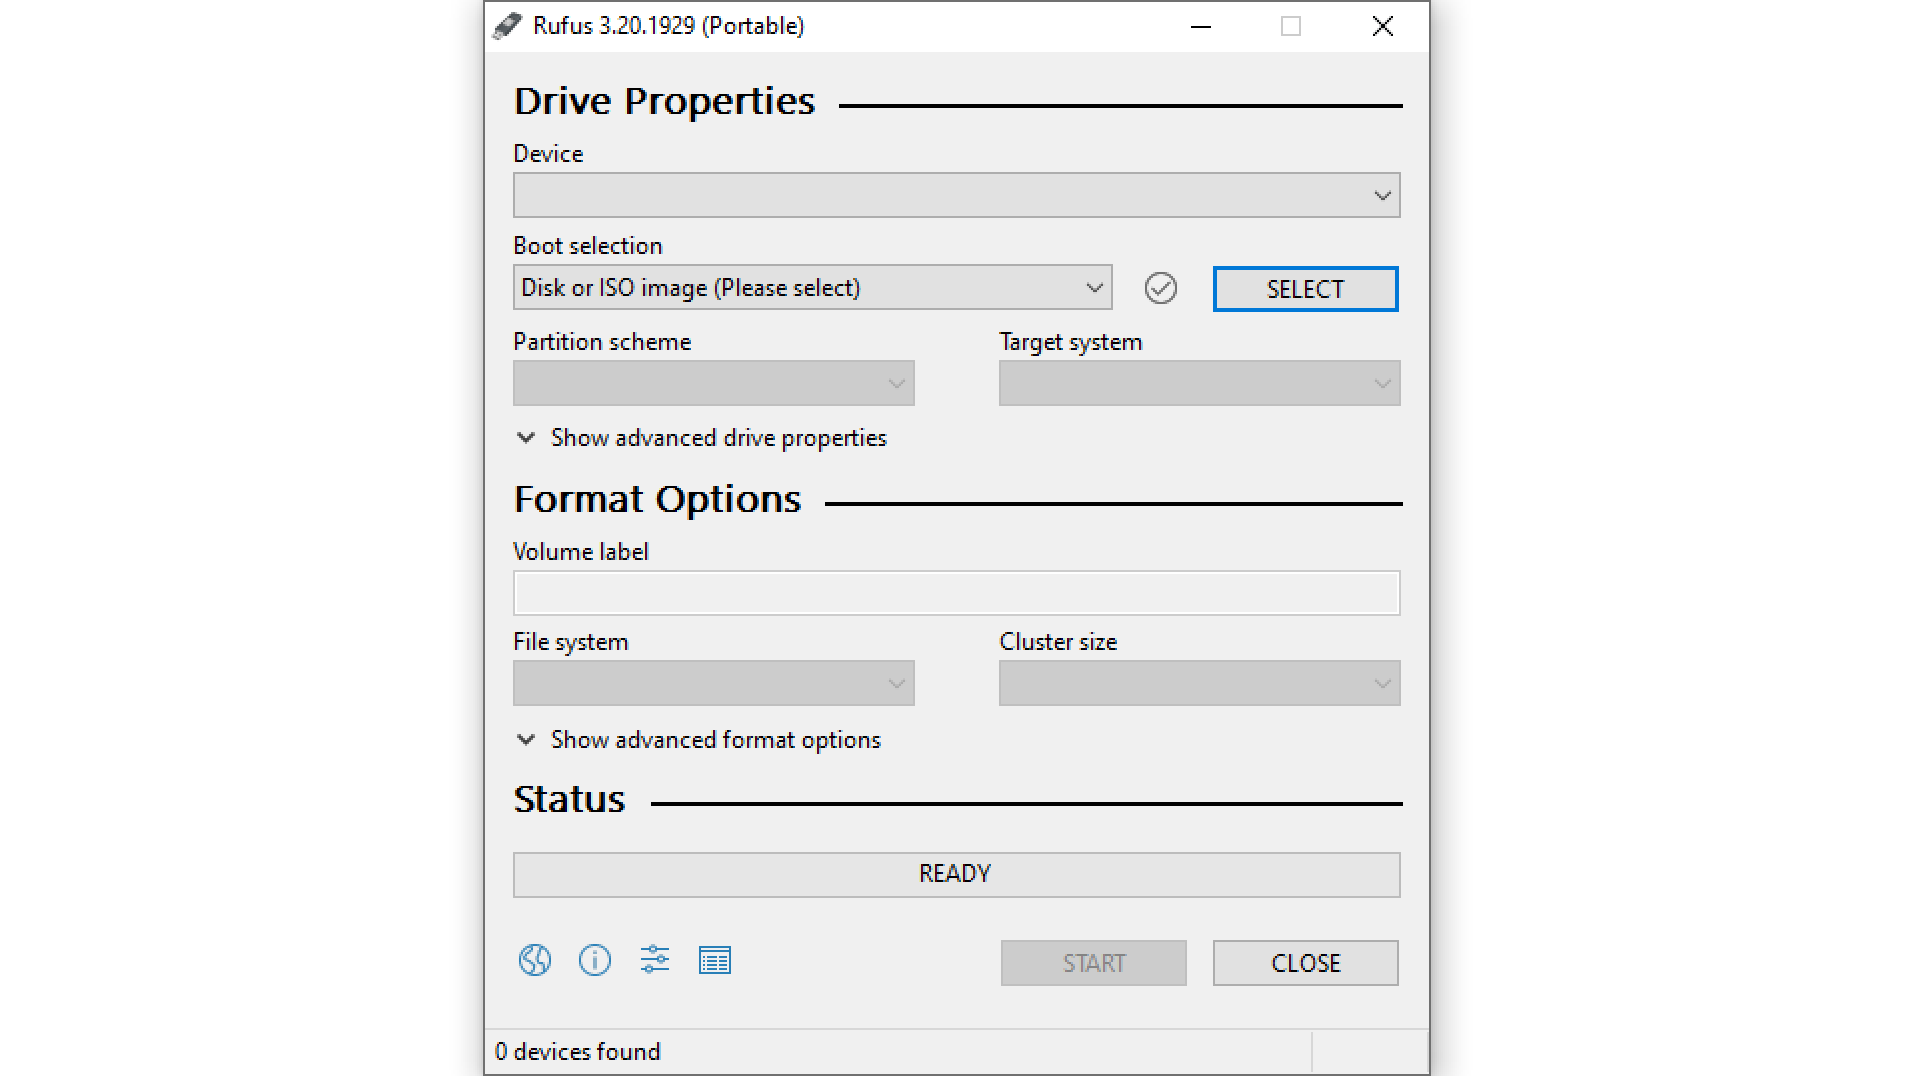
- Connect the USB flash drive to your PC and launch the Rufus Utility program.
- In Rufus, select your USB flash drive as the device and select the Windows 11 ISO in the Boot selection.
- Please ensure the partition scheme and target system are set to GPT and UEFI.
- Next, click on the START button and follow the instructions to write the Windows 11 ISO to the flash drive.
- After a few minutes, the Windows 11 installation media will be ready.
Now, we will add drivers to the USB flash drive. Here’s how to do so:
- Once the above process is done, launch Windows Explorer/This PC.
- Next, find the folder where you downloaded all the drivers. Rename the folder to “Drivers.”
- Right-click the Drivers folder and copy it. You must paste it directly inside the flash drive, not into any folders inside the flash drive.
That’s it. You are all done with the preparation, and now we can begin the installation.
Guide To Perform a Clean Installation of Windows 11

Now that the drivers and installation media are ready, we can begin the installation process. Here’s how to perform a clean installation of Windows 11:
- First, connect the USB flash drive to your PC.
- Go to your BIOS menu and ensure the TPM and Secure Boot options are turned on.
- Next, change the boot order to ensure the USB drive is first. Some BIOS setups have an option to boot directly from USB using a function key. Since every BIOS is different, you can watch a YouTube video on how to do that for your motherboard.
- Once you boot from the USB drive, the Windows installation UI will appear on the screen.
- Select the language and choose “Install Windows 11.”
- Next, you may be asked to enter the Windows 11 activation key. Enter your key here. If your PC came pre-installed with Windows, then you won’t see this page.
- Next, delete all the partitions listed there and create a new one.
- Once the new partition is ready, click Next. Keep in mind that this will delete all your data, so remember to back up.
- Next, click on Install to begin the installation.
- Once the installation process finishes and your PC restarts, set up your PC. You will soon reach the desktop screen.
How To Install Drivers
Once you are on the desktop screen, it’s time to install the drivers and get ready for daily usage. Follow these steps to install the drivers:
- Launch Windows Explorer/This PC, and go to the flash drive.
- Next, find the folder named Drivers that we copied here earlier.
- Go inside the Drivers folder and start installing the drivers one by one. Restart your PC whenever a driver installation prompts you to.
That’s it. You have successfully performed a clean installation of Windows 11 on your PC.
We provide the latest news and “How To’s” for Tech content. Meanwhile, you can check out the following articles related to PC GPUs, CPU and GPU comparisons, mobile phones, and more:
- 5 Best Air Coolers for CPUs in 2025
- ASUS TUF Gaming F16 Release Date, Specifications, Price, and More
- iPhone 16e vs iPhone SE (3rd Gen): Which One To Buy in 2025?
- Powerbeats Pro 2 vs AirPods Pro 2: Which One To Get in 2025
- RTX 5070 Ti vs. RTX 4070 Super: Specs, Price and More Compared
- Windows 11: How To Disable Lock Screen Widgets