Facebook
 Reddit
 Email
Email
We evaluate the new subclasses’ tier list from best to worst in Baldur’s Gate 3 Patch 8 based on their damage, survivability, and utility.

In Baldur’s Gate 3 Patch 8, Larian Studios has released 12 new classes, one for each class. These subclasses add unique features like actions, passives, or spells. In this guide, we evaluate the 12 new subclasses, giving pros and cons of each, and what makes them better or worse than others.
Specifically, what makes a subclass strong is it’s features and their unique to the overall class and build potential. In Patch 8, the addition of Shadow Blade, Booming Blade, and other spells and cantrips allows spellcasting builds to play as melee damage dealers. Therefore, expect a lot of changes regarding how spellcasters can, and should play for optimal damage and overall power. Below, we rank each new subclass with links to full builds and examples of how or who should play them.
Note: this guide has been updated and will continue to be after playing each class, subclass in all three Acts. Check back as the rankings may fluctuate with more testing!
Baldur’s Gate 3 Patch 8 Subclass Tier List
The Baldur’s Gate 3 Class tier list is ranked from best to worst:
- S Tier – Warlock Hexblade, Sorcerer Shadow Magic
- A Tier – Barbarian Path of the Giant, Wizard Bladesinging
- B Tier – Ranger Swarmkeeper, Cleric Death Domain, Monk Way of the Drunken Master, Fighter Arcane Archer
- C Tier – Rogue Swashbuckler, Paladin Oath of the Crown
- D Tier – Druid Circle of Stars, Bard College of Glamour
- 12 College of Glamour Bard (D- Tier)
- 11 Circle of the Stars Druid (D Tier)
- 10 Oath of the Crown Paladin (C- Tier)
- 9 Swashbuckler Rogue (C Tier)
- 8 Arcane Archer Fighter (B Tier)
- 7 Way of the Drunken Master Monk (B Tier)
- 6 Death Domain Cleric (B+ Tier)
- 5 Swarmkeeper Ranger (B+ Tier)
- 4 Bladesinging Wizard (A Tier)
- 3 Path of the Giant Barbarian (A+ Tier)
- 2 Shadow Magic Sorcerer (S Tier)
- 1 Hexblade Warlock (S+ Tier)
What is The Best Subclass in Patch 8 for Baldur’s Gate 3?

The Hexblade Warlock is the best new subclass in Patch 8 for BG3 because of the new spell Shadow Blade, its multiclass potential, and power throughout all the Acts of BG3. The Shadow Magic Sorcerer and the Hexblade Warlock play very similarly, however, the Hexblade can bind martial weapons and stack Charisma. Thus, it gives it the advantage of using either Shadow Magic spell or martial weapons for damage, along with a much faster start and better multiclass potential. Our third-ranked build is the Path of the Giant Barbarian, which uses the popular throw build, and Giant’s Rage doubles throw damage. These three subclasses are incredibly fun and versatile and are some of the best overall in BG3.
Here is a tier list of all the new Patch 8 Baldur’s Gate subclasses, Ranked best to worst:
| List Position | Class | Subclass | Ranking |
|---|---|---|---|
| 1 | Warlock | Hexblade | S+ |
| 2 | Sorcerer | Shadow Magic | S |
| 3 | Barbarian | Path of the Giant | A+ |
| 4 | Wizard | Bladesinging | A |
| 5 | Ranger | Swarmkeeper | B+ |
| 6 | Cleric | Death Domain | B+ |
| 7 | Monk | Way of the Drunken Master | B |
| 8 | Fighter | Arcane Archer | B |
| 9 | Rogue | Swashbuckler | C |
| 10 | Paladin | Oath of the Crown | C- |
| 11 | Druid | Circle of the Stars | D |
| 12 | Bard | College of Glamour | D- |
12 College of Glamour Bard (D- Tier)

The College of Glamour Bard unlocks features relating to charmed. At level 3, you can imbue to allies with HP and if a melee attack hits them, they can become charmed. At level six, you gain essentially the command spell and further increase HP and allies you can target. However, these bonuses are incredibly weak compared to the Bard’s other subclasses. College of Sword has powerful melee or range attacks, College of Lore further increases your spellbook and College of Valour is balanced for spellcasting and weapon attacks.

The best way to play the College of Glamour Bard is multiclassing it with a Sorcerer 6/6 split. The Sorcerer further expands the spellbook and allows the user to obtain Shadow Blade. Then, the Bard can use a powerful summoned shortsword with the resonance stone for big damage. However, the Bard is still one of the weakest classes to do this, and the Warlock, Wizard, and Sorcerer far outperform this playstyle.
We rank the College of Glamour Bard as the worst overall new subclass in Patch 8 because the features are dreadfully underwhelming. However, the class is still powerful; just use a different subclass and you will be much happier. Also consider at least one level with Hexblade Warlock, which will help with proficiencies and raw power with one level of investment.
College of Glamour Bard Features
- Mantle of Inspiration (Level 3): Imbue 2 allies with your vigour and grant them HP Icon.png 5 temporary hit points. If they’re hit with a melee attack, the attacker becomes Charmed.
- Mantle of Majesty: Command (Level 6): Command a creature to flee, move closer, freeze, drop to the ground or drop its weapon. Targets that are Charmed automatically fail their Saving Throw. ( Recharge: Long rest.)
- Mantle of Inspiration (Level 6): Bonus increases to HP 8 temporary hit points. Number of targets increases to 3.
- Mantle of Inspiration (Level 10): Bonus increases to HP 11 temporary hit points. Number of targets increases to 4.
11 Circle of the Stars Druid (D Tier)

The Circle of the Stars Druid avoids using Wild Shape and instead gains Starry Form powers. This allows the player to gain effects like luminous arrow, increased healing, or dragons breath. The strength of the Circle of Stars subclass is it’s powerful in Act 1 due to Guiding Bolt, and your Circle of Stars spells. This allows you to cast Guiding Bolt for free, and fire off Luminous Arrow. Using the Luminous Armour set obtained in Act 1, you quickly start to debuff enemies, playing a hybrid spellcaster avoiding Wild Shape. But the power fades beyond Act 2 where other subclasses like the Circle of the Moon shine.
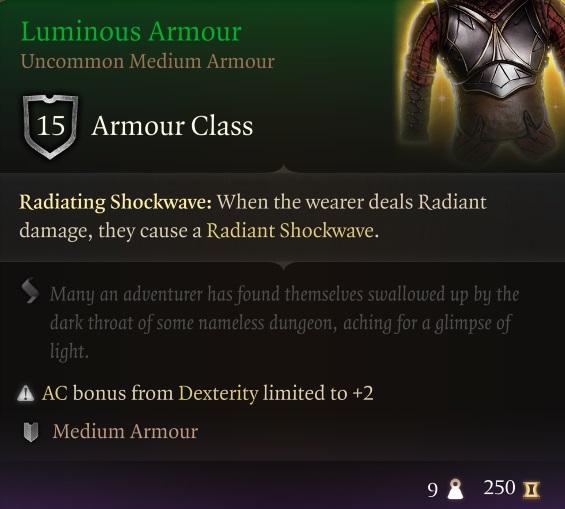
The best way to play the Circle of the Stars Druid is by utilizing Starry Form Archer, using your bonus action for Luminous Arrow and your action for Guiding Bolt. Combine Luminous Armor and Luminous Gloves to unleash a radiant shockwave, dealing extra damage. Additionally, cast Light on yourself to maximize the Coruscation Ring and Callous Glow Ring combo, which inflicts Radiant Orb on illuminated targets.
However, the issue with this specific setup and build is, that it’s outclassed by the Cleric who can do the same thing, but better with Spirit Guardians. Moreover, Tavern Brawler feat now works on Honour Mode, allowing the Circle of the Moon Wild Shape build to excel on the highest difficulty. Thus, we rank the Circle of the Stars Druid 9th overall, and average D tier subclass in best of BG3 Patch 8.
Circle of the Stars Druid Features
- Gain Guidance Cantrip (Level 2)
- Starry Form (Level 2): You can expend a Wild Shape Charge to take on a Starry Form rather than transforming into a beast.
- Starry Form Archer: As a Bonus Action while in this Starry Form, you can cast a luminous arrow.
- Starry Form: Chalice: Whenever you cast a healing spell that consumes a spell slot, you can cast Chalice Healing.
- Starry Form: Dragon: When you make a Saving throw to maintain Concentration on a spell, a roll result of 9 or lower is considered a 10.
- Star Map: 2 (Level 2) Used to cast Guiding Bolt without a spell slot. Replenished by a Long Rest.
- Circle of the Stars spells (Level 2): gain two spells Guiding Bolt, Star Map: Guiding Bolt
- Star Map: 3 (Level 5) You gain an additional Star Map.
- Cosmic Omen (Level 6): The omen grants you the ability to increase (Weal) or decrease (Woe) Attack rolls and Saving throws, and to increase your allies’ Ability Checks.
- Cosmic Omen: 3 (Level 6) Resource used for Omens. Replenished by a Long Rest.
- Star Map: 4 (Level 9) You gain an additional Star Map.
- Cosmic Omen: 4 (Level 9) You gain an additional Cosmic Omen.
- Twinkling Constellations (Level 10): The Archer’s damage and the Chalice’s healing are each increased by 1d8, and the Dragon gains the ability to hover and to Fly at a movement speed of meters.
10 Oath of the Crown Paladin (C- Tier)

The Oath of the Crown Paladin is ideal for players who want to tank in Baldur’s Gate 3. At level 3 you gain the ability to taunt enemies around you with the Champion Challenge subclass feature. This compels enemies to attack you or face a disadvantage attacking others. Additionally, the Paladin retains all the damage from Divine Smite and Strength stacking, making it a formidable defensive subclass. As you progress, you gain more tank and defensive-related spells, along with more ways to heal allies creating a hybrid healer tank spellcaster.
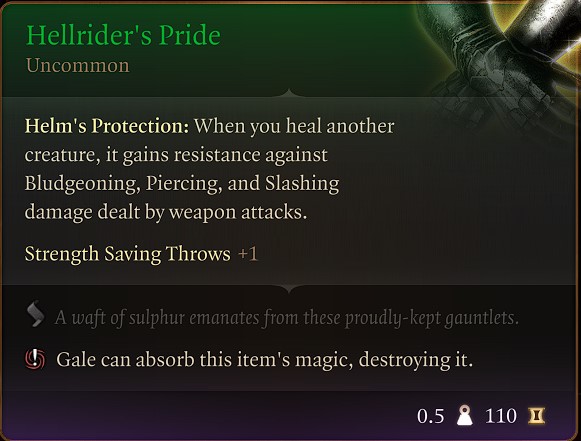
The best way to play the Oath of the Crown Paladin is to focus on a powerful tanking setup early in Act 1. Equip the Amulet of Restoration, The Whispering Promise, Hellrider’s Pride, and Boots of Aid and Comfort for maximum survivability and support. The Amulet of Restoration grants Mass Healing Word, a bonus action spell that heals allies within 18 meters. Each healed character gains the Bless spell, Resistance cantrip, and extra health, providing incredible utility while maintaining the Paladin’s strong damage output.
We rank the Oath of Crown Paladin as C- Tier because the subclasses is niche-focused on support, lower damage, and weak mobility. The Vengeance and Oathbreaker subclasses have more damage and spell options for offensive-minded builds and are suitable at higher difficulties. Therefore, the niche tank subclass features holds it back from ranking higher on our Best Patch 8 Subclass Tier List in Baldur’s Gate 3.
Oath of the Crown Paladin Features
- Oath of the Crown Tenets (level 1): A paladin must follow their sworn oaths or lose their divine power. Oath of Devotion paladins abide by the following tenets: Law. Uphold civilisation and order. Loyalty. Your word is your bond; without loyalty, oaths and laws are meaningless. Responsibility. Deal with the consequences of your actions, and fulfil your duties and obligations.
- Righteous Clarity (level 1): Target yourself or an ally to additionally grant the target’s proficiency bonus to their Attack rolls.
- Champion Challenge (level 3): Challenge the enemies around you, compelling them to attack only you. Any attacks they might make against other targets have Disadvantage.
- Turn the Tide (level 3): Shout out and heal all nearby non-enemy creatures.
- Oath Spells (level 3): You gain additional spells from your oath: Command, Compelled Duel
- Oath Spells (level 5): You gain additional spells from your oath: Warding Bond, Spiritual Weapon
- Divine Allegiance (level 7): When an ally within 1.5 meters of you takes damage, you can use your Reaction to magically substitute your own health for your ally’s, taking the damage instead of them.
- Oath Spells (level 9): You gain additional spells from your oath: Spirit Guardians, Crusader’s Mantle
9 Swashbuckler Rogue (C Tier)

The Swashbuckler Rogue is another underwhelming subclass with two features unlocked at level 3: Fancy Footwork and Rakish Audacity. Fancy Footwork prevents opportunity attacks against you when you make a melee attack against that target. Rakish Audacity allows you to automatically trigger Sneak Attack when you are within 1.5 meters. This bonus sounds great but forces you into a melee build playstyle, which can be difficult when survivability is low. At level 4, the Swashbuckler unlocks Dirty Tricks, similar subclass actions as the Battlemaster Fighter: Disarm, Blind, Cantrip. Consider the Rogue Thief subclass gains an extra bonus action EVERY turn, these subclass features are lackluster and thus rank C tier on our patch 8 tier list for BG3.
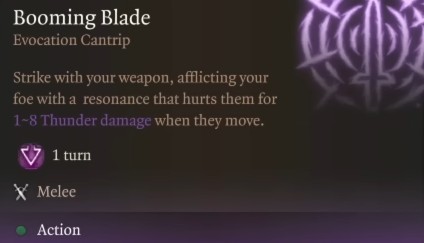
The best way to play the Swashbuckler Rogue is with a multiclass setup and melee martial damage. Players want to use the High Elf race to gain Longbow, Longsword proficiency, and Booming Blade Cantrip. This cantrip can be used once every action, adding thunder damage to every attack. Then multiclass to a Fighter at level 5 to gain four feats, extra attack, and two-weapon fighting. In Act 3, combine Crimson Mischief, Bloodthirst, and Bhaalist Armour to double-piercing damage.
While the melee martial Swashbuckler is the best build possible, it lacks the spellcasting of Arcane Trickster and the bonus action of the Thief. Moreover, it doesn’t outperform other melee damage dealers on this list. However, it makes a great Role-Play (RP) character and fans of pirate fantasy will enjoy this option. Thus, we rank it number 9 overall, on Baldur’s Gate 3 Patch 8 subclass tier list.
Swashbuckler Rogue Features
- Fancy Footwork (level 3): If you make a melee attack against a target, that target can’t make Opportunity Attacks against you for the rest of your turn.
- Rakish Audacity (level 3): You gain a +2 bonus to initiative rolls. This scales with your rogue level. You no longer need Advantage to trigger Sneak Attack if you are within 1.5 meters of the target and don’t have Disadvantage.
- Dirty Tricks (level 4): Learn the following Dirty Tricks. Charisma is the spellcasting modifier used for these abilities.
- Dirty Trick: Flick o’ the Wrist: Flick your weapon at a target and possibly Disarm them.
- Dirty Trick: Sand Toss a handful of sand at your enemy and possibly Blind them.
- Dirty Trick: Vicious Mockery: Cast as a cantrip at will.
- Panache (level 9): Roll a Persuasion check to beguile a humanoid, who must contest it with an Insight check. Enemies who fail gain Panache: Disadvantage; others who fail become Charmed.
8 Arcane Archer Fighter (B Tier)

The Arcane Archer Fighter is a ranged-based subclass that gains access to Arcane Arrows starting at level three. Also at level three is proficiency in arcana and nature as well as one cantrip. The Arcane Shot feature allows the player to select a specific type of arrow to debuff, hit multiple targets, stun, or cause blindness. As you progress in the subclass, you gain access to more arrows, which is a big issue because with Improved Extra Attack, the Fighter can make 3 attacks per action. Thus, you run out of these Arcane Shots quickly and need a short or long rest. While the arrows are helpful, they model game Arrows you can gain from looting or purchasing from vendors and are somewhat redundant.
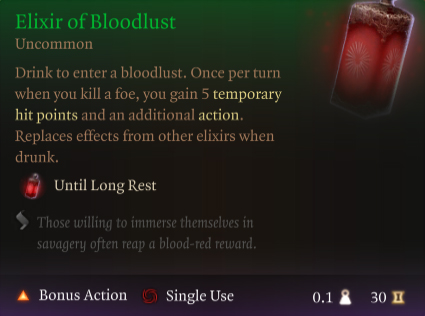
The best way to play the Arcane Archer Fighter is to focus on increasing your Actions per turn with Elixir of Blood Lust, Potion of Speed, and Action Surge. This combination grants four actions, each allowing three attacks. Utilize Arcane Arrows with each attack and aim to eliminate at least one target per turn to trigger Elixir of Blood Lust. Additionally, mix in elemental arrows and multi-target shots with Arcane Arrows to unleash AoE damage, apply debuffs, knock back enemies, or control the battlefield.
We rank the Arcane Archer at 8 on our BG3 Patch 8 Tier List primarily because the arrows run out quickly, and are similar to current arrows in the game. Moreover, the Fighter playing in melee range with two-handed weapons has more raw power. With the addition of the Booming Blade Cantrip, Eldritch Knight Fighters are more powerful than over, making it a better alternative to Arcane Archer.
Arcane Archer Features
- Arcane Archer Lore (Level 3): Gain proficiency in Arcana and Nature.
- Cantrip Choice (Level 3): Choose between Guidance, Light, and True Strike.
- Arcane Arrows (Level 3): Resource used to fire an Arcane Shot. Replenished by a Short or Long Rest.
- Bursting Arrow: AOE explosion
- Enfeebling Arrow: Necrotic damage and Feeble
- Beguiling Arrow: Psychic damage and charm
- Banishing Arrow: banish target (stun)
- Seeking Arrow: force damage seeks target and faerie fire.
- Shadow Arrow: Psychic damage and possibly blindness.
- Grasping Arrow: poison damage and reduced speed
- Piercing Arrow: AOE in front of you, and piercing damage
- Arcane Shots: 3 (Level 3): Choose 3 Arcane Shots, with an option to switch out one Arcane Shot every level.
- Curving Shot (Level 7): When you miss with any magical ranged attack, use a Bonus action to attack the next closest target with the same attack.
- Magic Arrow (Level 7): All of your ranged attacks are considered magical to overcome Resistance.
- Arcane Arrows: 5 (Learned at 7): Gain one additional Arcane Arrow.
- Arcane Shots: 4 (Level 7): Select one more Arcane Shot.
- Arcane Arrows: 6 (Level 10): Gain one additional Arcane Arrow.
- Arcane Shots: 5 (Level 10): Select one more Arcane Shot.
7 Way of the Drunken Master Monk (B Tier)

The Way of the Drunken Master Monk uses the drunk status effect to regain Ki Points and attacks enemies, causing them to be drunk. When drunk, enemies have a disadvantage on dexterity checks. Like other Monk builds, the Way of the Drunken Master has multiple attacks with extra attack (action) and bonus action attacks. Therefore, you have many ways to attack in melee, crowd controlling, bursting, and doing massive raw damage. The issue with this subclass is it’s more RP-focused, while still strong, lacks the raw power of the Way of the Open Hand Monk or the spell casting of Way of the Four Shadows.
The best way to play the Drunken Master Monk is to maximize your Ki usage, mobility, and unarmed strike damage. Use Ki attacks like Drunken Technique and Intoxicating Strike to stun enemies and inflict the Drunk status. Always save 1.5 meters of movement and one Ki point at the end of your turn for reaction strikes or to recover quickly if knocked prone. To enhance damage output, take the Tavern Brawler feat to double your unarmed strike damage. Then, multiclass three levels into Rogue for Fast Hands, granting an extra bonus action per turn.
Monks are overall a strong class with unarmed attack, high survivability, but are susceptible to stuns and immobilization. We rank the Way of the Drunken Master as 7th overall and B Tier on our list because it doesn’t outperform Way of the Open Hand in damage or survivability. Moreover, it focused on drunk status effect, which is fun, and unique but not the most dominant of the all subclasses in BG3.
Way of the Drunken Master Monk Features
- Cheeky Tipple (level 3): You are Immune to the negative effects of being Drunk. Once per day, when you drink alcohol, you regain half your Ki Points (rounded down).
- Drunken Performance (level 3): You gain Proficiency in Performance.
- Drunken Technique (level 3): Punch twice in quick succession and grant yourself an additional 3 meters movement and the benefits of Disengage.
- Intoxicating Strike (level 4): Hit a creature with your bare fists and possibly get them Drunk.
- Leap to Your Feet (level 6): When you are Prone, standing up uses only 1.5 meters of your Movement speed.
- Redirect Attack (level 6): When a creature misses you with a melee attack, you can spend 1 Ki Point as a reaction to make them attack a new target if possible.
- Life of the Party (level 7): Every time Intoxicating Strike hits, the monk gains Life of the Party, which increases Armour Class and Attack Rolls against Drunk targets. This effect can stack.
- Sobering Realisation (level 9): Hit a Drunk target and sober them up by dealing bonus Psychic damage. On a successful hit, the monk also loses Life of the Party.
- Drunkard’s Luck (level 11): When you make an Ability Check, Attack Roll, or Saving Throw and have Disadvantage on the roll, you can spend 2 Ki Points to negate the Disadvantage for that roll (Recharge: Per Round).
6 Death Domain Cleric (B+ Tier)
The Death Domain Cleric focused on Necrotic damage, cantrips, and melee attacks to trigger extra damage. With Marital weapon proficiency, the Death Domain Cleric excels at melee combat with two-handed weapons, similar to Barbarians and Fighters. At level one, you gain the ability to target two creatures with a Cantrip. This is helpful using either Booming Blade or Toll of the Death (both new cantrips in Patch 8). Moreover, you gain many additional Necromancy spells that are always prepared allowing you to play melee and spellcasting in one build.
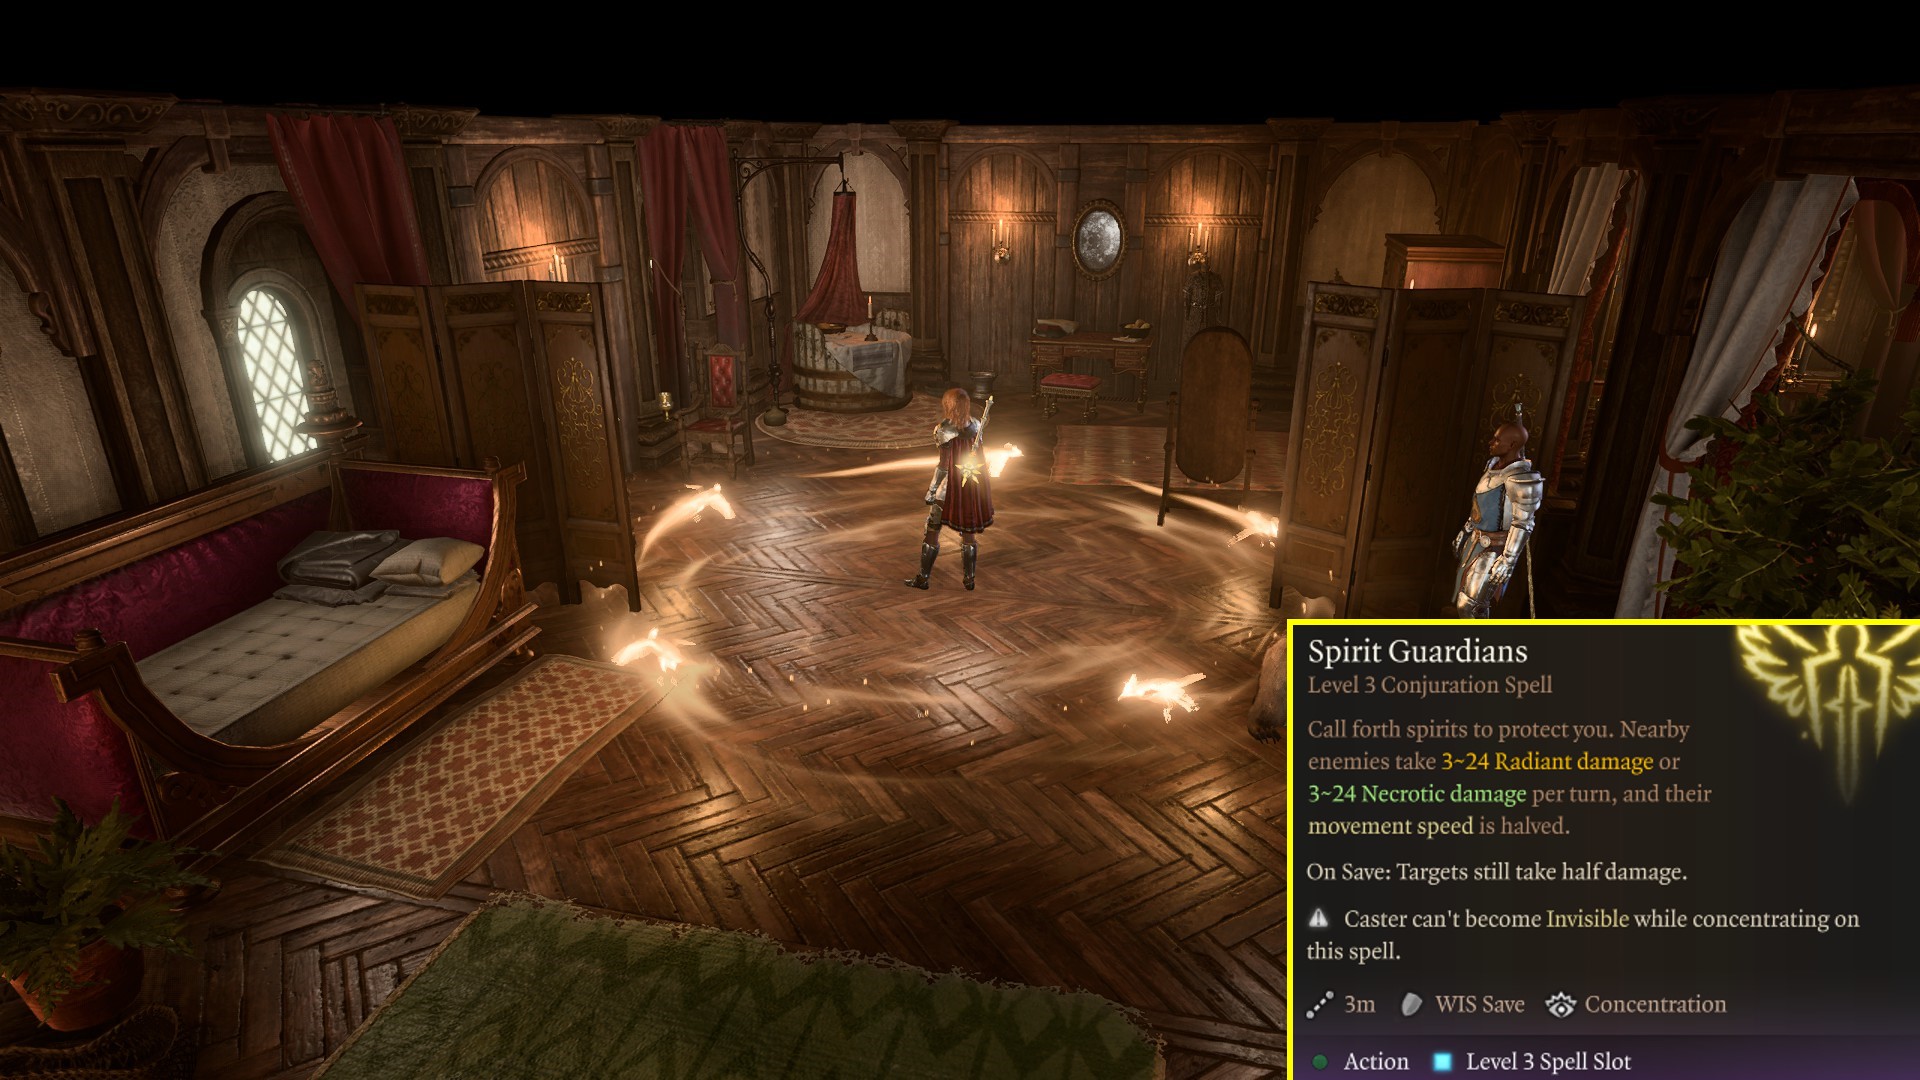
The best way to play the Death Domain Cleric is by maximizing melee damage through your Channel Divinity ability and the Toll of Death necrotic cantrip. Wielding a two-handed weapon and multiclassing into Fighter for an extra attack allows you to unleash devastating bursts of necrotic damage. Always cast Spirit Guardians, choosing necrotic damage, before engaging in combat. Use your bonus action to summon a Spiritual Weapon, providing additional pressure and a useful distraction.
With massive AOE damage, melee martial weapons, and powerful spells, it’s hard to put the Death Domain Cleric at B+ Tier on our list. However, the other new subclasses have more raw power, utility, or uniqueness. The major drawback to the Death Domain Cleric is that enemies are immune to Necrotic damage. Resistance can be bypassed, however, immunity will completely tank most of your damage. Thus, we ranked it 6 on our Best Patch 8 Subclass Tier List in Baldur’s Gate 3.
Death Domain Cleric Features
- Gain Martial weapons Proficiency (level 1).
- Reaper (level 1): Your Necromancy cantrips that only target 1 creature can target an additional creature.
- Domain Spells (level 1): You gain additional spells from your domain: Bone Chill, False Life, Ray of Sickness
- Channel Divinity (level 2): Touch of Death (level 2): When you hit a creature with a melee attack, you can use your Channel Divinity Charge to deal extra 5 + 2 × (Cleric level) Necrotic damage.
- Touch of Death (level 2): When you hit a creature with a melee attack, you can use your Channel Divinity to deal extra Necrotic damage.
- Level 3
- Domain Spells (level 3): You gain additional spells from your domain: Blindness, Ray of Enfeeblement
- Domain Spells (level 5): You gain additional spells from your domain: Animate Dead, Vampiric Touch
- Inescapable Destruction (level 6): Spells you cast ignore Resistance to Necrotic Damage.
- Domain Spells (level 7): You gain additional spells from your domain: Blight, Death Ward
- Divine Strike: Necrotic (level 8): Once per turn deal 1d8 Necrotic in addition to your weapon’s damage when you make a melee attack. (Recharge: Per turn.)
- Domain Spells (level 9): You gain additional spells from your domain: Cloudkill, Contagion
5 Swarmkeeper Ranger (B+ Tier)
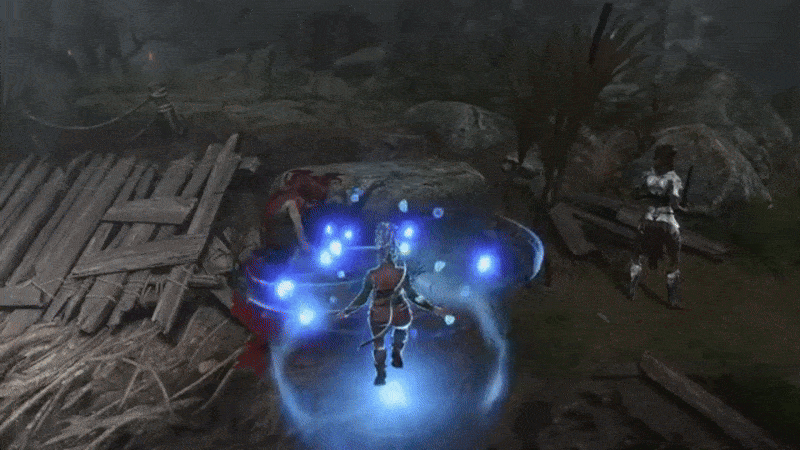
The Swarmkeeper Ranger allows you to add special effects creatures marked by Hunter’s Mark with Prey’s Scent subclass feature. You can deal extra piercing damage, teleport away, lighting damage, psychic damage, and even blind targets! The subclass also features a bonus action ability to fly away, giving you incredible mobility. Moreover, the Ranger is a strong class regardless of subclass with weapon and armour proficiencies, spellcasting, and arrows that trigger extra effects.
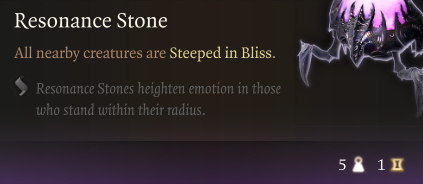
The best way to play the Swarmkeeper Ranger is by pairing the Flurry of Moths attack’s Psychic damage with the Resonance Stone from Act 2. This stone doubles Psychic damage and works perfectly with the Strange Conduit Ring, making your Hunter’s Mark incredibly strong.
With the Gloom Stalker Ranger adding so many bonus, the Swarmkeeper falls behind in terms of overall power. Moreover, you don’t gain anything that can outperform in terms of spellcasting, or utility and with the same multiclass setup, most players are incentivized to use the Gloom Stalker. However, this subclass is powerful due to its bonuses, thus we rank it 5 in B+ tier on our Best Patch 8 Subclass List in Baldur’s Gate 3.
Swarmkeeper Ranger Features
- Prey’s Scent (Level 3): Your swarm deals additional damage to creatures marked by Hunter’s Mark.
- Gathered Swarm (Level 3): Choose the swarm of nature spirits you’ve formed a bond with. You can change your swarm whenever you level up.
- Legion of Bees: it can attack and deal additional Piercing damage, push the enemy away from you, or teleport you to a safer location.
- Cloud of Jellyfish: it can attack and deal additional Lightning damage, Shock your enemy, or teleport you to a safer location.
- Flurry of Moths: The swarm can attack and deal additional Psychic damage, Blind your enemy, or teleport you to a safer location.
- Subclass Spells (Level 3): Mage Hand and Faerie Fire
- Subclass Spells (Level 5): Web
- Writhing Currents: 3 (Level 7): Used to cast Writhing Tide.
- Writhing Tide: Gain a flying speed of 9 m / 30 ft and become unaffected by surface effects.
- One additional use of Writhing Tide (Level 9).
- Subclass Spells (Level 9): Gaseous Form
- Mighty Swarm (Level 11): The swarm’s regular attack now deals 1d8 damage, its special attack has one additional feature, and teleporting with your swarm now also increases your Armour Class for the rest of the round.
4 Bladesinging Wizard (A Tier)

The Bladesinging Wizard subclass incentivizes players to use melee attacks with Bladesong, additional proficiencies, and extra attack. Therefore, you can viably build towards one hand and shield with multiple attacks per action and either high dexterity or strength to do massive damage. Meanwhile, you retain all the spellcasting ability that makes the Wizard powerful and useful while exploring.
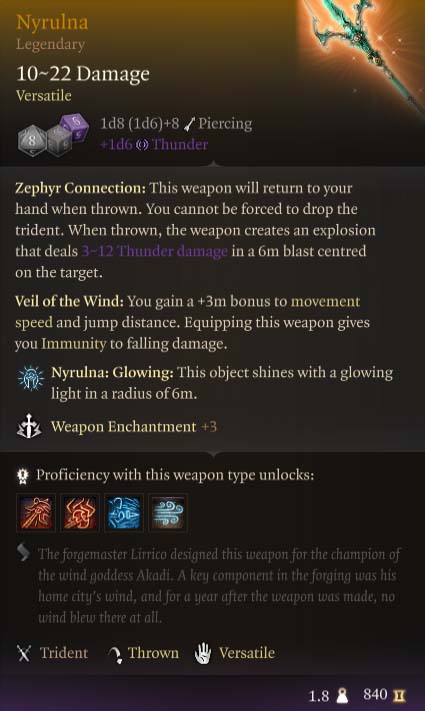
The best way to play the Bladesinging Wizard is multiclassing with a Paladin and Fighter to gain Divine Smite and Action Surge. This allows you to do melee damage and trigger Divine Smite with massive spell slots. Moreover, in Act 3, you can use Piercing damage like Nyrulna and Bhaalist Armour combo in a two-handed playstyle. Thus, making the Wizard a formidable melee build with spell-casting potential. Also, the new Bladesinging ability gives you the ability to heal by consuming all of your Bladesong stacks, giving you even more utility and survival!
In terms of damage potential, the Bladesinging Wizard could be the best overall subclass for the class. However, the overall best for Patch 8 still belongs to Charisma-based spellcasters due to their innate ability to multiclass with the Paladin and now Hexblade Warlock. But, this new subclass for the Wizard is a game-changer and will be interesting to see melee damage-dealing front-line Wizards in patch 8!
Bladesinging Wizard Features
- Bladesong Power: 2 (level 2) Used to cast Bladesong. Replenished on a Long Rest.
- Bladesong (level 2): Invoke the Bladesong. You gain a +proficiency bonus to Armour Class and your movement speed increases by 3 meters. You also gain Advantage in Acrobatics and a +proficiency bonus to Constitution saving throws.
- Training in War and Song: You gain proficiency with Light Armour and in the Performance skill. You also gain proficiency with Daggers, Sickles, Shortswords, Rapiers, Scimitars, and Longswords.
- Bladesong Power: 3 Gain an additional use of Bladesong (level 5).
- Extra Attack (level 6): You can make an additional free attack after making an unarmed or weapon attack.
- Bladesong Power: 4 Gain an additional use of Bladesong (level 9).
- Song of Defence (level 10): When you take damage during your Bladesong, you can expend a spell slot to subtract 5 damage per spell slot.
3 Path of the Giant Barbarian (A+ Tier)
The Path of the Giant Barbarian stands out for its enhanced damage with thrown weapons and items, making it a unique build. It also features a built-in mechanic to return thrown items to you, while adding elemental damage to them. This makes it the ultimate throw build, offering greater range and damage than a typical Barbarian subclass. Thanks to its high damage, range, and survivability, this build is capable of soloing Honor Mode. The main drawbacks are the lack of spellcasting, limited movement, and vulnerability to magic. However, with improved range, increased damage, and bonus action utility, the Giant Barbarian is one of the best builds and subclasses in BG3.
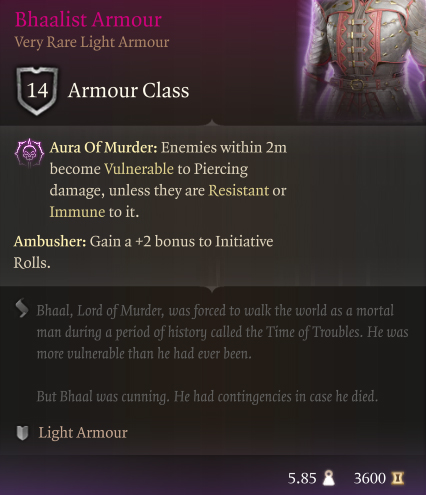
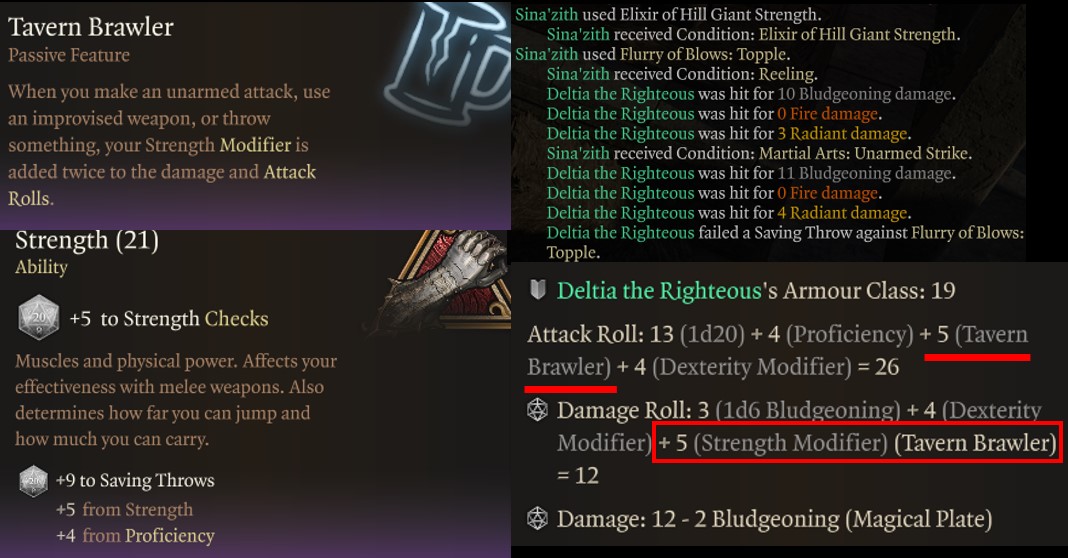
The best way to play the Giant Barbarian is by using the Nyrulna Trident, Bhaalist Armour, and Ring of Flinging. Nyrulna Trident is considered piercing damage and receives double damage from Bhaalist Armour when in melee range. With this subclass’s rage active, you double the damage of thrown objects. You then want to pick up the feat Tavern Brawler, which doubles your thrown weapon strength modifier to attack rolls. With high strength, you throw the trident or any piercing damage at a target in your aura of murders, and do incredible damage, making it absurdly strong.
With the previous Barbarian subclasses, you could solo Honour Mode using the throw build described above. Now, you can do it easier with the Giant subclass. Therefore, we rank it as the third-best, S tier on our Best Patch 8 Subclass List in Baldur’s Gate 3. The major downside is the lack of spellcasting and the build is completely gear-dependent. If those two things weren’t true, Giant would be the best overall or move higher on this list.
Giant Barbarian Features
- Giant’s Rage (level 3): Enter a Rage and increase in size. Your Rage damage bonus is doubled on throw attacks.
- Vaprak’s Greed (level 3): Your carrying capacity is increased by a quarter.
- Thaumaturgy (level 3): Cast as a cantrip at will.
- Boot of the Giants (level 5): Try to kick a target away. Your chances depend on your Athletics and are higher if you’re hidden or invisible.
- Elemental Cleaver (level 6): Channel primordial might into your weapon. Until the end of your Rage, your weapon will deal additional Acid, Cold, Fire, Lightning, or Thunder damage, and gain the Thrown property. If thrown, it will immediately reappear in your hand.
- Mighty Impel (level 10): Throw a creature or object that is Medium-sized or smaller.
2 Shadow Magic Sorcerer (S Tier)

What sets the Shadow Magic Sorcerer apart is its combination of melee attacks and spellcasting into a single build. After Patch 8 in BG3, two new abilities—Booming Blade and Shadow Blade—were introduced, allowing a spellcaster to make melee attacks that scale off Strength. As a result, this build stacks both Strength and Charisma while utilizing multiclassing to maximize its effectiveness. Moreover, you get an Eyes of Darkness spell, which allows you to avoid being blinding, casting a cloud that prevents you from being hit, but allows the use of the Shadow Blade with Resonance Stone Combo.

The best way to play the Shadow Magic Sorcerer is by using the Shadow Blade level 2 spell and Booming Blade. With Shadow Blade, you can attack based on your strength ability score, which can be improved to 27 via Cloud Giant Elixir. Moreover, you can pick up the resonance stone in Act 2 and double psychic damage. Then, multiclass into Paladin to gain Divine Smite and Extra Attack. Now, use your spell slots for divine smites while attacking with your Shadow Blade. Lastly, upcast Shadow Blade to further increase the damage.
The biggest downside to the Shadow Magic Sorc and why it’s now ranked second is the slow start. The Hexblade plays very similarly but starts MUCH stronger at level 1. Moreover, the Hexblade gains proficiencies right away without multiclass and it can use martial weapons or Shadow Blade, giving it the edge in the number one spot. We highly recommend playing the Shadow Sorcerer, ranked S Tier number two on our Baldur’s Gate 3 Patch 8 Subclass Tier List!
Shadow Magic Sorcerer Features
- Eyes of the Dark (level 1): You can see in the dark up to 24 meters.
- Strength of the Grave (level 1): After reaching 0 Hit Points, you regain 1 instead of becoming downed.
- Darkness (level 3): Cast as a level 2 spell at will.
- Eyes of the Dark: Darkness (level 3): Cast as a level 2 spell at will.
- Hound of Ill Omen (level 6): Summon forth a creature of darkness. (Recharge: Short rest.)
- Shadow Walk (level 11): Teleport into the shadows. The next spell you cast that turn will benefit from Distant Spell without costing any Sorcery Points.
1 Hexblade Warlock (S+ Tier)

The Hexblade build stands out for its ability to bind a weapon, gain additional proficiencies such as medium armor, and function as a true melee spellcaster. Its key advantages include high damage output, simplicity, and versatility, excelling in both melee combat and spellcasting. With the addition of the Shadow Blade spell, the Warlock can use a Strength or Charisma-based melee build. Additionally, the Bind Hexed Weapon subclass feature allows you to use Charisma instead of Strength or Dexterity for weapon attacks. This enables you to focus solely on Charisma, maximizing both your spellcasting and melee effectiveness.
To play the Hexblade effectively, use your bonus action to summon Shadow Blade and your action for melee attacks. Enhance your Psychic damage by equipping the Strange Conduit Ring and Resonance Stone, significantly boosting your Shadow Blade’s effectiveness. After summoning your blade, apply Hexblade’s Curse to your target for additional damage. Prioritize increasing your Charisma to maximize both your spellcasting and melee attack power. And, the Hexblade can use Bind Hexblade to use greatswords or any marital weapons and scale the damage with Charisma, not strength or dexerity!
After playing the Hexblade more, it’s clear the advantages and utility with its multiclassing and it’s quick start gives it the edge as an overall better subclass. The Sorc may have more damage once optimally built, but not throughout all acts or as a one to two level dip. Therefore, we rank the Hexblade build as S+ Tier on our Best Patch 8 Subclass List in Baldur’s Gate 3.
Hexblade Warlock Features
- Hex Warrior (Level 1): You gain proficiency with Medium armour, Shields, and Martial weapons. You gain Bind Hexed Weapon, which lets you use your Charisma modifier instead of Strength or Dexterity when attacking with weapons that you are proficient with.
- Bind Hexed Weapon (Level 1): Bind to your main hand weapon. Its damage becomes magical, you cannot drop or throw it, and you become Proficient with it if you weren’t already. When you attack with this weapon, there is a chance that Hexblade’s Curse will be applied to the target.
- Hexblade’s Curse (Level 1): Curse a target. Your damage rolls against the target gain a bonus equal to their Proficiency bonus. The number you need to roll a Critical Hit while attacking the target is also reduced by 1.
- Expanded Spell List (Level 1): Shield and Wrathful Smite
- Expanded Spell List (Level 3): Blur and Branding Smite
- Gain Extra Attack (Level 5): You can make an additional free attack after making an unarmed or weapon attack.
- Expanded Spell List (Level 5): Blink and Elemental Weapon
- Accursed Spectre (Level 6): Raise an Accursed Spectre from the soul of a fallen.
- Expanded Spell List (Level 7): Phantasmal Killer, Staggering Smite, Dominate Beast, and Greater Invisibility
- Expanded Spell List (Level 9): Banishing Smite and Cone of Cold
- Armour of Hexes (Level 10): When a creature you cursed with Hexblade’s Curse attacks you, potentially nullify the attack as a reaction.
FAQs about Patch 8 Subclasses in Baldur’s Gate 3
How do I unlock these new subclasses in Patch 8?
New subclasses are unlocked at specific levels based on the class. All classes can access their subclass by level 3.
Can I multiclass with the new subclasses?
Yes, the best multiclass options are the Hexblade Warlock, Shadow Magic Sorcerer with Vengeance Paladin or Monk Drunken Master with Rogue Thief.
What is the best subclass introduced in Patch 8 for solo play?
The Hexblade Warlock because it starts strong at level one, has massive damage with Shadow Blade, and it’s a great multiclass class.
What are the recommended builds for the new subclasses in BG3 Patch 8?
Below are the recommended builds for the 12 new subclasses in Patch 8 of BG3:
- Barbarian Build (Path of Giants): Tavern Brawler Throw build with high strength and Nyrulna Bhaalist Armour combo.
- Bard Build (College of Glamour): Multiclass into a Sorcerer and use Shadow Blade with high Charisma.
- Cleric Build (Death Domain): focus on two-handed melee damage with Spirit Guardians Necrotic damage.
- Druid Build (Circle of the Stars): Use radiant damage and Starry Archer with Luminous Armour and Luminous Gloves.
- Fighter Build (Arcane Archer): Stack dexterity rather than strength using a Longbow and extra attack with Arcane Arrows.
- Monk Build (Way of the Drunken Master): Multiclass into a Rogue Thief to gain extra bonus action and take Tavern Brawler feat.
- Paladin Build (Oath of the Crown): Play as a taunt with high Armour Class (AC) to taunt and avoid incoming damage.
- Ranger Build (Swarmkeeper): Use Hunter’s Mark and Flurry of Moths to deal Psychic damage and blind with Resonance Stone and Strange Conduit Ring.
- Rogue Build (Swashbuckler): Play a melee damage dealer with dual-wielding daggers or shortswords High Elf race Booming Blade cantrip.
- Sorcerer Build (Shadow Magic): Multiclass into Paladin at level 7 to gain Divine Smite with Shadow Blade, Resonance Stone, and Strange Conduit Ring.
- Warlock Build (The Hexblade): Stack Charisma, Bind Hex Weapon with Shadow Blade and Multiclass into Paladin.
- Wizard Build (Bladesinging): Use one-hand and Shield with multiclass and Hill Giant Strength Elixir to increase strength.
Looking For More About Baldur’s Gate 3?
Thank you for reading the Best Patch 8 Subclass Tier List in Baldur’s Gate 3 guide. We provide the latest news and create guides for Baldur’s Gate 3. Also, watch me play games on Twitch or visit my YouTube channel!