Facebook
 Reddit
 Email
Email
The “Epic graphics” settings in Silent Hill F are not the max settings. You can enable “True Epic” Settings, which enhances visuals.
Silent Hill F’s graphics are great due to the implementation of Unreal Engine 5’s Lumen GI and Nanite system. However, it’s the software Lumen GI system and not the hardware kind, which means the reflections are softer and less detailed. Unfortunately, that’s not the only caveat. The trees, small plants, and grasses of Silent Hill F lack ambient occlusion from the lighting, despite setting the game to the Epic preset. However, it’s the true Epic settings.
Konami had to nerf Global Illumination (GI), Ambient Occlusion (AO), and even shadows to deliver high framerates. However, since Silent Hill F is based on UE5, you can enable those graphics effects at the engine level and achieve the “True Epic” graphics settings to achieve significantly higher visual fidelity. In this article, we are showcasing a guide to enable the “True Epic” graphics settings in Silent Hill F. Read on to learn more.
Note: Parts of this article are subjective and reflect the writer’s opinions.
Guide To Enable “True Epic” Settings in Silent Hill F
This guide will enable a much better form of GI, AO, and shadows in Silent Hill F globally in every environment. Therefore, the trees, small plants, and grasses will appear more realistic. The “True Epic” settings will also use Hardware Lumen for an even more accurate rendering of the scene.
However, such hyper-realistic “True Epic” settings come with a massive performance cost, which could tank your frame rates by 30 – 45%, depending on your GPU. With that said, here’s the guide on how to enable “True Epic” settings in Silent Hill F:
- Press Win + R on your keyboard to launch the RUN program.
- Next, copy and paste “%localappdata%” in the RUN window and press Enter.
- Next, go to this directory: SHf\Saved\Config\Windows.
- Now, you will need to create a new text document there.
- Rename the text document to Engine.ini. Remember to replace the “.txt” with “.ini” at the end.
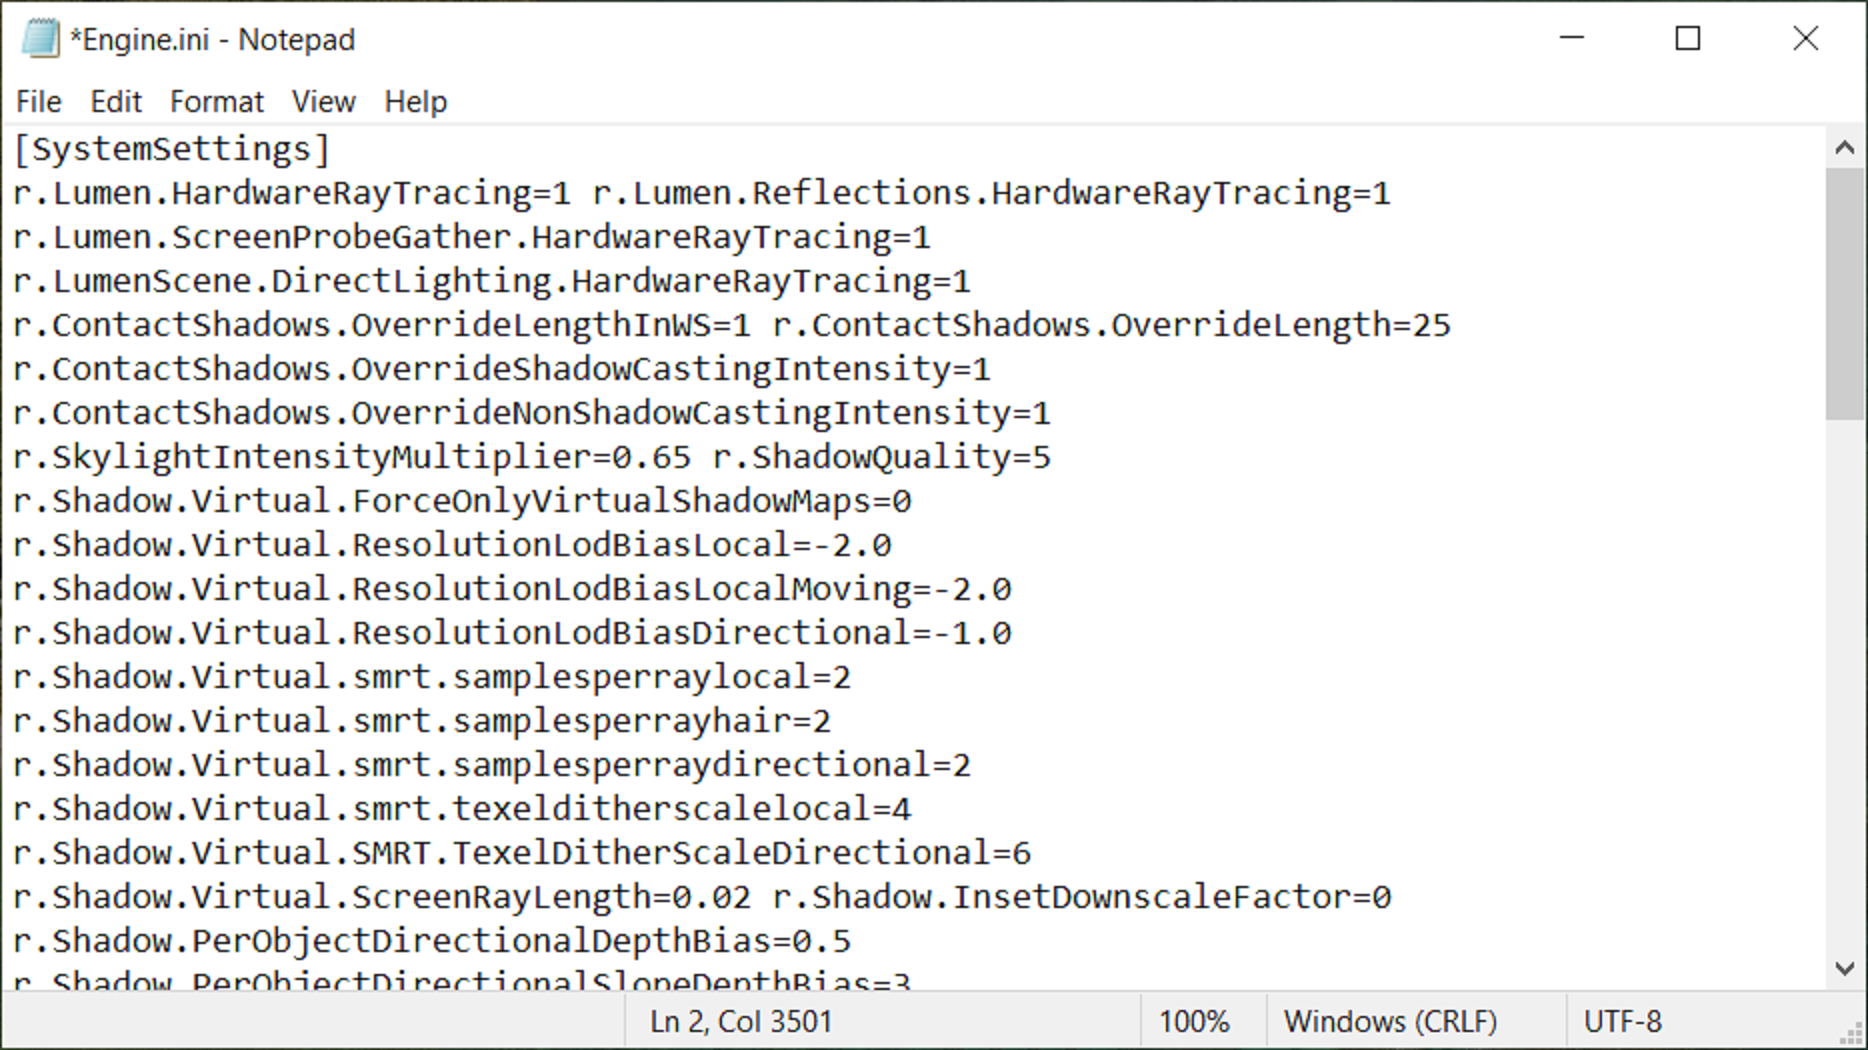
- Next, open the document. Copy the code mentioned below and paste it in the Engine.ini file:
[SystemSettings]

r.Lumen.HardwareRayTracing=1 r.Lumen.Reflections.HardwareRayTracing=1 r.Lumen.ScreenProbeGather.HardwareRayTracing=1 r.LumenScene.DirectLighting.HardwareRayTracing=1 r.ContactShadows.OverrideLengthInWS=1 r.ContactShadows.OverrideLength=25 r.ContactShadows.OverrideShadowCastingIntensity=1 r.ContactShadows.OverrideNonShadowCastingIntensity=1 r.SkylightIntensityMultiplier=0.65 r.ShadowQuality=5 r.Shadow.Virtual.ForceOnlyVirtualShadowMaps=0 r.Shadow.Virtual.ResolutionLodBiasLocal=-2.0 r.Shadow.Virtual.ResolutionLodBiasLocalMoving=-2.0 r.Shadow.Virtual.ResolutionLodBiasDirectional=-1.0 r.Shadow.Virtual.smrt.samplesperraylocal=2 r.Shadow.Virtual.smrt.samplesperrayhair=2 r.Shadow.Virtual.smrt.samplesperraydirectional=2 r.Shadow.Virtual.smrt.texelditherscalelocal=4 r.Shadow.Virtual.SMRT.TexelDitherScaleDirectional=6 r.Shadow.Virtual.ScreenRayLength=0.02 r.Shadow.InsetDownscaleFactor=0 r.Shadow.PerObjectDirectionalDepthBias=0.5 r.Shadow.PerObjectDirectionalSlopeDepthBias=3 r.Shadow.PerObjectSpotLightDepthBias=0.5 r.Shadow.PerObjectSpotLightSlopeDepthBias=3 r.Shadow.ShadowMaxSlopeScaleDepthBias=3 r.Shadow.SpotLightDepthBias=0.5 r.lumen.tracemeshsdfs=1 r.Lumen.TraceMeshSDFs.TraceDistance=240 r.Lumen.ScreenTracingSource=1 r.Lumen.DiffuseIndirect.SurfaceBias=8 r.LumenScene.DirectLighting.UpdateFactor=8 r.LumenScene.Radiosity.UpdateFactor=4 r.LumenScene.Radiosity.MaxRayIntensity=99 r.Lumen.ScreenProbeGather.TraceMeshSDFs=0 r.Lumen.ScreenProbeGather.DownsampleFactor=12 r.Lumen.ScreenProbeGather.MaxRayIntensity=1 r.Lumen.ScreenProbeGather.MaxRoughnessToEvaluateRoughSpecular=2 r.Lumen.ScreenProbeGather.MaxRoughnessToEvaluateRoughSpecularForFoliage=1 r.Lumen.ScreenProbeGather.ScreenTraces.HZBTraversal.SkipHairHits=0 r.Lumen.ScreenProbeGather.ScreenTraces.HZBTraversal.SkipFoliageHits=0 r.Lumen.ScreenProbeGather.ScreenTraces.HZBTraversal.FullResDepth=1 r.Lumen.ScreenProbeGather.ScreenTraces.HZBTraversal.MaxIterations=30 r.Lumen.ScreenProbeGather.ScreenTraces.HZBTraversal.RelativeDepthThickness=0.2 r.Lumen.ScreenProbeGather.ShortRangeAO.ScreenSpace.SlopeCompareToleranceScale=4.0 r.Lumen.ScreenProbeGather.ShortRangeAO.ScreenSpace.FoliageOcclusionStrength=1.0 r.Lumen.ScreenProbeGather.ShortRangeAO.MaxMultibounceAlbedo=0.8 r.Lumen.ScreenProbeGather.ShortRangeAO.ApplyDuringIntegration=0 r.Lumen.ScreenProbeGather.RadianceCache.ProbeResolution=64 r.Lumen.ScreenProbeGather.RoughSpecularSamplingMode=1 r.Lumen.ScreenProbeGather.DiffuseIntegralMethod=0 r.Lumen.ScreenProbeGather.Temporal.MaxFramesAccumulated=4 r.Lumen.Reflections.RadianceCache=1 r.Lumen.Reflections.GGXSamplingBias=0.7 r.Lumen.Reflections.HierarchicalScreenTraces.MaxIterations=96 r.Lumen.Reflections.SmoothBias=0.76 r.Lumen.Reflections.MaxRoughnessToTrace=0.63 r.Lumen.Reflections.Temporal.MaxFramesAccumulated=0 r.Lumen.Reflections.DownsampleFactor=0 r.Lumen.Reflections.HiResSurface=1 r.Lumen.Reflections.SampleSceneColorAtHit=1 r.Lumen.Reflections.SpecularScale=0.8 r.Lumen.TranslucencyVolume.MaxRayIntensity=0.62 r.Lumen.TranslucencyReflections.FrontLayer.Enable=1 r.Lumen.TranslucencyReflections.FrontLayer.Allow=1 r.SSR.Quality=4 r.SSR.MaxRoughness=1 r.SSR.Stencil=1 r.VolumetricFog.GridPixelSize=7 r.VolumetricFog.GridSizeZ=192 r.VolumetricFog.UpsampleJitterMultiplier=0.55 r.VolumetricCloud.EnableLocalLightsSampling=1 r.VolumetricRenderTarget.Mode=3 r.SSS.Scale=3.5 r.SSS.SampleSet=2 r.SSS.Quality=1 r.SSS.HalfRes=0 r.SSS.Filter=1 r.Water.SingleLayerWater.SupportCloudShadow=1 r.ParallelShadowsNonWholeScene=1- Once that’s done, please save the file and close it.
- Next, go to the file’s Properties window and tick the checkbox that says “Read only.”
- Press Okay and close it.
- Launch the game, and “True Epic” settings will be automatically applied.
Final Thoughts
Once you apply the above guide in Silent Hill F, the graphics will appear much better, but with a significant decrease in performance. However, you can utilize DLSS/FSR/XeSS upscaling to regain some of the lost performance. You can also enable the hidden Frame Generation feature to double your frame rates.
We provide the latest news and create guides for Silent Hill F. Meanwhile, you can check out the following articles or catch us playing games on YouTube: