 Facebook
 Reddit
 Email
Email
This guide explains how to use the best Elder Scrolls Online (ESO) One Bar PvE Magicka Necromancer build, skills, gear, champion points, and more!

This build has been updated for the Updated 42, the Gold Road Chapter of the Elder Scrolls Online (ESO).
Why Should You Play ESO One Bar PvE Magicka Necromancer Build?
The ESO One Bar PvE Magicka Necromancer build is a Heavy Attack build that relies on fully charged heavy attacks in combination with champion points, base game gear, and the Oakensoul mythic. This will destroy a parse dummy and complete veteran content with ease. We are also stacking into magicka but still using medium armor for the critical damage passives. You could technically run stamina for heavy attacking as well, but the lightning staff returns magicka with your heavy attacks, making it the overall best choice for these heavy attack builds.
In ESO, the One Bar Magicka Necromancer is perfect for everyone. It’s great for beginners, veterans, and players of any age and experience. It’s easy to understand and doesn’t require bar swapping. Even if you love the higher cpm play of a two-bar build, heavy attack builds are great for just completing dailies or giving your hands a break.
ESO One Bar PvE Magicka Necromancer Features
Below are some of the features found using the Oakensoul Heavy Attack Necromancer in the Elder Scrolls Online:
- Class: Necromancer
- Weapon: Lighting Staff
- Armor Types: 1 Light, 5 Medium, 1 Heavy
- Race: Dark Elf
- Set 1: Deadly Strike
- Set 2: Sergeant’s Mail
- Mythic: Oakensoul ring
- Attributes: 64 Magicka
- Mundus Stone: Thief
- Best Grimoires: Ulfsild’s Contingency, Soul Burst
Related:
ESO One Bar PvE Magicka Necromancer Build Playstyle
Heavy attacking requires you to fully charge attacks in between abilities, and the lightning staff has the strongest heavy attack mechanics. It deals incremental damage before unleashing a large burst of damage in an aoe around your primary target. You essentially play this build in the opposite way of a traditional two-bar build with light attack weaving. Before you complete your heavy attack, you can actually pre-cast an ability, and your character will cast is as soon as they can. It kind of feels like weaving abilities in this way, but you can hold down your left mouse button to instantly start heavy attacking again.
Unstable Wall of Elements actually acts like a pseudo-spammable in this build, which is why we’re opting for the morph that gives you extra damage when reapplying it. If you chose to run Blockade, you would actually always lose a couple of ticks of damage every cast, since the duration doesn’t line up with the heavy attack channel. Instead, recasting it a little early gives you some extra damage as well as ensures you keep a consistent source of off-balance on your targets. Off-balance lasts for 7 seconds and every enemy has a 15 second cooldown after its duration before it can be applied again. The reason why this is so important is it gives us an extra 10% damage through the Champion Point Exploiter.
You’ll get used to the playstyle quickly, and applying the wall of elements will become second nature. You can also use the add-on “DebuffMe” on your PC to track your off-balance buff status.
Skills 1 – High Survivability
One Bar Lightning Staff – Solo | High Survivability Setup
Front Bar Weapon = Lightning staff is the highest damage heavy attack weapon, dealing incremental damage as well as a huge aoe burst at the end of your fully charged heavy attack.
- Lightning Staff
This build rewards you for fully charging heavy attacks and building up stacks of Sergeant’s Mail. Sergeant’s Mail increases the base damage of your heavy attacks prior to any damage multipliers, resulting in a huge overall damage increase. This is the single most important set for your damage, but it is also heavy armor. That means even if you swap the armor on your body, you’ll keep Sergeant’s as your jewelry, staff, and one armor piece. It can be any armor piece, but we recommend your chest piece, as it gives you the most armor benefit from a single piece of heavy armor.
Unstable Wall of Storms (Morph of Wall of Elements | Skill Line : Destruction Staff) – Unstable Wall of Storms acts as a massive damage ground base AoE and the tool we used to proc off balance. Off balance is key to high DPS with the build due to Champion Point passive Exploiter along with huge area damage. You can “spam” or repeatedly cast the skill for an instant explosion doing area damage during “trash” or multiple mob non-boss fights. Consider this an important damage over time to maintain, and remember, an off-balance proc has a 7-second up time and 15-second downtime.
Elemental Susceptibility (Morph of Weakness to Elements | Skill Line : Destruction Staff) – In solo PvE content at the Veteran difficulty, enemies have 18,200 resistances. The closer you get to this total without “spilling” or going over, the better your overall damage will be. Not only does Elemental Susceptibility reduce armor, but it applies three important status effects. An additional reason it remains very strong, it costs zero resources and can be used at very long ranges. Normally this skill isn’t needed in group play because either your tank, healer or another damage dealer will reduce armor. In solo play, it’s all up to you. Razor Caltrops from the Alliance War skill line is a flex skill in this location. The advantage: it costs stamina, and it’s AoE damage, not a single target. This is a great option outside of boss fights.
Blighted Blastbones (Morph of Blastbones | Skill Line : Grave Lord) – Blastbones provides massive area and single target damage as well as corpse creation. Creating and using corpses does a lot for you, including generating ultimate and resource sustain. This morph deals damage. After the ability lands, make sure to consume a corpse using another skill for more damage or resource sustain.
Resistant Flesh (Morph of Render Flesh | Skill Line : Living Death) – Most solo builds require a burst heal, and as a Necromancer Resistance Flesh remains our best option. The morph choice boost our armor and you can cast this repeatedly when in trouble for massive self-healing.
Mortal Coil (Morph of Restoring Tether | Skill Line : Living Death) – As a solo player, we recommend a burst heal and a heal over time. Mortal Coil will do great healing over time, consume a corpse and generate resource sustain. If you feel you have too much survivability and lack damage, slot detonating Siphon in this position. That skill will give you a passive damage increase and massive AoE damage and damage over time when consuming a corpse.
Glacial Colossus (Morph of Frozen Colossus | Skill Line : Grave Lord) – For our ultimate choice, we recommend Glacial Colossus. This skill gives Major Vulnerability to any target hit, which significantly boosts your damage. Moreover, it has a massive area, so it’s great for single-target boss fights and trash or multiple enemy fights. Mage’s Guild Shooting Star and Destruction Staff Elemental Rage are other options in this position.
Skills 2 – Parse Max Damage
One Bar Lightning Staff – Parse | Optimal Damage Setup
Front Bar Weapon = Lightning staff is the highest damage heavy attack weapon, dealing incremental damage as well as a huge aoe burst at the end of your fully charged heavy attack.
- Lightning Staff
Unstable Wall of Storms (Morph of Wall of Elements | Skill Line : Destruction Staff) – Used to proc our off-balance consistently and AoE damage while active.
Skeletal Archer (Morph of Skeletal Mage | Skill Line : Grave Lord) – Skeletal Archer is a strong ability that deals damage over time, and gives you greater critical chance against enemies under 25% health through your passives. Skeletal Archer is unfortunately pretty weak in content, as you can’t control where it aims, so you usually would want to slot the other morph for more aoe damage instead. This is probably the skill you’d drop for a heal if you need it.
Avid Boneyard (Morph of Boneyard | Skill Line : Grave Lord) – Avid Boneyard allows you to use your own synergy, giving you a huge aoe damage increase. In content, you’ll often want to run Unnerving instead though, since you often need a source of Major Breach to get to the penetration cap.
Blighted Blastbones (Morph of Blastbones | Skill Line : Grave Lord) – Blastbones provides massive area and single target damage as well as corpse creation. Creating and using corpses does a lot for you, including generating ultimate and resource sustain. This morph deals damage. After the ability lands, make sure to consume a corpse using another skill for more damage or resource sustain.
Detonating Siphon (Morph of Shocking Siphon | Skill Line : Grave Lord) – In group play, we recommend dropping a sustain or heal skill and picking up something that consumes corpses and does big damage. Detonating Siphon AoE, single target damage is stellar though you need to keep it maintained and try your best to position so it hits the maximum amount of targets.
Glacial Colossus (Morph of Frozen Colossus | Skill Line : Grave Lord) – Colossus remains one of the strongest ultimates in the game due to Major Vulnerability. And in group settings, it’s even more coveted because everyone’s damage skyrockets, including yours. The trick with using this skill is the timing around difficult gameplay mechanics. Use this in conjunction with another player’s Aggressive Warhorn for Major Force, and bigger stats and huge damage to melt through boss phases.
Group Added Utility Skills
One Bar Lightning Staff – Group | Optimal Damage Setup
Front Bar Weapon = Lightning staff is the highest damage heavy attack weapon, dealing incremental damage as well as a huge aoe burst at the end of your fully charged heavy attack.
- Lightning Staff
Unstable Wall of Storms (Morph of Wall of Elements | Skill Line : Destruction Staff) – Use this skill to proc off-balance status effect and extra area and DoT damage.
Unnerving Boneyard (Morph of Boneyard | Skill Line : Grave Lord) – Strong aoe source of Major Breach and offers additional synergies to your group.
Blighted Blastbones (Morph of Blastbones | Skill Line : Grave Lord) – Blastbones provides massive area and single target damage as well as corpse creation. Creating and using corpses does a lot for you, including generating ultimate and resource sustain. This morph deals damage. After the ability lands, make sure to consume a corpse using another skill for more damage or resource sustain.
Skeletal Arcanist (Morph of Skeletal Mage | Skill Line : Grave Lord) – Gives you additional corpses as well as stronger aoe damage in group content.
Detonating Siphon (Morph of Shocking Siphon | Skill Line : Grave Lord) – In group play, we recommend dropping a sustain or heal skill and picking up something that consumes corpses and does big damage. Detonating Siphon AoE, single target damage is stellar though you need to keep it maintained and try your best to position so it hits the maximum amount of targets.
Glacial Colossus (Morph of Frozen Colossus | Skill Line : Grave Lord) – Colossus remains one of the strongest ultimates in the game due to Major Vulnerability. And in group settings, it’s even more coveted because everyone’s damage skyrockets, including yours. The trick with using this skill is the timing around difficult gameplay mechanics. Use this in conjunction with another play Aggressive Warhorn for Major Force, and bigger stats and huge damage to melt through boss phases.
Scribing Skills & Grimoires – Heavy Attack One Bar Build
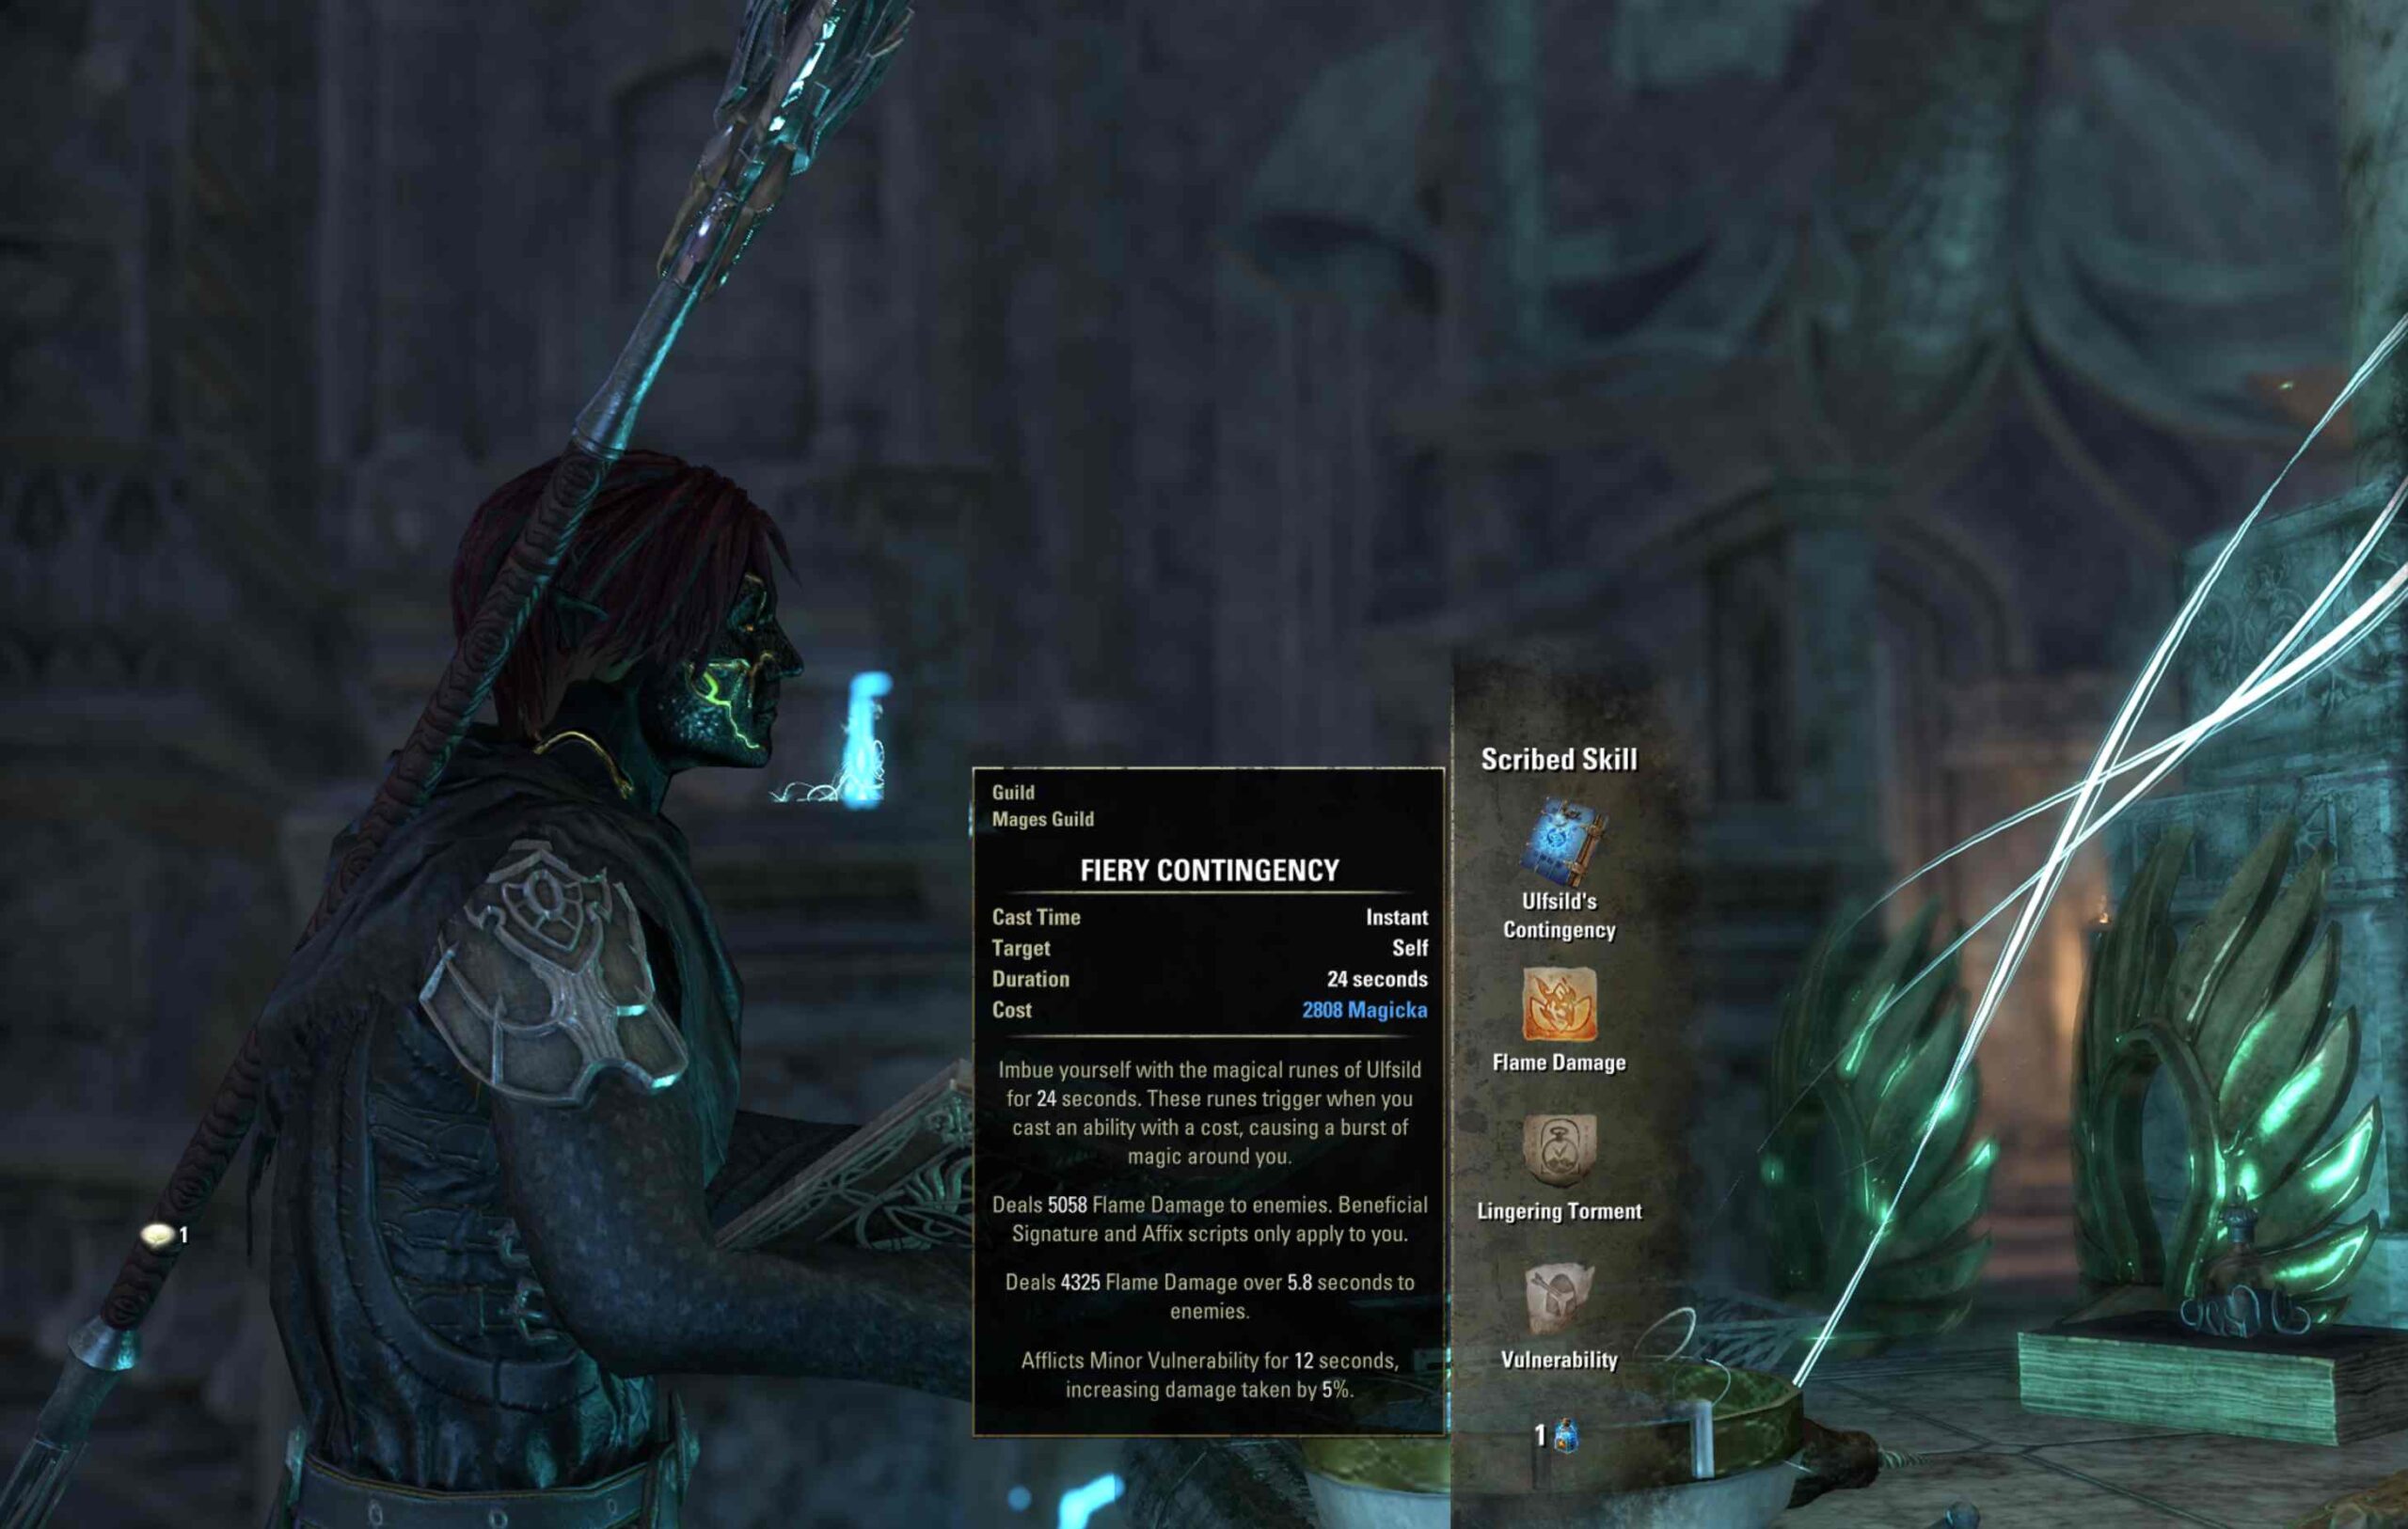
The best Grimoires for a Heavy Attack One Bar Build are Ulfsild’s Contingency or Soul Burst. For heavy attack one bar builds, the Scribing skills are not that applicable. Most are either melee or have a long cast time. One suggested grimoire ability is Ulfslid’s Contingency. This gives you a choice of buffs and debuffs, though it’s explodes from your character. Moreover, the Soul Burst is also helpful because it can pull enemies. This synergizes well with the shorter aoe from your heavy attack. Therefore, we suggest you experiment with these two and find what compliments your build for shields, survivability, and damage.
- Ulfsild’s Contingency (Mage Guild) – Flame Damage (focus script), Lingering Torment (signature script), Vulnerability (Affix Script)
- Soul Burst (Soul Magic) – Pull (focus script), Class Mastery or Lingering Torment (signature script), Courage (Affix Script)
The Scribing System utilizes one of 11 new skills from the Gold Road Chapter called Grimoires. With Grimoires, you can customize spells via Scripts. The scribing feature requires the purchase of the Gold Road Chapter (sponsored link). To learn more about scribing, check out our full guide here.
Passives Skills
Consider taking all of the passives in the below skill trees to increase your builds performance without slotting any skills:
- Grave Lord (class skill line)
- Bone Tyrant (class skill line)
- Living Death (class skill line)
- Destruction Staff (weapon skill line)
- Light Armor
- Medium Armor
- Heavy Armor
- Undaunted
- Mages Guild
- Racial
- Alliance War Support
- Alliance War Assault
- Crafting, Alchemy Medicinal Use
Gear – Best in Slot
Use the below gear setup for optimal damage with the ESO One Bar PvE Magicka Necromancer Build:
| Slot | Type | Set | Trait | Glyph |
| Head | Light | Slimecraw | Divines | Magicka |
| Shoulders | Medium | Deadly Strike | Divines | Magicka |
| Chest | Heavy | Sergeant’s Mail | Divines | Magicka |
| Legs | Medium | Deadly Strike | Divines | Magicka |
| Gloves | Medium | Deadly Strike | Divines | Magicka |
| Boots | Medium | Deadly Strike | Divines | Magicka |
| Belt | Medium | Deadly Strike | Divines | Magicka |
| Weapon One | Lightning Staff | Sergeant’s Mail | Precise | Flame |
| Necklace | Sergeant’s Mail | Bloodthirsty | Spell Damage | |
| Ring 1 | Mythic | Oakensoul ring | Bloodthirsty | Spell Damage |
| Ring 2 | Sergeant’s Mail | Bloodthirsty | Spell Damage |
While this is a magicka build, we use Medium Armor specifically to get closer to the critical damage cap of 125%. If you’re under the penetration cap of 18,200, you’ll want to swap your monster helm to a one piece pen item like Valkyn Skoria. Thus, medium armor with specific gear sets will outperform light in most content.
Monster Helms & Mythics
Slimecraw: Obtained from Wayrest Sewers 1, a base game dungeon. The best 1pc critical damage bonus piece in the game. Pen is also a good option, but this is considered best in slot for a one-piece.
Oakensoul: Obtained through ESO Mythics/antiquities system. You need the 5 Leads here to create the mythic. The best one-bar build for DPS because it gives an insane amount of buffs, freeing up bar spots and making us tankier with zero effort. It also gives Empower, which is what makes your heavy attacks hit so hard.
FLEX OPTIONS
- Iceheart, Grundwulf, Stone Husk, Zaan – All one piece with critical chance, just not as much as Slimecraw.
- Lady Malygda, Valkyn Skoria – One piece penetration sets which are great when you’re not at penetration cap.
Gear Sets
Deadly Strike: Obtained in Bruma Elite Gear Vendor, Cyrodiil zone (base game). Best medium body damage option since Storm Master was nerfed.
Sergeant’s Mail: Obtained in the Wayrest Sewers I & II dungeon, Stormhaven zone (base game). This builds stacks by heavy attacking; at 5x stacks, it pumps your base heavy attack damage before damage multipliers, giving you a massive damage increase. The downside is that it comes in heavy, thus putting on jewelry, weapons, and 1x body.
FLEX OPTIONS
- Storm Master – Okay DPS set though Deadly is better currently.
- Tarnished Nightmare – A powerful new set that does lower single target, but more area damage for one bar builds.
- Noble Duelist – Longer and more consistent buff, but less dps and requires melee distance.
- Pillar of Nirn – Good front bar proc damage set.
Race
The best racial choice for the one bar heavy attack PvE Build is below:
- Dark Elf: Gain max magicka, stamina, and weapon and spell damage. Dark Elf is considered the strongest overall PVE DPS race.
- High Elf: Gain resource sustain passive, max magicka, and weapon and spell damage. The downside of High Elf is a lack of stamina.
- Khajiit: This race gets recovery, max stats, and critical damage and healing. Consider the Khajiit a great option if you aren’t over the critical cap of 125%.
Attributes
The best choice for slotting Attribute points is 64 magicka, which increases damage, healing, and shields.
Mundus Stone
The Thief is the best Mundus Stone for PvE Builds because it gives Increases Weapon and Spell Critical Strike chance.
Champion Points
| Craft | Warfare | Fitness |
| War Mount | Weapons Expert | Boundless Vitality |
| Gifted Rider | Fighting Finesse | Celerity |
| Treasure Hunter | Master-at-Arms | Fortified |
| Steed’s Blessing | Exploiter | Rejuvenation |
Warfare Constellation Champion Points
Below is a step-by-step method for slotting your champion points in the Warfare tree (blue). We have used the minimum possible to reach 4 slottable selections all maxed out. If you have more CP, consider taking more in the passives for optimal performance.
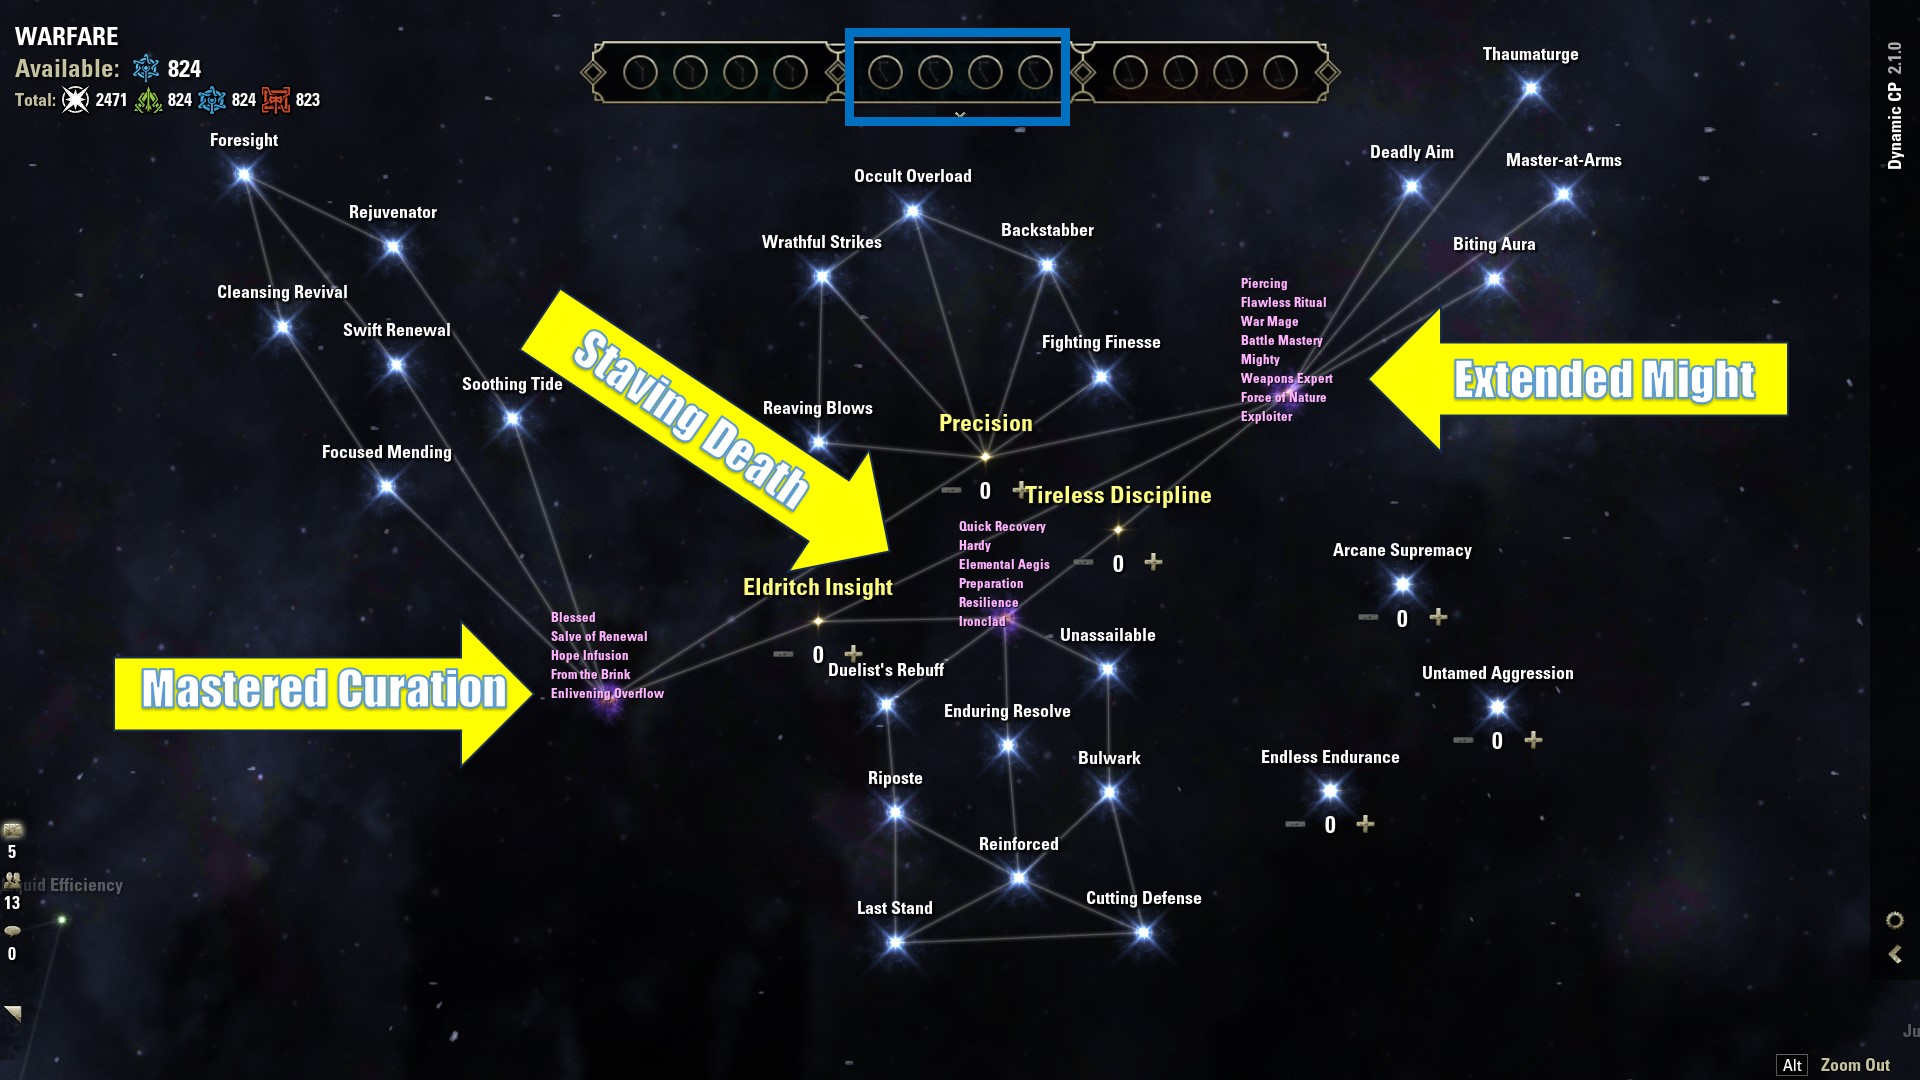
Below are recommended Warfare Champion Point selections for the ESO One Bar PvE Magicka Necromancer Build:
- Precision 10
- Fighting finesse (slottable) 50
- Extended Might sub-constellation – piercing 10
- Extended Might sub-constellation – weapons expert (slottable) 50
- Extended Might sub-constellation – exploiter (slottable) 50
- Master’s at arms (slottable) 50
This would be the bare minimum setup, spending 220 CP (660 total required). The next step is to max out passives, that do not require a slottable but increase performance.
- Precision 10
- Piercing 10
- Tireless discipline 20
- Eldritch insight 20
- Blessed 20
- Quick recovery 20
- Flawless ritual 40
- War mage 30
- Battle mastery 40
- Mighty 30
- Elemental aegis 20
- Hardy 20
- Preparation 20
This would max out the Warfare tree with all active and passive champion points at 520 spent 1,560 total spent.
Fitness Constellation Champion Points
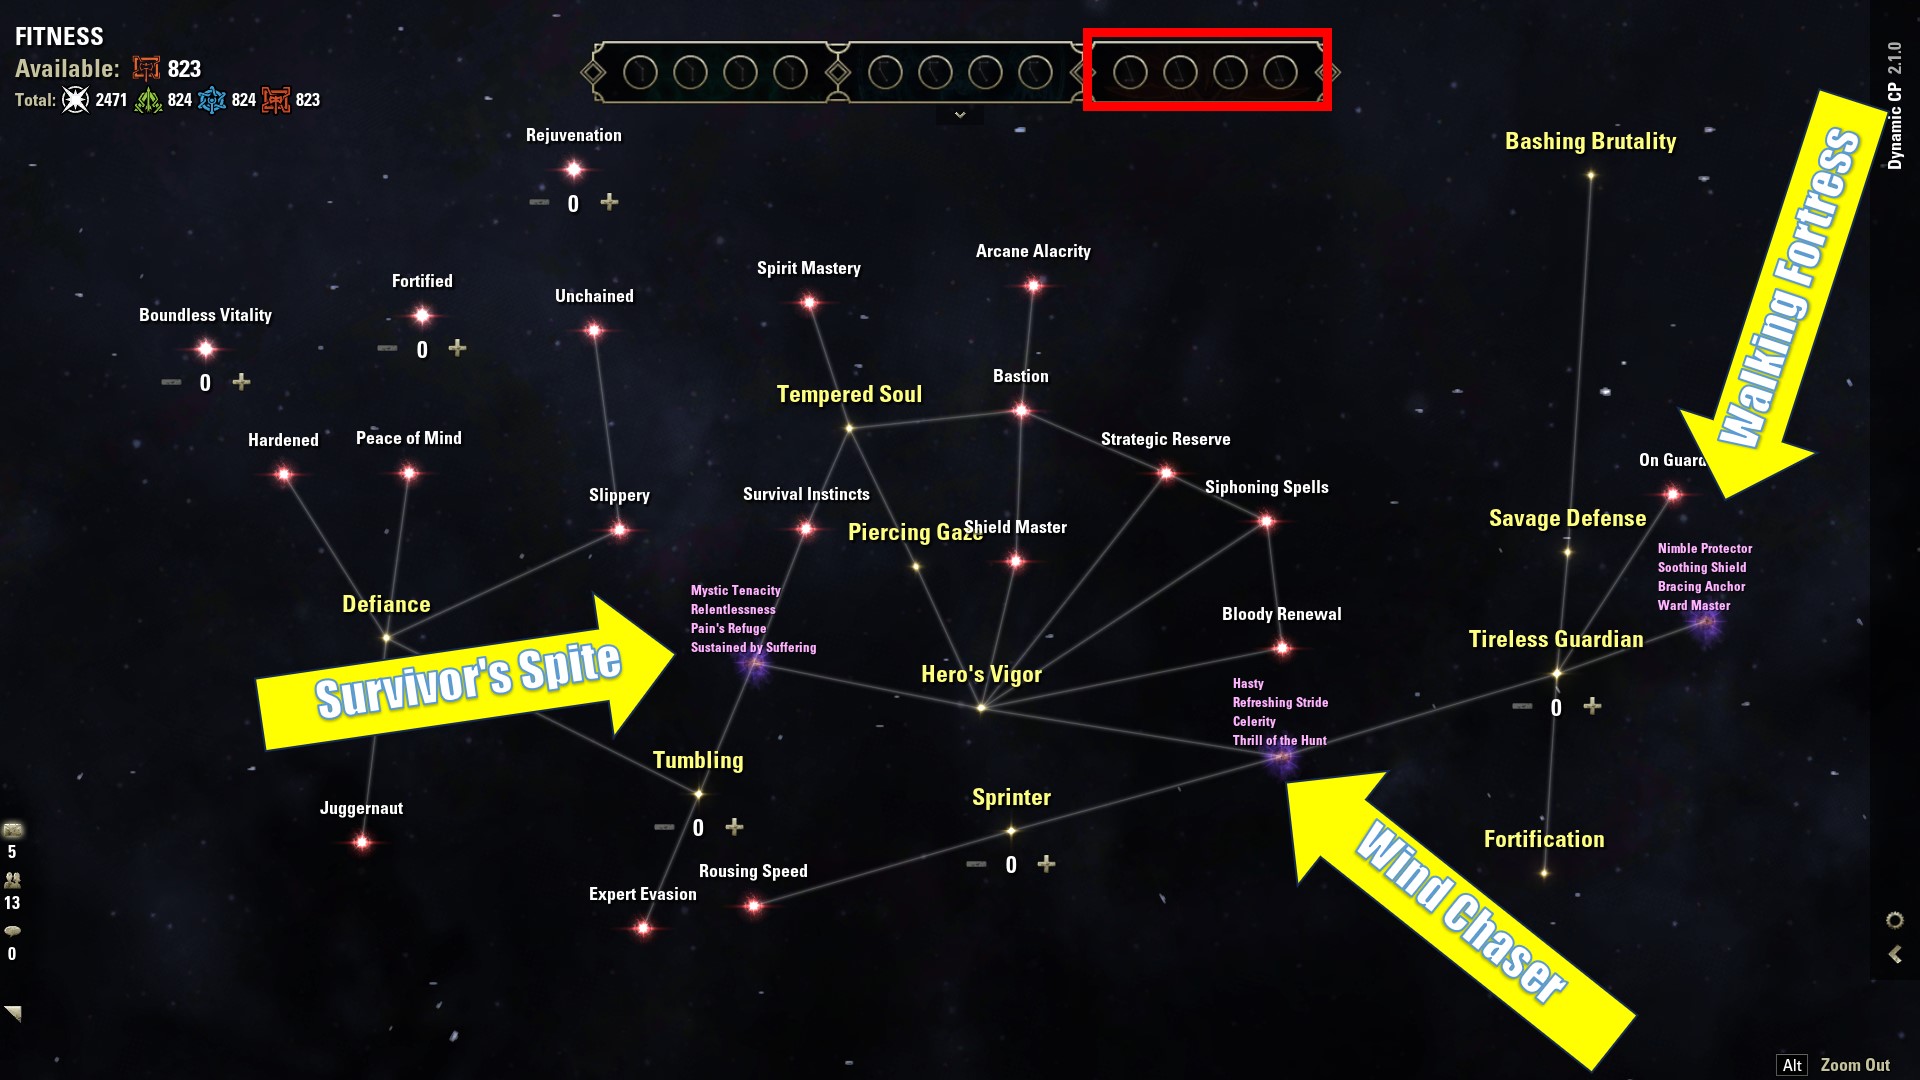
Below are recommended Fitness Champion Point selections for the ESO One Bar PvE Magicka Necromancer Build:
- Boundless vitality (slottable) 50
- Fortified (slottable) 50
- Rejuvenation (slottable) 50
- Sprinter 10
- Winder chaser sub-constellation – hasty 8
- Hero’s Vigor 10
- Celerity (slottable) 50
This would be the bare minimum setup, spending 228 CP (684 total required). The next step is to max out passives, that do not require a slottable but increase performance.
- Hero’s Vigor 10
- Tumbling 30
- Sprinter 10
- Defiance 20
- Hasty 8
- Tireless guardian 20
- Fortification 30
- Nimble 6
- Mystic tenacity 50
- Tempered soul 50
- Piercing gaze 30
- Savage defense 30
- Bashing brutality 20
This would max out the fitness tree with all active passive champion points at 542 cp spent and 1,626 total spent.
Craft Constellation Champion Points
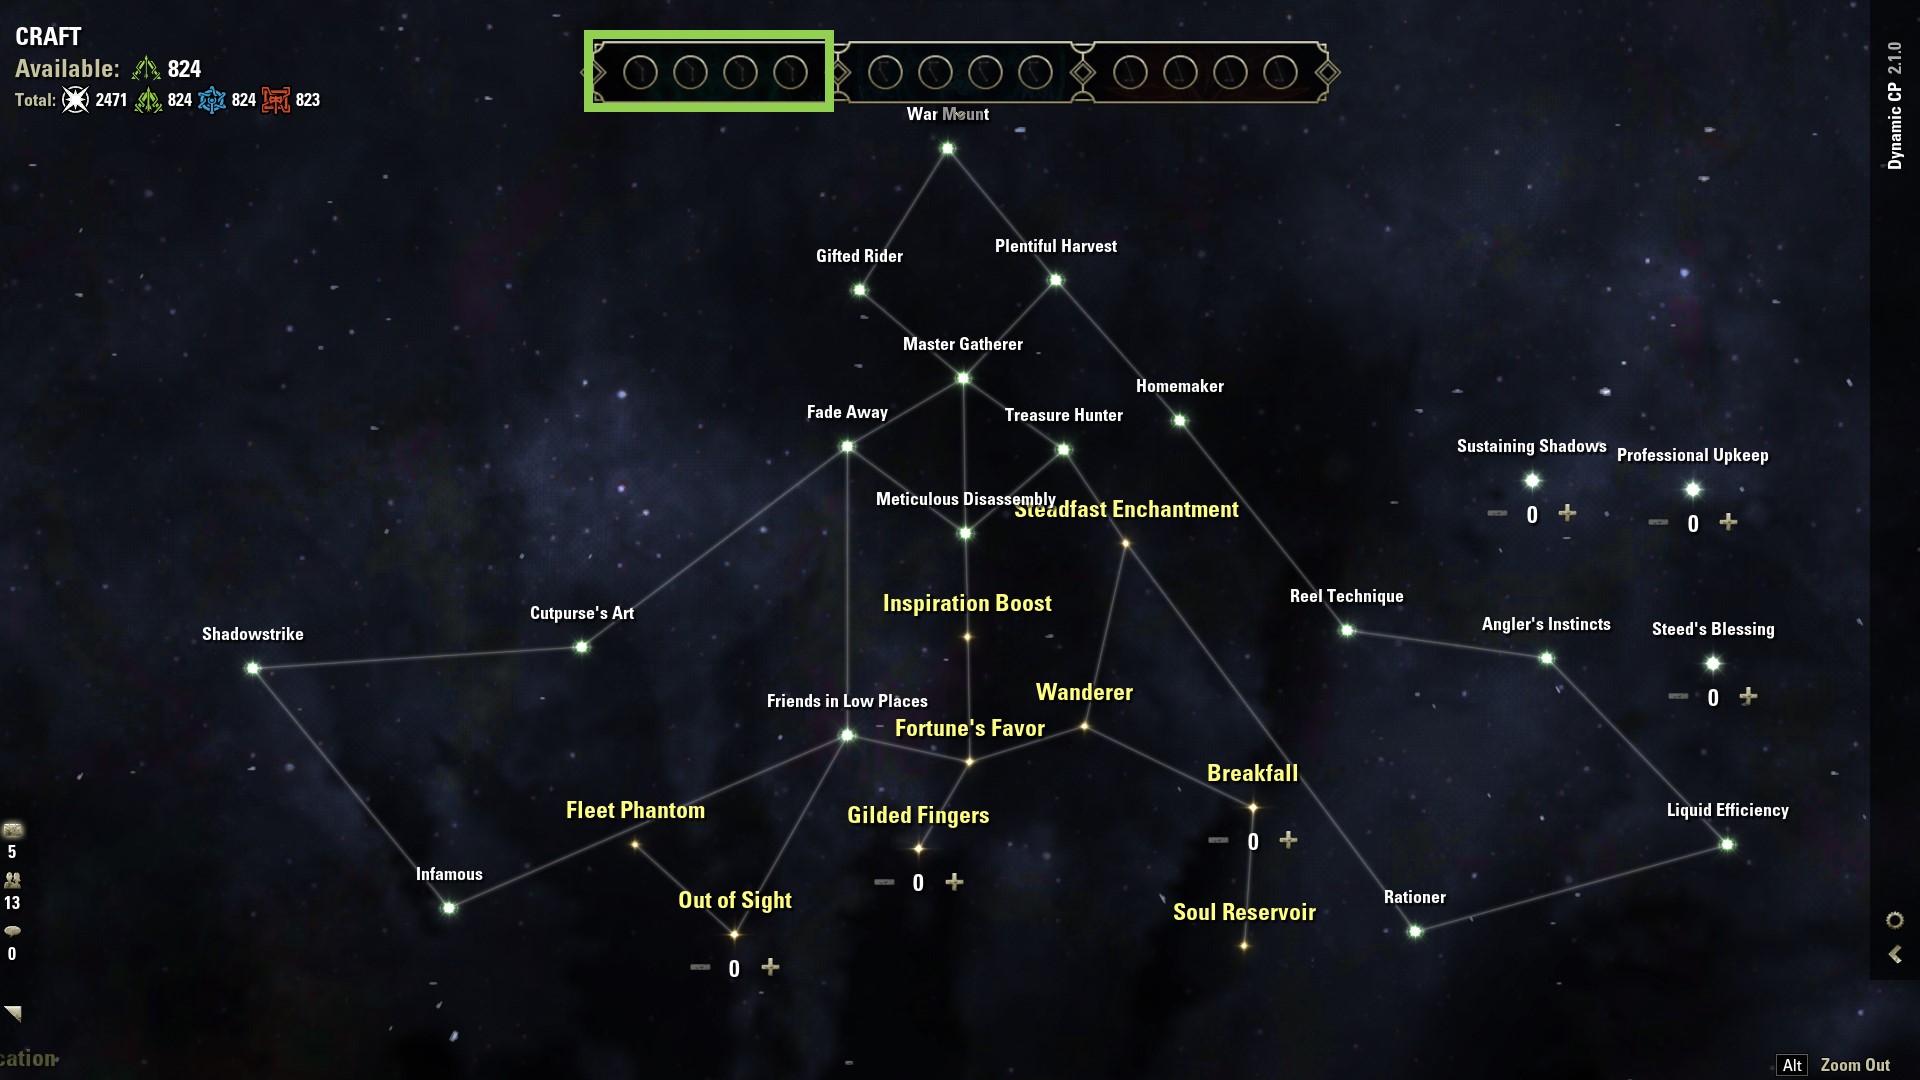
Below are recommended Craft Champion Point selections for the ESO One Bar PvE Magicka Necromancer Build:
- Steed’s blessing (slottable) – 50
- Breakfall 10
- Wanderer 15
- Steadfast 10
- Treasure hunter 50 (slottable)
- Master gatherer 15
- Gifted rider (slottable) 100
- War mount (slottable) 120
This would be the bare minimum setup, spending 370CP (1110 total required). The next step is to max out passives, that do not require a slottable but increase performance.
- Steadfast enchantment 40cp
- Breakfall 40 cp
- Wanderer 60
- Fortunes favor 10
- Rationer 10
- Friends in low places 25
- Out of sight 30
- Fleet of phantom 40
- Soul’s reservoir 33
- Gilded fingers 50
- Fortunes favor 40
- Inspiration boost 45
- Infamous 30
This would max out the crafting tree with all active passive champion points at 823 cp spent 2,469 total spent
Consumables – ESO One Bar PvE Magicka Necromancer Build
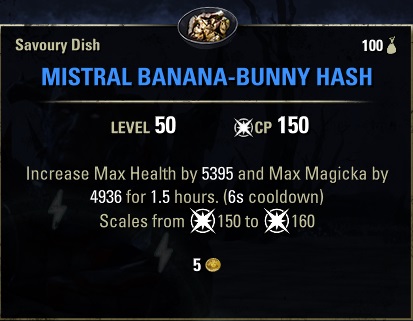
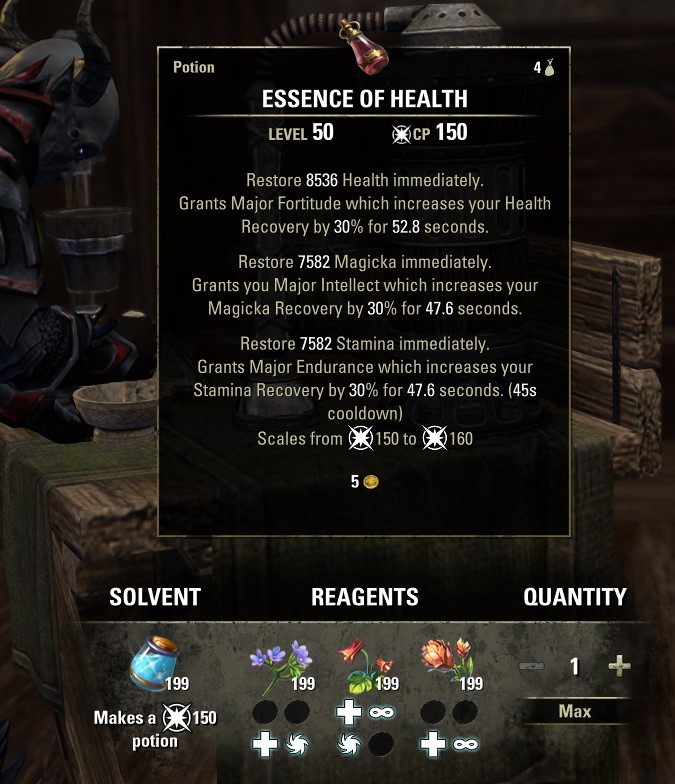
The best consumables for a Necromancer One Bar Heavy Attack build are Mistral Banana-Bunny Hash and Essence of Health tri-stat potions. Mistral Banana-Bunny Hash give a massive boost to magicka and health, and you really shouldn’t struggle with sustain with a heavy attack build. For your potions, tri-stat potions are the best to passively give you a flood of resources and tri-recovery with the alchemy passive medicinal use. Below are our recommended food and potion choices:
- Mistral Banana-Bunny Hash: Increase Max Health by 5395 and Max Magicka by 4936 for 1.5 Hours. Ingredients: Bananas (1), Seasoning (1), Small Game (1).
- Bewitched Sugar Skulls: Increase Max Health by 4620, Max Stamina and Max Magicka by 4250, and Health Recovery by 462 for 2 hours. They are crafted from provisioning with ingredients of Scrib Jelly, Flour, Columbine, Bervez Juice, and Honey.
- Tomato Garlic Chutney (parsing) increases max magicka. Crafted with provisioning of tomato and garlic ingredients.
- Essence of Health (tri-stat): Restore Health, Magicka, and Stamina immediately and increase your Health Recovery, Magicka Recovery, and Stamina Recovery. They are crafted from provisioning with ingredients of Bugloss, Columbine, and Mountain Flower.
Build Summary – Elder Scrolls Online (ESO) Magicka Necromancer One Bar PvE
Class: Necromancer
Race: Dark Elf
Attributes: Magicka 64
Mundus Stone: Thief
Weapon: Lighting Staff
Armor: 1 Light, 5 Medium, 1 Heavy
Set 1: Deadly Strike
Set 2: Sergeant’s Mail
Monster Helm: Slimecraw
Mythic: Oakensoul ring
Food: Mistral Banana-Bunny Hash
Potion: Essence of Health with Tri Restoration
Skill Bar
- Blighted Blastbones
- Elemental Susceptibility
- Resistant Flesh
- Mortal Coil
- Unstable Wall of Storms
- Glacial Colossus
Scribing Grimoires and Scripts
- Ulfsild’s Contingency
- Flame Damage (focus script)
- Lingering Torment (signature script)
- Vulnerability (Affix Script)
- Soul Burst
- Pull (focus script)
- Class Mastery (signature script)
- Courage (Affix Script)
Looking For More ESO Builds?
Thank you for reading the ESO One Bar PvE Magicka Necromancer Build Guide. We provide the latest news and create guides for ESO. Also, watch me play games on Twitch or visit my YouTube channel!