Facebook
 Reddit
 Email
Email
Unlock these vital fast travel points with our Enshrouded: All Ancient Spires and How to Complete Them guide!
This guide has been updated for the Souls of the Frozen Frontier update.
Enshrouded: All Ancient Spires and How to Complete Them
In Enshrouded, the Ancient Spires are incredibly tall towers that you can unlock as fast travel points by finding your way to the very top. Moreover, completing them will reveal additional ancient knowledge of Embervale. This will include unlocking new points of interest on your map where you can find additional treasures, as well as the location of incredibly important flame sparks.
However, getting to the top of the spires isn’t as easy as simply climbing a bunch of stairs. There will be various locked doors, traps, and puzzles you will need to overcome. Keep reading to discover how to unlock all of them in our Enshrouded: All Ancient Spires and How to Complete Them guide!
Enshrouded is currently in Early Access on Steam, and therefore players do not yet have access to the entire map. So far, there are just five Ancient Spires that can be unlocked across Embervale. Let us walk you through Enshrouded All Ancient Spires and How to Complete Them.
Related:
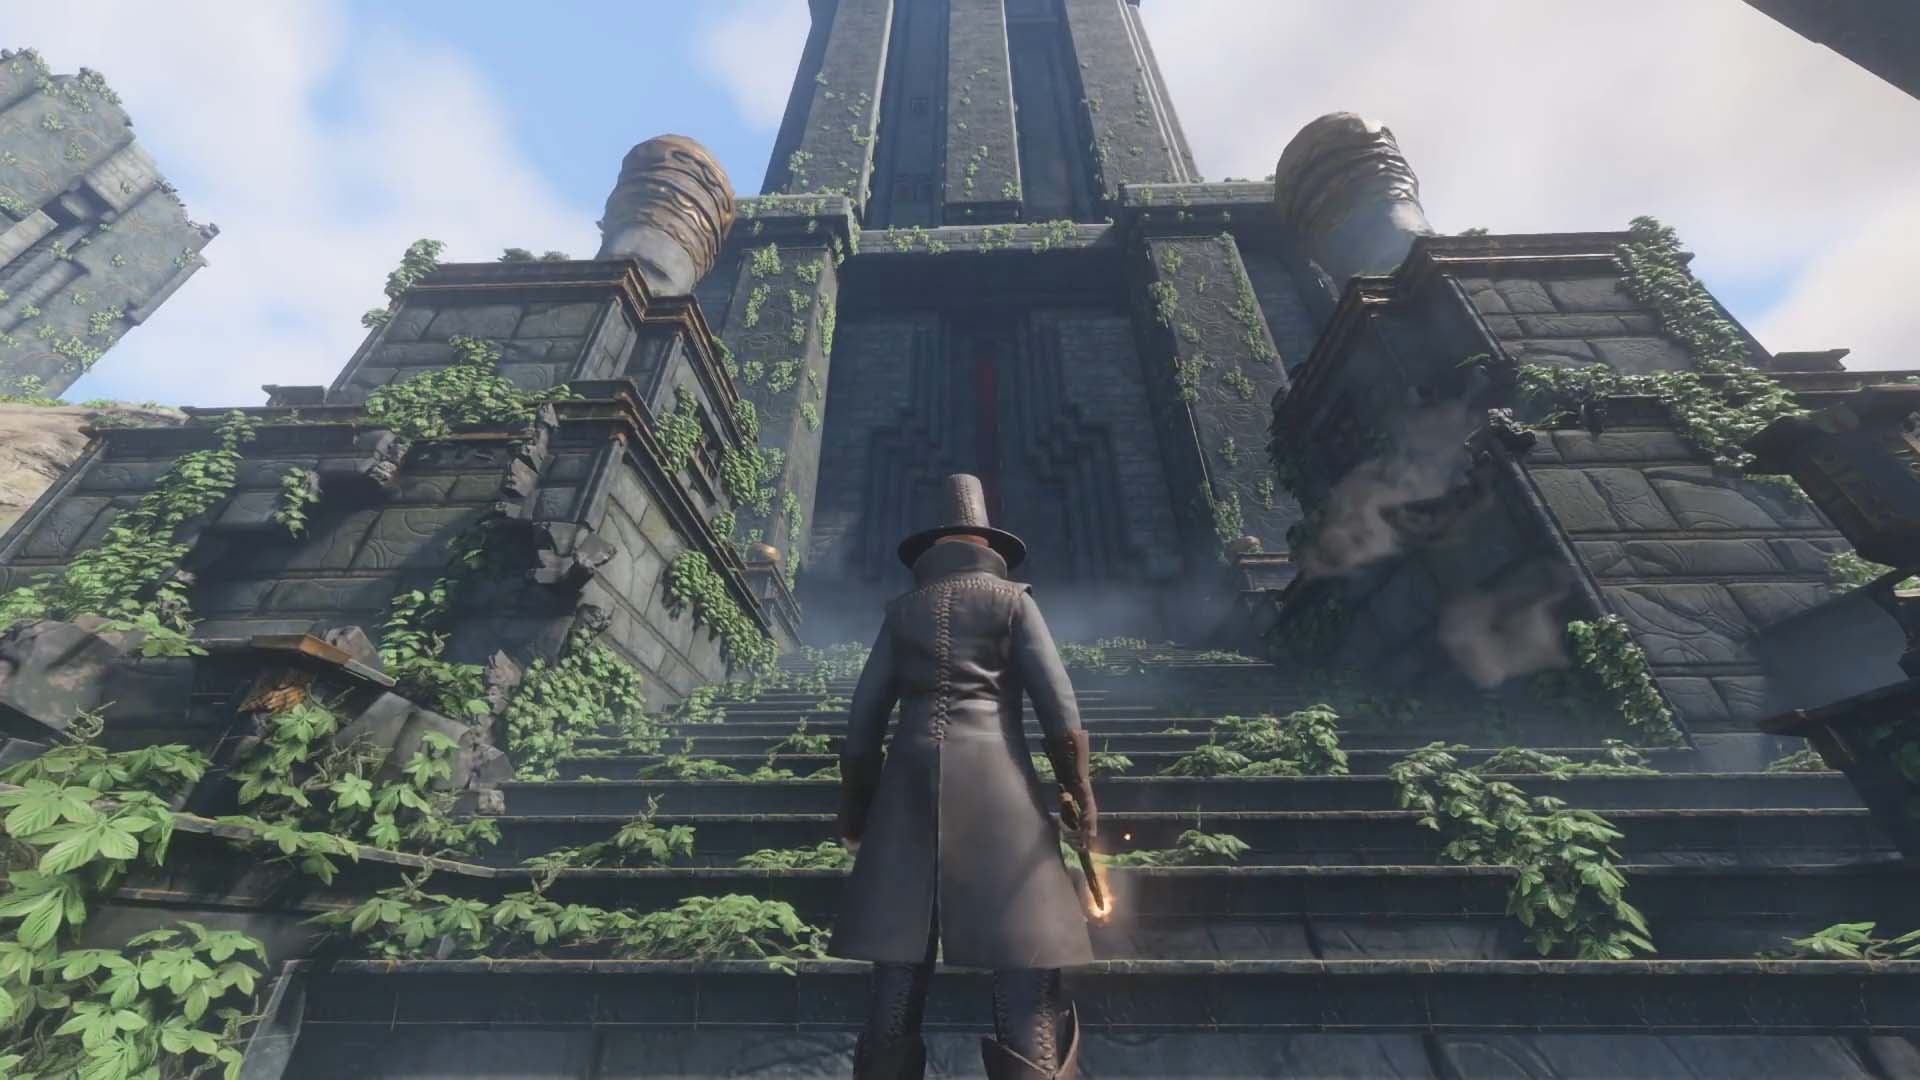
Springlands Ancient Spire
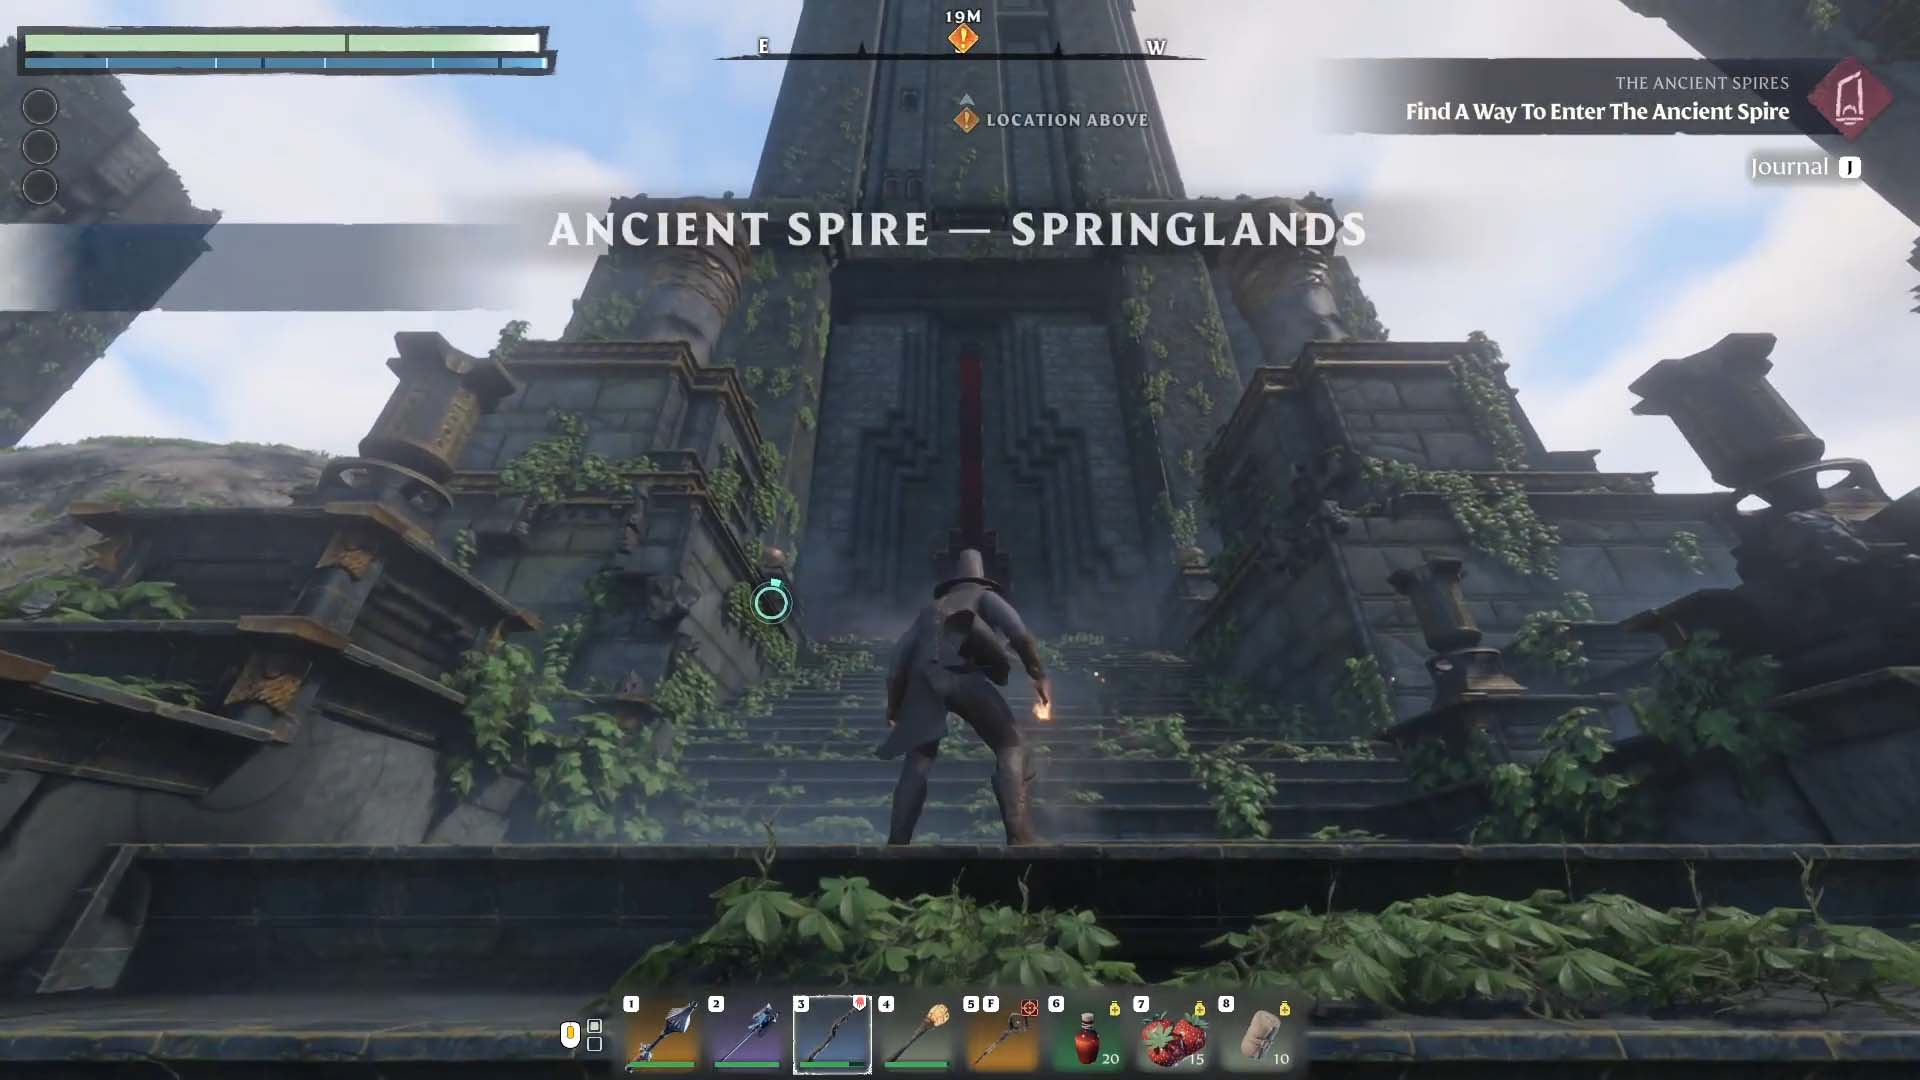
Springlands is the first of the Ancient Spires you can unlock, but to get there you will need first need to find the Blacksmith so that you can craft the Grappling Hook. Finding and awakening the Blacksmith is one of the earliest quests in the game, so you should be able to complete these first steps early on. Find the Blacksmith, craft a Workbench, find the necessary materials, and then craft your grappling hook.
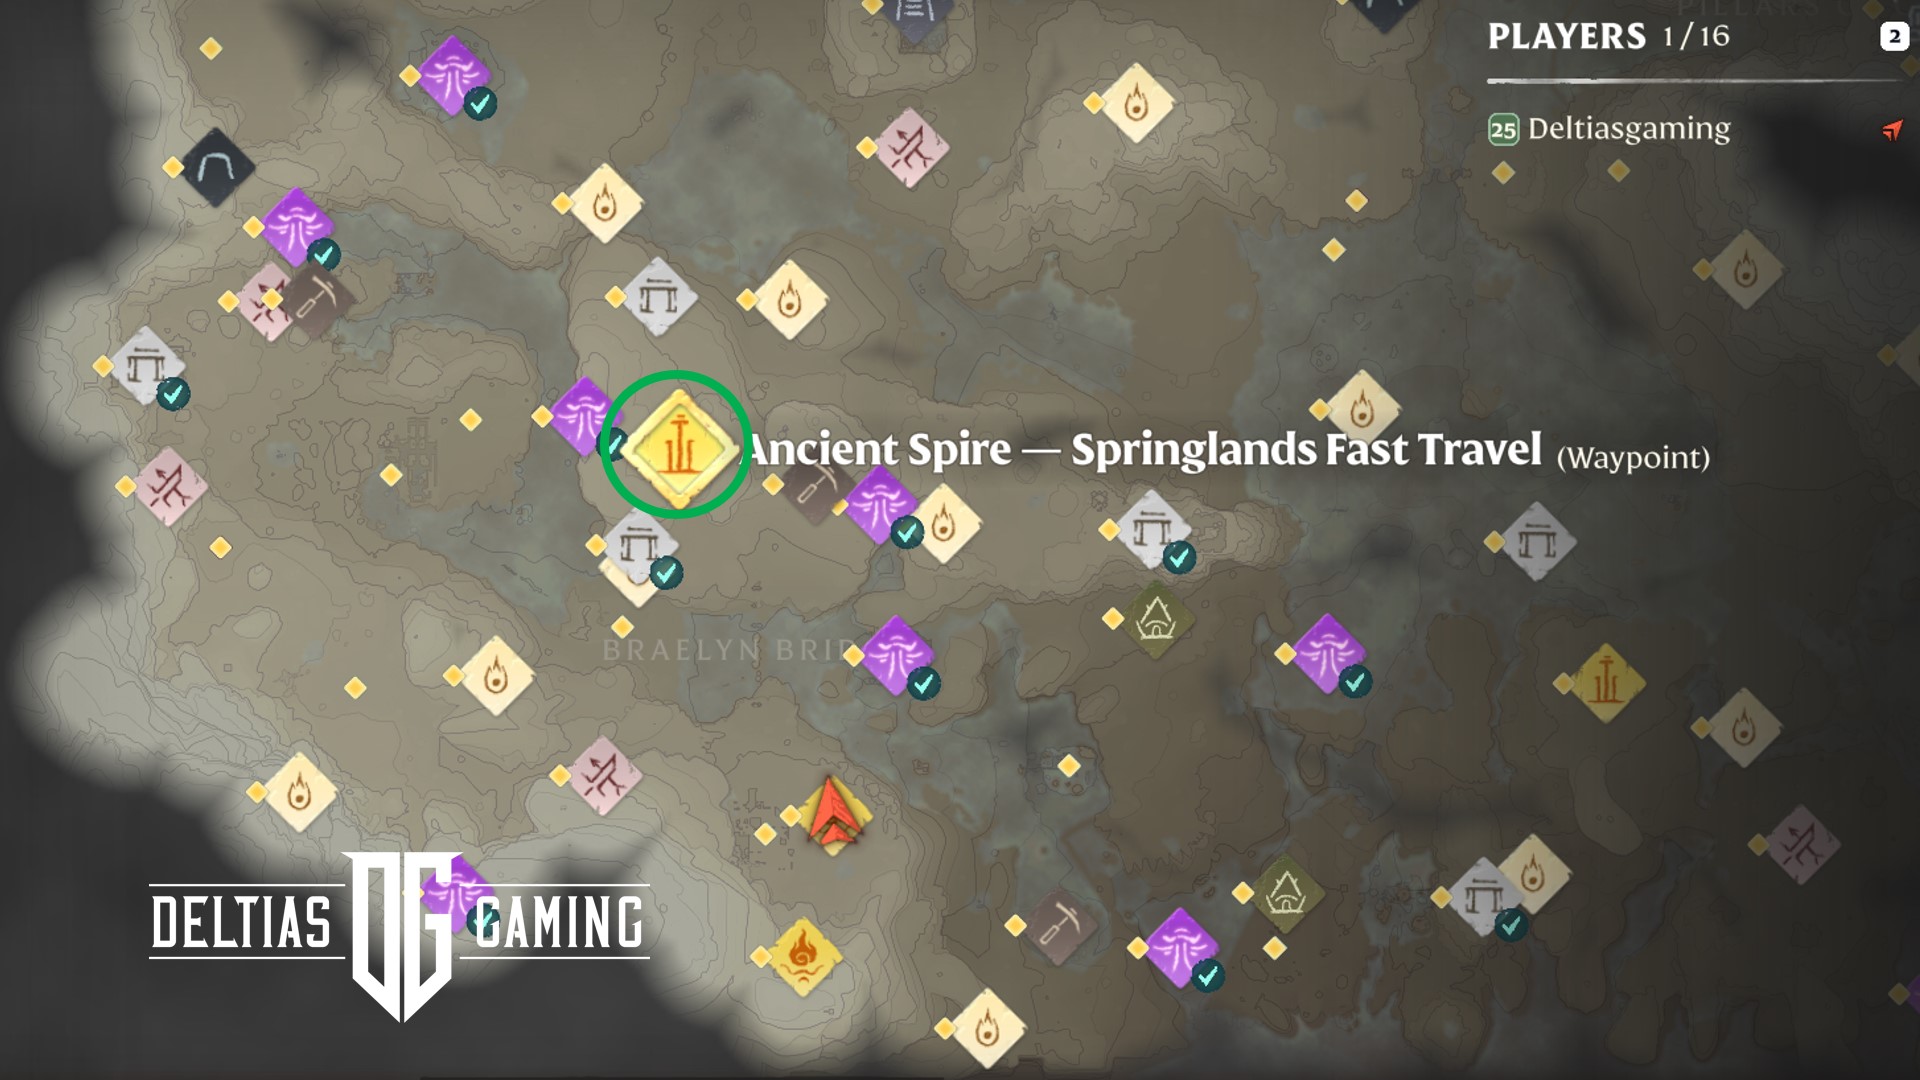
Now you can make your way to the location of the Springlands Ancient Spire. Head for the Braelyn Bridge, which should be roughly northwest of where you established your first Flame Alter. Cross the bridge and you don’t have far to go. Keep heading north. The Sprindlands spire is on top of a hill and you’ll have to walk past it north and then swing around to the left/west to walk up to it from the back.
Climbing the Springlands Spire
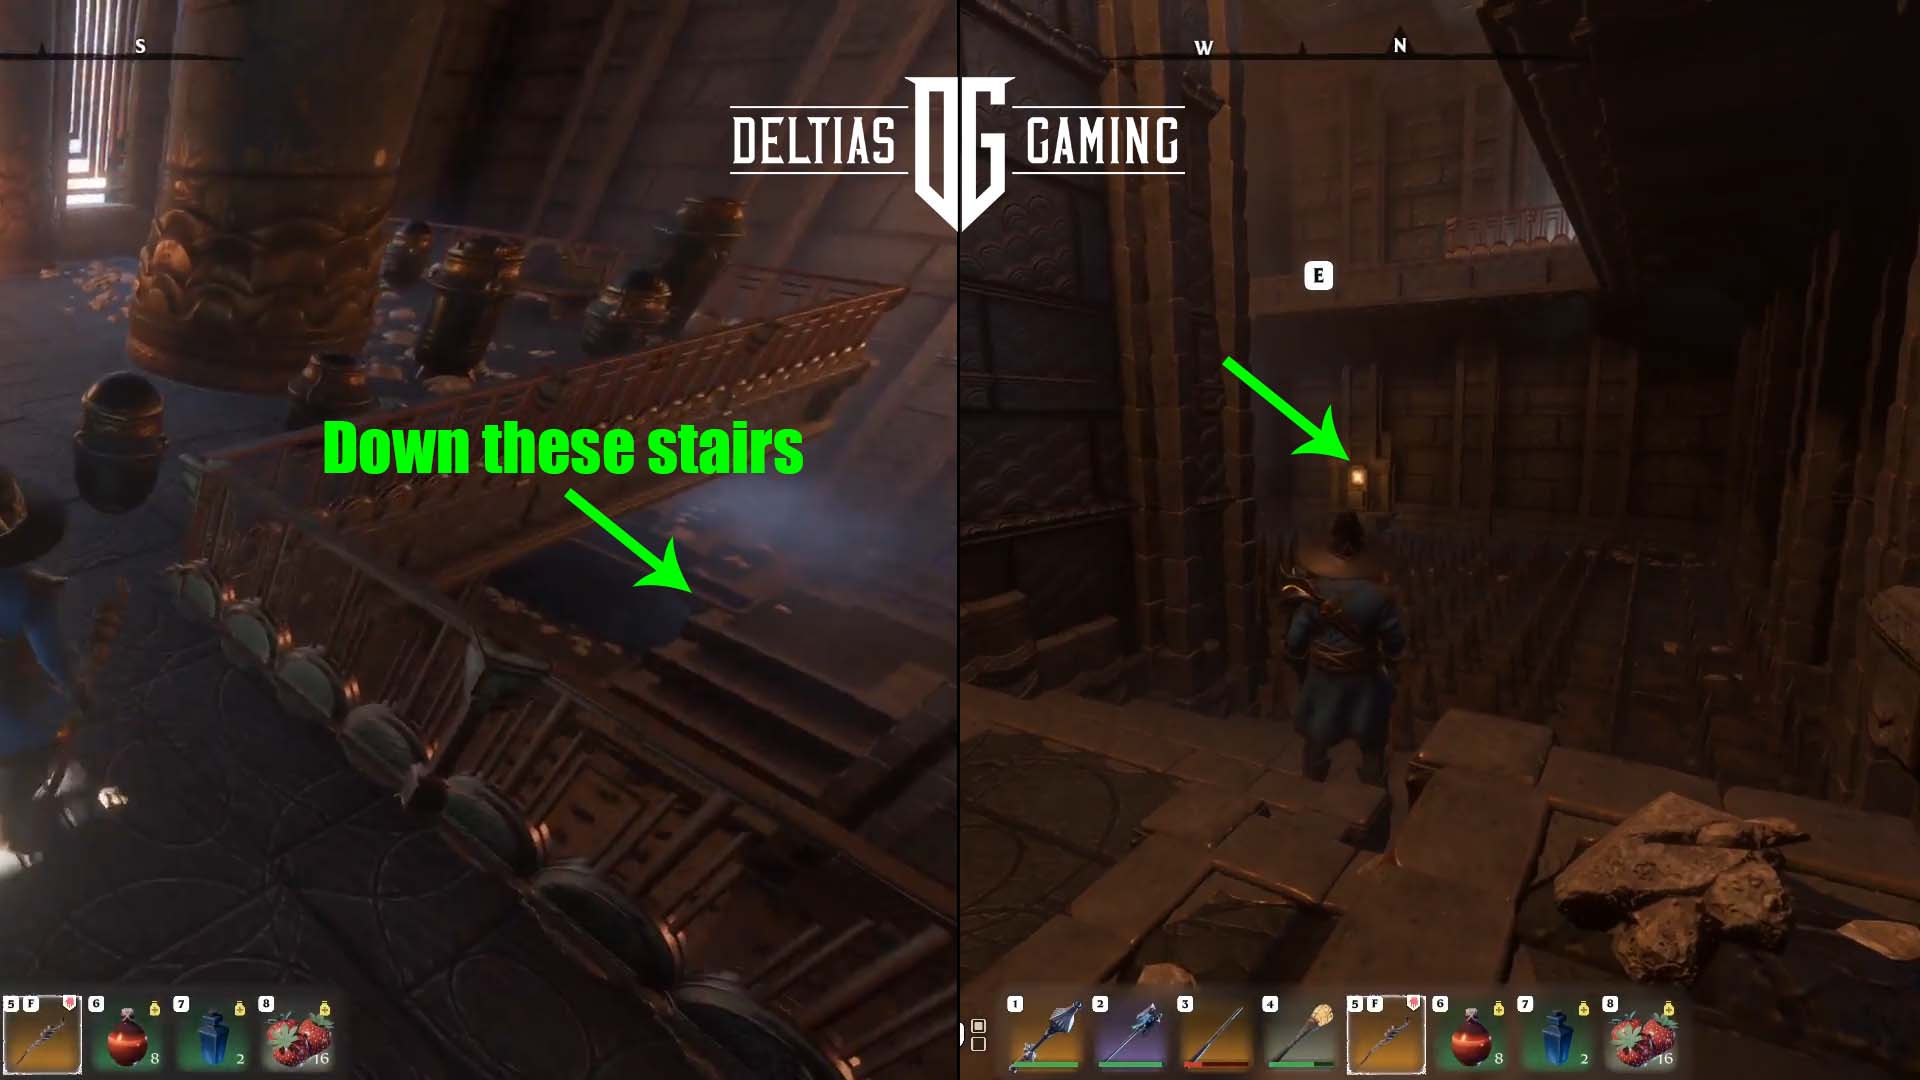
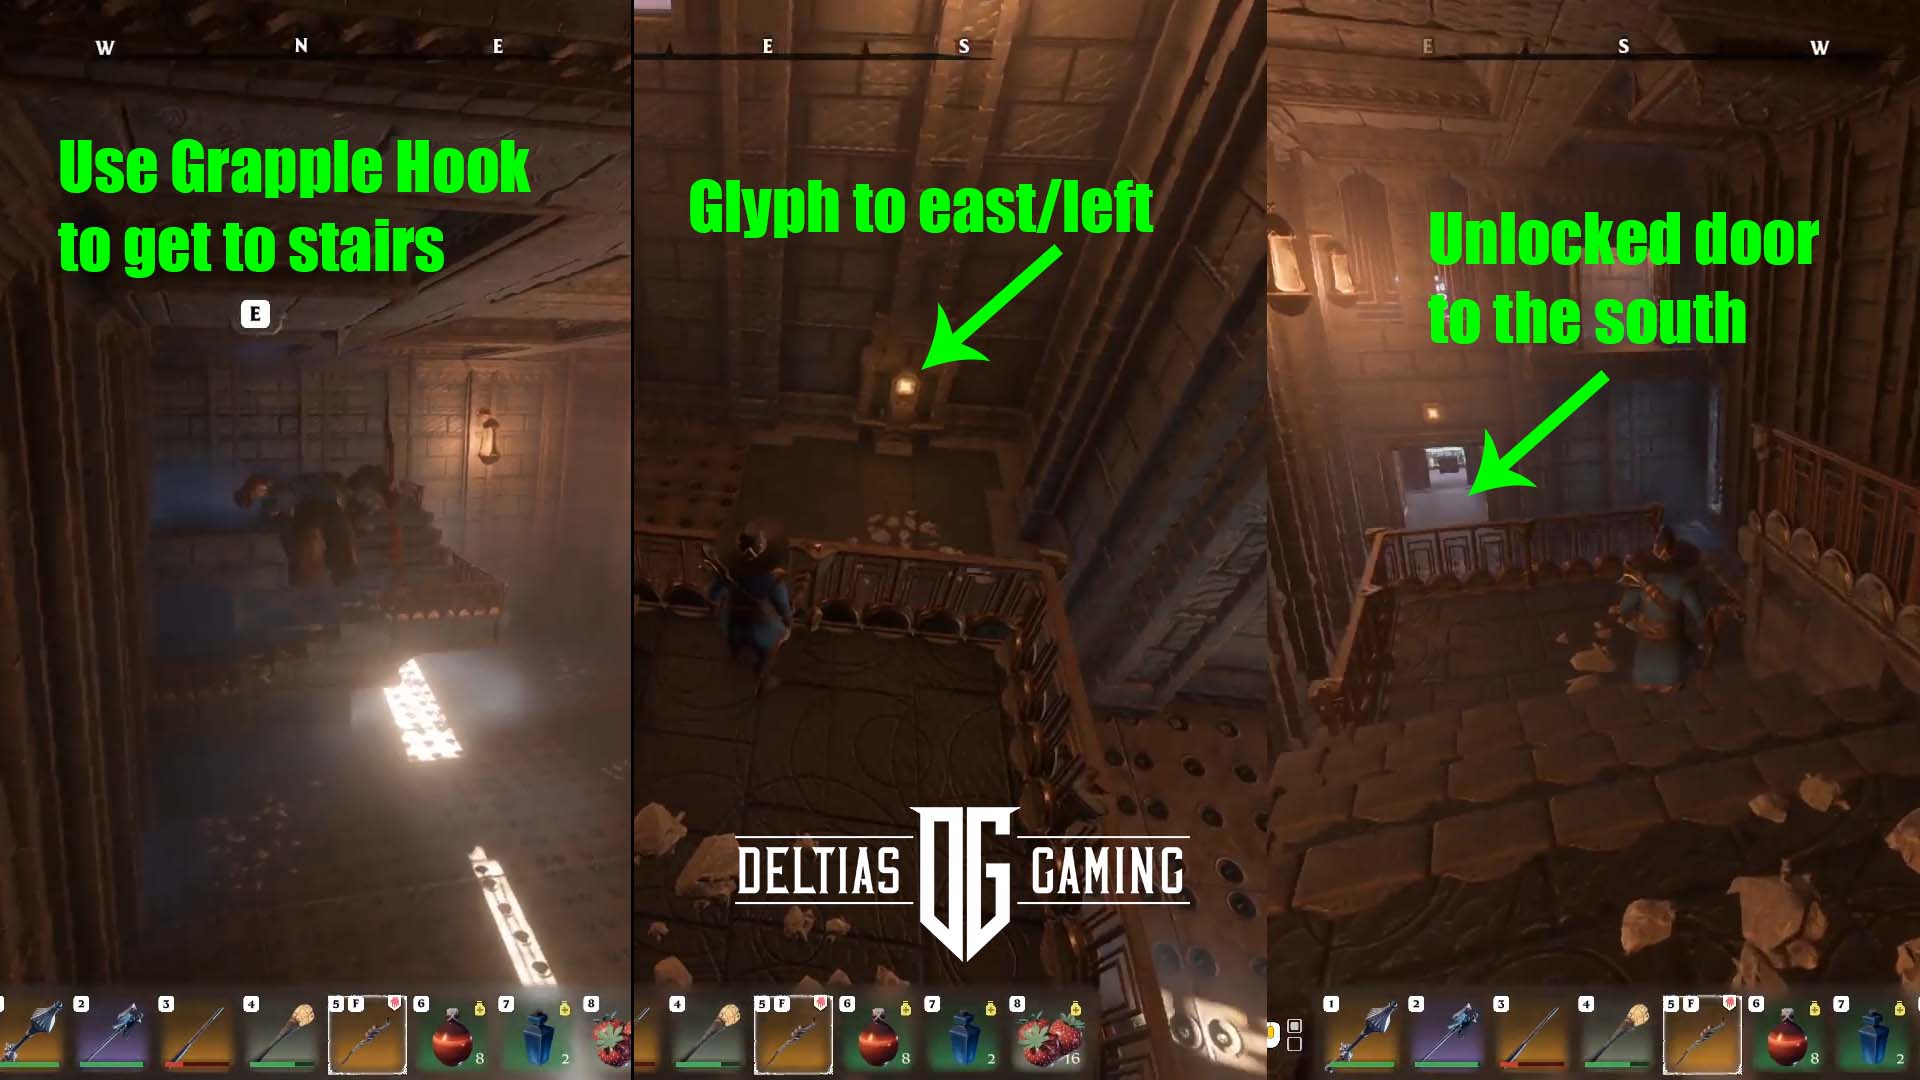
Head up the stairs and directly inside. Step on and ‘Use’ the glowing red teleport pad. This will take you up and inside the tower, beginning the puzzle. As you arrive in the interior space you’ll see a small staircase ahead and to the right. Head up the stairs to the top of a small platform. Look across to the south and you should see a door on the other side of the room. Jump across and press E to use your grappling hook to swing over the door.
Head through the door and go down the hallway to the left. Use the grappling hook again to pull yourself across the open gap. Then interact with the nearby teleport pad.

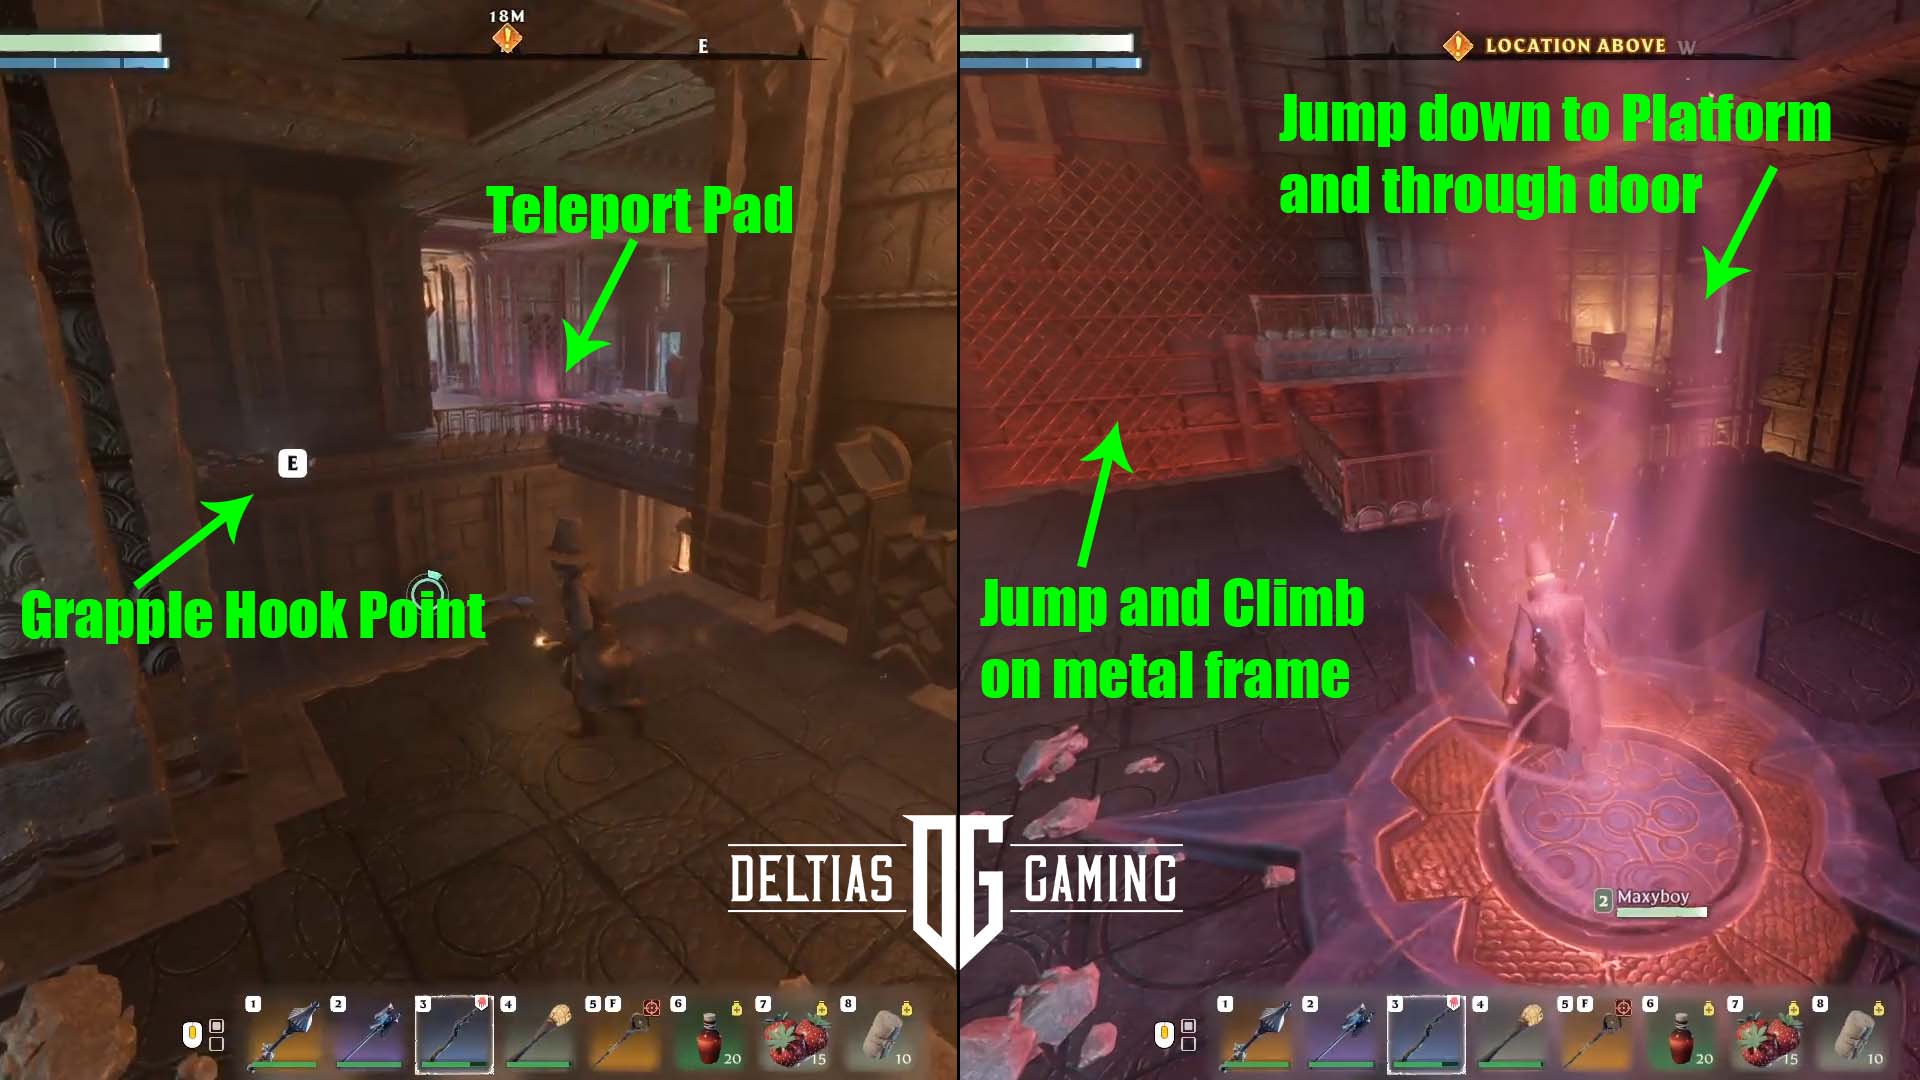
Springlands Spire Second Floor
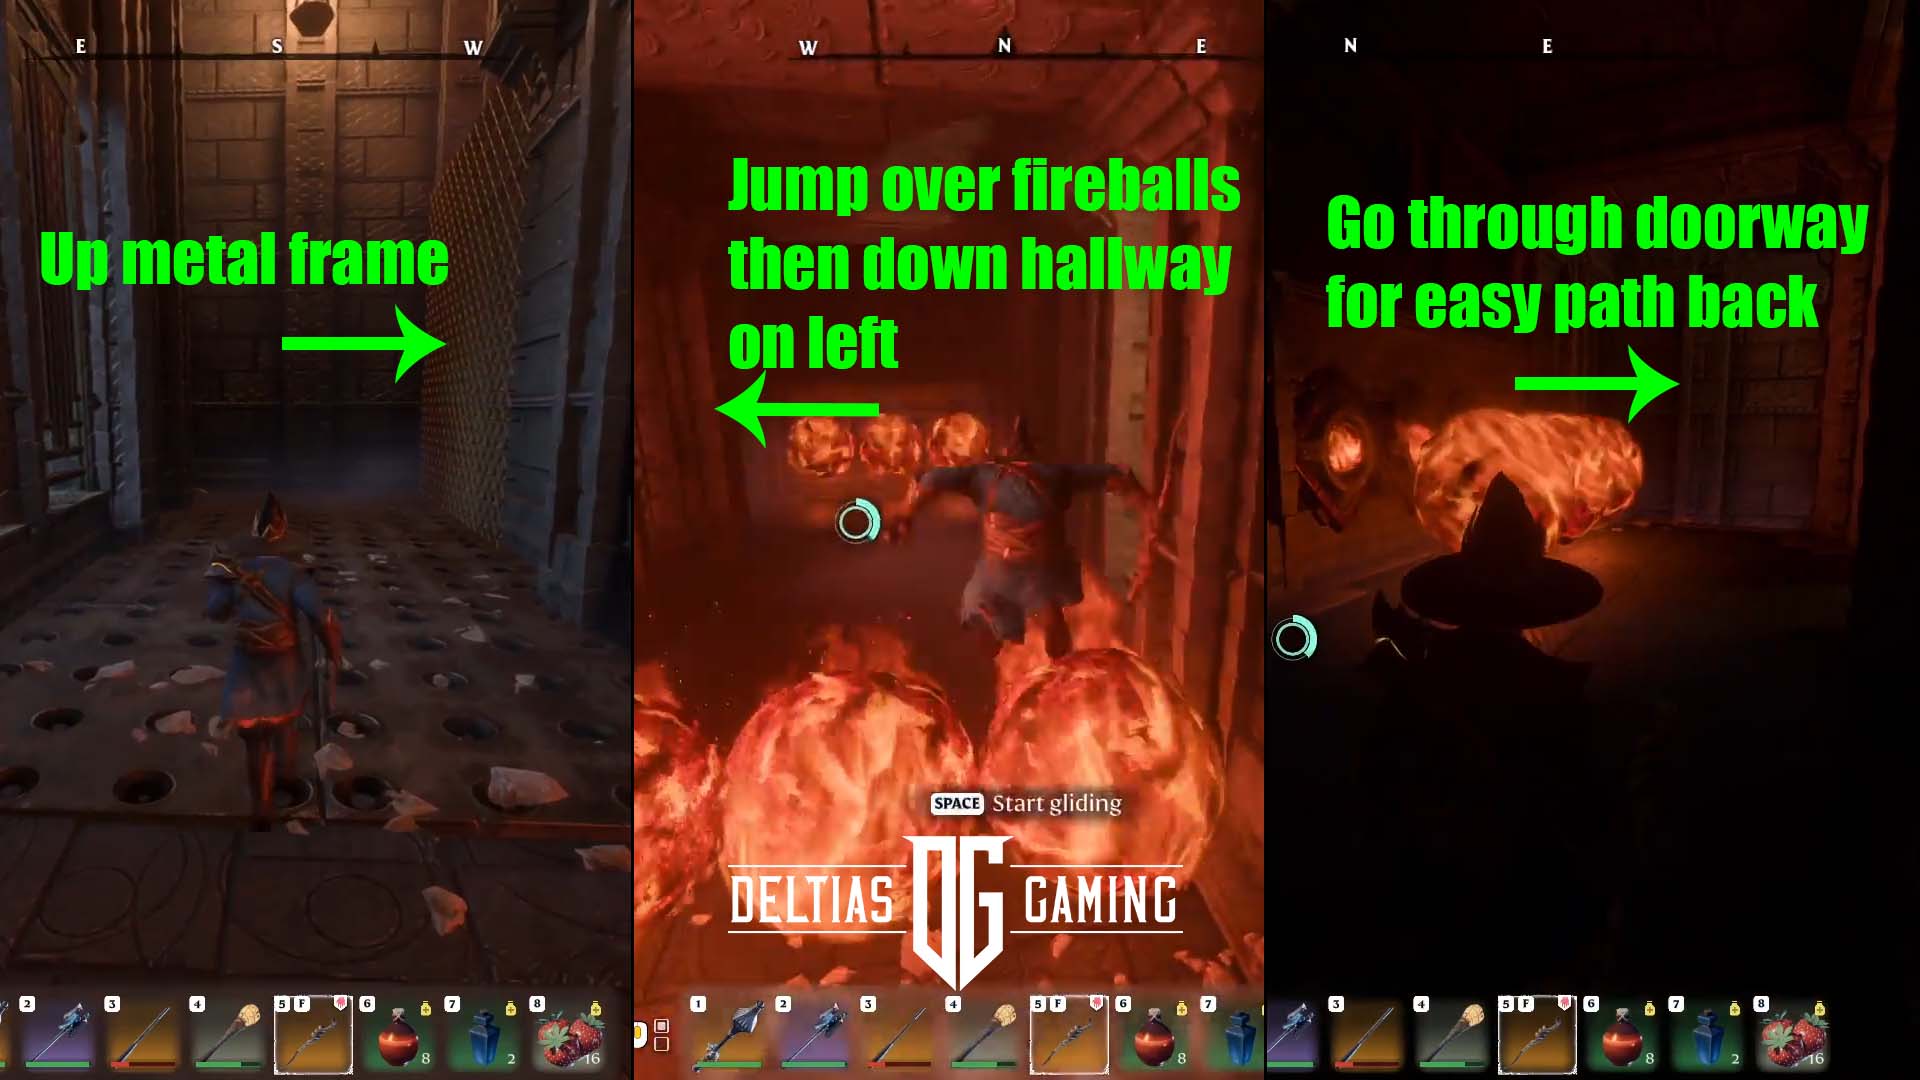
From this new room, jump across the gap on the left side and grab and climb on the metal frame to the platform on the right. Move to the west and jump across the small gap to the platform just below. Head left and follow the stairs down, then use the teleport pad you see.
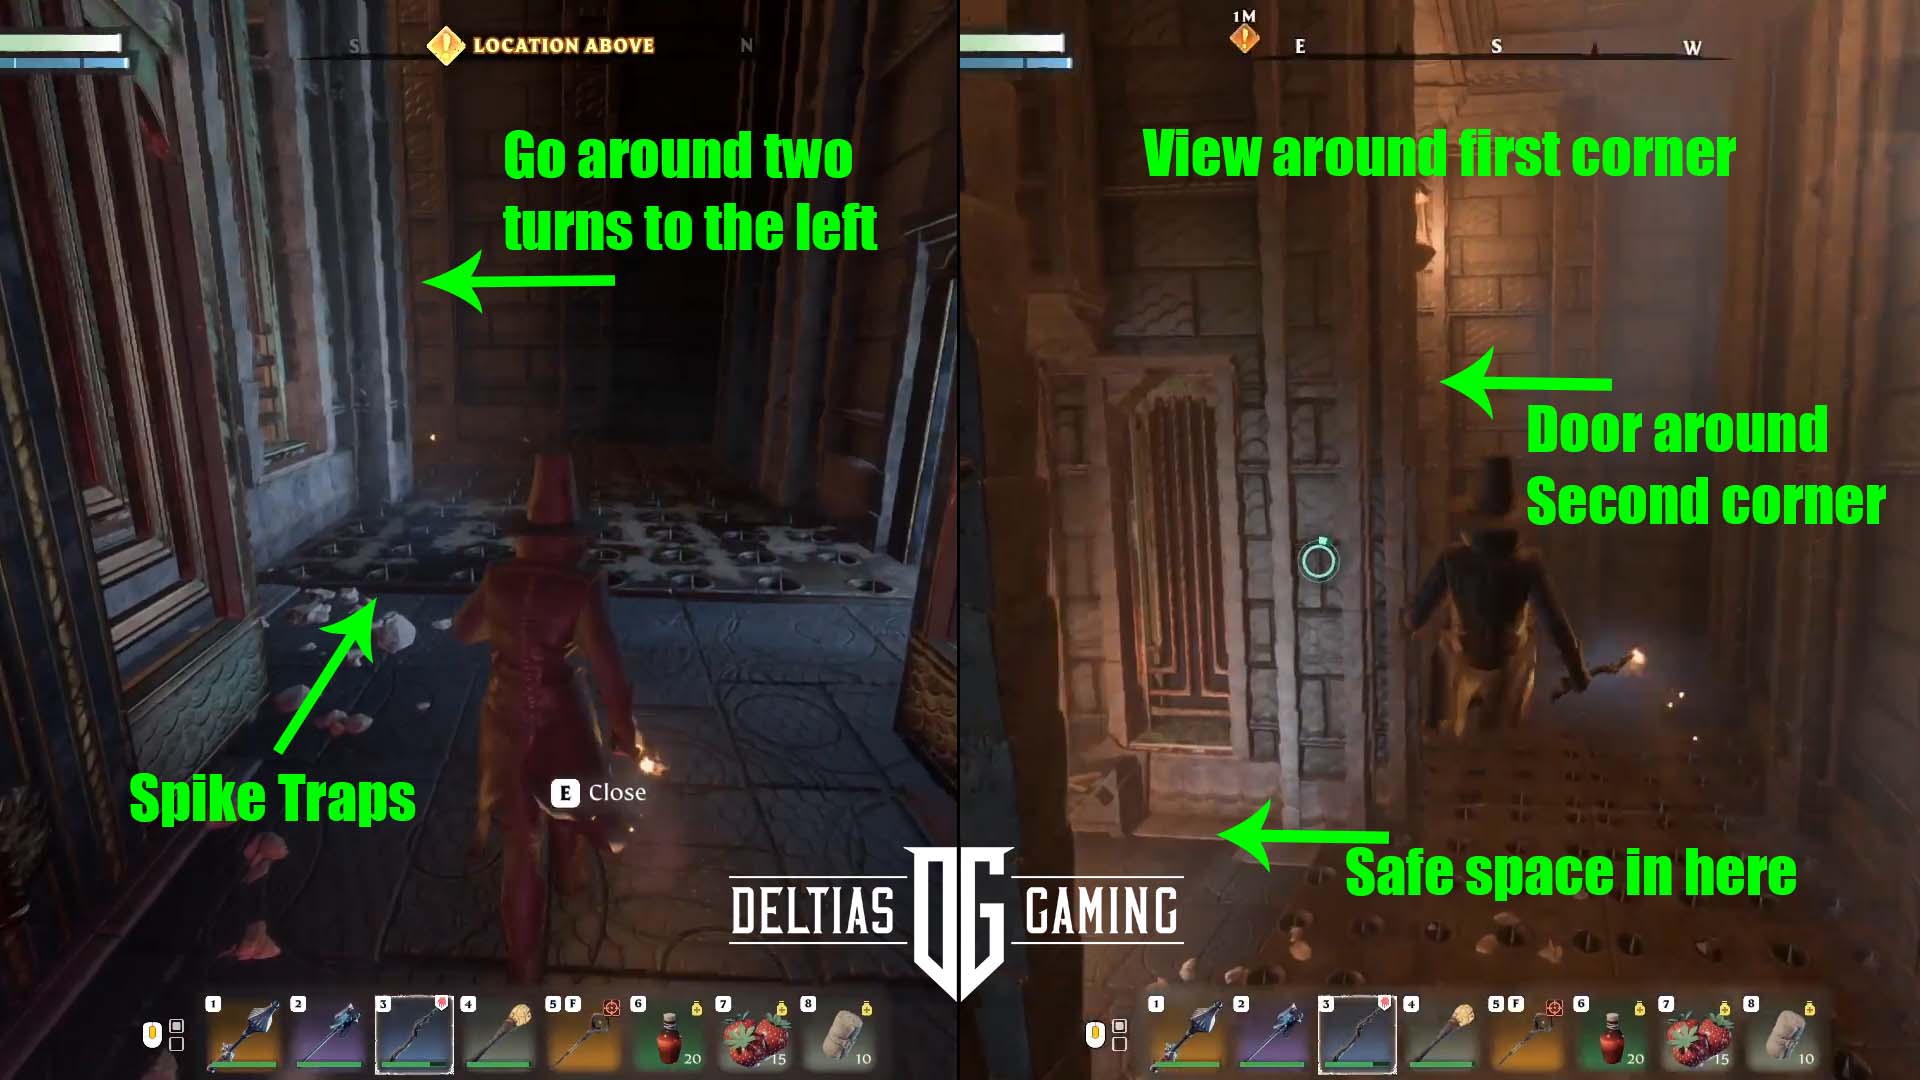
Head through the door right in front of you and then be careful in this next space. There are spike traps on the floor ahead. The path will go around two turns to the left. There is also a ‘safe space’ on the left after you make the first turn. Time your run, and you can get around without taking injury.
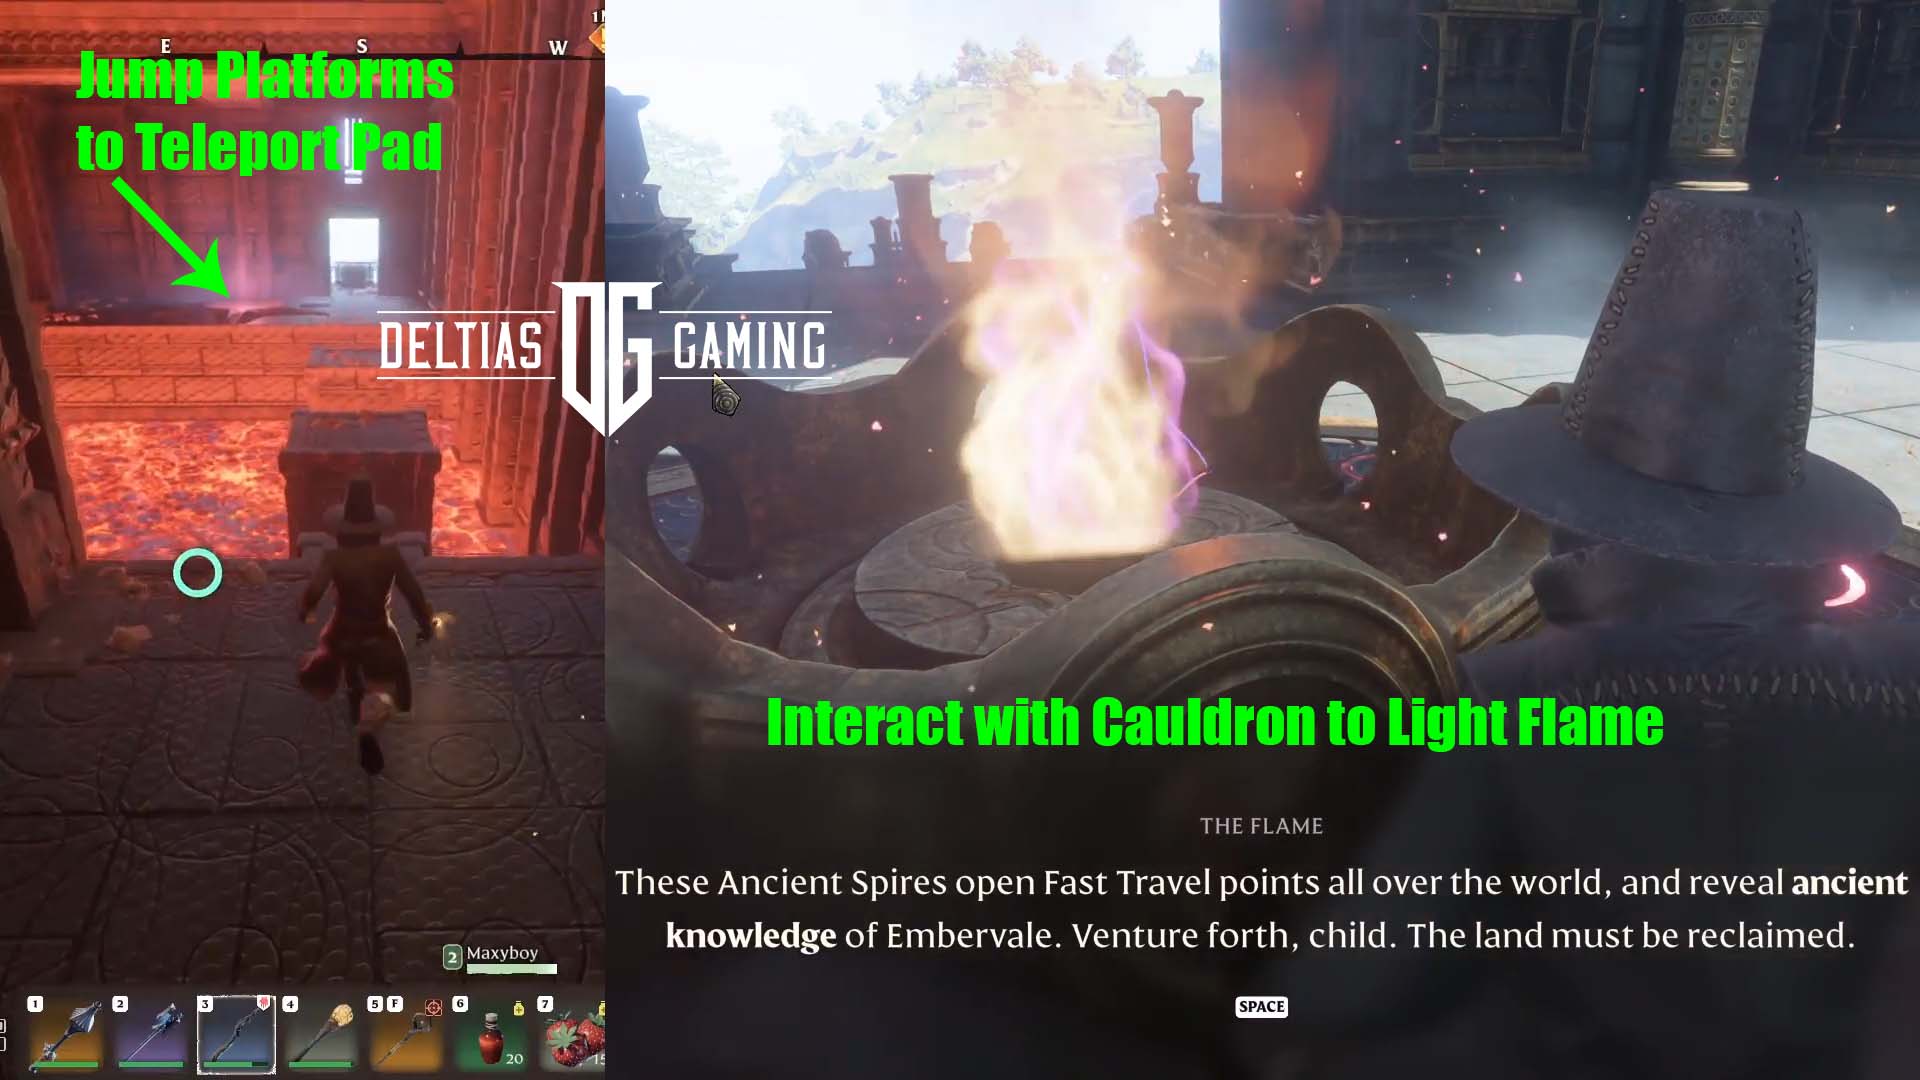
Open the door and head to the left down a short hallway to another door. Inside you’ll find some jumping platforms above a pool of lava. Jump across to safety on the other side. Use the teleport pad here.
Congratulations! You’ve unlocked fast travel to the Springlands Ancient Spire! Don’t forget to head inside and interact with the Flame cauldron in the center. Doing so will unlock new location markers on your map. Moving onto our second shrine up next in our Enshrouded All Ancient Spires and How to Complete Them.
Low Meadows Ancient Spire
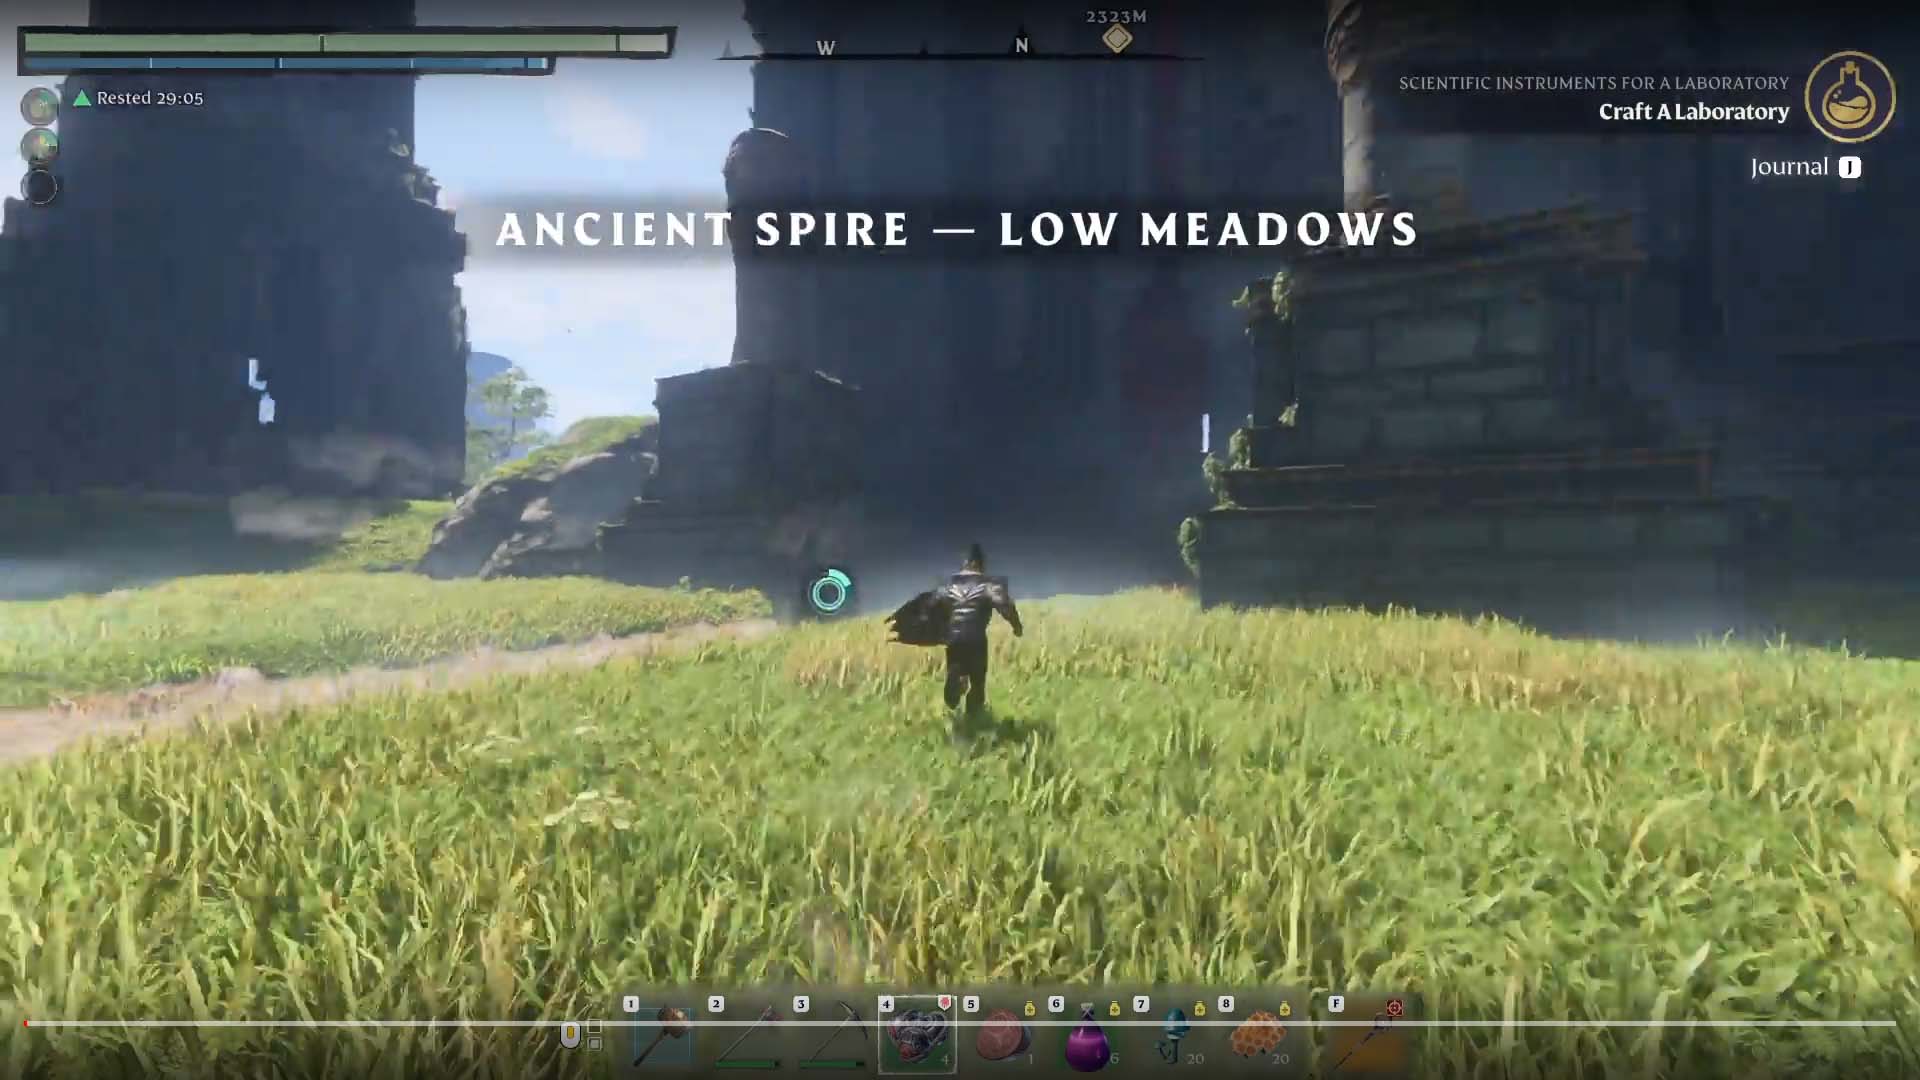
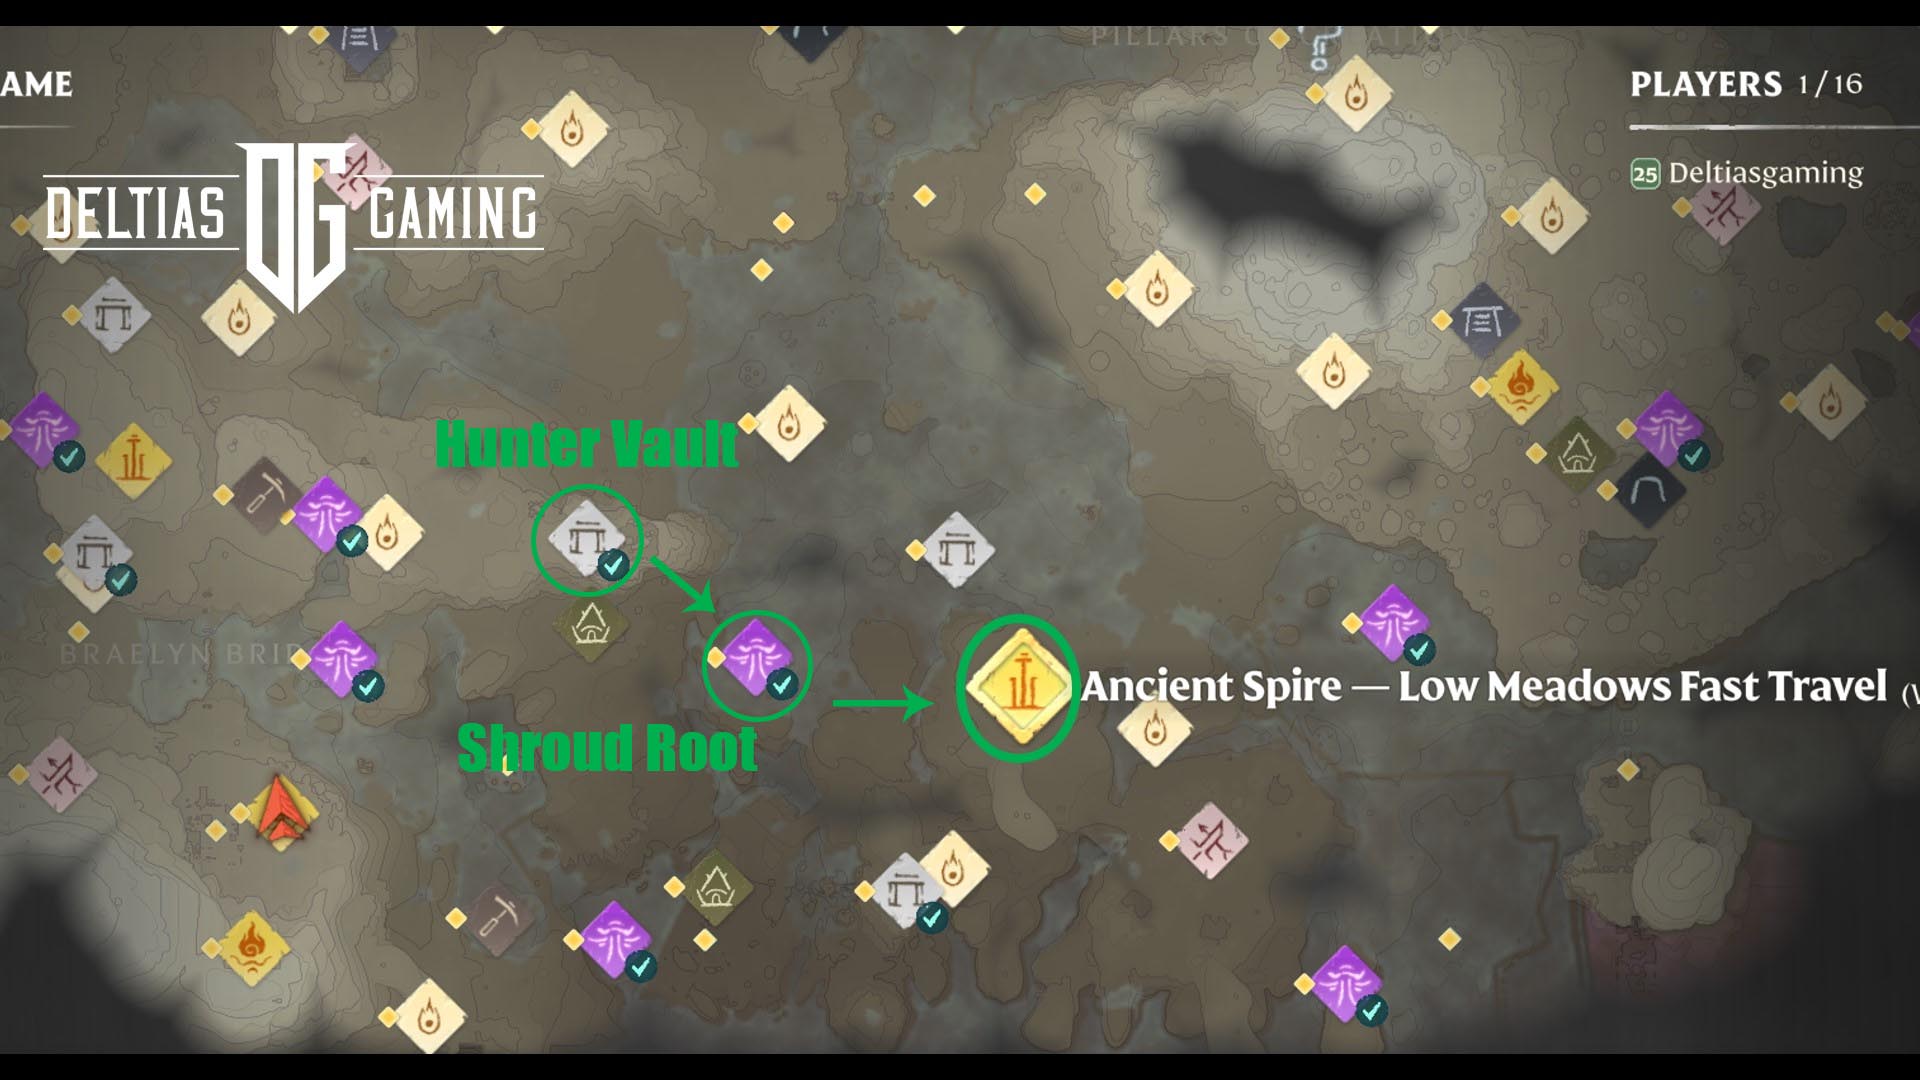
Low Meadows is the second of the Ancient Spires you can unlock, but to get there you will need first need to upgrade your Flame Alter to Level 2. The location of the Low Meadows spire is to the east on the map. The ideal way to get there starts with finding the Hunter Vault. After awakening the Hunter, you can continue to climb the vault and reach the roof space. Standing on the southeast corner, look for a shrouded area. There will be a Shroud Root you should be able to easily make your way to using the Glider.
The Root will be guarded by a Fell Thunderbrute, so be prepared. Afterward, continue east and make your way out of the shroud and towards the Low Meadows spire.
Climbing the Low Meadows Spire
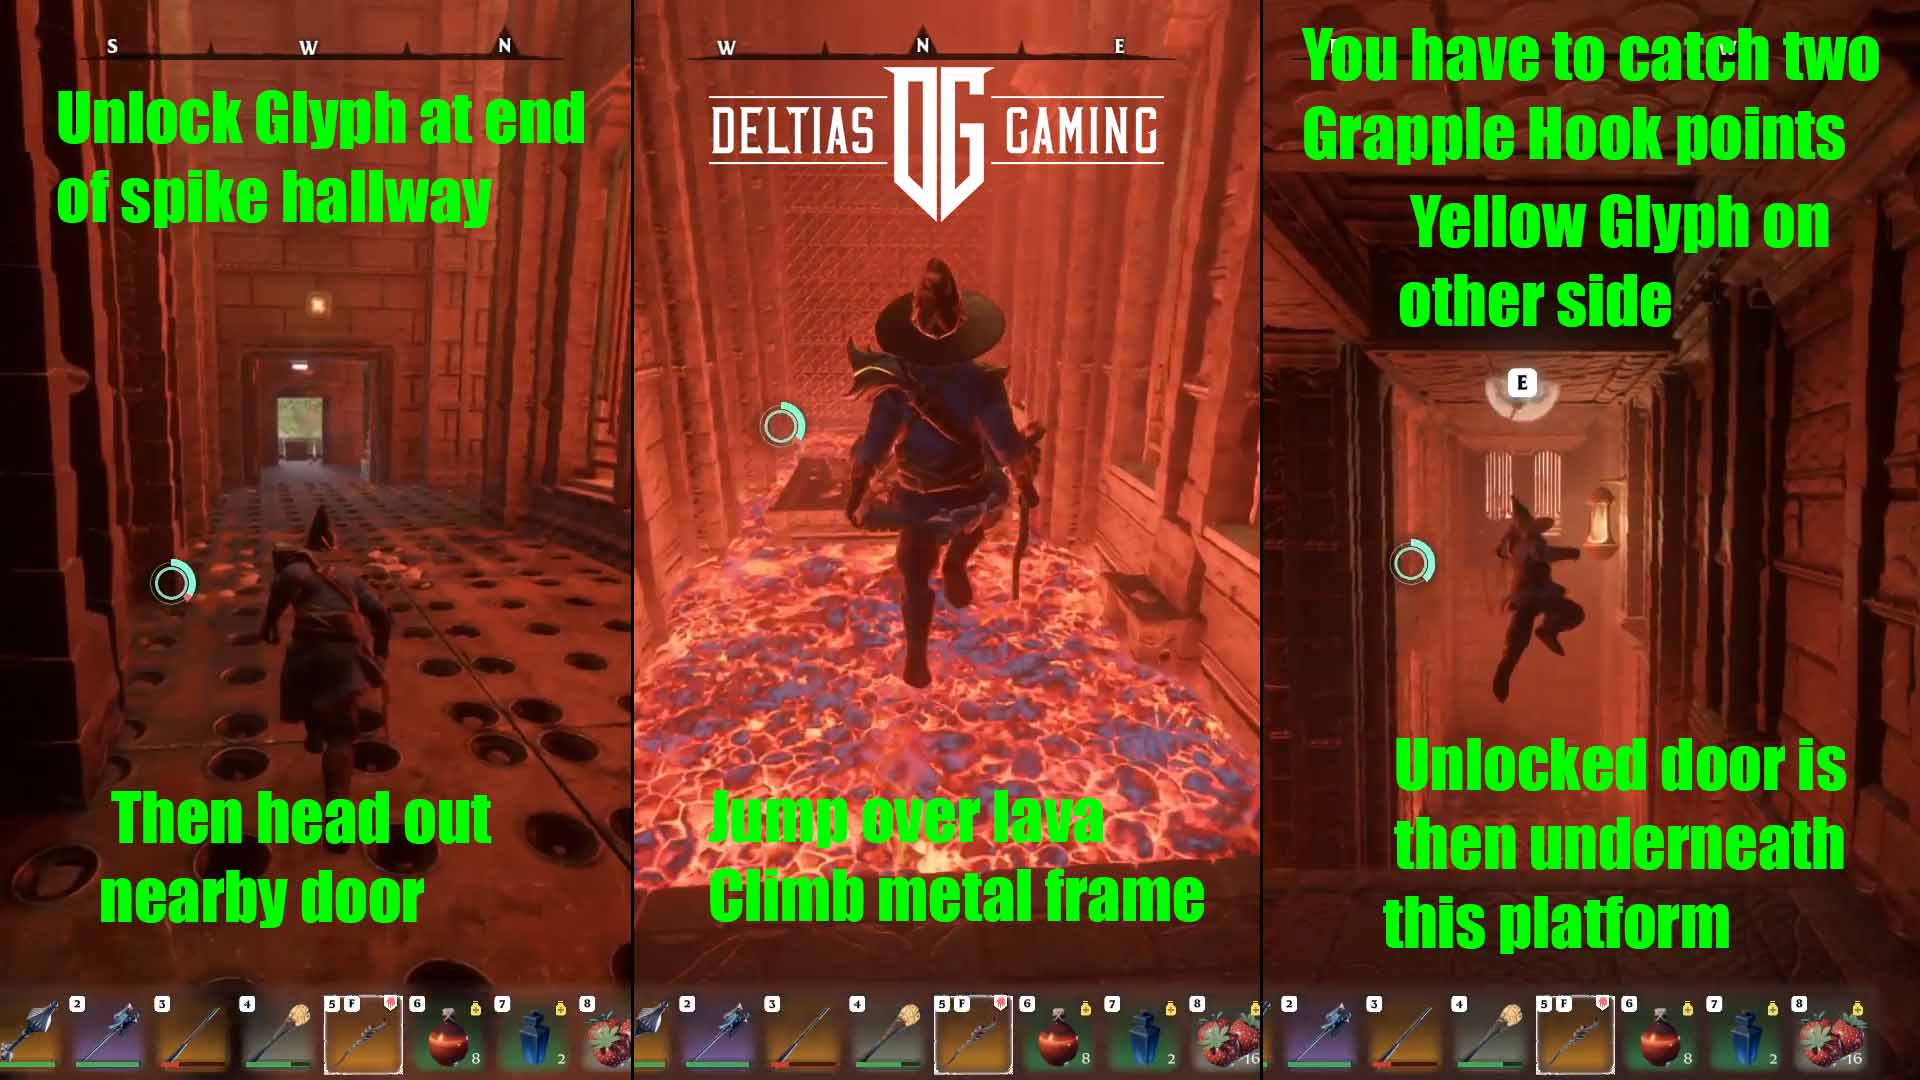
Use the initial glowing red teleport pad to reach the upper inside rooms. In this space, you’ll see a door on the left which is locked. Up above the door, you will see two stone glyphs which you need to unlock to open the door. So, for now, head through the open doorway on the right. Be careful because there are spike traps on the floor.
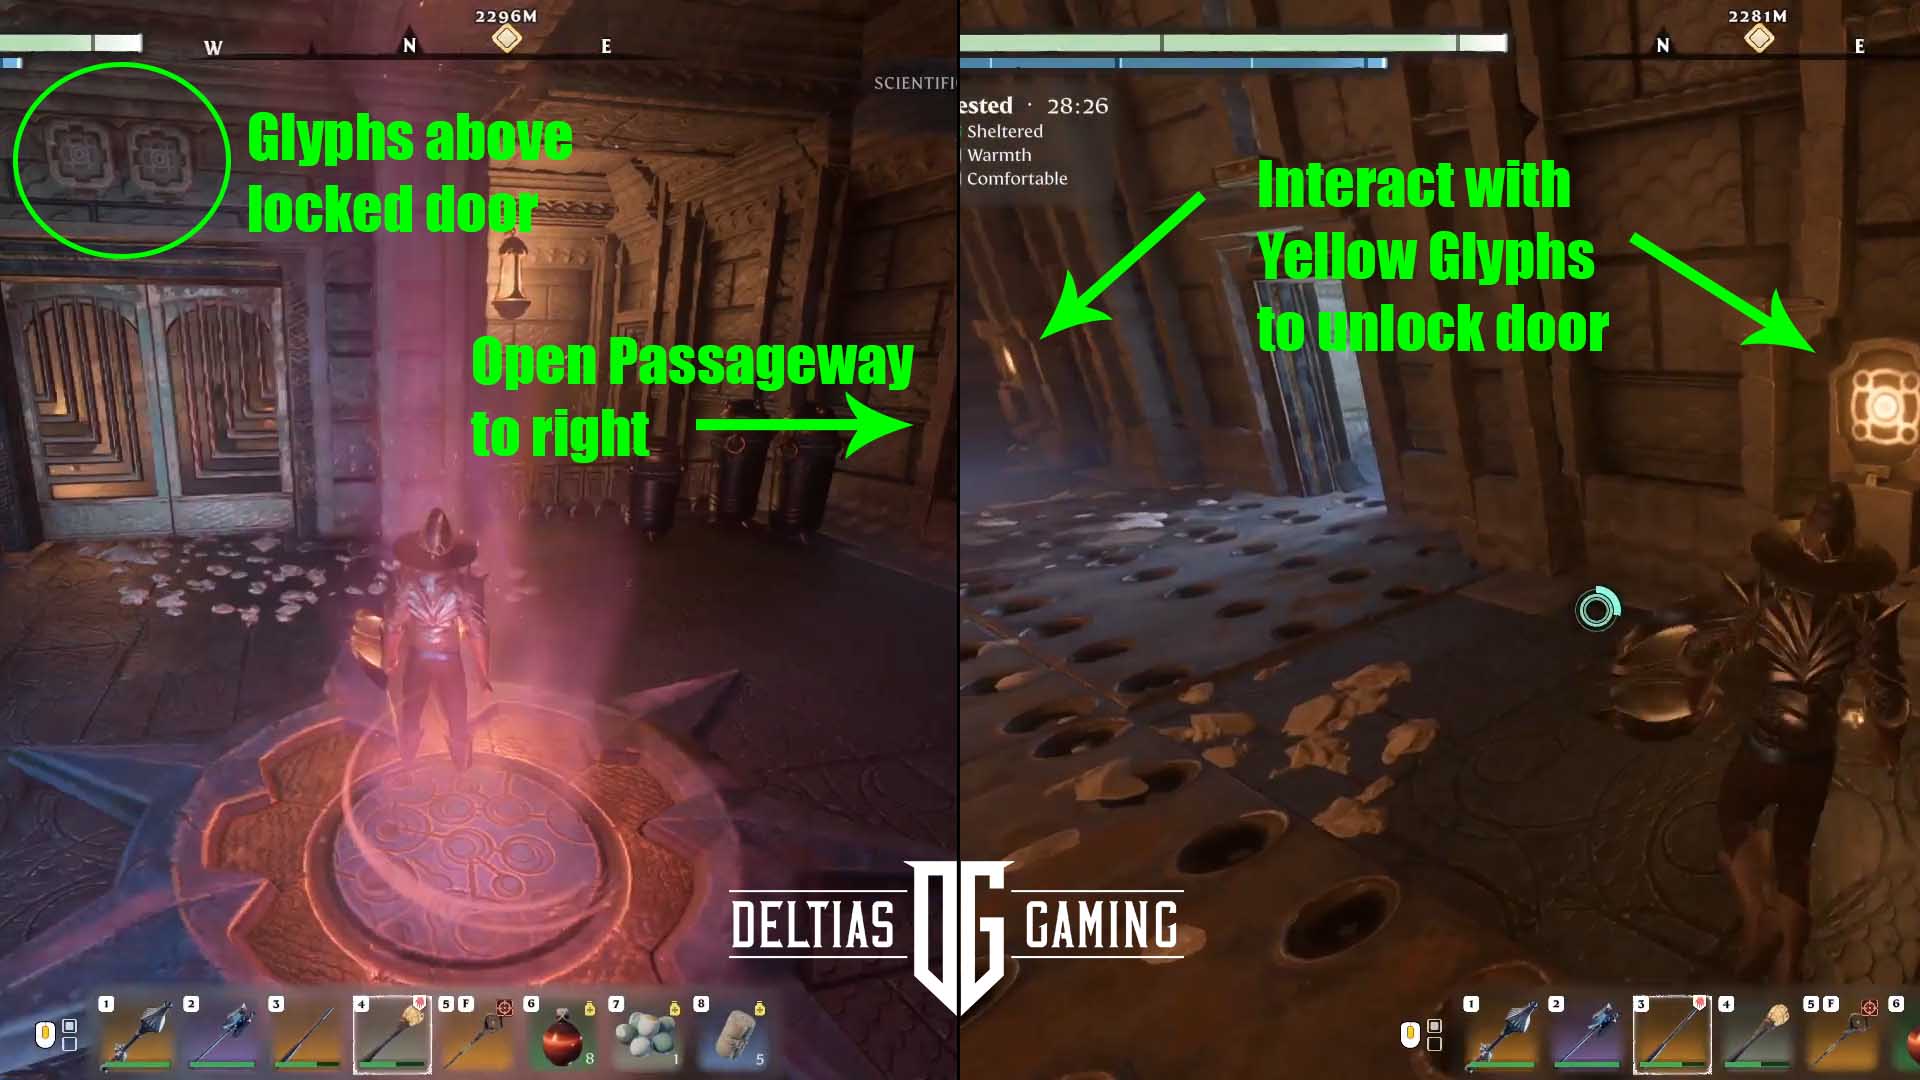
Both of the yellow glyphs you need to unlock the door are in here. The first is straight ahead. Interact with it, and it will go dark. The second yellow glyph will be directly to your left/north. Jump over the spikes again and interact with it. Then return to the first room and the door should be unlocked. Use the teleport pad inside.
Low Meadows Spire Second Floor
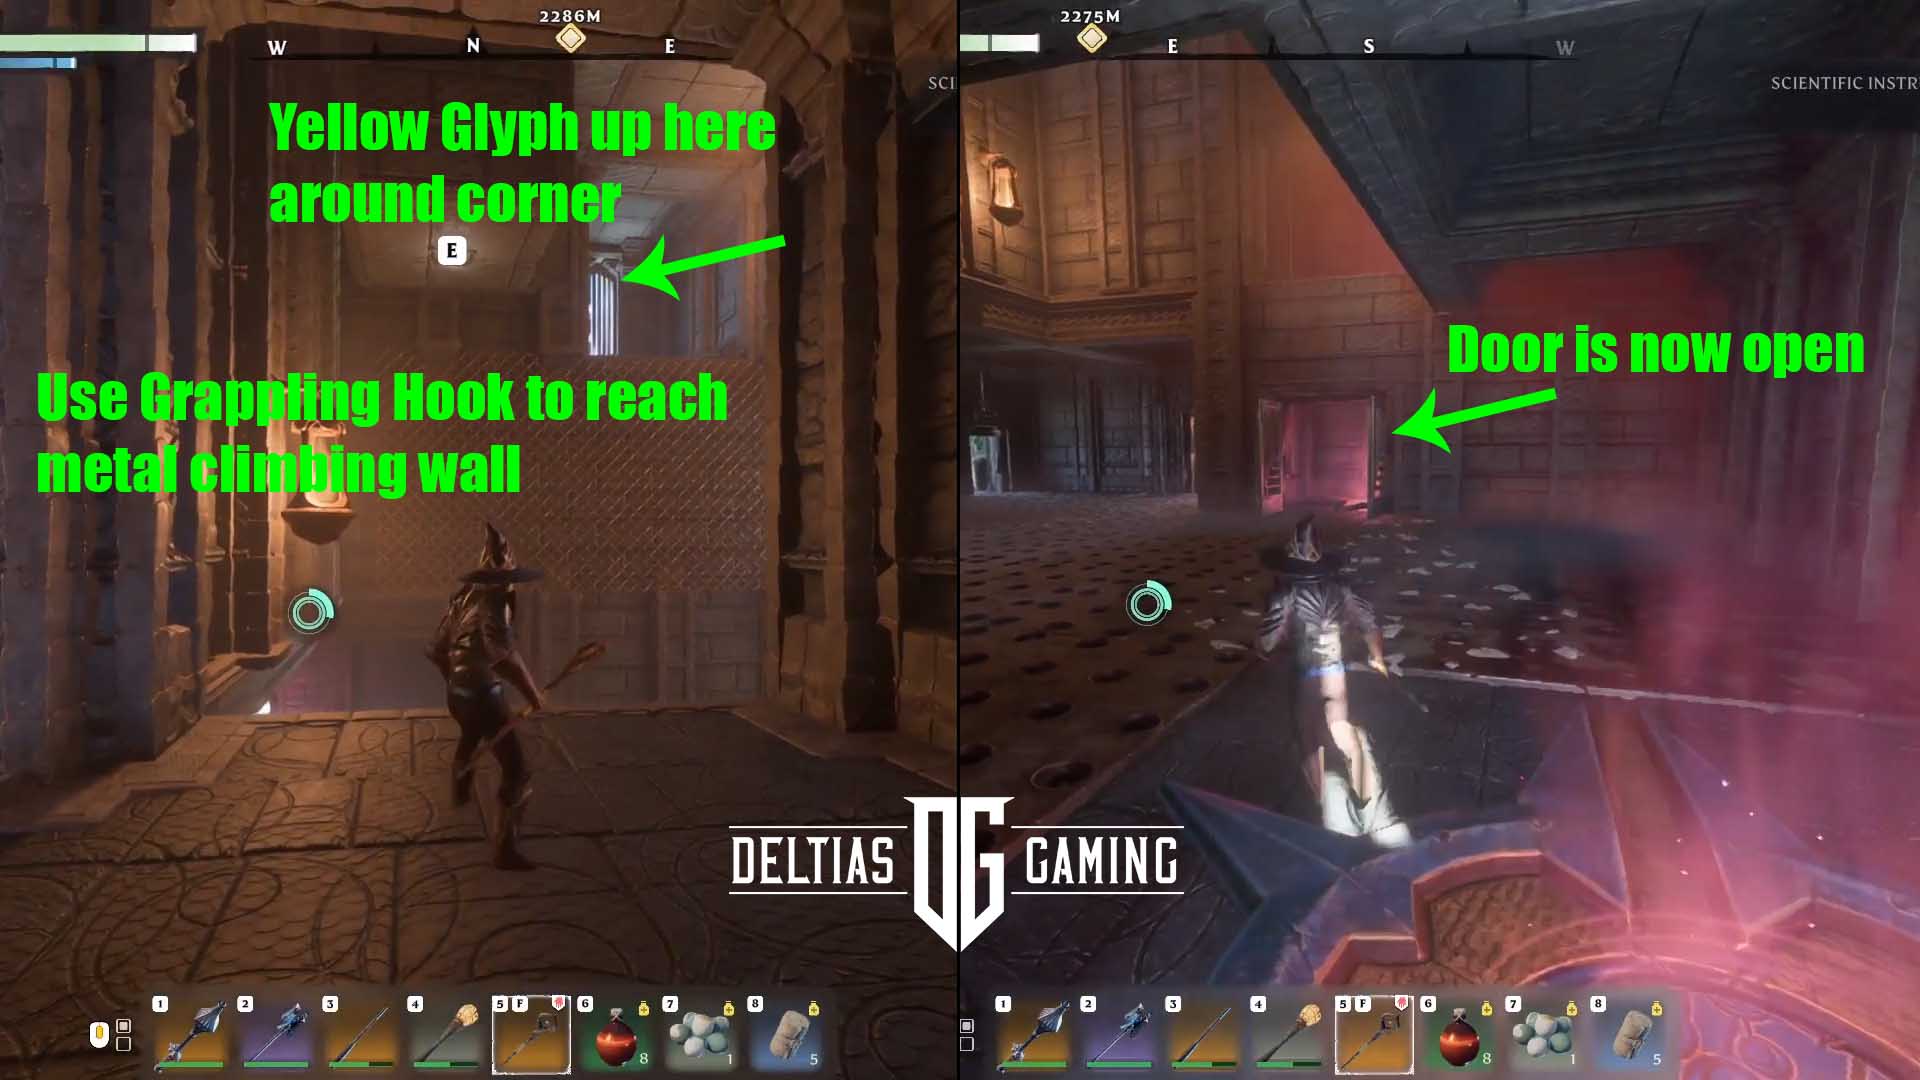
This time you’ll immediately find another locked door, with just one dark glyph above it. Watch out for more spike traps ahead, and go around the corner to the right and then left. Interact with the glyph and head back to the door. This leads to two more locked doors, each with a single glyph. Around the corner past the second locked door, you’ll find one that will open. More spike traps lay beyond. Follow the hallway down and you’ll see a teleport pad. Ignore it for now! Instead, interact with the glowing yellow glyph on the wall to the left!
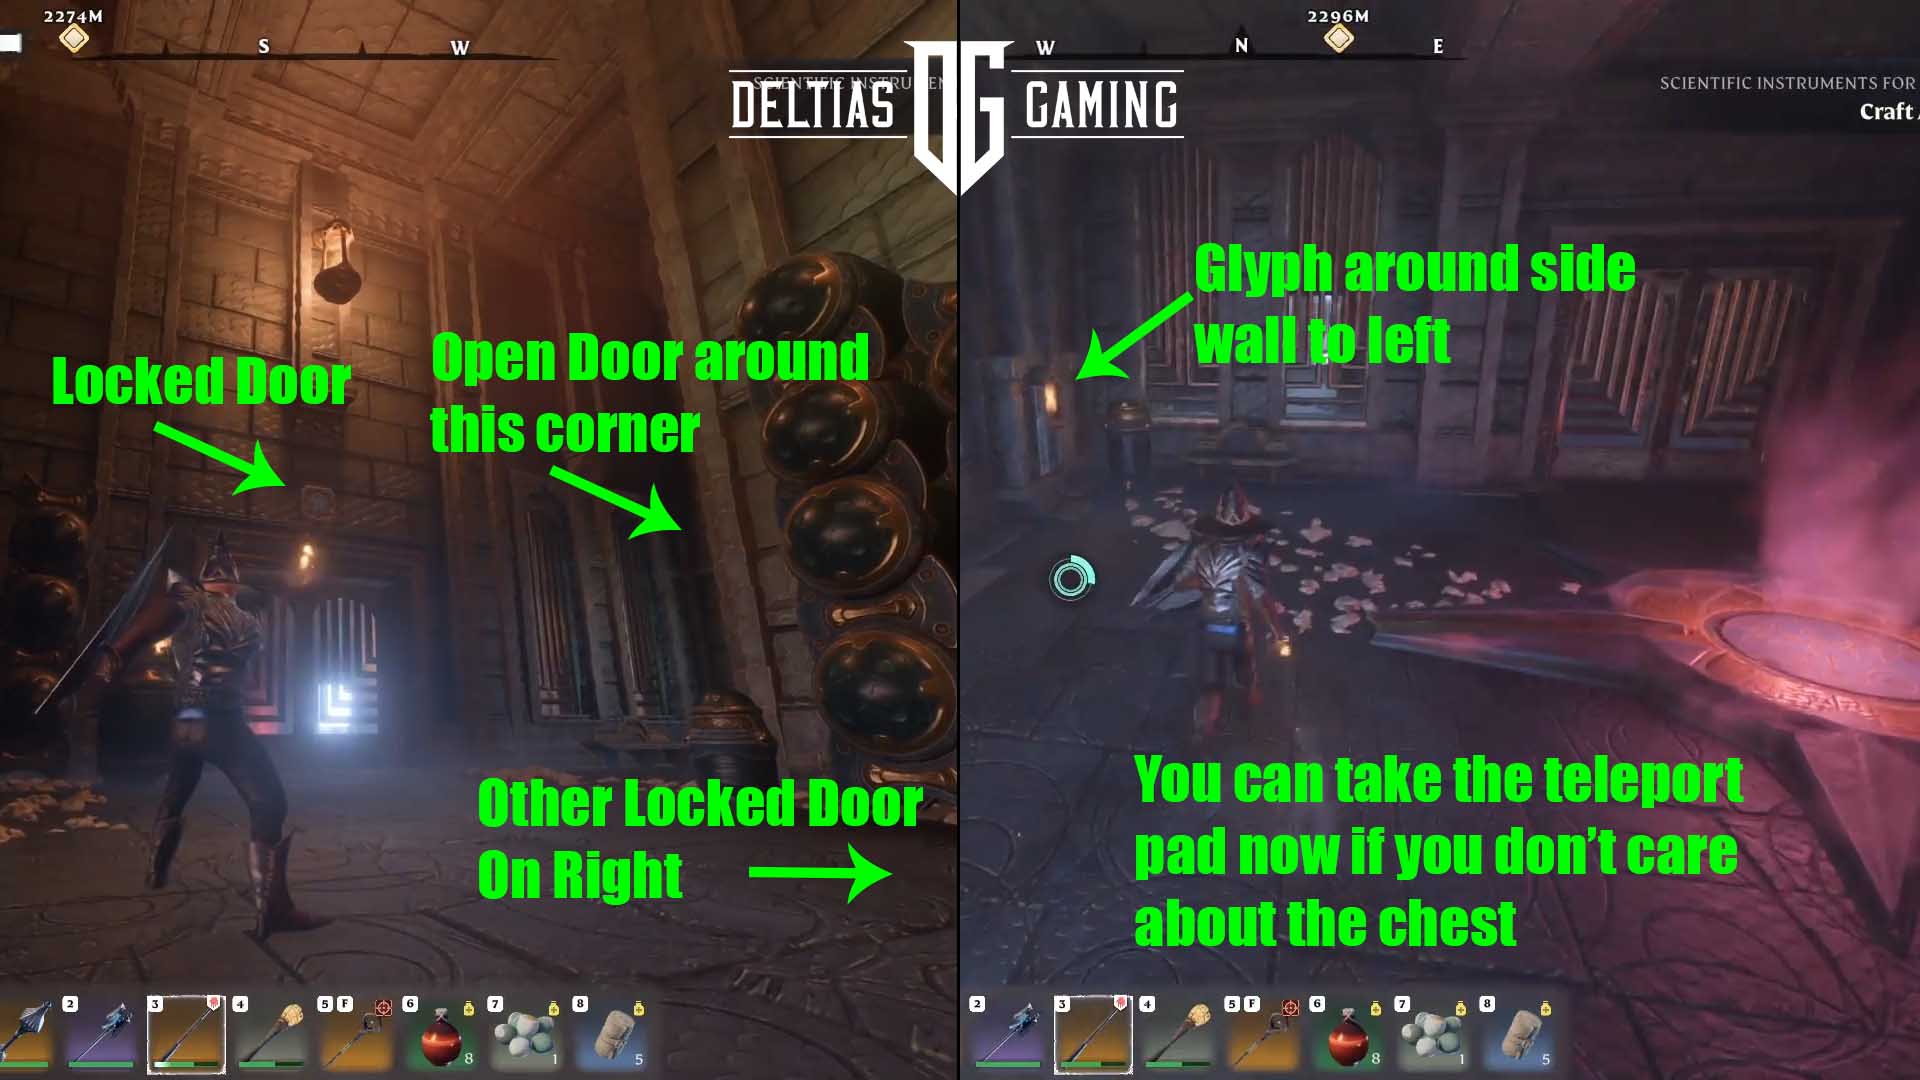
Return down the hallway you came and find one of the locked doors is now open. Head through it and you’ll find the second glowing glyph to interact with and a chest. Now, you can go through the second door and use the teleport pad.
Low Meadows Spire Third Floor
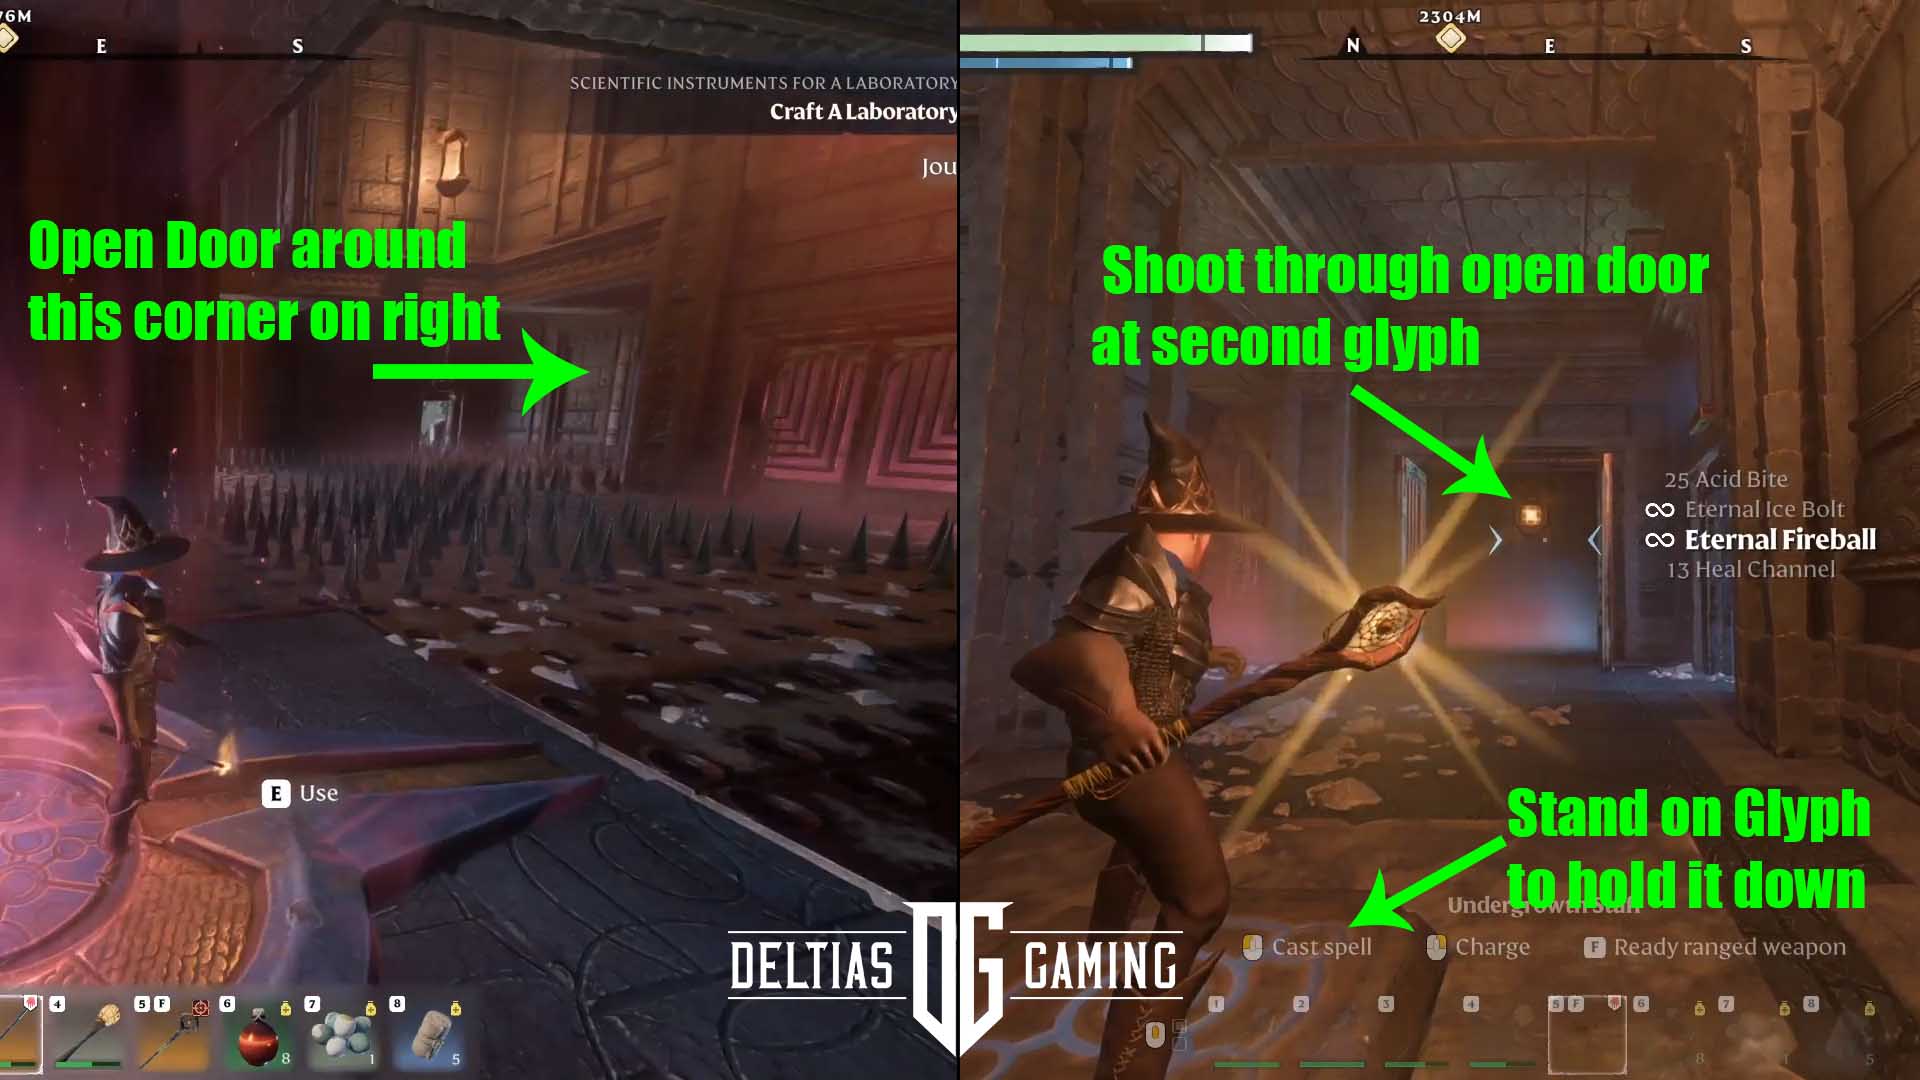
Watch out because almost the entire floor is covered with spike traps. Head to the door around the corner to the right. Jump across the lava once, and then again. At the end of this hallway climb the metal frame to the top. Then jump down into a hallway with electric sparks shooting across. Time your moves and safely navigate past them.
Now, step on the glowing yellow glyph to open the locked door across the way. Stay standing it, and use either a magic weapon or a bow and arrow to hit the glowing yellow glyph inside. That will hold the door open and you can get the chest inside. Around the corner to the left, you’ll use the grappling hook to cross the gap and grab onto the metal climbing frame.
Head to the top platform and you’ll find the glowing yellow glyph you need to interact with. This will also turn the spike traps off on that bottom floor. Jump down and you should see the locked doors now open. Go inside and use the teleport pad.
Congratulations! You’ve unlocked fast travel to the Low Meadows Ancient Spire! Interact with the Flame cauldron in the center. Doing so will unlock new location markers on your map. You still need to unlock three more to complete our Enshrouded All Ancient Spires and How to Complete Them.
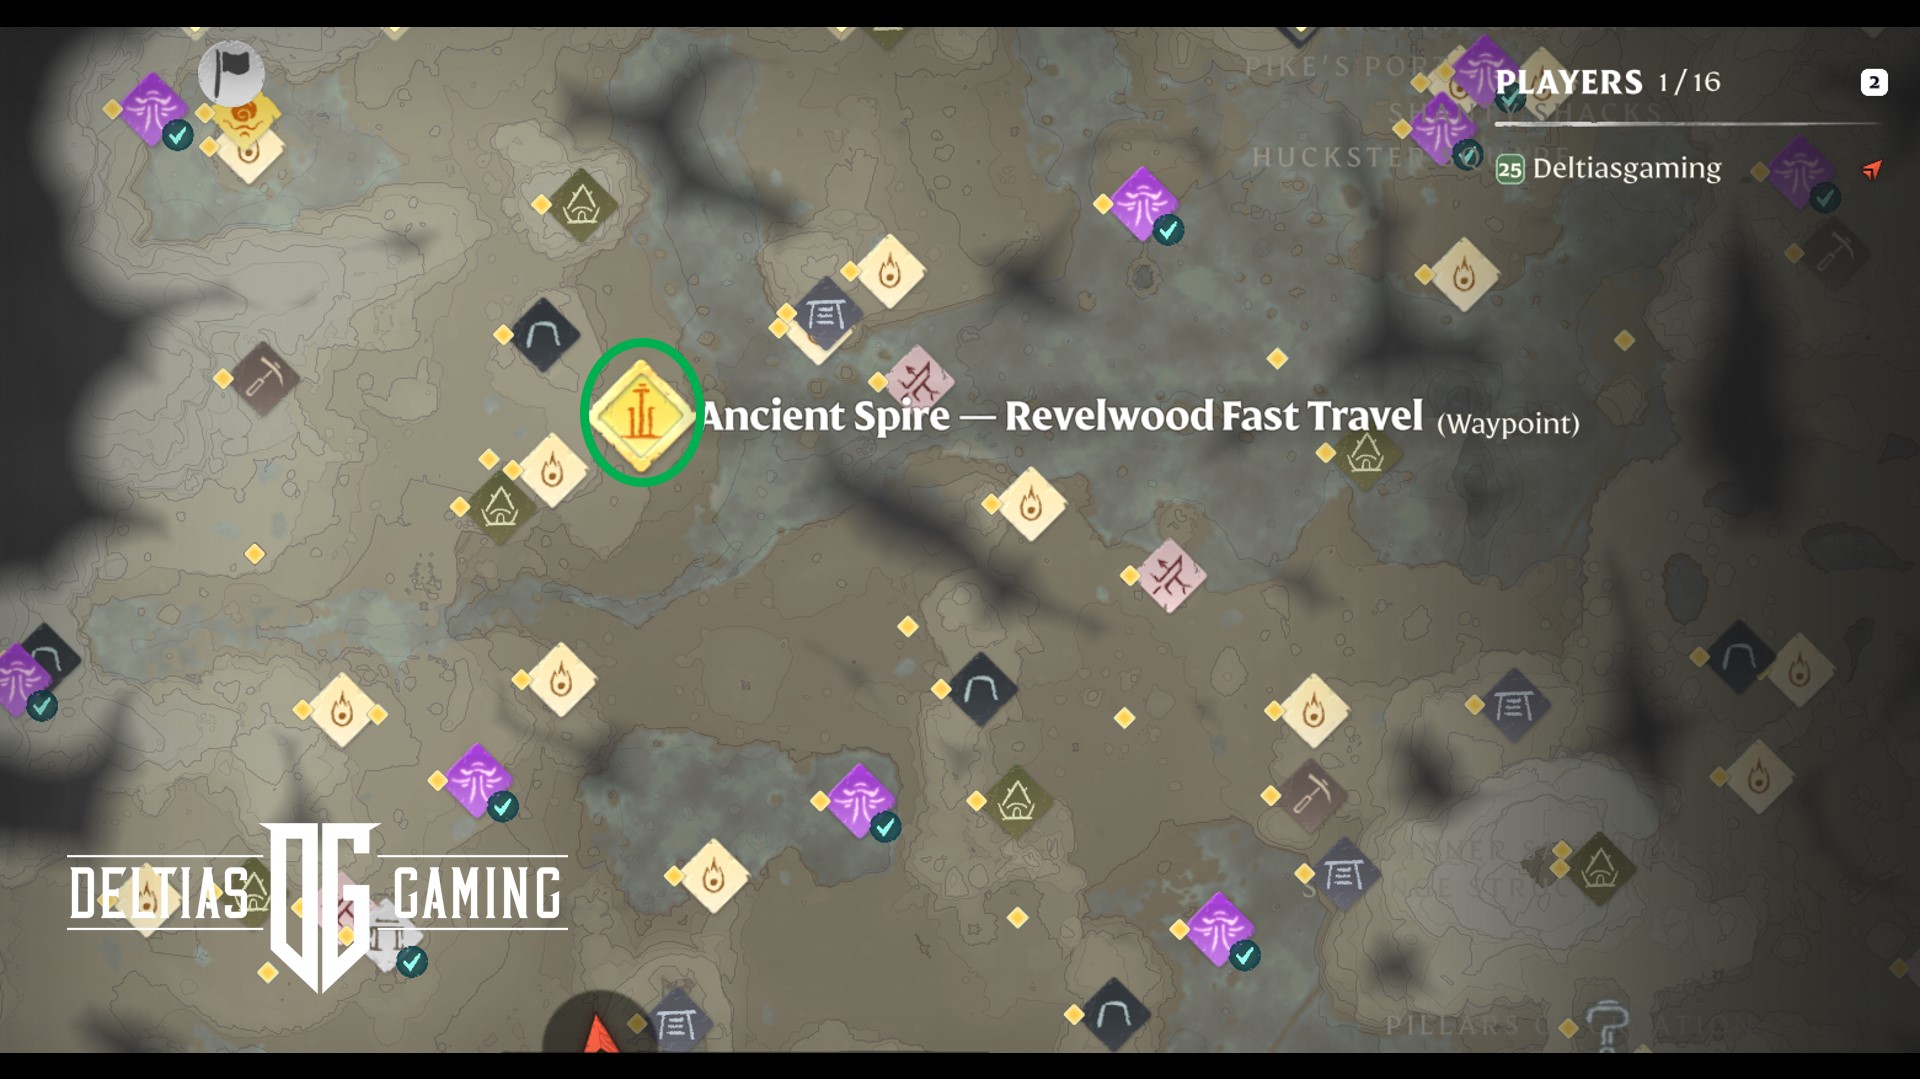
Revelwood Ancient Spire
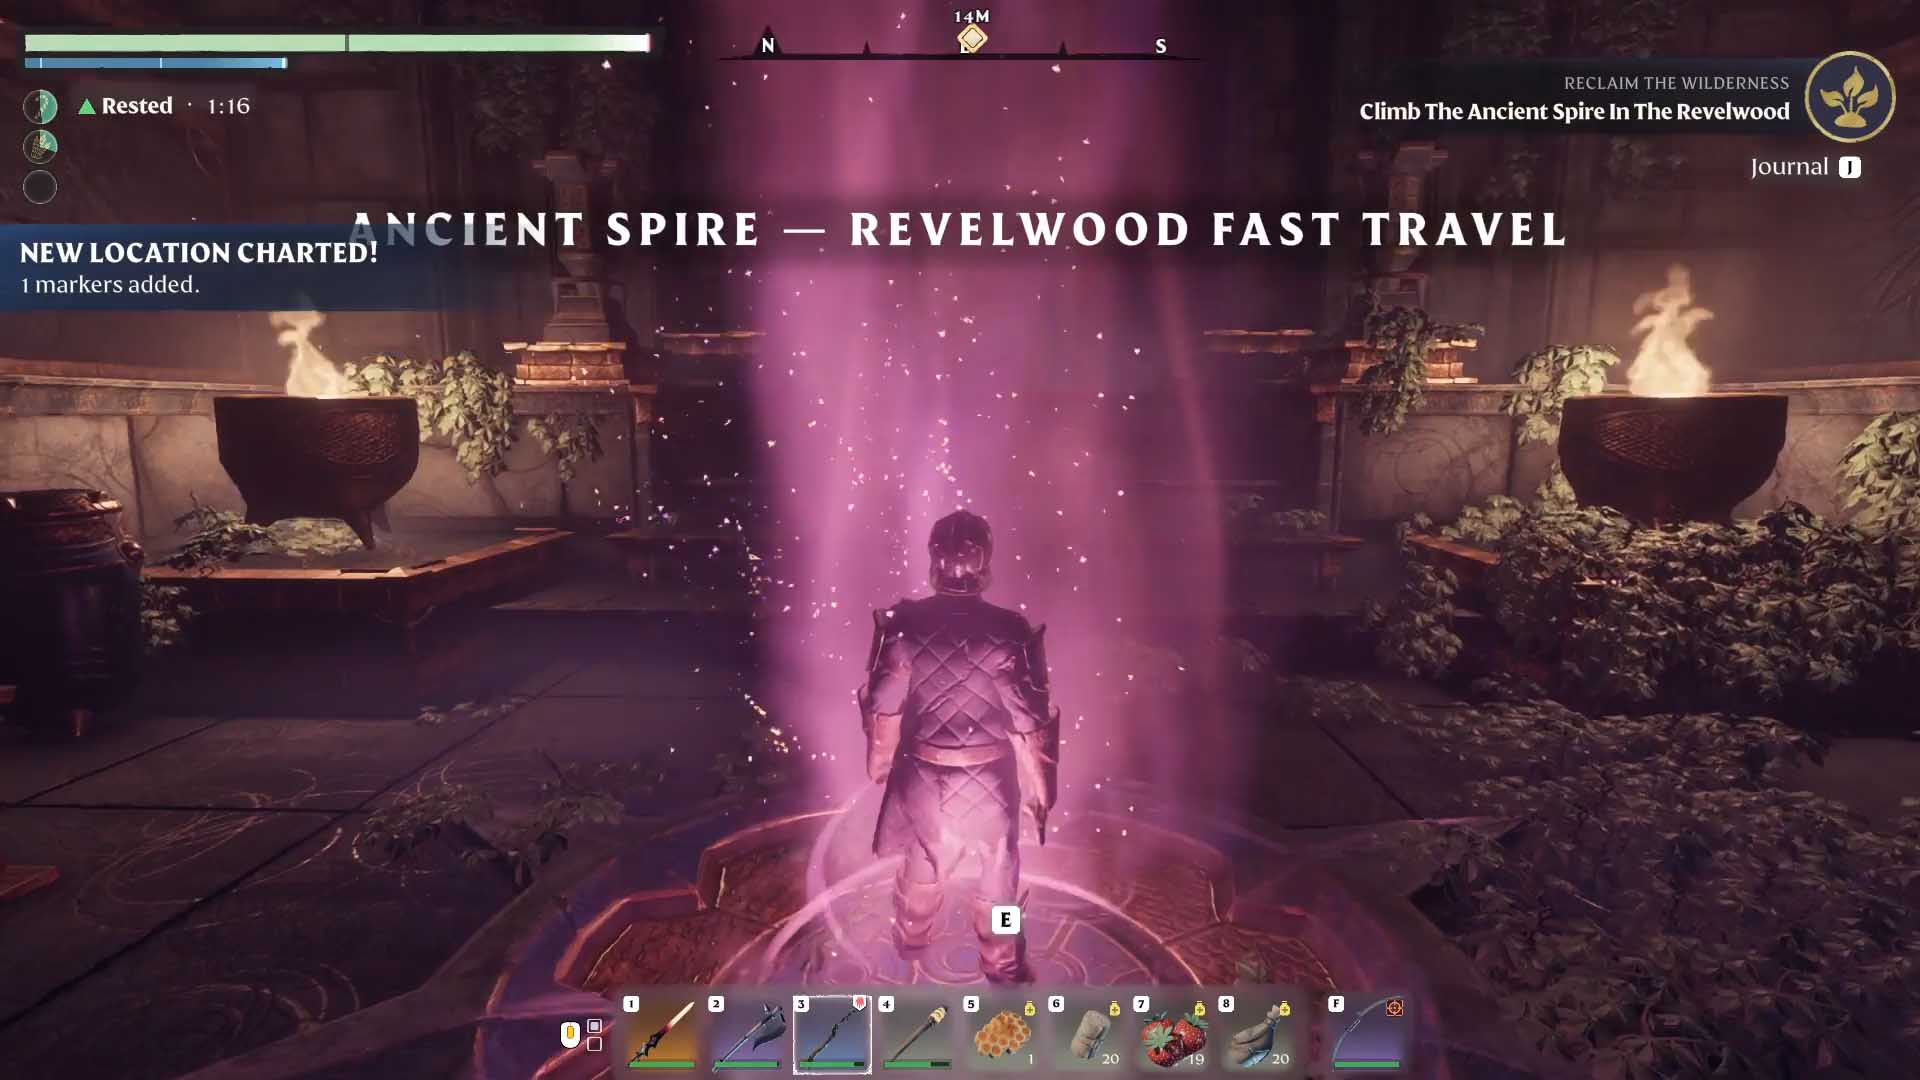
Revelwood is the third of the Ancient Spire you can unlock, but to get there you will need first need to upgrade your Flame Alter to a Level 3. You can find the location of the Revelwood spire north of the Farmer’s vault. This will be far to the north of your original base camp so be prepared for a journey. From the Farmer’s vault, you go north again. Don’t try to walk directly to the Revelwood icon. You’ll need to keep a bit to the west and go north past it until you find a Cave Passage.
You’ll want a source of light in the cave and be prepared to face some Boars. Once you’ve made it through, it should be a short walk for you to finally reach the spire.
Climbing the Revelwood Spire
You’ll see that the door immediately ahead of you is locked with two stone glyphs above. Instead, head through the door on the right and you will need to jump over and time your movement through some electric sparks and then some rolling fireballs. At the end of the hallway, you’ll find a yellow glyph to interact with. You’ll have to doge the elements and make your way back to the first room.
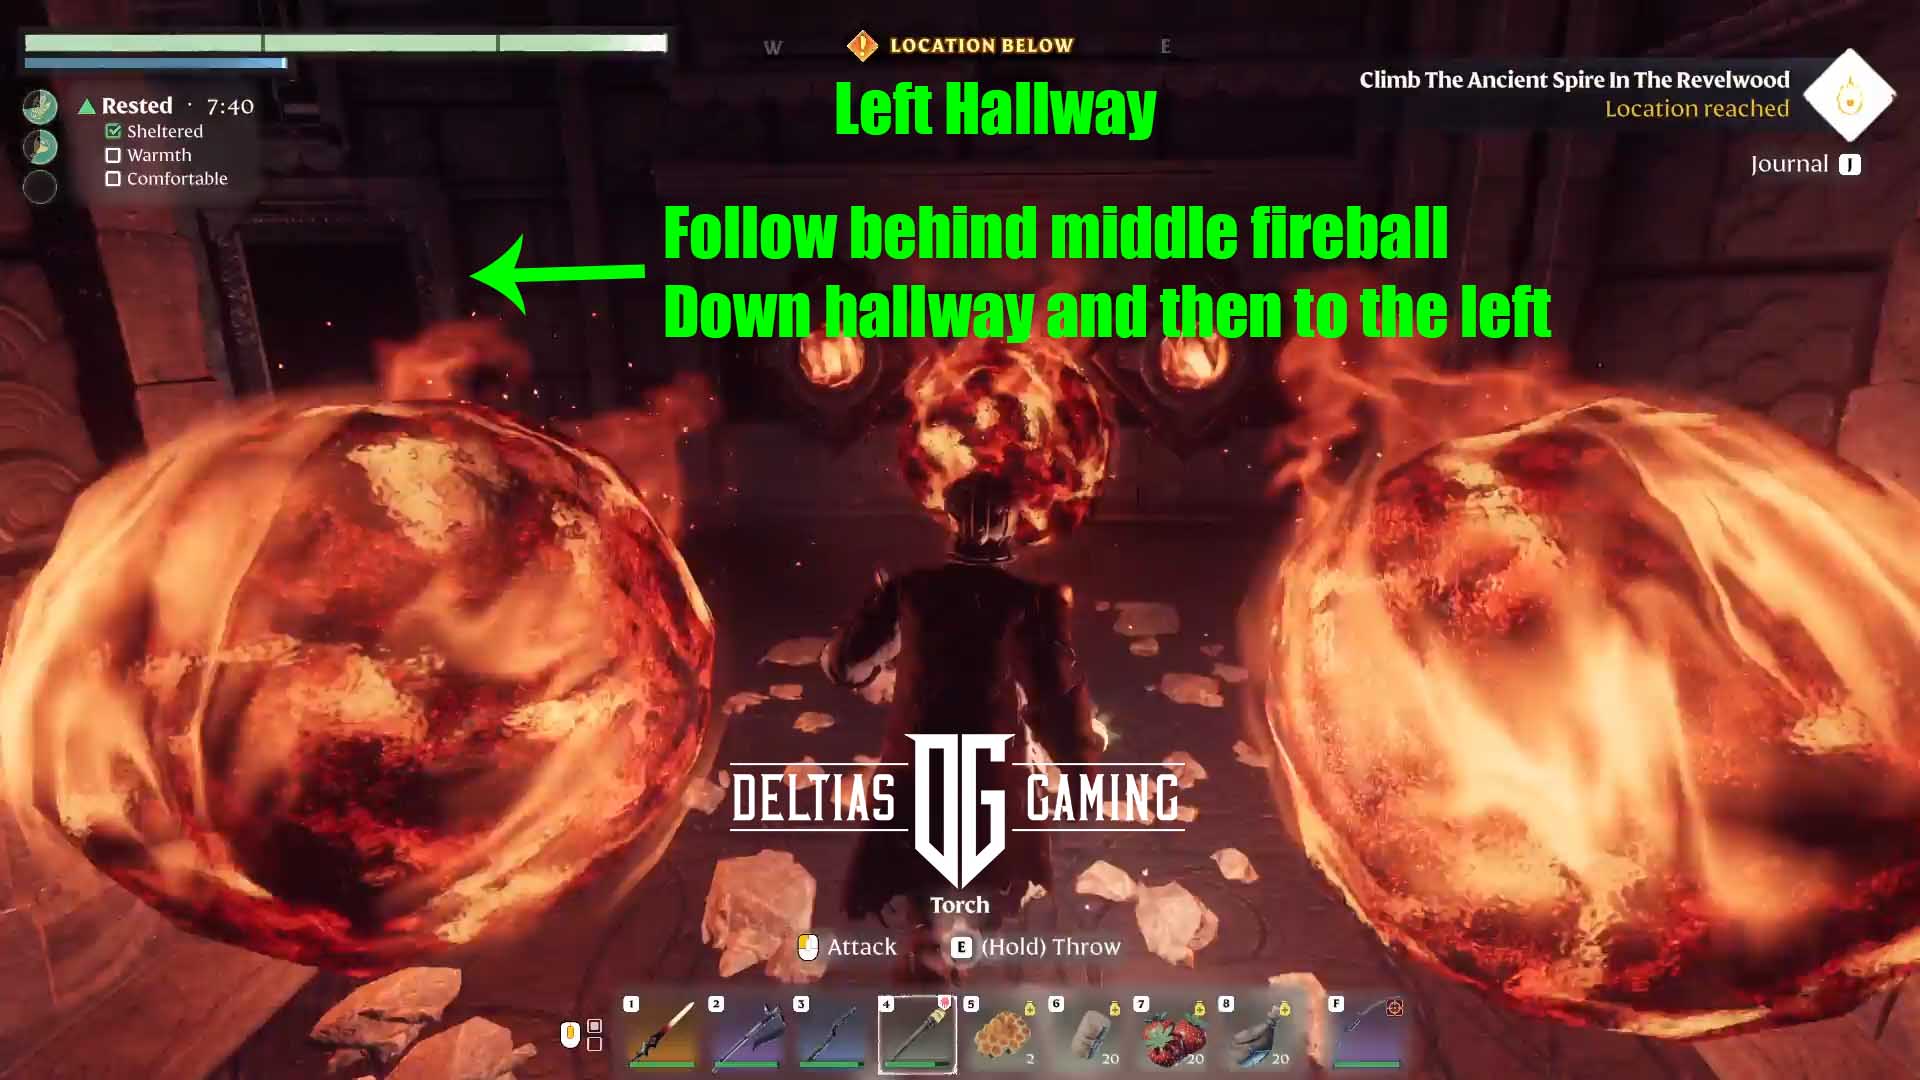
Now take the door to the left/east of the teleport pad. There will be more fireballs to dodge, this time with some running both forwards and back. Slip in behind one rolling in the direction you want to go and then slip safely back out on the left side before you reach the wall on the end. In this room, you’ll find another yellow glyph to press and a door that will give you an easy way back.
Head through the now unlocked door and use the teleport pad.
Revelwood Spire Second Floor
Open the door in front of you and you can see a locked door with four stone glyphs directly ahead. Additionally, you’ll find four different paths that branch off to the sides. Each of them has flooring with spike traps in them. Head left first. The short hallway leads to a yellow glyph and you’ll need to hit it with magic or an arrow.
Return to the center area. Head a bit forward and before the locked door, take another left. Look up and you’ll see a grapple hook point. Head up and at the very top of the platform you’ll immediately see the yellow glyph on your right. Again, it will be up high and you’ll need magic or an arrow to turn it off.
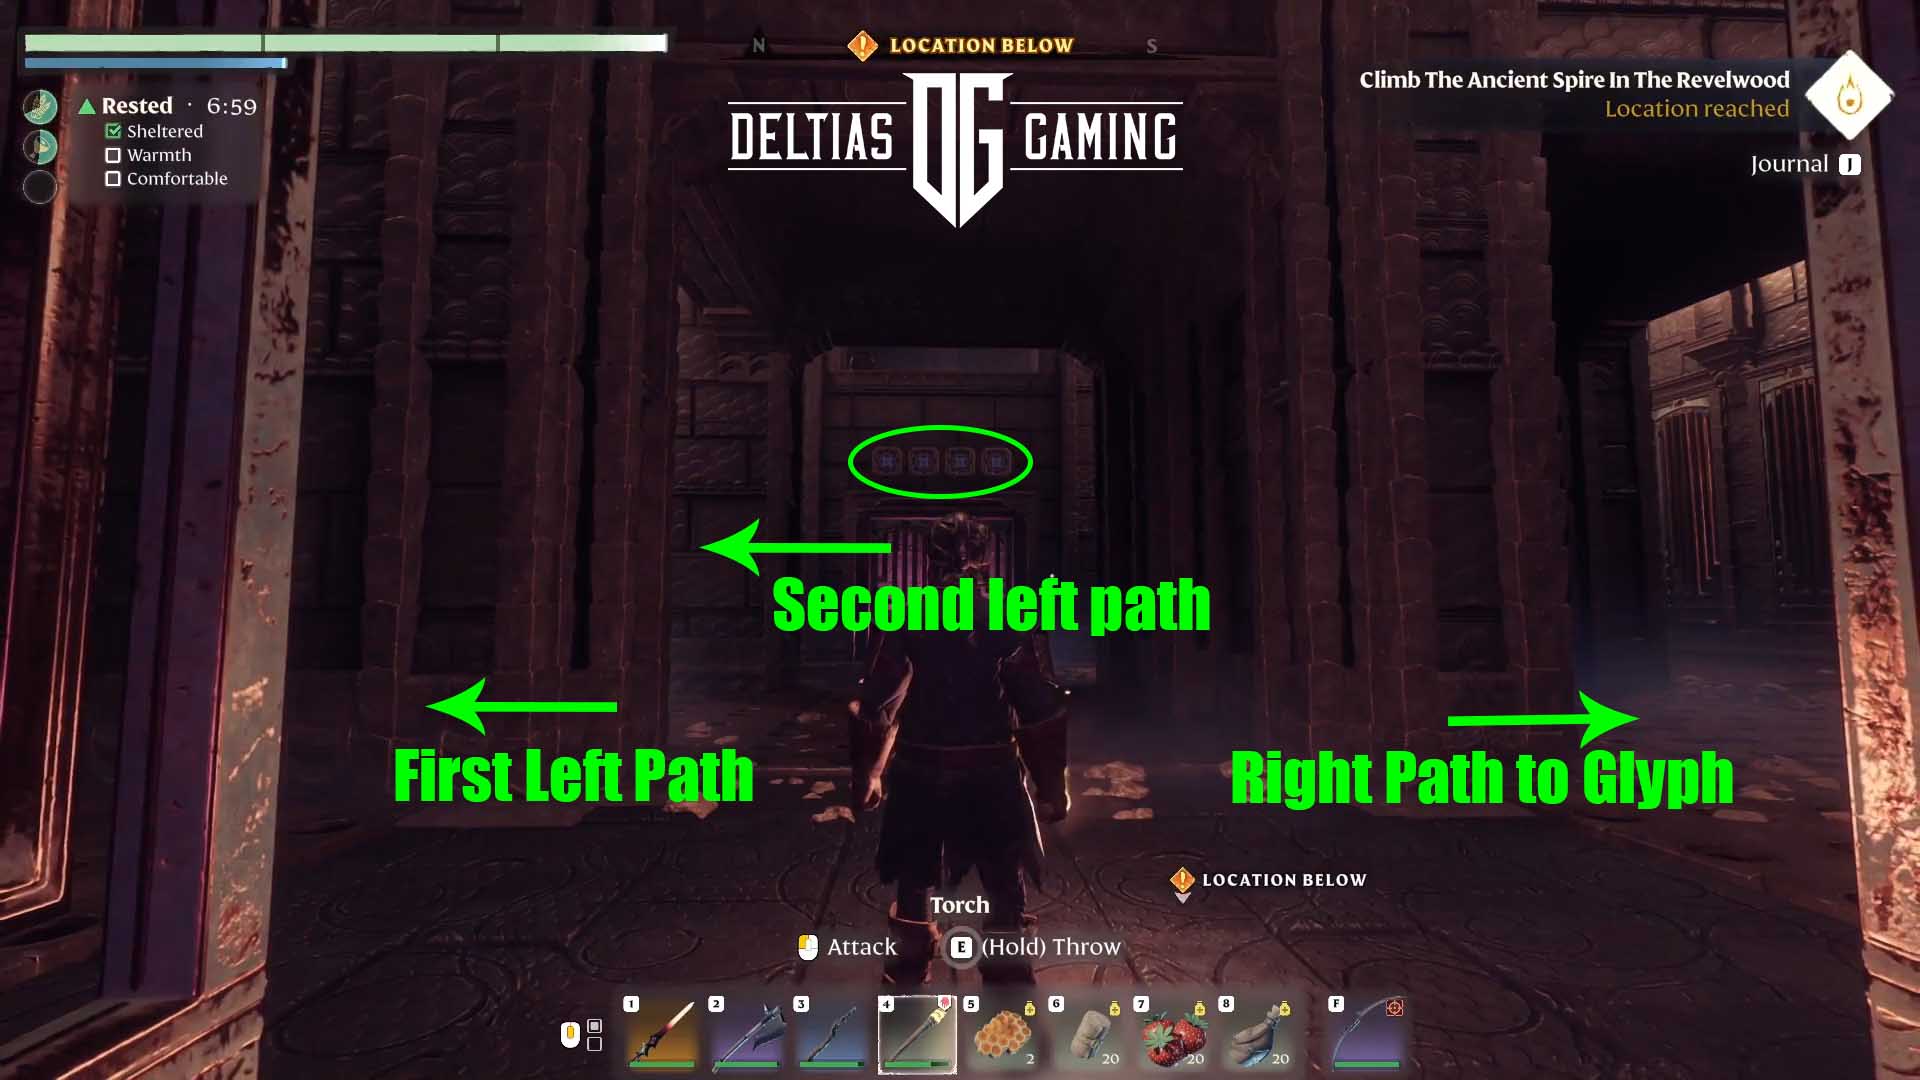
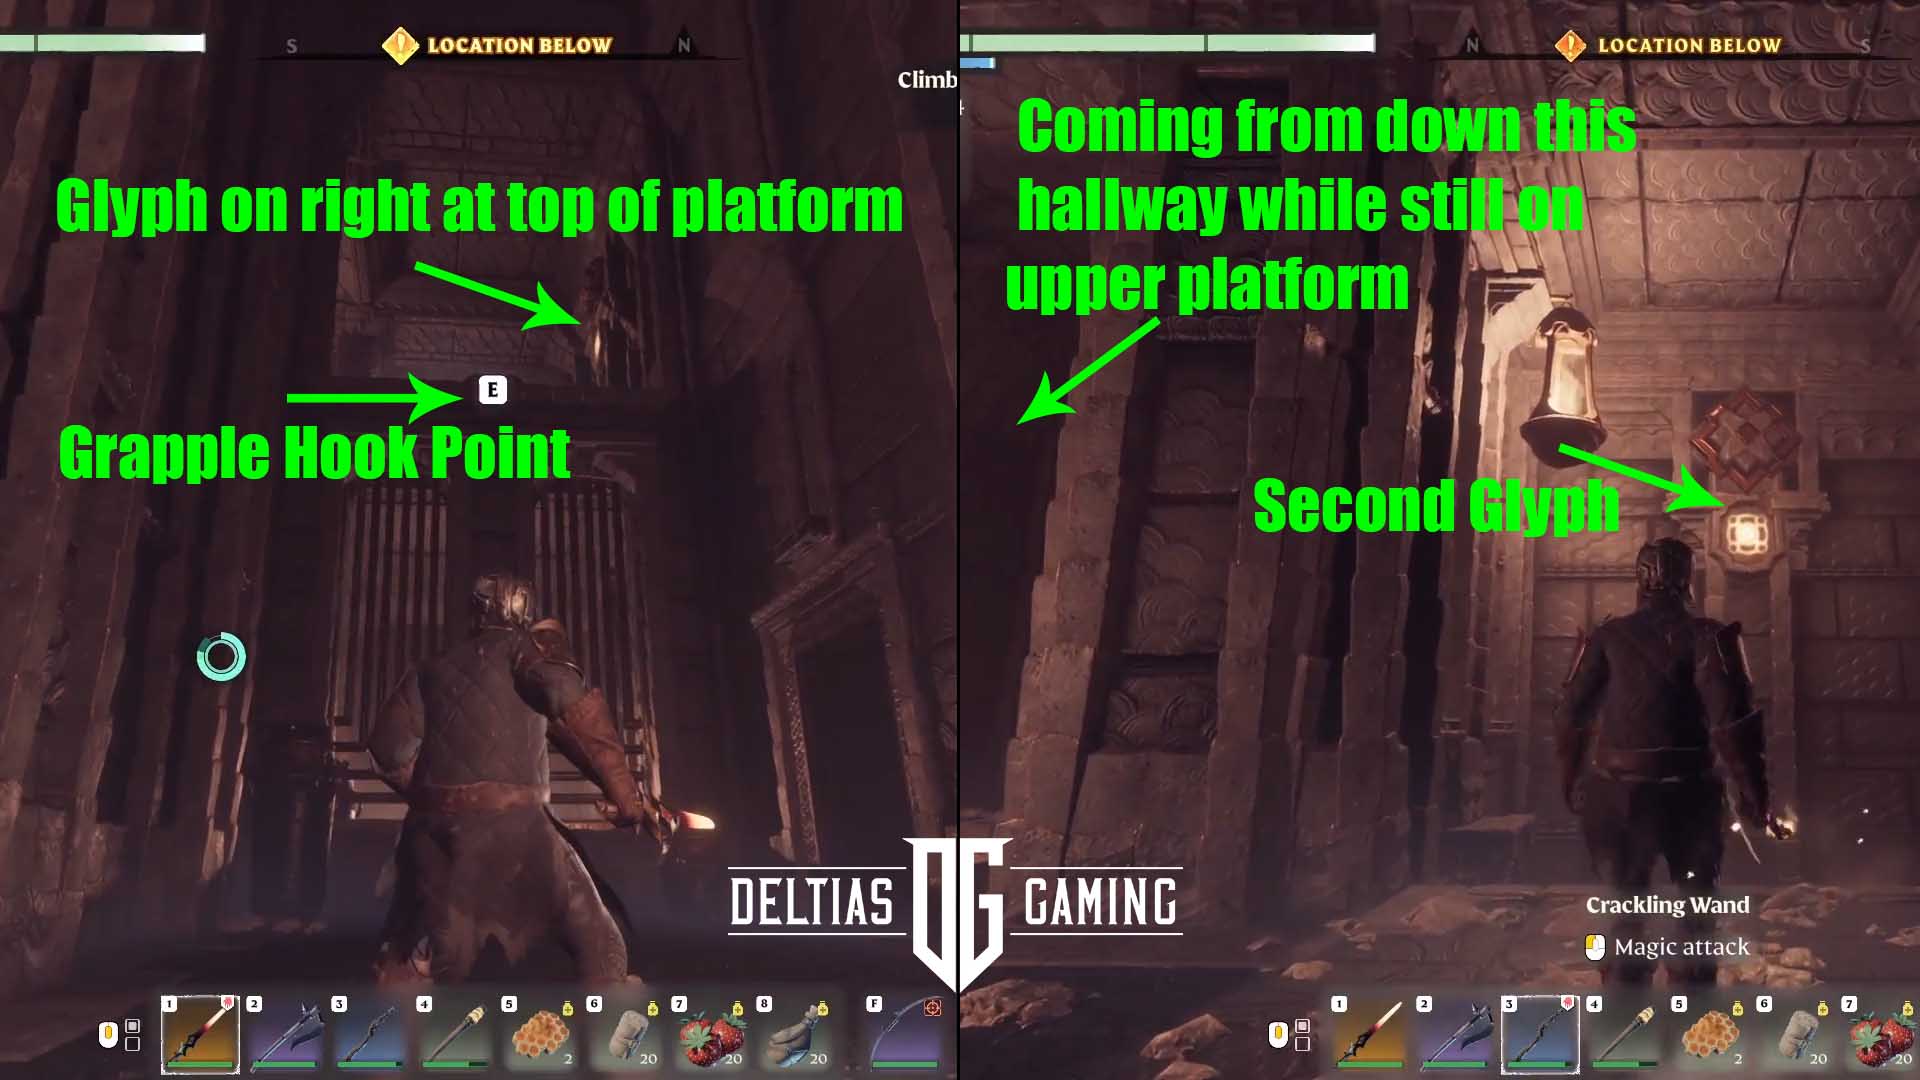
Stay up top and walk down the hallway and around the corner. Across a gap, you’ll see a third yellow glyph. Hit it with magic or an arrow. Then you can carefully jump back down to the center area.
From the center area facing the door, you now want to head down the path directly on your right. There will be a yellow glyph on the wall you can unlock with a magic hit or an arrow. Now the locked door should be open! Use the teleport pad inside.
Revelwood Spire Third Floor
As you port into the Third Floor, you’ll see a locked door straight ahead with two stone glyphs above. The two corresponding yellow glyphs can be found to the left and right. Look high up above your head on both sides. Unfortunately, this distance is going to be too far for magic from a wand. You’ll need to use a bow and arrow or Staff with charges to hit them.

Once the door is unlocked head through and you can go right or left. The floor with have spike traps again, so run/jump to the door at the end. There will be another door in the center, as both sides loop around. As you head up the stairs, stop and look up behind you on the wall. There will be another glowing yellow glyph. You’ll need to hit one on each side to unlock the final door and take the teleport pad to the top.
Congratulations! You’ve unlocked fast travel to the Revelwood Ancient Spire! Additionally, interact with the Flame cauldron in the center. Doing so will unlock new location markers on your map. Moving onto the fourth shrine up next in our Enshrouded All Ancient Spires and How to Complete Them.
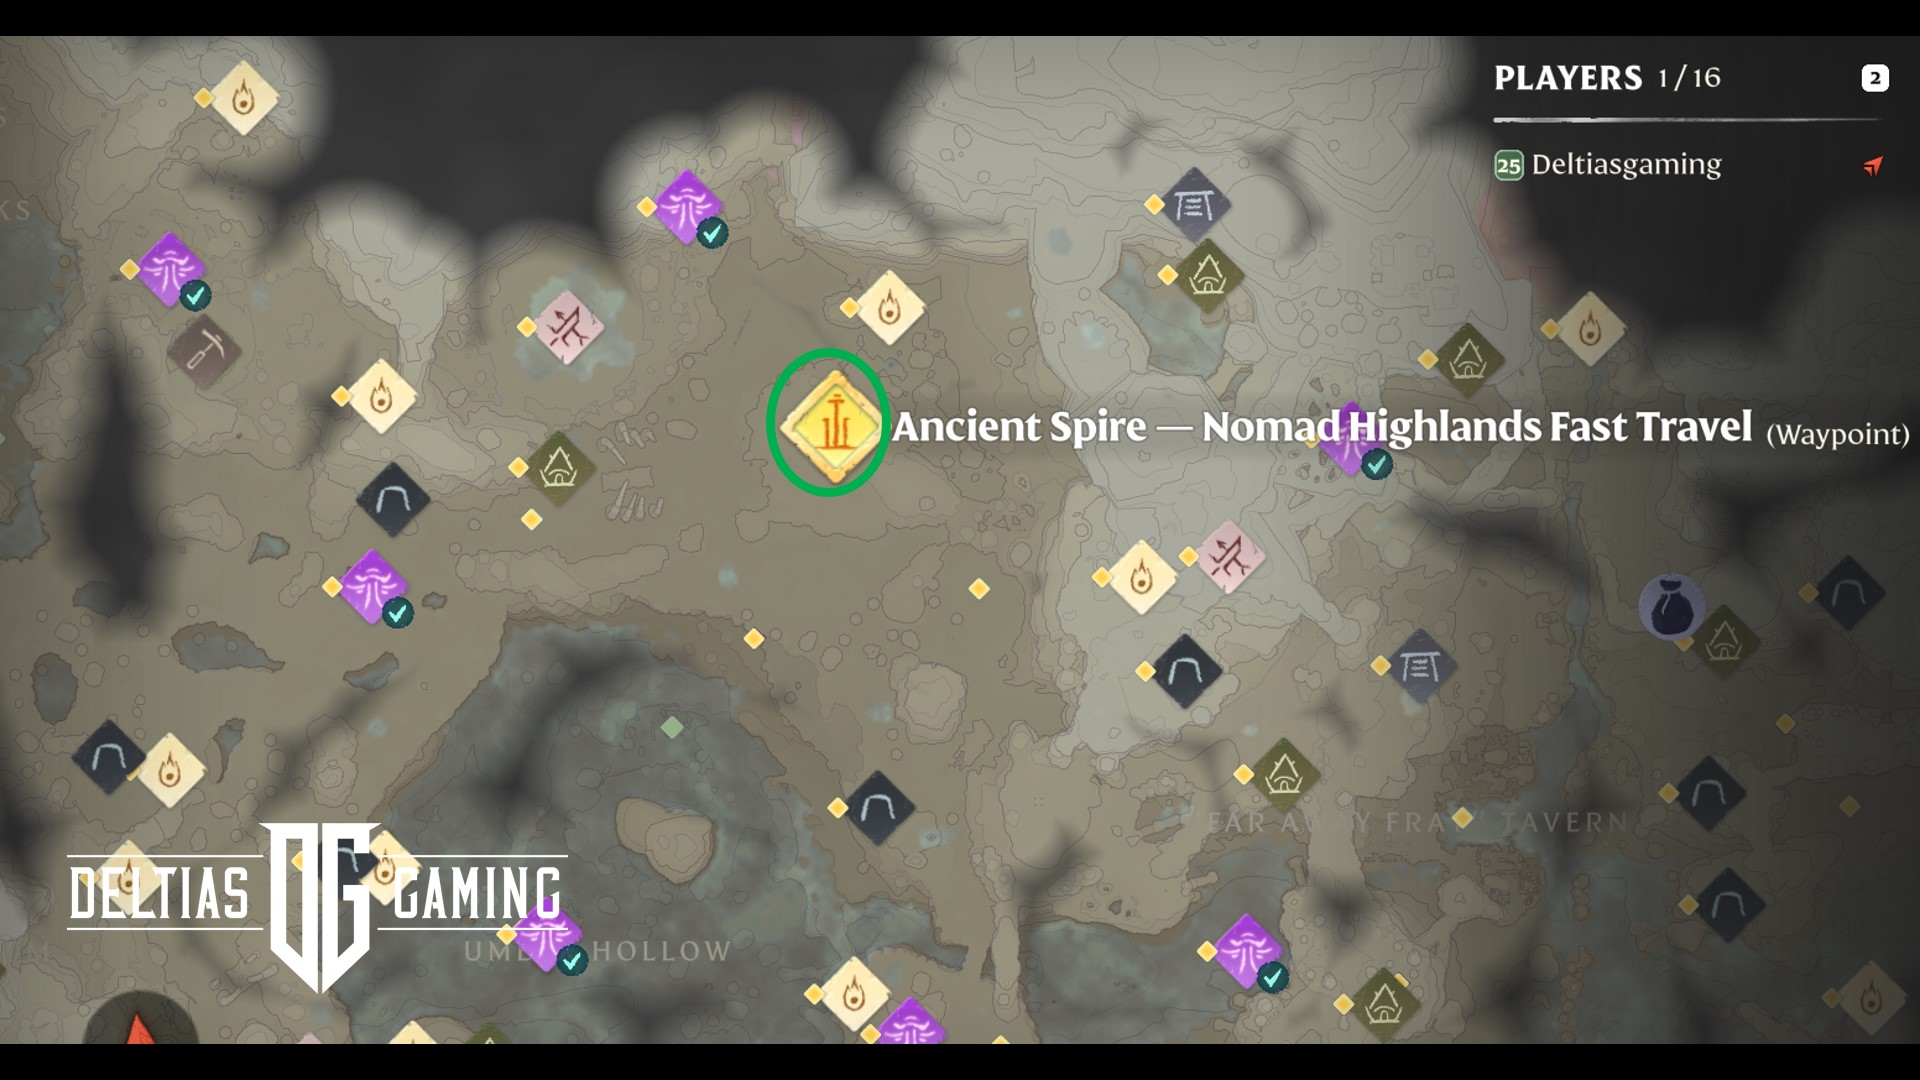
Nomad Highlands Ancient Spire

Nomad Highlands is the fourth Ancient Spires you can unlock, but to get there you will need first need to upgrade your Flame Alter to a Level 4. The location of this spire is far to the northeast of your original starting location so don’t be in a hurry to get there. If you’re following the natural progression of the story and quests, you’ll know you’re ready when you receive the quest to obtain the Tanning Station. If you’re playing the game normally, you’ll likely be around Level 10 or so.
When you find the Pillars of Creation area on the map, there will be a Research Camp nearby. The Nomad Highlands spire will be directly northeast of that location.
Climbing the Nomad Highlands Spire
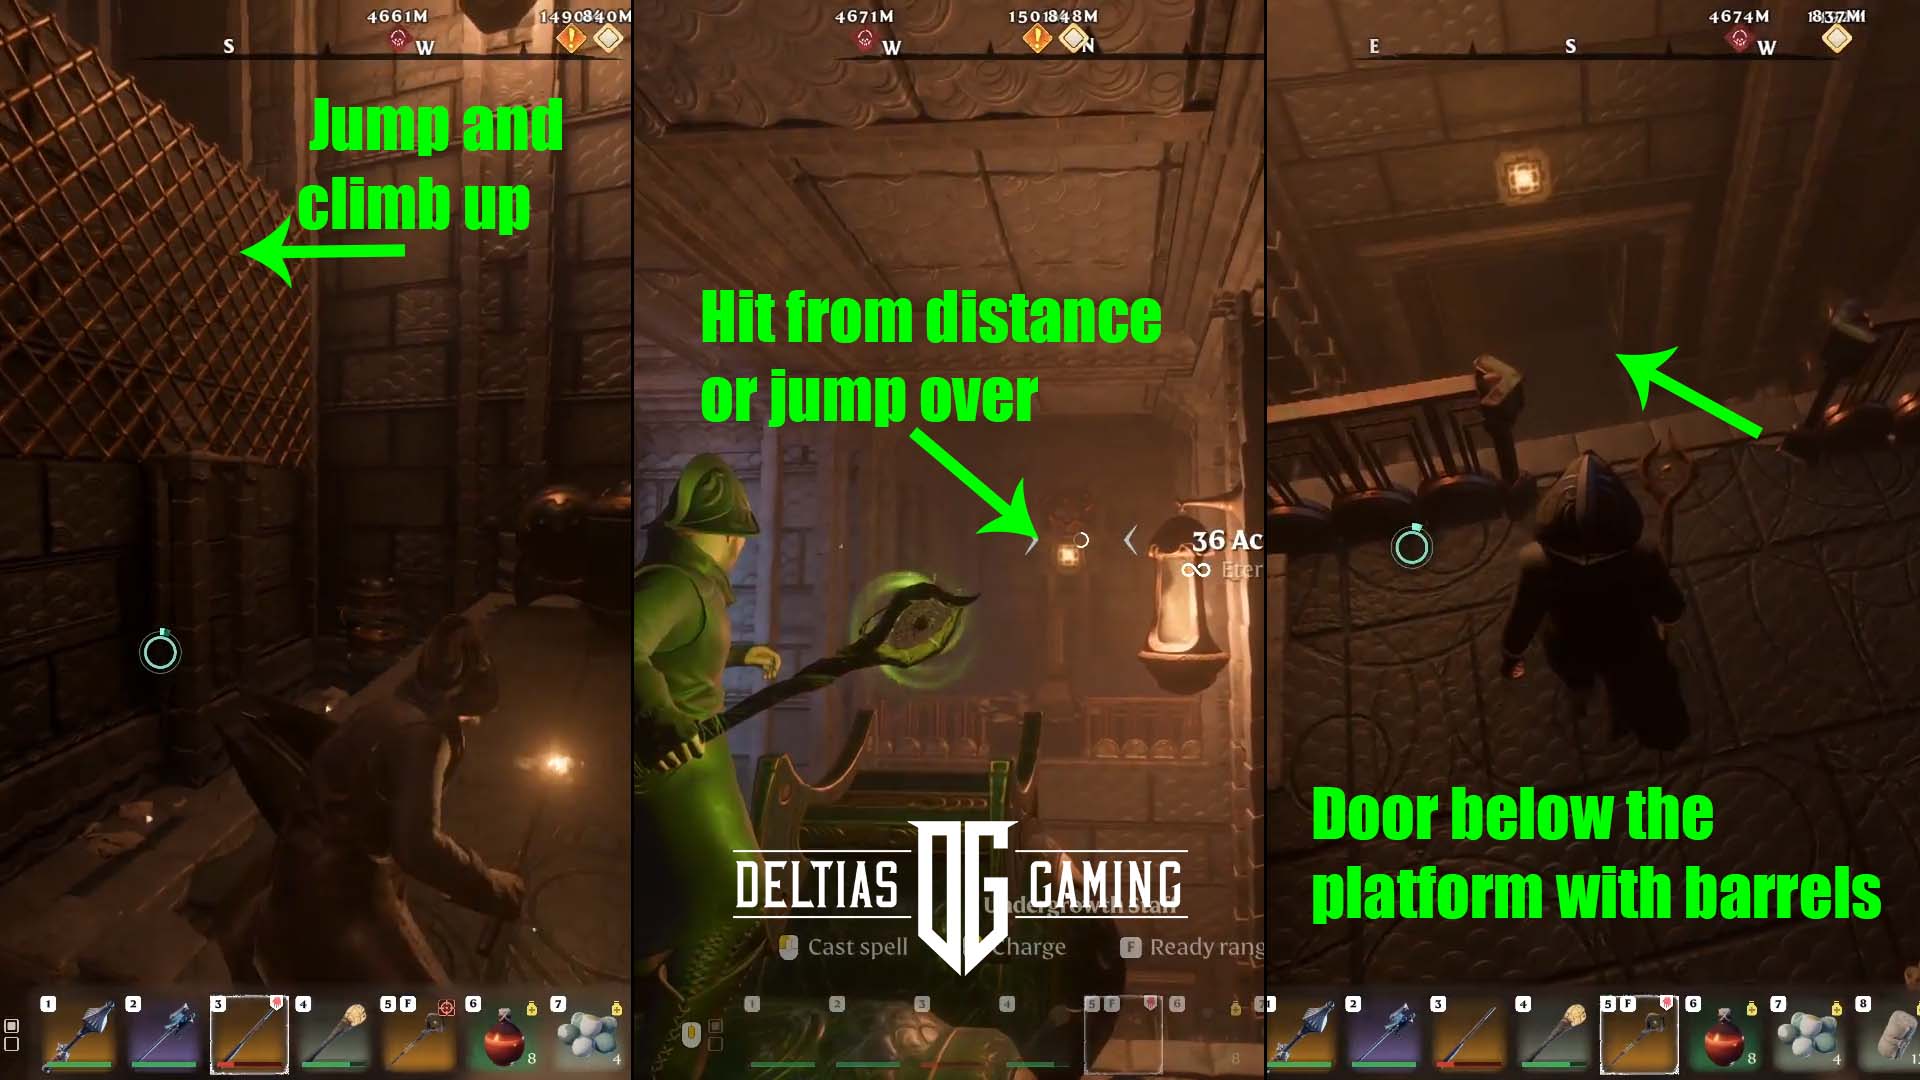
As you’ve done for all the spires before, take the first teleport pad into the structure of the tower to begin. Look immediately to your right/south to find the first yellow glyph to unlock. Then go down the stairs to the open door below. After stepping through the door, look up and to the left. Past the electric sparks and far above the open doorway you’ll see a second yellow glyph to hit. Once you’ve done that, turn around and head down the hallway on the right, dodging the electric sparks.
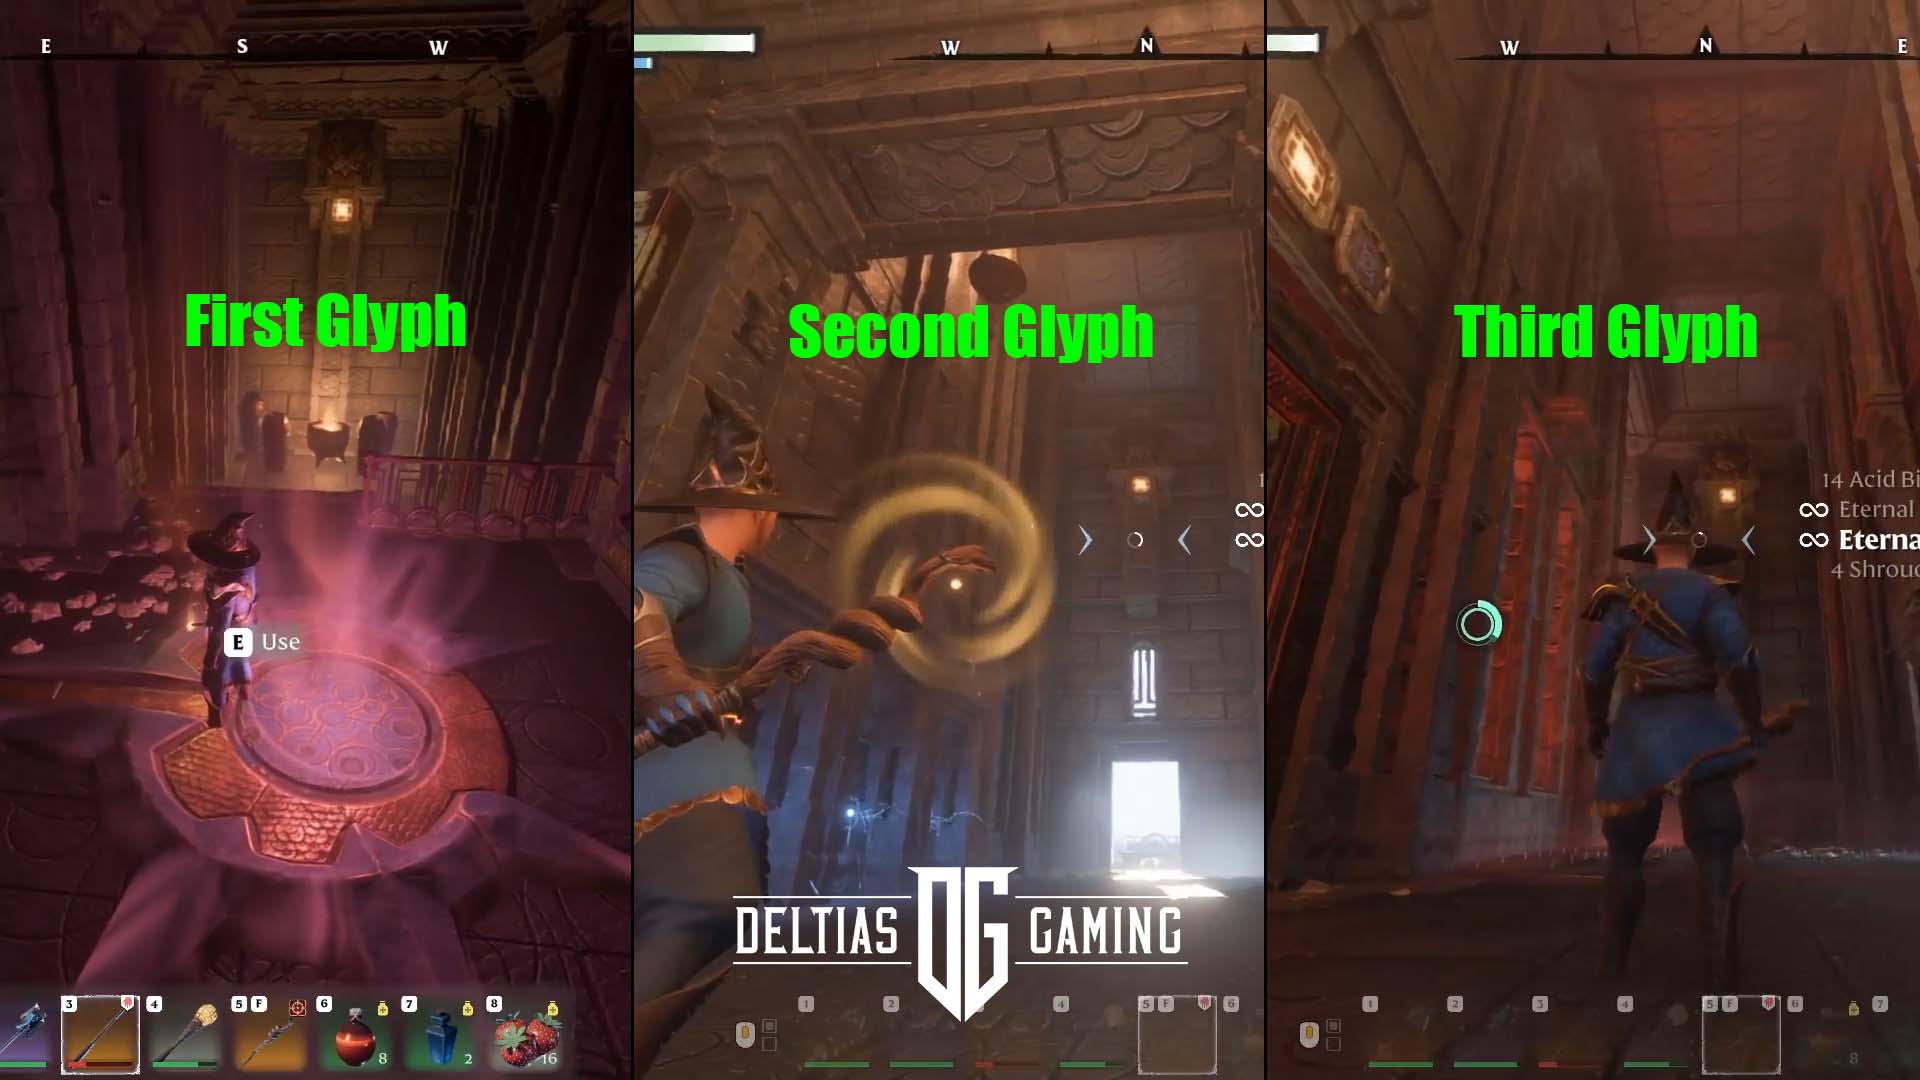
Enter the door at the end of this hall and run/jump over the spike traps around to the left. There will be another set of doors in the middle back here. Facing the doors, turn to look to the right/north. Way up high you’ll see another yellow glyph to hit. Turn around to face the other direction (south) and you’ll find the last yellow glyph to unlock.
You can now head back up to the first set of locked doors to claim a chest. To move forward in the spire, go through the double doors that are unlocked right in front of you. Use the teleport pad to reach the next level.
Nomad Highlands Spire Second Floor
In this room, walk to the back left corner and go down the stairs. The first yellow glyph will be down at the bottom past some spike traps. Once you hit it, then turn around and use your grappling hook to pull yourself up and across to the next space. The now unlocked door is down the hall on the right.
You’ll have to jump across this large gap and use your grappling hook to swing across to the staircase on the other side. Look to the east and down to find another yellow glyph to hit. Then look down and to the south to find an open doorway at the bottom. Head through that doorway and you’ll find a teleport pad on the left.
Nomad Highlands Spire Third Floor
Walk past the locked door here, run/jump over the spike traps, and climb the metal frame at the end on the right. Now you’re going to have to carefully make your way down a long hallway with fireballs coming at you. Time your jumps over them and head to the left when you reach the end. There will be a yellow glyph around the corner. Strike it and make your way back to that first door you passed.
There will be more spike traps on the floor as you make your way through. Take note of the locked door on your right, but keep moving around the turn. At the end, you’ll find a yellow glyph to unlock. Return to the door you passed, which will now be open.
Jump over some lava and onto the metal climbing frame. Head up and around the corner to the right. Look up and you’ll see a grappling hook point. There is a second one beyond that. You’ll have to use them both to reach the platform far to the other side. Shortly after you’ll find a yellow glyph. Finally, jump down and straight ahead to get through the door to the last teleport pad.
Congratulations! You’ve unlocked fast travel to the Nomad Highlands Ancient Spire! Additionally, interact with the Flame cauldron in the center. Doing so will unlock new location markers on your map. Next up in our guide, Enshrouded All Ancient Spires and How to Complete Them, we find the fifth and final Ancient Spire of Kindlewaste.
Kindlewaste Ancient Spire
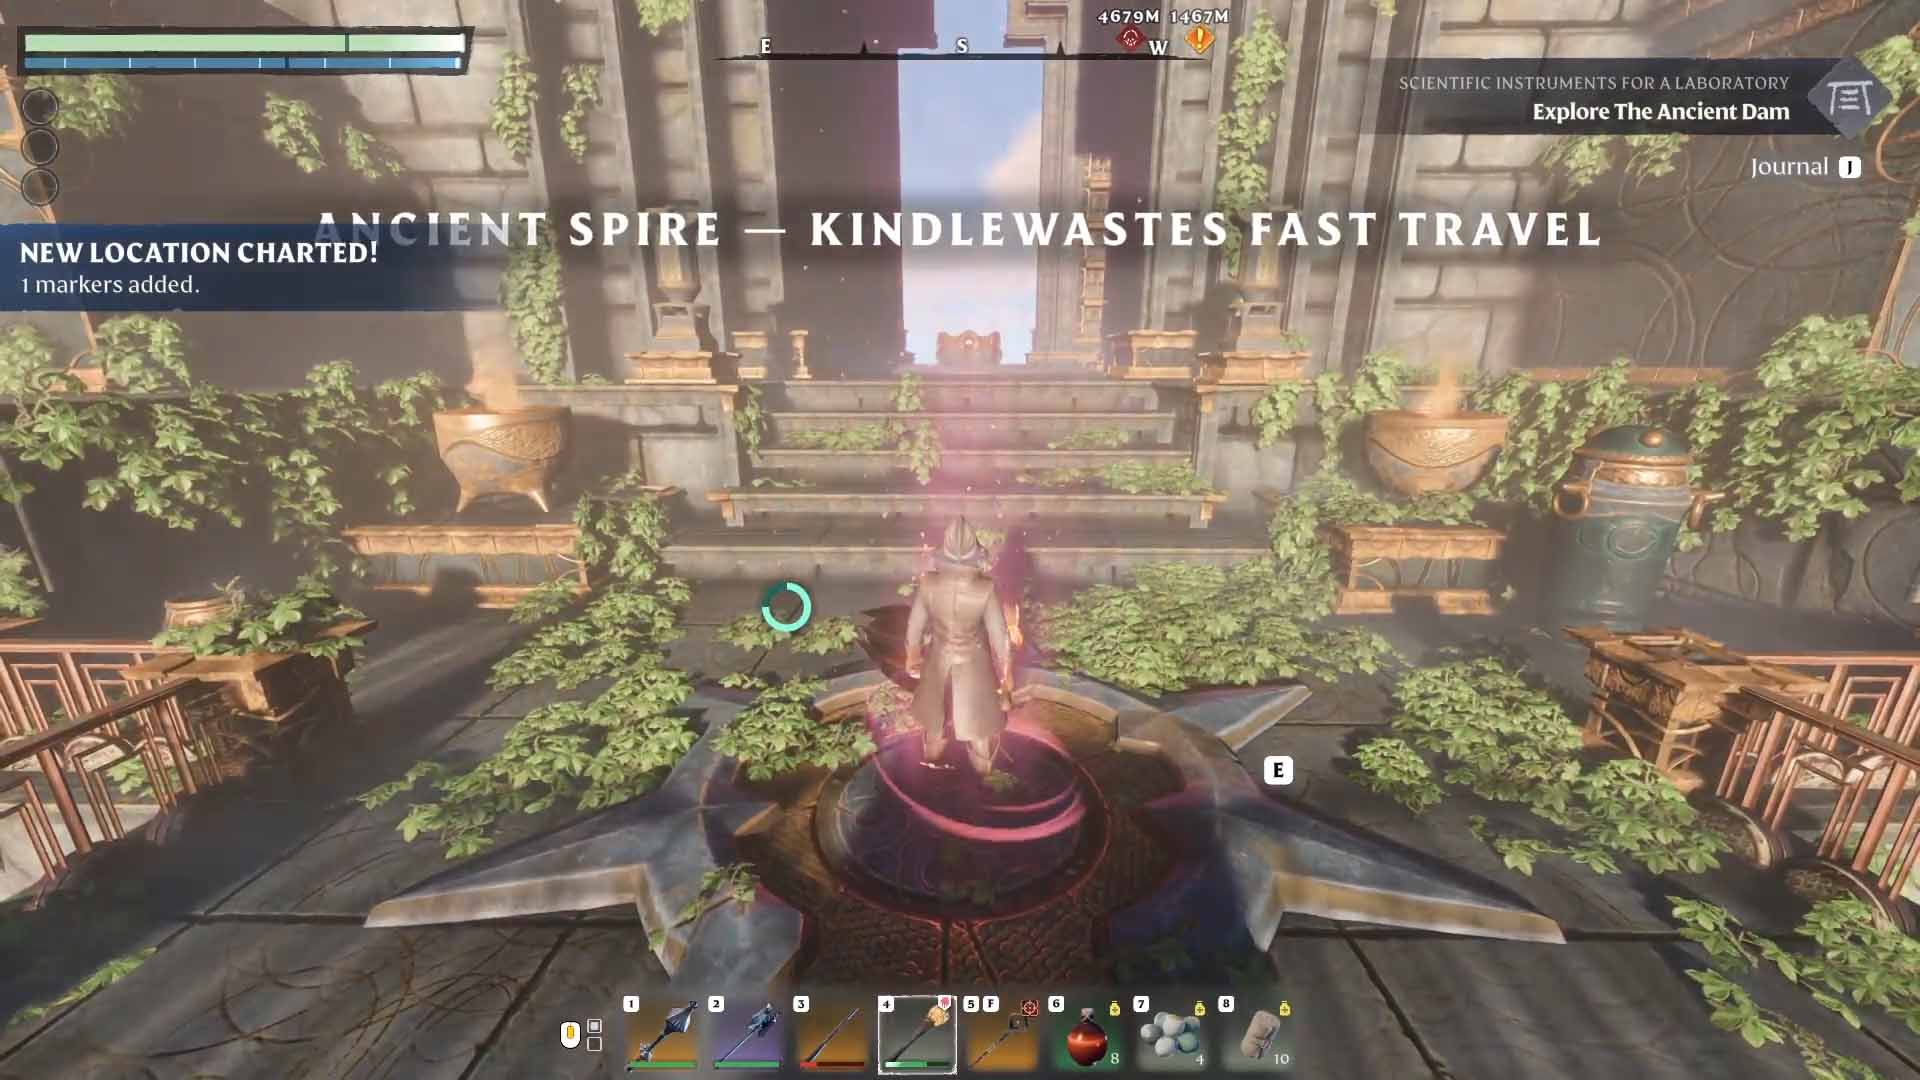
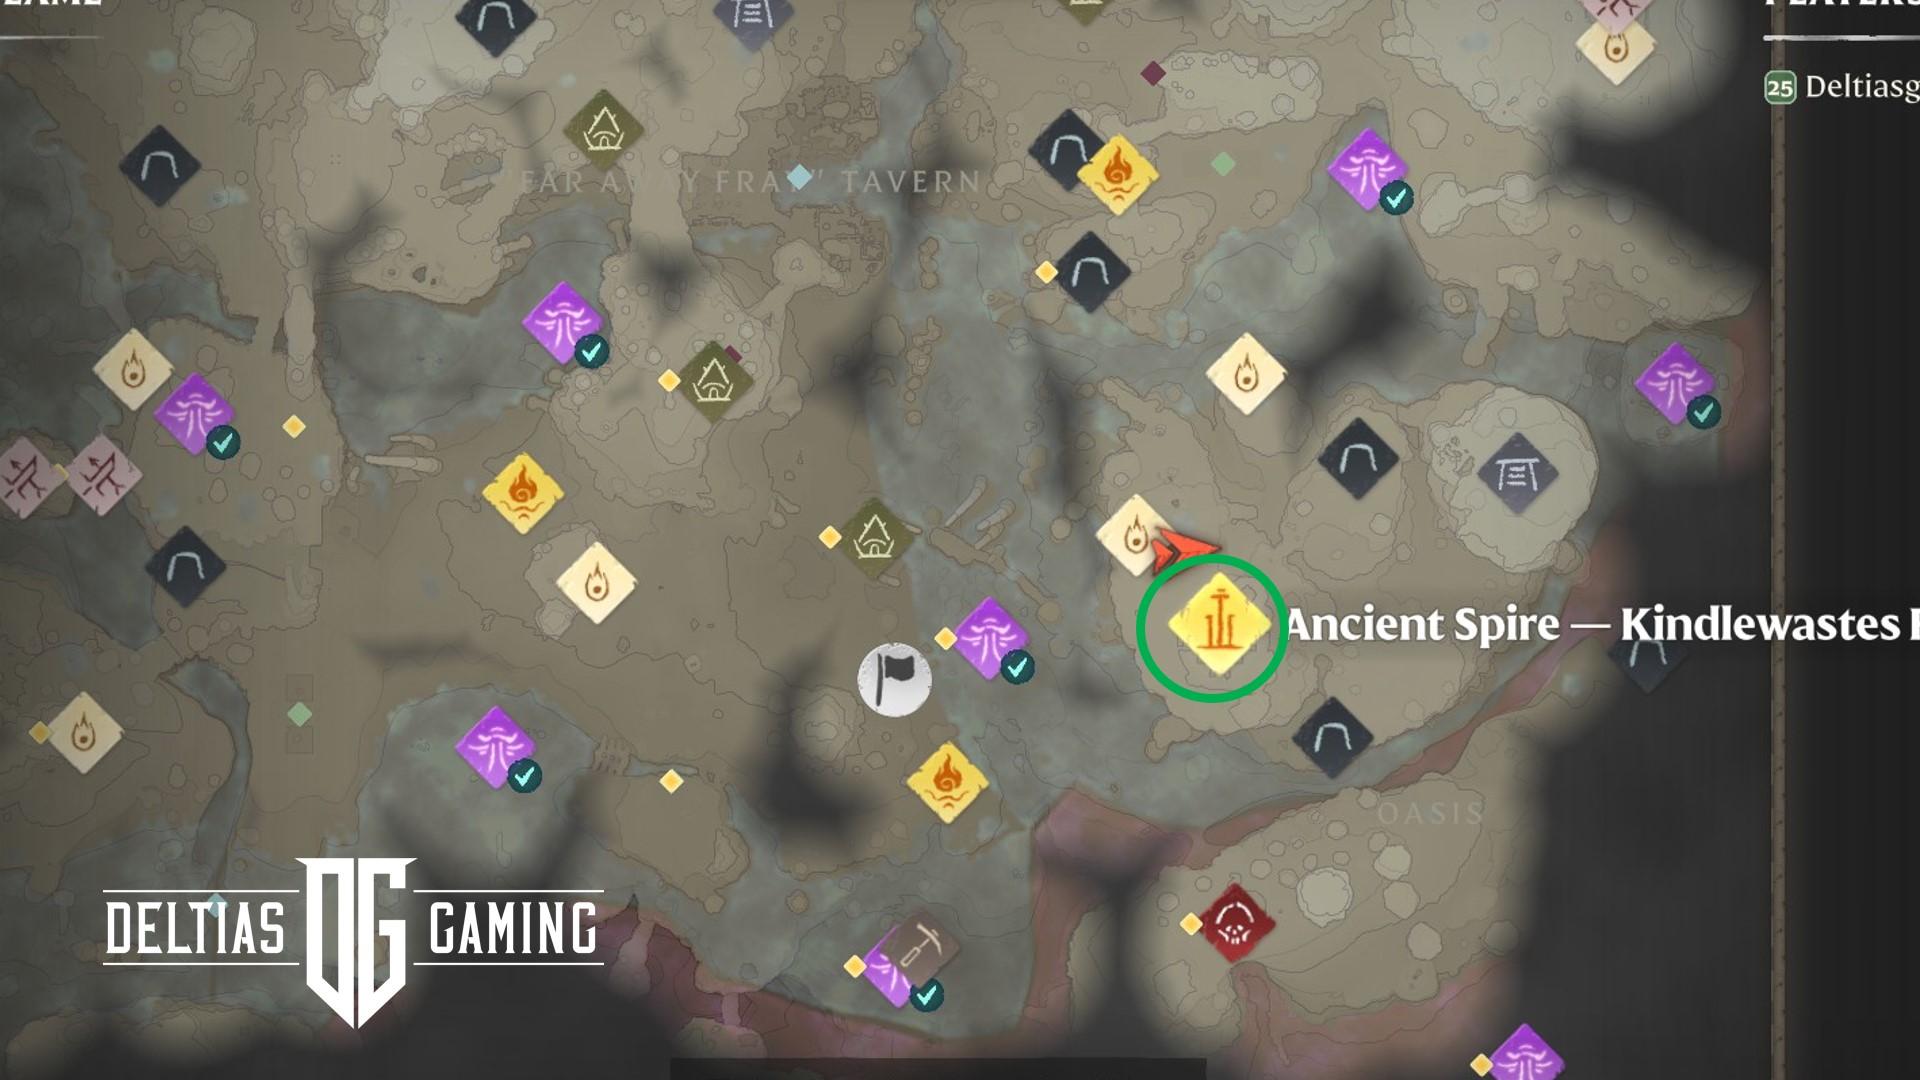
Kindlewastes is the fifth Ancient Spire you can unlock, but to get there you will need first need to upgrade your Flame Alter to a Level 5. You can find the Kindlewastes spire far to the east of your original starting point. If you’re standing on top of the Nomad Highlands spire, you may be able to see the Kindlewastes spire if you look down towards the southeast. Likely there will be some shroud in the way if you’re trying to go there in a straight line. You should be able to get there by walking down south from Nomad Highlands, keeping just to the east of the Umber Hollow. Once past it, you can turn and begin walking east towards the Kindlewastes spire.
Climbing the Kindlewastes Spire
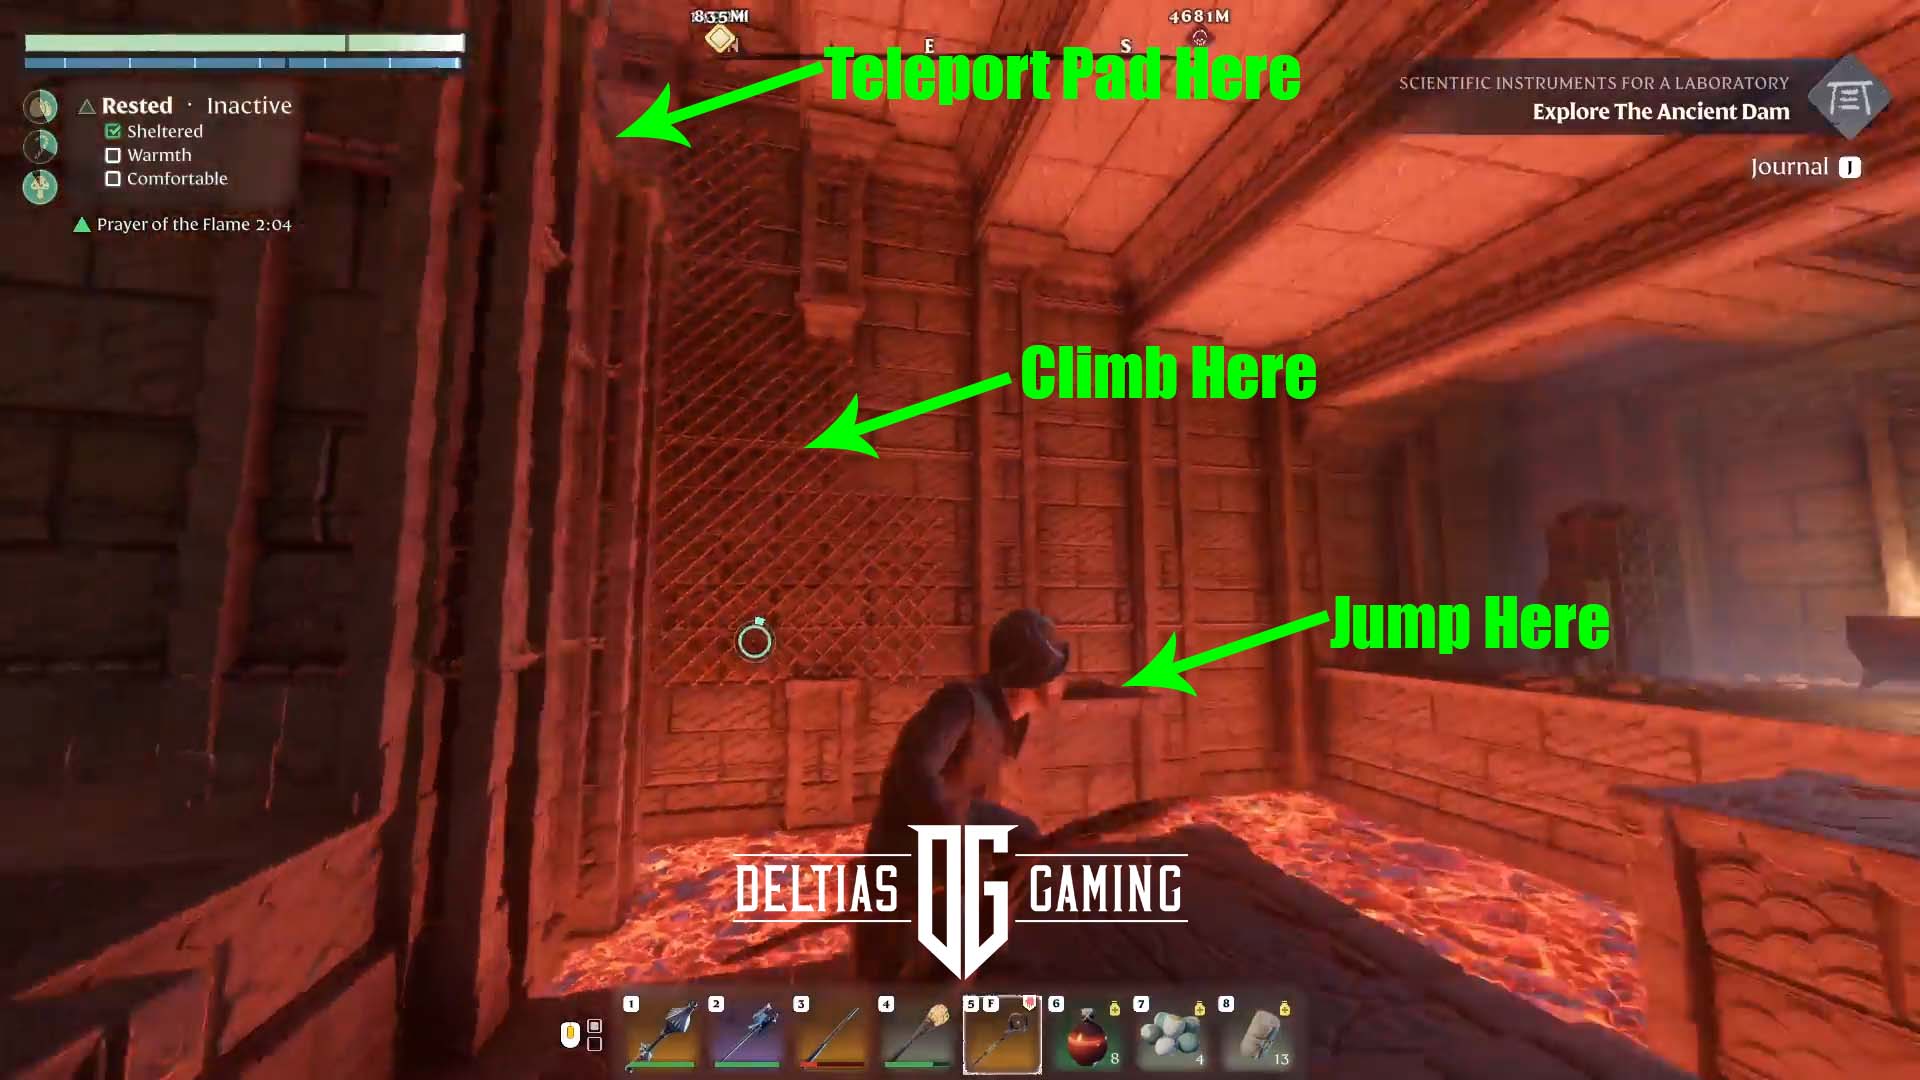
As with every spire before, take the first teleport pad to get inside and start your climb. You the grapple hook above in this room and swing straight across. Next, head down the stairs on the right. As you head down, look up and to the left. There is a yellow glyph to hit. Then keep on going to the bottom and jump/glide over the spike traps to get to the door you just unlocked across the way.
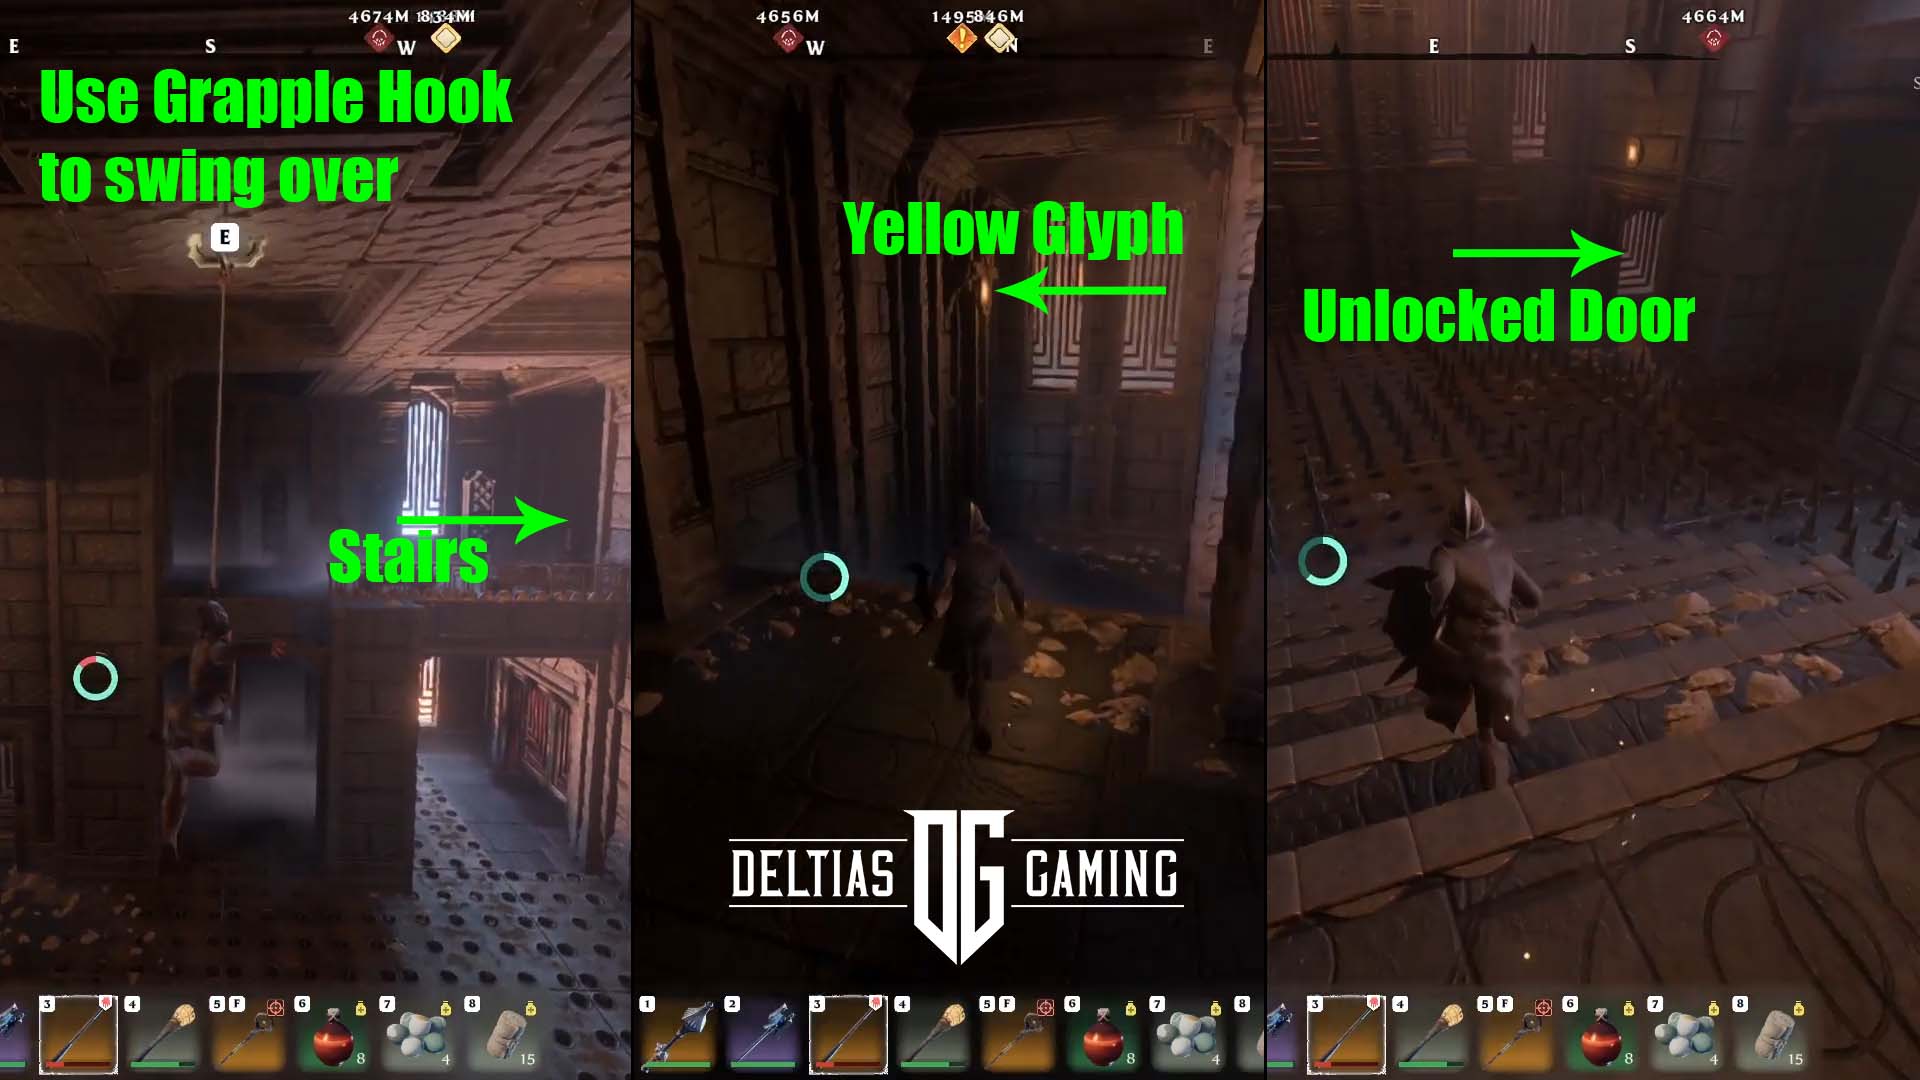
Head up the stairs, down the hallway with more spike traps, and up a few more stairs until you reach a room with a couple of small exterior doorways. You’ll find another yellow glyph against the back/west wall. Once you’ve interacted with it, head back down the way you came. On the bottom floor with all of the spikes, you’ll find another unlocked door with a teleport pad behind it.
Kindlewastes Spire Second Floor
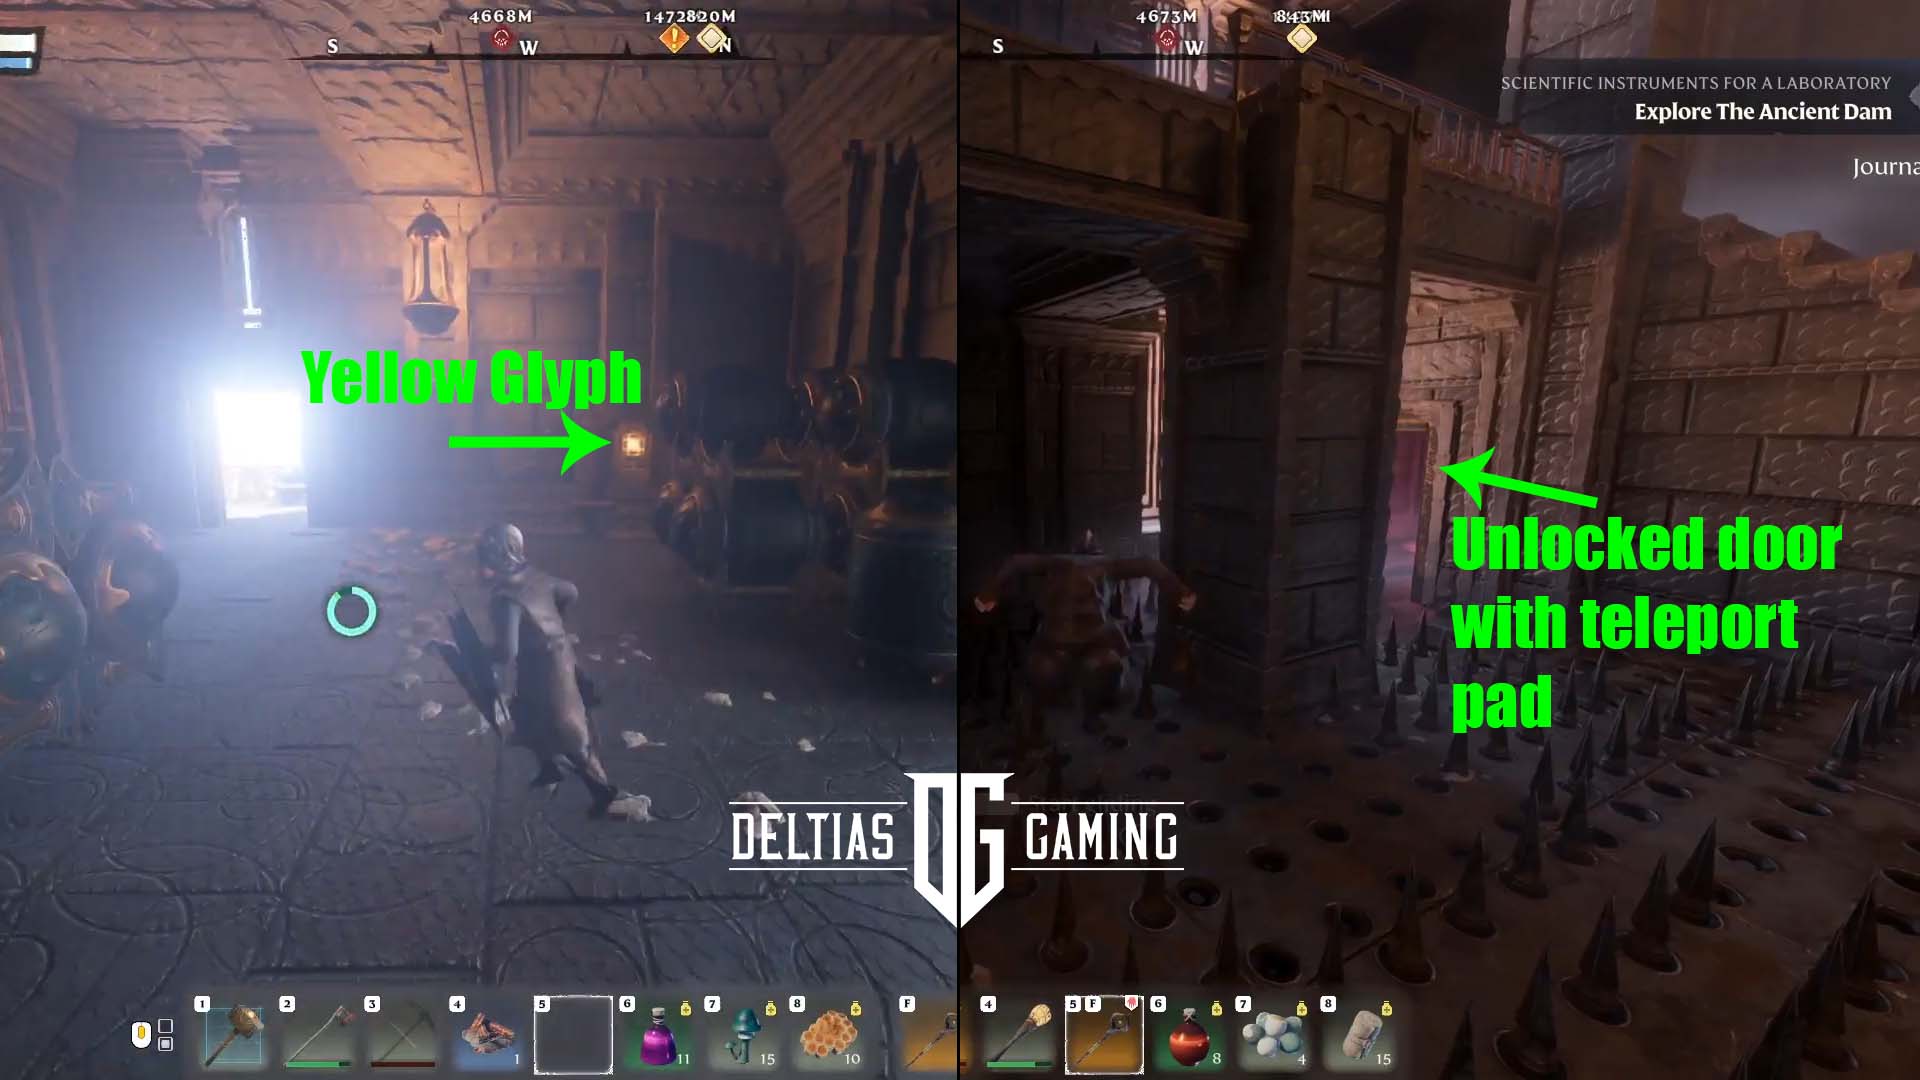
When you port into this space, the first thing you should see is a yellow glyph straight ahead. Hit it with magic or an arrow and then go around to the right, being careful of all the spike traps. You’ll see an unlocked door with another yellow glyph behind it. Interact with it, then head back to the starting point. Next, go around to the left. Go through the unlocked door and open the next set of doors immediately on your right.
Head up the short set of stairs to the right and use them to jump up and grab the climbing frame on the other side. Climb up, then down and over spike traps. When you get to the end, look to the left/north. Stand on top of the barrel items and shoot at the yellow glyph across the gap.
Then jump straight down and go into the unlocked doors directly beneath you. There will be another yellow glyph just inside and to the left. Now, turn around and head back through the nearby double doors you initially came through. Down that hall on the right will be the doors you just unlocked with those glyphs.
In this lava room, jump to the first platform in front, then to the one on the left. Then back to the metal climbing frame on the nearby wall. The next teleport pad will be on top. Let us continue with our Enshrouded All Ancient Spires and How to Complete Them, for the third floor of Kindlewastes Ancient Spire.
Kindlewastes Spire Third Floor
Look up and you’ll see a grapple hook point you can use to make the long jump to the platform across. Turn left and jump across. Then turn left again and jump across. Walk over to the left side of this slightly bigger platform and jump across to find the next teleport pad.
There are items you can get on this level if you want to jump down to the floor. But for the most direct and fastest route to complete the spire, this is how you get to the teleport pad.
Congratulations! You’ve unlocked fast travel to the Kindlewastes Ancient Spire! Additionally, interact with the Flame cauldron in the center. Doing so will unlock new location markers on your map.
Blackmire Ancient Spire
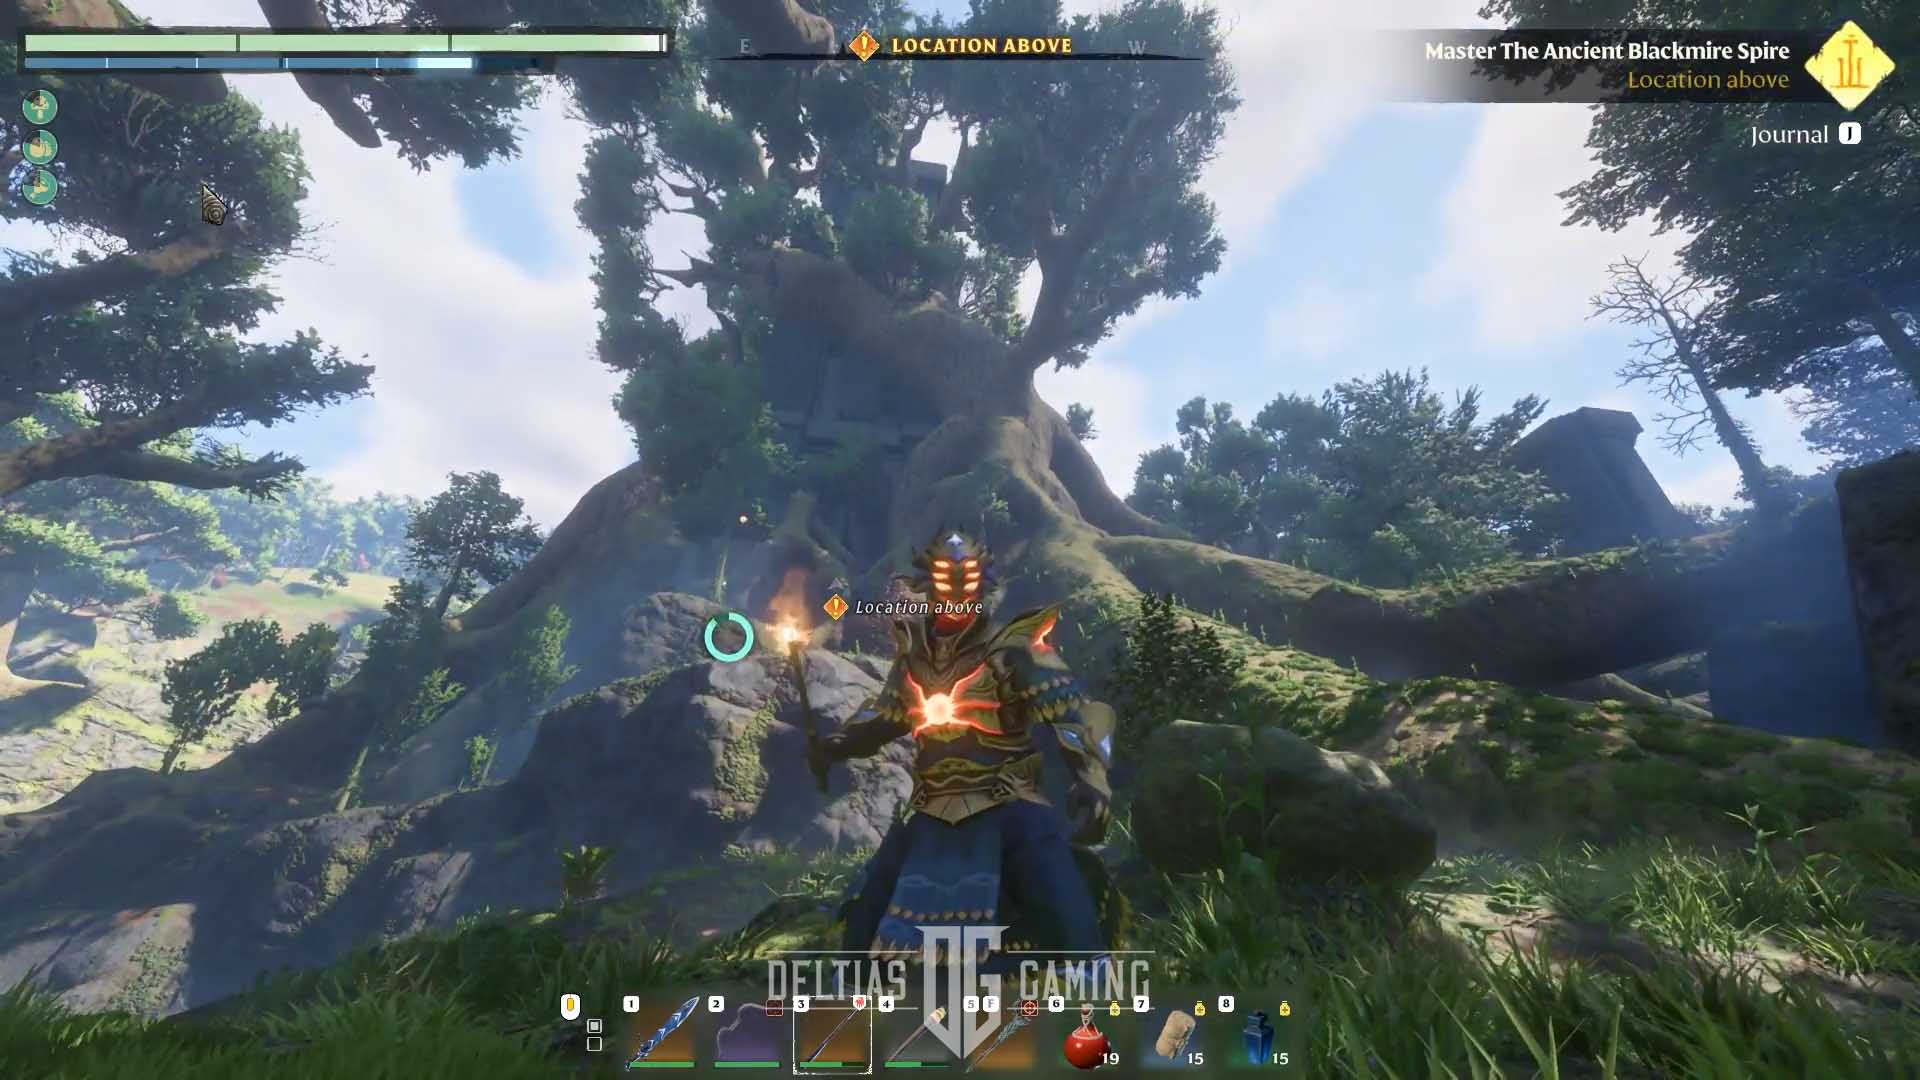
Blackmire is the sixth Ancient Spire you can unlock, and since this area is an extension of Revelwood you can travel there after upgrading your Flame Alter to Level 3. When you’re ready to reach this new tower, first fast travel to the Revelwood Spire. Step out on the edge that faces northwest and glide as far as you can in that direction. The Blue Goblet Tavern will be over on your left (to the west), and then the Blackmire Spire can be found north of that.
Additionally, this spire is almost hidden by the giant tree which has grown up around it. You’ll need to jump and climb up the large roots and limbs to get inside.

Climbing the Blackmire Spire
After using the teleport pad to get inside, head through the only doorway and jump over the flaming fireballs rolling down the hallway. You’ll end up in a little exterior section up in the tree, but there is another door on your left. Jump and glide over the electric volts down this next hallway. Next head through the door, around to the right and up the stairs. At the top you’ll find a door which is sealed by a single glyph.
The unlocking glyph is easy to find, just go through the open doorway into the outside, and around the corner on your left look up. You should see a glowing yellow glyph you can hit with a ranged attack. Consequently, the locked door will now open. Inside this room will be chest, likely will a nice weapon to collect.
Then, head back into the exterior space and jump up the ledges/limbs going around the outside of the tree. These will circle all the way around the tree, until you reach another building platform you can jump to.
Navigating the Purple ‘Springboard’ Flowers
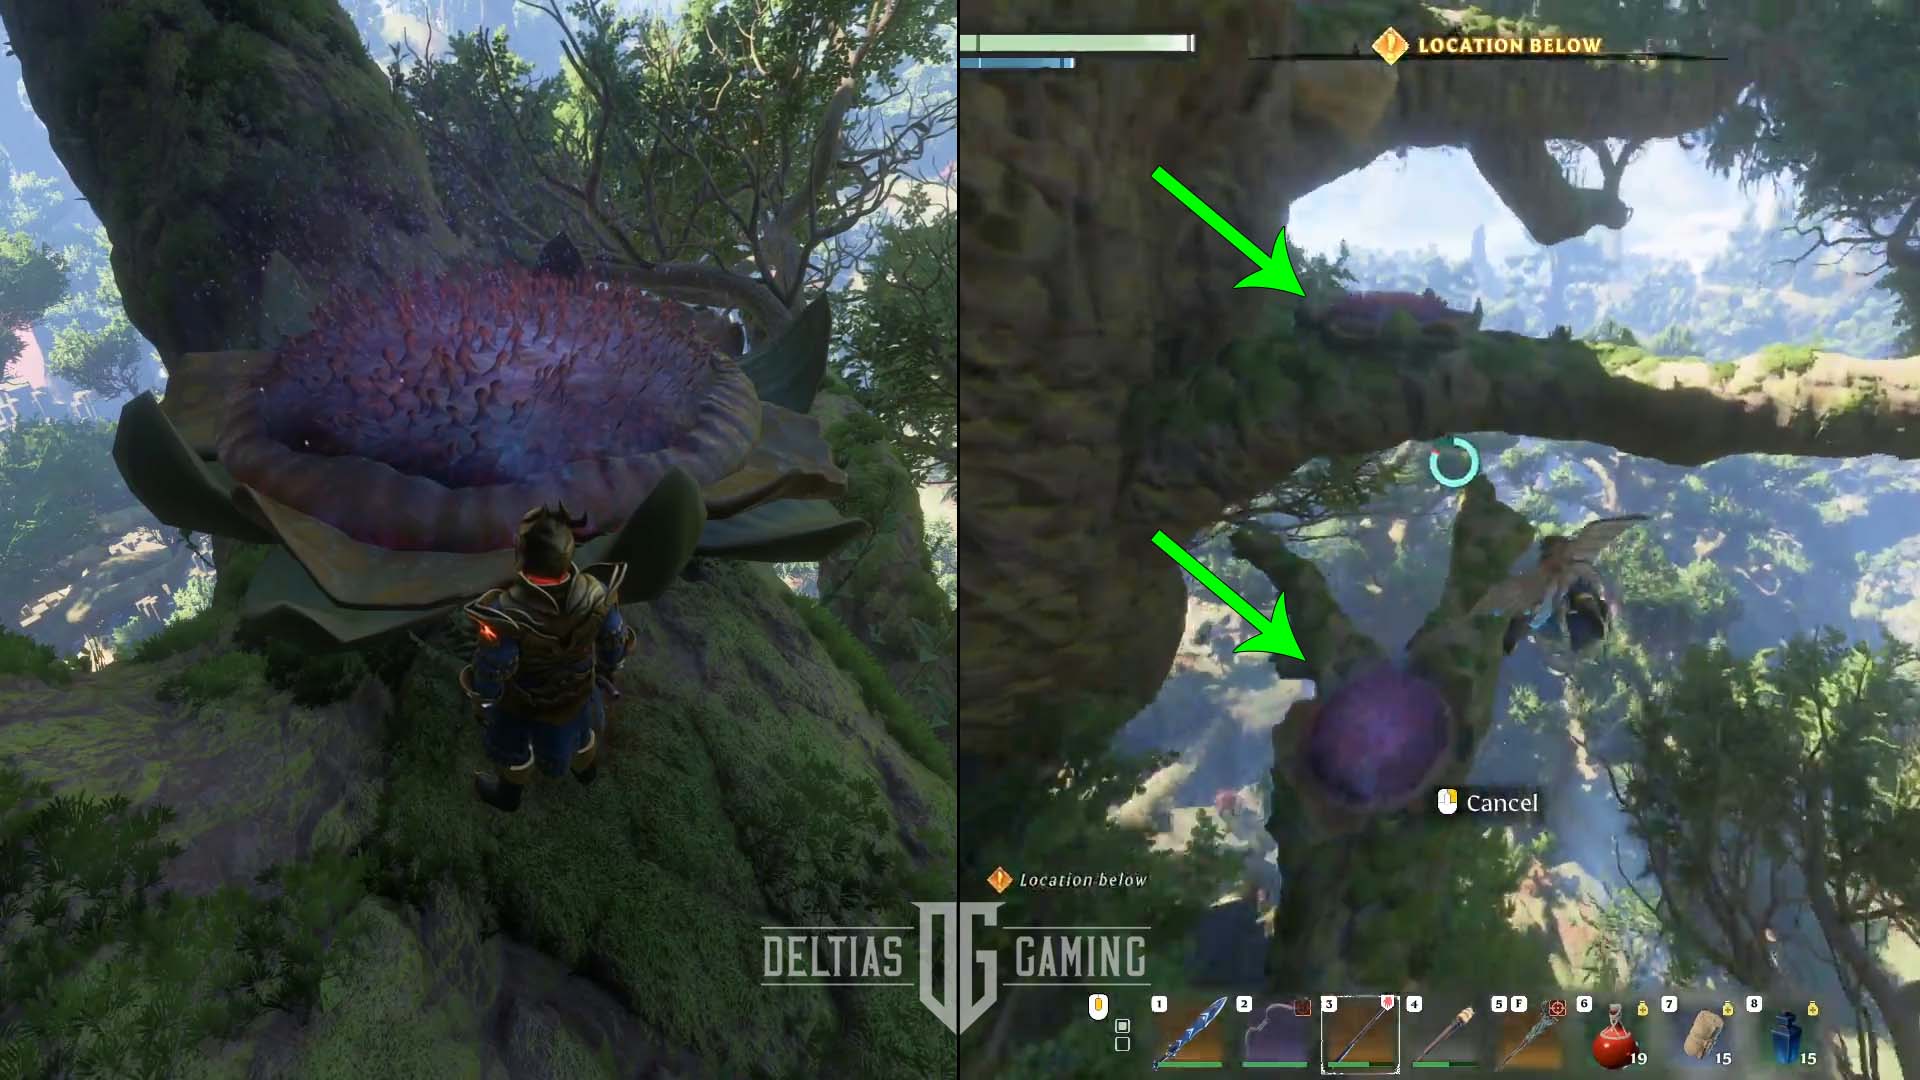
Finally, head up the stairs and there will be around room with rolling fireballs. The way out is around to the right. Then you’ll be outside and jumping/climbing more limbs again. Eventually, you’ll a large, purple flower on a branch. Jump on it and it will spring you into the air. You’ll see additional purple flowers you need to land on to get higher. These can be tricky because they fling you so high up into the air and it’s can be difficult to practice landing precisely on the next one.
Tips to Navigating the Purple Flowers in Blackmire Spire:
- Jump on the first flower and DO NOT click to use your glider. It’s a hard impulse to avoid, but this flower should get you more than high enough to nicely land on the second flower.
- The second flower may not push you high enough in the air to land on the third flower. If it doesn’t, try to land on the same branch. You can jump on the second flower again and use the glider quickly to give you a boost to the their flower.
- The third and final flower should send you high enough in the air to land on the next branch.
Back Inside the Blackmire Spire
Turn to the left, go across the ledge and then drop down onto the large branch below. Follow it forward and it will take you down and then back up into the spire building. Go through the door at the top of the branch on the right side. Then you’ll be back outside and walking up a large branch that goes around to the left.
Finally, make a short little hop from the tip of that branch to another. Follow this new branch back around into the building and you will have reached the top of the spire and unlocked the fast travel point!
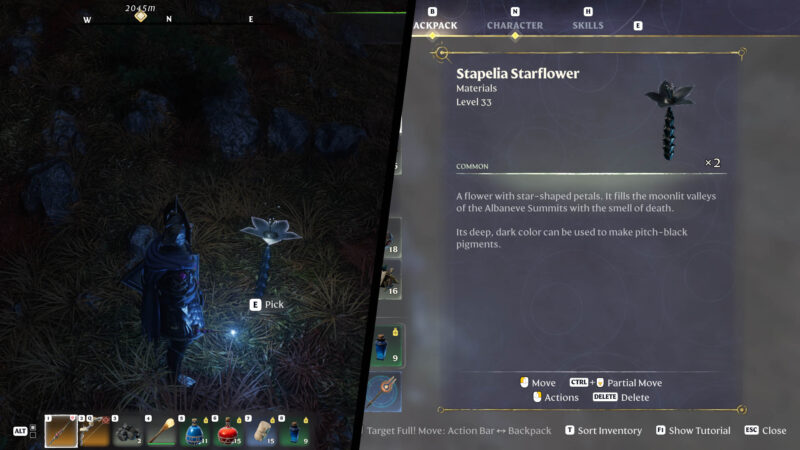
Albaneve Summits Ancient Spire
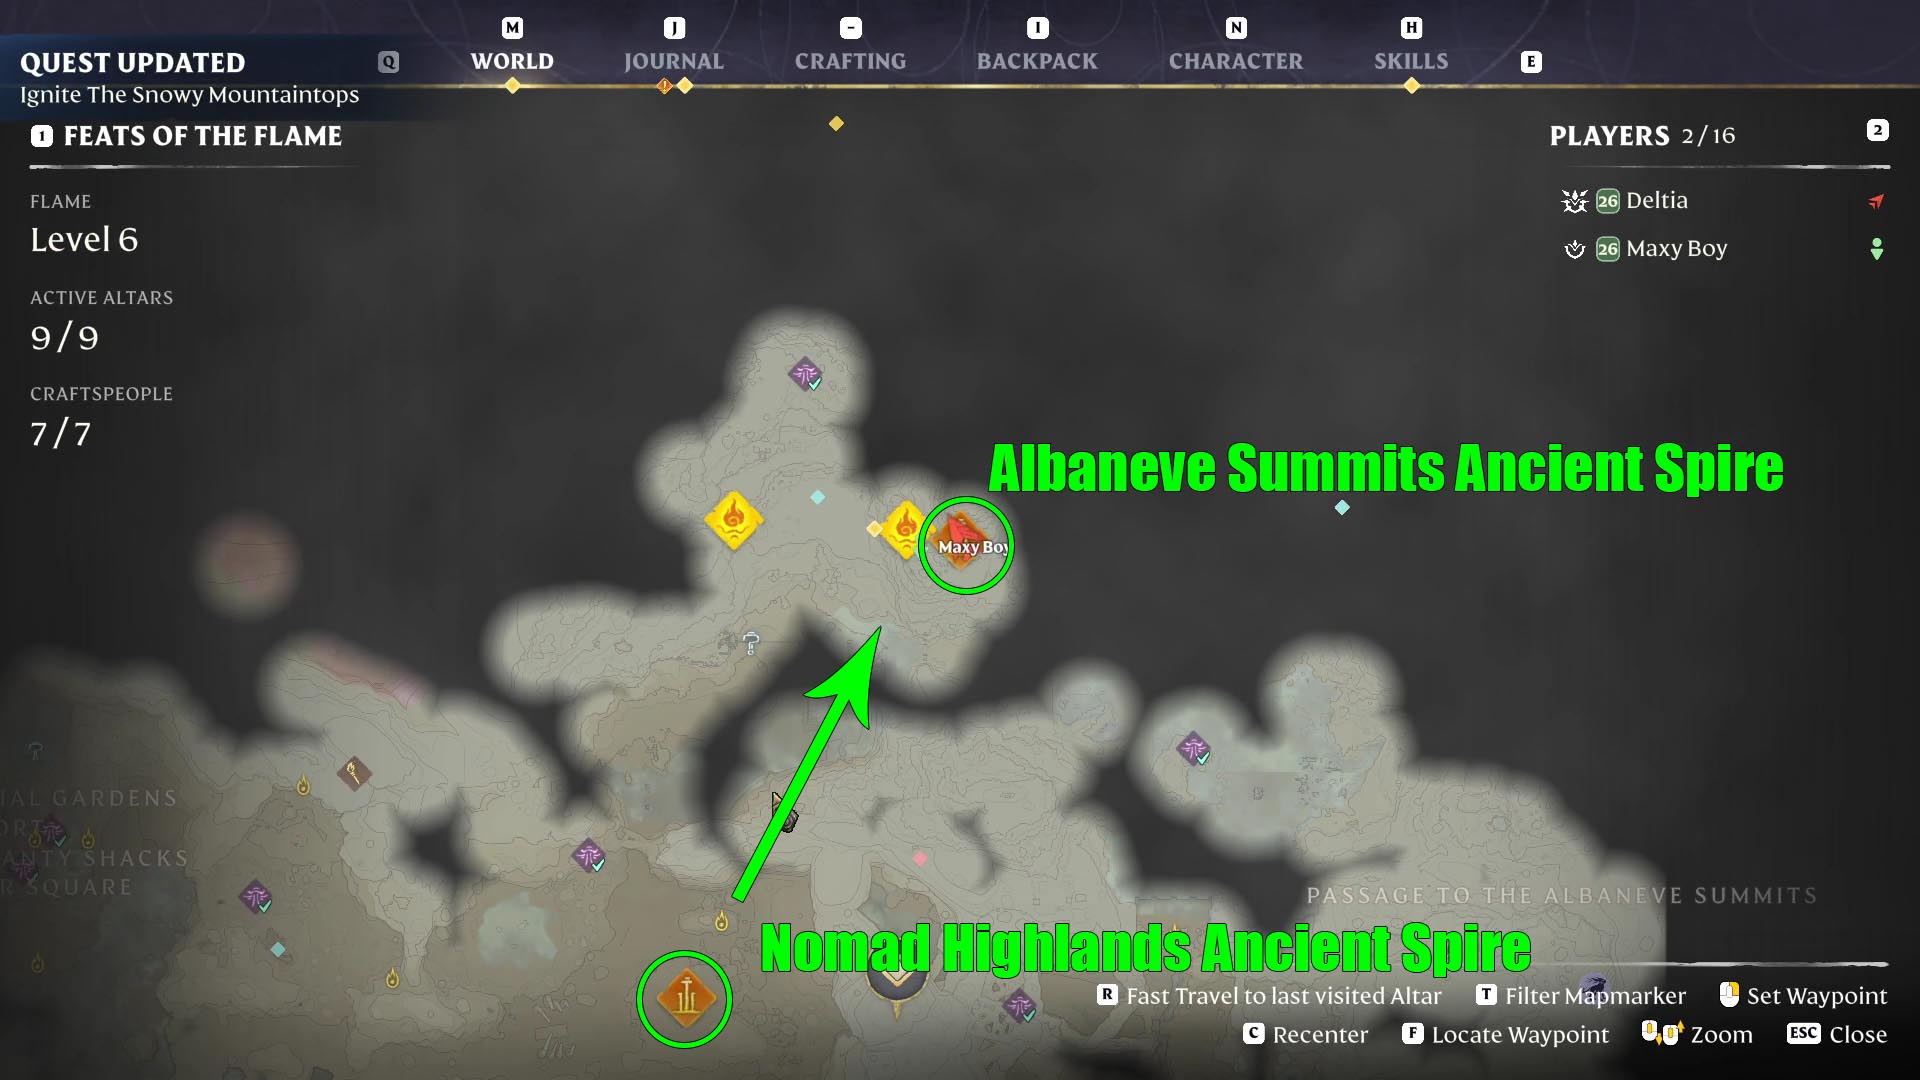
Albaneve Summits is the seventh Ancient Spire you can unlock, but to get there you will need to upgrade your Flame Alter to a Level 6. After unlocking this region, first fast travel to the Nomad Highlands Ancient Spire. Step out on a ledge that faces northeast and glide as far as you can in that direction. Depending on the terrain, you may not be able to walk to this spire in a straight line.
However, the tower will be a the top of a mountain and easy to spot. There is a pathway that winds around the mountain and leads to the entrance.You may have to scale the mountain a bit to find the path, but once on it, keep following it up.
Climbing the Albaneve Summits Spire
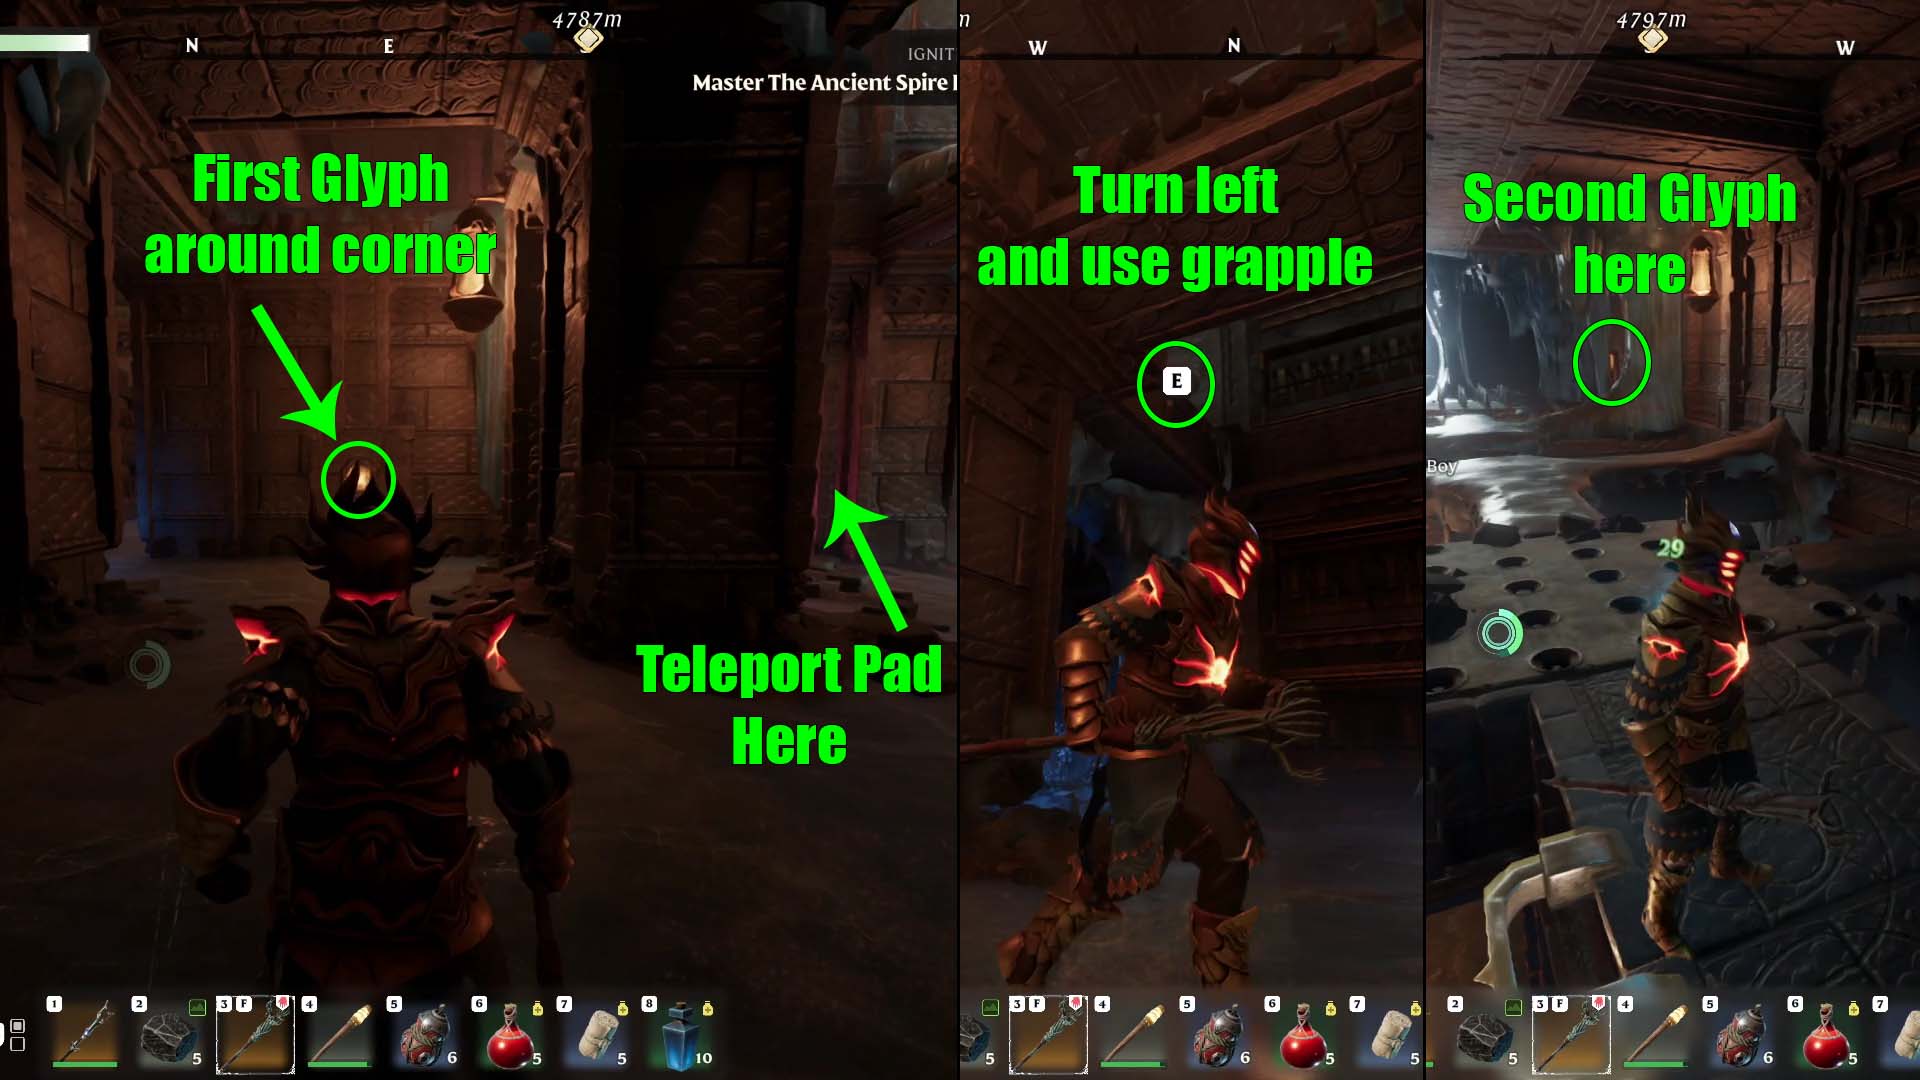
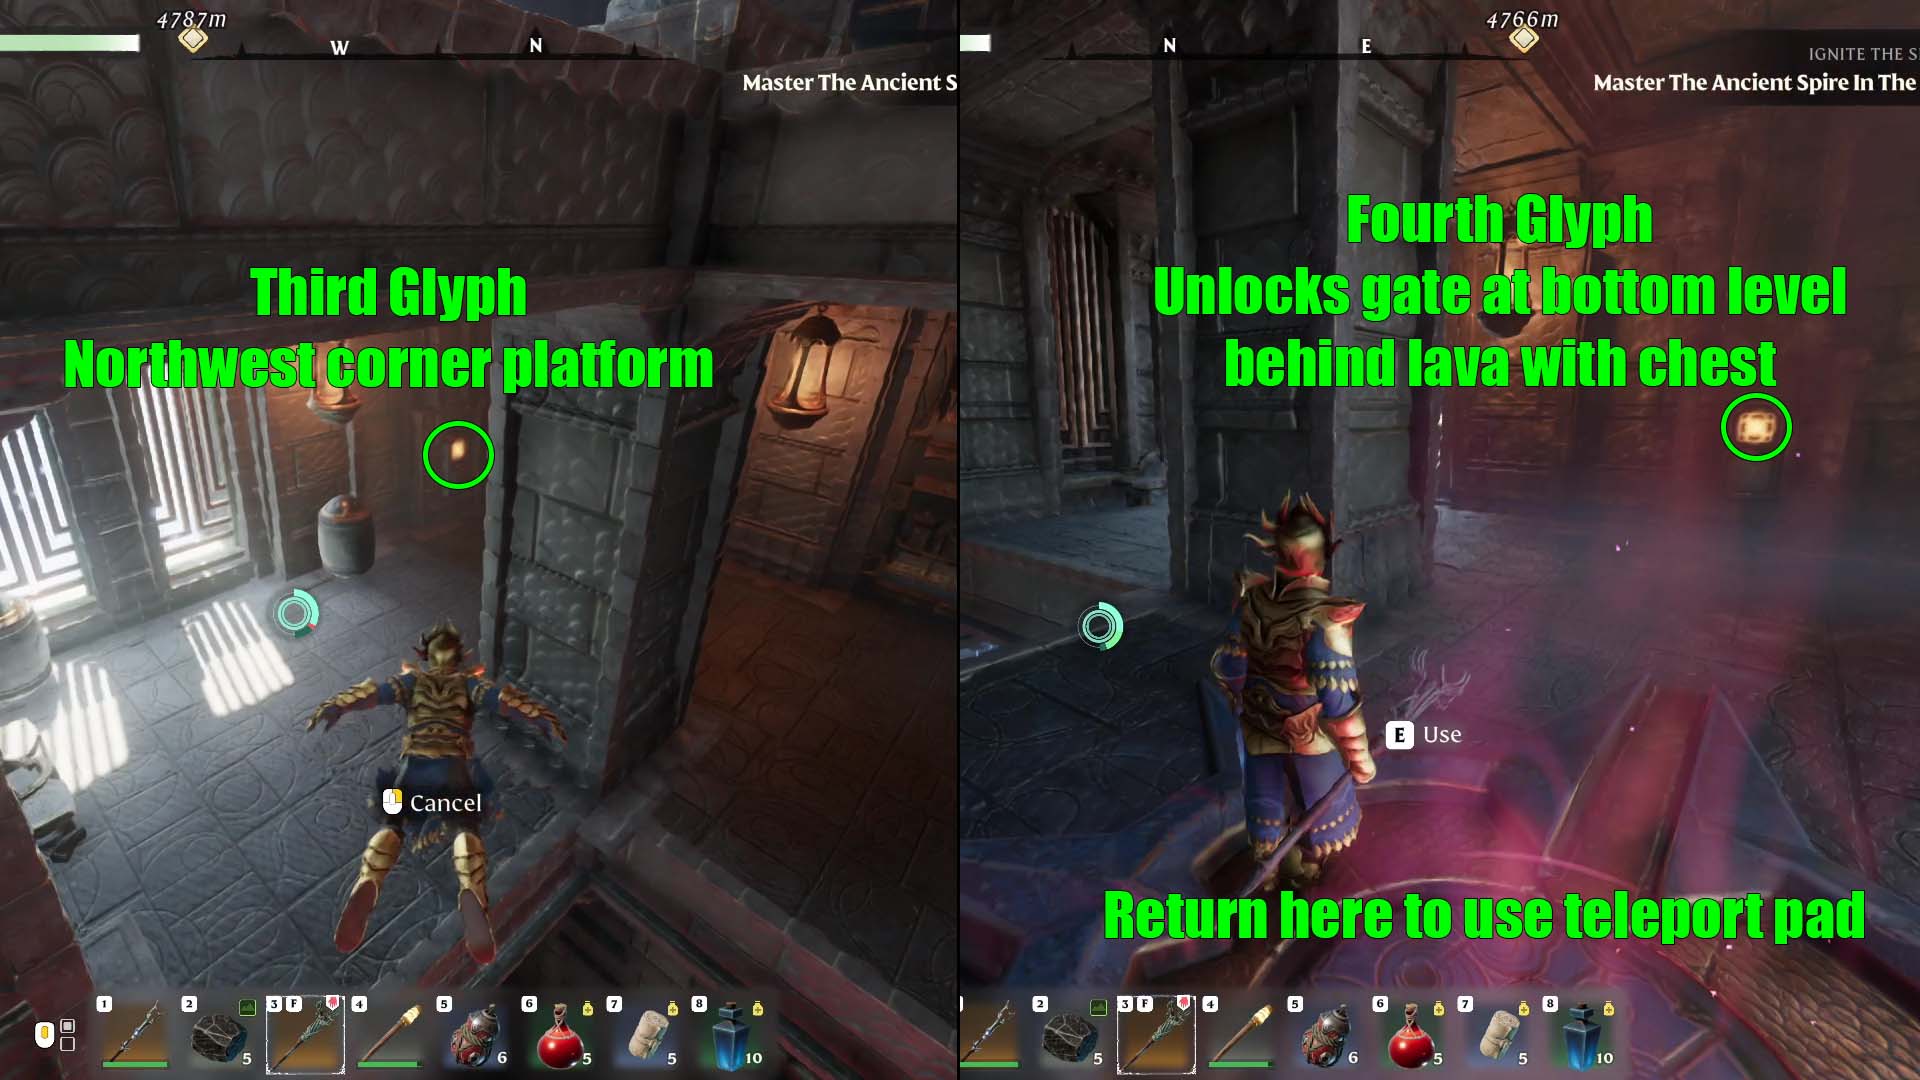
As always, use the initial teleport pad to get inside the tower. In this first large, two floor room you will need to unlock a door that is barred by four glyphs. The first yellow glyph can be found on the first floor, by moving west and then swinging around the corning and turning west. The glyph should be straight ahead. Press it, and then look over your shoulder to the left. Use your grapple hook to reach the second floor. From where you stand you should be able to see the second glyph all the way down on the right.

Next, turn and head east. If you stop in the middle you can look to the left to see the barred door. Just past the door, across the room, you should see the glow of the third glyph. Carefully make your way across the ice supports over to it. After pressing it, turn back the way you came. Head south and stop at the end where the path breaks off right before a spike trap. Drop down and the last glyph you need is there. Use the grapple hook to get up and take the teleport pad to the next floor.
Albaneve Summits Spire Second Floor
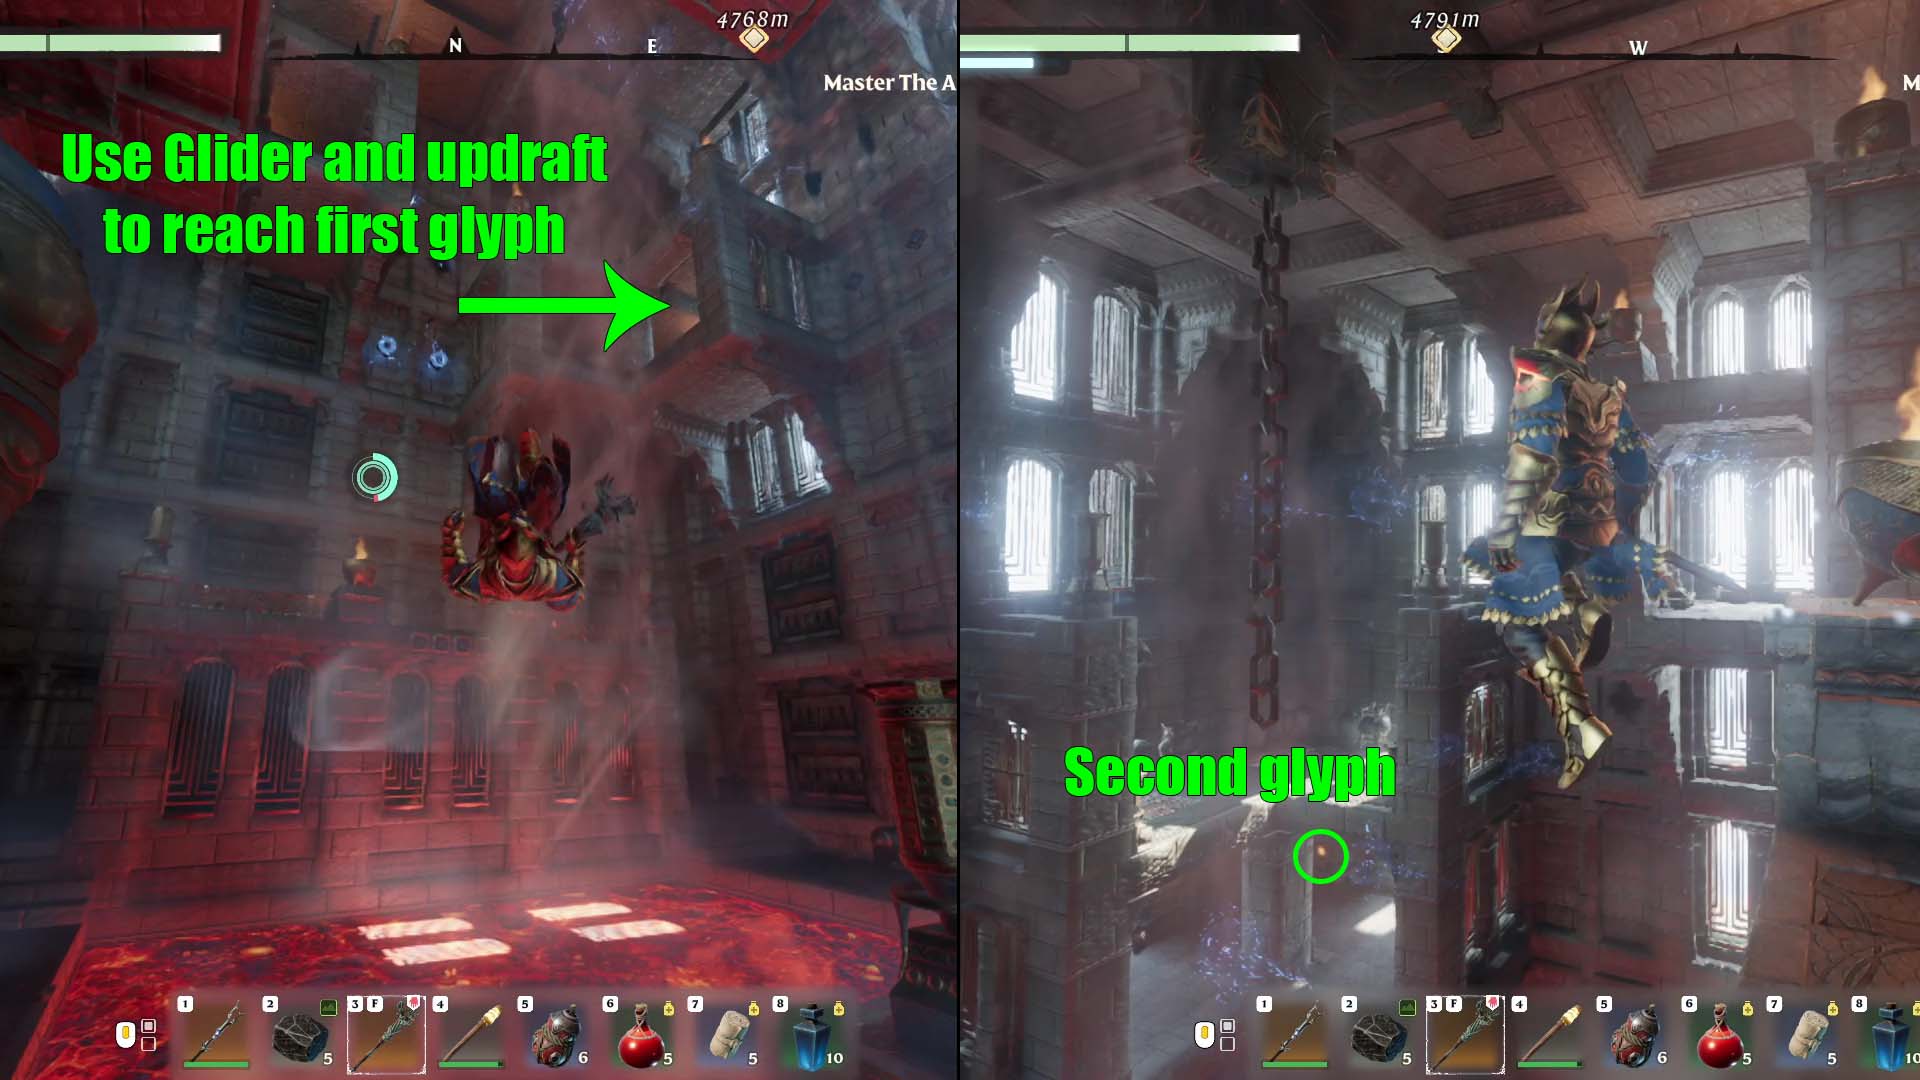
Inside this next space in a large room with a tall ceiling. The lava in the center floor is creating an updraft which you can use to reach the various platforms in the corners above. There are four glyphs you need to press to open the gates to reach the treasure chest on the far side of the lava. If you want to just use the teleport pad, it is up on a platform at the very top, in the southeast corner.
To reach the first glpyh jump and glide to the first platform in the northeast corner. It should be up at to the right from the teleport platform. Next, look across at the corner of the room diagonally across from you. On the lowest platform, you should see the yellow glow of the second glyph.
From this platform with the second glyph, jump and head north. In the northwest corner is the third glyph. The highest platform just above it has a chest you can grab. Then, jump down for this one.
The fourth and final glyph is on the same level as the teleport pad. This will be in the highest (and only) platform in the southeast corner. Use the teleport pad and this will take you to the top of the tower, unlocking the fast travel point.
Looking For More About Enshrouded?
Thank you for reading Enshrouded: All Ancient Spires and How to Complete Them Guide. We provide the latest news and create guides for Enshrouded, Baldur’s Gate 3, ESO, and more. Also, watch me play games on Twitch or visit my YouTube channel!