Facebook
 Reddit
 Email
Email
Sick of stutters, input lag, and random hitches despite high FPS? This guide shows you how to optimize your PC for low-latency gaming.

With the rise of chiplet-based processors in the PC industry came a host of subtle yet frustrating issues, such as click latency, unresponsive gameplay, and frequent audio dropouts during streaming, among others. These problems are tough to recreate, but many gamers and content creators face them daily. That said, we can’t entirely place the blame on chiplet architecture alone. Moore’s Law is effectively dead, and even monolithic designs aren’t making changes like it did back in the 2000s. Remember the Core i9-10900K? It was arguably the last “pinnacle” CPU, offering rock-solid performance for gaming and editing, with only occasional SA voltage spikes, which were easily fixed via SA voltage override within the motherboard.
Since then, things haven’t improved much. Intel’s 11th generation onwards introduced memory-gear modes, which continue to this day with the 15th generation Core Ultra series. This introduces noticeable latency issues, and numerous Reddit threads discuss this issue. Gamers and content creators frequently complain about an indescribable laggy input or inconsistent performance, but when asked to reproduce the problem, it becomes elusive. What can be consistently reproduced are the timeline scrubbing hitches, click delays, freezing when dealing with multiple files at once, frame pacing issues within the game, and more. If any of these issues keep plaguing your game or professional workflow, the guide is for you.
1) Get Your RAM Timings Right for Low Latency Gaming
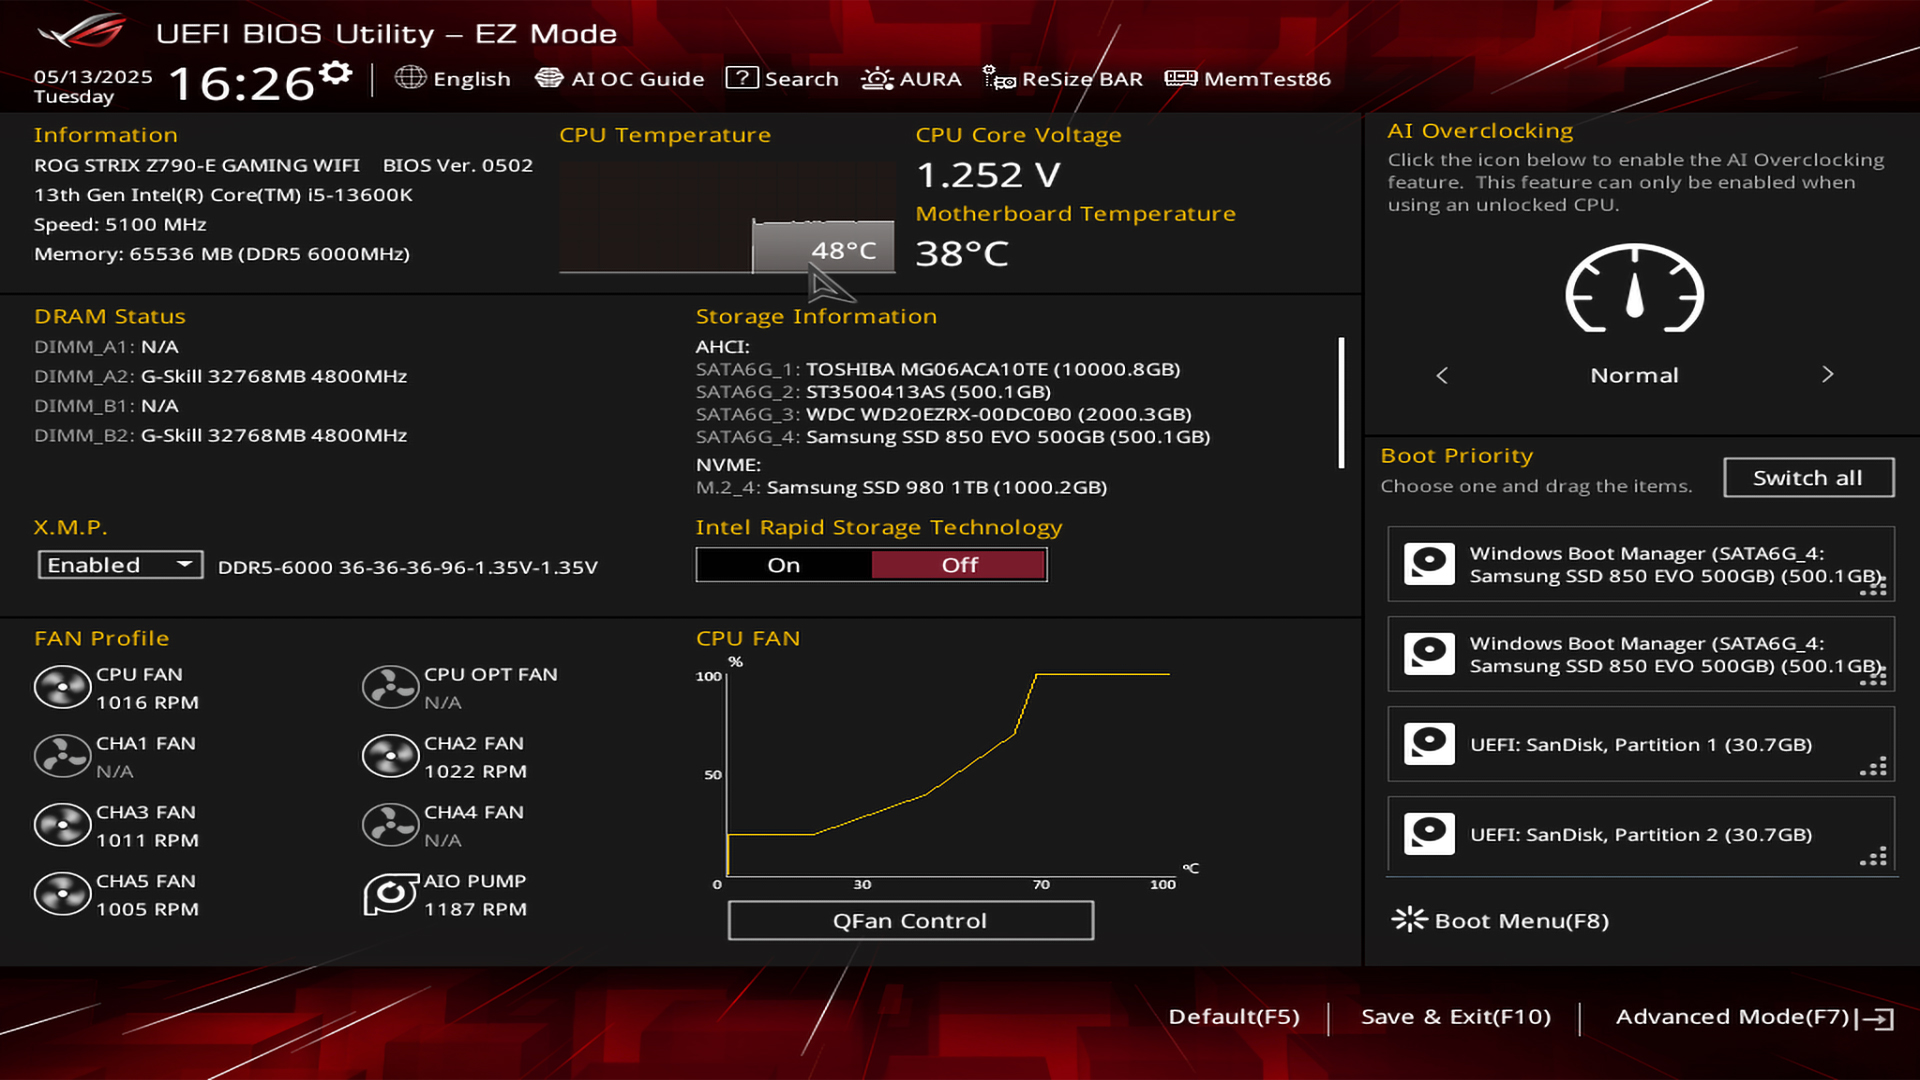
Before making OS (Windows) level tweaks, this is where most problems with CPUs typically arise. Covering the basics, RAM timings control how quickly your system accesses memory. This directly affects gaming performance. Once you enter your motherboard’s BIOS, under the memory subsystem, it will appear as four numbers, such as 16-18-18-36. Now it reads as follows in order: CAS Latency (CL), Row Address to Column Address Delay (tRCD), Row Precharge Time (tRP), and Row Active Time (tRAS). The lower the number, the faster the memory response times are, and the lower your system latency.
Note: This guide discusses the Memory subsection and timings on a surface level. Users who are intrigued should refer to media outlets such as Skatterbench and Buildzoid for a super deep explanation. Going deep depends on the type of CPU you have, its IMC (Integrated Memory Controller), the motherboard you choose, and the manufacturer of the Memory IC (Samsung, SK-Hynix, Crucial) in your RAM.
It is highly recommended that you also save up for RAM; a dedicated article will cover budget low-latency memory kits. Read it here:
5 Best Budget Low Latency DDR5 Desktop Memory Kits in 2025
Enabling XMP / EXPO Profiles
Enabling XMP or EXPO settings in the BIOS is the easiest option, as it will automatically configure the optimal frequency and timing combinations set by the memory manufacturer for your modules. It’s simple: access your BIOS during startup, press Delete or F2, go to memory settings, and enable XMP profile 1. That’s it. The costlier your memory kit is, the better these timings will be, and the lower your latency. Keep in mind that manual timing adjustments can yield even better results. Here are a few basics. Focus primarily on CAS latency and reduce it incrementally, for example, from 16 to 15, and then 14, while testing stability with Memtest86. Experiment with lowering the command rate from 2T to 1T, and see how it fares.
2) Disabling HPET for Reduced Latency
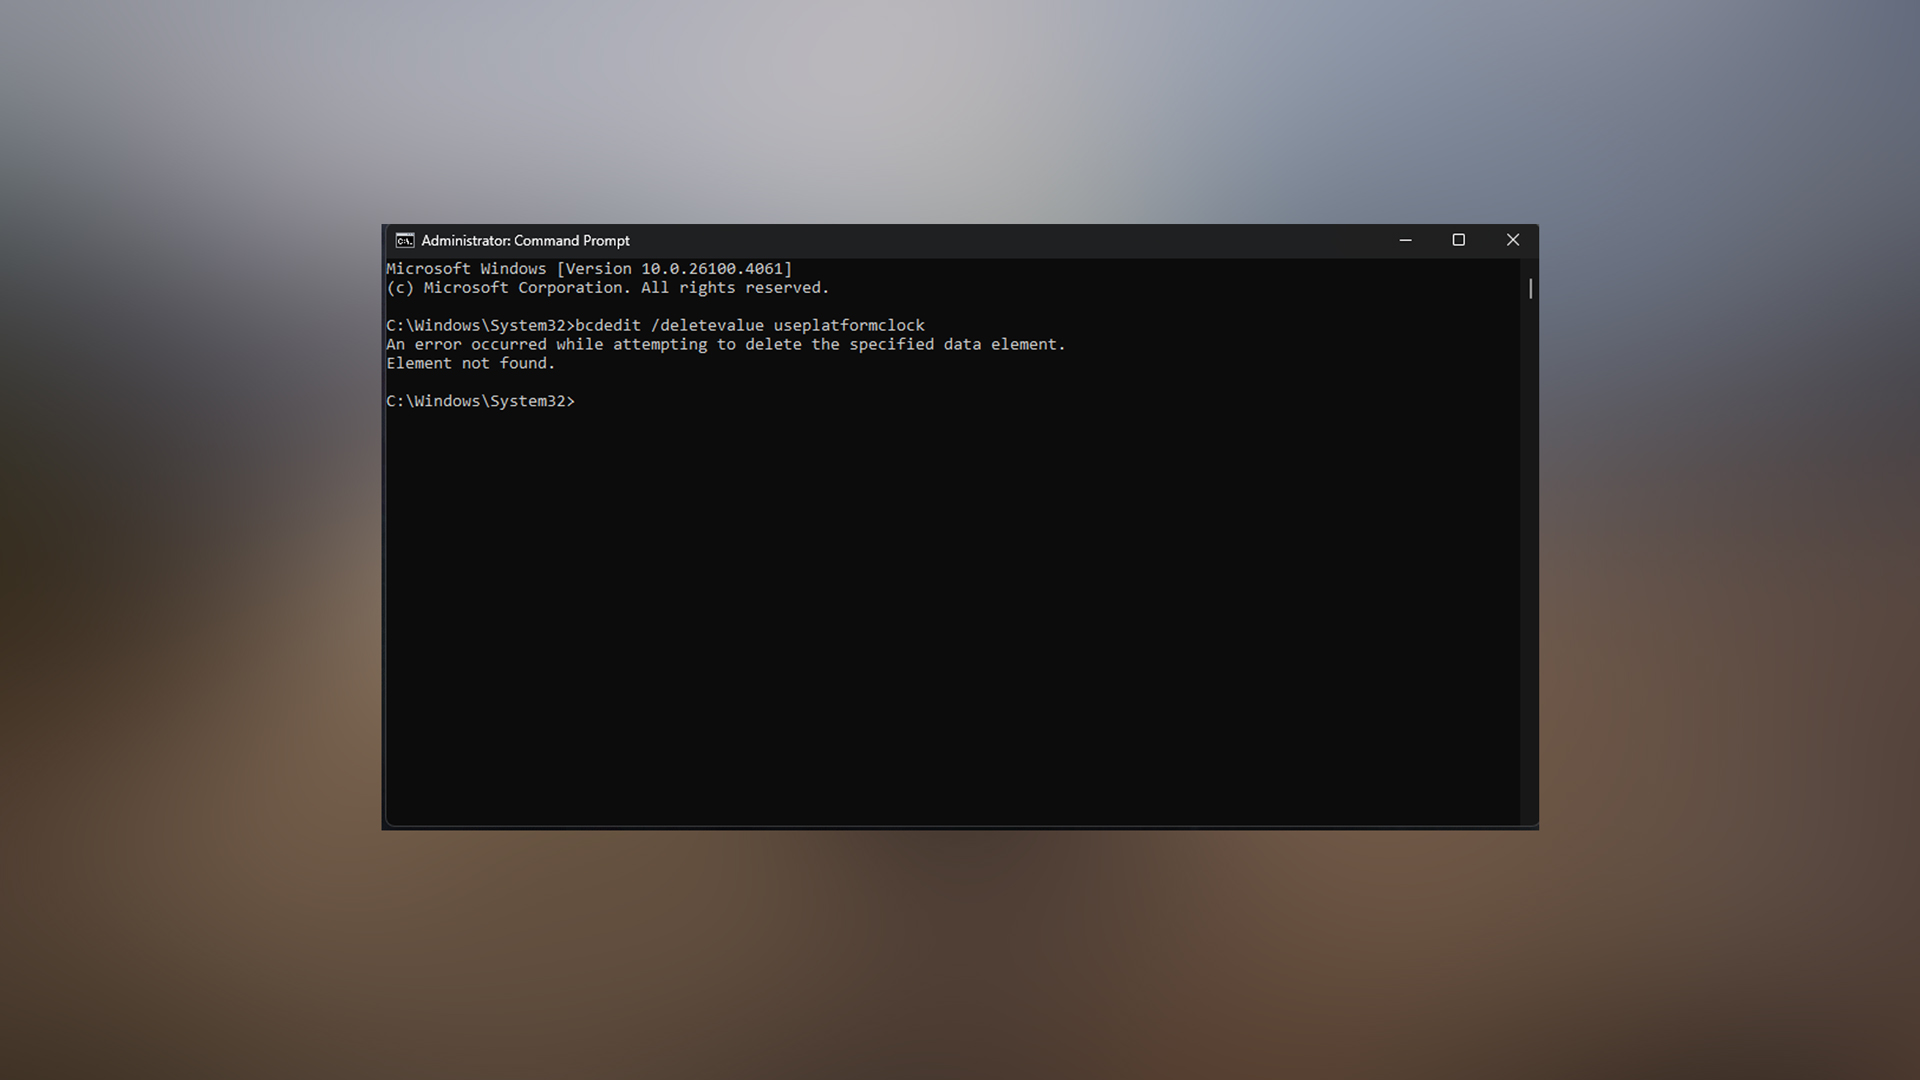
Now that the hardware side of things is taken care of, let’s focus on the software aspect. As the name suggests, HPET stands for High Precision Event Timer. What it does is synchronize multimedia streams for your PC, but it can introduce delays of 0.1-0.15 ms while you are gaming. Modern high-performance systems often experience micro-stuttering and reduced frame rates when HPET is active. This occurs because the timer generates unnecessary overhead, which affects your CPU utilization and hinders gaming responsiveness.
Disabling HPET via Command Prompt
Open Command Prompt as Administrator and execute: bcdedit /deletevalue useplatformclock. If you receive an “element not found” error, HPET is already disabled. Next, open Device Manager, expand System Devices, right-click “High Precision Event Timer,” and select Disable. Restart your computer to apply the changes. As of 2025, the option to disable HPET from the motherboard BIOS is missing.
3) Run Debloat Scripts
Windows nowadays come pre-installed with numerous applications and telemetry services that consume a significant amount of CPU cycles, RAM, bandwidth, and storage I/O. This is critical, even on a high-end system. Imagine a parasite sitting on your computer, slowly slowing it down day by day. This can be easily dealt with, as there are countless trusted third-party debloat tools that strip out the freshly installed Windows.
Some of which are:
Win11Debloat: Fully Gaming-focused. Disables Cortana voice services, removes Teams chat, and kills Game Bar recording. Gaming Mode auto-sets GPU scheduling and network throttling.
Chris Titus Tech’s Utility: A comprehensive, all-in-one tool. Removes bloatware and offers a diverse set of additional functionality you can use, such as installing software via NuGet, and more.
O&O AppBuster: Visual interface. Pick and choose what to remove. The core highlights are:
- Phone Link – Stops Bluetooth polling
- Widgets – Saves 120–180MB of RAM
- Search Indexing – Cuts background CPU usage
Windows 10 Debloater: Finally, for Windows 10 enthusiasts, this one is particularly popular for its aggressive mode option. It strips down a freshly installed Windows to a minimal one just for gaming.
4) Network Optimization with TCP Optimizer
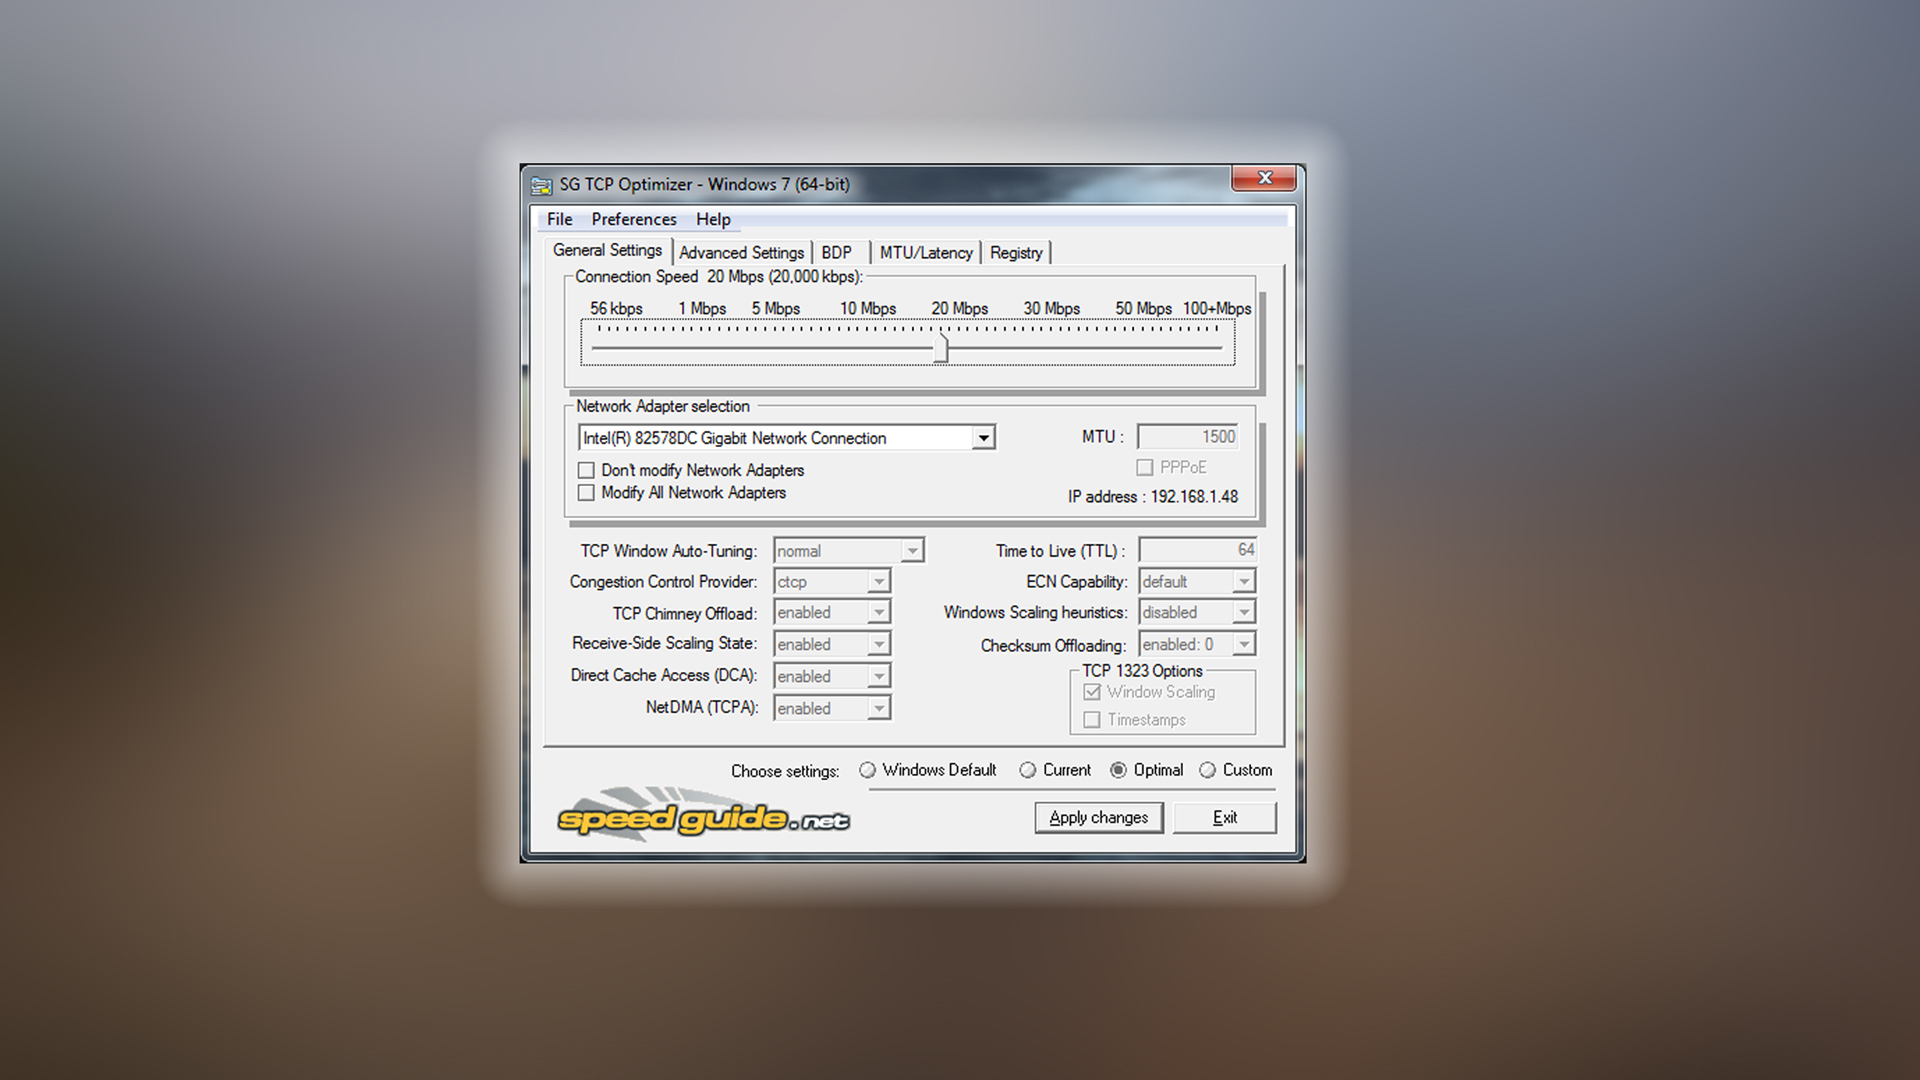
TCP Optimizer helps reduce network latency for online gaming by fine-tuning Windows networking parameters. Download the tool from speedguide.net, run it as Administrator, and use the slider to set your connection speed. Select the “Optimal settings” option, as this alone can significantly improve network performance.
Gaming Specific Settings
Navigate to the Advanced settings tab and enable these:
- Network Throttling Index: Set to disabled:ffffffff
- System Responsiveness: Set to gaming: 0
These prevent Windows from throttling network traffic while you are gaming.
Disabling Nagle’s Algorithm
Enable the “Disable Nagle’s Algorithm” setting with these parameters
- TcpAckFrequency: 1
- TcpNoDelay: 1
- TcpDelAckTicks: 0
Nagle’s algorithm combines small network packets into larger ones to improve efficiency, but this can introduce latency in gaming, where immediate packet transmission is more critical than bandwidth efficiency.
Many consider TCP Optimizer and Network optimization as a placebo effect. Over here, its implementation is available for your use.
Conclusion
All the optimization techniques provided here aim to address various aspects of system latency issues. RAM timings address in-game FPS inconsistencies and reduce the overall latency between RAM and cache. Turning off HPET addresses microstuttering, and the TCP optimizer helps resolve overall input lag while playing games.
Looking For More Related to Tech?
We provide the latest news and “How To’s” for Tech content. Meanwhile, you can check out the following articles related to PC GPUs, CPU and GPU comparisons, mobile phones, and more:
- 5 Best Air Coolers for CPUs in 2025
- ASUS TUF Gaming F16 Release Date, Specifications, Price, and More
- iPhone 16e vs iPhone SE (3rd Gen): Which One To Buy in 2025?
- Powerbeats Pro 2 vs AirPods Pro 2: Which One To Get in 2025
- RTX 5070 Ti vs. RTX 4070 Super: Specs, Price and More Compared
- Windows 11: How To Disable Lock Screen Widgets