Facebook
 Reddit
 Email
Email
This guide explores the best Gunlance build that you can use in Monster Hunter Wilds to absolutely shred any and every monster.

Gunlance is a weapon with very high damage and a truly unique playstyle in Monster Hunter Wilds. With this weapon, you take a hit to your mobility, but gain a unique mix of melee and mid-ranged gameplay. While it might seem slow and clunky to many, the right build can make it an absolute beast that can take down any monster.
If you are just picking this weapon, Gunlance might feel slow and clunky. There are quite a few reasons behind this sentiment, but none stop it from being an absolute beast in Wilds. With the right set of skills to optimize it, Gunlance can become an unstoppable force in the right hands. In this guide, we will look at the best Gunlance build that you can use in Monster Hunter Wilds.
Monster Hunter Wilds Gunlance Overview
As mentioned earlier, Gunlance might feel slow off the bat. This is primarily because the weapon does not have a dodge mechanic, but you rely on sidesteps and guards instead. These dictate a unique playstyle that requires you to take the aggro of the monster as much as possible, especially to enable the Power Clash mechanic.
One of the main concerns of using a Gunlance is that its damage is divided between melee slashes and shell and stake shots. Moreover, this weapon is not the best choice when it comes to fighting very aggressive monsters like Guardian Ebony Odogaron, for example.
Here are the main pros and cons of the Gunlance:
| Pros | Cons |
|---|---|
| -High damage output. -Can deal both raw and elemental damage. -Can guard and initiate Power Clash. -Versatile weapon that is easy to pick up. | -Not great against agile monsters. -Relies a lot on reloading shells and stake. -Needs very frequent repositioning. |
Our best Gunlance build for Monster Hunter Wilds focuses on diminishing the reloading aspect and getting the maximum damage output at any given point in time. It will also focus on the best balance between raw and elemental damage to ensure that both the shells and the melee attacks hit massive numbers.
Best Gunlance Build in Monster Hunter Wilds
Here are the full details of the best Dual Blades build in Monster Hunter Wilds:
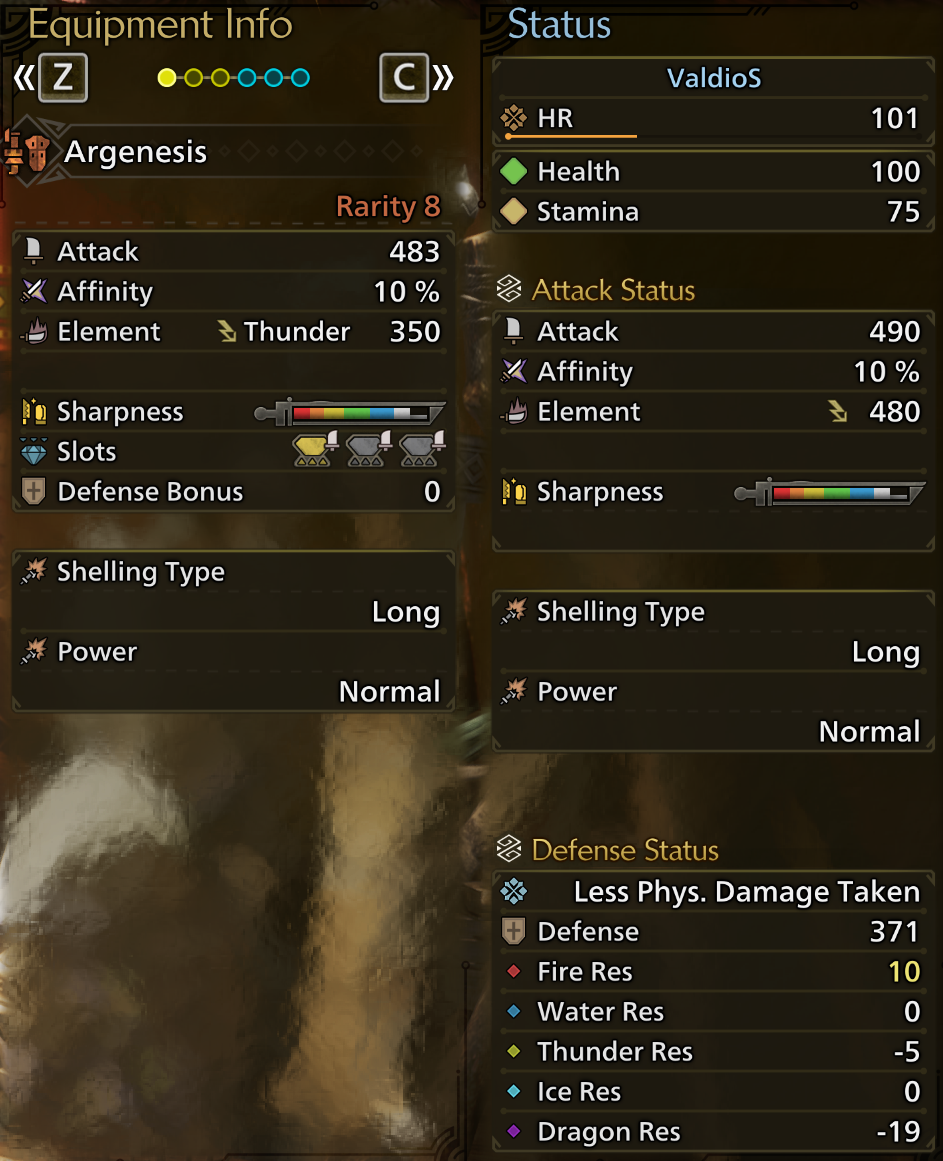
- Element: Thunder
- Weapon: Argenesis (Artian weapon, Rarity: 8)
- Shelling Type: Long
- Crafting Materials:
- Cracked Disc: Thunder Attack Infusion x2
- Rusted Device: Thunder Attack Infusion x1
- Weapon Decorations:
- Bolt/Crit Elem Jewel [3]
- Magazine/Attack Jewel [3]
- Artillery Jewel III [3]
- Armor: Guardian Arkveld β (4-piece set) + Arkvulcan Mail β (1 piece)
- Guardian Arkveld Helm β
- Decorations:
- Tenderizer Jewel [3]
- Protection Jewel [1]
- Decorations:
- Arkvulcan Mail β
- Decorations:
- Flayer Jewel [3]
- Refresh Jewel [2]
- Decorations:
- Guardian Arkveld Vambraces β
- Decorations:
- Adapt Jewel [1]
- Steadfast Jewel [1]
- Medicine Jewel [1]
- Decorations:
- Guardian Arkveld Coil β
- Decorations:
- Refresh Jewel [2]
- Protection Jewel [1]
- Decorations:
- Guardian Arkveld Greaves β
- Decorations:
- Refresh Jewel [2]
- Medicine Jewel [1]
- Decorations:
- Guardian Arkveld Helm β
- Talisman: Recovery Charm II
- Mantle: Rocksteady Mantle
Best Monster Hunter Wilds Gunlance Build: Statistics
By equipping all the above items, you should have the following stats:
Attack Status
- Attack: 478
- Affinity: 5%
- Element: 480 (Thunder)
Note: These are the stats for Artian Weapons that are not reinforced. They are at base level, and reinforcing them to their maximum level (5) is suggested, which will further boost some random statistics for this weapon. Ideally, an increase in Affinity is the most desired buff.
Defense Status
- Defense: 331
- Fire Res: 10
- Water Res: 0
- Thunder Res: -5
- Ice Res: 0
- Dragon Res: -19
Note: These stats are for armor parts that are at base level. Upgrading them to their maximum level (7) will further increase your defense.
Best Monster Hunter Wilds Dual Blade Build: Active Skills
This best Dual Blades build in Monster Hunter Wilds will give you the following skills (and levels):
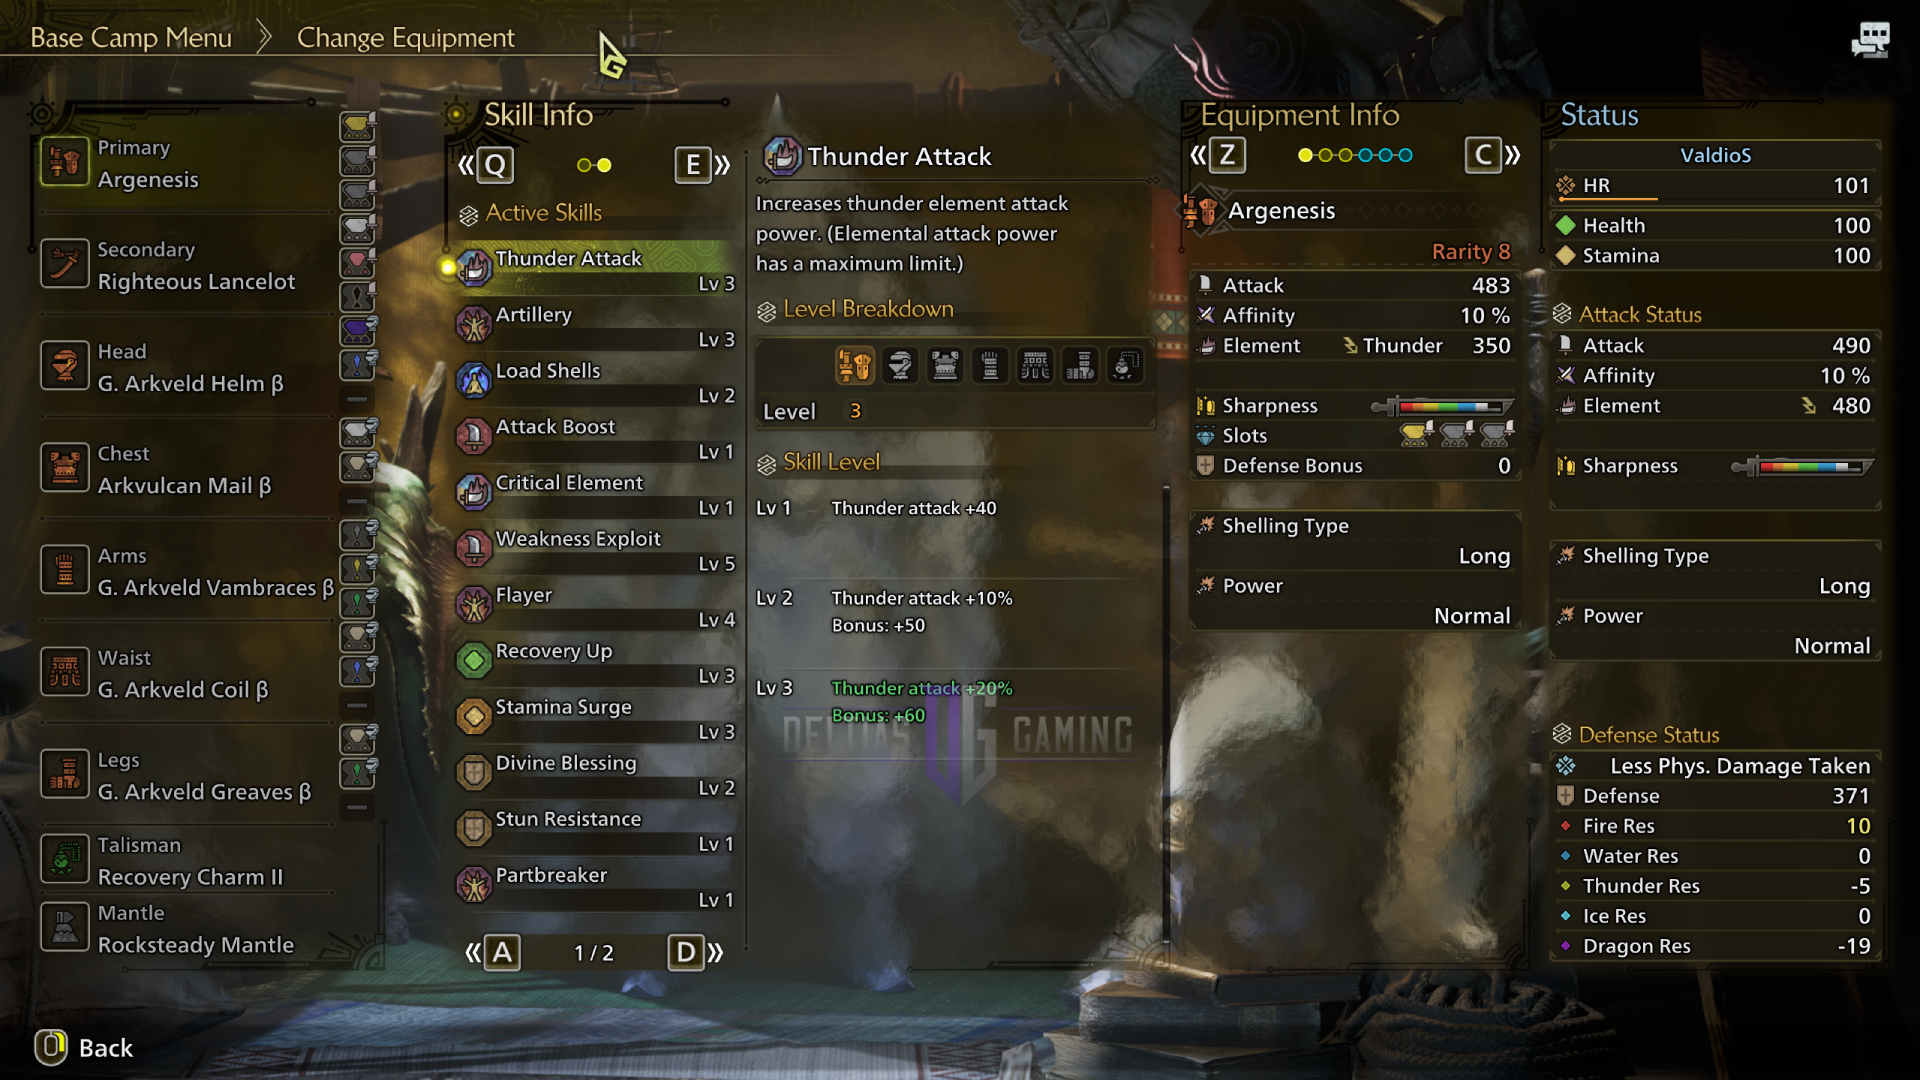
Equipment Skills
- Thunder Attack: Level 3
- Artillery: Level 3
- Load Shells: Level 2
- Slugger: Level 1
- Attack Boost: Level 1
- Critical Element: Level 1
- Weakness Exploit: Level 5
- Flayer: Level 4
- Recovery Up: Level 3
- Stamina Surge: Level 3
- Divine Blessing: Level 2
- Stun Resistance: Level 1
- Partbreaker: Level 1
- Elemental Absorption: Level 1
- Adaptability: Level 1
Set Bonus Skills: Guardian Arkveld’s Vitality
- 2-set bonus active: Decimator I
- 4-set bonus active: Decimator II
Group Skills: Guardian’s Protection
- 3-set bonus active: Ward of Wyveria
Monster Hunter Wilds Best Gunlance Build Explained
This best Gunlance build for Monster Hunter Wilds is primarily shaped to do the following:
- Deal both raw and elemental damage.
- Provides maximum Shelling attack damage with a fourth shell.
- Improves reload speed for Shells.
- Create wounds and deal maximum damage to them.
- Use healing items less frequently, but gain massive heals from them.
Here is a detailed explanation of each point mentioned above:
1) Deal Raw And Elemental Damage
Gunlance deals damage in two ways — its melee damage, which also relies on elemental, and its shell damage. As such, this best Gunlance build for Monster Hunter Wilds ensures your damage on both ends is top-notch. Most of your combos using Gunlance involve using the shells along with melee, so this ensures you get the maximum damage output on both fronts.
2) Maximum Shelling Damage
The Artian Gunlance, Argenesis, has three shells by default. By using the Load Shells skill at its maximum level 2, you get one additional shell, bringing your total number to four. This significantly increases your overall damage output and is also what makes this the best Gunlance build in Monster Hunter Wilds.
Most of the combos with the Gunlance end with Wyrmstake Full Blast Combo, which fires all of your shells and the stake to end the combo. With an added shell, you get more damage by default. Similarly, the Multi Wyrmstake Full Blast combo has an added round of shelling and stake damage.
Effectively, you get two more shells of damage with the Multi Wyrmstake Full Blast Combo. Similarly, the Burst Fire Combo also has one extra shell this way, which deals more damage.
3) Improves Reload Speed
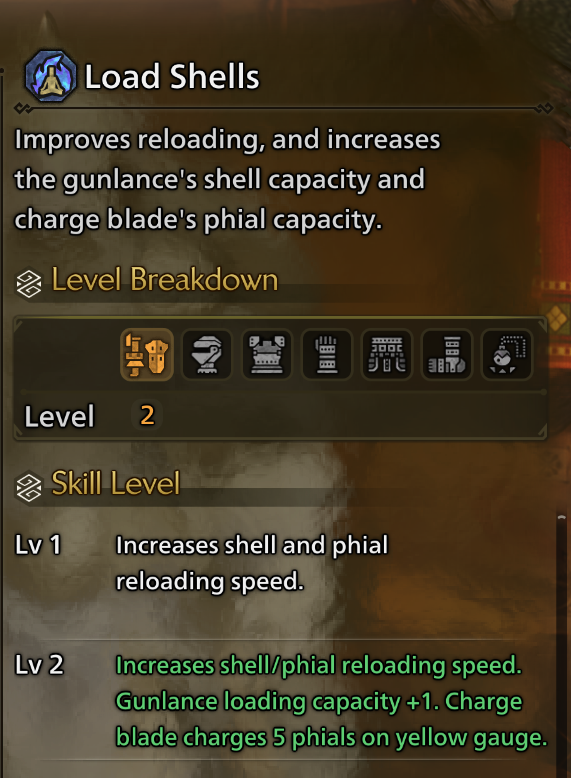
During a fight, you will need to reload your shells outside of combos. As such, the reload time is an important thing to factor in. With the same Load Shells skill, the overall time to reload also reduces greatly.
Less reload time means less time away from battle, which means more damage from your end. At the same time, you are also vulnerable for a very short duration with faster reloads.
4) Create Wounds And Deal Massive Damage
The Gunlance deals many instances of damage with one full combo. This includes instances of the melee damage, the shellings, and also the stake. With Flayer skill at level 4, you can more than often create multiple wounds on a monster at the same time.
Hit these wounds with the Focus Strike, and you will be able to deal massive damage because of the Weakness Exploit skill at level 5.
5) Use Heals Less Frequently But Gain Massive Recovery
A lot of factors go on to uphold your survivability in this best Gunlance build in Monster Hunter Wilds. First, you have the Divine Blessing skill that automatically reduces the damage you take. Next, the Decimator II skill from the armor set further restores health when you deal damage to wounds.
Finally, the Recovery Up skill at level 3 provides maximum health restoration from a single use of a healing item. As such, this best Gunlance build easily makes sure you survive, without relying a lot on consumable items.
How to Use This Best Gunlance Build in Monster Hunter Wilds
Gunlance is easy to pick up in Monster Hunter Wilds, even as a beginner. This is largely because of the reworked shelling mechanic, which no longer consumes sharpness in Wilds. That said, this is the gameplay loop that you should try to achieve with this best Gunlance build in Monster Hunter Wilds:
- Start with either Sneak Attack with the Ghillie Mantle or with a Wyvern’s Fire.
- Deal damage with the Burst Fire Combo and Wyrmstake Canon Combo.
- Guard enemy attacks and try to get a Perfect Guard as much as possible to enable Power Clash.
- When the enemy is toppled, use the Multi Wyrmstake Full Blast Combo. You can get this in many ways, as each attack combo can be ended in the Multi Wyrmstake combo. On average, these do between 1000-1700 damage, based on your exact sequence.
- When you see wounds, immediately use Focus Strike to activate the Weakness Exploit and Decimator II skills to deal damage and heal at the same time.
- Use Wyvern’s Damage as frequently as you can.
- Use Sidestep to dodge any ranged attack that you cannot guard against.
Additional Notes
As of Title Update 2, there are a few better GL alternatives in the game apart from Artian. With TU1, Capcom introduced some stealth nerfs for the Arkveld GL, which essentially made it the superior choice due to its Blast Shells. However, with TU2, you now have a few other alternatives, such as the Seregios and Lagiacrus Gunlances. Both these GLs are quite good options for endgame and offer pretty decent base DPS.

We provide the latest news and create guides for Monster Hunter Wilds or MH Wilds. Meanwhile, you can check out the following Monster Hunter articles or catch us playing games on Twitch and YouTube: