Facebook
 Reddit
 Email
Email
Discover everything you need to know about All Act 1 bosses guide in Path of Exile 2 and how to defeat and find them.

Path of Exile 2 has received an initial release on December 6, 2024. There is a total of 12 distinct Classes (6 during early access), each granting its own uniqueness in the game. Use the best class to defeat all 16 bosses in Act 1. Specific bosses drop consumables that permanently boost your spirit when used. Some bosses in Act 1 have unblockable attacks that can pose a challenge. Not all of these bosses are required to beat for the story as there are some optional bosses as well. You’ll also have to worry about the arena, as there will be totems that will shoot projectiles at you. In this guide, we’ll discuss all Act 1 bosses and where & how to kill them.
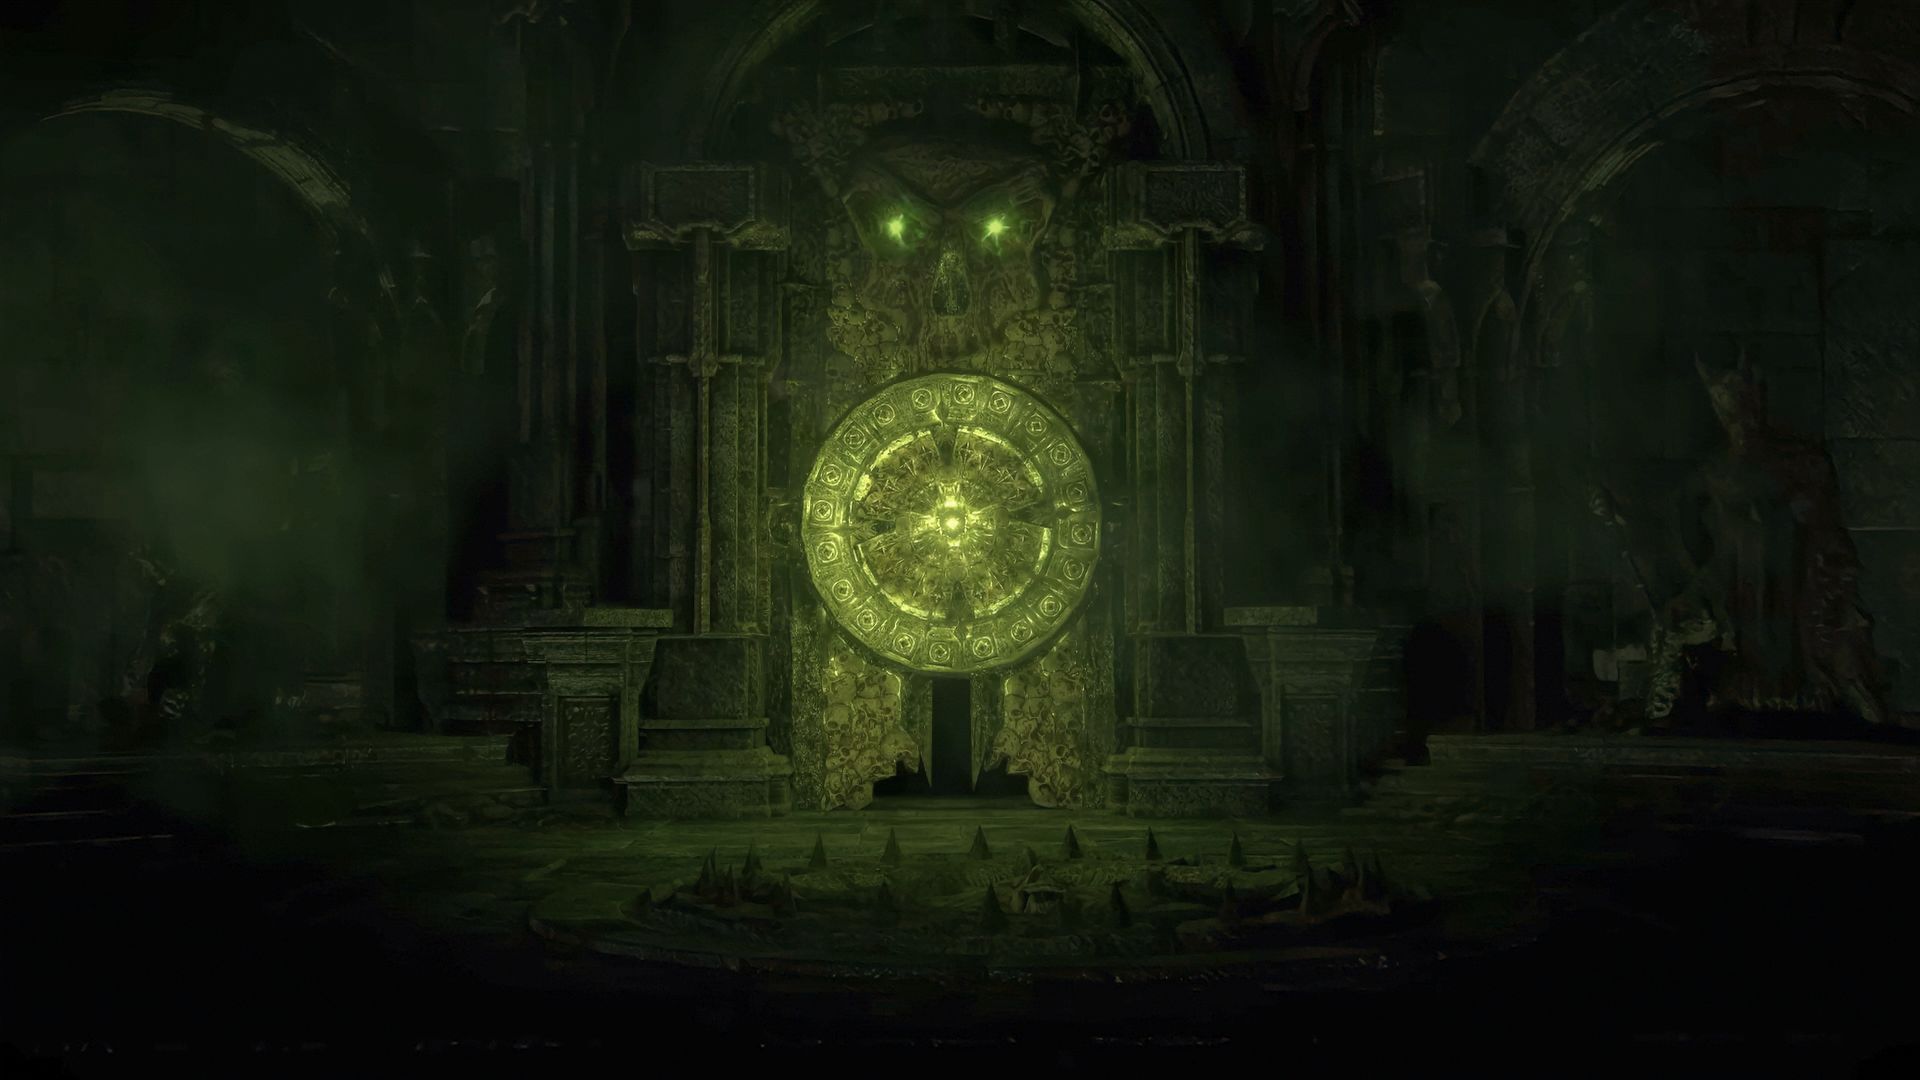
Act 1 Overview in POE 2
Act 1 Path of Exile 2 introduces players to the game’s narrative, characters, and mechanics. The story begins with your character being sentenced to execution by the Count, setting the stage for your journey through the land of Wraeclast. You will engage in side quests and discover hidden encounters that offer valuable rewards. Reaching Clearfell, Secrets in the Dark, The Mysterious Shade, Sorrow Among Stones, The Trail of Corruption, and The Mad Wolf of Ogham are the main quests that you need to complete to make progress in the game. The bosses in Act 1 offer you multiple opportunities to practice dodge roll mechanics and learn new techniques to dominate enemies.
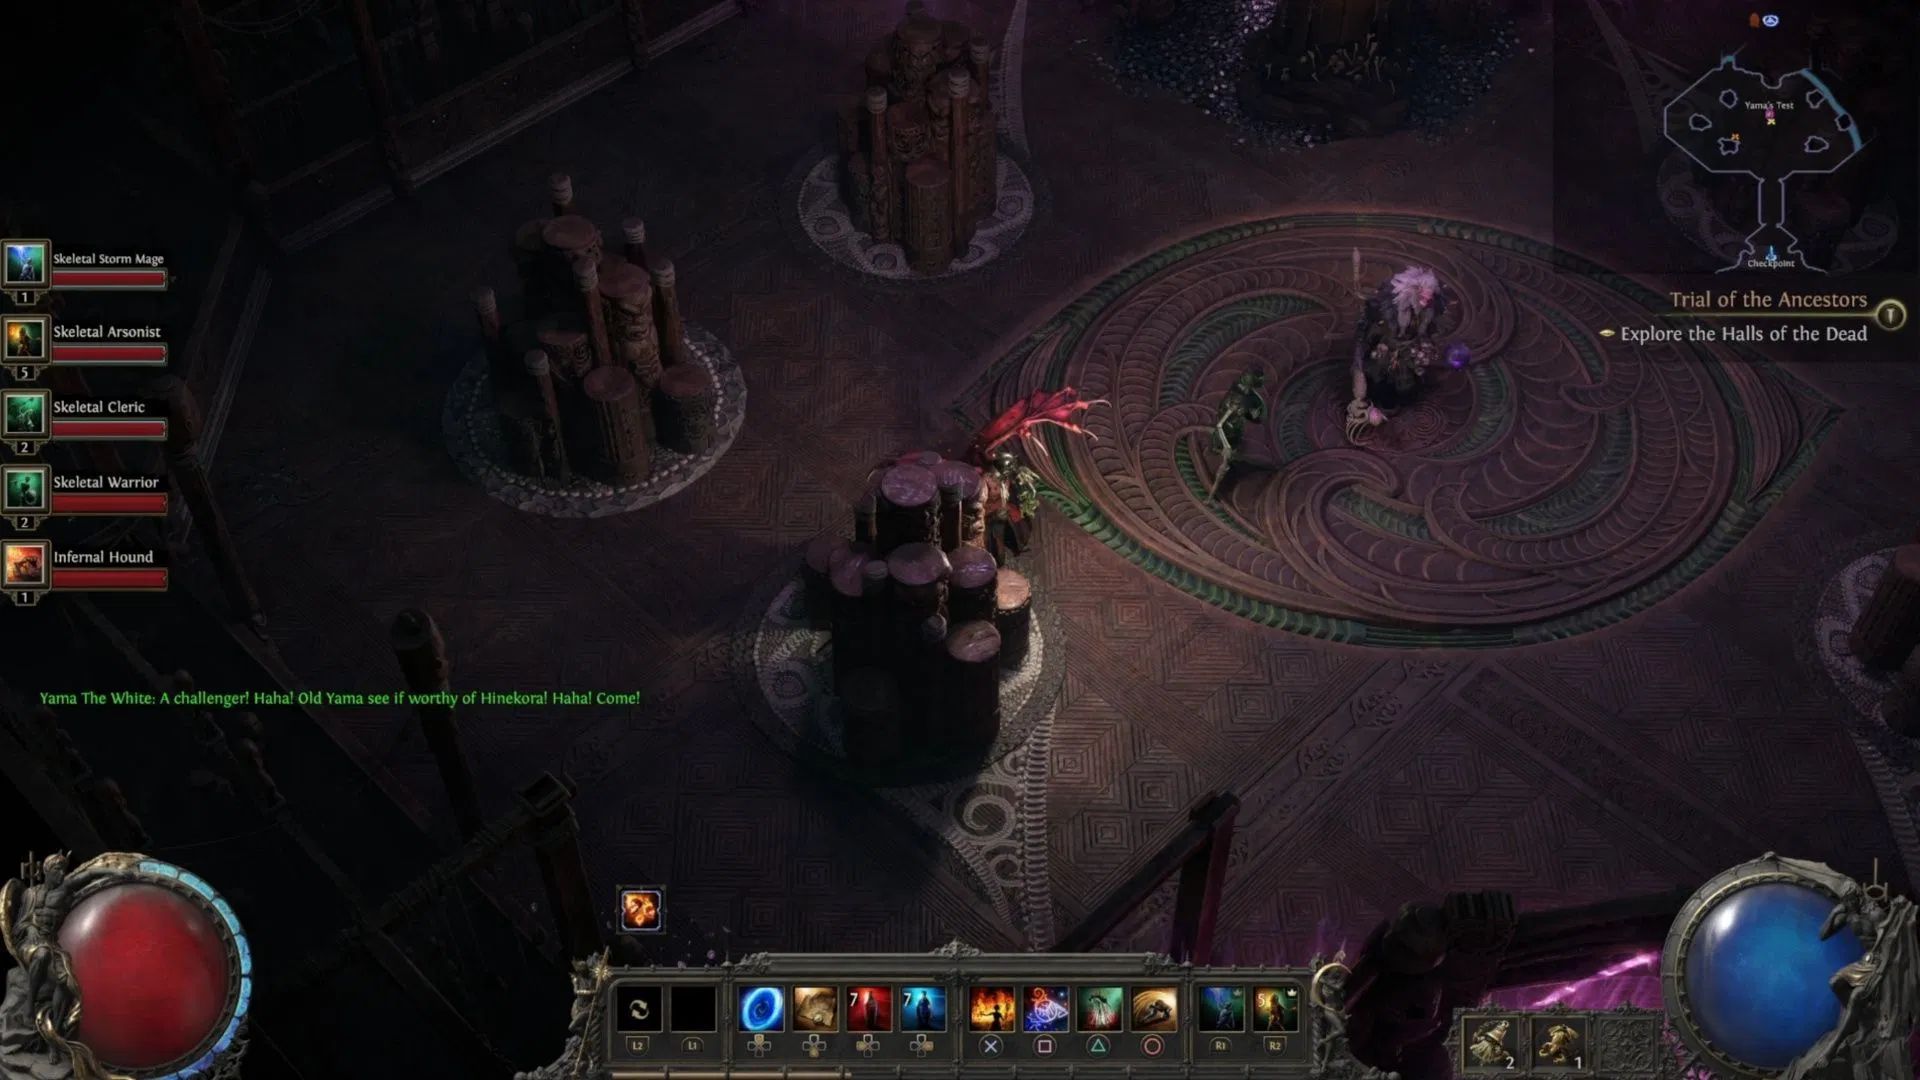
All Act 1 Bosses Guide in POE 2
Path of Exile 2 offers 16 different bosses in Path of Exile 2 including 7 main bosses and 9 optional bosses. Each boss has its own unique attack pattern and offensive capabilities. Some are easy to tackle but the majority of them require a bit of experience for killing them due to their abilities. Here’s a list of all of the bosses that you will encounter in Act 1 of Path of Exile 2.
- Vargir the Feral Mutt (Optional Boss)- located in Ogham Farmlands
- The Bloated Miller (Main Boss)- located on The Riverbank
- The Devourer (Optional Boss)- located in Mud Burrow
- Beira of the Rotten Pack (Optional Boss)- located in Clearfell
- The brambleghast (Optional Boss)- located in The Grelwood
- The Rust King (Main Boss)- located in The Red Vale
- Ervig, the Rotten Druid (Optional Boss)- located in The Grim Tangle
- Asinia, The praetor’s Consort (Main Boss)- located in the Tomb of the Consort
- Draven, The Eternal Praetor (Main Boss)- located in the Mausoleum of the Praetor
- Lachlann of Endless Lament (Main Boss)- located in Cemetery of the Eternals
- The Crowbell (Optional Boss)- located in The Hunting Grounds
- The King in the Mists (Optional Boss)- located in Freythorn
- The Executioner (Main Boss)- located in Ogham Village
- Candlemass, the Living Rite (Optional Boss)- located in Ogham Manor
- Count Geonor (Main Boss)- located in Ogham Manor
- Areagne, the Forgotten Witch (Optional Boss)- located in The Grelwood
The Bloated Miller

- Boss Type: Main
- Damage Types: Physical
- Resistances: None
- Weaknesses: None
The Bloated Miller in Path of Exile is the first boss that you will encounter in the Clearfell Encampment during the prologue section of Act 1. This boss is a large and slow-moving foe with highly telegraphed but dangerous attacks. However, the sluggish movement grants ample opportunities for counterattacks.
He’ll be doing charges at you when you encounter him, so make sure to walk away from those. He also performs a frontal slam line attack that’s not blockable, so make sure you’re rolling out of that when he does that. He also yells and summons a bunch of ads, so you got your AoE abilities at the beginning of the game. Defeat the drowned enemies that spawn in the area while fighting with The Bloated Miller.
| Attack | Description | Counter |
|---|---|---|
| Saw Smash | He brings his saw over his head and slams it on the ground | Move away before he smashes his saw |
| Charge Attack | Charges at you and swings his saw upward | Immediately move back when he spins his saw and dodge when he charges |
| Punch | Punches you with his left hand at close range | Counter it with your heavy attack |
| Saw Smash Wave | Slams his saw and sends a shockwave to you | Dodge it as fast as you see the wave coming towards you |
He drops a few magic items and some gold after you defeat him in combat. However, the only reward you obtain for defeating him is a level 1 Uncut Skill Gem.
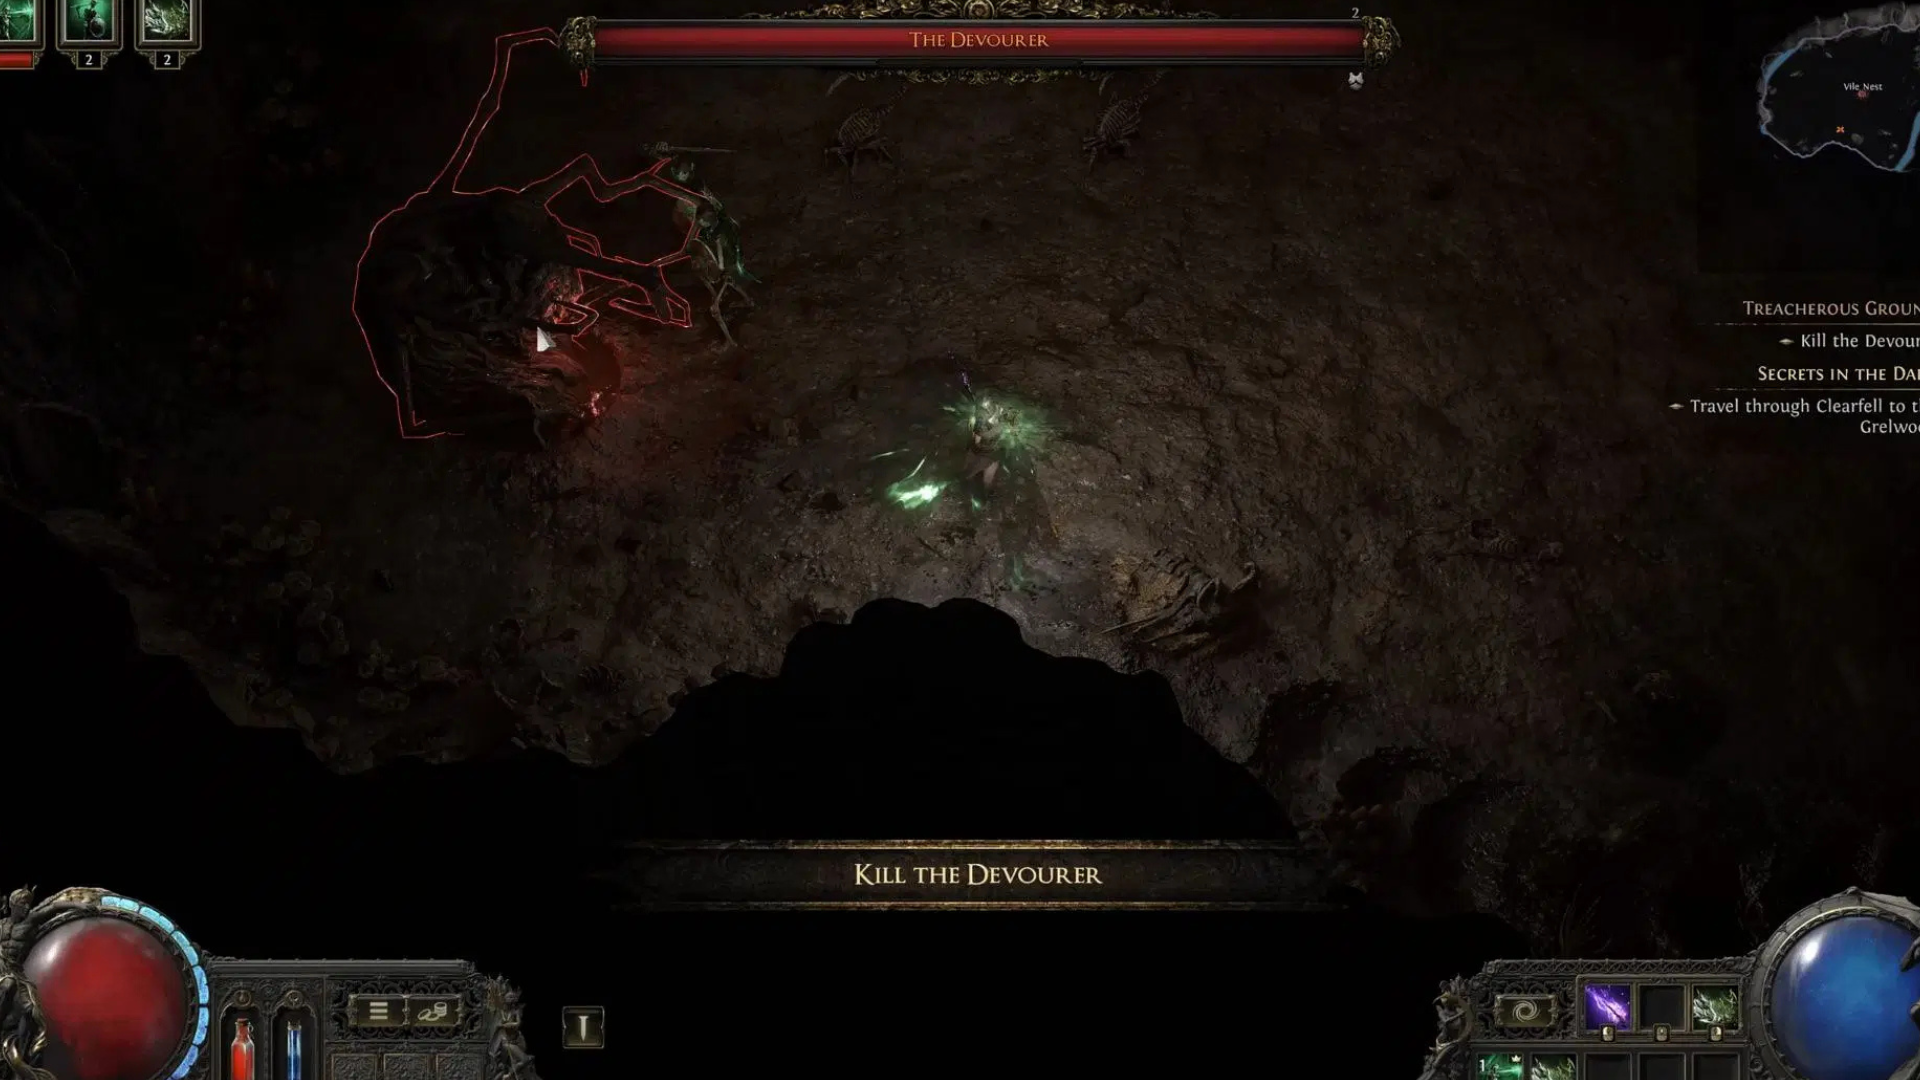
The Devourer
- Boss Type: Optional
- Damage Type: Physical + Chaos
- Resistance: Physical
- Weaknesses: None
The Devourer is an optional boss in Path of Exle 2 which can be found at The Mud Burrow. Move inside and enter the tunnel till you get to a large open area called the Vile Nest. When the Devourer turns red, he’ll be sending an AoE slam in front of him, so make sure you’re rolling out of that. He also moves around the arena and goes underground. You can see a rod spot from where he’s popping out from.
He’ll also summon ads as he comes out of the ground. You need to watch out for his poison volley. He also has a poison NOA that he sprays across the whole arena, so make sure you’re dodging that and then kill him. This boss uses a combination of leg and head attacks to deal damage. Avoid its area of effect, especially the one that deals massive damage. He is lightly armored, so use elemental damage to defeat him.
| Attack | Description | Counter |
|---|---|---|
| Blood Spit | Spits out toxic blood toward you | Step backward once you see he is yanking his head and then immediately prepare for a dodge. |
| Swipe | Swings one of its arms onto you during close-range | Dodge it as he swings his arms |
| Ground Smash | Smash the head on the ground toward you and create a small AoE | Move back when you see his head yanking and then dodge immediately |
| Blood Spit from all direction | Spits blood onto you and moves underground and moves outside from the other side and spits at you again | Dodge the spit and keep an eye on the area where it will spawn again. |
| Flesh Larva Summon | Summon 5 Flesh Larva and have them attack you | You need to run away while he attacks you |
Once you defeat The Devourer, you will gain Treacherous Ground quest completion as a reward and plenty of gold and a few items.
Beira of the Rotten Pack
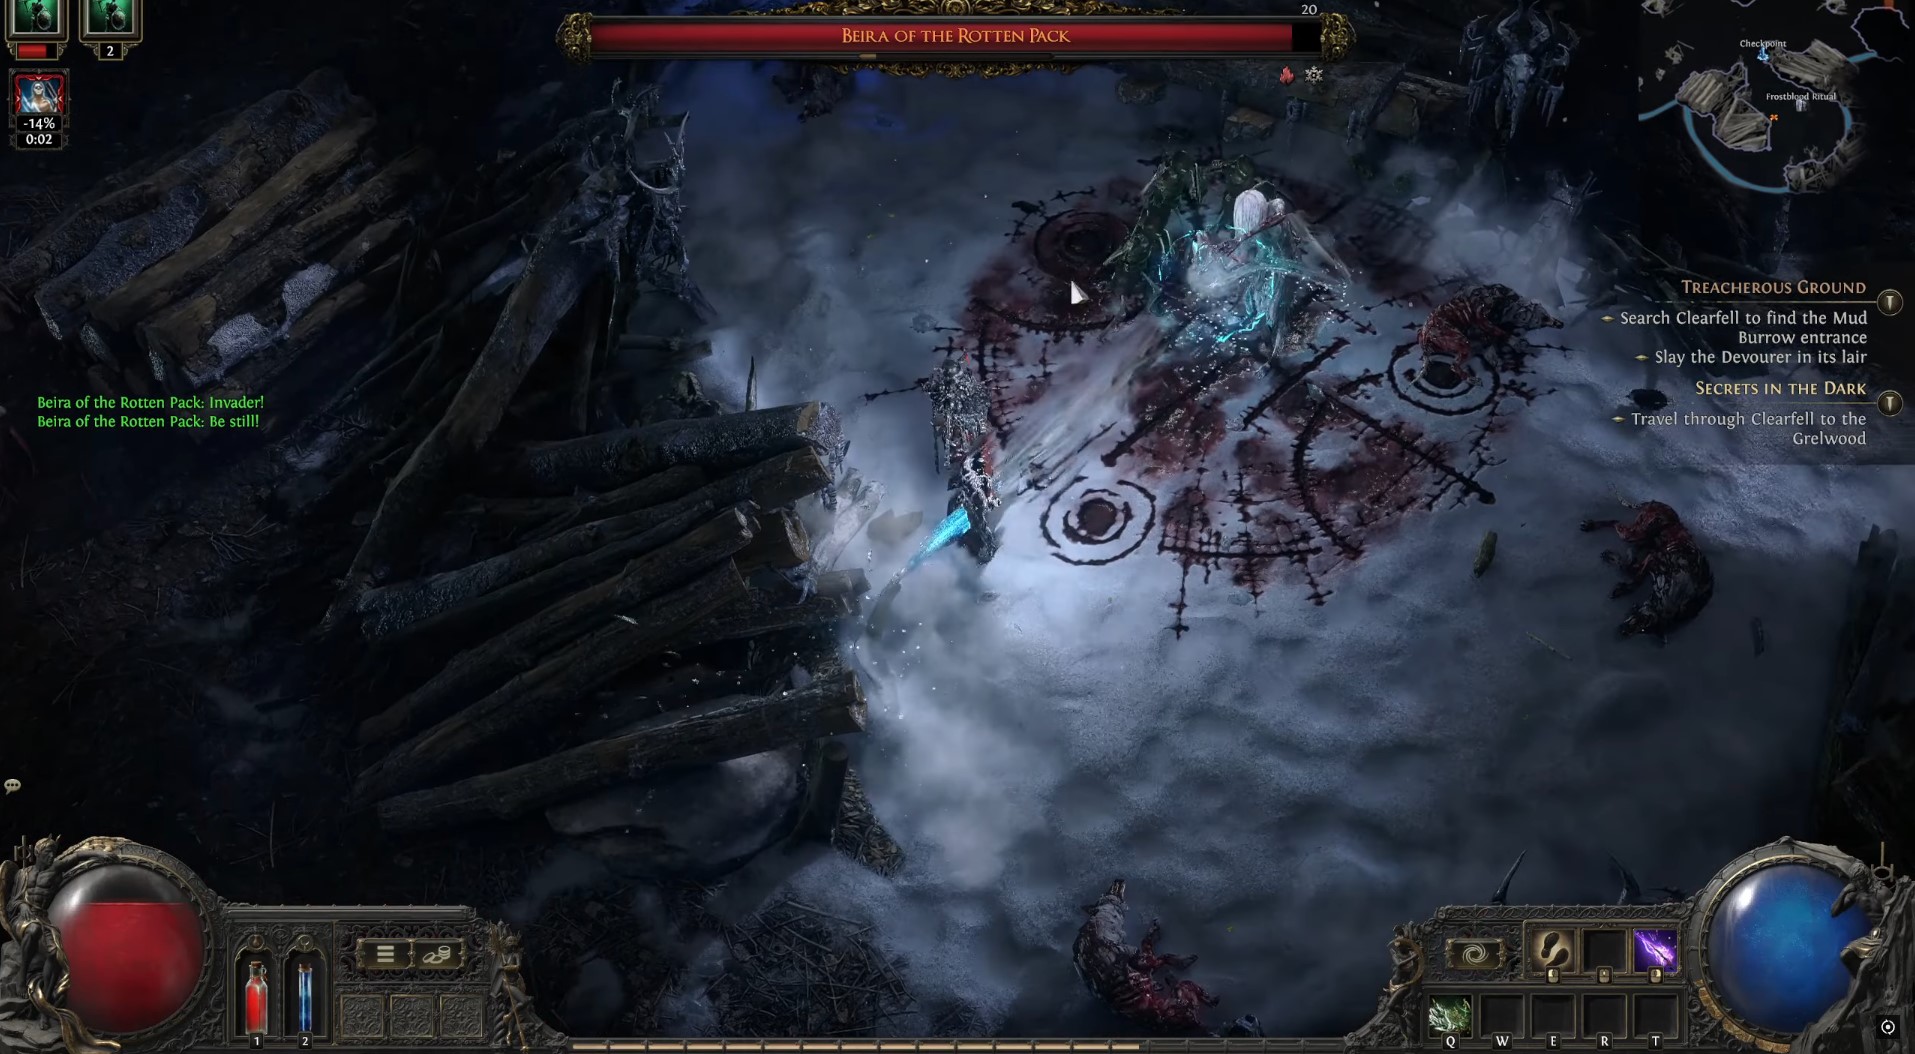
- Boss Type: Optional
- Damage Type: Physical + Cold
- Resistance: Cold
- Weaknesses: Fire
The Beira of the Rotten Pack is an optional boss and can be found at Clearfell. She’s found near the center of the zone, north of the Clearfell Encampment. She will be doing ice waves with ice shards, so make sure you dodge them without taking any damage. She also summons two large ice circles that will blast you if you’re standing in those. Beira also summons some wolves to attack you and spawn small circles that will also shoot you, so make sure you’re not standing on top of those. Circle the arena’s outer wall to defeat her. Prepare to dodge-roll out of the way when she uses the AoE effect.
| Attack | Description | Counter |
|---|---|---|
| Crystal Blast | Shoot 5 crystal blasts 1 by 1 towards you in a circular motion | You can avoid it by just rolling to one side continuously |
| Crystal Barrage | She swings its curved sword and releases multiple crystal shards around you. | Move back when you see the boss is going to swing and dodge in the opposite direction where she fires her crystals. |
| Rotten Wolf Summon | Summon 5 undead wolves that will attack you. | Run around while the boss attacks you because she will be shooting crystals while attacking you. |
| Ground Slam AoE | Slam the ground and cause a small shockwave to deal damage | Dodge when you see that she raises her curved sword |
The rewards that you obtain after defeating the Beira of the Rotten Pack are:
- Head of the Winter Wolf – Grants +10% to Cold Resistance
- Cruel: Head of the Winter Wolf – Grants +10% to Cold Resistance
The Brambleghast
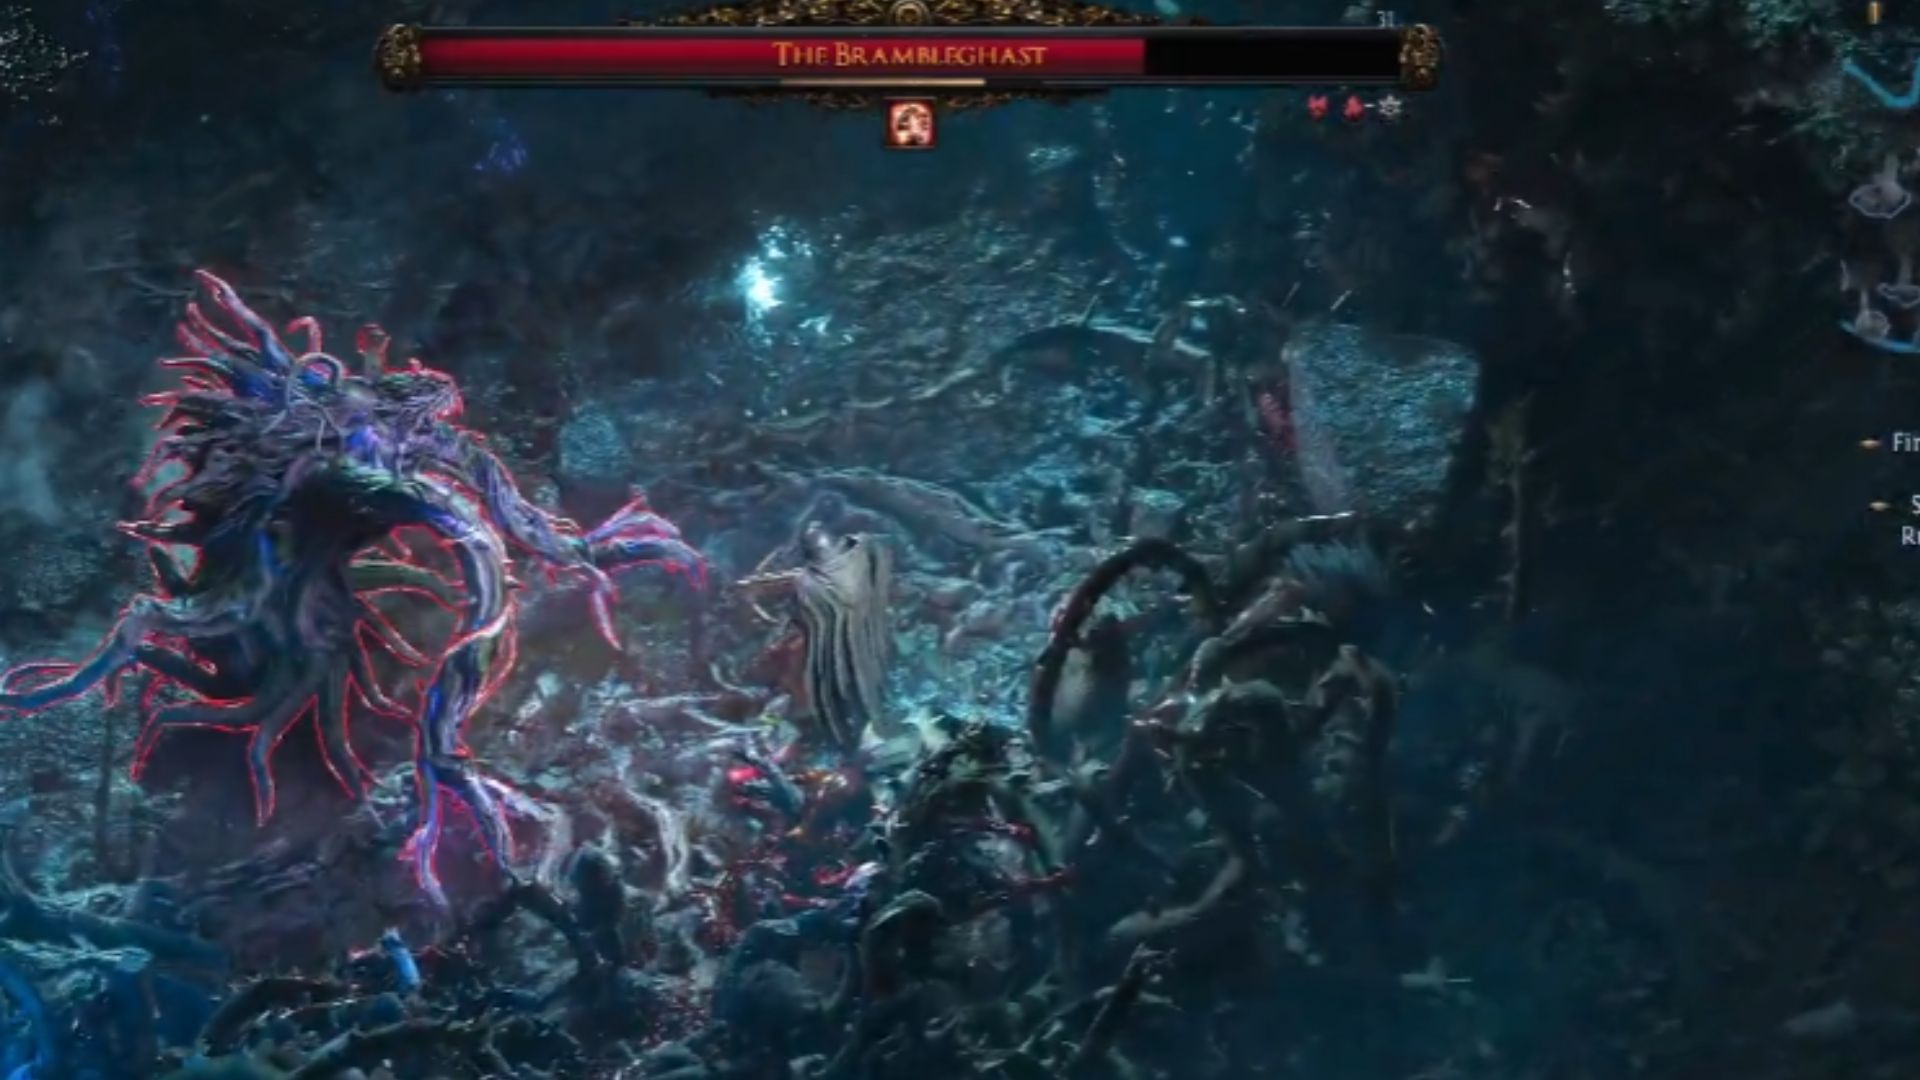
- Boss Type: Optional
- Damage Type: Physical + Chaos
- Resistances: Physical + Cold
- Weaknesses: Fire
Brambleghast is a Boss that can encountered while doing the quest Secrets in the Dark. This optional boss is found at The Moving Bramble near the center of The Grelwood in Act 1, nested inside a thicket of vines. Keep in mind that the walls of the arena are different from the environment around Grelwood, which makes it easier to find. When he reaches into his mouth he shoots out a purple orb that’s going to shoot spikes from that orb, so make sure that you’re running away from that. He also slams his two fists into the ground and spawns two big branches with spike purple balls on them that will slam on your location.
Make sure you dodge rolling or you have a bunch of defenses to take the hit. Periodically, he also randomly whips at you. They’re usually on the side of the arena and he also spawns the homing purple things that will chase you. You need to run into them and run past them, so they just explode or you just wait till they expire and they will explode on their own. We recommend you to destroy Tentacles in the area and avoid chaos blasts.
| Attack | Description | Counter |
|---|---|---|
| Double Tree Swipe | Use his tree branch to swipe at you twice | Immediately dodge when you see him swiping |
| Bite | Chomps at you when fighting in close range | When the boss yanks his backward, then dodge-rolling immediately |
| Tree Root Summon | He roars and summons up to 3 large Vicious Vines that slam you continuously. | Destroy the branches upon summoning. |
| Energy Roots | Summon 4 roots that release purple energy that follows you | You can dodge it easily as the roots are slow |
The reward upon defeating The Brambleghast is Uncut Skill Gem Level 2. You may also gain other items, such as drop loot, once you defeat the boss.
The Rust King
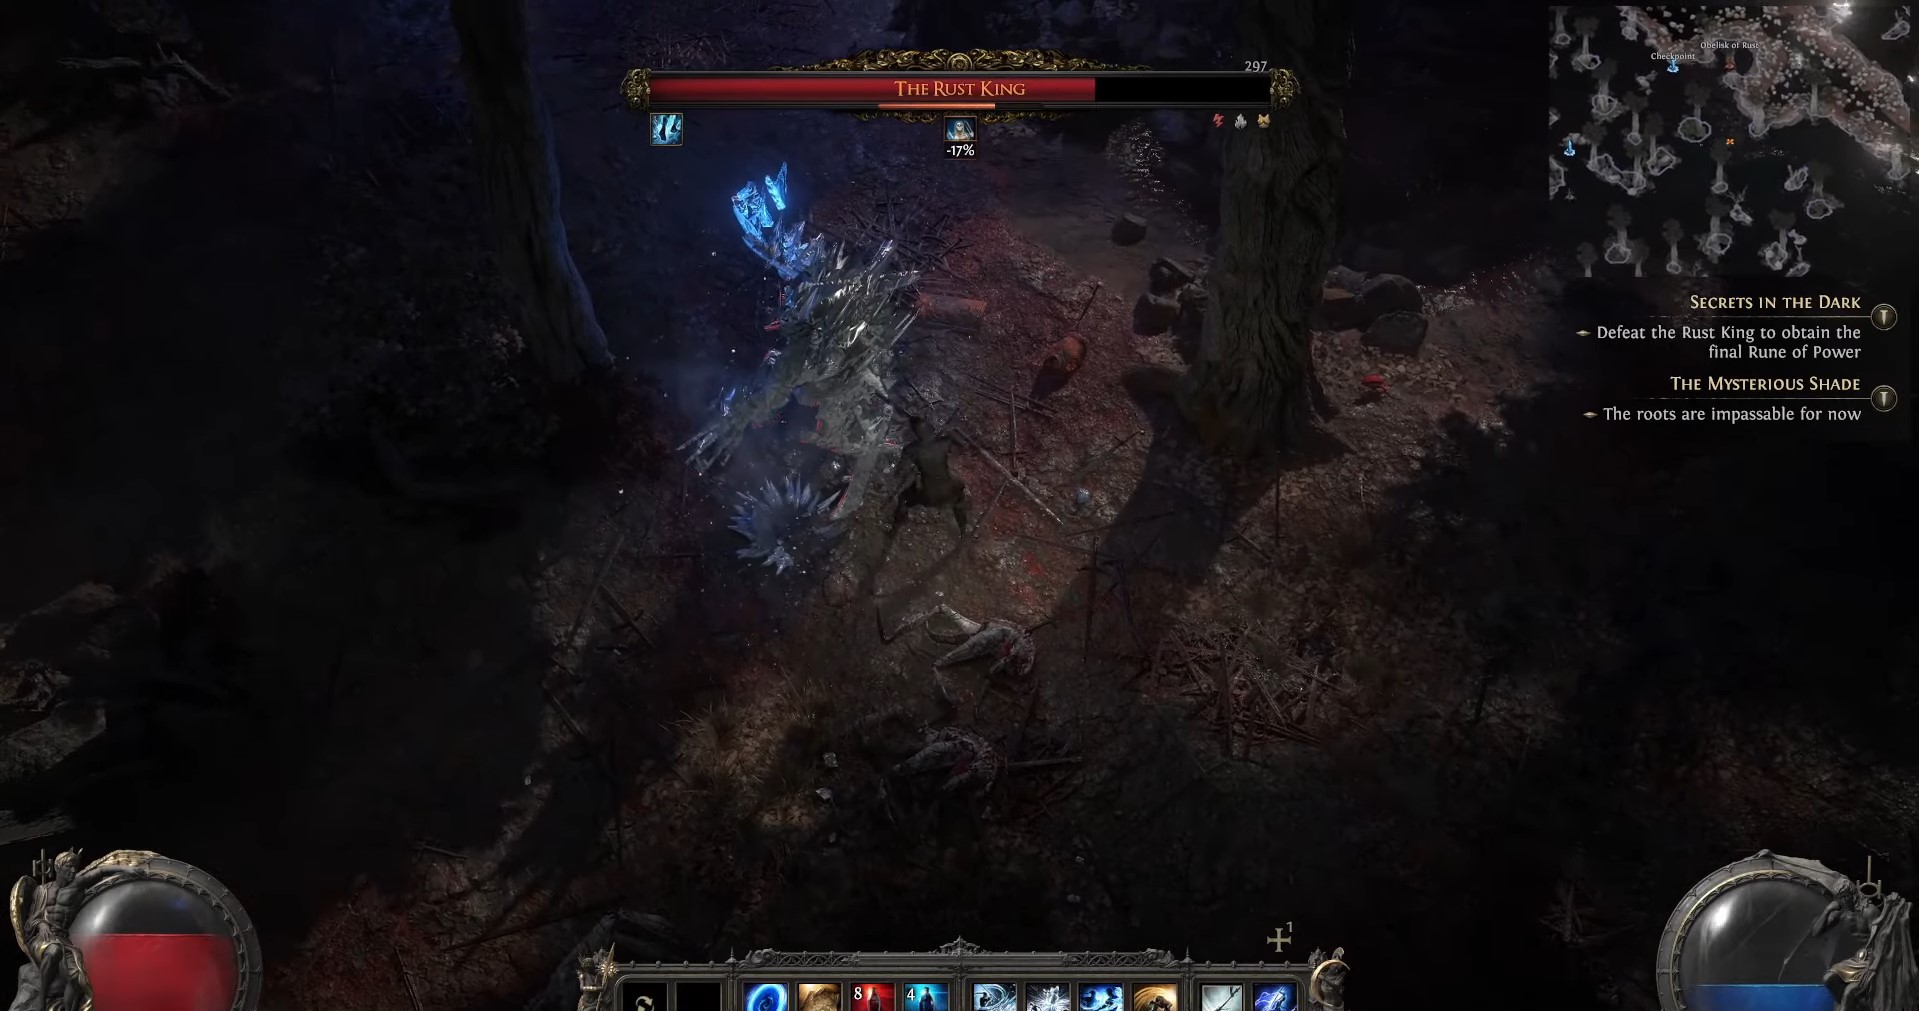
- Boss Type: Main
- Damage Type: Physical
- Resistances: Fire + Physical
- Weaknesses: Lightning
The Rust King is a main boss who can conjure weapons that he can move at will to deal damage can be found at The Red Vale. You will encounter him during the Path of Exile 2 campaign. Once you interact with the third Obelisk of Rust, he will spawn in the arena. He’ll be doing an attack where he just spawns weapons above your head and slams down on you. He also has the ability where he spawns swords that point outwards from him and have a star shape. Those will shoot out eventually, just make sure in between the weapons he’s shooting so you don’t get hit.
Like most of the early game bosses, there are more ads that he’ll summon indicated by the lightning arc. He starts spinning around a bunch of weapons and shoots at you pretty quickly, so try to roll away. For his final mechanic, he will whip you and then shoot a crap ton of weapons. You can dodge it by just moving aside and dodging in either direction.
| Attack | Description | Counter |
|---|---|---|
| Swipe | Swipe its arms towards you while encountering a close-range | When the boss brings his arm to his chest, take it as an indicator and dodge immediately |
| Lightning Barrage | He stands for a few seconds and unleashes a barrage of lightning around | Immediately back up when the boss raises his hand and get ready to dodge incoming lightning |
| Multiple Sword Summon | Summons multiple small swords to attack you continuously | Move-in backward direction once you see the swords above his head |
| Ancient Ezomyte Summon | Summons multiple Ancient Ezomyte to attack you continuously | You can easily kill them because they’re a bit slow |
Upon defeating The Rust King you gain Rune Skull Cap (Secrets in the Dark quest item) as a reward.
Ervig, the Rotten Druid
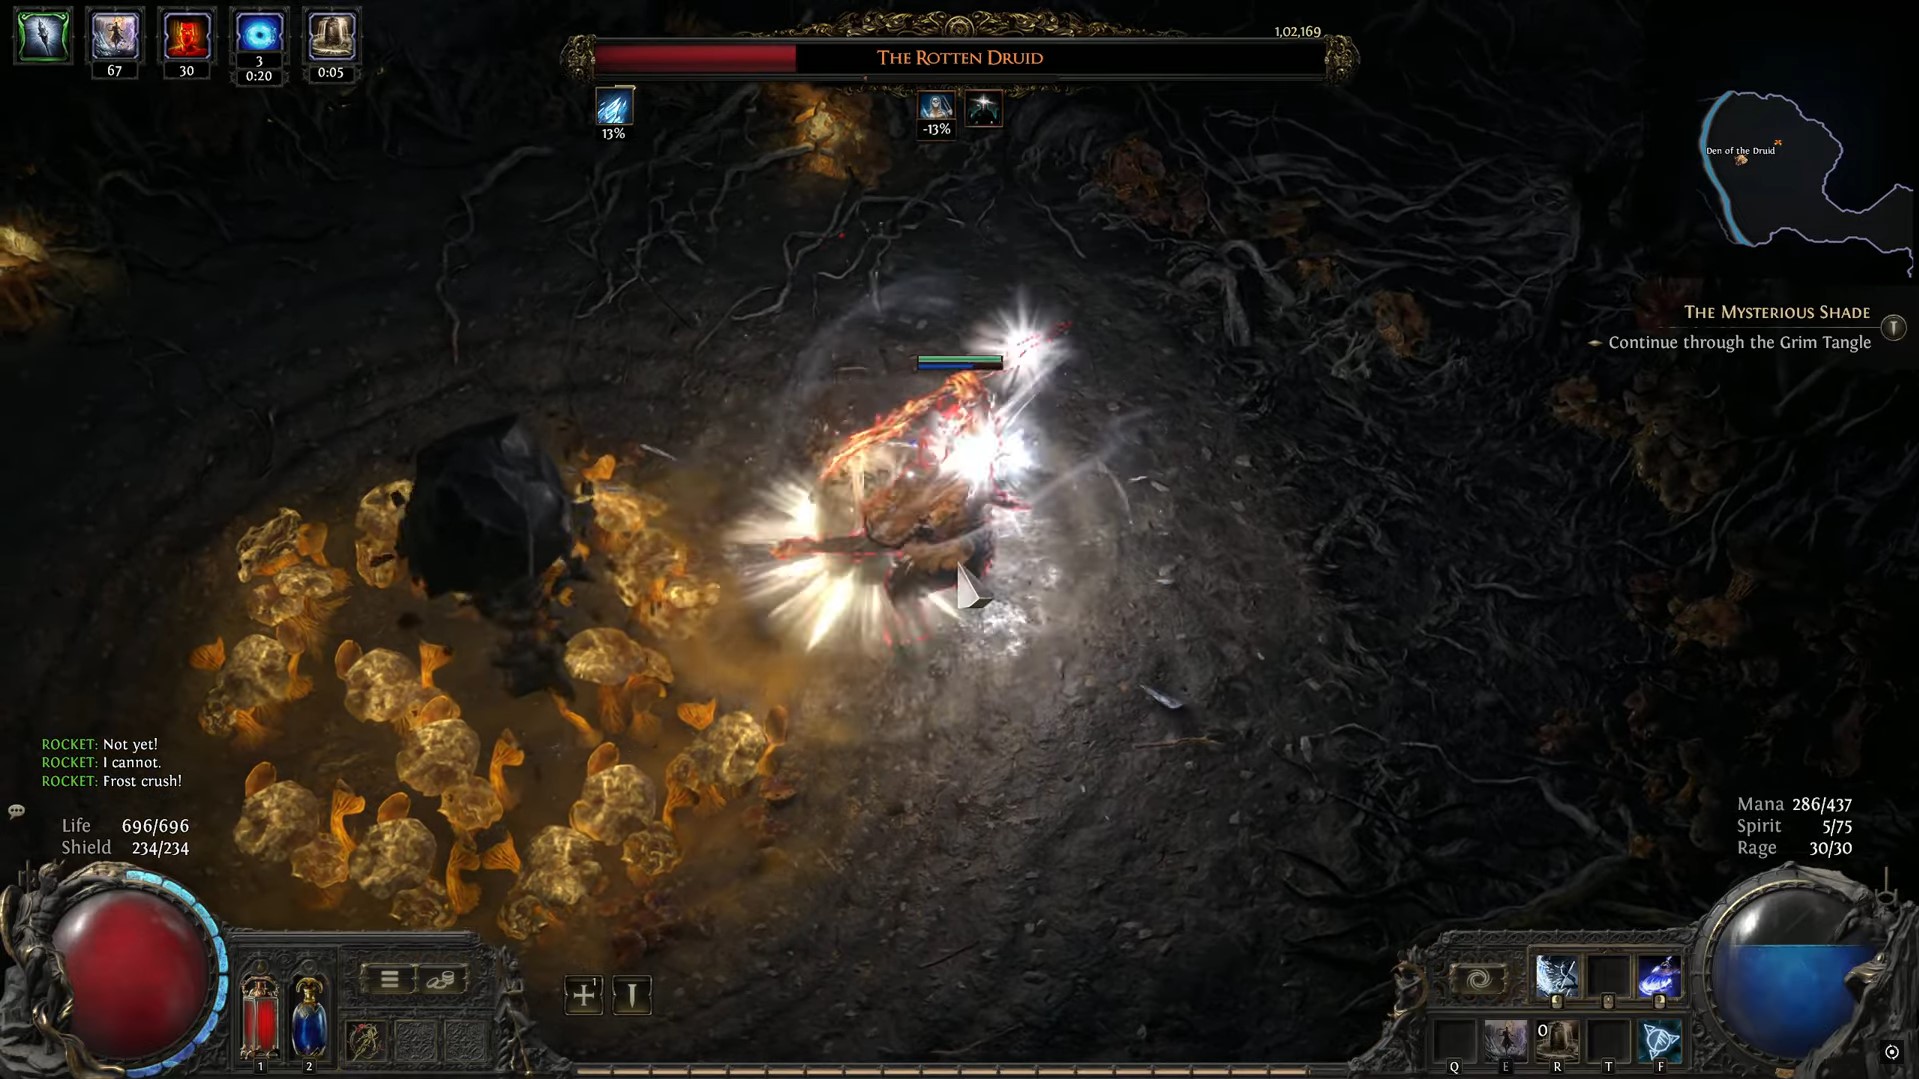
- Boss Type: Optional
- Damage Type: Physical + Chaos
- Resistances: None
- Weaknesses: None
The Ervig, the Rotten Druid is an optional boss that takes place in a hazardous arena filled with Spore Clouds that deal Chaos Damage and inflict a Slow debuff. There’s a bunch of yellow mushrooms and they’ll spawn later in the fight in the middle of his arena. If you step in these it will explode on you. The boss will periodically teleport himself to the other side of the arena while you’re fighting him.
One of his most devastating attacks is his barrage where he just launches a bunch of missiles at you, so make sure to just on a full sprint and dodge them. The boss will also do a huge brown nova that doesn’t do damage but spawns a ton of vines. You summon a big boulder from the middle arena and throw it at you, so make sure you time dodge it.
| Attack | Description | Counter |
|---|---|---|
| Thorns | Fires a blast that lands on the ground, creating a group of thorn spikes and dealing significant damage. The yellow beam light indicates the attack. | Once you get an indication, use the dodge-roll strategy to avoid the damage. Stand in areas with less spikes. |
| AoE | Summons large zones of damage and can appear around the boss, dealing heavy damage | Once you see them forming, run out of the affected area without wasting time. |
| Root Smash | The boss summons plant roots that smash the ground | Use dodge-roll and quick movement strategy to avoid getting hit |
The rewards for defeating Ervig, the Rotten Druid are:
- 25 Gold
- Superior Tattered Robe
- Wrapped Quarterstaff
- Medium Mana Flask
- Orb of Augmentation
- Uncut Support Gem
Asinia, The Praetor’s Consort

- Boss Type: Main
- Damage Type: Physical
- Resistances: Physical + Cold
- Weaknesses: None
Asinia Praetor Consort uses a teleporting ability and can be found at The Tomb which you’ll find at the end of the Tomb of the Consort in Act 1. She spawns four circles on the ground that will chase you, so you won’t constantly be moving and the fourth one will be double the size. Also, she does an Unearth just like the Necromancer skill that will shoot bones and frontal cones. She yells and a big green AoE nova that will not do any damage but summon spirit.
To stop this, use need to run to the ads to make them disappear. She also summons her partner to shoot out a wave of necrotic bolts, so make sure you’re between those shots. She also teleports on top of you and tries to melee you and curse you with a 30% slow.
| Attack | Description | Counter |
|---|---|---|
| Greenflame summons | Summons green flames in a circular shape from the ground 3 times | Get out of the circle when a circular ring appears from the ground |
| Teleport Swing | She disappears and teleports beside you and does a spinning Swing | Back up when she disappears |
| Sword Combo | Perform a four-hit combo toward you with her curved sword. | Notice her arm movement and back up and dodge until all four hits are done when she swings. |
| Greenflame Barrage | Changes her sword and summons a barrage of green flames | Simple back up and get in between the flames |
The reward for defeating the Asinia, The praetor’s Consort is Sorrow Among Stones’s main quest progression.
Draven, The Eternal Praetor
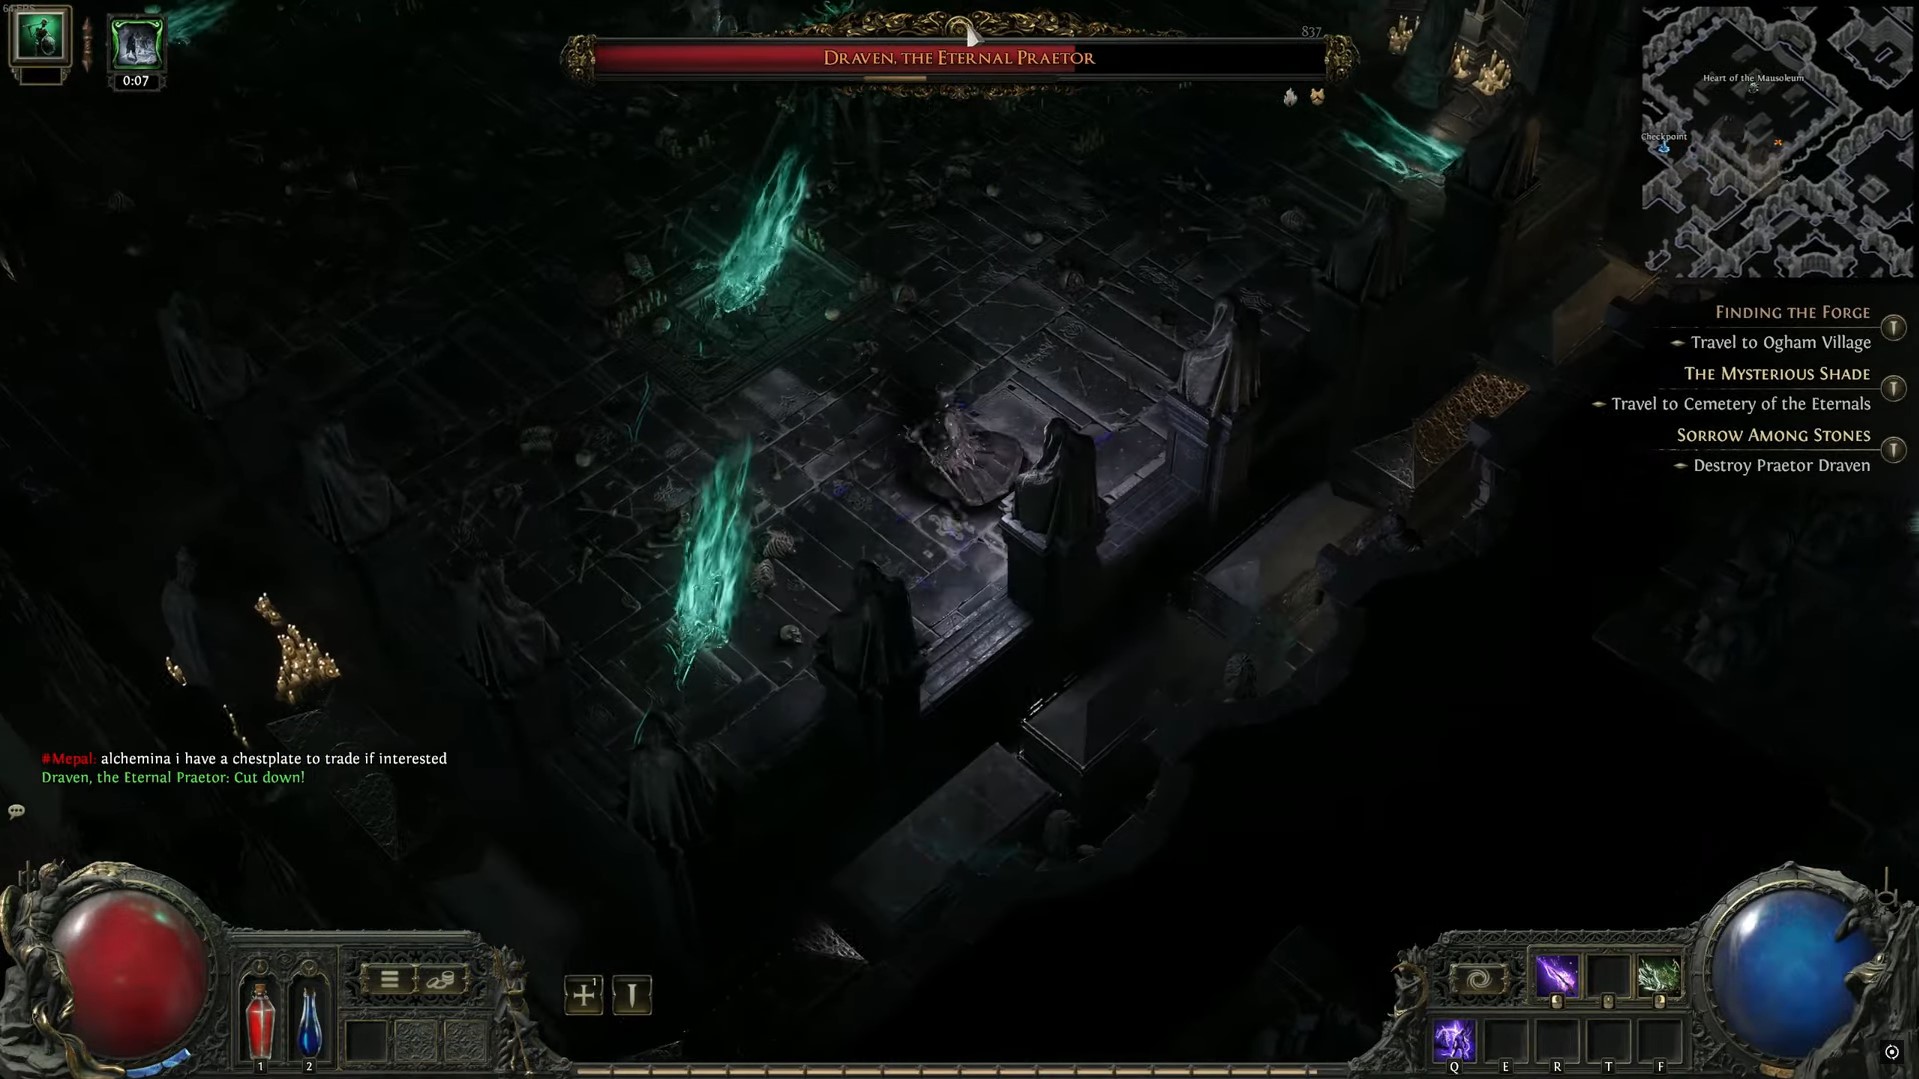
- Boss Type: Main
- Damage Type: Physical
- Resistances: Physical + Fire
- Weaknesses: None
The Draven Eternal Praetor is an unavoidable boss that can be found at The Mausoleum, under the Cemetery of the Eternals. Find and defeat him to progress the Sorrow Among Stone’s main quest. He makes the deadly wave attacks with all the necrotic bolts, so make sure you’re between the bolts when he shoots them. He also has a big melee combo where he swipes for time. He’ll also do the same AoE Nova that will start summoning the spirits, so make sure to run into those bad boys and dodge the circles they leave behind. He also does a big line frontal that slams down and shoots out waves from where he initially hit. You can get behind the boss or just outrange the waves. We recommend you avoid cursed areas and walk over the souls to dissipate them.
| Attack | Description | Counter |
|---|---|---|
| Swing | Sings his sword downward | You can easily dodge this attack because the swing is easily predictable |
| Sword Combo | Perform a four-hit combo toward you with his sword. | Notice his arm movement and back up and dodge until all four hits are done when he swings. |
| Green Flame Fury | Slams his foot on the ground creating green flames that head toward you | Back up and dodge sideways to avoid the spread of the green flame |
| Greenflame Barrage | Changes his sword and summons a barrage of green flames | Simple back up and get in between the flames |
The reward for defeating the Draven, The Eternal Praetor is Draven’s Memorial Key Piece (Sorrow Among Stones).
Lachlann of Endless Lament
- Boss Type: Main
- Damage Type: Physical
- Resistances: Physical
- Weaknesses: None
The Lachlann of Endless Lament is a slow-moving boss that can be found in the Memorial of the Lost which is a portion of Cemetery for the Eternals. Lachlann of Endless Lament double slams in the front and slams behind him, so make sure you’re out of range. He’s got multiple spirits summon attacks. The first ones in a straight line and it will shoot out and leave a trail of ice that will slow you. He also stomps his foot on the ground and the spirits will underground chase you and start swirling around. The boss shoots off the ground and it comes back down on your location. When this boss turns, he’ll do a heavy-hitting frontal cone attack. The tip for defeating this boss is to avoid its soul rise and dive attack. During the ground attack, try to dodge sideways.
| Attack | Description | Counter |
|---|---|---|
| Spirit Blast | Summons 3 spirits that head toward your direction | Blast is not fast, so it is easier to dodge |
| Mace Slam | Brings his mace over his head and slams it on the ground toward you | You can easily predict the dodge, so try to dodge sideways |
| Spirit Drop | summons spirits and the spirit goes up first and comes flying down on you. | Immediately and continuously back up until the spirit crashes on the ground |
| Swing | swings his mace sideways | The swing is predictable |
The reward for defeating the Lachlann of Endless Lament is Count Lachlann’s Ring (The Mysterious Shade quest item).
The Crowbell
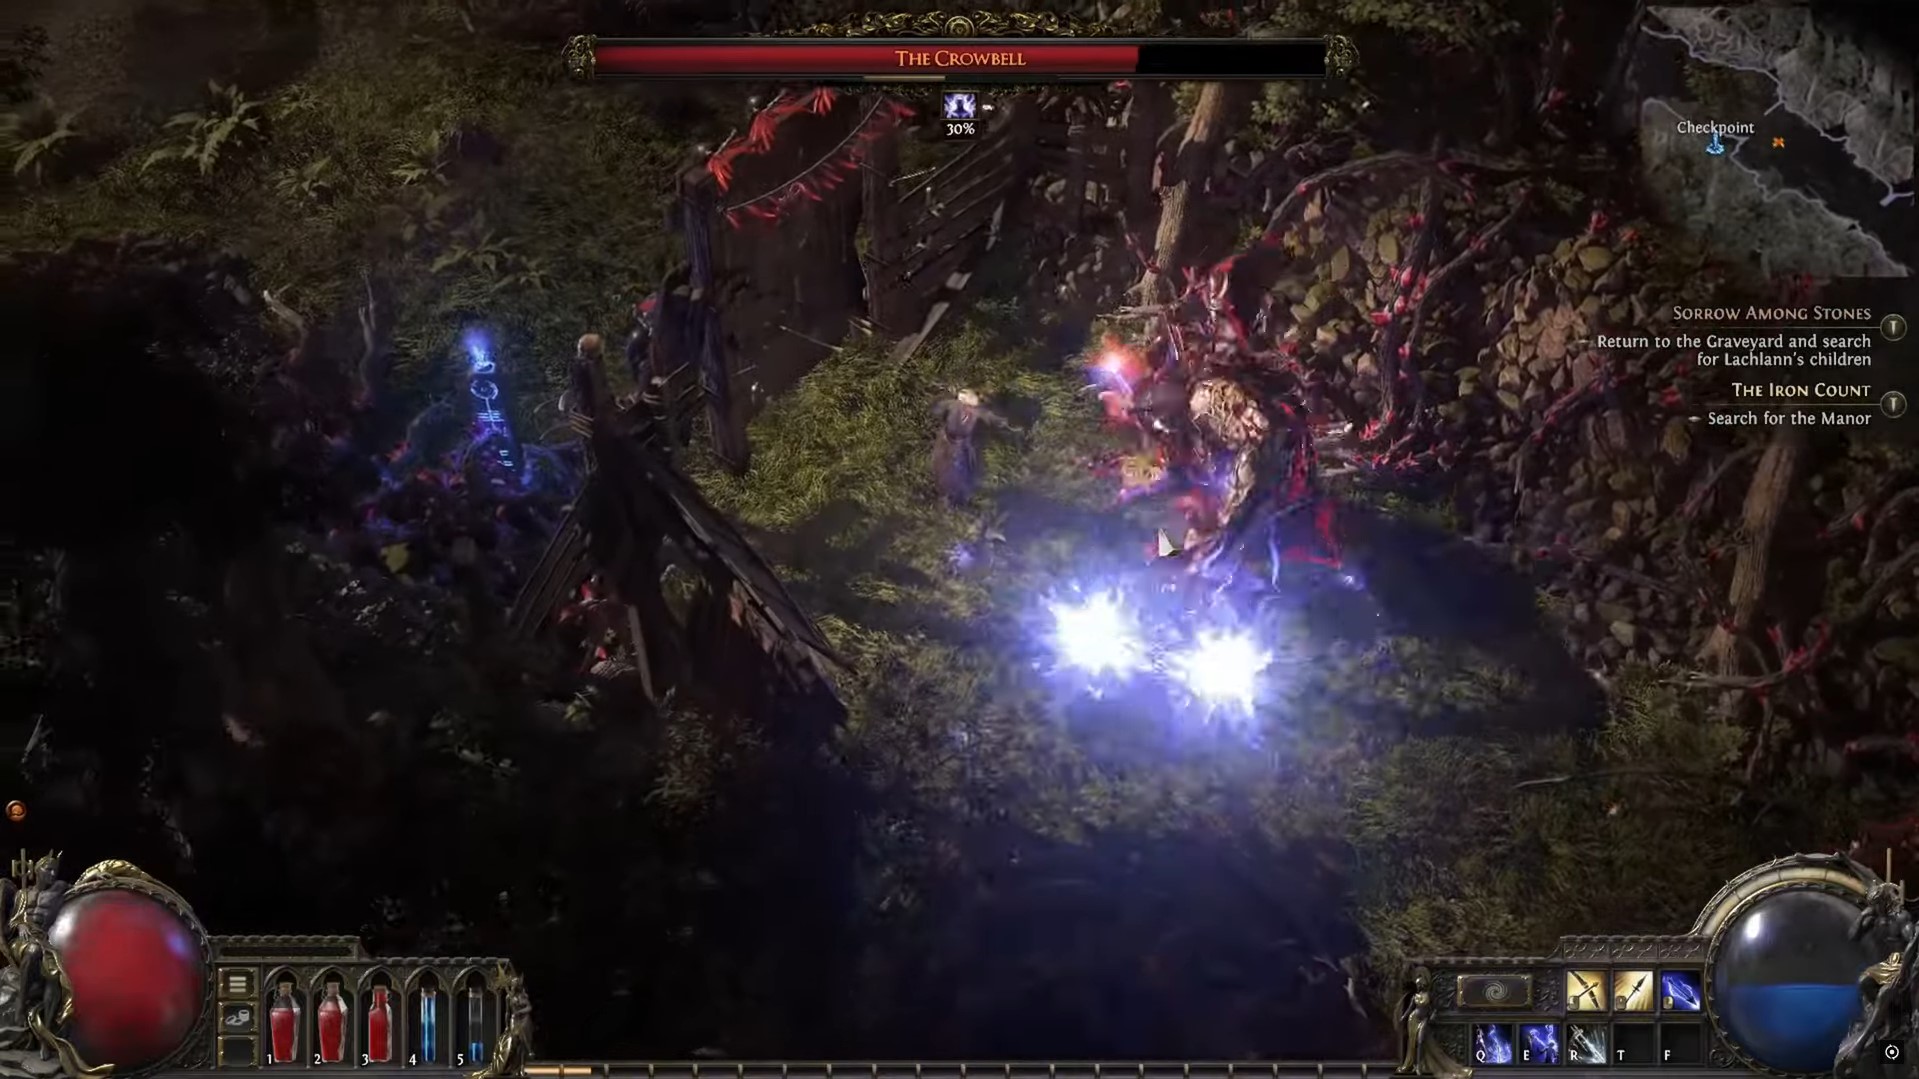
- Boss Type: Optional
- Damage Type: Physical
- Resistances: None
- Weaknesses: None
The Crowbell is an optional and challenging two-phase boss that is well known for its powerful attacks and ability to pick up a massive bell. You can find this boss in the Hunting Grounds located at one of the far corners of the map in Path of Exile 2. You can easily defeat him by staying behind the Crowbell’s back and keeping distance from its bell spin attack. The fight is pretty simple, he does a bunch of swipes and slams nothing too dangerous. When you phase him to the second part of the fight, he actually enrages, so all the swipes and slams just hit harder. In the third part of the fight, he rips the bell to do more swipes and slams with some spin attacks. You can just dodge-roll every attack and use a melee attack to kill this boss.
| Attack | Description | Counter |
|---|---|---|
| Ground Slam | Slams the ground, creating a small shockwave | Dodge out of the way when the boss raises |
| Uppercut | Punches upward, launching close-range players into the air | Move back or dodge as soon as you see the indicator |
| Leaping Slam | Touches the ground briefly, then leaps into the air and slams down on your location. | Dodge to the sideway to avoid the attack |
| Bell Slam (Phase Two) | Slams the bell into the ground sending shockwaves into your location | Immediately back up and get ready to dodge when the boss lifts the bell |
| Spinning Bell Swing (Phase Two) | Swings the bell in a wide arc, spinning twice to hit in range | Use the momentum as an indicator that the boss creates. |
The rewards for defeating The Crowbell in Path of Exile 2 are:
- Cruel: Book of Specialization – Grants two Weapon Set Passive Skill Points
- 35 Gold
- Horned Crown
- Pathfinder Coat
- Ringmail Gauntlets
- Lesser Mana Flask
- Orb of Transmutation
- Uncut Skill Gem
The King in the Mists

- Boss Type: Optional
- Damage Type: Physical + Chaos
- Resistances: Physical + Chaos
- Weaknesses: None
The King in the Mists is a challenging boss who uses a mix of physical and magical attacks. He teleports around the arena to confuse and overwhelm the players. This boss is part of an optional side quest in Freythorn, provided to you by Finn. Destroy the ritual altars to finish this side quest by defeating The King in the Mists. It’s a two-phase fight where most of his abilities are the exact same they’re just powered up and hit harder. He spawns the blood pools that don’t want to stand in otherwise you take damage over time. He’ll be doing a huge AoE slam in front of him when he turns red. He’ll spawn an effigy of you that will make you take more damage, so make sure you’re killing that effigy as soon as possible.
| Attack | Description | Counter |
|---|---|---|
| Charged Staff | Slams his staff onto the ground, causing a purple shockwave | immediately back up when you see the Staff getting raised |
| Purple Energy | Reappears and shoots a burst of purple energy toward you | You can easily anticipate when to dodge as the energy is slow |
| Uppercut | Punches you upward when fighting him at close range | Use the spin as an indicator to dodge |
| Small Purple Blast | Reappears and shoots a burst of purple energy toward you | You can easily anticipate when to dodge as the energy is slow |
The Executioner
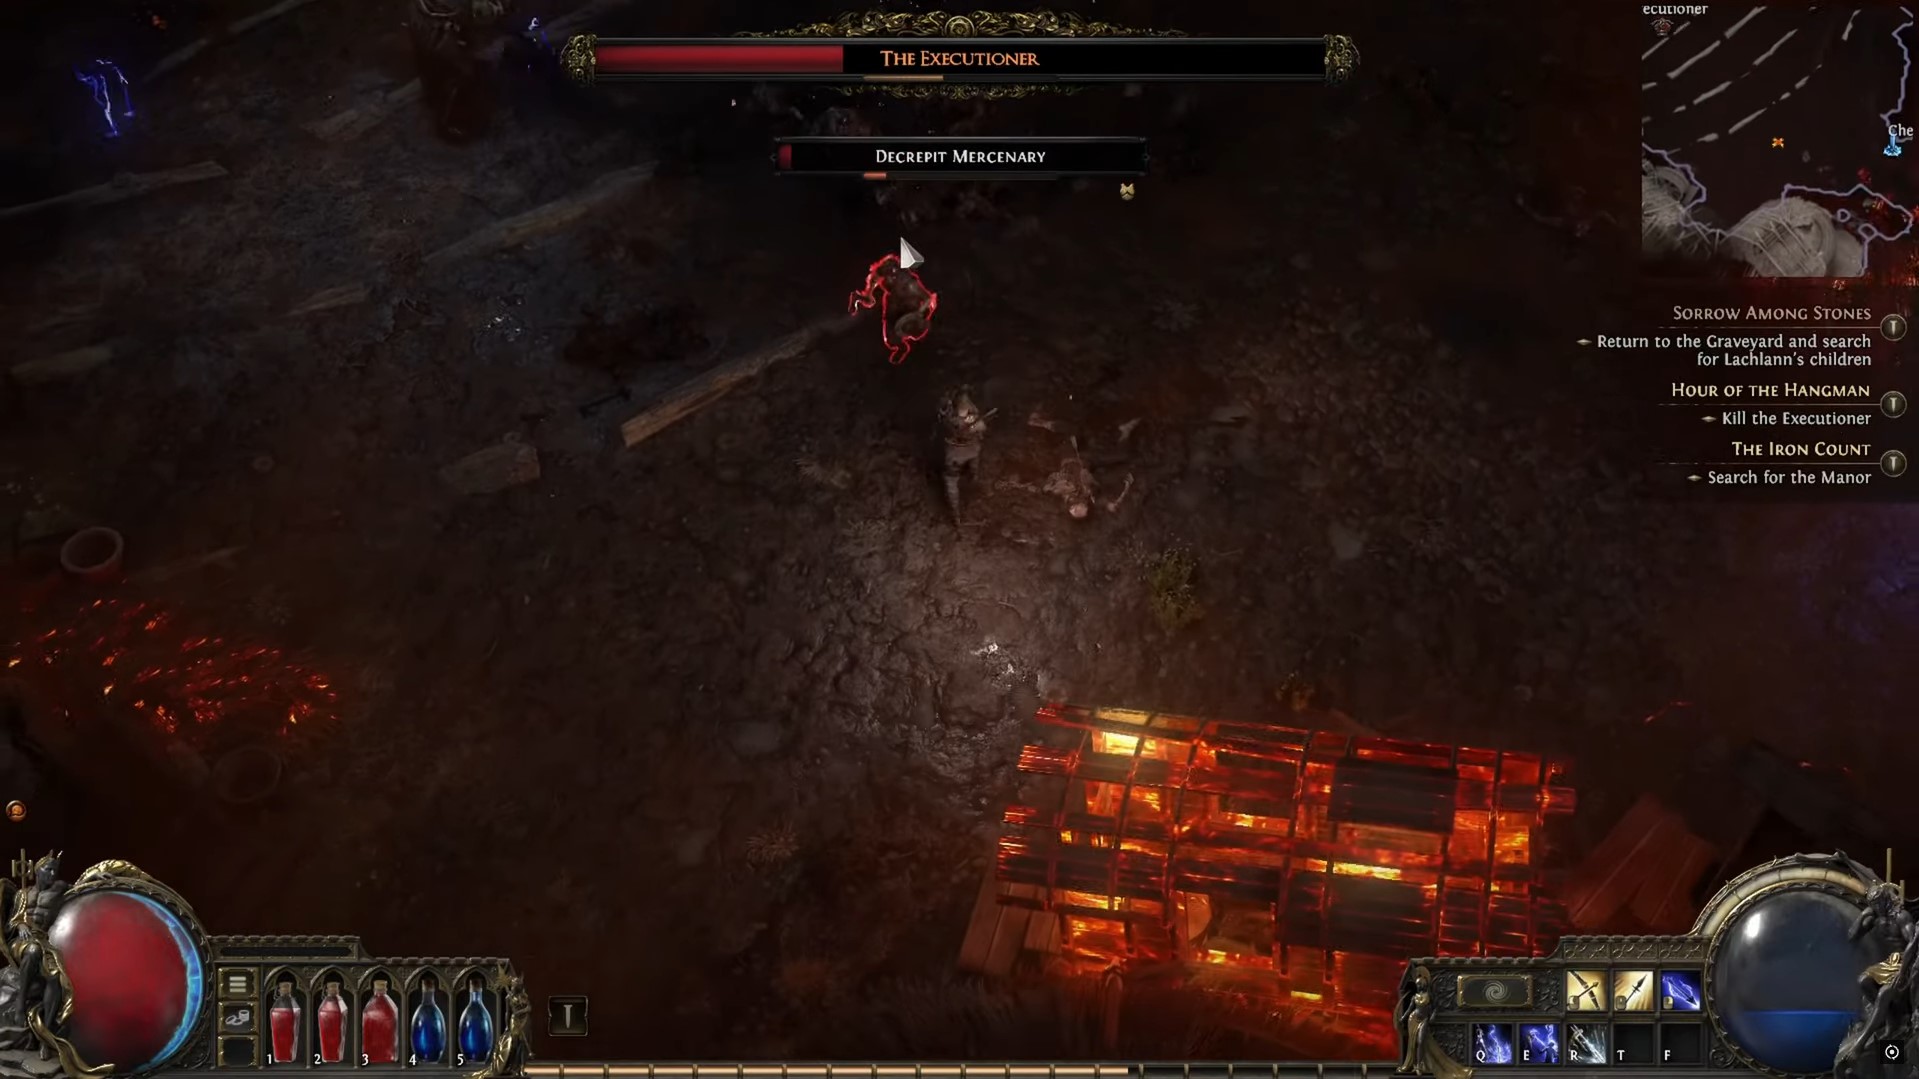
- Boss Type: Main
- Damage Type: Physical
- Resistances: Fire
- Weaknesses: None
The Executioner in Path of Exile 2 is a semi-fast boss armed with a massive mace that allows him to reach you with ease. This boss is located at Ogham Village in Act 1. He will be available at the opposite side of the Ogham Village’s Waypoint. The Executioner has two big slams with his axes that are indicated by him getting all red. He also has ads running down to help him fight you. There are also the ads that will shoot ballistics at you, indicated by the red circles.
Once he shoots those ballistics, it will leave a patch of fire on the ground that will ignite you. His final ability will slam you down a huge Guillotine axe that will be indicated by dust pulsing away from the boss. We recommend you move away from its area attacks and be careful of Guillotine blade attacks.
| Attack | Description | Counter |
|---|---|---|
| Leaping Slam | Leaps through the air and slams his mace at you | The boss stays in the air for a time that gives you enough time to dodge |
| Double Swing | Swings his mace 2 times left and right | The attack is slow, so you can dodge it easily |
| Mace Slam | Slams his mace on the ground causing cracks | Immediately back up and get ready to dodge |
| Charged Flame Slam | Brings his mace overhead and pauses a bit to charge an attack, then slams it on the ground | While the attack charges, you need to back up immediately |
The rewards for defeating The Executioner are The Trail of Corruption’s main quest progression.
Candlemass, the Living Rite

- Boss Type: Optional
- Damage Type: Physical + Fire
- Resistances: Fire + Cold + Physical
- Weaknesses: None
The Candlemass the Living Rite is an optional boss that uses fire spell damage. This boss is found at the Fallen Altar on the first floor of Ogham Manor in Act 1. He powers up his sword from the candles on his back and just does a harder melee attack for one of his abilities. Another one, he’ll power up again but this he spins in a circle and launches a fire slash at you then his fire breath inhales and then breath around in a circle. Keep spins around to not get hit and then his last he just explodes all the candles on his back, dealing a bunch of AoE.
| Attack | Description | You have plenty of time to dodge |
|---|---|---|
| Flame Slash | Spins first and then slashes its sword toward you to create a flame blast | Immediately back up when you see the boss spinning |
| Leaping Slam | Leaps through the air and slams its sword at you | You a plenty of time to dodge |
| Slash | A regular slash with its sword | Immediately back up or dodge when you see the boss lift its arm to slash |
| Flame Barrage | Charges up and starts releasing multiple fire shards | He aims in one direction when it starts firing, allowing you to immediately move sideways. |
The reward for defeating Candlemass, the Living Rite is Cruel: Candlemass’ Essence – Grants 8% Increased Maximum Life, and Candlemass’ Essence – Grants +20 Maximum Life.
Count Geonor

- Boss Type: Main
- Damage Type: Physical + Cold
- Resistances: Cold
- Weaknesses: None
Count Geonor is an Act Boss found in The Iron Manor and has a shapeshifting ability that he uses when his health drops around 40%. This boss has three phases and the first few abilities are indicated by him glowing red. He locks on you and shoots a frost bolt out of his sword, so you need to run and dodge. Count Geoneor charges at the wall, make sure you’re not close to him. He slams his sword into the ground and puts a little frost circle around the sword, don’t stand on it as you will get frozen and get killed.
| Attack | Description | Counter |
|---|---|---|
| 3 Sword Slash | Spins and slashes 2 times and ends with a regular swing. | Back up to avoid the attack. |
| Sword Blast | charges his sword does a thrusting pose and releases energy that deals damage | Immediately move to any side to avoid it |
| Running Sword Thrust | Charging at you and thrusting his sword at you | Avoid it by sidestepping when he gets close |
| Long swing | Wide slash that surprisingly reaches long-range | The attack is fast, so you need to watch his move after the Running Sword Thrust. |
The reward for defeating the Count Geonor is The Mad Wolf of Ogham’s main quest completion and you also gain Candlemass’ Essence which grants you +20 to max life.
Areagne, the Forgotten Witch

- Boss Type: Optional
- Damage Type: Physical
- Resistances: None
- Weaknesses: None
Areagne, the Forgotten Witch, is a secret boss in Path of Exile 2 that can’t be encountered by those who don’t explore the game much. You may have to travel an extra mile to get to her and reap the satisfaction of achieving a victory. You can run into her in the Grelwood. This encounter can take place as early as Act 1. She has a hut in the middle of nowhere that you can stumble upon while exploring the region of Grelwood.
Once you step inside, the witch will vanish almost immediately. Loot whatever is inside and prepare yourself for what’s about to come. There’s no easy way to defeat Areagne in Path of Exile 2. Despite being an Act 1 boss, she can be a nuisance to handle on your own. It’s not impossible, though. The best approach we found in this regard was sticking true to your class. Once you are done killing Areagne, she will drop an Uncut Support Gem and an Uncut Skill Gem that you can use later. You also gain the following for defeating the Areagne, the Forgotten Witch.
- Rope Cuffs
- Orb of Augmentation
- Scroll of Wisdom
Vargir the Feral Mutt
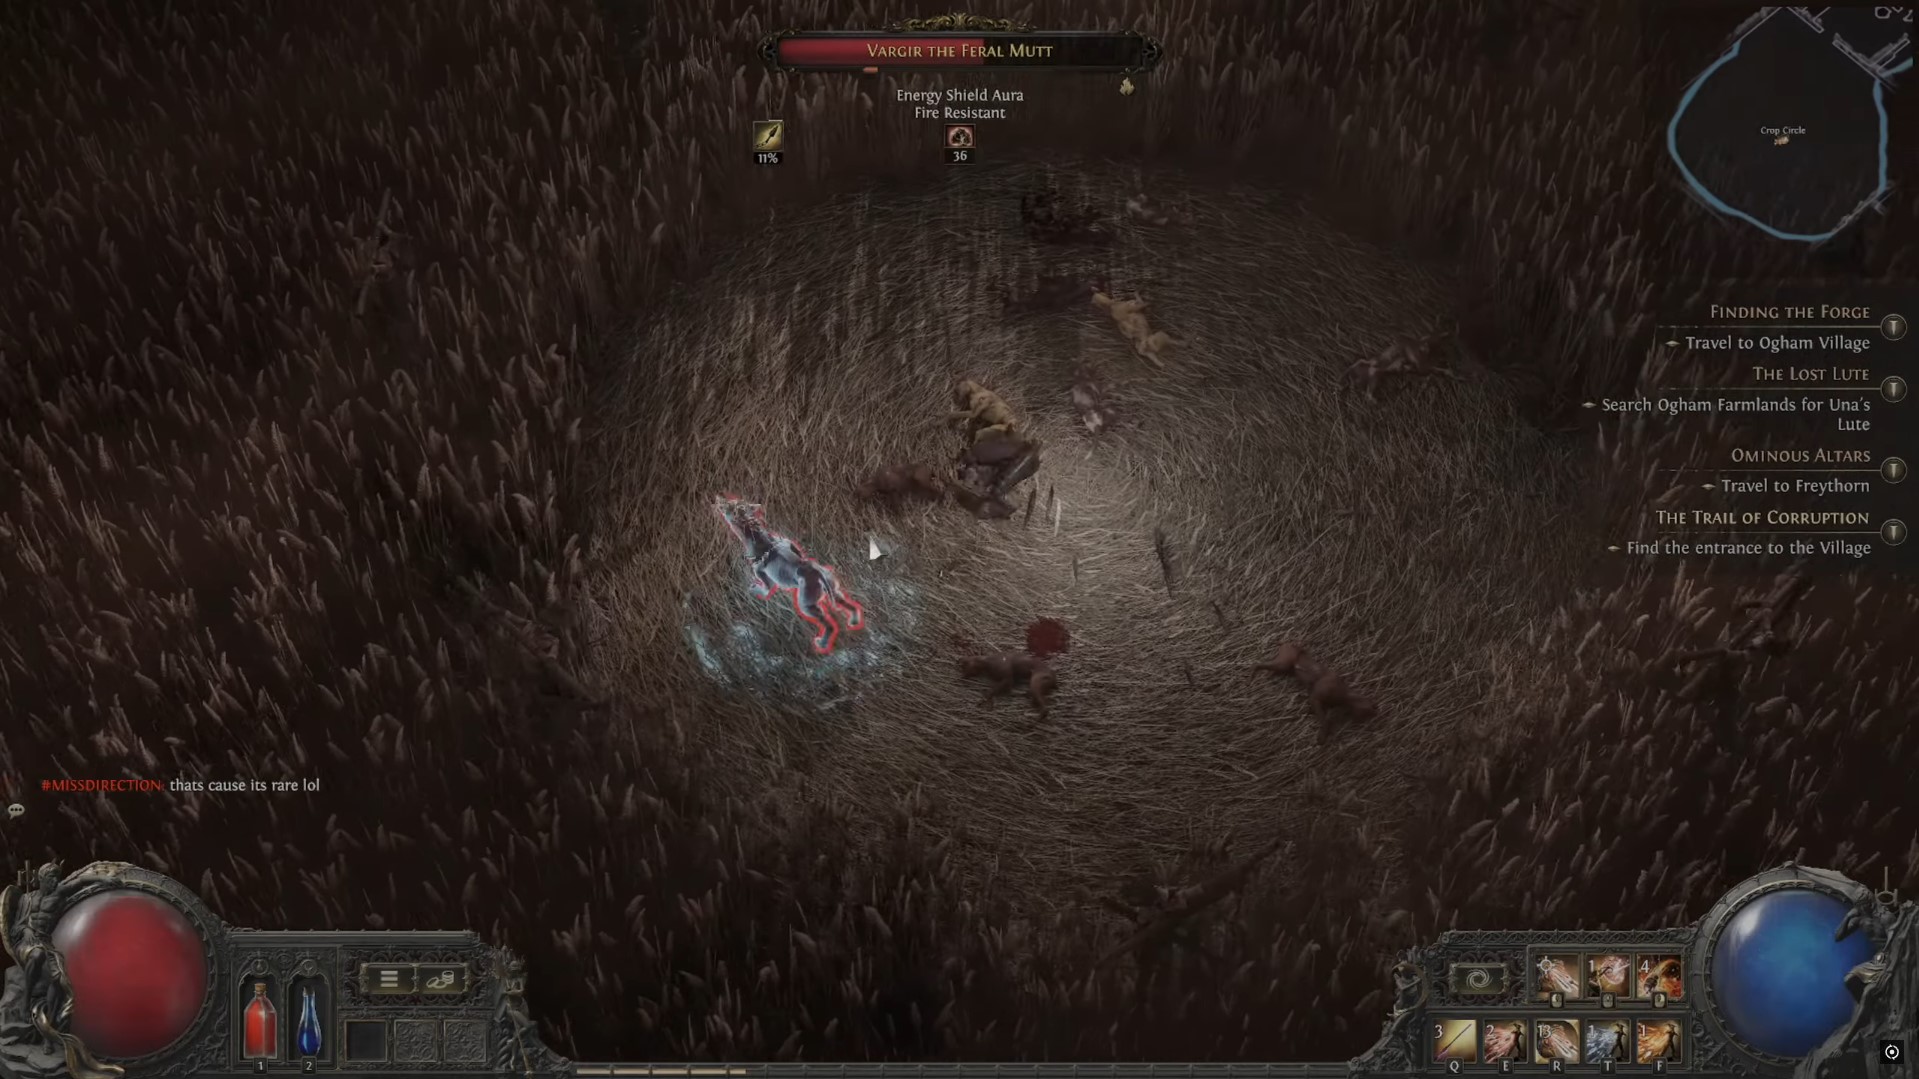
- Boss Type: Optional
- Damage Type: Physical
- Resistances: None
- Weaknesses: None
Visit Ogham Farmlands and reach the Crop Circle in the cornfield region here. This is where Vargir will be waiting to jump you. However, his ambush isn’t that direct. He is smart and sends his minions first. As soon as you enter the area, a pack of wild dogs will run towards you to attack you. This is where you would want to use your most powerful AoE attacks. We recommend AoE specifically because it can take out the pack in less time. Once you defeat the Feral Mutt, he drops an Uncut Skill Gem. This is a type of gem in the game that can prove to be pretty helpful. If you are confused about using it, don’t worry; we have got you covered.
How many bosses are there in Act 1 POE 2?
There are several bosses in Act 1 of Path of Exile 2, including 7 Man bosses and 9 optional bosses. You will encounter all main bosses while progressing in Act 1. However, the optional bosses reward you with useful items, making them crucial to face in the game.
- Vargir the Feral Mutt
- The Bloated Miller
- The Rust King
- Asinia, The praetor’s Consort
- Draven, The Eternal Praetor
- Lachlann of Endless Lament
- Count Geonor
- The Executioner
- The Devourer
- Beira of the Rotten Pack
- The brambleghast
- Ervig, the Rotten Druid
- The Crowbell
- The King in the Mists
- Candlemass, the Living Rite
- Areagne, the Forgotten Witch
Tips and Tricks for defeating Act 1 Bosses in POE 2?
Here are all the tips and tricks you need to know for defeating Act 1 bosses on Path of Exile 2.
- Bait explosive spores to the arena’s edges to maintain safe zones.
- Maintain mid-range distance to anticipate the attacks of Biera of the Rotten Pack.
- Stay mobile to evade the eruption and tail attacks of The Devourer.
- Keep a safe distance to avoid melee attacks The Brambleghast.
- Maintain mid-range distance to anticipate the attacks of The Rust King.
- Destroy affliction totems quickly to minimize damage over time effects.
- keep moving during the Ritual of Dance.
- During Avalanche, dodge roll through frost walls to avoid the overhead slam from Count Geonor.
- Move to the sides or behind Count Geonor to evade the frontal attack.
FAQs about Act 1 Bosses in Path of Exile 2
Who are the main bosses in Act 1?
The Bloated Miller, The Rust King, Asinia, The praetor’s Consort, Draven, The Eternal Praetor, Lachlann of Endless Lament, Count Geonor, and The Executioner are the main bosses in Act 1.
What rewards do Act 1 bosses provide?
The bosses in Act 1 of Path of Exile 2 reward you with uncut skill gems, key pieces, and permanent bonuses.
Are there any optional bosses worth seeking out in Act 1?
Yes, there are optional bosses worth seeking out in Act 1 of Path of Exile 2: Beira of the Rotten Pack is the worth-seeking boss due to the rewards you gain upon defeating.
Who are the optional bosses in Act 1?
The Devourer, Beira of the Rotten Pack, The brambleghast, Ervig, the Rotten Druid, The Crowbell, The King in the Mists, Candlemass, the Living Rite, Areagne, the Forgotten Witch, Vargir the Feral Mutt are the optional bosses in Path of Exile 2.
Looking for More Path of Exile 2 (POE2)?
Thank you for reading the Path of Exile 2: All Act 1 bosses Guide and where to find them. We provide the latest news and create guides for Baldur’s Gate 3, Path of Exile 2, Stalker 2, and more. Also, watch Deltia play games on Twitch or visit his YouTube channel!