Welcome to The ULTIMATE Magicka PvE DPS Gear Guide for ESO! This guide will discuss various gear sets for PvE DPS in the Elder Scrolls Online. Whether you’re a new players or top tier end game, you’ll want to watch this video for ideas and options on all the various gear setups in ESO regardless of class! This guide will also feature progression based systems starting with overland, crafting, dungeons and trials! Thanks for reading and be sure to bookmark as this information will get updated.
Table of Contents
- Gear Setups
- Primary Offensive
- Secondary Offensive
- Monster Helms
- Mythic
- Arena Weapons
- Build Templates
Video Guide
[yotuwp type=”videos” id=”UiYCLd_wCX0″ ]
Gear Setups
In 2021, I restarted ESO on the PC EU server. I had little to nothing to start and made my way through a progression based gearing system with various loadouts at stages. What I found best was to use a three pronged approach to tackling gear. Beginner, this is without monster helms, mythics, trials gear and even dungeons. You can use some gold and overland gear sets to get a good loadout for a starting point. Next I’d work toward an intermediate loadout which would focus on getting a base game monster helm, one dungeon set and an overland set on the body. Then I worked toward converting that into a solo friendly build in order to farm arena weapons. And eventually, I’d progress towards a trials set on the body at all times, a front bar high damage set and monster or a mythic for optimal damage.
Progression
- First goal is to get one or more overland sets. DO NOT worry about the traits, get cheap or easy jewelry and body pieces and leave the weapons open.
- Next is to get some starter two piece weapons and you’ll have two five pieces and another two piece weapon loadout. This will be very easy to do and add a lot of power to your build early.
- Now you’ll have the ability to start farming dungeons, this is where you prioritize your classes best fit for monster helm in the base game along with undaunted pledges (non-DLC) for easy keys.
- Once you obtain the monster helm and shoulder, next comes replacing the weapons with a front bar overland or dungeon set. You’ll then have a 5pc on the body at all times, a front bar 5pc activate on your main damage bar and a monster helm. You can leave your back bar weapon as is for now.
- Your goal from here is 1) work towards getting better dungeon sets, monsters from more challenging dungeons (DLC). 2) work towards unlocking mythic aimed at solo play. 3) work towards obtaining a base set of trials gear on the body. 4) work towards completing arenas like VMA, Vateshran in order to collect relevant weapons to add power to your back bar.
Now you’ll be approaching end game which I have two loadouts I run.
- Solo or without a healer, survival setup. This is typically with a mythic for survivability, a trials or dungeon gear choice for resources sustain and a front bar damage setup. I won’t require healing, resource sustain and can solo Veteran Hardmode dungeons with this. Sample templates later.
- Group setup, this is meant to optimize damage at the expense of solo survivability and resource sustain. This is playing with coordinated dungeon, arena and trials group where you’ll be getting healed, resource sustain and damage amps. You have one goal, melt mobs like butter!
Now lets give you a clear sense of how to accomplish this with crafting, overland, dungeons, trials, mythic and more!
Primary Offensive
Desktop hover over gear for set bonuses, mobile click once for set bonuses
Your first objective is to obtain a 5pc item set to be used on your body at all time so the effect doesn’t come on or off. Then to do the same with jewelry and the two remaining pieces. Then weapons to get another 2pc set bonus giving you decent starter setup.
DO NOT WORRY ABOUT THE TRAITS or golding out the gear. Just get the 5pc set and that’s what’s most important. I’d start with a set that gives good sustain until you’re comfortable then work towards damage.
Overland & Crafting Options
- Withered Hand = great resources sustain set, comes from from Alik’r Desert DC Zone. This is great because it carries your sustain and healing when starting out giving you back health and magicka when you kill mobs. You can use this on any class and it’s what I use when making budget builds. Plus you can buy this gear on the traders around ESO for dirt cheap. If you don’t know, Tamriel Trader Centre is a great place to look for available gear sets on traders.
- Magnus’ Gift = good sustain set, craftable 4 traits (Greenshade, Rivenspire, Shadowfen). This is a great set for sustain if you are having trouble. And since it’s craftable you can get it very early in the game. I usually combine one damage producing set with a resource sustain set starting out with low CP.
- Mother’s Sorrow = great DPS set because of critical chance increase, comes from Deshaan overland EP Zone. This set rocks at end game and beginning because the critical chance increase is so substantial. I use this on most of my builds when I don’t want to swap or baby sit more complex gear setups like Bahesei’s. It’s also DIRT cheap on the traders if you don’t want best in slots Divine traits.
- Julianos = good dps set, craftable 6 traits in Orsinium. You can also use this on your front bar for a decent combination if you have the crafting traits. It’ll add some damage but make sure you have some type of sustain especially if you’re low on champion points.
Dungeon
The dungeon sets that perform well are best used on the weapon and jewelry. Reason being, they have a “proc” that means you don’t have to keep them on at all time. Burning Spell Weave, Scathing Mage, etc, all have x to causes z in order to happen. You can always use on the body but will lose out in efficiency.
- Overwhelming Surge = great DPS and sustain, comes from Tempest Island base game dungeon. This is dealy for magplars playing in melee range.
Trials
These are the big dog DPS sets that add a ton of value. Regardless of the five piece set bonus, the three piece comes with minor slayer increasing your damage by a flat 5%.
- Perfected False Gods = trials god tier resources sustain, comes from Sunspire trial. This absolutely carries your sustain and mobility. This is my primary 5pc farming solo arenas or doing hard mode vet dungeons solo because the sustain is so powerful. If you can, you REALLY want to obtain this as it’s much higher in damage and sustain than Withered Hand and Overwhelming Surge.
- Perfect Mantle of Siroria = good in stationary fights, comes from Cloudrest trial. This is a good 5pc set in very specific situations that doesn’t require mobility. A lot of folks use this when parsing to get very high DPS numbers and specific trials with long stationary fights. I don’t use this on any of my builds because I primarily run dungeons and like another set overall in trials.
- Perfected Bahsei’s Mania = considered best in slot mag DPS gear, comes from Rockgrove in Blackwood must own chapter. This is next level DPS and folks have very specific builds to not over sustain and keeping their max magicka right around 15-25% to take full advantage of this gear. It stacks on top of major and minor berserk and slayer, thus the damage added is through the rough. Depending on when you’re watching this, the set will be toned down to 12% increase damage from the original value of 15%. Still will be meta if you can baby sit your max magicka pool.
Now you have a progression of a 5pc body set that goes on at all time. The next up is jewelry and weapon which you have TONS of options and is very flexible depending on character.
Secondary Offensive
Desktop hover over gear for set bonuses, mobile click once for set bonuses
The premise here is your front bar is active which procs an effect thus you save another two piece back bar weapon. That two piece back bar weapon can be used for more stats or added effect increasing your overall dps. Thus, these items sets do not need to be active at all time to increase efficiency! Aim for a front bar offensive set that works for your specific class, then push towards more optimal setup as you learn light attack weaving.
Overland and Crafting
- War Maiden = great dps set for non-elemental users like magplar, comes from Overland Morrowind or traders. This set is very simple and easy to obtain for classes who’s main spammable is magicka damage (nightblade, templar, etc).
- Mechanical Acuity = advanced solo arena DPS set, craftable clockwork city 6 traits. This is a popular set when doing solo arenas because it can potentially melt bosses within seconds. The long cooldown isn’t ideal in long large group fights, but to melt something in 10 seconds its great.
- New Moon Acolyte = craftable option giving big damage on front bar only, 9 traits in Southern Elsweyr. This is a great set if you can deal with the negative resource sustain. It’s more damage than Julianos and preforms better sustain DPS than Mech Acuity.
- Deadly Strike = insane damage for high DoT builds or Templars with main spammable a channel, obtained via Bruma Elite Gear vendor in Cyrodiil or from traders. This is a very good set and forget front bar set that doesn’t require anything special. You’ll want to use this primary on a Templar and it can work on a Dragonknight as well.
Dungeons
- Burning Spell Weave = great DPS for dragonknights or elemental users, comes from City of Ash 1 or 2 normal or veteran. This set is awesome because it has an easy chance to proc, the spell damage is awesome but the burning status effect adds a ton of damage. Not to mention it’s extremely easy to obtain and will be a staple with DKs going forward.
- Medusa = great DPS set because of the buff it provides and increase critical damage, comes from Arx Corinium dungeon normal or veteran. You’ll get a very important buff, minor force which you won’t have to activate a skill. End game, most folks run an ability to provide this, but it makes your build much simpler while on your primary damage bar. And it works for literally every class!
- Scathing Mage = great spell damage set that similar to BSW, adds a lot of spell damage, comes from Imperial City dungeon. The strength of this set is the proc is direct damage, which is almost all classes main spammable attacks. Thus you can maintain high uptime doing great damage regardless of class!
- Tzogvin’s Warband = great damage that gives better DPS than Medusa and easier to maintain than Kinra’s, coming from Frostvault dungeon. This also gives minor force buff and a massive amount of critical chance. While it comes in medium armor, using jewelry and weapon means its a great mag user DPS set!
- Kinras’s Wrath = considered best in slot front bar mag DPS gear, comes from blackdrake Villa dungeon. This gives a super powerful damage amp but it’s VERY hard to maintain high up time. Most of the top skilled players run this because they are able to hit every light attack weave giving 5 stacks and big time DPS. If you’re not at that level (me either), I usually shy away because it’s very hard to maintain.
Trials
Typically folks don’t run a lot of front bar trials gear. You could always do the others mentioned previously, but I chose to put those on the body. If you don’t have the correct setup, it’s still not a bad thing to have front bar only but your goal is to keep the build efficient as possible!
Monster Helms
Desktop hover over gear for set bonuses, mobile click once for set bonuses
There are a ton of options here for Monster Sets, resource sustain, damage, aoe, you name it. I’ll give you my favorites but it’s hard to list them all for every specific build and class. I’d suggest targeting Iceheart for survivability at first, then move to a base game set either for range or melee and move on to top tier DPS setup requiring DLCs later.
- Iceheart = great survivability set and best for newer players, obtained in Direfrost keep base game. This set gives a big damage shield which is very nice for new players. You can use this at end game as well for certain tough fights and solo arenas so collect it right away.
- Nerien’eth = good damage aoe, single target and range, obtained in Crypt of Hearts 2 base game. This set does very good damage in any situation and works with any class. It’s not the top tier damage producer, but once your survivability increase, you can get it without any DLCs and do very good on any class.
- Grothdarr = good AoE damage if in melee, from Vaults of Madness base game. This is my go to when playing Dragonknight or Templar in melee range because it just melts mobs. Not as good single target but for trash and large fights its great.
- Maw of the Infernal = great for magsorc Pet Builds and a little more niche, obtained in Banished Cells 2. This is a great setup for running double pet magsorc build. Something I don’t use a whole lot of because I’m not fond of the gameplay but it absolutely does work!
- Ilambris = another great range DPS option, from Crypt of Hearts 1 base game. This is a good ranged set if you’re using crushing shock from destruction staff as a main spammable because you’ll keep a high up time. Downside is, it’s not a mobile set but can work starting off.
- Balorgh = insane burst set for bosses or solo arenas, comes from March of Sacrifices. This is a good niche set for specific encounters requiring a ton of burst damage. I pair this with mechanical acuity on VMA/Vateshran boss fights for utter carnage and killing bosses within 5 seconds.
- Zaan = amazing single target damage if in melee, obtained from Scalecaller Peak. This set excels at melting one target but you need to be in melee range. Not considered meta right now, but a great alternative for magplar/magdk up close in personal on boss fights.
- Kjalnar’s Nightmare = considered best in slot magdps gear, obtained in Unhallow Grave dungeon. The upside is, if you’re light attack weaving bosses appropriately, you’ll have some of the highest single target damage in the game. Downside? Well only one person can use it, it doesn’t work on adds because it stuns them, and it’s not new player friendly. I’d consider this the pinnacle DPS monster helm in the game but not great for every situation or player.
Now you have two five piece sets, a monster helm and you’re good to go. Truthfully, you could complete the entirety of the game at this point. Hower, mythic are a good options in certain situations, and if you have the ability, time and patiences you definitely should collect them.
Mythic
Desktop hover over gear for set bonuses, mobile click once for set bonuses
The mythic setup changes your build a bit depending on what you slot. The below item set is used in conjunction with a mythic. Your main goal on mythic collection is to obtain them for certain situations. Trials fights for max damage, solo arenas for insane survivability, or dungeons that require heavy movement and max stats are key. Not necessary but they’ll make your life a lot easier.
- Slimecraw = obtained in Wayrest 1 not a mythic BUT, with a mythic slotted you won’t be able to use a monster in conjunction. Thus most players run a shoulder or monster helm of Slimcraw for extra critical chance.
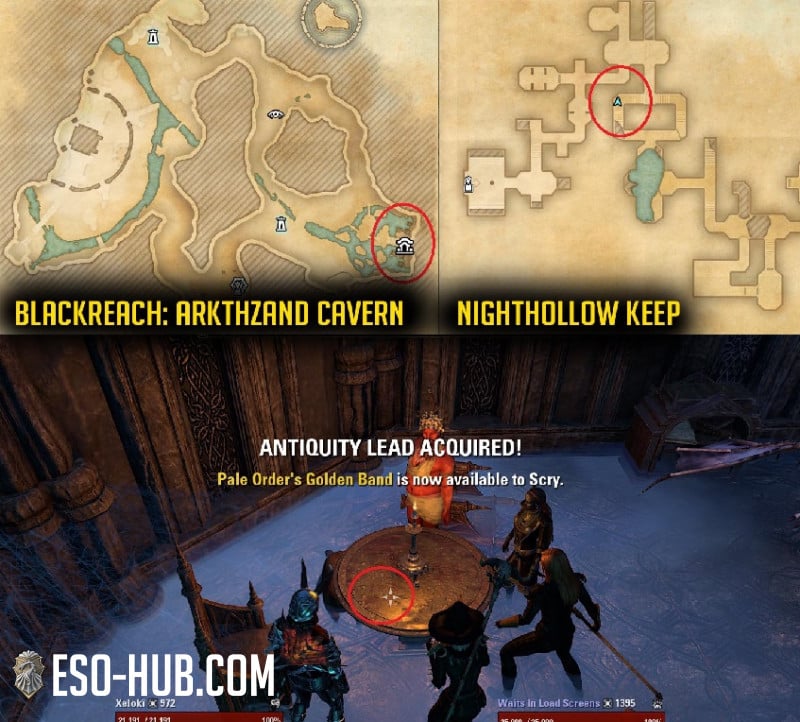
- Pale Order = god mode solo play survivability set. This set carries your survivability so much, I don’t recommend it for the average player. It heals you based on damage done thus you can go ultra aggressive in solo arenas for huge scores and quick runs. Near mandatory on some classes for solo score runs and worth collecting.
-
- Bangkorai – Aurmine Ancestral Signet – Chests
- Alik’r Desert – Direnni Elegy Loop – Coldrock Diggings Delve Boss
- Wrothgar – Onix Accent Stones – All World Bosses
- Glenumbra – Order-Etched Gallery Rail – Bad Man’s Hallow Trash Monsters
- The Reach – Pale Order’s Golden Band – Nighthollow Keep (Blackreach: Arkthzand Cavern, east side.) Follow the way, down the stairs on the right, read the “Ancient Text” paper on the table. (Long Respawn Time) (click to see image)
- Harpooner’s Kilt = considered best in slot PvE DPS mythic IF NOT taking direct damage. Thus using this in certain fights isn’t advisable, but in long, high HP fights without taking damage, it’ll out perform a monster helm. Also it’ll work great on parse dummies or dungeons where you’re not touched. I personally don’t use this a whole lot and find it not friendly to the average player who doesn’t have a super coordinated trials guild (aka 99% of people who play ESO).
-
- Murkmire – Wolf-Tail Sash Lead – Murkmire Foul Fishing Spots
- Blackwood – Kothringi-Cut Leather Lead – World Boss Death Wart, World Boss Sul-Xan Ritualists
- Shadowfen – Bog-Blue Jasper Fetish Lead – Ruins of Mazzatun Dungeon last boss
- Shadowfen – Tide-Glass Beads Lead – All water and alchemy nodes
- Bal Foyen – Silverweave Cord Lead – Covenant Enemies, most likely all enemies
- Death Dealer’s Fete = great if you have healing solo or in group if Kilt is not an option. The strength of Death Dealer’s is massive stat pool increases dps substantially and survivability with stamina and health. It does require 1 minute in combat but doesn’t become reduced when taking damage. I prefer this on my magplar over pale order or kilt because I’m playing in melee and constantly taking damage.
-
- Dragonstar Arena – Sturdy Silver Prongs Lead – Dragonstar Arena last chest after endboss
- Imperial City – Carved Signet Base Lead – Imperial City Upstair Bosses
- Blackwood – Warm Asymmetrical Ruby Lead – Oblivion Portal final Chest
- Cyrodiil – Weighted Spiked Bridge Lead – Rewards from the Worthy Mail Box
- Craglorn – Wide Barbed Shank Lead – Anomalies in Craglorn in the reward treasure chest, Nirncrux Mines
Now you have almost everything you need to be super successful PvE DPS in ESO. BUT remember we talked about efficiency right? Well there’s one more piece to add and that’s our back bar weapon!
Arena Weapons
Using a front bar proc set frees up some space for a back bar two piece that does something like amplify an abilities effect or increase max stats. This is the icing on the cake. Don’t freak out if you’re not able to complete Veteran versions of the arenas, just do normal as you’re only getting about 1-2% damage bonus from perfected. It’s the item set that you really want!
- Willpower = beginner 2pc item set for max magicka, obtained in Imperial City, Dungeon Finder and traders. The strength of this set is you get massive max stats on your back bar. This is typically where your shield is anyways thus you’ll have a much bigger shield. Not to mention this is dirt cheap on the traders and you can obtain at level 10 doing random dungeons.
- Trainee = beginner 2pc item set for max stats, obtained in the starter islands in each of the factions. This is a decent alternative to Willpower but you’ll move off from trainee pretty quickly.
Caveat: depending on when you’re watching this video, ESO is hybridizing stats. Thus, using a stamina based ability in Update 33 or in the future, will still scale in effectiveness of your max magicka/spell damage. Meaning, stamina abilities will do as much damage as magicka (if not more). This will free up TONS of back bar options and I’ll switch a lot of my builds to stamina depending on playstyle. Here’s some options for you to consider.
- Perfected Crushing Wall = great back bar damage, obtained in Maelstorm Arena solo. A magicka based ability set which most folks will use unstable wall of elements skill to trigger its effect. This amps your light and heavy attack damage thus increasing your overall dps. However, it’s a very clunky animation and you’ll need to be in melee range to make the most out of it. It also has a short duration but a staple in end game dps.
- Perfect Spectral Cloak = great damage increase and reduction, obtained in Blackrose Prison 4 player arena. A stamina based ability which most folks will use Deadly Cloak skill to trigger its effect.
- Perfected Merciless Charge = great back bar damage, obtained in Maelstorm Arena solo. A stamina based ability which most folks will use Stampede skill to trigger its effect. An awesome setup for melee builds that need to be up close and personal anyways. It does massive damage up front, good AoE and damage over time. A lot of my magicka builds will switch to this.
- Perfected Thunderous Volley = great back bar damage, obtained in Maelstorm Arena solo. A stamina based ability which most folks will use Endless Hail skill to trigger its effect. A odd setup but you can use for magicka range casters since you’ll be far away anyways. I won’t switch this over Crushing wall or Merciless Charge but an option.
Now, you’re ready to sweat up ESO PvE! Here’s some sample loadouts I use at various stages of progression and content.
Build Templates
Here’s some priorities when getting your build sorted. At first, don’t worry about traits, golding out your gear, having best in slot. It’s the 5pc sets you want then work towards upgrading as you get better and better items.
- Body Traits = Divines, though infused works good on chest/head/legs because you get more stats.
- Jewelry Traits = Bloodthirsty, but Arcane works great just starting out.
- Front Bar Weapons = this is a bit different depending on what you use. Top tier DPS uses dual wield rather than a staff due to the passives. Average players stick with fire staff.
- Fire staff = precise or charged for dragonknights due to their passive combustion.
- Dual Wield = main hand nirnhoned, charged off hand with fire/poison enchants.
- Back Bar Weapons = infused with a weapon/spell damage enchant for massive burst even when bar swapping. Sharpened, charged and others are not bad either.
- Body Enchants = go with all magicka BUT make sure you have at least 22 to 23,000 health with food and CP. If you go below that, the game can be unforgiving if you make a mistake.
- Jewelry Enchants = typically go with 1 or 2 magicka recovery which will hit the sweet spot freeing up the Thief or Shadow Mundus stone.
- Weapon Enchant = dual wield setup go fire/poison or flame with fire staff. Shock is also not a bad alternative.
-
Food BEST = Clockwork Citrus Filet, cheap alternative = Witchmother’s Brew, parsing on a dummy = Ghastly Eye Bowl
- Potions = Alliance War or spell power potions but make sure medical use is maxed via alchemy.
JUST STARTING ESO SETUP
This is exactly what I used when starting on PC EU with nothing. I worked at collecting gold to buy Withered Hand on traders, farming Mother’s Sorrow body pieces and completing random normal dungeons for willpower.
| Slot | Weight | Set | Trait | Glyph |
| Head | Light | Withered Hand | Divines > Any | Magicka |
| Shoulders | Light | Withered Hand | Divines > Any | Magicka |
| Chest | Light | Mother’s Sorrow | Divines > Any | Magicka |
| Gloves | Light | Mother’s Sorrow | Divines > Any | Magicka |
| Legs | Light | Mother’s Sorrow | Divines > Any | Magicka |
| Boots | Light | Mother’s Sorrow | Divines > Any | Magicka |
| Belt | Light | Mother’s Sorrow | Divines > Any | Magicka |
| Weapon One | Fire | Willpower | Precise > Sharpened > Charged | Fire |
| Weapon Two | Fire | Willpower | Infused > Charged > Sharp | Weapon Damage |
| Necklace | Arcane | Withered Hand | Magicka Recovery | |
| Ring | Arcane | Withered Hand | Spell Power | |
| Ring | Arcane | Withered Hand | Spell Power |
PROGRESSION
- Work towards obtaining monster helm
- Iceheart for survival solo play
- Nerien’eth or Grothdarr for damage set
- Replace your front bar gear set with craftable, dungeon or overland
- Work towards obtaining solo arena back bar weapon
Now you’ll be ready to do Veteran and some DLC dungeons. Here’s the next step!
INTERMEDIATE
| Slot | Weight | Set | Trait | Glyph |
| Head | Light | Nerien’eth | Divines > Any | Magicka |
| Shoulders | Light | Nerien’eth | Divines > Any | Magicka |
| Chest | Light | Mother’s Sorrow | Divines > Any | Magicka |
| Gloves | Light | Mother’s Sorrow | Divines > Any | Magicka |
| Legs | Light | Mother’s Sorrow | Divines > Any | Magicka |
| Boots | Light | Mother’s Sorrow | Divines > Any | Magicka |
| Belt | Light | Mother’s Sorrow | Divines > Any | Magicka |
| Weapon One | Fire or DW | Medusa | Precise | Fire |
| Weapon Two | Fire / 2H | Willpower | Infused | Weapon Damage |
| Necklace | Bloodthirsty | Medusa | Magicka Recovery | |
| Ring | Bloodthirsty | Medusa | Spell Power | |
| Ring | Bloodthirsty | Medusa | Spell Power |
PROGRESSION
- Work towards obtaining mythic
- Pale Order for solo play
- Death Dealer’s / Harpooners for trials
- Replace your front bar gear set with optimal dungeon set like Kinra’s, BSW, Deadly, etc.
- Obtain a trials 5pc body set for better damage
- Replace front bar set with optimal 5pc set
- Work towards obtaining optimal back bar weapon
- Start getting best in slot traits and upgrade to gold
Now you’ll be ready to do Veteran, DLC dungeons and even beginner trials. Here’s the next step!
| Slot | Weight | Set | Trait | Glyph |
| Head | Medium | Kjalnar’s Nightmare | Divines | Magicka |
| Shoulders | Light | Kjalnar’s Nightmare | Divines | Magicka |
| Chest | Light | Perfected Bahsei’s Mania | Divines | Magicka |
| Gloves | Light | Perfected Bahsei’s Mania | Divines | Magicka |
| Legs | Light | Perfected Bahsei’s Mania | Divines | Magicka |
| Boots | Light | Perfected Bahsei’s Mania | Divines | Magicka |
| Belt | Light | Perfected Bahsei’s Mania | Divines | Magicka |
| Weapon One | Fire Staff or Dagger | Kinra’s Wrath | Precise or Nirn | Fire |
| Secondary | Fire Staff or Dagger | Kinra’s Wrath | Charged | Poison |
| Weapon Two | Fire Staff | Perfected Maelstrom | Infused | Weapon/Spell Damage |
| Necklace | Kinra’s Wrath | Bloodthirsty | Spell Power | |
| Ring | Kinra’s Wrath | Bloodthirsty | Spell Power | |
| Ring | Kinra’s Wrath | Bloodthirsty | Spell Power |
END GAME
Now your setup will look something like this depending on your class.
- You’ll want a flex option if Kjalnar’s is being used by another player like a mythic or a backup monster.
- You’ll want to specialize in another 5pc set if it’s more optimal or easier like Deadly for Magplars or Zen of DKs
- You’ll want to find the ideal back bar weapon for your playstyle with update 33
- Start by upgrading all materials to gold, weapon > jewelry > armor to min-max every ounce of performance
And now you’re ready to melt in ESO end game PvE! Thanks for reading and be sure to bookmark this page as these gear sets change frequently!