 Facebook
 Reddit
 Email
Email
ESO Dragonknight PvE Healer Build makes for a good healer due to their innate class abilities and passives like major mending.

This build has been updated for the Updated 42, the Gold Road Chapter of the Elder Scrolls Online (ESO).
Why Should You Play ESO Dragonknight PvE Healer Build?
Welcome to ESO Dragonknight PvE Healer Build! Dragonknight in The Elder Scrolls Online are known to be the juggernauts of tanking, yet the damage and healing they can do not fall short. Being able to wield fiery magic and alter the earth to strengthen their allies, ESO Dragonknight PvE Healer Build can be powerful. Shattering the ground and slamming enemies with the molten rock to heal your allies makes for fun gameplay, and you will be able to burn through the most content with this fire build! In ESO, the Dragonknight Healer PvE is perfect for everyone looking for a survival class with good tools for group gameplay.
ESO Dragonknight PvE Healer Build Playstyle
Use the following rotation as the starter point. After, apply your buffs on cooldown for the best, highest healing and survivability. Healing is about keeping up all your buffs, healing over time and buffing your teammates. Dragonknight Healer has a lot of good group tools in its toolkit, so make sure to take advantage of them. Certain 5-piece gear sets require a fully-charge heavy attack to proc extra effect e.g. Roaring Opportunist or Stone-Talker’s Oath.
Take advantage of your passives and game mechanics
Additionally, thanks to the destruction staff passive Elemental Force, you have double chances to apply the so-called: status effect. Also, Cycle of Life passive makes your fully-charged Heavy Attacks with restoration staff to restore 30% more Magicka. And because of Essence Drain passive, you gain Major Mending for 4 seconds after completing a fully-charged Heavy Attack, increasing your healing done by 16%. As a result, it’s important to keep fully charged heavy attacks in your rotation to keep high uptime.
Resources and Sustain
With this Healer Dragonknight Build, you should have plenty of resources. However, if you run out of magic, do a heavy attack and return to your rotation. Remember that a heavy attack on off-balance enemies will return double the resources. While casting your abilities, be sure to do light and heavy attacks in between, as both help you regenerate ultimate, proc weapon enchantments, and specific healer set bonuses. Also, always use the suggested food and potions as they significantly increase your damage, survivability, and resource sustain.
Dragonknight PvE Healer Features and Mechanics
Below are some of the features found using the ESO Dragonknight PvE Healer Build in the Elder Scrolls Online:
- Class – Dragonknight
- Weapon One – Restoration staff
- Weapon Two – Destruction Staff
- Armor Types: 6 Light, 1 Medium
- Race: Breton
- Attributes: 64 Magicka
- Mundus Stone: Atronach
Skills
Skill Set 1 Front Bar
We use restoration staff for main healing abilities.
Illustrious Healing (Morph of Grand Healing | Skill Line : Restoration Staff) – Great AoE heal over time ability with a big radius. Keep this heal up, especially when stationary, also used to proc sets requiring a ground cast ability.
Combat Prayer (Morph of Blessing of Protection | Skill Line : Restoration Staff) – Very important AoE heal that applies Minor Berserk and Minor Resolve, increasing damage output and resistances for you and your allies. Apply these buffs up as much as possible, so use ability as your main spammable.
Obsidian Shard (Morph of Stonefist | Skill Line : Earthen Heart) – Strong burst heal that can be applied to yourself or 2 allies, but you’ll need to damage an enemy with this ability to apply the heal.
Cauterize (Morph of Inferno | Skill Line : Ardent Flame) – Nice heal over time ability that targets you or an ally with 28m every 5 seconds. Grants you Major Prophecy while slotted, increasing your Spell Critical.
Radiating Regeneration (Morph of Regeneration | Skill Line : Restoration Staff) – Great multi-targeting heal over time ability, especially for mobile encounters, also helps to proc specific healer sets. Spam ability to cover more targets if needed.
Reviving Barrier (Morph of Barrier | Skill Line : Support) – An ultimate that applies massive damage shields to group members, and those shielded also receive healing over time. Provides extra Magicka Recovery through Support skill line passive when slotting this ultimate ability.
Back Bar: Destruction Staff – Ice
Healers can use all three options, and the choice depends on the situation and content you are trying to complete. For beginners, I advise using lightning staff if you want easier heavy attack channeling or using Ice staff for extra block mitigation and shield if you struggle with survivability.
- Ice staff
- Inferno Staff
- Lightning Staff
Echoing Vigor (Morph of Vigor | Skill Line : Assault) – Use this on your back bar to proc Powerful Assault and dump your stamina for a good are heal over time that stacks with others.
Energy Orb (Morph of Necrotic Orb | Skill Line : Undaunted) – Main resource sustain synergy for your allies, also provides a strong AoE heal over time. Keep orb active and in proximity of your allies as much as possible
Fragmented Shield (Morph of Obsidian Shield | Skill Line : Earthen Heart) – Decent shield for you and your nearby allies and grants you 6 seconds of Major Mending, increasing your healing done. Mainly used for a higher uptime on Major Mending and to proc Mountain’s Blessing passive in Earthen Heart skill line giving you and your group members increased Weapon Damage through Minor Brutality. If group consists of all Magicka DPS, or a group member using this ability, consider using another skill to flex in. [flex] Bone Surge (morph of Bone Shield | Guild/Undaunted skill line): Provides a damage shield that scales off your Max Health, an ally can activate the synergy granting them and other nearby allies a damage shield that absorbs up to 30% of their Max Health while applying Major Vitality increasing their healing received. All around great for synergy/healing buff.
Overflowing Altar (Morph of Blood Altar | Skill Line : Undaunted) – Another great utility skill, applies Minor Lifsteal to enemies in the area healing you and your allies when damaging them. Allies can also active the synergy healing them for 60% of their Max Health which is huge. If another group member is using this ability, swap out for flex skill.
Blockade of Storms (Morph of Wall of Elements | Skill Line : Destruction Staff) – Ground cast AoE ability, primarily used to apply status effects that debuff and weapon enchant, making it ideal to use Lighting or Ice staff.
Aggressive Horn (Morph of War Horn | Skill Line : Assault) – One of the most important ultimate abilities for a support role. Grants Major Force increasing critical damage by 20%, also increases Max Magicka and Stamina by 10% for you and your group members. Prioritize use of this ultimate, it provides a huge damage boost to your group, coordinate with other support roles if possible to keep a high uptime.
Scribing Skills & Grimoires – ESO PvE Healer Build
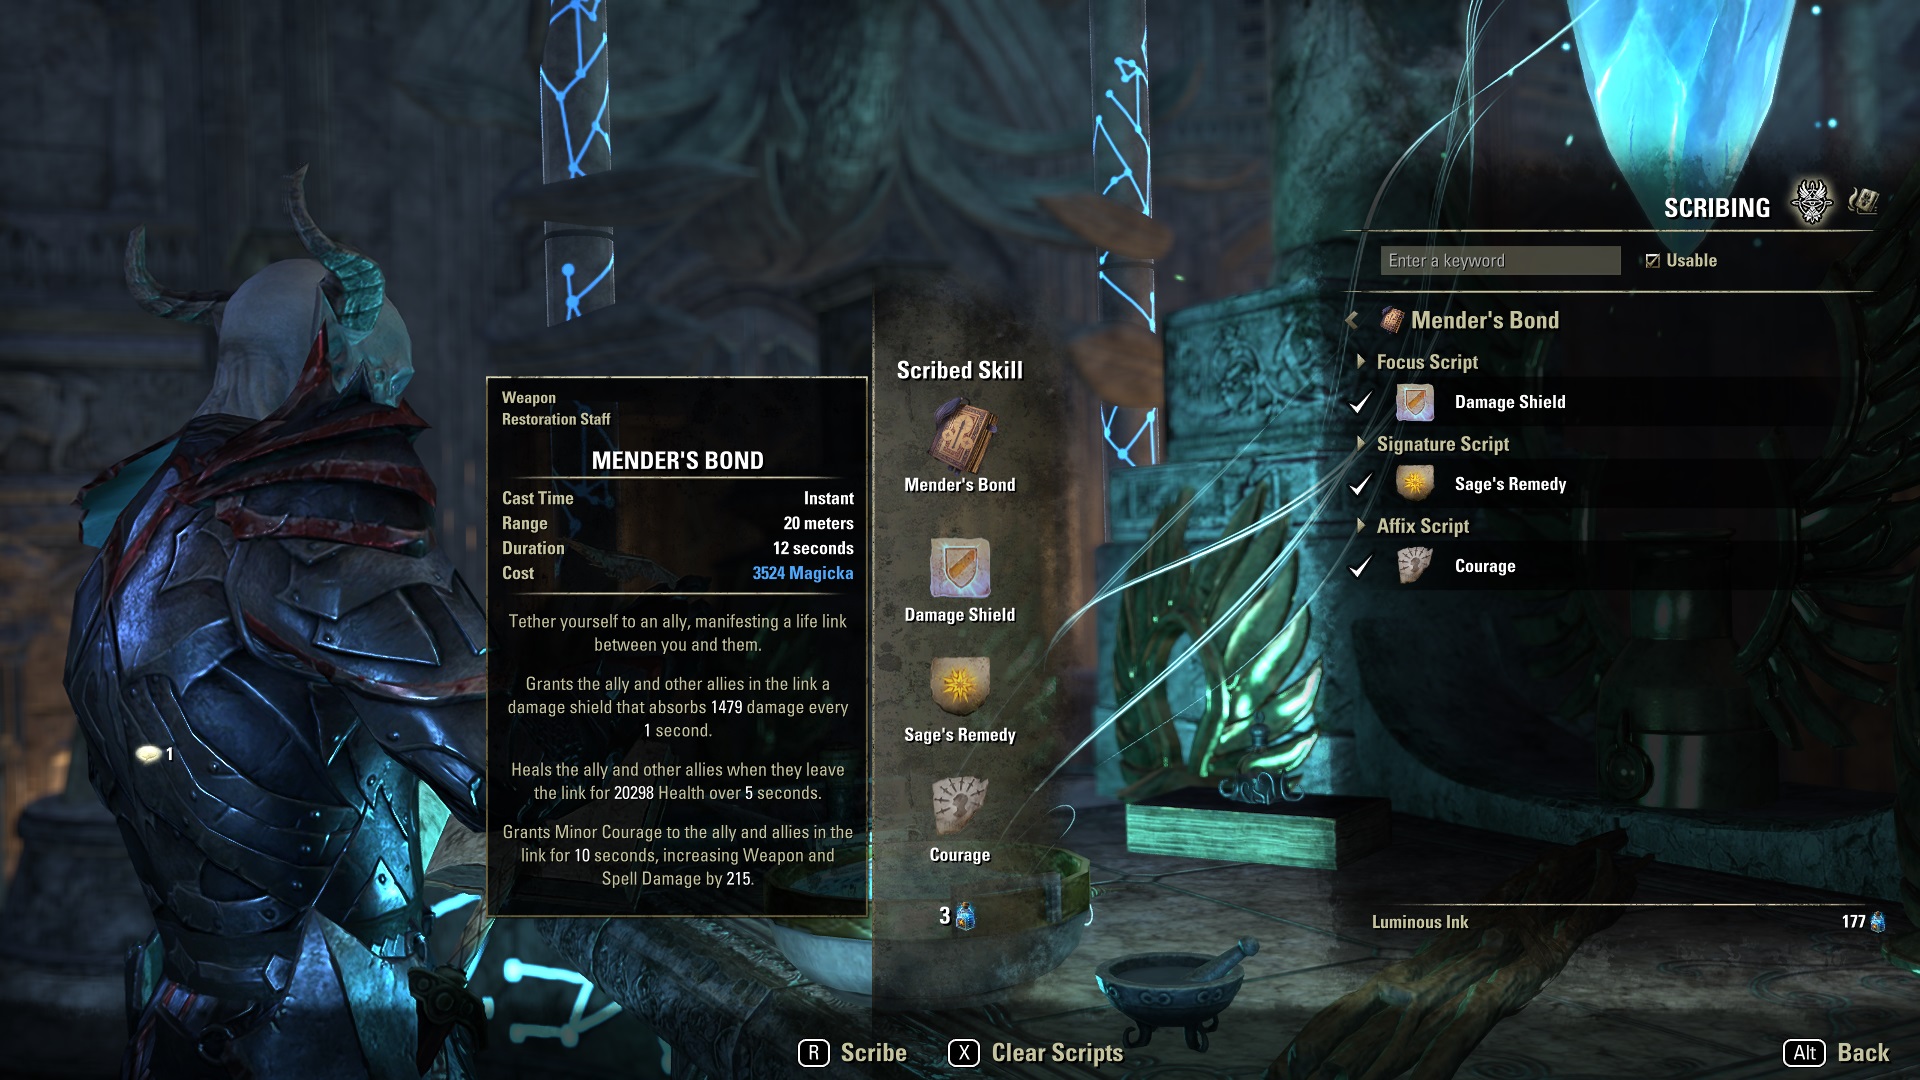
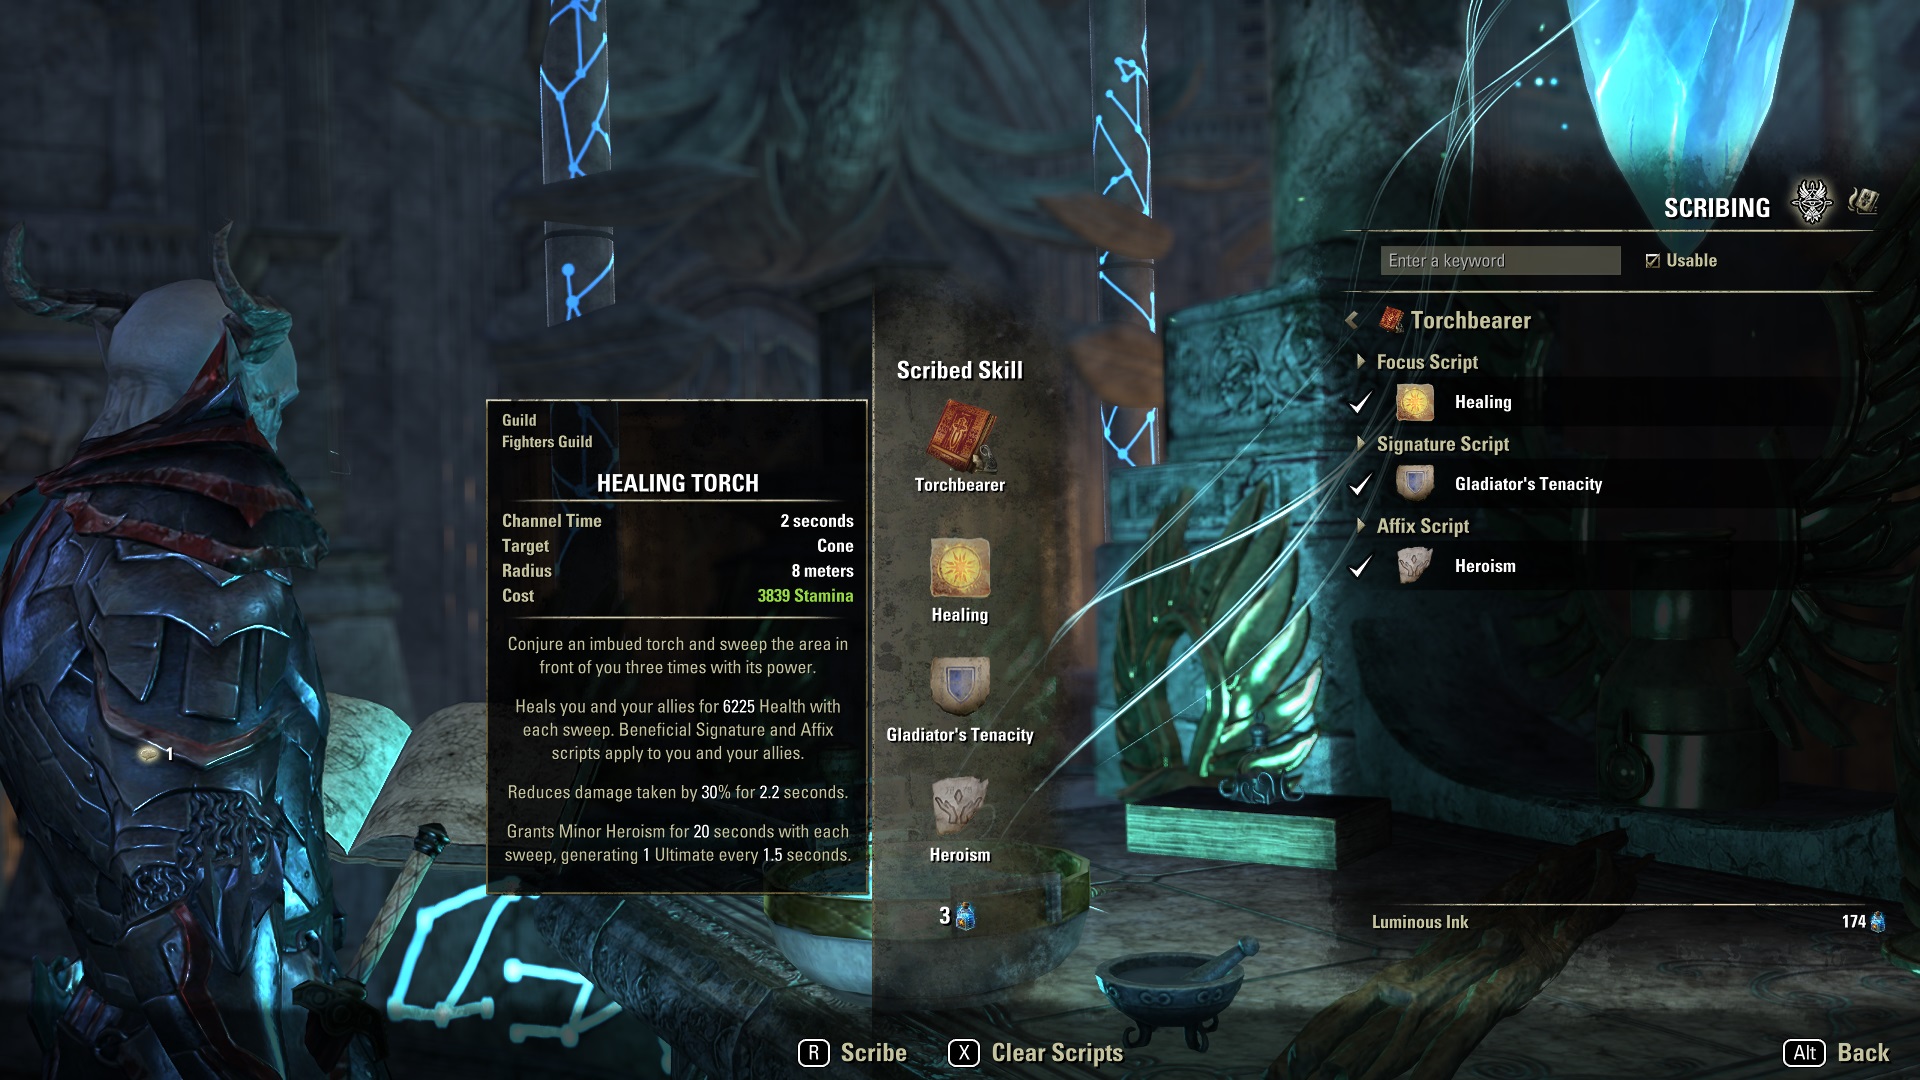
Mender’s Bond and Torchbearer are the best Grimoires (skills) for the Dragonknight PvE Healer build. Mender’s Bond gives minor courage; big heals, and a shield. Torchbearer changed into healing torch grants heroism and damage reduction. This frees up the group to stop running herosim potions and is a huge boon to the group. Below are the suggested combination of Grimoires, focus, signature, and affix scripts:
- Mender’s Bond (Restoration Staff): Damage Shield (focus script), Sage’s Remedy (signature script), Courage (affix script).
- Torchbearer (Fighters Guild): Healing (focus script), Gladiator’s Tenacity (signature script), and Heroism (affix script).
The Scribing System utilizes one of 11 new skills from the Gold Road Chapter called Grimoires. With Grimoires, you can customize spells via Scripts. The scribing feature requires the purchase of the Gold Road Chapter (sponsored link). To learn more about scribing, check out our full guide here.
Passives Skills
Consider taking all of the passives in the below skill trees to increase your builds performance without slotting any skills:
- Ardent Flame (class skill line)
- Draconic Power (class skill line)
- Earthen Heart (class skill line)
- Restoration Staff (weapon skill line)
- Destruction Staff (weapon skill line)
- Light Armor
- Medium Armor
- Undaunted
- Racial
- Alliance War Support
- Alliance War Assault
- Crafting, Alchemy Medicinal Use
Gear Setup 1: Trials Best in Slot
Best in Slot Trials setup for PvE healer, though requires constant bar swaps.
| Slot | Type | Set | Trait | Glyph |
| Head | light | Nazaray | Divines | Magicka |
| Shoulders | light | Nazaray | Divines | Magicka |
| Chest | medium | Armor of the Trainee | Divines | Magicka |
| Legs | light | Spell Power Cure | Divines | Magicka |
| Gloves | light | Spell Power Cure | Divines | Magicka |
| Boots | light | Spell Power Cure | Divines | Magicka |
| Belt | light | Perfected Pillager’s Profit | Divines | Magicka |
| Weapon One | Restoration staff | Spell Power Cure | Powered | Absorb Magicka |
| Weapon Two | Lighting staff | Perfected Pillager’s Profit | Charged | Shock |
| Necklace | Pearl of Ehlnofey | Infused | Spell Damage | |
| Ring 1 | Perfected Pillager’s Profit | Infused | Reduce Spell Cost | |
| Ring 2 | Perfected Pillager’s Profit | Infused | Reduce Spell Cost |
Check your uptime on Spell Power Cure; if low, drop the Mythic and slot Spell Power Cure on five pieces on the body. You should have high uptime on Major Courage, but check with ESO logs or visually. Moreover, swap out the Spell Power Cure set for another light set if your secondary healer is running it.
Monster Helm
Nazaray: obtained in Shiepwright’s Regret, Ascending Tide DLC. Useful to increase major and minor debuffs when using an ultimate.
FLEX OPTIONS
- Symphony of Blades: Great resource sustain for the entire group
- Sentinel of Rkugamz: Beginner resource sustain set.
- Nightflame = good HPS
- Earthgore = AoE burst heal
- Chokethorn = single target burst heal
- Troll King= niche set for specific trials
Gear Sets
Perfected Pillager’s Profit: obtained in Dreadsail Reef trial, high Isle Chapter. Useful for using a back bar ultimate and feeding ultimate to other players.
Spell Power Cure: obtained from base game White Gold Tower dungeon. This grants major courage, and it’s mobile, though only on one bar, requiring constant bar swaps for high-up time.
Armor of the Trainee: obtained from traders or starter zones like Bal Foyen and Bleakrock Isle. Useful when running a mythic to get an extra bit of health.
FLEX OPTIONS
- Perfected Stone-Talker’s Oath= great back bar sustain set
- Perfected Vestments of Olorime = longer lastly, major courage though not mobile
- Z’en’s Redress = niche setup that adds tons of damage
- Powerful Assault: = great increase in overall DPS if running Echoing Vigor/Caltrops on the back bar
- Hollowfang Thirst= another sustain set that can be back bared
- Perfected Saxhleel Champion = great burst damage when combined with a barrier
- Spell Power Cure = major courage and it’s mobile
- The Worm’s Raiment = good group sustain buff set
- Way of Martial Knowledge = great overall DPS added set
Mythic
Pearl of Ehlnofey: obtained through Mythic system in Markarth DLC. Useful to spam ultimate and feed other players with Pillager’s Profit.
Alternative: drop Pearl and Trainee and use an arena weapon.
- Perfected Grand Rejuvenation: the best all-around resource sustain 2pc weapon.
- Perfected Timelss Blessing = good sustain option but you’ll need combat pray
- Force Overflow = good but you’ll need to use the skill force siphon
- Perfected Precise Regeneration = okay option if you lack anything to use
Gear Setup 2: Trials ROJO
Use the ROJO setup as a good alternative gear option but not meta currently.
| Slot | Type | Set | Trait | Glyph |
| Head | Medium | Symphony of Blades | Divines | Magicka |
| Shoulders | light | Symphony of Blades | Divines | Magicka |
| Chest | light | Jorvuld’s Guidance | Divines | Magicka |
| Legs | light | Jorvuld’s Guidance | Divines | Magicka |
| Gloves | light | Jorvuld’s Guidance | Divines | Magicka |
| Boots | light | Jorvuld’s Guidance | Divines | Magicka |
| Belt | light | Jorvuld’s Guidance | Divines | Magicka |
| Weapon One | Restoration staff | Perfected Grand Rejuvenation | Powered | Absorb Magicka |
| Weapon Two | Frost > Fire > Lighting | Roaring Opportunist | Charged | Shock |
| Necklace | Roaring Opportunist | Arcane | Magicka Recovery | |
| Ring 1 | Roaring Opportunist | Arcane | Magicka Recovery | |
| Ring 2 | Roaring Opportunist | Arcane | Magicka Recovery |
- Symphony of Blades: obtained in Depths of Malatar dungeon Wrathstone DLC. Great resource sustain for the entire group.
- Perfected Roaring Opportunist: obtained in Kyne’s Aegis trial Greymoor DLC. The combination of RO/Jorv = enormous DPS for your entire group.
- Jorvuld’s Guidance: obtained in Scalecaller Peak dungeon Dragon Bones DLC. Adds duration to buffs and is helpful when paired with Roaring Opportunitst for burning bosses.
- Perfected Grand Rejuvenation: obtained in Veteran Dragonstar Arena. The best all-around resource sustains 2pc weapon.
Gear Setup 3: Dungeons
This is meant for hard-mode dungeons for huge DPS burst windows.
| Slot | Type | Set | Trait | Glyph |
| Head | medium | Symphony of Blades | Divines | Magicka |
| Shoulders | light | Symphony of Blades | Divines | Magicka |
| Chest | light | Spell Power Cure | Divines | Magicka |
| Legs | light | Spell Power Cure | Divines | Magicka |
| Gloves | light | Spell Power Cure | Divines | Magicka |
| Boots | light | Spell Power Cure | Divines | Magicka |
| Belt | light | Spell Power Cure | Divines | Magicka |
| Weapon One | Restoration Staff | Perfected Grand Rejuvenation | Powered | Weapon/Spell Damage |
| Weapon Two | Frost > Fire > Lighting | Master Architect | Charged | Shock |
| Necklace | Master Architect | Arcane | Spell Damage | |
| Ring 1 | Master Architect | Arcane | Spell Damage | |
| Ring 2 | Master Architect | Arcane | Spell Damage |
Use this in four-player content where you need to burn a boss with back bar ultimate.
- Master Architect: Boost your entire team’s DPS for brief time. Found in Halls of Fabrications, Morrowid DLC Trial.
- Perfected Grand Rejuvenation: Provides resource sustain circle. Found in Dragonstar Arena, Base game, Craglorn.
- Spell Power Cure: Gives the party massive boost in damage with heals over time. Found in White-Gold Tower dungeon, Imperial City.
- Symphony of Blades: Provides the party resource sustain. Helm found in Depths of Malatar, Wrathstone DLC.
Gear Setup 4: Beginners
This setup is great for beginners who do not have access to trial gear.
| Slot | Type | Set | Trait | Glyph |
| Head | light | Winter’s Respite | Infused | Magicka |
| Shoulders | light | Winter’s Respite | Divines | Magicka |
| Chest | heavy | Armor of the Seducer | Infused | Magicka |
| Legs | medium | Armor of the Seducer | Infused | Magicka |
| Gloves | light | Armor of the Seducer | Divines | Magicka |
| Boots | light | Armor of the Seducer | Divines | Magicka |
| Belt | light | Armor of the Seducer | Divines | Magicka |
| Weapon One | Restoration Staff | Willpower | Powered | Absorb Magicka |
| Weapon Two | Lightning Staff | Willpower | Charged | Shock |
| Necklace | Winter’s Respite | Arcane | Magicka Recovery | |
| Ring 1 | Winter’s Respite | Arcane | Magicka Recovery | |
| Ring 2 | Winter’s Respite | Arcane | Magicka Recovery |
Use this healer gear setup when just starting or if you lack gear suggested above.
- Winter’s Respite: Creates powerful area heal circle. Obtained in Overland, Wester Skyrim DLC Greymoor.
- Willpower: Adds massive magicka with two pieces. Obtained in Imperial City or daily dungeon rewards.
- Armor of the Seducer: Used for resource sustain. Craftable with 3 traits learned in base game zones Deshaan, Grahtwood, Stormhaven.
Race
The best race choices for the Magicka Dragonknight PvE Healer:
- Breton: Insane sustainability lacks spell damage or increased healing.
- Argonian: Great for pure healing and survival, lacks sustain and has less Max Magicka.
Attributes
The best choice is 64 magicka, which increases damage, healing, and shields.
Mundus Stone
The Atronach is the best Mundus Stone for PvE Healer Builds because it increases Magicka recovery.
Champion Points – ESO Dragonknight PvE Healer Build
| Craft | Warfare | Fitness |
| Treasure Hunter | Soothing Tide | Boundless Vitality |
| Liquid Efficiency | Swift Renewal | Fortified |
| Rationer | Rejuvenator | Spirit Mastery |
| Steed’s Blessing | Enlivening Overflow | Rejuvenation |
Warfare Constellation Champion Points

Below is a step-by-step method for slotting your champion points in the Warfare tree (blue). We have used the minimum possible to reach 4 slottable selections all maxed out. If you have more CP, consider taking more in the passives for optimal performance.
Below are recommended Warfare Champion Point selections for the ESO Dragonknight PvE Healer Build:
- Eldritch insight 10
- Mastered Curation sub-constellation – blessed10
- Mastered Curation sub-constellation Enlivening overflow (slottable) 50
- Soothing tide (slottable) 50
- Rejuvenator (slottable) 50
- Swift renewal (slottable) 50
This would be the bare minimum setup, spending 220 CP (660 total required). The next step is to max out passives, that do not require a slottable but increase performance.
- Precision 20
- Eldritch Insight 10
- Tireless Discipline 20
- Blessed 10
- Quick recovery 20
- Elemental Aegis 20
- Hardy 20
- Piercing 20
- Flawless ritual 40
- War mage 30
- Battle mastery 40
- Mighty 30
- Preparation 20
This would max out the Warfare tree with all active and passive champion points at 530 spent 1,590 total spent.
Fitness Constellation Champion Points

Below are recommended Fitness Champion Point selections for the ESO Dragonknight PvE Healer Build:
- Bondless vitality (slottable) 50
- Fortified (slottable) 50
- Rejuvenation (slottable) 50
- Sprinter 10
- Wind chaser – sub-constellation – hasty 8
- Hero’s Vigar 10
- Piercing gaze 10
- Tempered soul 25
- Spirit mastery (slottable) 50
This would be the bare minimum setup, spending 253 CP (759 total required). The next step is to max out passives, that do not require a slottable but increase performance.
- Sprinter 10
- Hero’s Vigar 10
- Tumbling 30
- Defiance 20
- Hasty 8
- Tireless guardian 10
- Fortification 30
- Nimble Protector 6
- Mystic tenacity 50
- Tempered soul 25
- Piercing gaze 20
- Savage defense 30
- Bashing brutality 20
This would max out the fitness tree with all active passive champion points at 522 cp spent and 1,566 total spent.
Craft Constellation Champion Points

Below are recommended Craft Champion Point selections for the ESO Dragonknight PvE Healer Build:
- Steed’s blessing – (slottable)50
- Breakfall 10
- Wanderer 15
- Steadfast 10
- Rationer (slottable) 30
- Liquid efficiency (slottable) 75
- Treasure hunter (slottable) 50
This would be the bare minimum setup, spending 240CP (720 total required). The next step is to max out passives, that do not require a slottable but increase performance.
- Steadfast enchantment 40cp
- Breakfall 40 cp
- Wanderer 60
- Fortunes favor 50
- Friends in low places 25
- Out of sight 30
- Fleet of Phantom 40
- Soul’s Reservoir 33
- Gilded fingers 50
- Fortunes favor 40
- Inspiration boost 45
This would max out the crafting tree with all active passive champion points at 693 cp spent and 2,079 total spent.
Consumables
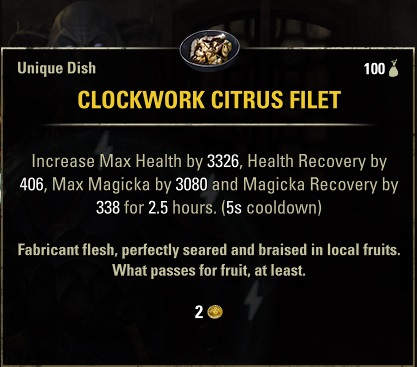

Clockwork Citrus Filet and Essence of Spell Power are the best consumables for a PVE Healer in the ESO. Clockwork gives you a balance of health and recovery, which is helpful for most healers. You can use Artaeum Pickled Fish Bowl if you’re using the ROJO setup or already have good sustain. Bewitch Sugar Skulls is helpful if you need stamina spamming Echoing Vigor. Spell Power Potions are used to source your major buffs and increase recovery. Below are our recommended food and potion choices:
- Clockwork Citrus Filet – Increases max health, health recovery, max magicka, and magicka recovery. Crafted with Provisioning ingredients of Red Meat, Lemon, Frost Mirriam, and Perfect Roe.
- Artaeum Pickled Fish Bowl – increases max health and max magicka. Crafted with Provisioning ingredients of Clam Gall, Fish, Honey, and Rice.
- Witchmother’s Potent Brew – Increases max magicka, max health, and magicka recovery. Crafted with Provisioning ingredients of Nightshade, Bervez Juice, Rice, and Small Game.
- Bewitched Sugar Skulls (tri-max stats) – increases max health, stamina, magicka, and health recovery. Crafted with provisioning from ingredients of Scrib Jelly, Flour, Columbine, Bervez Juice, and Honey.
- Essence of Spell Power – grants major critical, major spell power buff, and magicka recovery. Crafted with alchemy from ingredients such as Corn Flower, Lady’s Smock, and Luminous Russula (other combinations).
- Tri-Pots – grants immediate health, stamina and magicka, along with tri-recovery. Crafted with Alchemy from ingredients of Bugloss, Columbine, and Mountain Flower.
Build Summary – Dragonknight PvE Healer Build
Class: Dragonknight
Race: Breton
Attributes: 64 Magicka
Mundus Stone: Atronach
Weapon One: Restoration staff
Weapon Two: Destruction Staff
Armor Set 1: Spell Power Cure
Armor Set 2: Perfected Pillager’s Profit
Monster Helm: Nazaray
Mythic: Pearl of Ehlnofey
Armor Weight: 6 Light, 1 Medium
Skill Bar 1
- Illustrious Healing
- Obsidian Shard
- Cauterize
- Combat Prayer
- Radiating Regeneration
- Reviving Barrier (Ultimate)
Skill Bar 2
- Fragmented Shield
- Overflowing Alter
- Blockade of Storms
- Energy Orb
- Echoing Vigor
- Aggressive Warhorn (Ultimate)
Scribing Grimoires and Scripts
- Mender’s Bond
- Damage Shield (focus script)
- Sage’s Remedy (signature script)
- Courage (affix Script)
- Torchbearer
- Healing (focus script)
- Gladiator’s Tenacity (signature script)
- Heroism (Affix Script)
Looking For More ESO Builds?
Thank you for reading the ESO Dragonknight PvE Healer Build Guide. We provide the latest news and create guides for ESO. Also, watch me play games on Twitch or visit my YouTube channel!