 Facebook
 Reddit
 Email
Email
This guide explains how to use the best One Bar Elder Scrolls Online (ESO) Magicka Arcanist PvE build, skills, gear, champion points, and more!

This build has been updated for the Updated 42, the Gold Road Chapter of the Elder Scrolls Online (ESO).
Why Should You Play ESO One Bar PvE Magicka Arcanist Build?
The ESO One Bar PvE Magicka Arcanist Build is for players who are looking to complete solo and group content. This build uses a one-bar but doesn’t rely on heavy attack for damage and plays uniquely. Heavy attack builds unfortunately don’t work very well on the Arcanist, since the class’s damage already uses a long channel for the majority of its damage.
Arcanist Pros
- Range – Slways play at the far range and still do damage.
- Survivability – Built-in passive damage and superb active skills that heal or shield.
- Damage – The Arcanist’s damage, though nerfed, is still high and one of the best in the game.
Arcanist Cons
- Doesn’t Heavy Attack – Unlike other builds, the Arcanist uses Fatecarver skill rather than heavy attacks.
- Requires Purchase – Behind a paywall means not everyone can access this class.
- Fatecarver Dependent – Fatecarver can be difficult to cast solo with enemies constantly attacking you.
Though the Arcanist has seen a couple rounds of nerfs, it’s still an incredible strong option in content. You still unfortunately need to purchase the Necrom chapter to obtain the class, creating a paywall for players. Try this one-bar build if you like the Arcanist and want something more straightforward and still effective, but do know that it’s just a simpler version of the Two-bar Arcanist Build. If you really want a one-bar build, this one will still do great damage, but it really isn’t much more difficult to play the two-bar build and it deals a ton more damage.
ESO One Bar PvE Magicka Arcanist Features and Mechanics
Below are some of the features found using the ESO One Bar PvE Magicka Arcanist in the Elder Scrolls Online:
- Class – Arcanist
- Weapon – Lightning Staff
- Armor Types – 1 Light, 6 Medium
- Race – Dark Elf
- Set 1 – Deadly Strike
- Set 2 – Perfected Ansuul’s Torment
- Mythic – Oakensoul ring
- Attributes – 64 Magicka
- Mundus Stone – Thief
- Best Grimoires – Ulfsild’s Contingency
Related:
ESO One Bar PvE Magicka Arcanist Build Playstyle

While limited to a single bar, there really isn’t all that much to do besides build up three crux and beam. You will want to make sure you keep up your other skills though, even if a majority of your damage comes straight from your beam.

As an Arcanist, you’ll need to generate and consume Cruxes to enhance your stats constantly, so keep close attention to it. The Cephaliarch’s Flail skill is your main spammable and crux builder. Next, you’ll be beaming with Pragmatic Fatecarver and its 4-second channel. Your goal is to build up 3x Crux with Flail and beam. While you have Inspired Scholarship active, however, you will generate a crux during your beam channel, requiring you to only Flail twice once you finishing beaming.
Survivability
Your primary skills, Flail and Fatecarver, give you heals and shield, so you’ll want to prioritize these two skills if you’re taking heavy damage. Even if you don’t have three crux for a maximum damage beam, you can still use Fatecarver to gain a huge shield and absorb some incoming damage if you need to.
Skills
One Bar Flame Staff – Solo | Optimal
Flame Staff is ideal because the Ancient Knowledge passive gives increased area damage, which is both of our damage abilities. This essentially increases your DPS dramatically, plus its much easier to rip off fully charged heavy attacks at range for resource sustain. It also deals a ton of burning damage.
Cephaliarch’s Flail (Morph of Abyssal Impact | Skill Line : Herald of the Tome) – This skill is our crux builder and hits harder the lower the enemies health gets. The main reason you use this is to get a 5% damage buff and build three Crux for your main nuke with Fatecarver. You can use this for a decent bit of healing and somewhat your main spammable. Key here is to not get caught with a heavy attack because it is a 0.3 second channel.
Pragmatic Fatecarver (Morph of Fatecarver | Skill Line : Herald of the Tome) – the build center’s around this ability and its 4-second channel. Your goal is to build up 3x Crux’s with Flail and beam. This morph is ideal because it dramatically increases your survivability. When playing ina group, or super confidence with content you can swap to Exhausting. But Pragmatic will provide a massive damage shield that can be further increased with Bastion Red CP slottable. This will make you very survivable during the beam phase of damage. You can “cancel” or end the animation via blocking, dodging or bashing. This is useful when taking a heavy attack or needing to cast another ability.
Inspired Scholarship (Morph of Tome Bearer’s Inspiration | Skill Line : Herald of the Tome) – Additional Crux gain and damage over time. This skill keeps you beaming for longer.
Fulminating Rune (Morph of The Imperfect Ring | Skill Line : Herald of the Tome) – Solid damage over time and gives allies an additional synergy when you do decide to jump into group content.
Blockade of Fire (Morph of Wall of Elements | Skill Line : Destruction Staff) – Blockade lasts for 15 seconds and does a ton of damage in a huge aoe.
The Tide King’s Gaze (Morph of The Unblinking Eye | Skill Line : Herald of the Tome) – Great damage ultimate that deals even more damage than Mages Guild Meteor. It also autotargets the enemies, making it extremely useful and easy to use with a very fast channel.
Scribing Skills & Grimoires – Arcanist One Bar Build
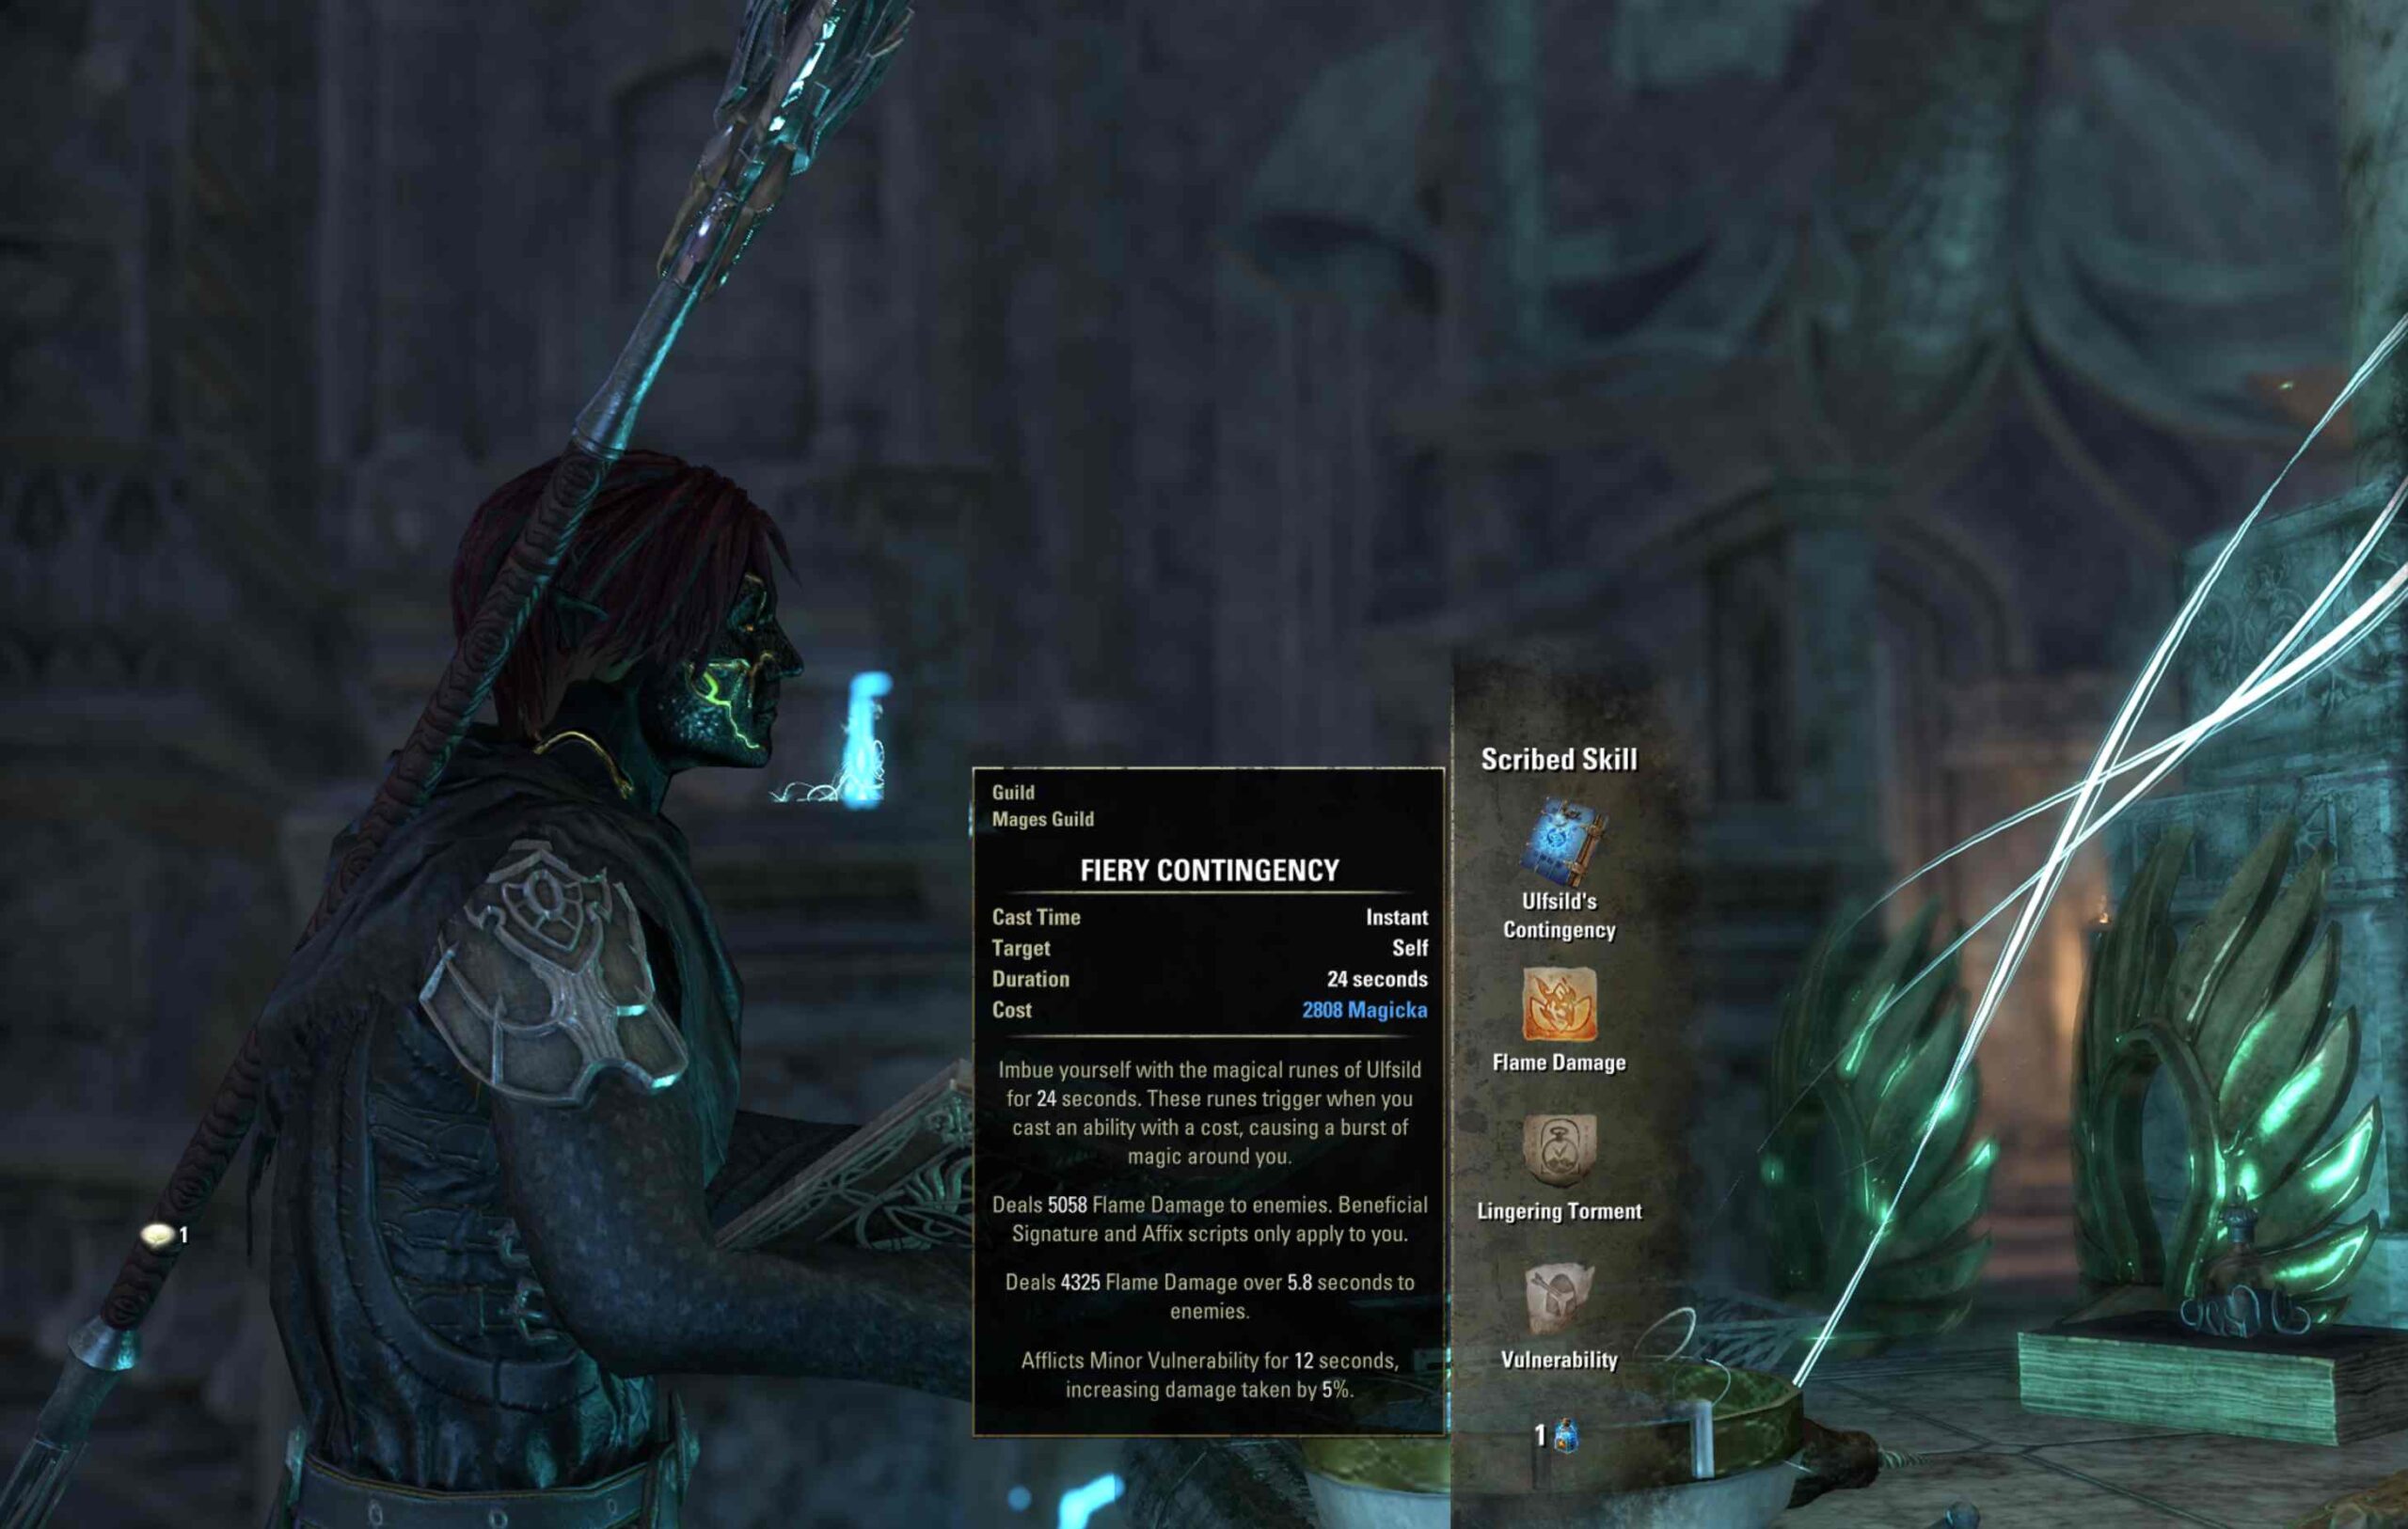
The best Grimoire for the Arcanist One Bar Build is Ulfsild’s Contingency. Ulfsild’s Contingency is actually really solid to substitute in for Blockade of Elements. This gives you a choice of buffs and debuffs, and we go with Vulnerability here, since you’re getting most of the other buffs through the Oakensoul Ring.
- Ulfsild’s Contingency (Mage Guild) – Flame Damage (focus script), Lingering Torment (signature script), Vulnerability (Affix Script)
The Scribing System utilizes one of 11 new skills from the Gold Road Chapter called Grimoires. With Grimoires, you can customize spells via Scripts. The scribing feature requires the purchase of the Gold Road Chapter (sponsored link). To learn more about scribing, check out our full guide here.
Passives Skills – ESO One Bar PvE Magicka Arcanist Build
Consider taking all of the passives in the below skill trees to increase your builds performance without slotting any skills:
- Herald of the Tome (class skill line)
- Apocryphal Soldier (class skill line)
- Curative Runeforms (class skill line)
- Destruction Staff (weapon skill line)
- Light Armor
- Medium Armor
- Undaunted
- Mages Guild
- Racial
- Alliance War Support
- Alliance War Assault
- Crafting, Alchemy Medicinal Use
Gear Setup 1: Optimal with Mythics
This is for the highest damage loadout possible, flex options below if you don’t have this gear
| Slot | Type | Set | Trait | Glyph |
| Head | Medium | Deadly Strike | Divines | Magicka |
| Shoulders | Light | Slimecraw | Divines | Magicka |
| Chest | Medium | Perfected Ansuul’s Torment | Divines | Magicka |
| Legs | Medium | Perfected Ansuul’s Torment | Divines | Magicka |
| Gloves | Medium | Perfected Ansuul’s Torment | Divines | Magicka |
| Boots | Medium | Perfected Ansuul’s Torment | Divines | Magicka |
| Belt | Medium | Perfected Ansuul’s Torment | Divines | Magicka |
| Weapon One | Flame Staff | Deadly Strike | Precise | Poison |
| Necklace | Deadly Strike | Bloodthirsty | Spell Damage | |
| Ring 1 | Oakensoul ring | Bloodthirsty | Spell Damage | |
| Ring 2 | Deadly Strike | Bloodthirsty | Spell Damage |
While this is a magicka build, we use Medium Armor specifically to get closer to the critical damage cap of 125%. If you’re under the penetration cap of 18,200, you’ll want to swap your monster helm to a one piece pen item like Valkyn Skoria. Thus, medium armor with specific gear sets will outperform light in most content.
Monster Helms & Mythics
Slimecraw: Obtained from Wayrest Sewers 1, a base game dungeon. The best 1pc critical damage bonus piece in the game. Pen is also a good option, but this is considered best in slot for a one-piece.
Oakensoul: Obtained through ESO Mythics/antiquities system. You need the 5 Leads here to create the mythic. The best one-bar build for DPS because it gives an insane amount of buffs, freeing up bar spots and making us tankier with zero effort.
FLEX OPTIONS
- Iceheart, Grundwulf, Stone Husk, Zaan – All one piece with critical chance, just not as much as Slimecraw.
- Lady Malygda, Valkyn Skoria – One piece penetration sets which are great when you’re not at penetration cap.
- Pale Order – Provides the best heals per second solo in the game, but you can’t wear it in group content.
- Velothi Ur-Mage’s Amulet – Powerful damage mythic ideal for two bar builds. You’ll want this when you swap to the two-bar Arcanist.
Gear Sets
Deadly Strike: Obtained in Bruma Elite Gear Vendor, Cyrodiil zone (base game). This provides the most damage for the Arcanist because both damage abilities are channels.
Perfected Ansuul’s Torment: Obtained in Sanity’s Edge, Veteran Trail Set, Necrom DLC. Set and forget set, that directly increases damage.
FLEX Five Piece Gear Sets: use these if you don’t have optimal sets.
- Order’s Wrath – Best overall craftable set for high damage.
- Pillar of Nirn – Good front bar proc damage set, replace Ansuul for Pillar for more stationary and single target fights.
Race
The best racial choice for the one bar heavy attack PvE Build is below:
- Dark Elf: Gain max magicka, stamina, and weapon and spell damage. Dark Elf is considered the strongest overall PVE DPS race.
- High Elf: Gain resource sustain passive, max magicka, and weapon and spell damage. The downside of High Elf is a lack of stamina, making it notably worse for stamina builds.
- Khajiit: This race gets recovery, max stats, and critical damage and healing. Consider the Khajiit a great option if you aren’t over the critical cap of 125%.
Attributes
The best choice for slotting Attribute points is 64 magicka, which increases damage, healing, and shields.
Mundus Stone
The Thief is the best Mundus Stone for PvE Builds because it gives Increases Weapon and Spell Critical Strike chance.
Champion Points
| Craft | Warfare | Fitness |
| War Mount | Biting Aura | Boundless Vitality |
| Gifted Rider | Fighting Finesse | Celerity |
| Treasure Hunter | Wrathful Strikes | Bastion |
| Steed’s Blessing | Thaumaturge | Rejuvenation |
Warfare Constellation Champion Points

Below is a step-by-step method for slotting your champion points in the Warfare tree (blue). We have used the minimum possible to reach 4 slottable selections all maxed out. If you have more CP, consider taking more in the passives for optimal performance.
Below are recommended Warfare Champion Point selections for the ESO One Bar PvE Magicka Arcanist:
- Precision 10
- Fighting finesse (slottable) 50
- Wrathful Strikes (slottable) 50
- Extended might – sub con – piercing 10
- Biting aura (slottable) 50
- Thaumaturge (slottable) 50
This would be the bare minimum setup, spending 220 CP (660 total required). The next step is to max out passives, that do not require a slottable but increase performance.
- Precision 10
- Piercing 10
- Tireless discipline 20
- Eldritch insight 20
- Blessed 20
- Quick recovery 20
- Flawless ritual 40
- War mage 30
- Battle mastery 40
- Mighty 30
- Elemental aegis 20
- Hardy 20
- Preparation 20
This would max out the Warfare tree with all active and passive champion points at 520 spent 1,560 total spent.
Fitness Constellation Champion Points

Below are recommended Fitness Champion Point selections for the ESO One Bar PvE Magicka Arcanist:
- Celerity (slottable) 50
- Boundless vitality (slottable) 50
- Rejuvenation (slottable) 50
- Sprinter 10
- Winder chaser – sub con – hasty 8
- Hero’s vigar 10
- Shield master’s – 10
- Bastion (slottable) 50
This would be the bare minimum setup, spending 238 CP (714 total required). The next step is to max out passives, that do not require a slottable but increase performance.
- Hero’s vigar 10
- Tumbling 30
- Sprinter 10
- Defiance 20
- Hasty 8
- Tireless guardian 20
- Fortification 30
- Nimble 6
- Mystic tenacity 50
- Tempered soul 50
- Piercing gaze 30
- Savage defense 30
- Bashing brutality 20
This would max out the fitness tree with all active passive champion points at 552 cp spent 1,656 total spent
Craft Constellation Champion Points

Below are recommended Craft Champion Point selections for the ESO One Bar PvE Magicka Arcanist:
- Steed’s blessing (slottable) – 50
- Breakfall 10
- Wanderer 15
- Steadfast 10
- Treasure hunter 50 (slottable)
- Master gatherer 15
- Gifted rider (slottable) 100
- War mount (slottable) 120
This would be the bare minimum setup, spending 370CP (1110 total required). The next step is to max out passives, that do not require a slottable but increase performance.
- Steadfast enchantment 40cp
- Breakfall 40 cp
- Wanderer 60
- Fortunes favor 10
- Rationer 10
- Friends in low places 25
- Out of sight 30
- Fleet of phantom 40
- Soul’s reservoir 33
- Gilded fingers 50
- Fortunes favor 40
- Inspiration boost 45
- Infamous 30
This would max out the crafting tree with all active passive champion points at 823 cp spent 2,469 total spent
Consumables
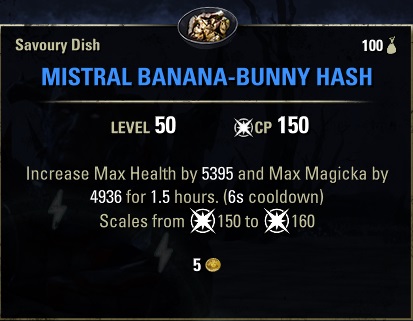
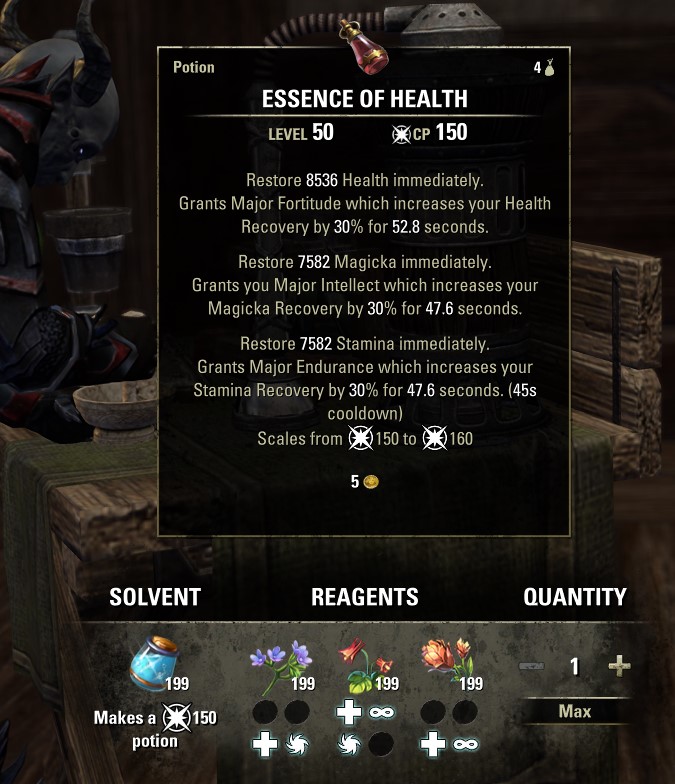
The best consumables for an Arcanist One Bar build are Mistral Banana-Bunny Hash and Essence of Health tri-stat potions. Mistral Banana-Bunny Hash give a massive boost to magicka and health. You could also run Clockwork Citrus Filet or Witchmother’s if you end up needing additional sustain. For your potions, tri-stat potions are the best to passively give you a flood of resources and tri-recovery with the alchemy passive medicinal use. Below are our recommended food and potion choices:
- Mistral Banana-Bunny Hash: Increase Max Health by 5395 and Max Magicka by 4936 for 1.5 Hours. Ingredients: Bananas (1), Seasoning (1), Small Game (1).
- Clockwork Citrus Filet: Increase Max Health by 3326, Health Recovery by 406, Max Magicka by 3080, and Magicka Recovery by 338 for 2 hours. Ingredients: Frost Mirriam (1), Lemon (1), Perfect Roe (1), Red Meat (1).
- Essence of Health (tri-stat): Restore Health, Magicka, and Stamina immediately and increase your Health Recovery, Magicka Recovery, and Stamina Recovery.They are crafted from provisioning with ingredients of Bugloss, Columbine, and Mountain Flower.
Build Summary – The ESO One Bar PvE Magicka Arcanist
Class: Arcanist
Race: Dark Elf
Attributes: 64 Magicka
Mundus Stone: Thief
Weapon One: Flame Staff
Armor Set 1: Perfected Ansuul’s Torment
Armor Set 2: Deadly Strike
Monster Helm: Slimecraw
Mythic: Oakensoul ring
Armor Weight: 6 Medium, 1 Light
Food: Mistral Banana-Bunny Hash
Potion: Essence of Health with Tri Restoration
Skill Bar 1
- Cephaliarch’s flail
- Pragmatic Fatecarver
- Inspired Scholarship
- Fulminating Rune
- Blockade of Elements
- The Tide’s King Gaze (Ultimate)
Scribing Grimoires and Scripts
- Ulfsild’s Contingency
- Flame Damage (focus script)
- Lingering Torment (signature script)
- Vulnerability (Affix Script)
Looking For More ESO Builds?
Thank you for reading the ESO One Bar PvE Magicka Arcanist Build Guide. We provide the latest news and create guides for ESO. Also, watch me play games on Twitch or visit my YouTube channel!