Facebook
 Reddit
 Email
Email
Looking for ultimate protection with the best Baldur’s Gate 3 (BG3) shields? This ranking enhances gameplay with epic items.

Shields belong to the category of Equipment that bestows a +1 bonus to characters’ Armour Class (AC), consequently lowering the likelihood of enemy attacks landing successfully. Just like other items in Baldur’s Gate 3, you need proficiency with the item. Otherwise, you suffer a penalty. Using a shield without proficiency will prevent you from casting spells and impose a Disadvantage on attack rolls, ability checks, and saving throws.
Using a shield provides a couple of benefits. One, you get increased AC by +1 or higher. Two, you get an additional item slot that has bonuses and even extra spells. Using one hand and shield is the preferred “tank” way to play the game, but it’s a quick and easy way to add a lot of utility and survivability if you don’t rely solely on weapon attacks for damage. The Cleric is a great example of a class that can do decent damage with a weapon attack but benefits from a shield, increasing survival and using spells for their main damage source.
- Classes with Shield Proficiency: Barbarian, Bard (subclass College of Valour), Cleric, Druid, Fighter, Paladin, Ranger
- Classes that Typically use a Shield In BG3: Cleric, Fighter, Druid, and Paladin.
- Races with Shield Proficiency: Human, Half-Elf
- Shield Proficiency Feat: Moderately Armored provides Medium Armor and Shields expertise.
Best Shield in Baldur’s Gate 3, Ranked
Viconia’s Walking Fortress is the best shield in Baldur’s Gate 3 because it has the highest AC bonus +3, an advantage on saving throws against spells, and Rebuke of the Mighty. This shield also provides two powerful defensive spells, Reflective Spell and Warding Bong. When an enemy hits you, they take Force damage and may be knocked prone, essentially eliminating their turn. This shield is the best in the game for all-around defensive capabilities that punish enemies for attacking you.
Below is a top 10 list of the best shields in BG3:
- Viconia’s Walking Fortress: The most defensive capabilities and AC
- Shield of Devotion: gain an extra spell slot and Shield of Devotion spell
- Shield of the Undevout: gains an additional level 1 spell and helpful with fear spell.
- Shield of Scorching Reprisal: Gain a reaction skill and a bonus action skill
- Sentinel Shield: Passively boost initiative and advantage on perception checks
- Justiciar’s Greatshield: Can go stealth and gain advantage on perception
- Adamantine Shield: Best Act 1 shield
- The Real Sparky Sparkswall: Helps gain Lighting Charges and jolts enemies
- Glowing Shield: Best starter shield after prologue
- Absolute’s Warboard: Helpful if branded with Absolute in Act 1
Best Shield for Each Class in BG3
The Best shield for each proficient class in Baldur’s Gate 3:
- Bard: Viconia’s Walking Fortress
- Barbarian: Viconia’s Walking Fortress
- Cleric: Shield of Scorching Reprisal
- Fighter: Viconia’s Walking Fortress
- Druid: Sentinel Shield
- Paladin: Shield of the Undevout
- Ranger: Viconia’s Walking Fortress
10. Absolute’s Warboard
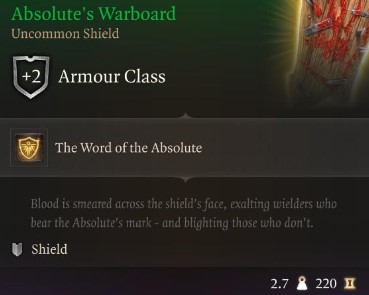
Absolute’s Warboard features in Baldur’s Gate 3:
- Armour Class: +2 AC
- Rarity: Uncommon
- Location: Priestess Gut in the Shattered Sanctum, Act 1
Making our way further into Act 1 and specifically the Golbin camp, we discover Absolute’s Warboard. This shield also gives +2 AC and a unique bonus, Absolute’s Ward. If the wielder bears the Absolute’s Brand, they gain a +1 bonus to Saving Throw. Inside the Golbin camp, you will encounter Priestess Gut, who wants to give you the Mark of the Absolute. While this isn’t a guide about that, it comes with some upsides and downsides throughout the game. You need to accept that mark in order to get this bonus.
Even if you do not accept the mark, the shield is still a strong choice. The wielder can cast Heroism once per long rest, boosting you or an ally’s health. You also cannot be Frightened, a status effect that locks you in place. This is a worthwhile shield to pick up early, especially if you take the Absolute’s Brand or have two characters using one hand and shield and need an AC boost.
9. Glowing Shield
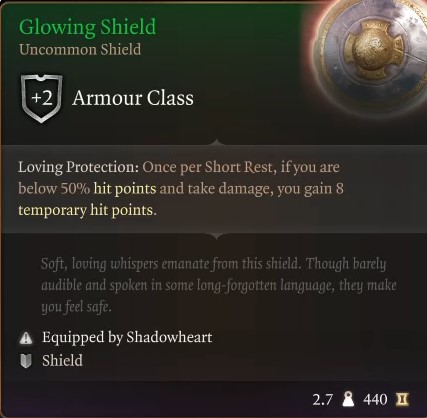
Glowing Shield features in Baldur’s Gate 3:
- Armour Class: +2 AC
- Rarity: Uncommon
- Location: Behind the Goblin Camp (X:-53 Y:461), Act 1
The Glowing Shield is our first recommended shield in Act 1. It can be obtained in a locked chest behind the Golbin Camp very early. This shield provides +2 AC, which is a boost over the default +1 and helps avoid attacks early. You also get the Loving Protection property, which gives you 8 temporary hit points when you take damage while below 50% health. This can be a lifesaver in a tough fight and activates automatically, not requiring an Action or Bonus Action.
With it being easy to get, this shield goes great with a Cleric support build, specifically Shadowheart companion early on. Regardless of which subclass, the Cleric has access to shields, and most likely, you will be using the class or her for support. Giving her extra protection via AC and Loving Protection is a great way to ensure she stays alive in tough battles.
8. The Real Sparky Sparkswall

The Real Sparky Sparkswall Shield features in Baldur’s Gate 3:
- Armour Class:+2
- Rarity: Uncommon
- Location: the Grymforge at coordinates X: -695 Y: 420, locked in and trapped chest
With a previous BG3 patch update, Lighting Charges effectiveness was changed making The Real Sparky Sparkswall one of the best shields in Act 1. The shield can consume three lighting charges, releasing a massive blast around enemies and jolting them. Lightning charges are gained by using weapons like the Joltshooter or the Speedy Lightfeet. You can even create a lightning charges build centered on multiple pieces of gear, subclass like Stormy Sorcerer to increase lightning damage.
The downside of the Real Sparky Sparkswall is it’s obtained later in Act 1 in the Grymforge. By then, you can acquire the Adamantine Shield, a much stronger option, though it lacks an offensive action. However, having a spellcaster with shield proficiency to pick up and use the Sparky Sparkswall with the Spellsparker staff is still valid.
7. Adamantine Shield
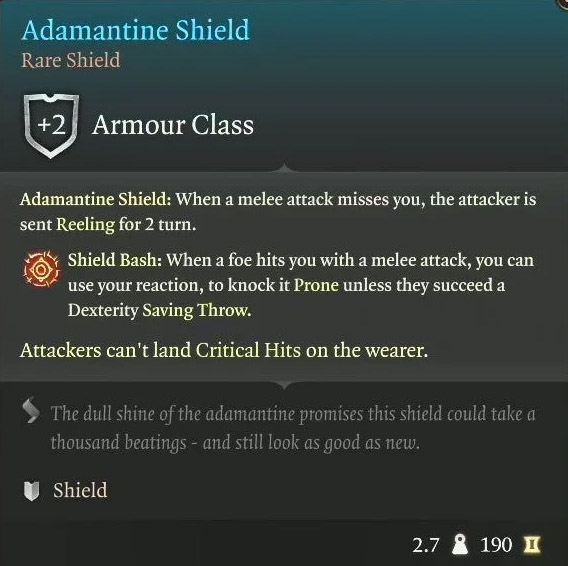
Adamantine Shield features in Baldur’s Gate 3:
- Armour Class: +2 AC
- Rarity: Uncommon
- Location: Forged in The Adamantine Forge with a Shield Mould and Mithral Ore.
Ending our Act 1 Shield with the ultra-powerful Adamantine Shield. You obtain this in Adamantine Forge using a Shield Mold and Mithral Ore. This shield provides +2 AC, Adamantine Shield passive, and Shield Bash. Adamantine Shield: When a melee attack misses you, the attacker is sent Reeling for 2 turns. Recovering from receiving a terrible blow or hitting a strong metal. Has a -1 penalty to Attack Rolls for every turn remaining. This is a very important and useful passive you expect to take damage.
The Shield Bash passive provides a reaction attack when someone hits you and can knock them prone. The nice thing about this is reactions do not consume Action or Bonus Action. The Prone status effect essentially removes someone Action or Bonus Action and renders their turn useless. It’s a punishing way to return fire on an enemy, and you practically beg them to attack you. The Fighter Battle Master has a subclass ability, Goading Attack. This can force a target to attack you further, taking advantage of this punishing shield feature. Lastly, you can not be critical hit while wearing this, lowering the overall enemy burst potential against you.
This shield can take you all the way to Act 3 with its overall power. The downside of this shield is that it requires Mithral Ore, and only a couple are available in the game. So, you must make a decision in Act 1: Do I craft a heavy chest, shield, or what’s most important to my overall party composition? If you want an ultra-powerful tank, craft this shield.
6. Justiciar’s Greatshield

Justiciar’s Greatshield features in Baldur’s Gate 3:
- Armour Class: +2
- Rarity: Rare
- Location: Act 2 in the Gauntlet of Shar at coordinates X: -713 Y: -732 dropped by NPC by Lyrthindor.
The strength of the Justicar’s Greatshield is the ease of access. You won’t need some complex crafting like the Adamantine Shield and gain a unique bonus action skill darkness cloak. Darkness Cloak allows you to immediately hide using a bonus action once per short rest. This allows you to quickly escape dangerous encounters or near death on honour mode campaigns.
Additionally, the bonus to Perception checks, gaining advantage, is helpful while exploring. Especially playing a Cleric with high Wisdom, you can spot almost any object as you explore. However, without a powerful defensive or offensive bonus outside of stealth, there are still better shield options in BG3.
5. Sentinel Shield

Sentinel Shield features in Baldur’s Gate 3:
- Armour Class: +2 AC
- Rarity: Rare
- Location: Sold by Lann Tarv in Moonrise Towers, Act 2
Moving into Act 2, we get the easily obtained Sentinel Shield. At first glance, this shield doesn’t seem impressive with +2, bonus to initiative rolls, and Shield Bash. However, the Initiative roll increase of +3 is a huge bonus. You want to equip this in classes that have lower-than-average Dexterity, like a Druid. Having a high initiative means going earlier in the combat turn, with the Druid and other lower Dexterity classes lagging. This prevents you from being stunned, incapacitated, and damaged.
The Druid makes great use of this because the Circle of the Moon subclass wants to use their Bonus Action on turn one to get into Wild Shape. The earlier you can cast one spell and get into Wild Shape, the better off you will be. You can even go further and pair this with the Alert Feat, giving you a whooping +5 bonus to Initiative, and you can’t be Surprised. I add this to my Fighter builds because I want them to go early, crowd control, or eliminate the enemy on turn one rather than react to what they do to me. It’s an underrated shield, and I recommend getting it for specific classes that change the turn order.
Also Check:- BG3 Interactive Map
4. Shield of Scorching Reprisal
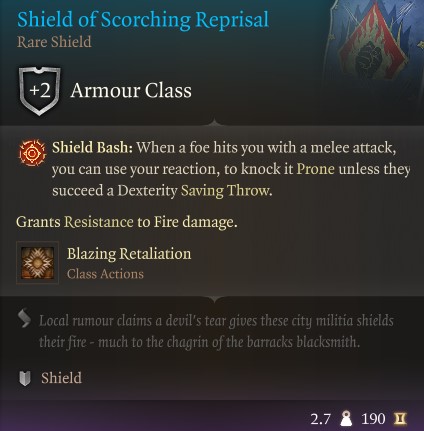
Shield of Scorching Reprisal features in Baldur’s Gate 3:
- Armour Class: +2 AC
- Rarity: Rare
- Location: Looted from a Flaming Fist’s corpse (X:-3 Y:215), Act 2
Next, in Act 2 Shield, we have Shield of Scorching Reprisal. This shield comes with +2 to AC, Shield Bash, and a new class, Action Blazing Retaliation. Once per Short Rest, use a Bonus Action to huddle behind your shield to increase your Armour Class by 1 and reap scorching retaliation upon attackers who miss you. When an attacker misses you with a melee attack, they take 1-6 Fire damage. The retaliation damage is nice, but the fact that you can use a Bonus Action rather than an action makes it worthwhile.
The matching is perfect for the Cleric who doesn’t make use of their Bonus Action often. It’s the class’s weakness, unlike the Monk, Rogue, Ranger, or Warlock, who use their Bonus Action every turn – It may go to waste. Increasing your AC and doing some damage back at the attackers is a great way to keep your character alive and punish enemies for attacking you.
3. Shield of the Undevout

Shield of the Undevout features in Baldur’s Gate 3:
- Armour Class: +2 AC
- Rarity: Very Rare
- Location: Bhaalist Crypt, Act 3
We’ve moved into Act 3 with some of the best items in the game, and the shield you should target here is the Shield of the Undevout. The Dreadful Hewer gives a Disadvantage on saving throws, meaning two D20 are rolled, and the lowest is taken. This will make enemies easier to hit, allowing you to burst them down with Smite spells.
Speaking of Smite spells, this shield gives you a level 1 spell slot for free. While that might seem weak in Act 3, a Paladin spell slot is vital to sustained damage. You don’t get as many as a traditional spellcaster; most of the time, these go to Divine Smite, which is a reaction. After two or more rounds of combat, your Paladin can be completely drained of spell slots. Having that extra one spell slot passively adds a lot of damage in the form of Divine Smite. This shield is well worth picking up in Act 3, especially if the user is a spellcaster.
2. Shield of Devotion
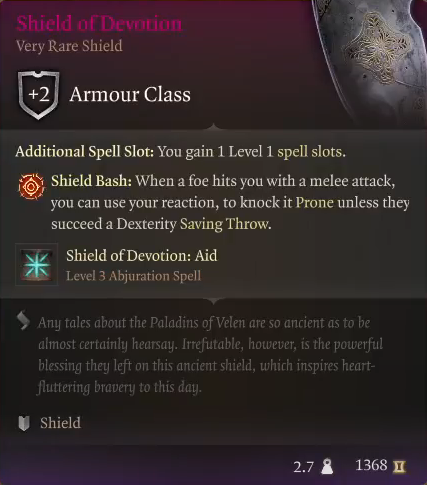
Shield of Devotion features in Baldur’s Gate 3:
- Armour Class: +2 AC
- Rarity: Very Rare
- Location: Act 2 Last Light Inn bought or stolen from Quartermaster Talli at coordinates X: -31 Y: 130.
The Shield of Devotion is the second build in the game, giving you a free level 1 spell slot, shield of devotion spell, and +2 AC. Moreover, this shield is easy to obtain with a simple purchase in Act 2, carrying you all the way to Act 3 legendary shield.
The trick to using the shield of devotion is to “pre-buff” encounters with the Aid spell. Aid, at level 3 grants +10 hit points until a long rest. Therefore, you can cast a series of spells that last until a long rest, and massively increase your combat effectiveness. A trick we recommend is having a hireling with nothing but long rest spells to pre-buff your party. Using Aid at max level or with the shield, protection from poison, daylight, freedom of movement, death ward, and even Heroes Feast. It takes a bit of time to recast the spells and dismiss the hireling, but the added benefits are worth the effort and it’s a free spell with Shield of Devotion.
1. Viconia’s Walking Fortress
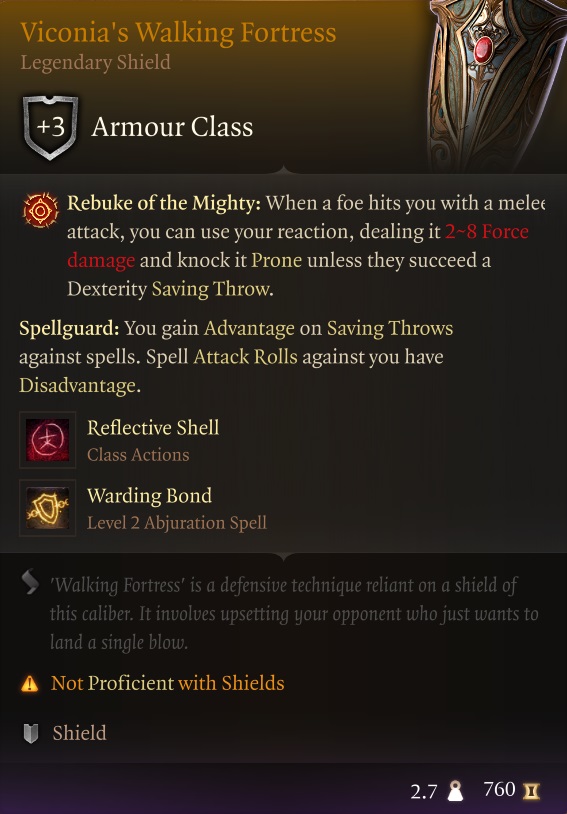
Viconia’s Walking Fortress features in Baldur’s Gate 3:
- Armour Class: +3 AC
- Rarity: Legendary
- Location: Looted from Viconia DeVir during the quest Daughter of Darkness, Act 3
We have reached the best shield in Baldur’s Gate 3, Viconia’s Walking Fortress Legendary Shield. This shield gives the highest AC of +3 and Rebuke of the Might. This is an enhanced version of Shield Bash, dealing extra force damage. Anyone who targets you with a spell has a tough time with you getting an advantage for saving against spells, and the enemy gets a disadvantage.
Related:
The Reflect Spell class Action is utterly powerful, reflecting any projectiles targeted at you back to their point of origin for two turns. On top of that, you get another defensive spell, Warding Bond, which gives resistance to all damage and a +1 bonus to their Armour Class and Saving Throws. Each time the target takes damage, the spellcaster takes the same amount of damage. This shield lets you shut down range attackers and reflect their damage.
The fighter Class’s biggest issue is handling spellcasters. While they have the highest actions in the game with Extra Attack, Improved Extra Attack, and Action Surge, their one weakness is ranged spellcasters stunning, immobilizing, and disabling them. Viconia’s Walking Fortress Legendary Shield is the counter to that weakness and can also work for any other Baldur’s Gate 3 class. This is the number one shield, and you should prioritize it immediately in Act 3 when you reach the Daughter of Darkness quest.
FAQs about the best shields in Baldur’s Gate 3 (BG3)
1. Question: Is there a legendary shield in BG3?
Yes, in Act 3 Viconia’s Walking Fortress is obtained through the Shadowheart companion questline Daughter of Darkness. Enter the House of Grief in Act 3 and continue the quest to it’s conclusion/
2. Question: What’s the best shield in BG3?
Viconia’s Walking Fortress is the best shield in BG3 because it provides the most AC, a projectile reflect spell, and a reaction skill that knocks enemies prone and inflicts 2d4 force damage.
3. Question: What’s the best shield in Act 1 BG3?
The best shield in Act 1 is the Adamantine Shield requiring crafting in the Grymforge.
Looking For More About Baldur’s Gate 3?
Thank you for reading the Baldur’s Gate 3: Best Shields Guide. We provide the latest news and create guides for Baldur’s Gate 3. Also, watch me play games on Twitch or visit my YouTube channel!