Facebook
 Reddit
 Email
Email
Discover the best Warlock class spells you should use in Baldur’s Gate 3 for damage, survivability, and crowd control!

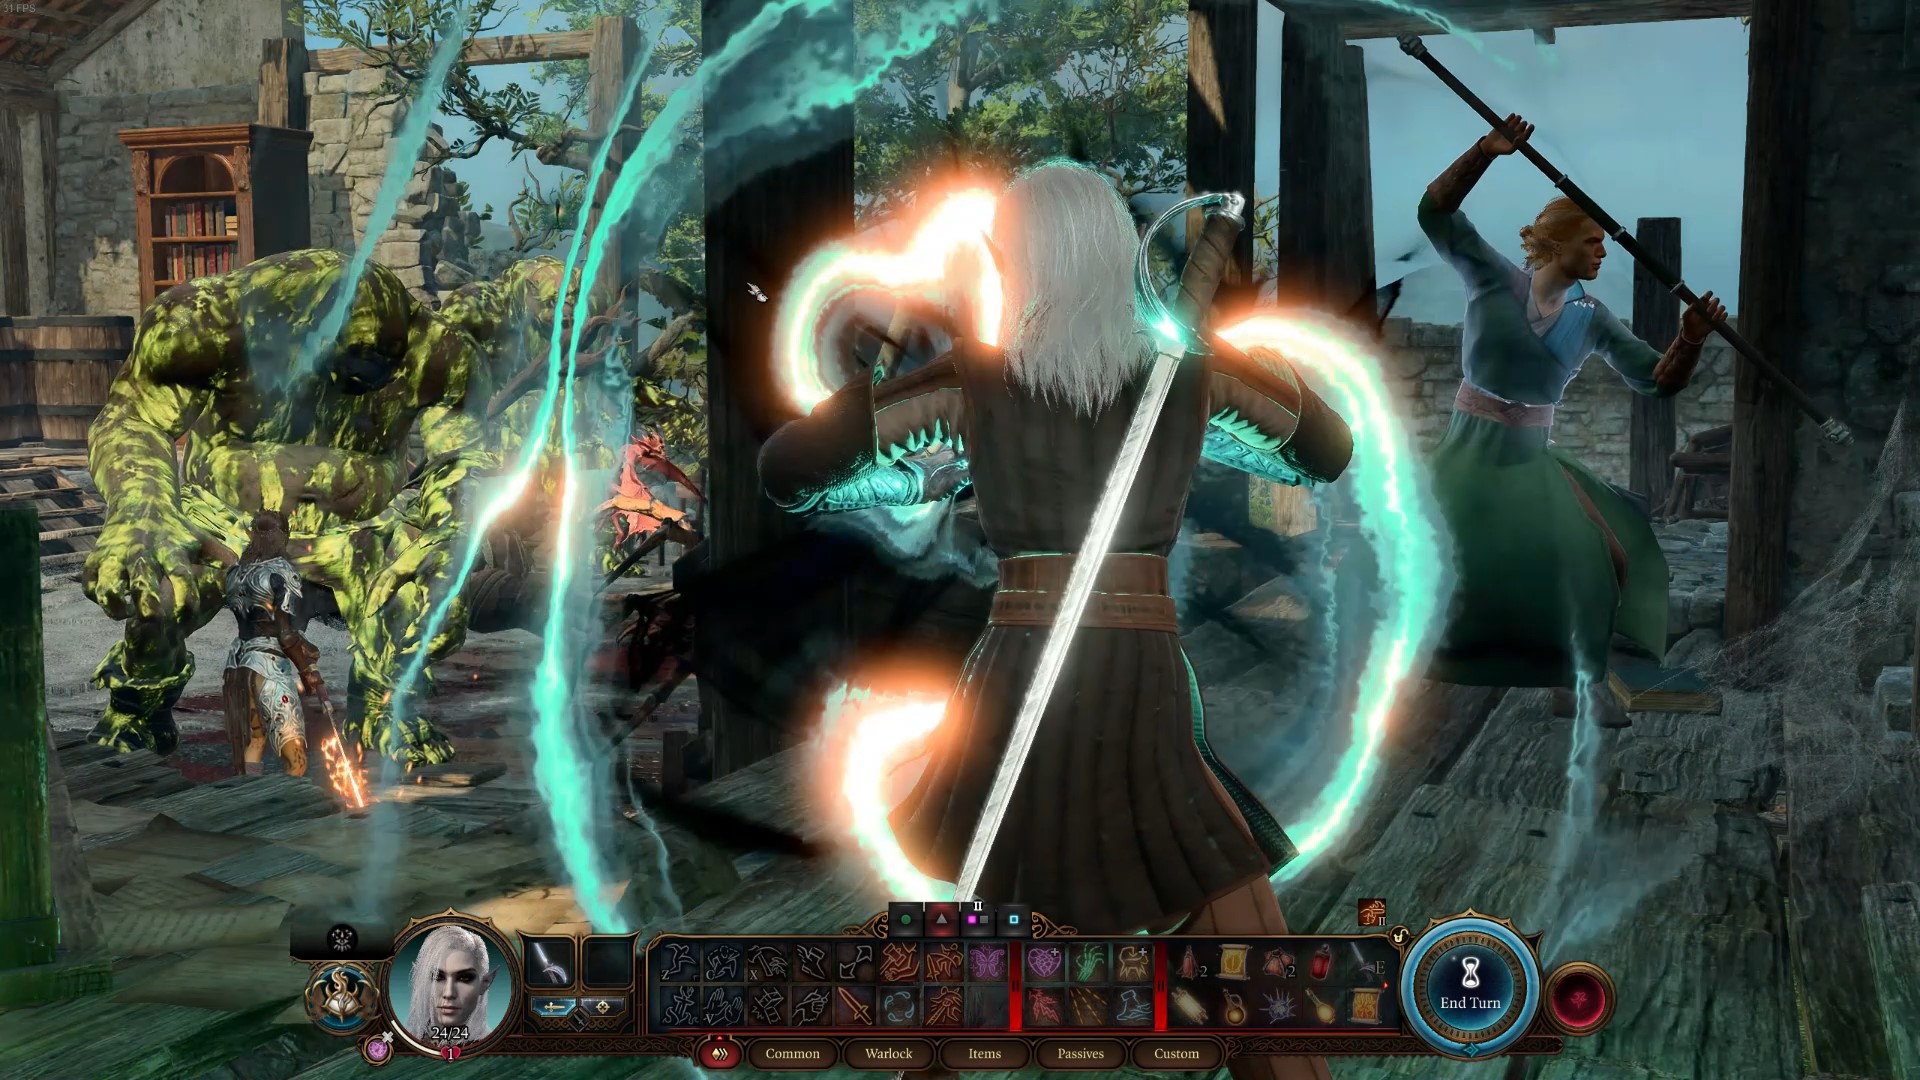
In Baldur’s Gate 3, the Warlock is a unique spellcaster class who draws their power from a powerful entity known as a Patron. This pact grants them access to a specific set of abilities and spells, making them highly customizable and versatile. Warlocks are known for the most powerful cantrip in the game, Eldritch Blast. Additionally, Warlocks can customize their spells, Eldritch Blast, and build to hone in our their particular area of focus.
Unlike other spell casters, Warlocks have limited spell slots. Additionally, Warlocks spell slots (pact slots) are not level 1, 2, 3, and so forth. Warlock’s spells are equal to the highest level of spells the Warlock has access to. Thus, if you are level 11, your spells will be automatically upcast to level 6. Moreover, you gain all your spell slots back on short rest, rather than long. In summary, Warlocks have more limited spell slots, but they are almost more powerful.
This guide, Best Spells for the Warlock Class in Baldur’s Gate 3, examines the best and most powerful spells and how to use them. We will include gear suggestions, examples, and powerful combinations to get the most out of your Warlock build!
What are the Best Spells for the Warlock Class in Baldur’s Gate 3
Eldritch Blast, Circle of Death, and Fireball are the best Warlock class spells in Baldur’s Gate 3. While Eldritch Blast is technically a cantrip, it revivals the power of any spell and doesn’t require a spell slot for usage. Circle of Death is one of the most powerful area spells in the game and a unique staff makes it more deadly. Lastly, the D&D classic Fireball makes our list for sheer raw area damage with fire!
Below are the strongest spells for the Warlock class in Baldur’s Gate 3:
- Eldritch Blast: strongest cantrip in the game, and overall the best part of Warlock class
- Circle of Death: massive area damage with high damage
- Fireball: amazing fire damage though has friendly fire
- Cone of Cold: powerful close-quarters cold spell
- Hellish Rebuke: inflicts retaliatory damage when attacked
- Hex: debuffs enemies and adds damage per attack
- Hunger of Hadar: area-based blind and speed reduction spell
- Invisibility: the best evasion spell in BG3
- Command: versatile single target control spell
- Armour of Agathys: helpful early-game buff spell
Related:
10 Armour of Agathys

Armour of Agathys features in Baldur’s Gate 3:
- Description: Gain 5 temporary hit points and deal 5 Cold damage to any creature that hits you with a melee attack.
- School: Abjuration spell
- Cost: Action + Level 1 Spell Slot
- Range: Self
- Concentration: No
- Upcast: Gain an additional 5 temporary hit points and deal an additional 5 Cold damage per level.
- Subclass: All
What makes Armour of Agathys effective is the Warlock automatic upcasting, granting additional temporary hit points and cold damage to the higher level of your Warlock. For instance, the default spell only gains 5 temporary hit points, however at level 9, the Warlock will automatically upcast this to a level 5 spell, granting 25 temporary hit points and 25 cold damage. This spell also lasts until a long rest, so you can preemptively cast on yourself before a tough battle.
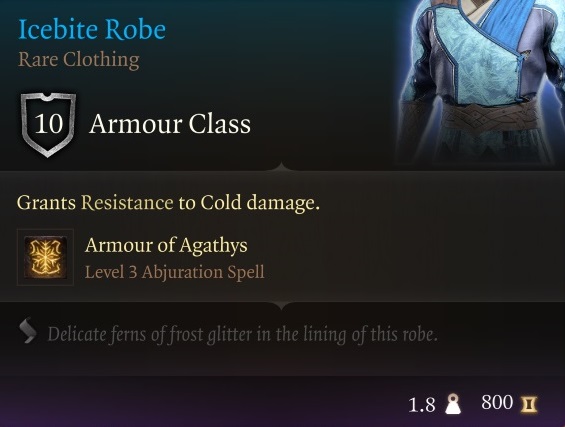
Considering the limited available spell slots for the Warlock, obtain the Icebite Robe in Act 2 of Baldur’s Gate 3. This item can be found in a sarcophagus in the Shadow-Cursed Lands and grants a free level 3 Armour of Agathys. You gain protection without the consumption of a spell slot. Moreover, you gain Cold damage resistance, cutting the damage in half for the cold elemental type. Consider this combination a powerful gear and spell alternative to other early defensive spells, making it one of the best in Baldur’s Gate 3 for the Warlock class.
9 Command
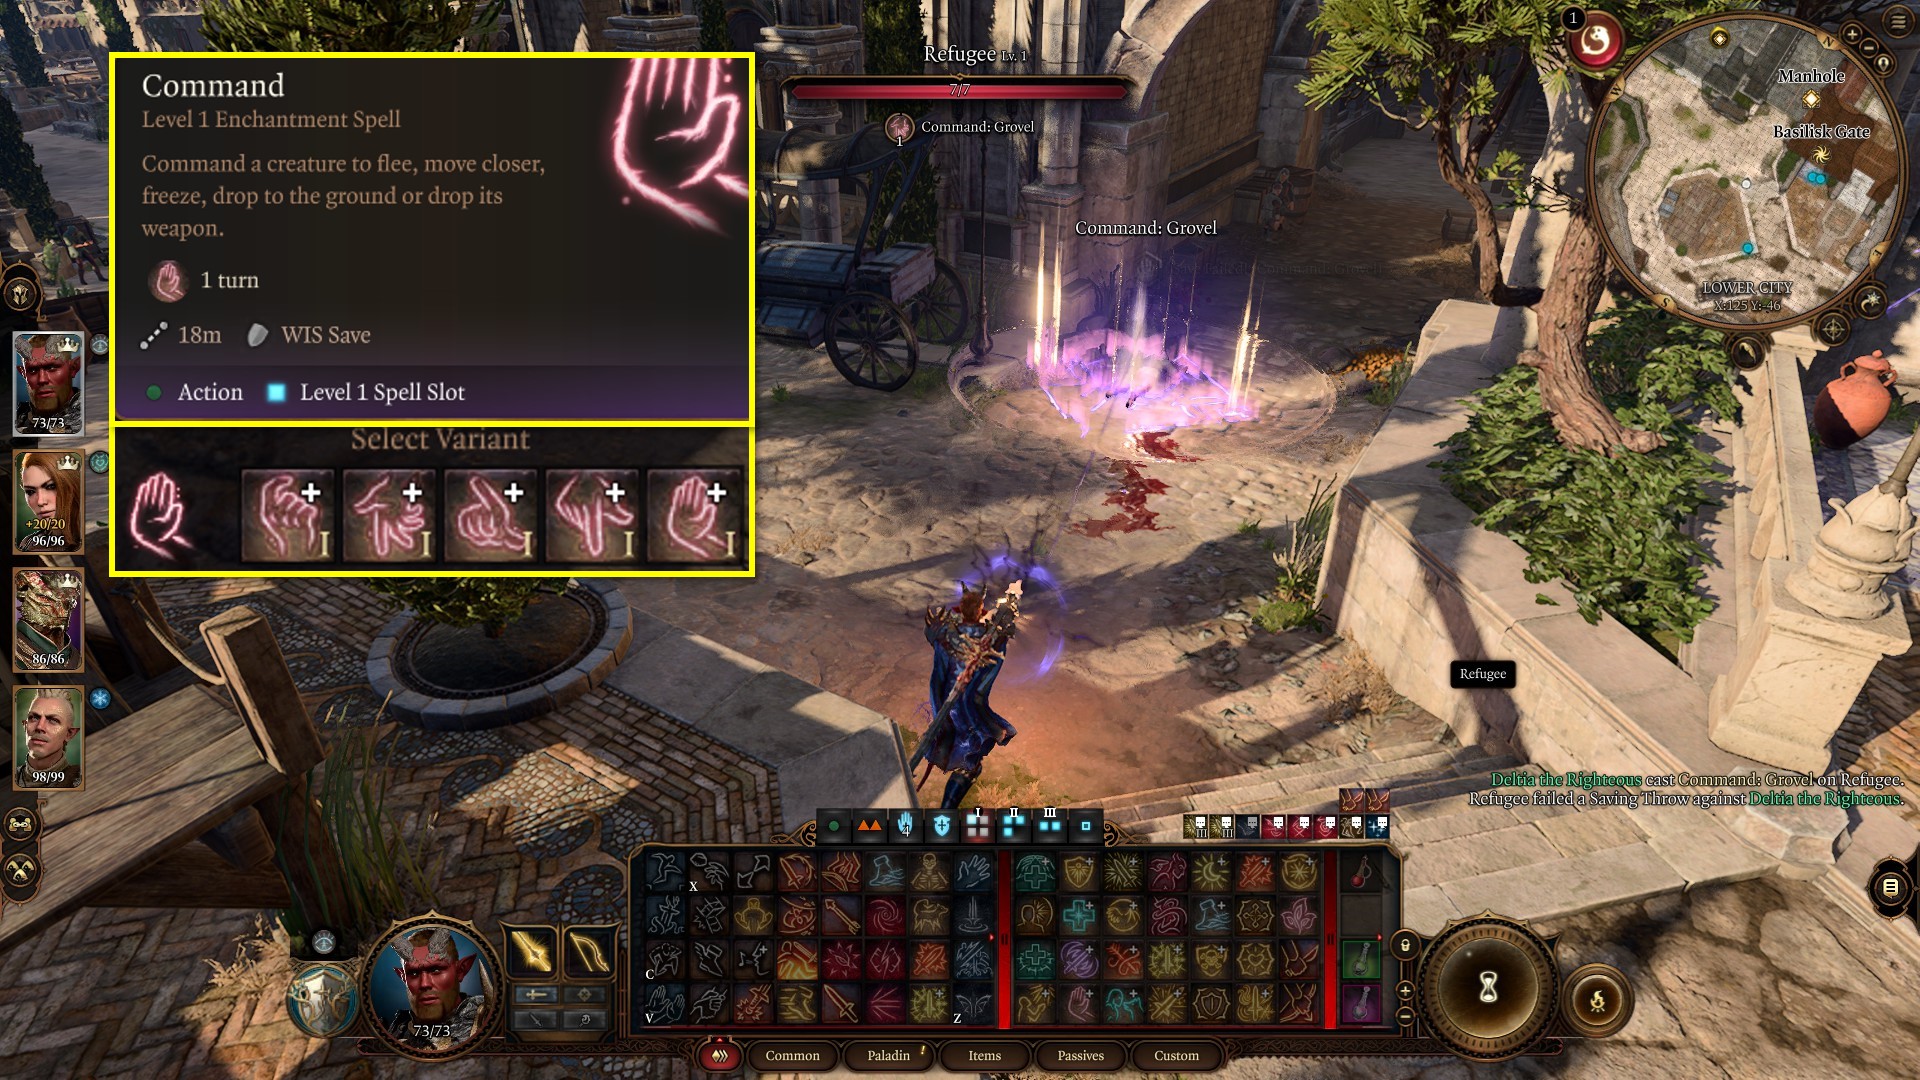
Command features in Baldur’s Gate 3:
- Description: Command a creature to flee, move closer, freeze, drop to the ground, or drop its weapon.
- School: Enchantment spell
- Cost: Action + Level 1 Spell Slot
- Range: 18 meters
- Concentration: No
- Upcast: Affects an additional target for each Spell Slot Level above 1.
- Subclass: The Fiend
The Command spell stands out as a versatile tool for crowd control and utility for Warlocks. It offers various versions such as Approach, Drop, Flee, Grovel, and Halt, each with distinct effects. Among these, Grovel and Drop are particularly favored. Grovel forces enemies to kneel, stunning them with the prone status effect for one turn. With a high Charisma modifier, the chances of success with Grovel are considerable, even against resilient foes in Baldur’s Gate 3.
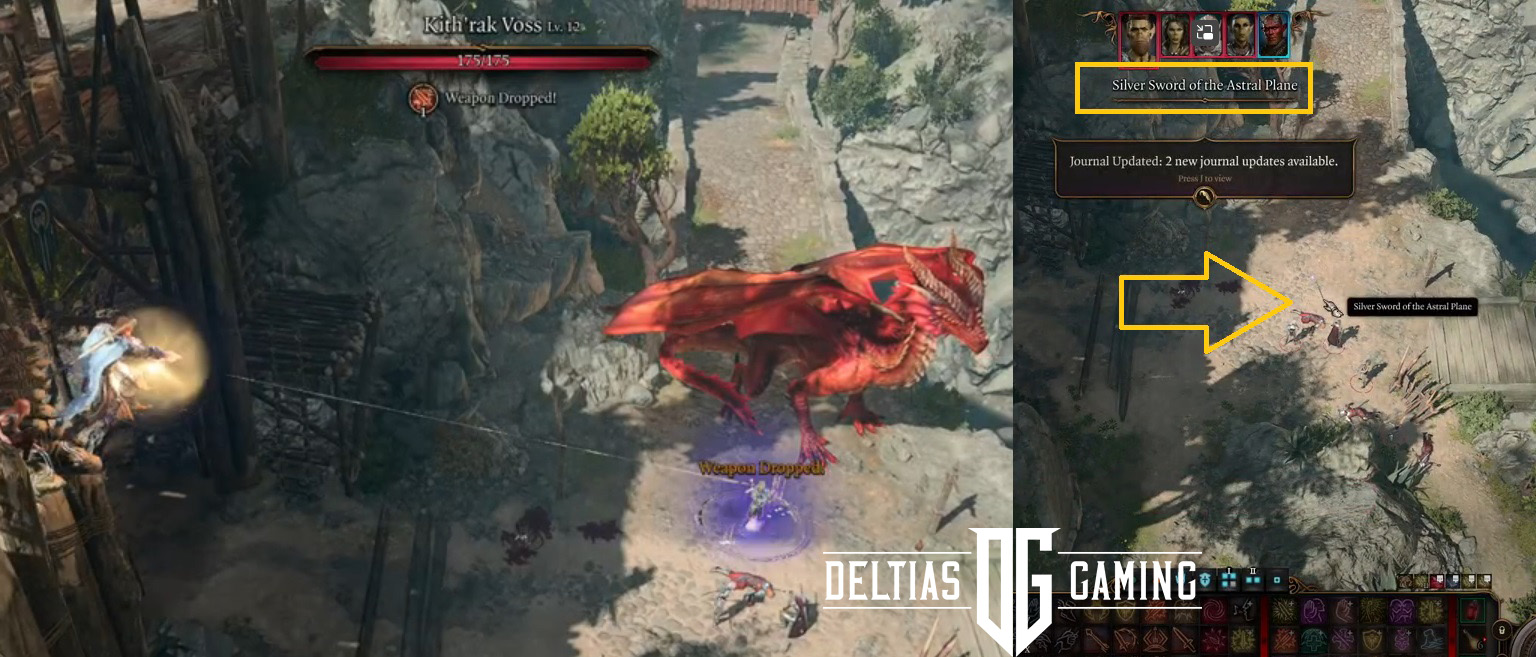
The Drop version compels enemies to relinquish their weapons, making it useful against formidable weapon users like Githyanki. This tactic proves especially handy in Act 1 for obtaining the Legendary Silver Sword of the Astral Plane. Moreover, defeating Gortash in Act 3 grants access to the Gauntlets of the Tyrant, providing further opportunities to utilize the spell.
Considering its adaptability and reliable success rate, Command emerges as a top recommendation among spells for Warlocks in Baldur’s Gate 3.
8 Invisibility

Invisibility features in Baldur’s Gate 3:
- Description: Touch a creature to turn it Invisible. Attacks against it have Disadvantage. It attacks with Advantage.
- School: Illusion spell
- Cost: Action + Level 2 Spell Slot
- Range: 1.5 meters
- Concentration: Yes
- Upcast: For Affects an additional target for each Spell Slot Level above 2.
- Subclass: All
The strategy for effectively utilizing the Invisibility spell revolves around exploiting the surprise status effect. Unlike traditional stealth mechanics, Invisibility allows you to traverse visibly detectable areas marked in red. By positioning yourself strategically, you can initiate attacks on your intended target, potentially triggering a surprise. This grants you a valuable extra round to inflict damage, significantly easing encounters.
To employ the Invisibility spell, begin by activating the turn-based mode from the User Interface. Cast the spell on your most potent damage dealer and have them enhance their capabilities with oils, elixirs, or both using bonus actions. Then, maneuver them into proximity to the target, maintaining a concealed position behind them. End the turn to refresh actions and bonus actions, then execute your attack.
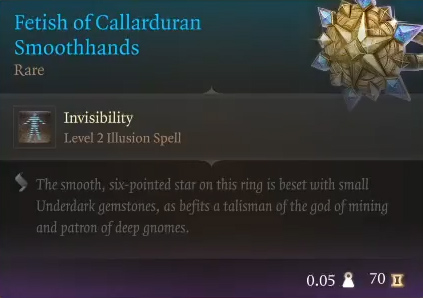
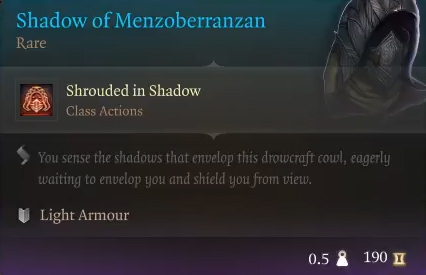
In Act 1 Underdark and Gymforce, you can obtain two items that give Invisibility Spell: Fetish of Calladuran Smoothands, and Shadow of Menzoberranzan. Pick up both of these before you transition out of Act 1.
7 Hunger of Hadar
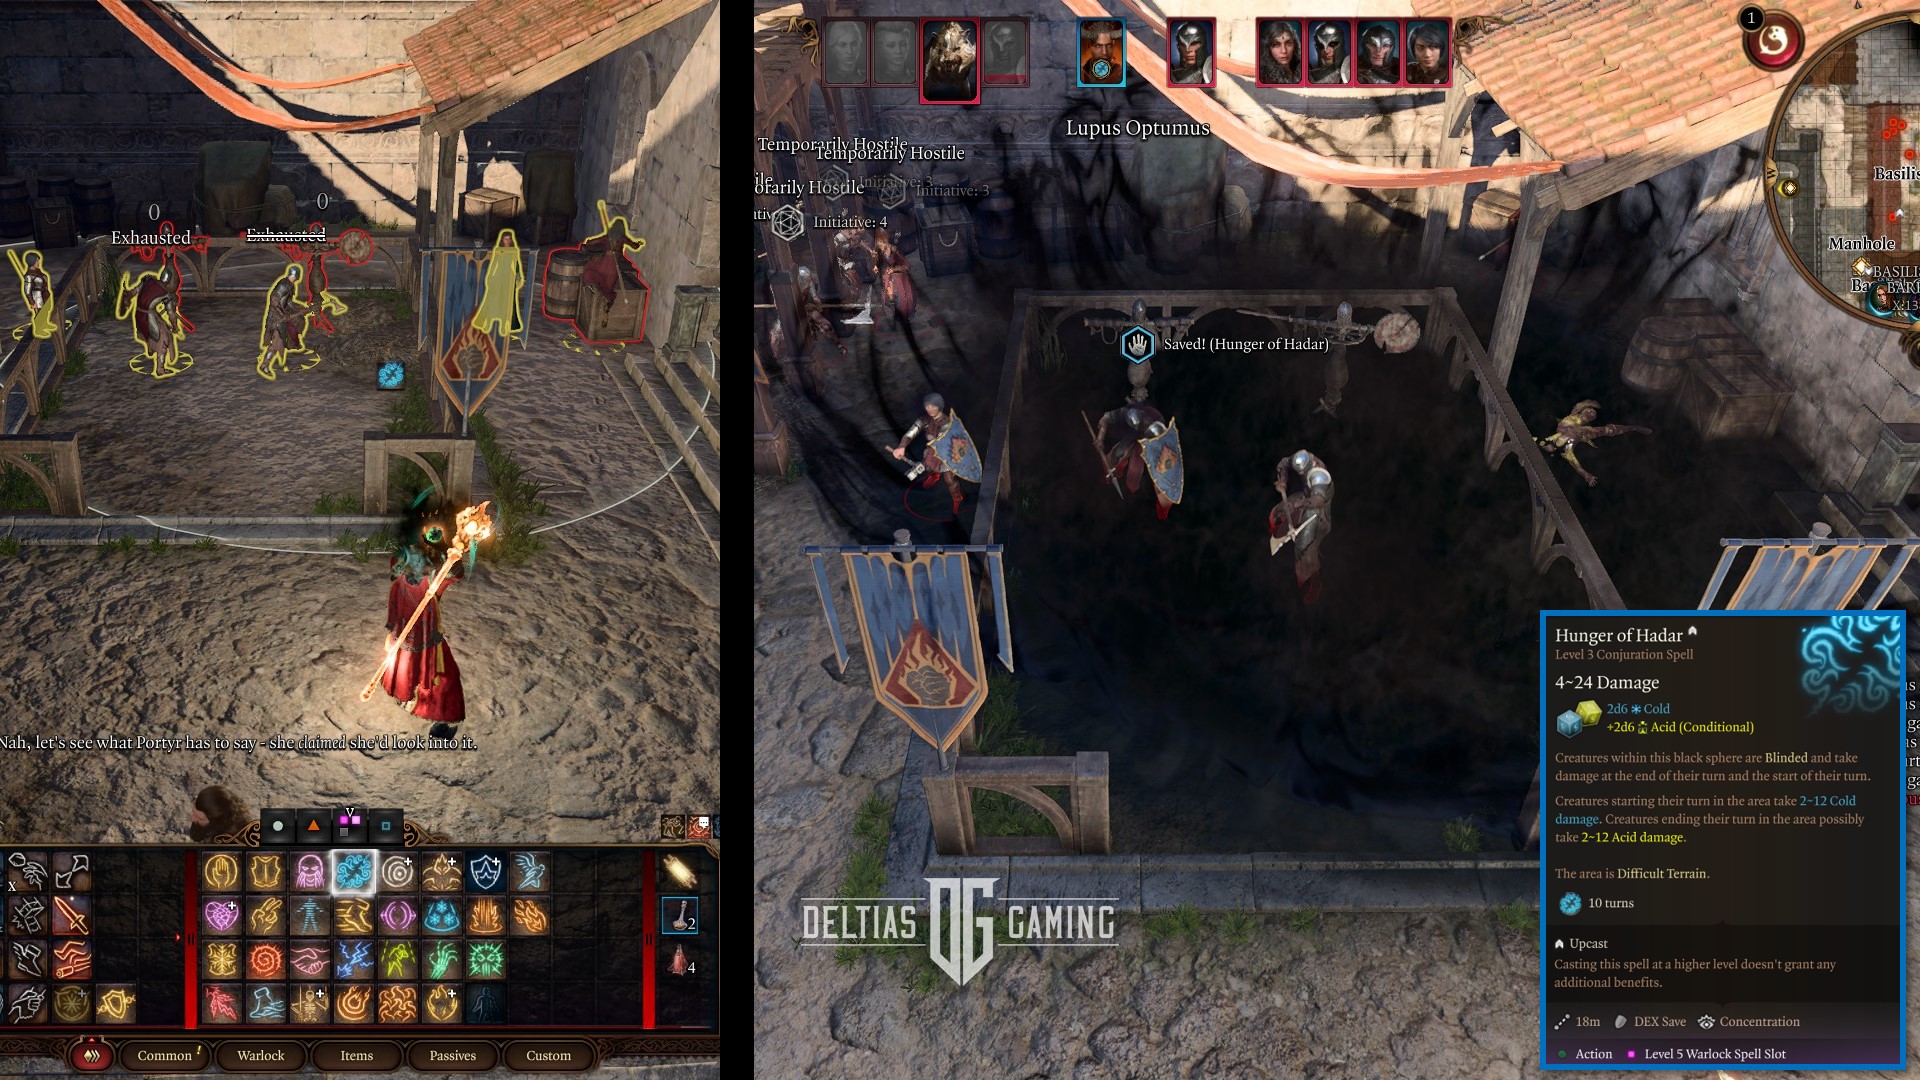
Hunger of Hadar features in Baldur’s Gate 3:
- Description: Creatures within this black sphere are Blinded and take damage at the end of their turn and the start of their turn. Additionally, creatures starting their turn in the area take 2d6 Cold damage. Creatures ending their turn in the area possibly take 2d6 Acid damage.
- School: Conjuration spell
- Cost: Action + Level 3 Spell Slot
- Range: 18 meters
- Concentration: Yes
- Upcast: No
- Subclass: All
The strength of the Hunger of Hadar spell is the massive area and obnoxious status effects inflicted inside. While inside the cloud, targets will suffer possibly cold or acid damage, have movement speed halved, and suffer blind status effects. Blind limits spellcasting and ranged attacks to 3 meters, completely shutting down ranged targets.
Hunger of Hadar is a great spell to cast in choke points. When a fight is triggered, and enemies are funneled into a small tight area. This limits their offense potential, and movement, and you gain an advantage against them. Look to cast Hunger of Hadar when overwhelmed where a choke point exists.
6 Hex
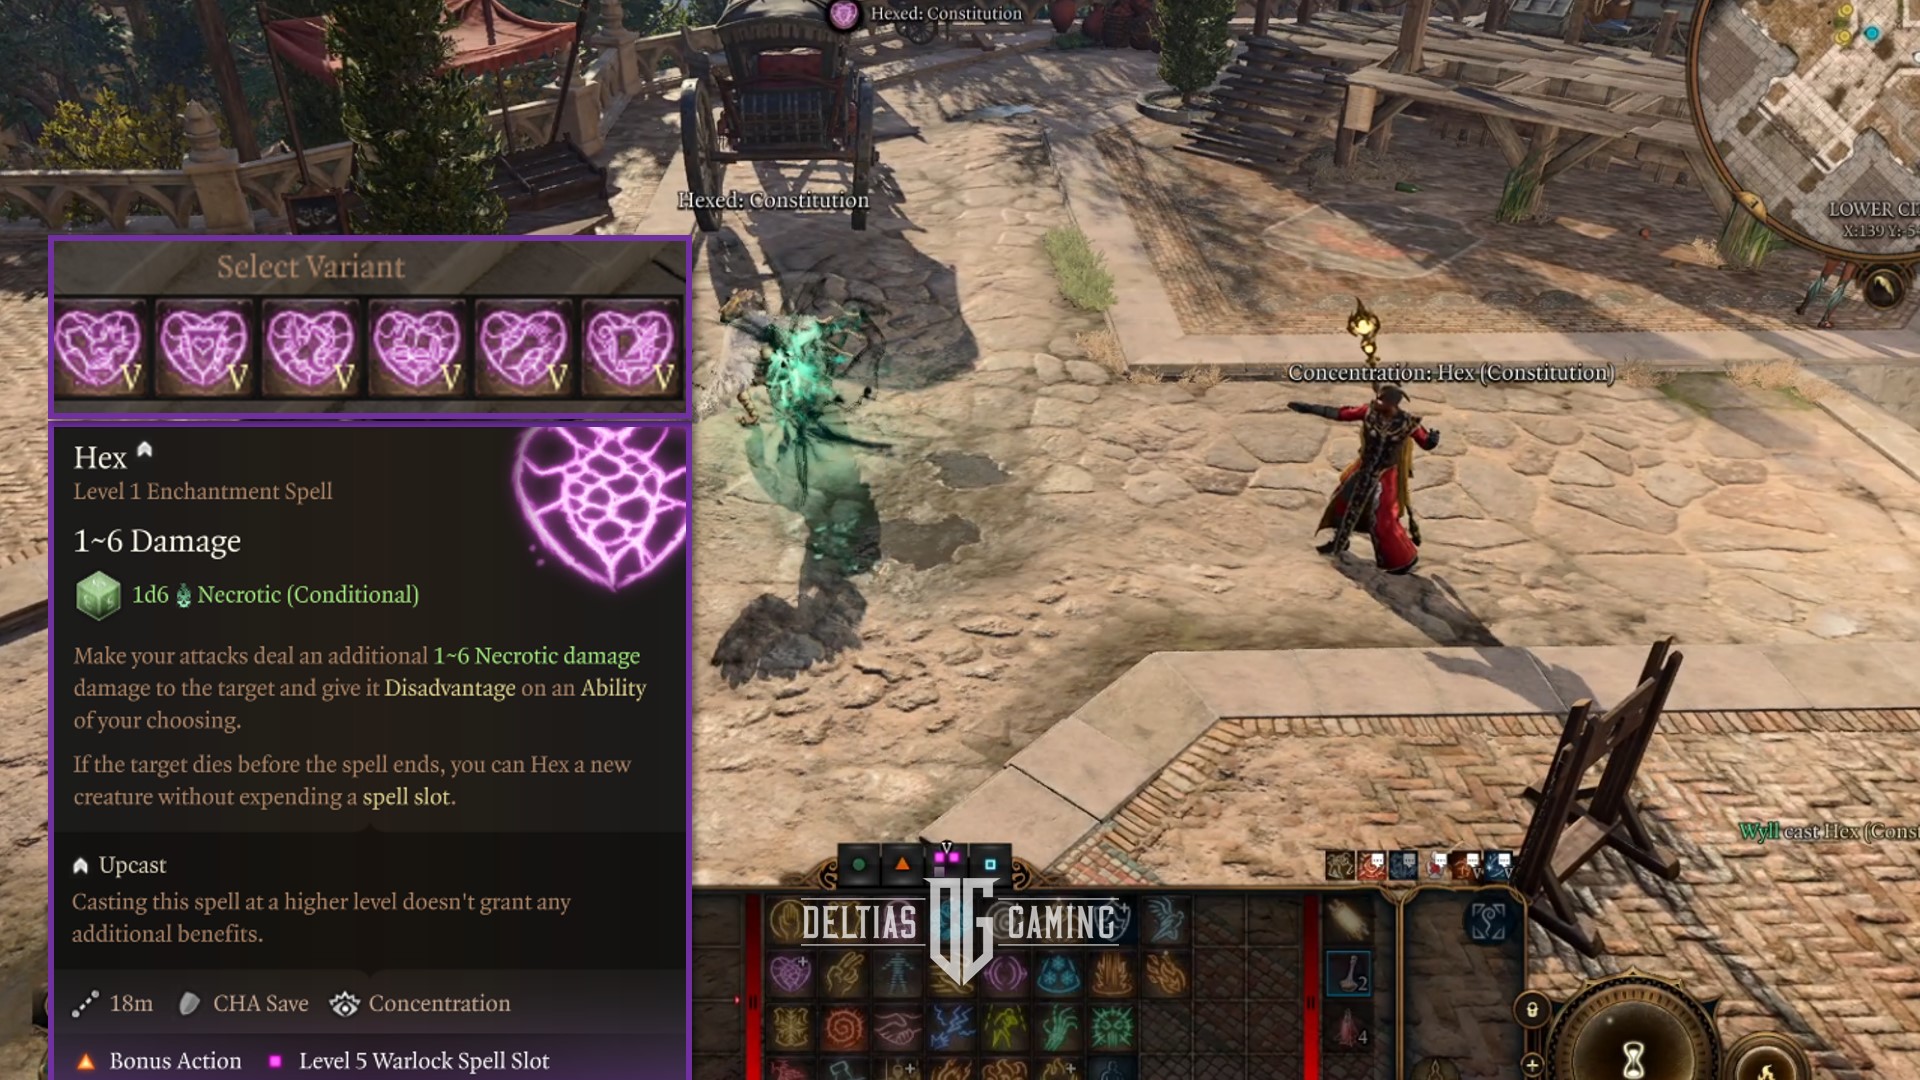
Hex features in Baldur’s Gate 3:
- Description: Make your attacks deal an additional 1d6 Necrotic damage to the target and give it a Disadvantage on Checks on an Ability of your choosing. Additionally, if the target dies before the spell ends, you can Reapply Hex to a new creature without expending a Spell Slot.
- School: Enchantment spell
- Cost: Bonus Action + Level 1 Spell Slot
- Range: 18 meters
- Concentration: Yes
- Upcast: No
- Subclass: All
Using Hex and Eldritch Blast is the Warlock’s class equivalent to peanut butter and jelly sandwiches. They just go together! Hex debuffs an enemy with whatever ability score you wish to give a disadvantage. You want to select an ability score that influences landing an attack, or preventing a saving throw. For instance, if you Hex a target and intend to cast Fireball next, you want to reduce dexterity to prevent a saving throw or less damage.
At levels 5 and 10, the Warlock’s Eldritch Blast gains an additional bolt. Meaning, that at level 10, you shot 3 bolts doing significant force damage. Hex, adds damage to each bolt that lands, further increasing the effectiveness of Eldritch Blast. Moreover, Hex uses a bonus action vs an action for a spell cast, and it can be reapplied without consuming a spell slot.
Consider Hex part 1 of your 1-2 punch combo with the Warlock class in Baldur’s Gate 3, and best used together.
Also Check:- BG3 Map
5 Hellish Rebuke

Hellish Rebuke features in Baldur’s Gate 3:
- Description: React to your next attacker with flames that deal 2d10 Fire damage.
- School: Evocation spell
- Cost: Reaction + Level 1 Spell Slot
- Range: Any
- Concentration: No
- Upcast: Deals an additional 1d10 Fire damage per level.
- Subclass: All
The Warlock class gains access to the potent retaliation spell known as Hellish Rebuke. This ability allows you to retaliate with damage during an enemy’s turn, using your reaction. Notably, Hellish Rebuke serves as a deterrent against enemy attacks without requiring an action or bonus action. Additionally, the Tiefling race also possesses access to this spell, allowing for dual usage to apply extra pressure when under attack.

However, a notable consideration with Hellish Rebuke is its reliance on a spell slot. This aspect becomes particularly relevant in the early stages of Baldur’s Gate 3, where spell slots are limited for the Warlock class. Therefore, exercise caution when deciding to utilize it, taking into account your available spell slots.
4 Cone of Cold

Cone of Cold features in Baldur’s Gate 3:
- Description: Make a flurry of frost, crisp air, and condensed snow crystals erupt from your hands.
- School: Evocation spell
- Cost: Action + Level 5 Spell Slot
- Range: 9-meter blast in cone shape
- Concentration: No
- Upcast: The damage is increased by 1d8 Cold for each Spell Slot Level above 5.
- Subclass: The Fiend only
What makes Cone of Cold an especially powerful Warlock class spell is its high damage in a 9-meter cone. This spell serves as a medium-range area blast of cold damage, and targets still take half damage on constitution saves. The user must be aware of their surroundings, and carefully aim this spell to avoid attacking friendly targets. The cone shape rather than a circular radius can make it easier to avoid friendly fire and land on your intended targets.
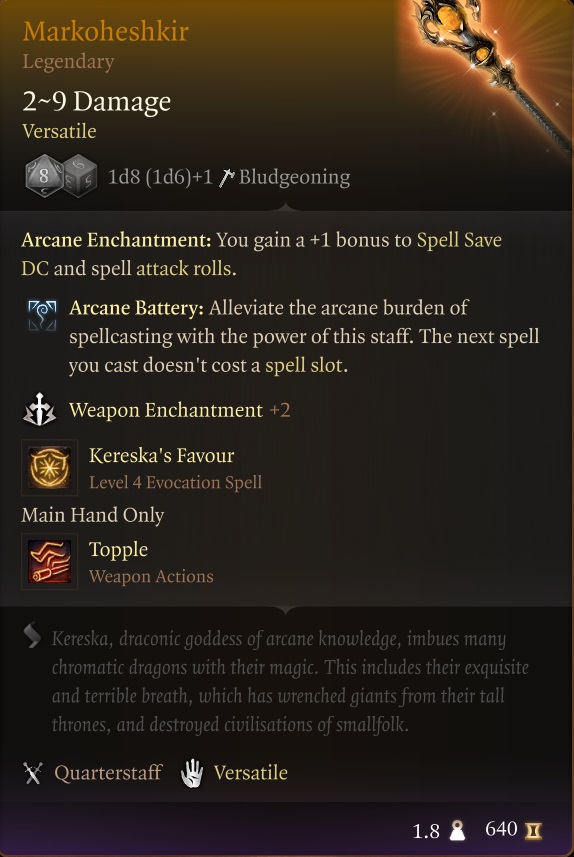
The Markoheshkir Legendary quarterstaff gives free usage of Cone of Cold via the Kereska’s Favour. This passive feature can be active to gain elemental resistance and additional spells of your particular element of choice. This can be useful to fill in missing gaps for elemental damage. Having powerful fire spells is great, but what happens when you encounter a fire-immune or resistant enemy? This spell and others from different elements are chosen for this reason, making them some of the best for the Warlock class in Baldur’s Gate 3.
3 Fireball

Fireball features in Baldur’s Gate 3:
- Description: Shoot a bright flame from your fingers that explodes upon contact, torching everything in the vicinity for 8d6 Fire damage.
- School: Evocation spell
- Cost: Action + Level 3 Spell Slot
- Range: 18 meters
- Concentration: No
- Upcast: When the spell is cast using a 4th level slot or higher, damage increases by 1d6 Fire for each spell slot level above 3.
- Subclass: All
The most effective area-based damage spell available to the Warlock is Fireball, distinguished by its fire elemental nature and extensive radius. This spell becomes accessible at level 5 and retains its potency through the ability to be upcast for increased damage output. To utilize Fireball effectively, it’s essential to position the spell radius carefully to avoid damaging allies. This strategic consideration is why we’ve rated Fireball as the third-best spell for the Warlock class in Baldur’s Gate 3.
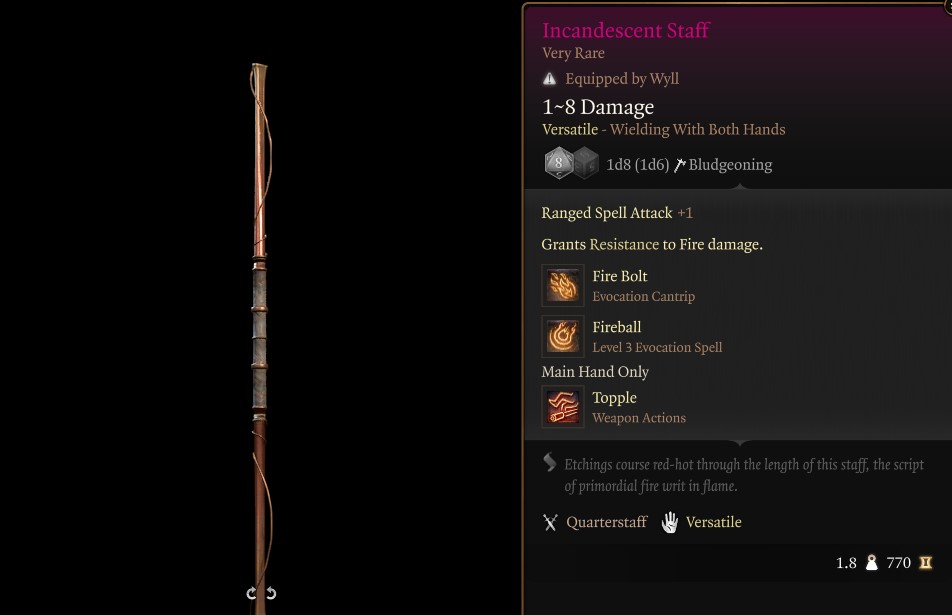
Two items can give the Warlock a once-per-long rest-free use of the Fireball Spell: Act 2 Incandescent Staff and Act 3 Markoheshkir Legendary quarterstaff. While some Warlocks chose different weapons, the Quarterstaff is perfect for a spell-casting build with shield proficiency.
Warlocks don’t come equipped with shield proficiency, however, this can be obtained using the Half-Elf or Human racial selection. Once equipped, you can combine the powerful quarterstaff spell granting items with a shield giving you extra Armour Class (AC). This combination blends the best of both worlds, a defensive-minded spell-casting Warlock with more spells at their disposal!
2 Circle of Death
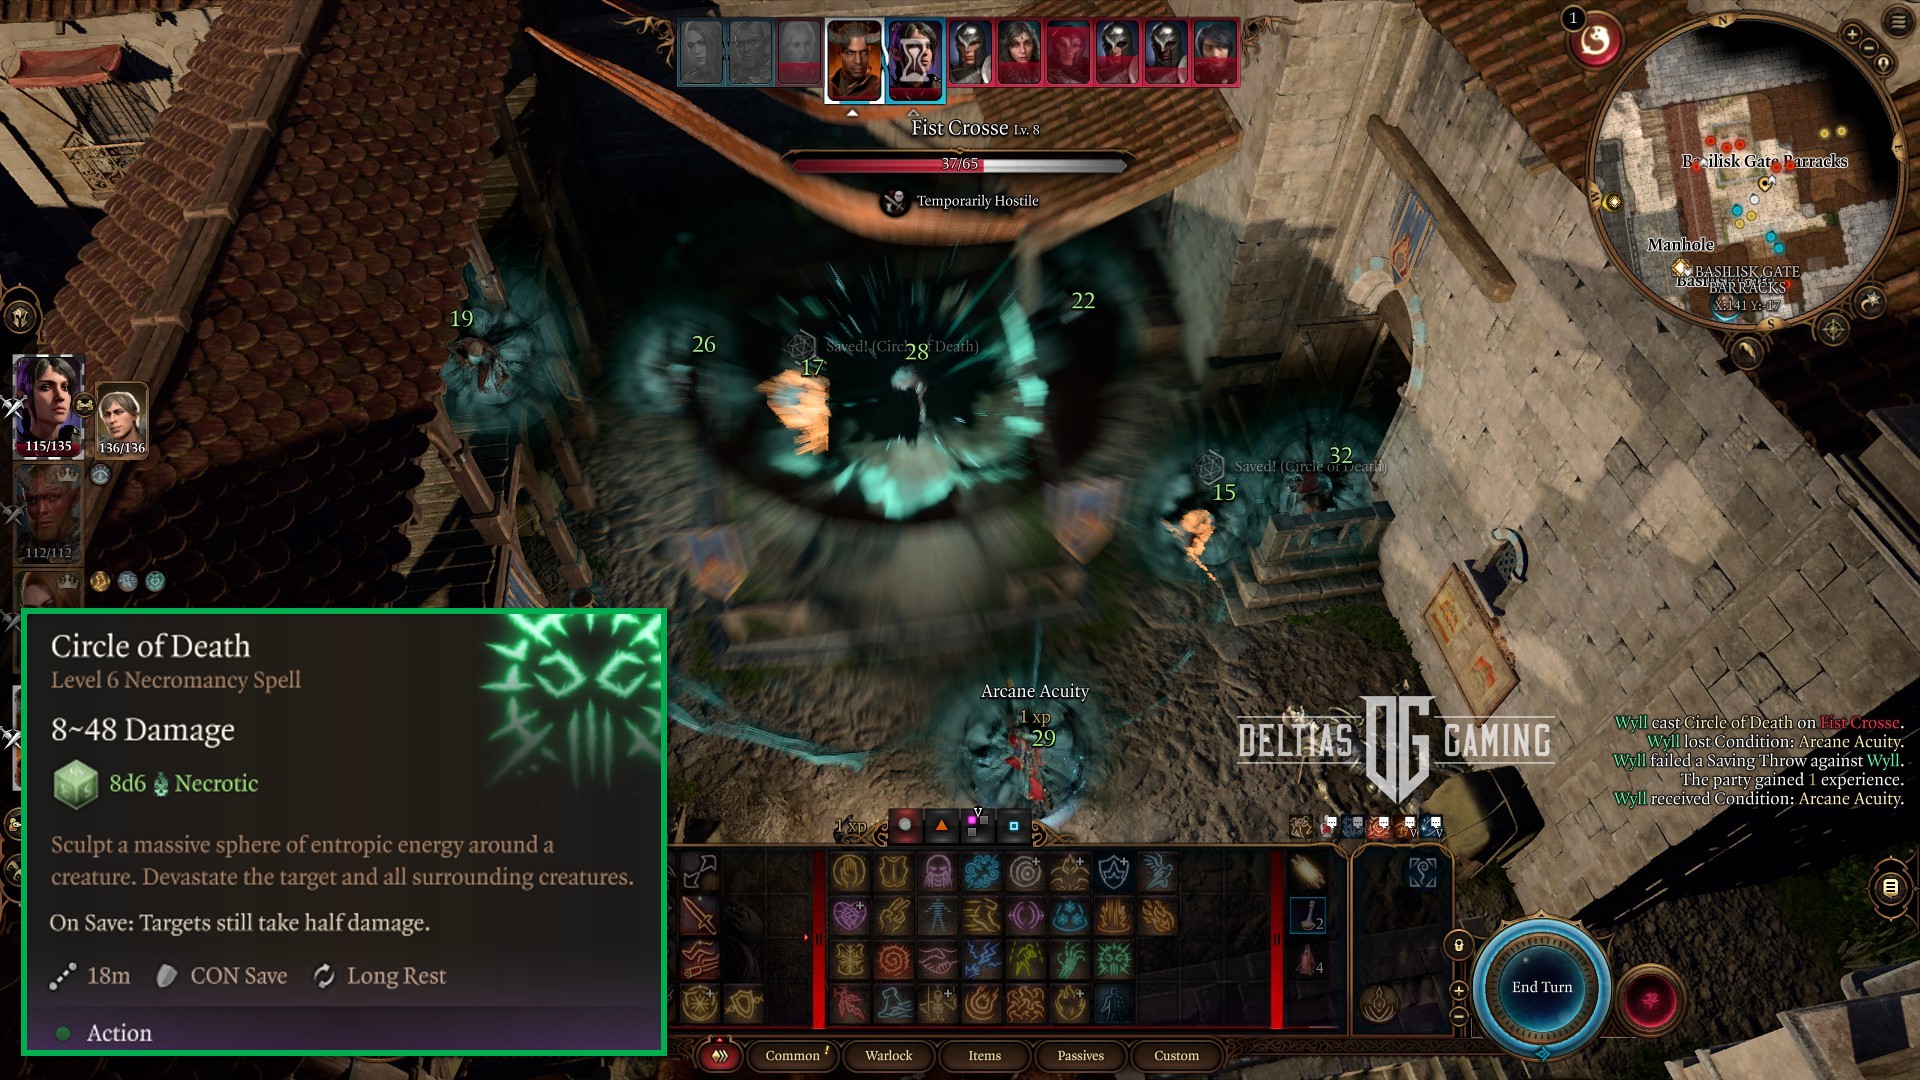
Circle of Death features in Baldur’s Gate 3:
- Description: Sculpt a massive sphere of entropic energy around a creature. Devastate the target and all surrounding creatures.
- School: Necromancy spell
- Cost: Action + Level 6 Spell Slot
- Range: 18 meters
- Concentration: Yes
- Upcast: No
- Subclass: All
The Circle of Death spell is underrated in the pantheon of end-game Baldur’s Gate 3 spells. You won’t unlock Circle of Death until level 11, and many powerful choices to choose from. However, the strength of Circle of Death is its sheer massive area of 9 meters, and you can cast this up to 18 meters away. This raw area power is hard to beat considering Fireball is only 4 meters. While the damage might be lower, you have a particular weapon in Act 3, that makes this one of the best in Baldur’s Gate 3.

The Staff of Cherished Necromancy not only gives a disadvantage to saving throws against Necromancy spells but absorbs life energy on kills allowing you to cast another necromancy spell for free! Essentially, when a target dies with a spell in combat, you gain a popup on your toolbar, and once active allow a free cast of a Necromancy spell. This is one way to get around the low level of spell slots on your Warlock and maintain high damage regardless of the rounds!
1 Eldritch Blast
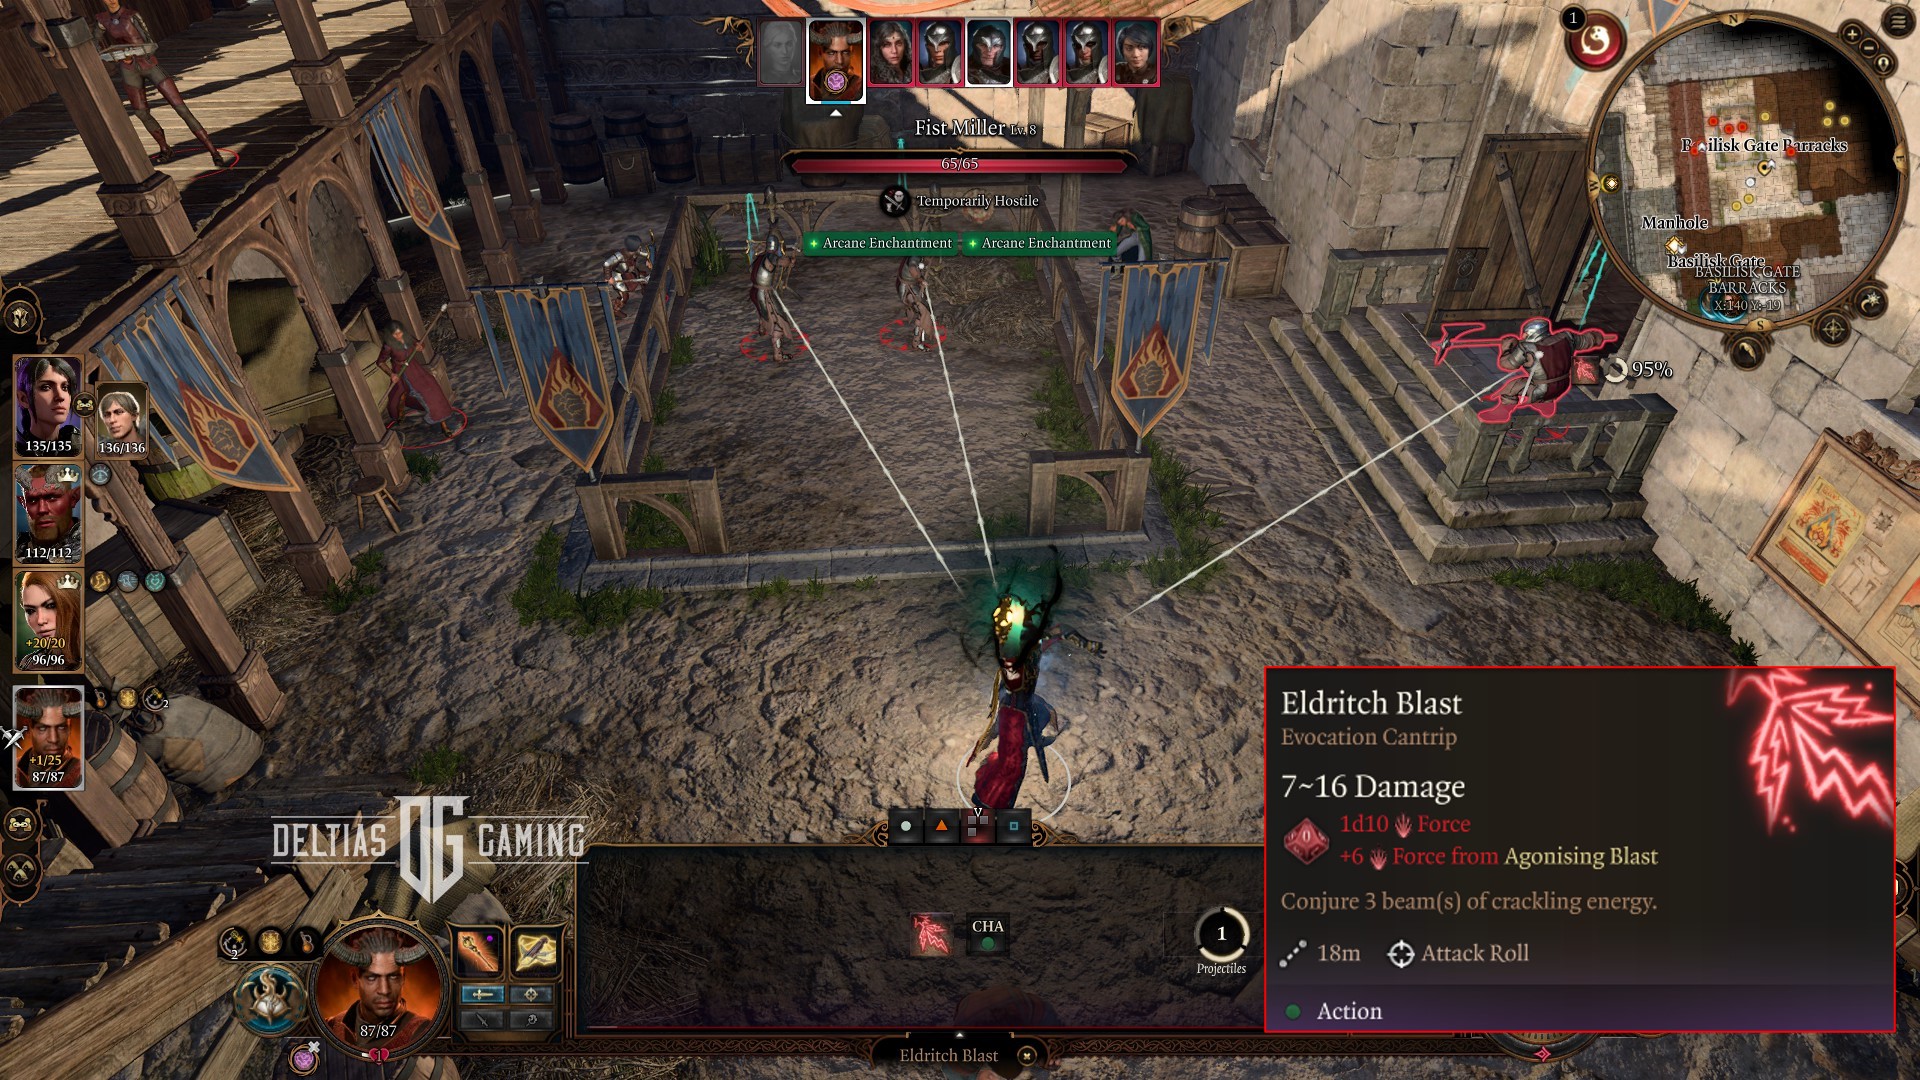
Eldritch Blast features in Baldur’s Gate 3:
- Description: Conjure a beam of crackling energy. Deals 1d10 Force damage to a target.
- School: Cantrip
- Cost: Action
- Range: 18 meters
- Concentration: No
- Upcast: The spell creates multiple beams at higher levels: 2 beams at Level 5 and 3 beams at Level 10. Moreover, you can either target a single creature or multiple creatures with the beams.
- Subclass: All
While not a spell, but a a cantrip, we consider Eldritch Blast the most powerful ability within the Warlock’s kit. What makes this cantrip so strong is it increases in effectiveness at higher levels, doesn’t cost a spell slot, and can be augmented with Eldritch Invocations for added effects. Below is Eldritch Blast Progression:
Eldritch Blast Progression
- Agonising Blast (level 2) – Add your Charisma modifier to the damage of each beam of Eldritch Blast.
- Repelling Blast (level 2) – When you hit a creature with Eldritch Blast, you can push the creature up to 4.5 meters.
- Eldritch Blast (level 5) – instead fires an additional beam, allowing you to attack two targets once or the same target twice.
- Eldritch Blast (level 10) – instead fires an additional beam, allowing you to attack three targets once or the same target thrice.
- Agonising Blast & Repelling Blast – are applied to every beam.
Now, combine the power of high force damage with Hex, and you get a powerful multi-kill spell that solves the Warlock’s biggest issue, lack of spell slots. However, it gets even better for the Warlock thanks to permanent bonuses and gear!
High Charisma Warlock Builds
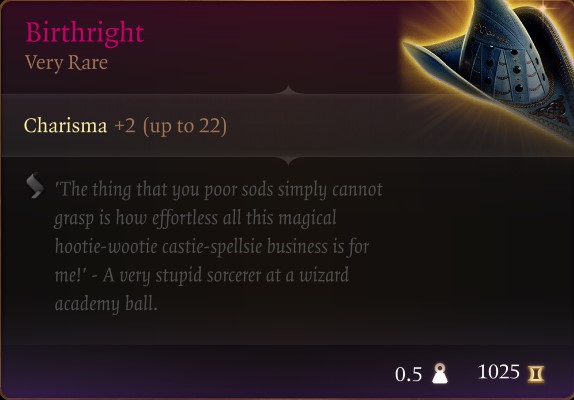

Using two feats, the Warlock can obtain 20 Charisma. You can push your Charisma higher with the Birthright helmet sold in Act 3. Lastly, the Mirror of Loss Shadowheart companion side quest gives you the ability to push Charisma even further with another +2. This gives you 24 Charisma or a +7 modifier. This high-level modifier combined with Act 2’s Potent Robe which adds 7 cantrip damage and 7 temporary hit points at the start of each turn.
In summary, the Warlock can achieve high levels of Charisma and when combined with the right gear sets, gains higher damage with cantrips and temporary hit points on each round. This gives the class a distinct advantage making a cantrip, the most powerful spell, and solving the biggest downside with the class. Thus, we rank Eldritch Blast combined with the Hex spell as the best combination for the Warlock class in Baldur’s Gate 3.
Looking For More About Baldur’s Gate 3?
Thank you for reading Baldur’s Gate 3: Best Spells for the Warlock Class Guide. We provide the latest news and create guides for Baldur’s Gate 3. Also, watch me play games on Twitch or visit my YouTube channel!