• Skip to main content
  • Skip to primary sidebar
  • Skip to footer

Deltia's Gaming

The best games, the best guides!

  • HOT 🔥Latest
    • One Bar Sorcerer Build
    • Destiny 2 Void Hunter PvE Build
    • ESO Stamina Dragonknight PvP Build
    • Destiny 2 Void Warlock PvE Build
    • Destiny 2 Solar Hunter PvE Build
    • Destiny 2 Arc Hunter PvE Build
  • Redfall
    • The Best Redfall Builds
    • Release Date
    • Will Redfall Launch on PlayStation? – All Redfall Platforms
    • All Redfall Weapons and Gear
    • Abilities Attributes and Heroes Customisation
    • What Are The Best Heroes – Strengths & Backgrounds Guide
    • Redfall Quests Walkthrough and Missions
    • Classes
    • Enemies
    • Redfall Overview
    • Redfall Gameplay and Trailers
    • Redfall Crossplay
    • Redfall Bite Back Edition
    • Redfall Game Pass
    • Redfall Pictures & Art
  • Guides
    • Destiny 2 Guides
      • Lightfall & Season 20
        • All Lightfall Legendary Weapons
        • All Lightfall Exotic Weapons & How to Get Them
        • All Strand Weapons & How to Get Them
        • Season 20 Weapons & How to Get Them
        • How to Get the Terminal Overload Keys
        • The Best War Table Upgrades
        • How to Complete Destiny 2 From Zero – Quest Guide
        • How to get The Revision Zero Catalyst
        • The Revision Zero how to get and unlock the weapon
        • How to Unlock Season 20 Artifact
        • New Origin Traits Season 20
        • Season Pass Rewards Season 20
        • New Seasonal Vendor Season 20
        • New Destiny 2 Lightfall Mods
        • Strand Warlock: Abilities, Aspects & Fragments
        • Strand Hunter: Abilities, Aspects & Fragments
        • Strand Titan: Abilities, Aspects & Fragments
        • All Destiny 2 Lightfall Editions Explained
        • "How to get Exotic Gear" Guides
          • Final Warning how to get and unlock the weapon
          • Winterbite how to get and unlock the weapon
          • Deterministic Chaos how to get and unlock the weapon
          • How to Get the Quicksilver Storm Exotic Catalyst
          • Cyrtarachne’s Facade how to get and unlock the Armor
          • Abeyant Leap how to get and unlock the Armor
          • Swarmers how to get and unlock the Armor
      • Root of Nightmares: Loot Table Raid
      • How to Get Vexcalibur Exotic Glaive
      • How to Unlock Strand Subclass
      • God Roll Weapons
      • Xur Locations Guide
      • Xur Guide
      • Beginner Guide
        • Gear & Weapon Mods
        • Weapon Crafting Guide
        • Legacy Exotics Guide
        • Armor Guide
        • Lost Sector Guide
        • Recommended Weapon Rolls
      • Iron Banner Guide
      • Returning Player Guide
      • How to Get ALL New IKELOS Weapons
      • How to Link Twitch and Bungie accounts
    • Hogwarts Legacy Guides
      • Which House should you choose
      • Hogwarts Legacy Houses
        • Hufflepuff
        • Slytherin
        • Ravenclaw
        • Gryffindor
      • Important Professors
        • Headmaster Phineas Nigellus Black
        • Professor Matilda Weasley
        • Professor Eleazar Fig
        • Professor Aesop Sharp
        • Professor Mirabel Garlick
        • Professor Dianah Hecat
        • Professor Abraham Ronen
      • Hogwarts Legacy Classes Guide
        • Classes – Beasts
        • Classes – Potions
        • Classes – Herbology
        • Classes – Charms
        • Classes – Defence Against the Dark Arts
        • Classes – Broomstick Flying
      • Can you be an evil Dark Wizard? Guide
      • How to Unlock and Enter Dark Arts Battle Arena
      • Max level & Talents Cap
      • Talents Guide
      • Quest Guides & Walkthrough
      • Merlin’s Trials & How to Increase Inventory Slots
      • Wand Guide and Customisation
      • How to unlock all Mounts
      • Fantastic Beasts Guide
      • Character Creation and Cosmetics Guide
      • How to Identify Gear Items Guide
      • Spells Guide
      • Plants Guide
      • How to change the Time of The Day?
      • Time Period
      • Combat Guide
      • How to Solve Puzzle Door?
    • ESO Guides
      • Jester’s Festival Guide
      • Character & Leveling
        • Complete Beginners Guide
        • Character Creation
        • Race Guide
        • Class Guides
          • Dragonknight
          • Nightblade
          • Templar
          • Sorcerer
        • Power Leveling & Grinding Guide
        • Skill Points Guide
        • Attribute Points Guide
        • Psijic Order Leveling Guide
        • Champion Points System
        • Champion Point Grinding Tips
      • Combat & Solo
        • How to Light Attack Weave
        • 5 Tips for Increasing Your DPS
        • What Tanks Should Know
        • Magicka DPS Gear Guide
        • SOLO Stamina Class Guide
        • SOLO Magicka Class Guide
      • PvP Guides
        • How to unlock Alliance War Skills
        • PvP Beginner Guide
        • PvP Campaigns, what to choose, CP or no-CP?
        • How to farm Alliance Points (AP)
        • How to farm Tel Var Stones
        • Cyrodiil guide for Beginners
        • Imperial City Guide for Beginners
        • Battlegrounds for Beginners
        • Battlegrounds objectives and strategies
        • Siege Guide
        • PvP Survival Tips
        • PvP Tips, Tricks and Hints
          • The best PvP Tips, Tricks and Hints
          • Best PvP Ultimates
          • How to “Stop a Ganker"
      • Crafting
        • Alchemy Potions & Recipes
        • Crafting Writs Guide
        • Master Crafting Writs
        • Fishing Guide
        • Crafting Trait Research Guide
      • ESO Tools
        • ESO Server Status
        • ESO Daily Endeavors Tool
        • ESO Golden Vendor
      • Tales of Tribute
        • Tales of Tribute Guide
        • Tales of Tribute Decks Guide
        • Tales of Tribute Strategies
        • Tales of Tribute Tutorial
      • Daily Routine Guides
        • Daily Priorities Guide
        • Daily Dungeon Guide
        • Undaunted Daily Pledges
        • Daily Job Brokers Guide
        • Daily Guild Quests Guide
        • Mount Training & Increase Speed
        • Daily Login Rewards
        • Endeavors Guide
      • Companions Guides
        • Full Companions Guide
        • Isobel Velois guide.
      • Addons, UI, and Keybinds
      • How to Link ESO Account to Twitch
      • How to Use the Public Test Server
  • ESO Builds
    • Beginner & Leveling PvE
      • Dragonknight
        • Magicka
        • Stamina
      • Nightblade
        • Magicka
        • Stamina
      • Sorcerer
        • Magicka
        • Stamina
      • Templar
        • Magicka
        • Stamina
      • Warden
        • Magicka
        • Stamina
      • Necromancer
        • Magicka
        • Stamina
    • Solo PvE
      • Dragonknight
        • Magicka
        • Stamina
      • Necromancer
        • Magicka
        • Stamina
      • Nightblade
        • Magicka
        • Stamina
      • Sorcerer
        • Magicka
        • Stamina
      • Templar
        • Magicka
        • Stamina
      • Warden
        • Magicka
        • Stamina
    • Group PvE
      • Dragonknight
        • Magicka DPS
        • Stamina DPS
        • Healer
        • Tank
      • Necromancer
        • Magicka DPS
        • Stamina DPS
        • Healer
        • Tank
      • Nightblade
        • Magicka DPS
        • Stamina DPS
        • Healer
        • Tank
      • Sorcerer
        • Magicka DPS
        • Stamina DPS
        • Healer
        • Tank
      • Templar
        • Magicka DPS
        • Stamina DPS
        • Healer
        • Tank
      • Warden
        • Magicka DPS
        • Stamina DPS
        • Healer
        • Tank
    • PvP
      • Dragonknight
        • Magicka
        • Stamina
        • Healer
      • Necromancer
        • Magicka
        • Stamina
        • Healer
      • Nightblade
        • Magicka
        • Stamina
        • Healer
      • Sorcerer
        • Stamina
        • Magicka
        • Healer
      • Templar
        • Magicka
        • Stamina
        • Healer
      • Warden
        • Magicka
        • Stamina
        • Healer
    • One Bar PvE
      • Dragonknight
        • DPS
        • Healer
        • Tank
      • Nightblade
        • DPS
        • Healer
        • Tank
      • Sorcerer
        • DPS
        • Healer
        • Tank
      • Templar
        • DPS
        • Healer
        • Tank
      • Warden
        • DPS
        • Healer
        • Tank
      • Necromancer
        • DPS
        • Healer
        • Tank
    • One Bar PvP
      • Dragonknight
        • Magica DPS
        • Stamina DPS
        • Healer
        • Tank
      • Nightblade
        • Magica DPS
        • Stamina DPS
        • Healer
        • Tank
      • Sorcerer
        • Magica DPS
        • Stamina DPS
        • Healer
        • Tank
      • Templar
        • Magica DPS
        • Stamina DPS
        • Healer
        • Tank
      • Warden
        • Magica DPS
        • Stamina DPS
        • Healer
        • Tank
      • Necromancer
        • Magica DPS
        • Stamina DPS
        • Healer
        • Tank
    • Companion Builds
      • Azandar Al-Cybiades
        • Ranged DPS builds
        • Melee DPS builds
        • Healer build
        • Tank build
      • Sharp-As-Night
        • Ranged DPS builds
        • Melee DPS builds
        • Healer build
        • Tank build
      • Ember
        • Ranged DPS builds
        • Melee DPS builds
        • Healer build
        • Tank build
      • Isobel Velois
        • Ranged DPS builds
        • Melee DPS builds
        • Healer build
        • Tank build
      • Mirri Elendis
        • Ranged DPS builds
        • Melee DPS builds
        • Healer build
        • Tank build
      • Bastian Hallix
        • Ranged DPS builds
        • Melee DPS builds
        • Healer build
        • Tank build
  • Destiny 2 Builds
    • Solo
      • Hunter
        • Arc Hunter
        • Solar Hunter
        • Stasis Hunter
        • Strand Hunter
        • Void Hunter
      • Titan
        • Arc Titan
        • Solar Titan
        • Stasis Titan
        • Strand Titan
        • Void Titan
      • Warlock
        • Arc Warlock
        • Solar Warlock
        • Stasis Warlock
        • Strand Warlock
        • Void Warlock
    • PvE
      • Hunter
        • Arc Hunter
        • Solar Hunter
        • Stasis Hunter
        • Strand Hunter
        • Void Hunter
      • Titan
        • Arc Titan
        • Solar Titan
        • Stasis Titan
        • Strand Titan
        • Void Titan
      • Warlock
        • Arc Warlock
        • Solar Warlock
        • Stasis Warlock
        • Strand Warlock
        • Void Warlock
    • PvP
      • Hunter
        • Arc Hunter
        • Solar Hunter
        • Stasis Hunter
        • Strand Hunter
        • Void Hunter
      • Titan
        • Arc Titan
        • Solar Titan
        • Stasis Titan
        • Strand Titan
        • Void Titan
      • Warlock
        • Arc Warlock
        • Solar Warlock
        • Stasis Warlock
        • Strand Warlock
        • Void Warlock
  • Hogwarts Legacy Builds
    • Plant & Cabbage Build
    • Dark Arts Build
    • Spell Build
    • Stealth Build
    • Protego Build
    • Ancient Magic Build
    • Fire Build
  • Contact
    • Support
    • Streaming Setup

Feb 22 2023

Hogwarts Legacy – The Helm of Urtkot Quest

Welcome to our guide for Hogwarts Legacy – The Helm of Urtkot Quest! Hogwarts Legacy is a highly anticipated single player, action RPG with an endless amount of places to explore and magical spells to learn! Read on below to follow this Hogwarts Legacy quest!

Last updated February 22, 2023 – Added table of contents, clarified/simplified text instructions

Table of Contents

  • The Helm of Urtkot Quest
    • Meetings in Hogsmeade
    • Witch’s Tomb
      • Puzzle Room #1
      • Puzzle Room #2
      • Puzzle Room #3
      • Witch’s Final Resting Place
  • Top Hogwarts Legacy Articles:

The Helm of Urtkot Quest

Meetings in Hogsmeade

  • Speak to Sirona in the Three Broomsticks
    • Fast travel to Hogsmeade and follow the quest marker
    • She’ll give you information to help find her friend Lodgok
  • Look for Lodgok at the Hog’s Head Inn
    • Best to mention that Sirona trusts you
    • Agree to retrieve the relic in order to find out Ranrok’s plans
  • Meet Lodgok near the witch’s tomb
    • The location isn’t too far from Hogsmeade, just follow the quest marker trail on your mini map
  • Follow Lodgok to the tomb’s entrance
    • Along the way, Lodgok will share that the relic is called the Helm of Urtkot
    • The rest of the way is a bit of a walk. Feel free to sprint, Lodgok should also pick up his pace
    • Lodgok will stay outside the tomb while you go inside. You can talk to him if you have any further questions

Witch’s Tomb

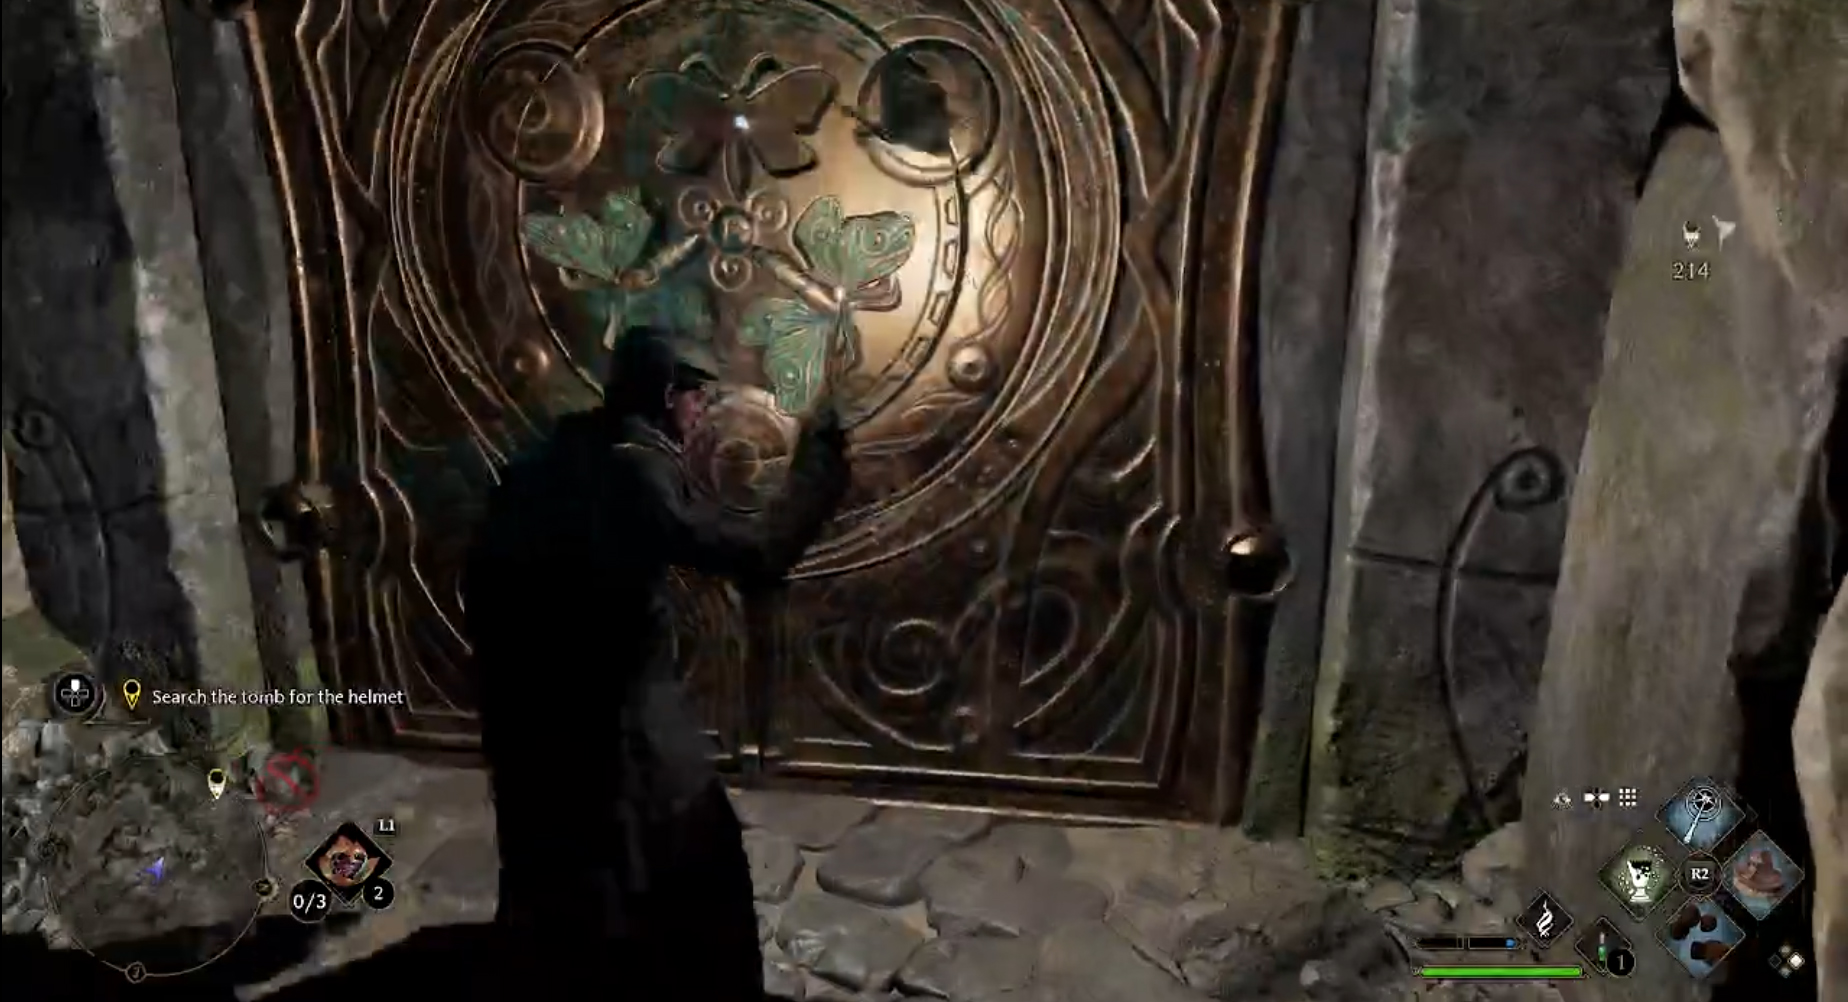
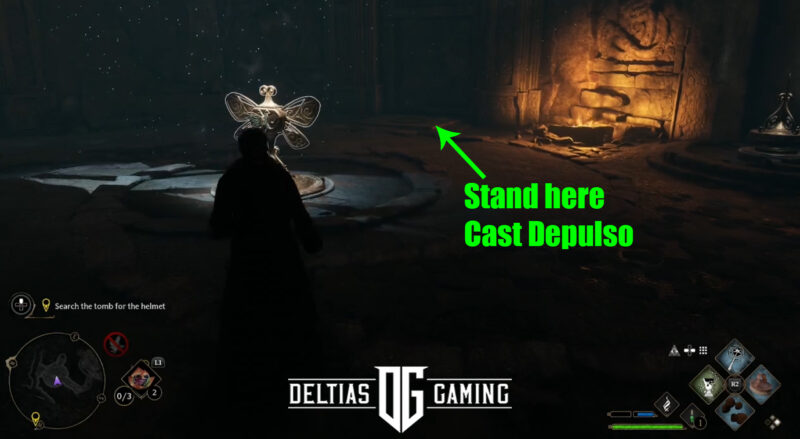
  • Search the tomb for the helmet
    • Step inside the tomb and move down the passageway
    • You’ll reach a sealed door
    • Head to the left and you’ll find a fluttering moth. Stand near it and cast Lumos to get it to follow your wand and take it back to the door. Cancel the spell and it will fill a section with a missing moth and the door will open

Hogwarts Legacy - The Helm of Urtkot moth door

  • The next room has some gold in an alcove on the right and a chest in an alcove on the left
    • After grabbing these items, move forward down the passageway
  • Puzzle Room #1
    • This circular room looks like it has a sarcophagus in the middle, but it’s not the witch’s tomb. However, it goes have two sets of doors to open.
    • The center doors are another pair of sealed moth doors. You can find two of the needed moths right there in the circular room. Cast Lumos next to each and take them over to the doors.
    • The doors on the right are broken and rattling. You can blast these doors open and find the third moth inside. Open the nearby chest first, and then cast Lumos and take it over to break the seal and open the doors
  • Crypt keepers
    • Move towards the next room and as you enter, skeleton enemies will rise up to stop you.
    • These Inferius are particularly vulnerable to fire. Use Incendio as often as possible and you can also throw nearby barrels at them, as well.
    • Once defeated, you can search the area for items and gold, Of particular note is a chest up high in the back left-hand corner of the room (from the door you entered from). No fancy magics needed to get through it, you can jump and climb up.
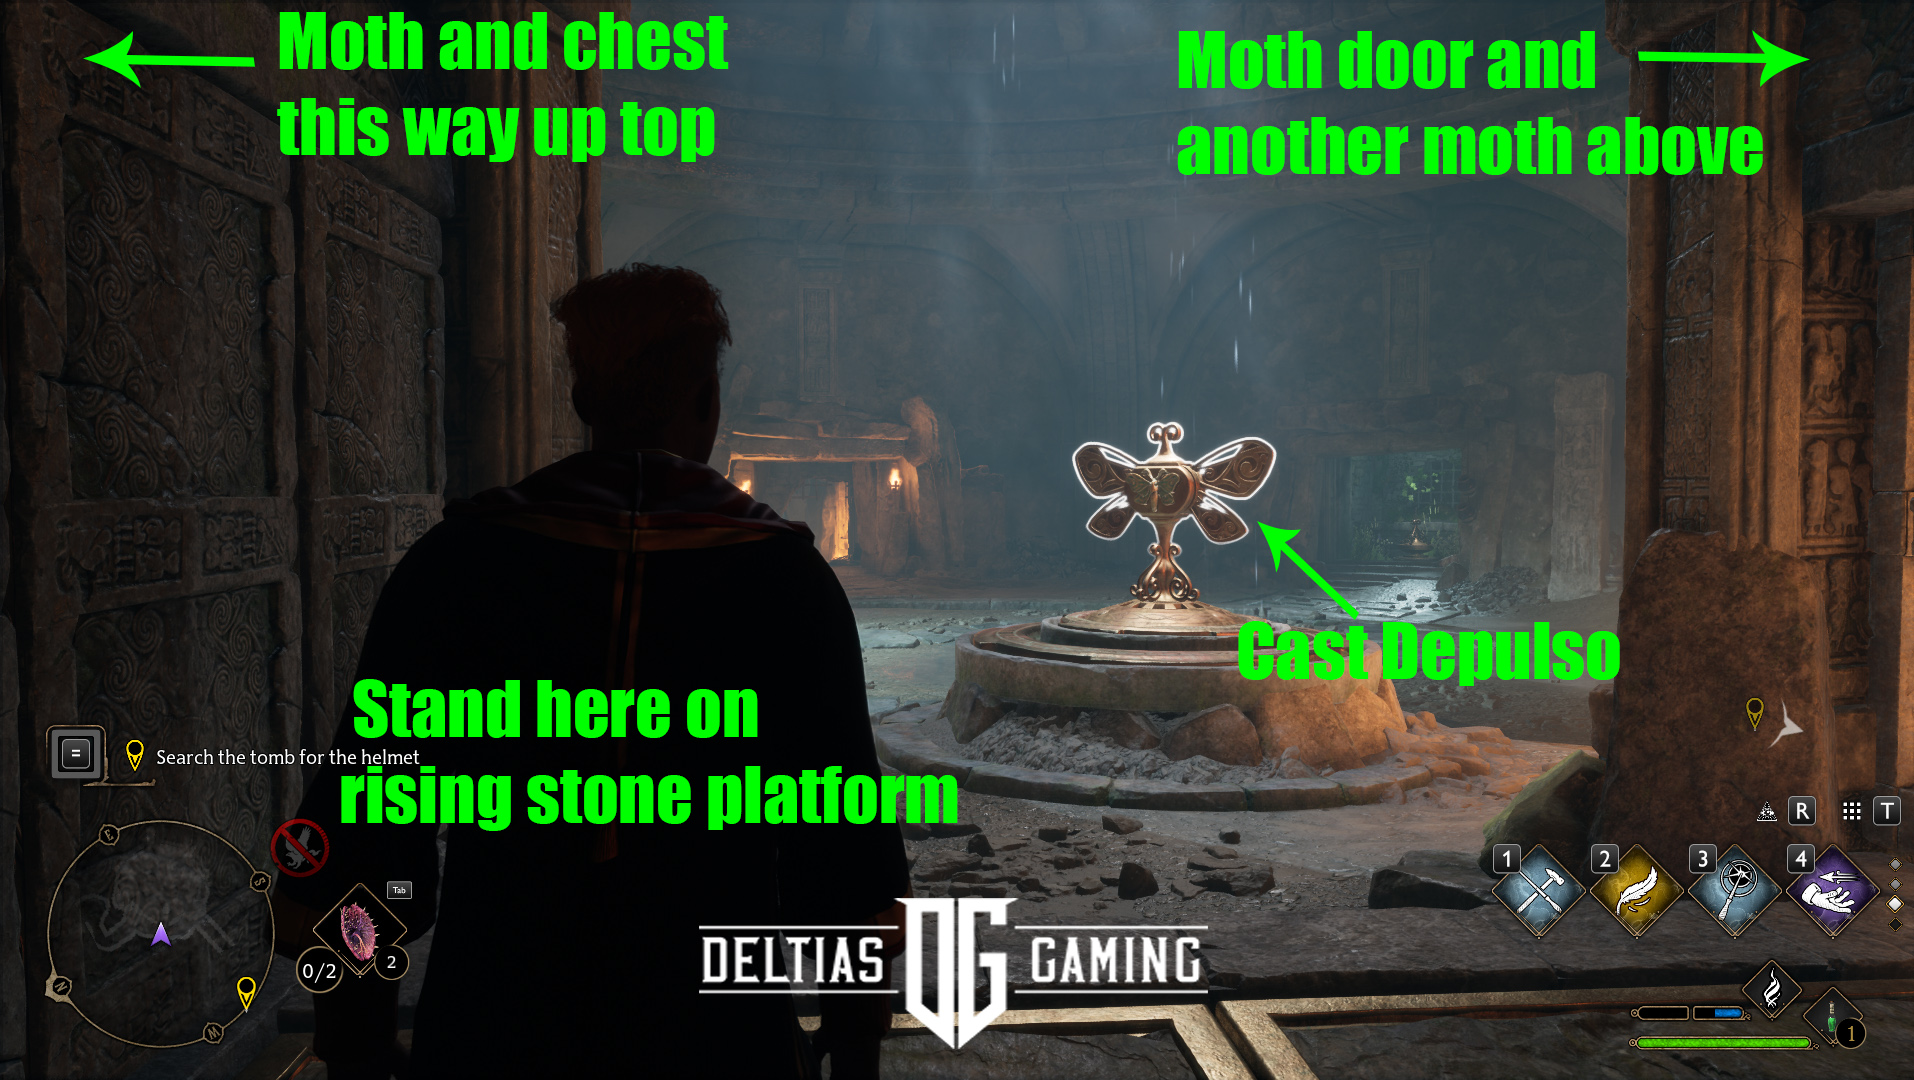
  • Puzzle Room #2
    • Down the passage leads to another moth door. This room also has a central pedestal feature which also has moth indentations.
    • There are two available moths in the room – one on either side. Cast Lumos and bring one over to the central pedestal.
  • Hogwarts Legacy - The Helm of Urtkot moth pedestal
    • Once the moth is in place, stand on the stone platform and hit the pedestal with the Depulso spell. It will turn, and the stone platform you’re standing on will rise up. Climb up the ledge it rises to, and use Lumos to get this third moth and take it to the door.
    • Now go back to the pedestal and retrieve this moth (and then the other one in the alcove) and take them each to the set of doors.
  • Farther in
    • Down this passage leads to another circular room, this time with another set of rattling doors as well as a load of crates hanging from the ceiling above.
    • A hit with the Depulso spell will burst the doors open and you can find a basic crate inside. Climb up on the crate and jump up again to find a chest on a high ledge.
    • Jump back down and move down the wall to the right. Pull the crate towards you with Accio and you can climb and jump up again for another chest.
    • Return to the circular room and hit the load of crates with the Depulso spell. It will come crashing down, breaking through the floor below. You’ll have to jump in.
  • Crypt Keepers #2
    • Come up out of the water and into another open area. As you move farther in more Inferius enemies appear. This fight should be similar to the one before.
  • Puzzle Room #3

Hogwarts Legacy - The Helm of Urtkot puzzle room 3

    • When the fight is over and you have a chance to look around, you’ll see another moth pedestal and two moths waiting to be moved.
    • Grab one moth and take it over to the pedestal. Once in place, move behind the pedestal, where you will see stone platforms in the floor. Like before, stand in place and hit the pedestal with Depulso. You’ll need to do this repeatedly to get the platform all the way to the top.
    • The platform will rise and to the left (from your position facing the pedestal) you can climb up to get another moth on the ledge. But don’t immediately grab the moth. There is a pathway here that leads you to two more chests.
    • After you loot, come back to where the moth is. From above, hit the pedestal with Depulso multiple times in order to raise the platform. The quickly grab the moth with Lumos and hurry across to reach the sealed doors and release your moth.
    • Between the door and the jump you just made, there is an alcove with another moth inside. Cast Lumos and take that moth to the door as well.
    • Now, jump back down to the ground. Go to the second alcove and grab the last moth. Take it over to an empty perch – this will be in the area to the left of the pedestal and at the end of the upper ledge. Release the moth.
    • Go back to the rising platform, stand on it and hit Depulso. Step onto the ledge where the door is. At the far end, you may still be able to see that hitting the pedestal not only raises the platform, but also rasies this moth perch. If you need to, hit the pedestal with Depulso again from up above. Then grab the moth with Lumos as it rises up to you.
    • Place the final moth in the door and it will unseal.
  • Witch’s Final Resting Place
    • Unfortunately, as you move forward you see that the tomb has already been looted
    • Interact with the doorway behind the sarcophagus to exit
  • Speak with Lodgok
    • He will tell you there is an Ashwinder camp nearby and you must get the helmet back from them
  • Recover the helmet from the thieves
    • Hop on your broom if you have one to make quick work of the distance to camp.
    • You can try flying over their heads and directly to the chest they have the helmet in. It’s in a tent at the very back of the camp. If you do it fast enough you can be back on your broom and fly away again before taking a hit.
    • But what’s the fun in skipping combat? You can take these jerks and get some experience points along the way.
  • Return the helmet to Lodgok
    • Follow the quest marker and return to the waiting goblin


Next Quest – In the Shadow of the Estate

Previous Quest – The Caretaker’s Lunar Lament


Thanks for following our guide for Hogwarts Legacy – The Helm of Urtkot Quest! We’ll be posting walkthroughs, guides, combat builds and more for Hogwarts Legacy, so keep your eyes out for more! Deltia will also be streaming the game at launch – you can watch him at https://www.twitch.tv/deltiasgaming

Top Hogwarts Legacy Articles:

  • Hogwarts Legacy Builds
  • Hogwarts Legacy Quest Walkthroughs
  • All Spells in Hogwarts Legacy
  • Hogwarts Legacy Full Talent Guide
  • Unlock all the Mounts in Hogwarts Legacy

Written by Jeanstarwind · Categorized: Hogwarts Legacy, Hogwarts Legacy Quests Walkthrough, RPG Games, Single Player Games · Tagged: AvalancheSoftware studio, Deltia, Deltias Gaming, deltiasgaming, Harry Potter, Hogwarts, Hogwarts Legacy, Hogwarts Legacy AvalancheSoftware, hogwarts legacy channel, hogwarts legacy characters, Hogwarts Legacy Gameplay, hogwarts legacy gameplay showcase, Hogwarts Legacy Harry Potter, hogwarts legacy news, Hogwarts Legacy RPG, Nintendo Switch, pc, PS4, PS5, Rewards, RPG, Wand, Wand Ceremony, WB Games, Wizarding World, xbox one, xbox series x, Xbox Series X/S

Primary Sidebar

Youtube Channel

Deltia's Gaming

Deltiasgaming the player & coach simple writing guides for RPGs & MMOs. Our goal is to give you the information needed, to enjoy your favorite games, without having to spend countless hours. The best games, the best guides.

Deltia's Gaming
With 100k gold, I was able to complete trifecta Veteran Vateshran Hollow, the latest DLC dungeons and trials.  This guide walks you through the gear, skills, passives and more.  

Important Links
Written Build: https://deltiasgaming.com/builds/eso-solo-nightblade-magicka-build-for-pve/
Tamriel Trade Center: https://www.tamrieltradecentre.com/
Race Guide: https://deltiasgaming.com/eso-race-guide/
Complete Beginners Guide: https://youtu.be/lcbfj92Mdb8
ESO Builds: https://deltiasgaming.com/build_type/eso-beginner-build/
Champion Points Guide: https://deltiasgaming.com/eso-champion-point-system-guide/
UI and Addons Video: https://www.youtube.com/watch?v=btYXcWA3_Mw
Daily Priorities Guide: https://deltiasgaming.com/eso-daily-priorities-guide/
Addons, UI and Keybind changes: https://deltiasgaming.com/addons-ui-and-keybinds-guide-for-eso-2022/

💜 Twitch: https://www.twitch.tv/deltiasgaming
❤️ Patreon be in the ending credits: https://www.patreon.com/deltiasgaming
🔵 Follow me on Twitter https://twitter.com/Deltiasgaming1 
✔️ Check out our Website:  https://www.deltiasgaming.com/ 

Timestamps
0:00 Intro
0:40 Sets
3:00 TTC
4:27 Parse
10:48 Skills
19:35 Rotation
21:47 Champion Points
24:02 Gameplay
30:13 Outro

🎥PRODUCT LINKS (Commission Earned)
My Streaming Setup https://deltiasgaming.com/deltias-gaming-streaming-setup 

Deltiasgaming the MMO and RPG player & coach writes guides for MMO, MMORPGs,  RPGs, focusing on walkthroughs, hints, tricks, builds, news and guides 

#eso  #theelderscrollsonline #deltiasgaming 

Description Tags
ESO,Elder Scrolls Online,MMORPG,ESO Builds,elder scrolls online,eso,teso,eso gameplay,the elder scrolls online,eso builds,deltiasgaming,deltia,deltia's gaming,nightblade,necromancer,sorcerer,warden,eso pve,eso pve build,ESO PvE,elder scrolls,eso guide,teso trials,eso beginner,eso beginner tips,eso beginner guides,eso beginner guide,eso beginner tips and tricks,eso new player guide,eso nightblade,eso nightblade guide,eso class guide,nightblade eso
Load More... Subscribe

Latest Post

Gates of Oblivion: DLC Bundle

ESO Builds Update 37 Scribes of Fate

Jedi Survivor Cal Kestis and BD-1 vista

Star Wars Jedi: Survivor Quest Guides

Jedi Survivor Cal and BD-1 discover a mystery

Star Wars Jedi: Survivor Trailers

UESP.net


We are proud to partner with the Unofficial Elder Scrolls Pages (UESP) for some of our content. Check out their ESO Build Editor or support them through Patreon.

Footer

Logo

Deltia’s Gaming is your home for the best games & the best guilds. builds, Guides and walthroughs for your favorite video games daily!

  • Address : Deltia's Gaming, LLC, PO Box 460721, Papillion, NE 68046
  • Email : info@deltiasgaming.com
Follow us

Privacy

Deltia's Gaming Privacy Policy.

WATCH LIVE

Copyright © 2023 · Deltias Gaming · Log in