Facebook
 Reddit
 Email
Email
In Baldur’s Gate 3, Balduran’s Giantslayer is a must-have Legendary Greatsword you can acquire in Act 3 – this short Guide explains everything you need to know about Balduran’s Giantslayer in BG3.

Baldur’s Gate 3 is filled with legendary weapons, but few are as iconic and powerful as Balduran’s Giantslayer, a weapon with a storied history and the power to defeat even the mightiest of foes. As the name suggests, this massive weapon was once wielded by the legendary Balduran himself, a hero renowned for his battle against giants. In this guide, we’ll explore Balduran’s Giantslayer, how to acquire it, and tips for using it effectively in Baldur’s Gate 3.
What is Balduran’s Giantslayer in BG3?
In Baldur’s Gate 3, the Balduran’s Giantslayer is one of the best martial weapons in the game and something you’ll want to get for martial classes like the Paladin, Fighter, and Barbarian. Depending on how you play through Act 3 it likely won’t be available until late in the game, but you shouldn’t skip it.
The Giant Form special ability allows you to grow in size, and your weapons deal an additional 1d6 damage, and you gain 27 Temporary Hit Points and Advantage on Strength Checks and Saving Throws. Combine the Giant Form with an Elixir of Cloud Giant Strength, and you are a walking juggernaut in BG3. And if you go up against a massive-sized monster, you get an advantage against them via Giant Slayer.
Related:
Balduran’s Giantslayer Abilities and Effects
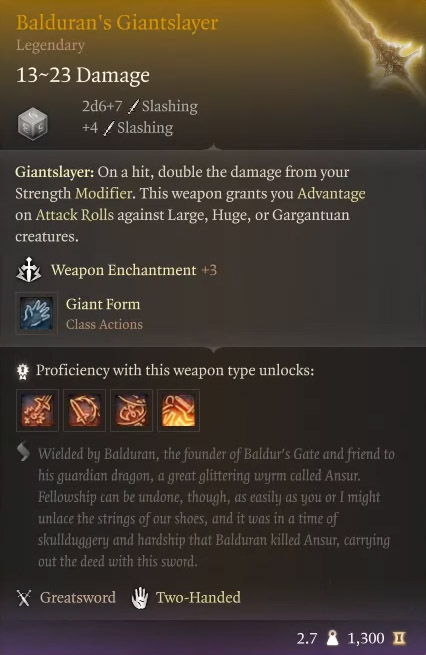
Below are all the features, abilities, and effects of Balduran’s Giantslayer in Baldur’s Gate 3:
- Weapon Type: Greatsword
- Damage: 2d6+7 Slashing and +4 Slashing
- Requirements: Martial Weapons or Greatsword Proficiency
- Rarity: Legendary
- Location: Completing the Wrymway Trials and defeating a boss, Act 3
- Weight: 2.7 kg
- Value: 1,300
- Bonuses:
- Giantslayer: On a hit, double the damage from your Strength Modifier. This weapon grants you Advantage on Attack Rolls against Large, Huge or Gargantuan creatures.
- Giant Form: Grow to a fearsome size. Your weapons deal an additional 1d6 damage and you gain 27 Temporary Hit Points and Advantage on Strength Checks and Saving Throws.
- Topple the Big Folk: Deal additional damage equal to your Proficiency Bonus. On a hit, Large, Huge, or Gargantuan creatures take an additional 2-12 Slashing damage and must succeed in a Strength Saving Throw or fall prone.
- Classes with Martial Weapons Proficiency: Barbarian, Fighter, Paladin, and Ranger
- Races with Greatsword Proficiency: Githyanki
- Companions Who Can Use This Weapon: Shadowheart, Lae’zel, Minthara, Minsc
NOTE: Potential spoilers for Act 3 below.
How to Get the Baldurran’s Giantslayer in BG3? Explained
To get the Baldurran’s Giantslayer Greatsword, locate the Dragon Sanctum within the Wyrm’s Rock Prison. From here, you will need to solve various puzzles explained in this guide Wrymway Trials guide in Act 3. Here is a quick breakdown of how to find and solve the Wrymway Trials:
- Locate the Wrym’s Rock Prison, accessed either via the Passageway next to Wrym’s Rock waypoint or through the crack in the wall outside the Fortress on the east side
- Find the wall with the Dragon Head torches. Light them with Lightning, not Fire.
- Chamber of Courage – Hold the torch and stay alive for 4 turns.
- Chamber of Strategy – Blast the Black King Piece with Lightning.
- Chamber of Insight – Shoot Suelto at the end of the path.
- Chamber of Justice – Cleanse shadow with Remove Curse. Place ‘The Cell’ painting into the Empty Niche.
- Enter the large double doors to the Dragon’s Sanctum.
Entering Wrym’s Rock Prison

The first step to acquiring the Baldur’s Greatsword is entering the Wyrm’s Rock prison via a small door in the main hallway. Simply head north from Rivington, at the start of Act 3, and enter. Depending on your dealings with Gortash, a fight might ensue immediately so be prepared.
Wyrmway Trials Entrance
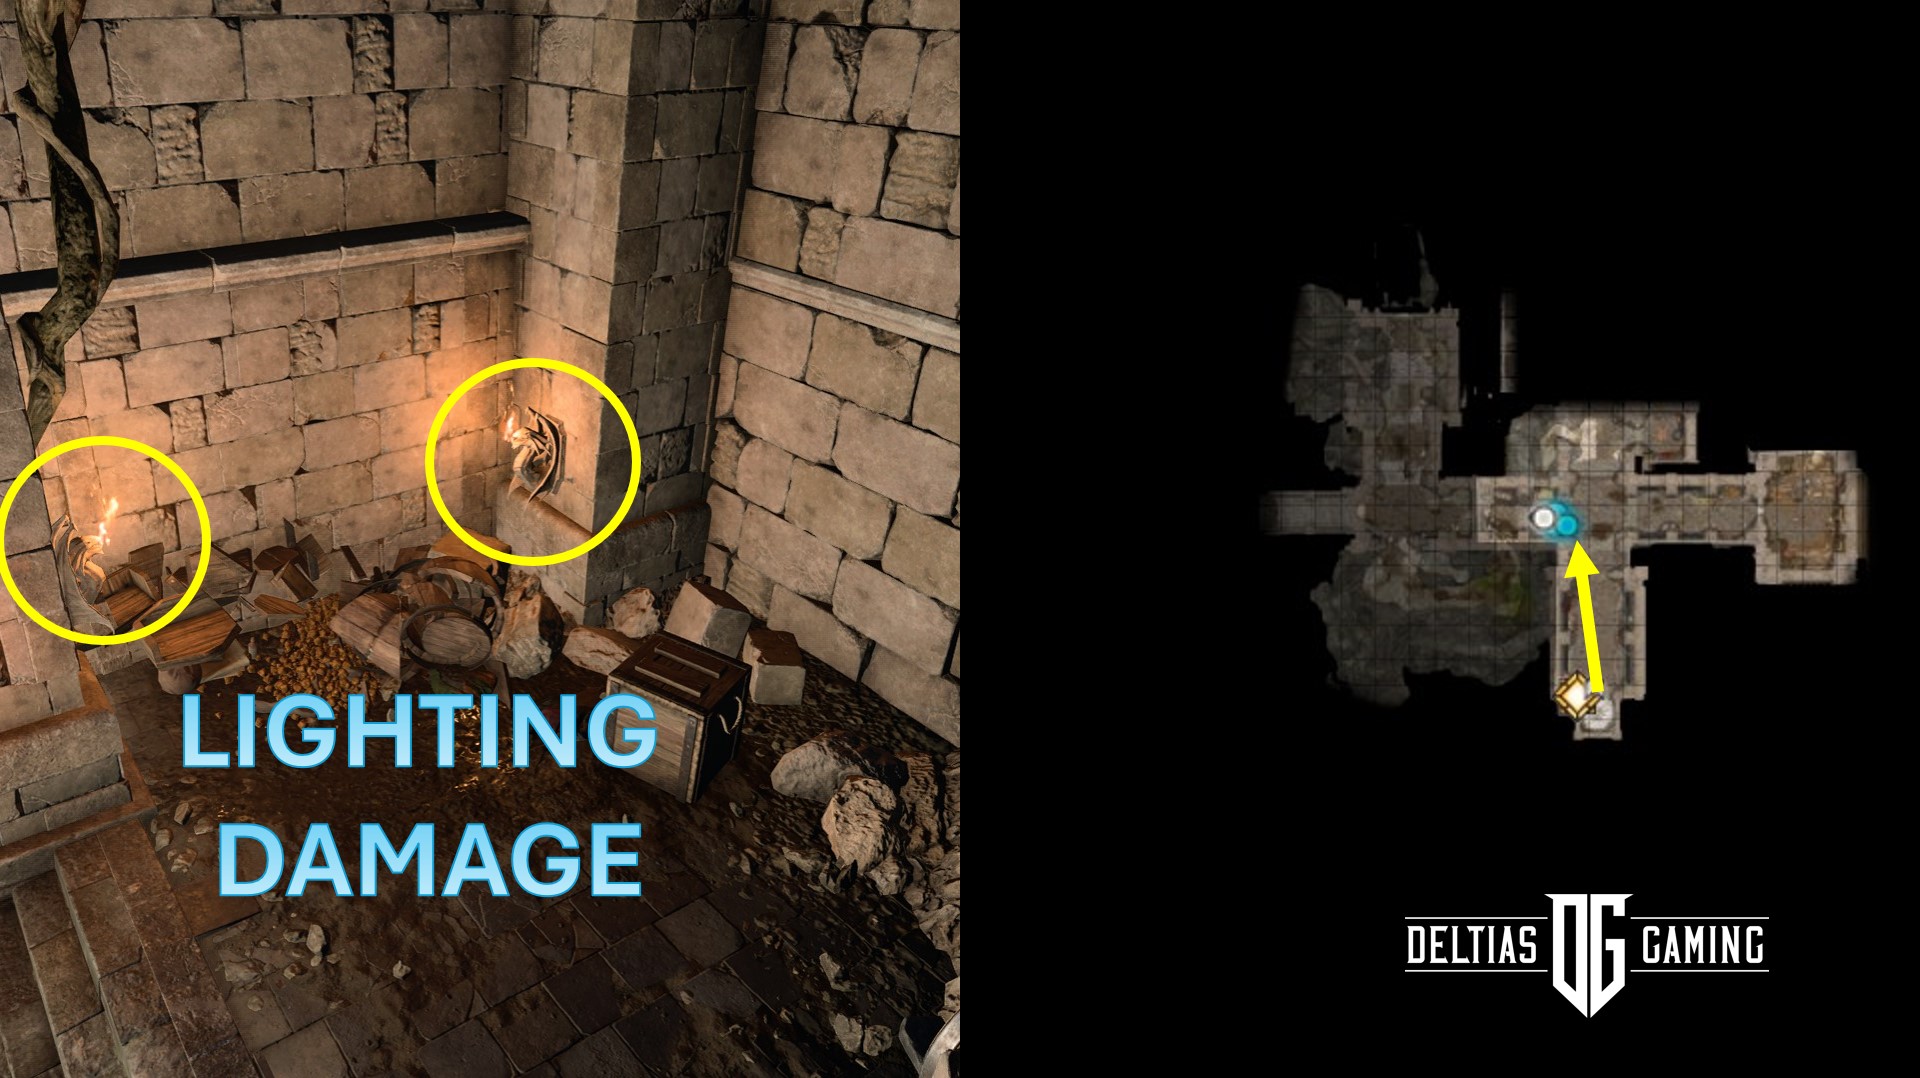
After you’ve entered the prison area, move forward and left to find two dragon-looking pillars. You simply need to hit them both with lighting damage. This can be lighting arrows, Shock cantrip, or any spell. You need to do this roughly in a few seconds. Once completed, the hidden door will open and allow you to move through.
Wyrmway Trials
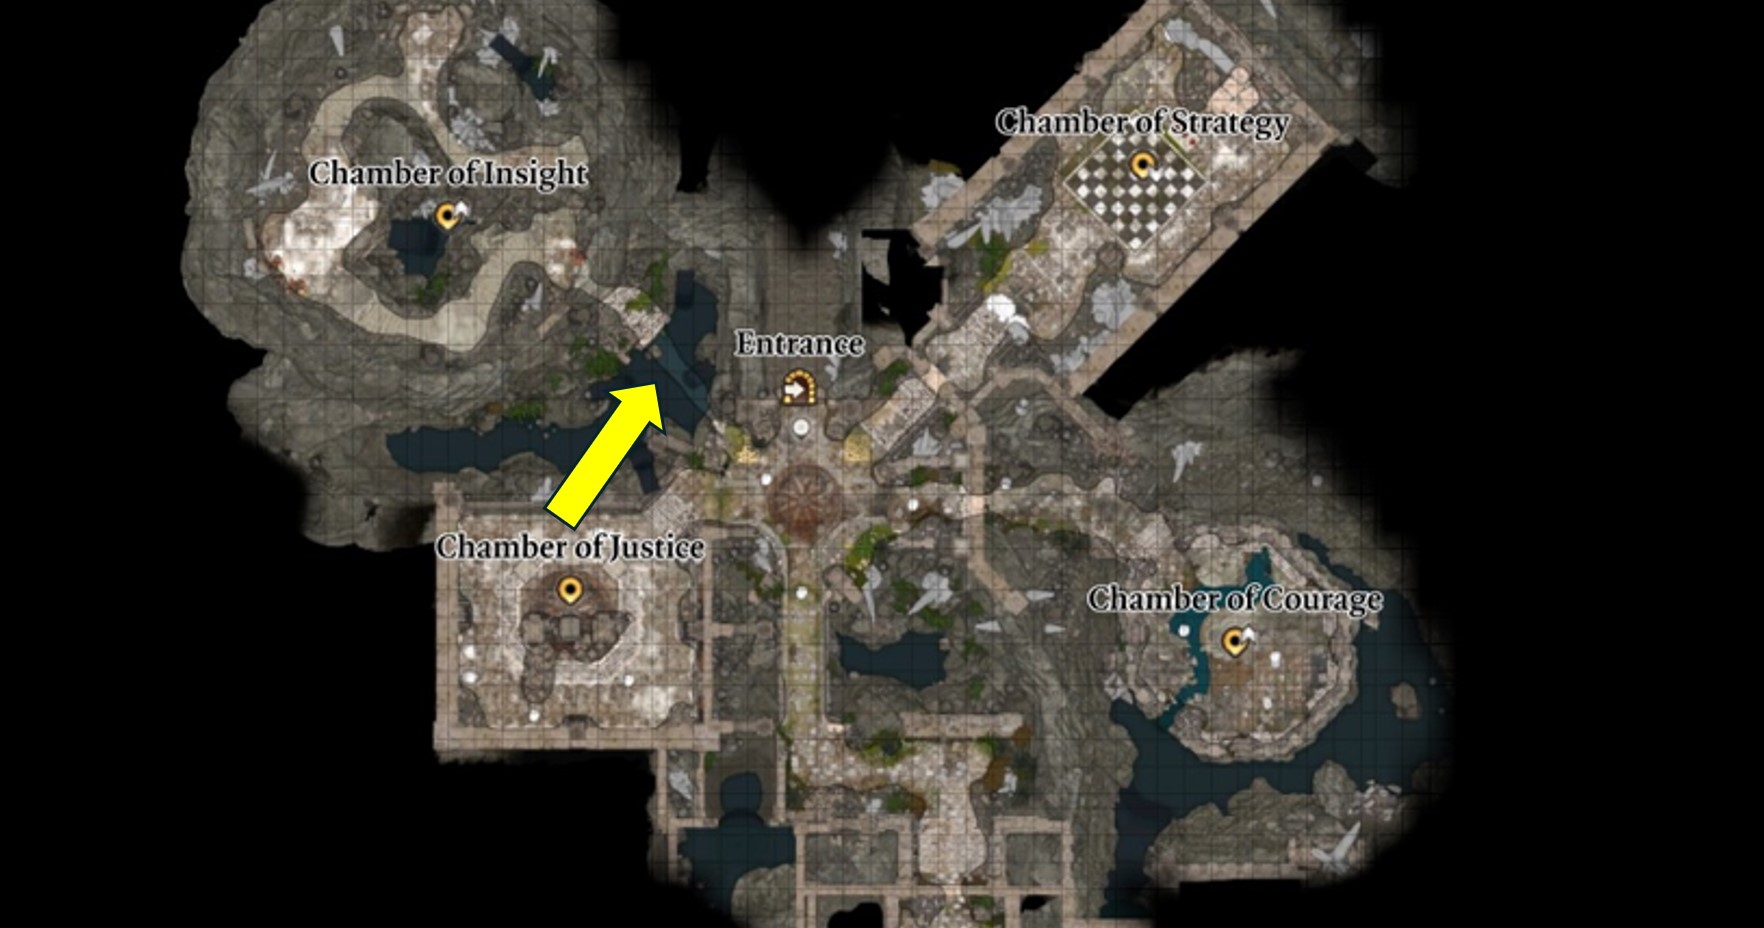
Now, you’ve entered the Wyrmay Trials, a series of four tests. The tricky one to locate is the Chamber of Insight, which you can access across a semi-transparent bridge. To fight Ansur the Dragon and obtain the weapon, you need to complete each trial. To start the trial, speak with the statue in each corresponding area. Let us show you how to complete each of them.
Chamber of Justice
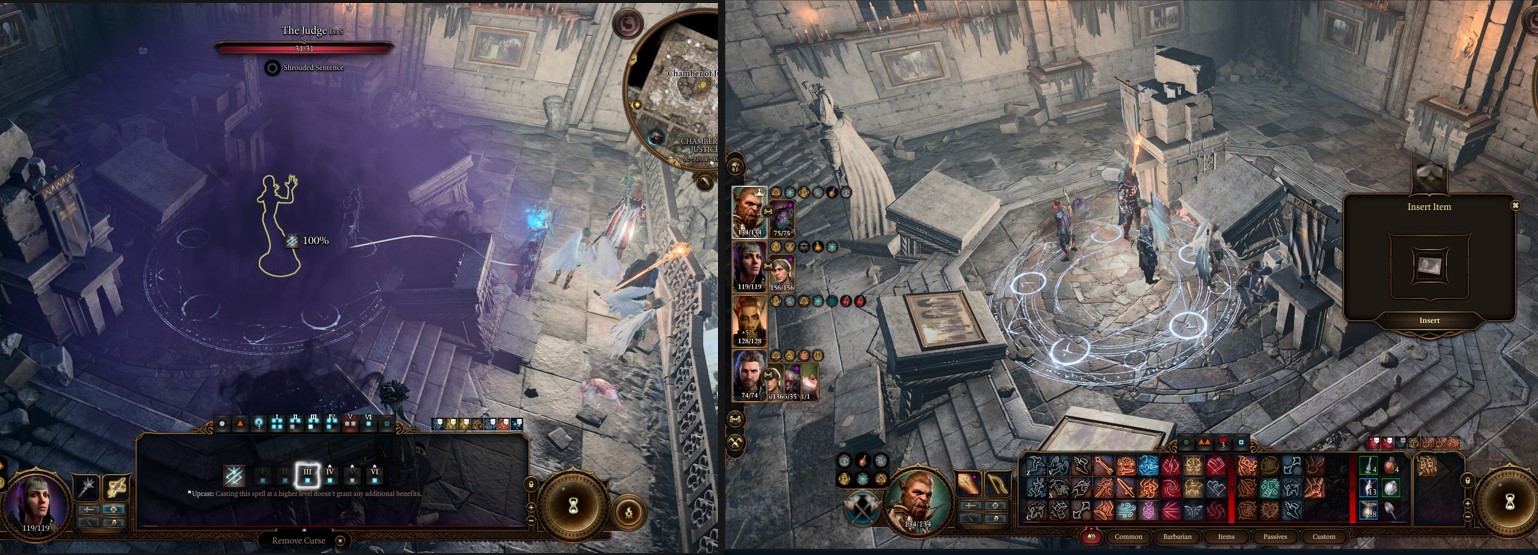
Activate the Chamber of Justice status upon entering. Next, cast the spell “remove curse” on the judge character in the center. The simplest way is using Shadowheart as a Cleric who has this spell by default (life subclass). Next, three pictures are lying on stands in the center. Right-click on The Cell and select Pickup. Interact with the missing large tablet in the center which opens up a menu to place an item. Place the Cell picture and complete the Chamber of Justice.
Chamber of Courage

The Chamber of Courage requires you to pick up a torch and hold it for four turns without dying. During this time, you will be attacked by various elemental creatures. Here are some tips for completing Chamber of Courage in BG3:
- Have your lowest damage dealer, and highest survivability character pick up the torch
- Move to the center of the room and have a Cleric cast a Sanctuary spell on the torch carrier
- Do not attack or attempt to change weapons with the torch carrier as long as Sanctuary is active
- You can knock off enemies from the ledges with Roaring Arrows or Thunderwave
- Additionally, cast Globe of Invulnerability on top of the torch carrier which prevents all damage
- Be prepared for silence spells and elemental damage
- Use the crystals on the outside for elemental damage reduction
Chamber of Strategy
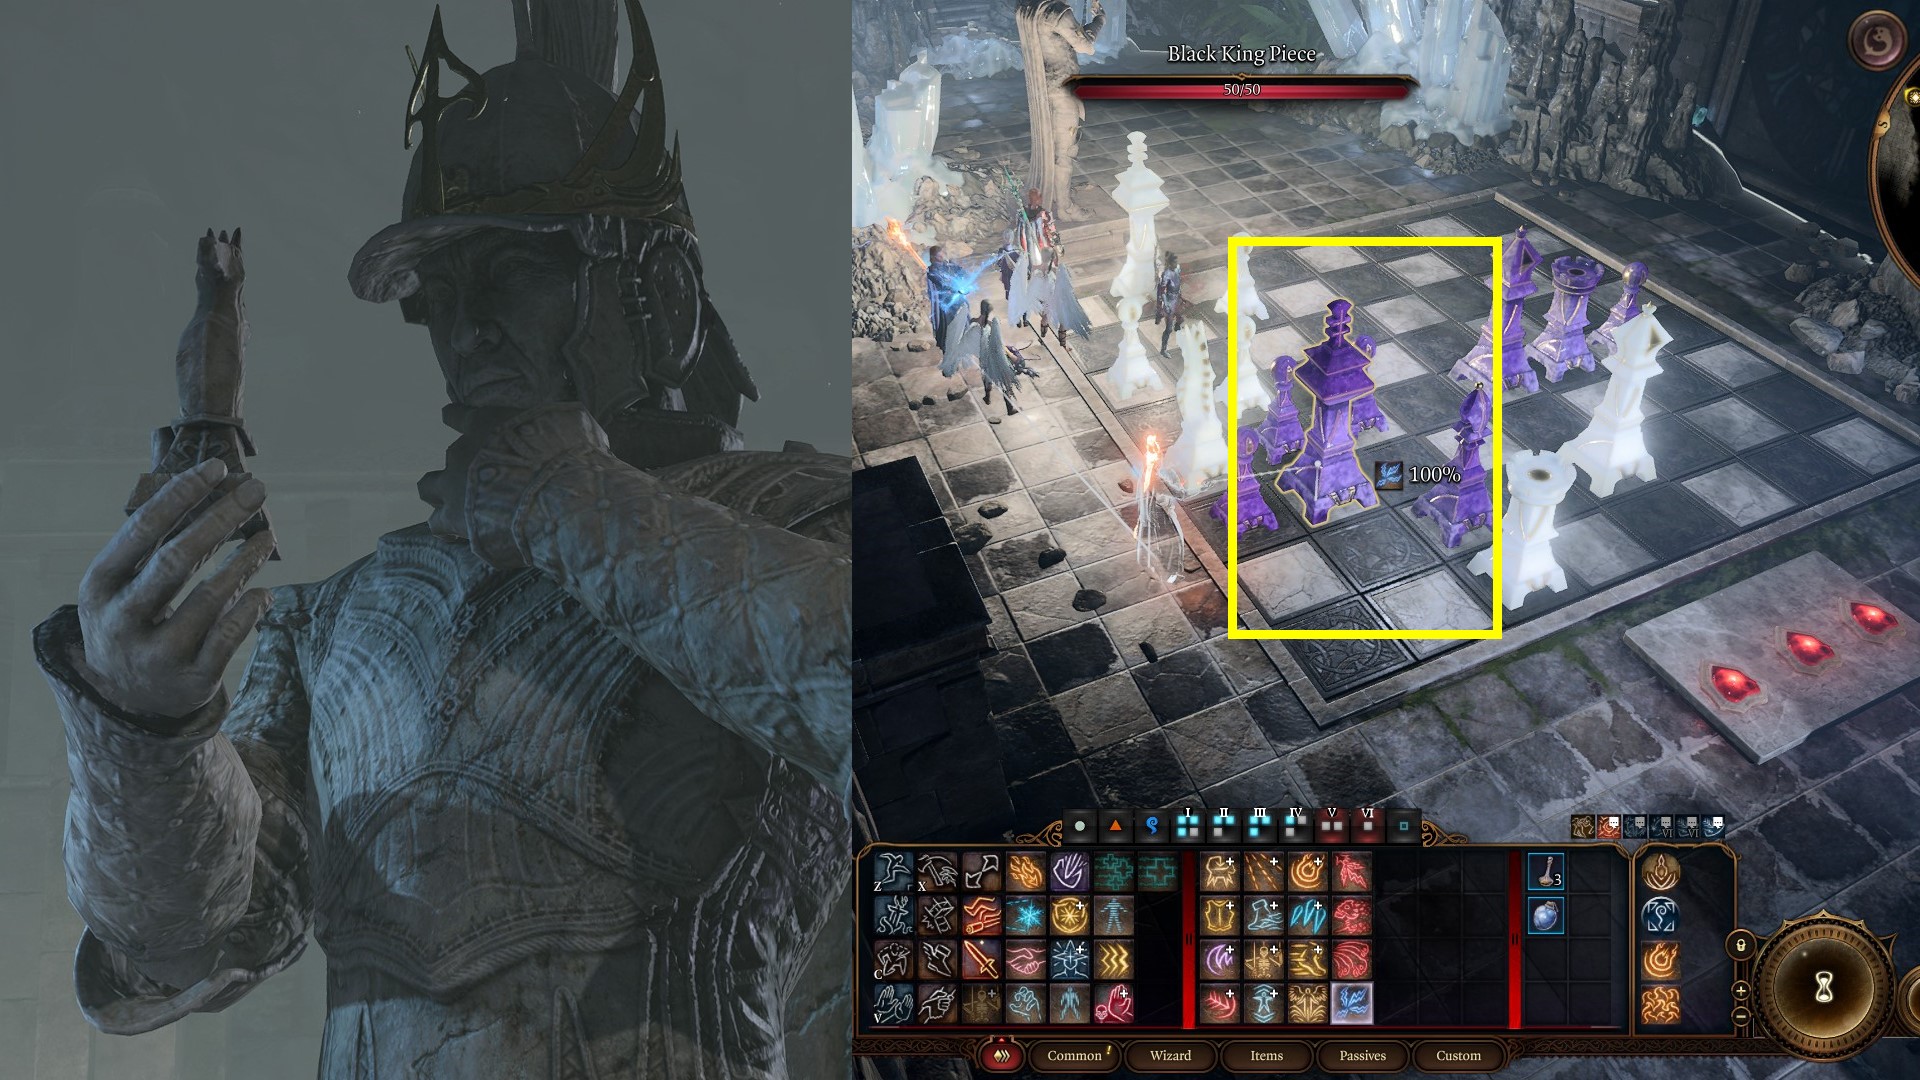
The Chamber of Strategy wants you to complete a randomized chest puzzle. If you have Gale in your party, he will essentially tell you how to solve the puzzle. The easiest way to solve the Chamber of Strategy is using lighting damage on the Black King Piece as it is vulnerable (takes 2x damage). This will kill it outright and solve the puzzle. We used Chain Lighting with Evocation Wizard build.
Chamber of Insight
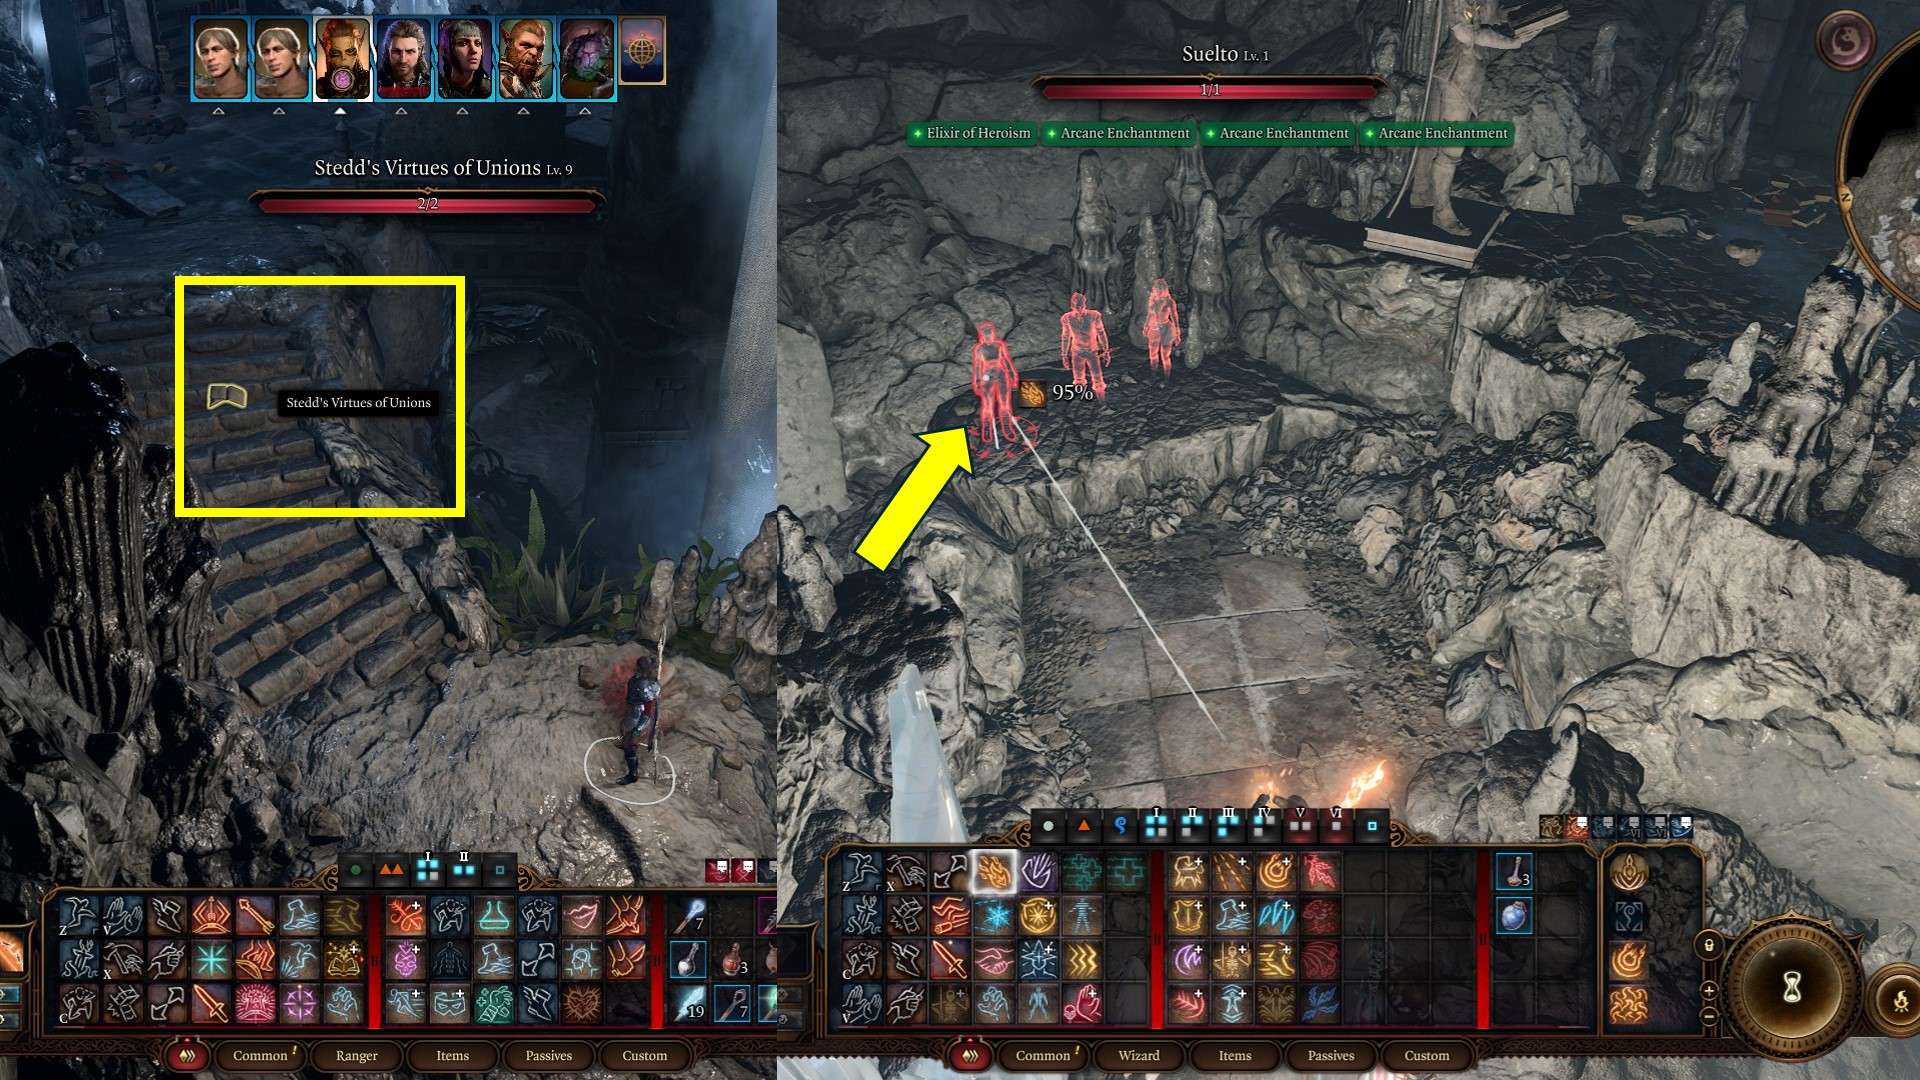
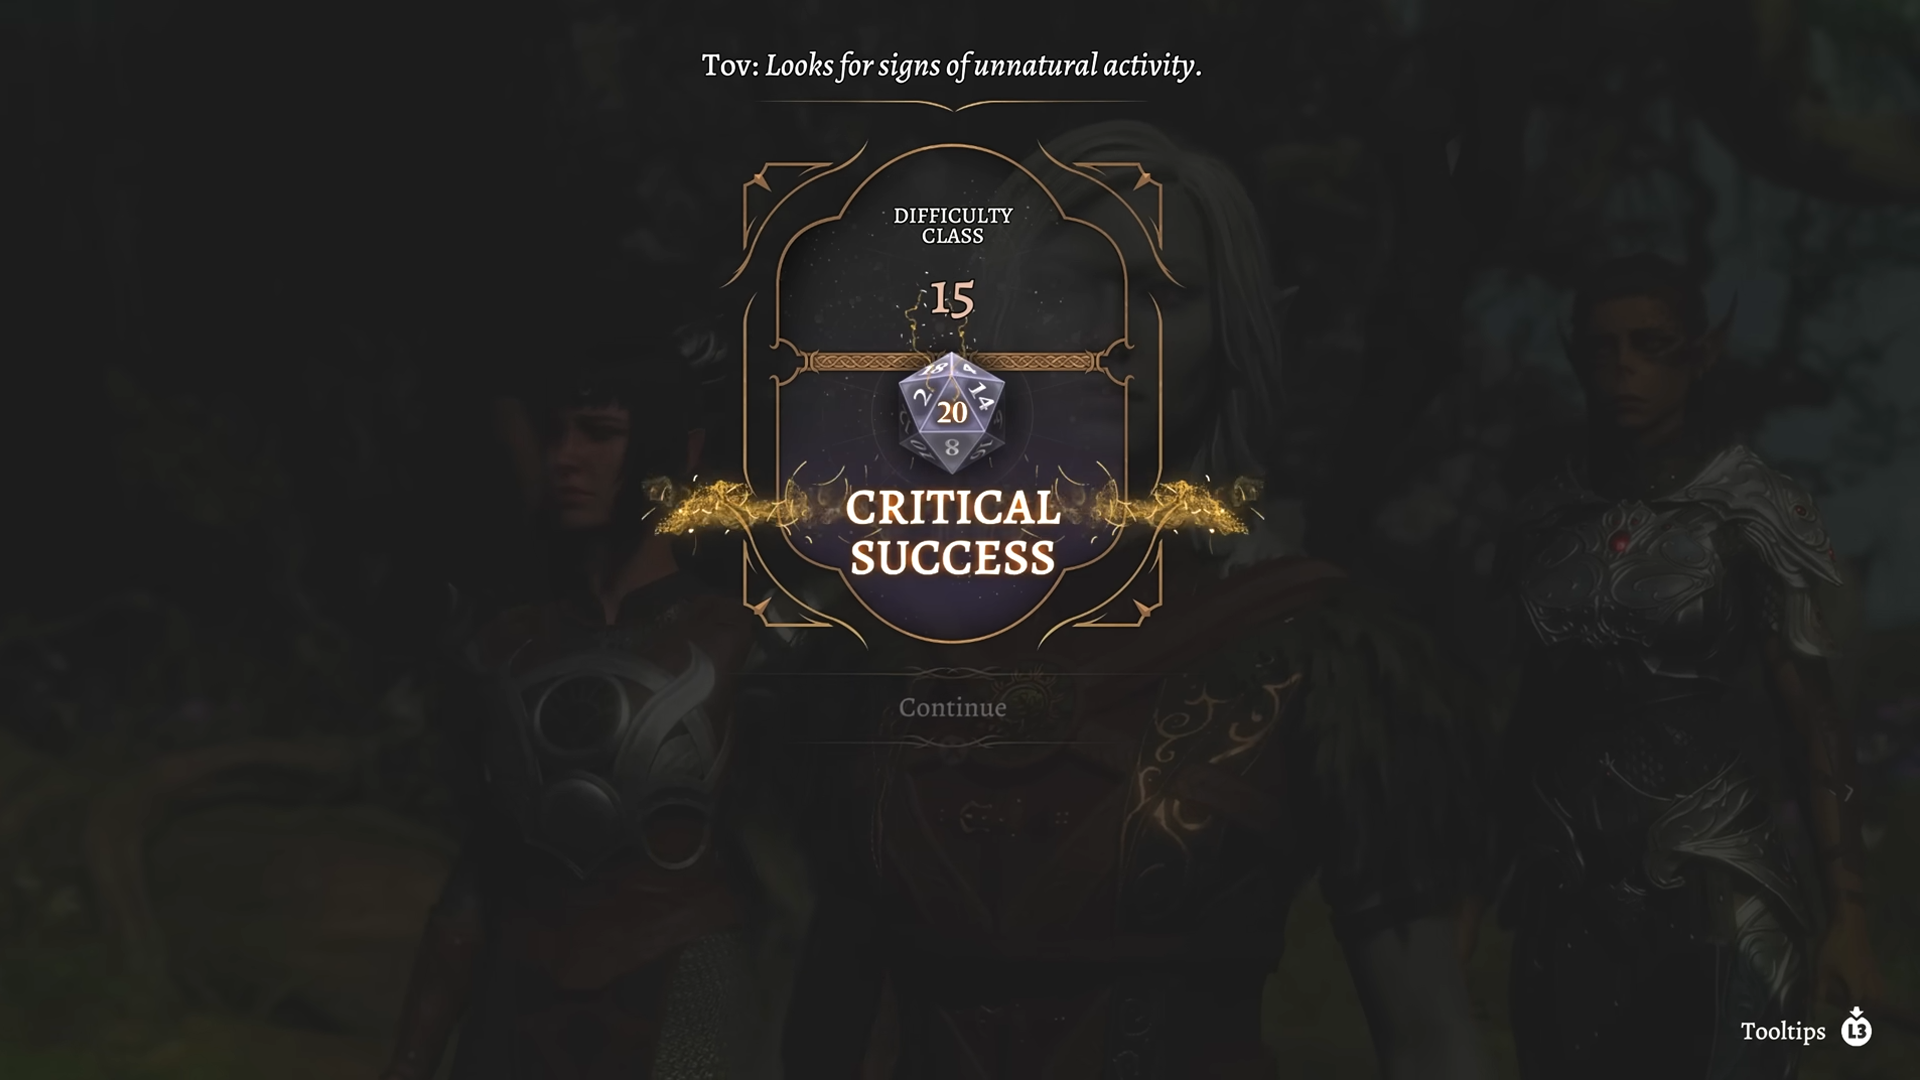
Within the Chamber of Insights, look for 3 flying books throughout the room. You want to enter turn-based combat and move towards, loot, and read the book. This will require a slight of hand check and may require 3 characters to complete. The books tell you that Suelto is guilty, which you should attack in kill. You need to use a single target spell and only kill Suelto. Turn off Cull of the Weak or any passive area-based damage. We used Gale with Firebolt to kill him and advance the quest.
This should now unlock the Dragon’s Sanctum where you can get the Balduran’s Greatsword and helmet in Baldur’s Gate 3.
Fighting Ansur
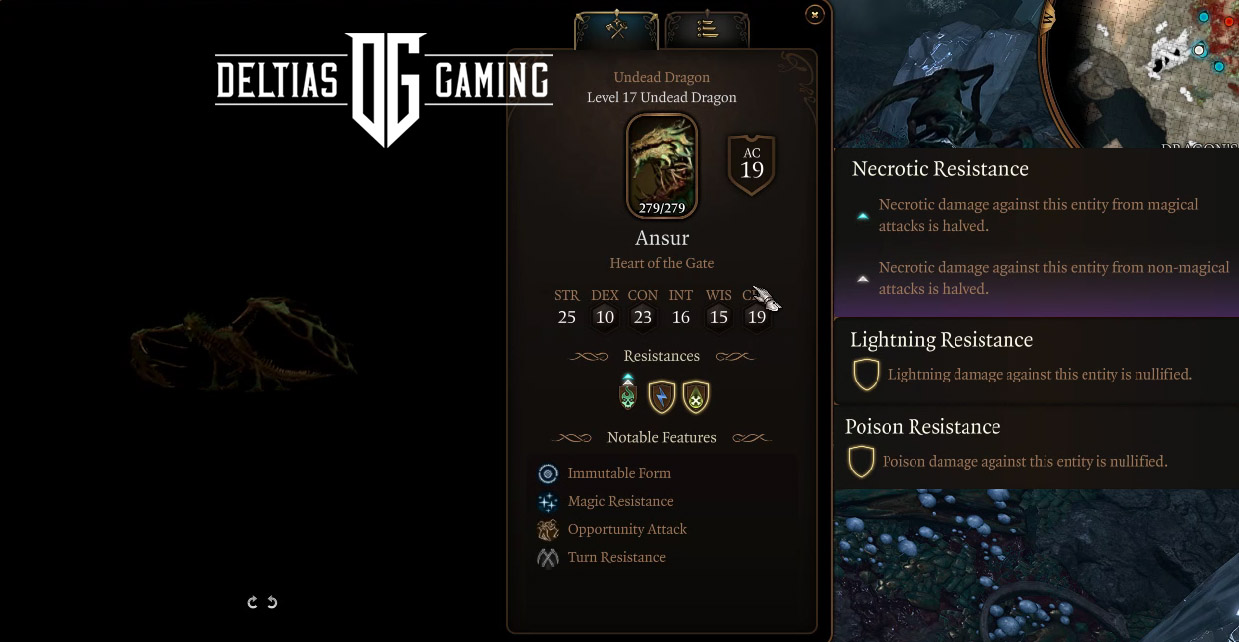
After some dialogue and cut scenes, you’ll find yourself facing a very angry Ansur. If you take a moment to right-click and Examine him, you’ll see that he has Neocrotic, Lightning, and Poison Resistances. Additionally, he has an overall Magic Resistance, meaning you’ll want to rely more on your melee and ranged attacks to take him down. However, his Opportunity Attack feature means that melee can be hazardous unless you have a character using Polearms for additional reach.
There will be some Myrmidon ads that spawn during this encounter, but it’s best to ignore them for the most part. Taking Ansur down as quickly as possible with as much damage as you can muster is most important.

After two turns Ansur will begin to Gather Power, flying up into the air. You’ll see him generating Lightning energy. At this point, you’ll need to take a sharp look at his HP. If your characters can’t blast him out of the sky in one turn, then everyone needs to prioritize hiding behind the large white crystals in the area. Ansur will blast the whole area with his Stormheart Supernova and the crystals won’t necessarily promise full protection, as some of my party still died. Death Ward is a handy spell in this situation.
Hopefully, at least one or two of your characters are left standing after the blast and can finish bringing him down. Afterward, you can loot him and finally claim Balduran’s Giantslayer. Don’t forget to pick up the Helm of Balduran, sitting on a pedestal just to the back of the area where you brought down Ansur.
How to Use the Balduran’s Giantslayer in BG3?
Our most recommended builds for using Balduran’s Giantslayer would be the Battle Master Fighter, Berserker Barbarian, Tempest Cleric, or Vengeance Paladin. Any class with a high Strength ability score will benefit from the double damage granted by this weapon. Additionally, you’ll hit with Advantage when attacking Large, Huge or Gargantuan creatures. In Act 3 this will include enemies such as the Steel Watchers, Orin’s Slayer form, and the dragon at the final battle.
Furthermore, the Giant Form class action should not be triggers until you are in combat, because the affects will only last for 10 turns. Moreover, you can stack giant effect by drinking an Elixir of the Colossus
Tips and Tricks for Balduran’s Giantslayer in BG3
These are the best tips and tricks for finding and using Balduran’s Giantslayer in Baldur’s Gate 3:
- The Giant form granted by this weapon will not stack with the Enlarge spell. However, it does stack with the Elixir of the Colossus.
- If you can manage to kill Ansur while he is in the air before his big attack you will earn the Crash Landing achievement.
- The special weapon action, Topple the Big Folk, will only work on Large, Huge, or Gargantuan creatures.
Related:
FAQs about Balduran’s Giantslayer in BG3
Where can I find Balduran’s Giantslayer in Baldur’s Gate 3?
You can find the Balduran’s Giantslayer by completing the Wyrmway Trials and defeating the dragon boss Ansur.
Which classes or builds benefit most from Balduran’s Giantslayer?
The best classes to equip the Balduran’s Giantslayer greatsword to are powerful frontline builds such as Fighters, Paladins, Barbarians, and Clerics.
How long does the Giant Form class action last in BG3?
You can only remain in Giant Form for 10 turns. However, the additional 27 temporary hit points will last until the next long rest.
Looking For More About Baldur’s Gate 3?
Thank you for reading the How to Get Balduran’s Giantslayer in Baldur’s Gate 3 guide. We provide the latest news and create guides for Baldur’s Gate 3. Also, watch me play games on Twitch or visit my YouTube channel!