Facebook
 Reddit
 Email
Email
In Baldur’s Gate 3, The Watcher’s Guide is a useful early game spear and you can get it in Act 1 from the Dank Crypt.

The Watcher’s Guide is a unique spear in Baldur’s Gate 3 that many players seek out early for its solid stats and useful passive ability. Whether you’re building a spear-wielding warrior or simply looking to upgrade your gear, this weapon offers a reliable edge in combat. In this guide, we’ll explore The Watcher’s Guide, how to acquire it, and tips for using it effectively in Baldur’s Gate 3.
What is The Watcher’s Guide in BG3?
In Baldur’s Gate 3, The Watcher’s Guide offers an additional benefit: whenever your spear attack misses the target, your next attack against the same foe gains an advantage on the attack roll. To utilize this spear’s enhancements, equip it in your character’s weapon slot within the inventory. While it can function as either a one-handed or two-handed weapon, your character or companion needs to be proficient in simple weapons to wield it effectively.
Related:
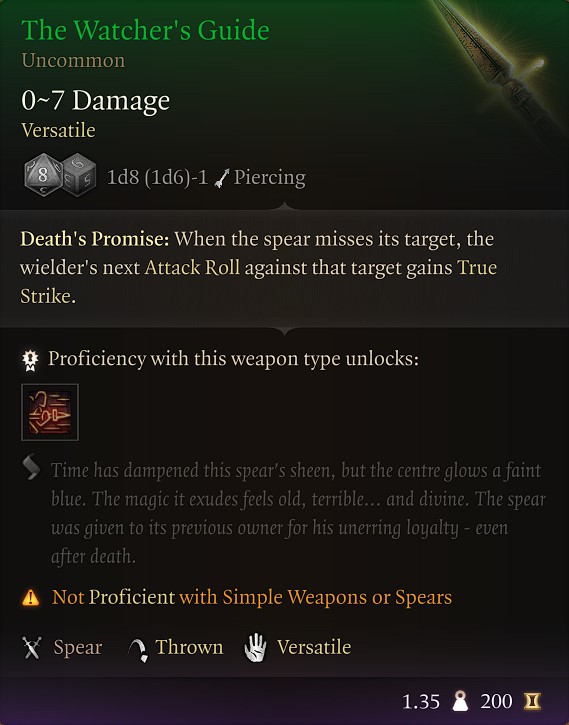
The Watcher’s Guide Abilities and Effects
Below are all the features, abilities, and effects of The Watcher’s Guide in Baldur’s Gate 3:
- Weapon Type: Spear, Versatile
- Proficiency Requirement: Simple Weapons
- Weight: 1.35 kg
- Value: 200
- Location: The Dank Crypt Sarcophagus
- Bonuses:
- Death’s Promise: When the spear misses its target, the wielder’s next Attack Roll against that target has an Advantage.
- Classes that Can Use This Item:
- Bard, Cleric, Fighter, Ranger, Rogue, Warlock, and Paladin
- Companions Who Can Use This Item: Shadowheart, Lae’zel, Minsc, Astarion, Wyll, and Minthara
How to Get The Watcher’s Guide in BG3? Explained
The Watcher’s Guide in Baldur’s Gate 3 can be obtained only from the sarcophagus in the Dank Crypt. But before you can get this great early-game weapon you need to fight your way through the various packs of enemies, bandits, and undead and then solve simple puzzles to dismantle the traps that protect the sarcophagus and The Watcher’s Guide spear.
The Dank Crypt Location

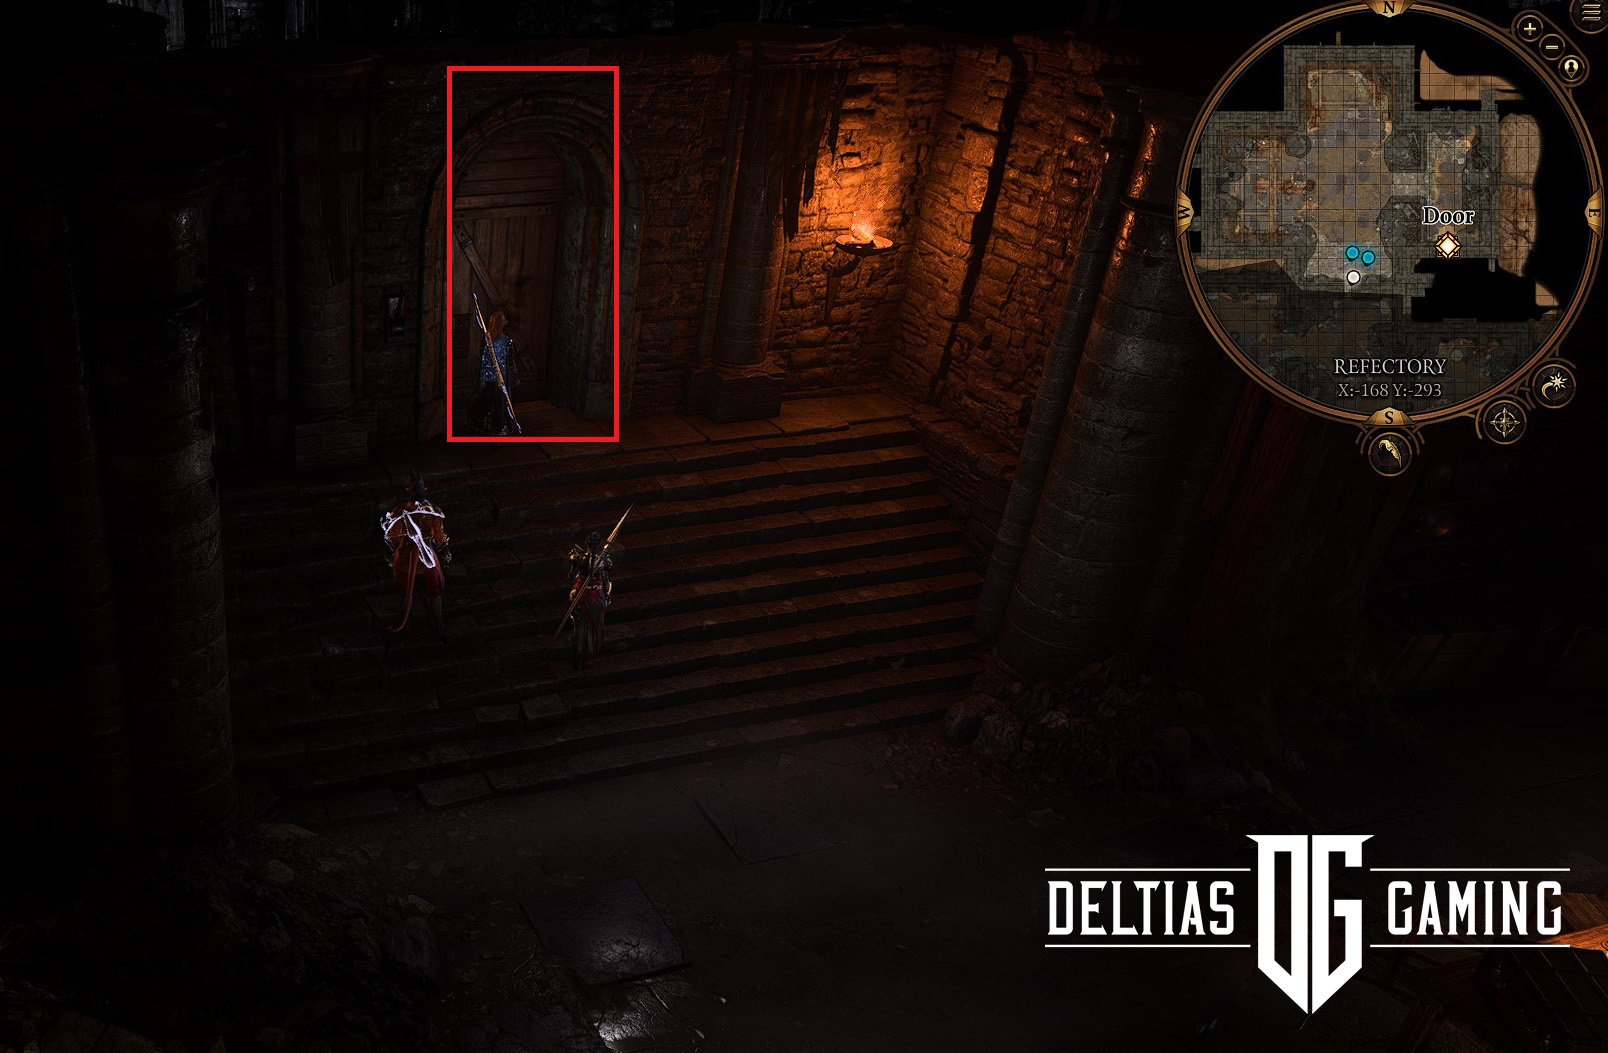
After the prologue on the ship, you wake up on the Ravenged Beach, and the spear is just to the north behind the locked door to the crypt. You can try to open it using thief’s tools from this side but it may be problematic early in the game. However, you can find the first entrance to the Dank Crypt just next to the Overgrown Ruins portal on the Beach. If you managed to open the ancient door, skip to Solve the Dunk Crypt Puzzle to Get the Watcher’s Guide section.
Second and the back entrance to the Overgrown Ruins is further to the north. As you approach the ruins, do it carefully because a small group of bandits will be there. One caster, archer, and two warriors. You can solve this in two ways:
- Defeat them: Ensure you have a full party of four with you and focus on the caster and range enemies first. Your melee companions such as Lae’zel or Shadowheart can focus on the rest.
- Convince them to leave: If your character is proficient with persuasion, deception, or intimidation, you can also attempt to convince bandits to leave the ruins peacefully.
Regardless of your choice, you can now enter the ruin’s door. Straight when you knock on the door, another bandit will ask you to explain yourself, again you can enter with the performance, or deception dialogue option or use the thief’s tools to open the lock and get inside. The free Thief tools should be in one of the containers in the area, barrels, and backpack. Now you can enter the Overgrown Ruins.
Find the Sarcophagus
You can find the sarcophagus with the Watcher’s Guide spear much deeper into the ruins so we need to find our way there now. Inside will be only one guard so you can easily deal with him. Loot the area, also fans of Divinity: Original Sin 2 will find one of the paintings on the wall very interesting…
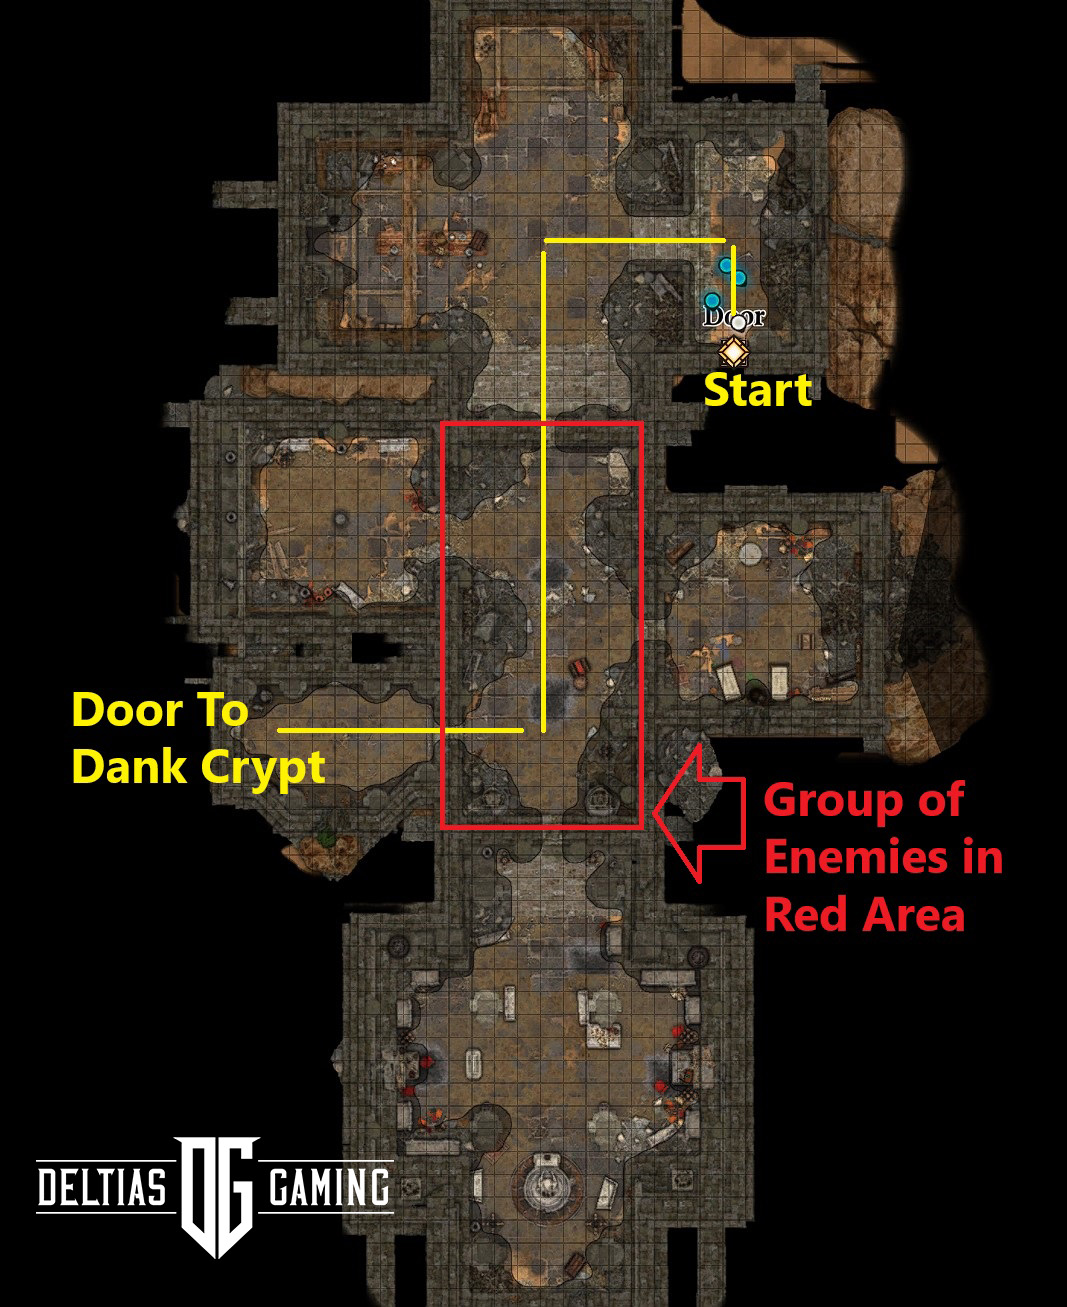
Behind the closed door is a group of enemies, two range characters, a spellcaster, and a few melee. Make sure your spellcasters have remaining spell slots and your team has at least 3/4 hit points left because this fight can be difficult depending on your level, experience, and game’s difficulty. try to approach this fight in stealth, surprise the enemy and force them to skip their first turn. Let your most survival character enter the next chamber behind the door first. Meantime your casters and range characters can deal damage from far and hide behind walls and columns to avoid being hit.
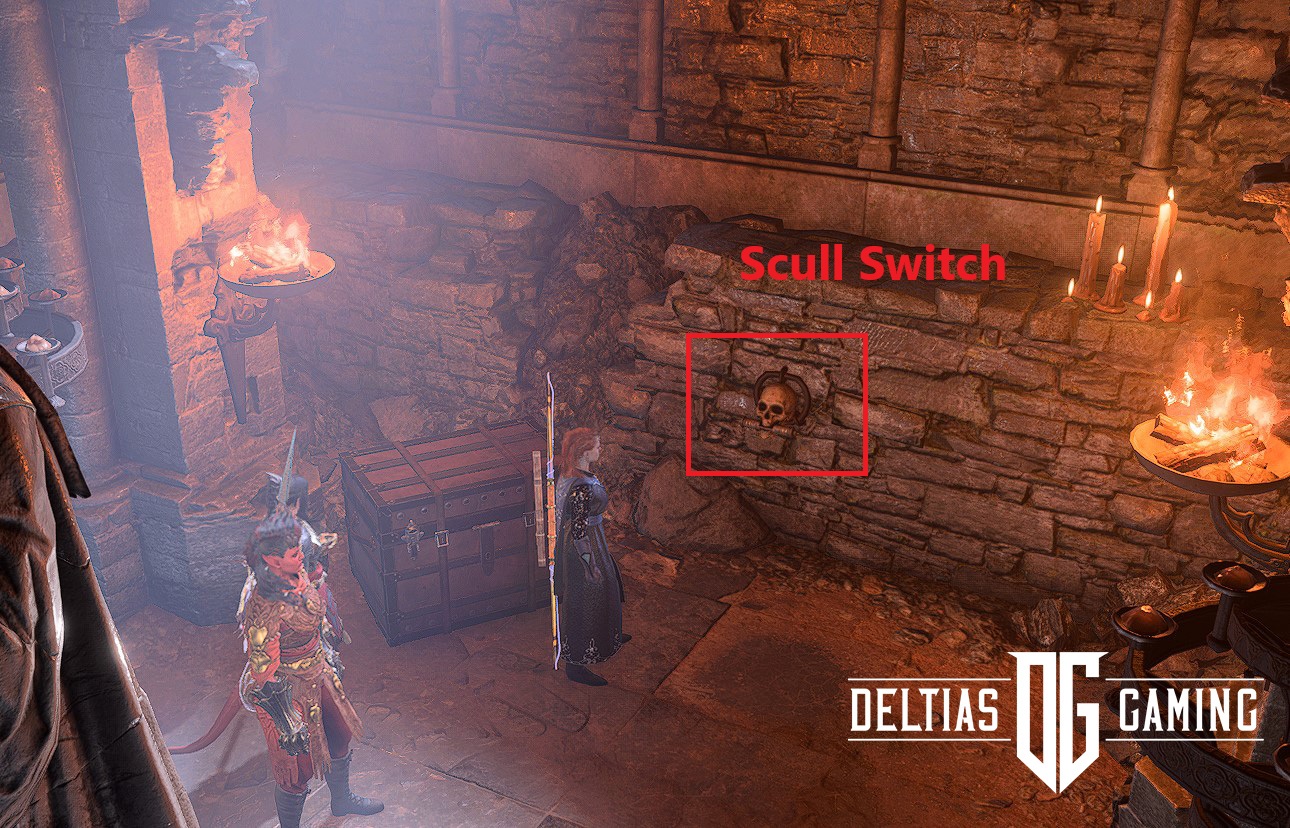
When the fight is over, search the area, the chamber far to the south has a hidden switch with the scull on the wall, upon approach your characters should pass an automatic perception skill check and discover hidden treasures. When you finish exploration progress deeper into the crypt through the door to the west.
Solve the Dunk Crypt Puzzle to Get the Watcher’s Guide
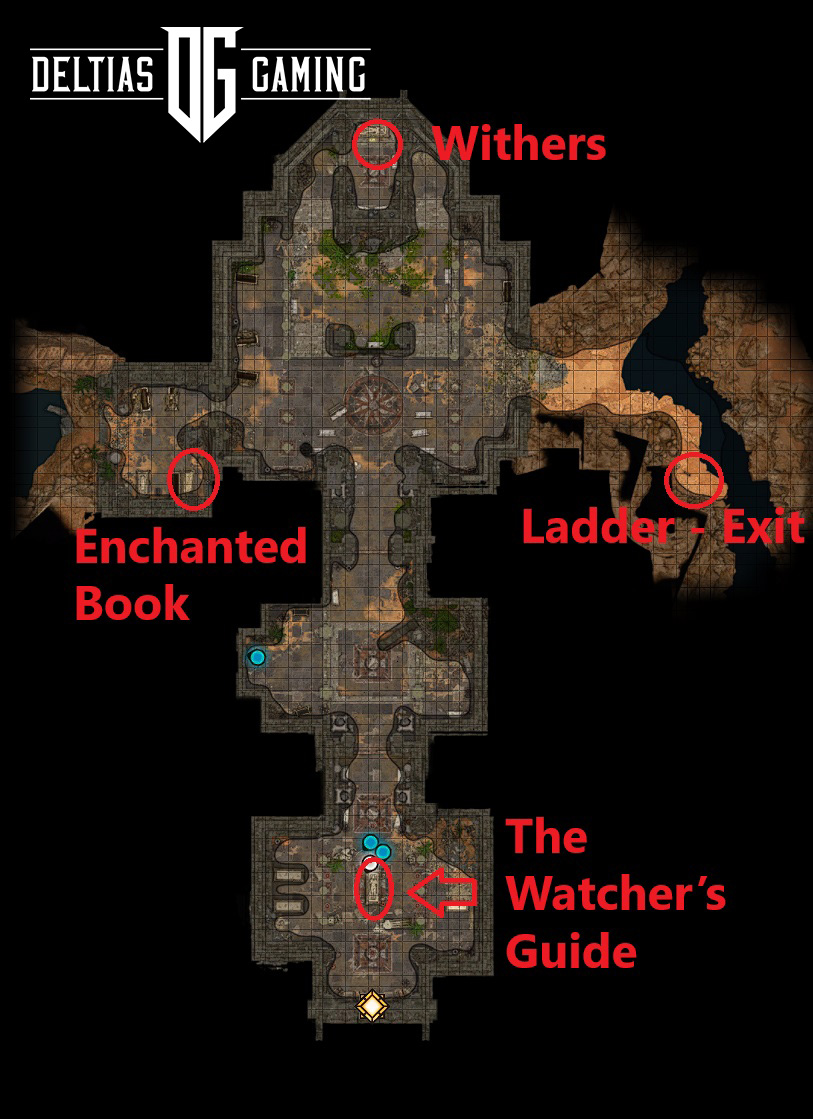
After entering the next location, there are several crucial places to investigate, including the Enchanted Book located in the back room of the main chamber. Another important spot to check is Withers’s sarcophagus. Withers is an essential character on your journey, as he can assist you in respeccing your class or reviving fallen allies. He remains in your camp throughout the entire game, offering his knowledge and advice. If you haven’t recruited him yet, this is the perfect opportunity. Head north from your current location and defeat the enemies in the chamber. Then, locate Withers, and invite him to join your camp. Now, let’s go to the Dank Crypt located on the right and discover how to obtain The Watcher’s Guide Spear in Baldur’s Gate 3.
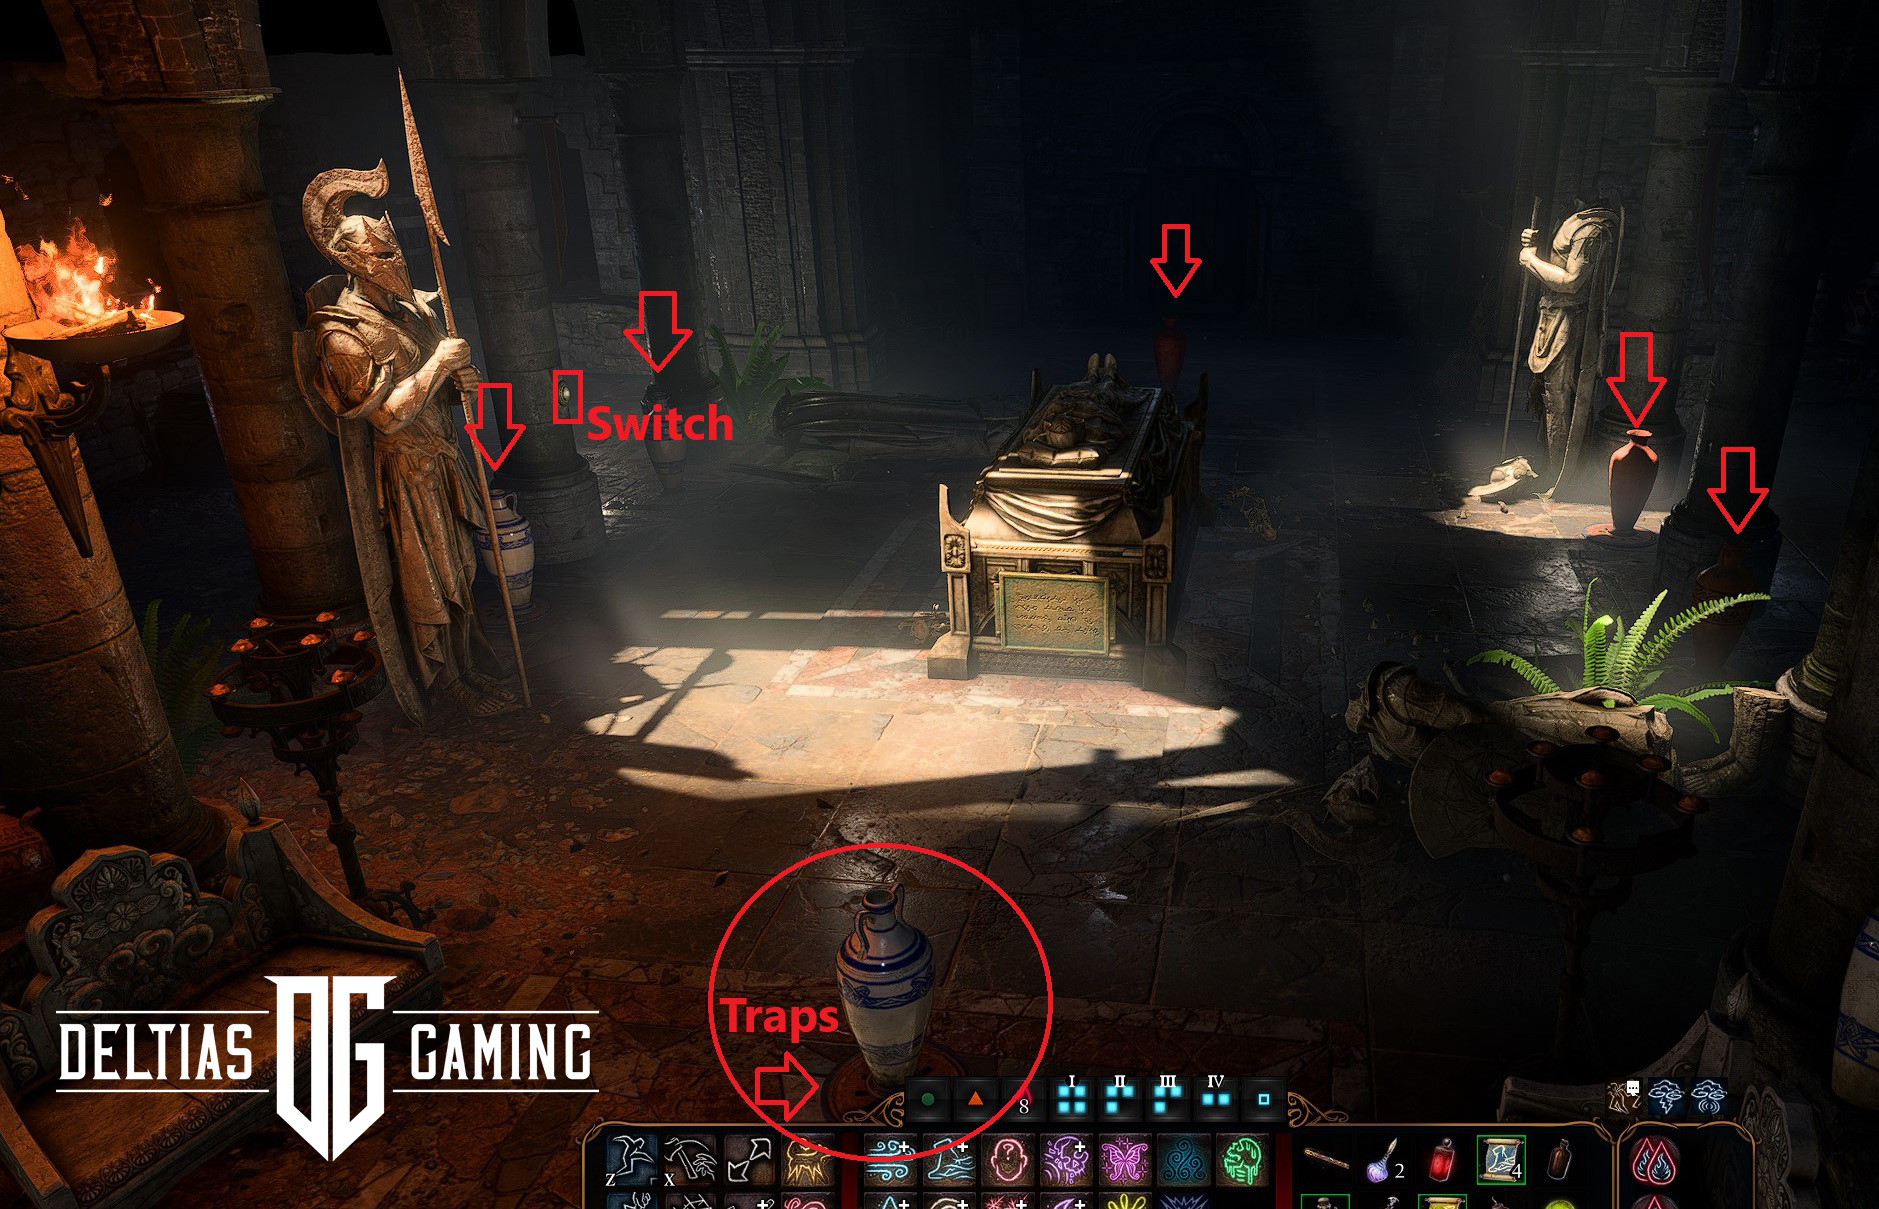
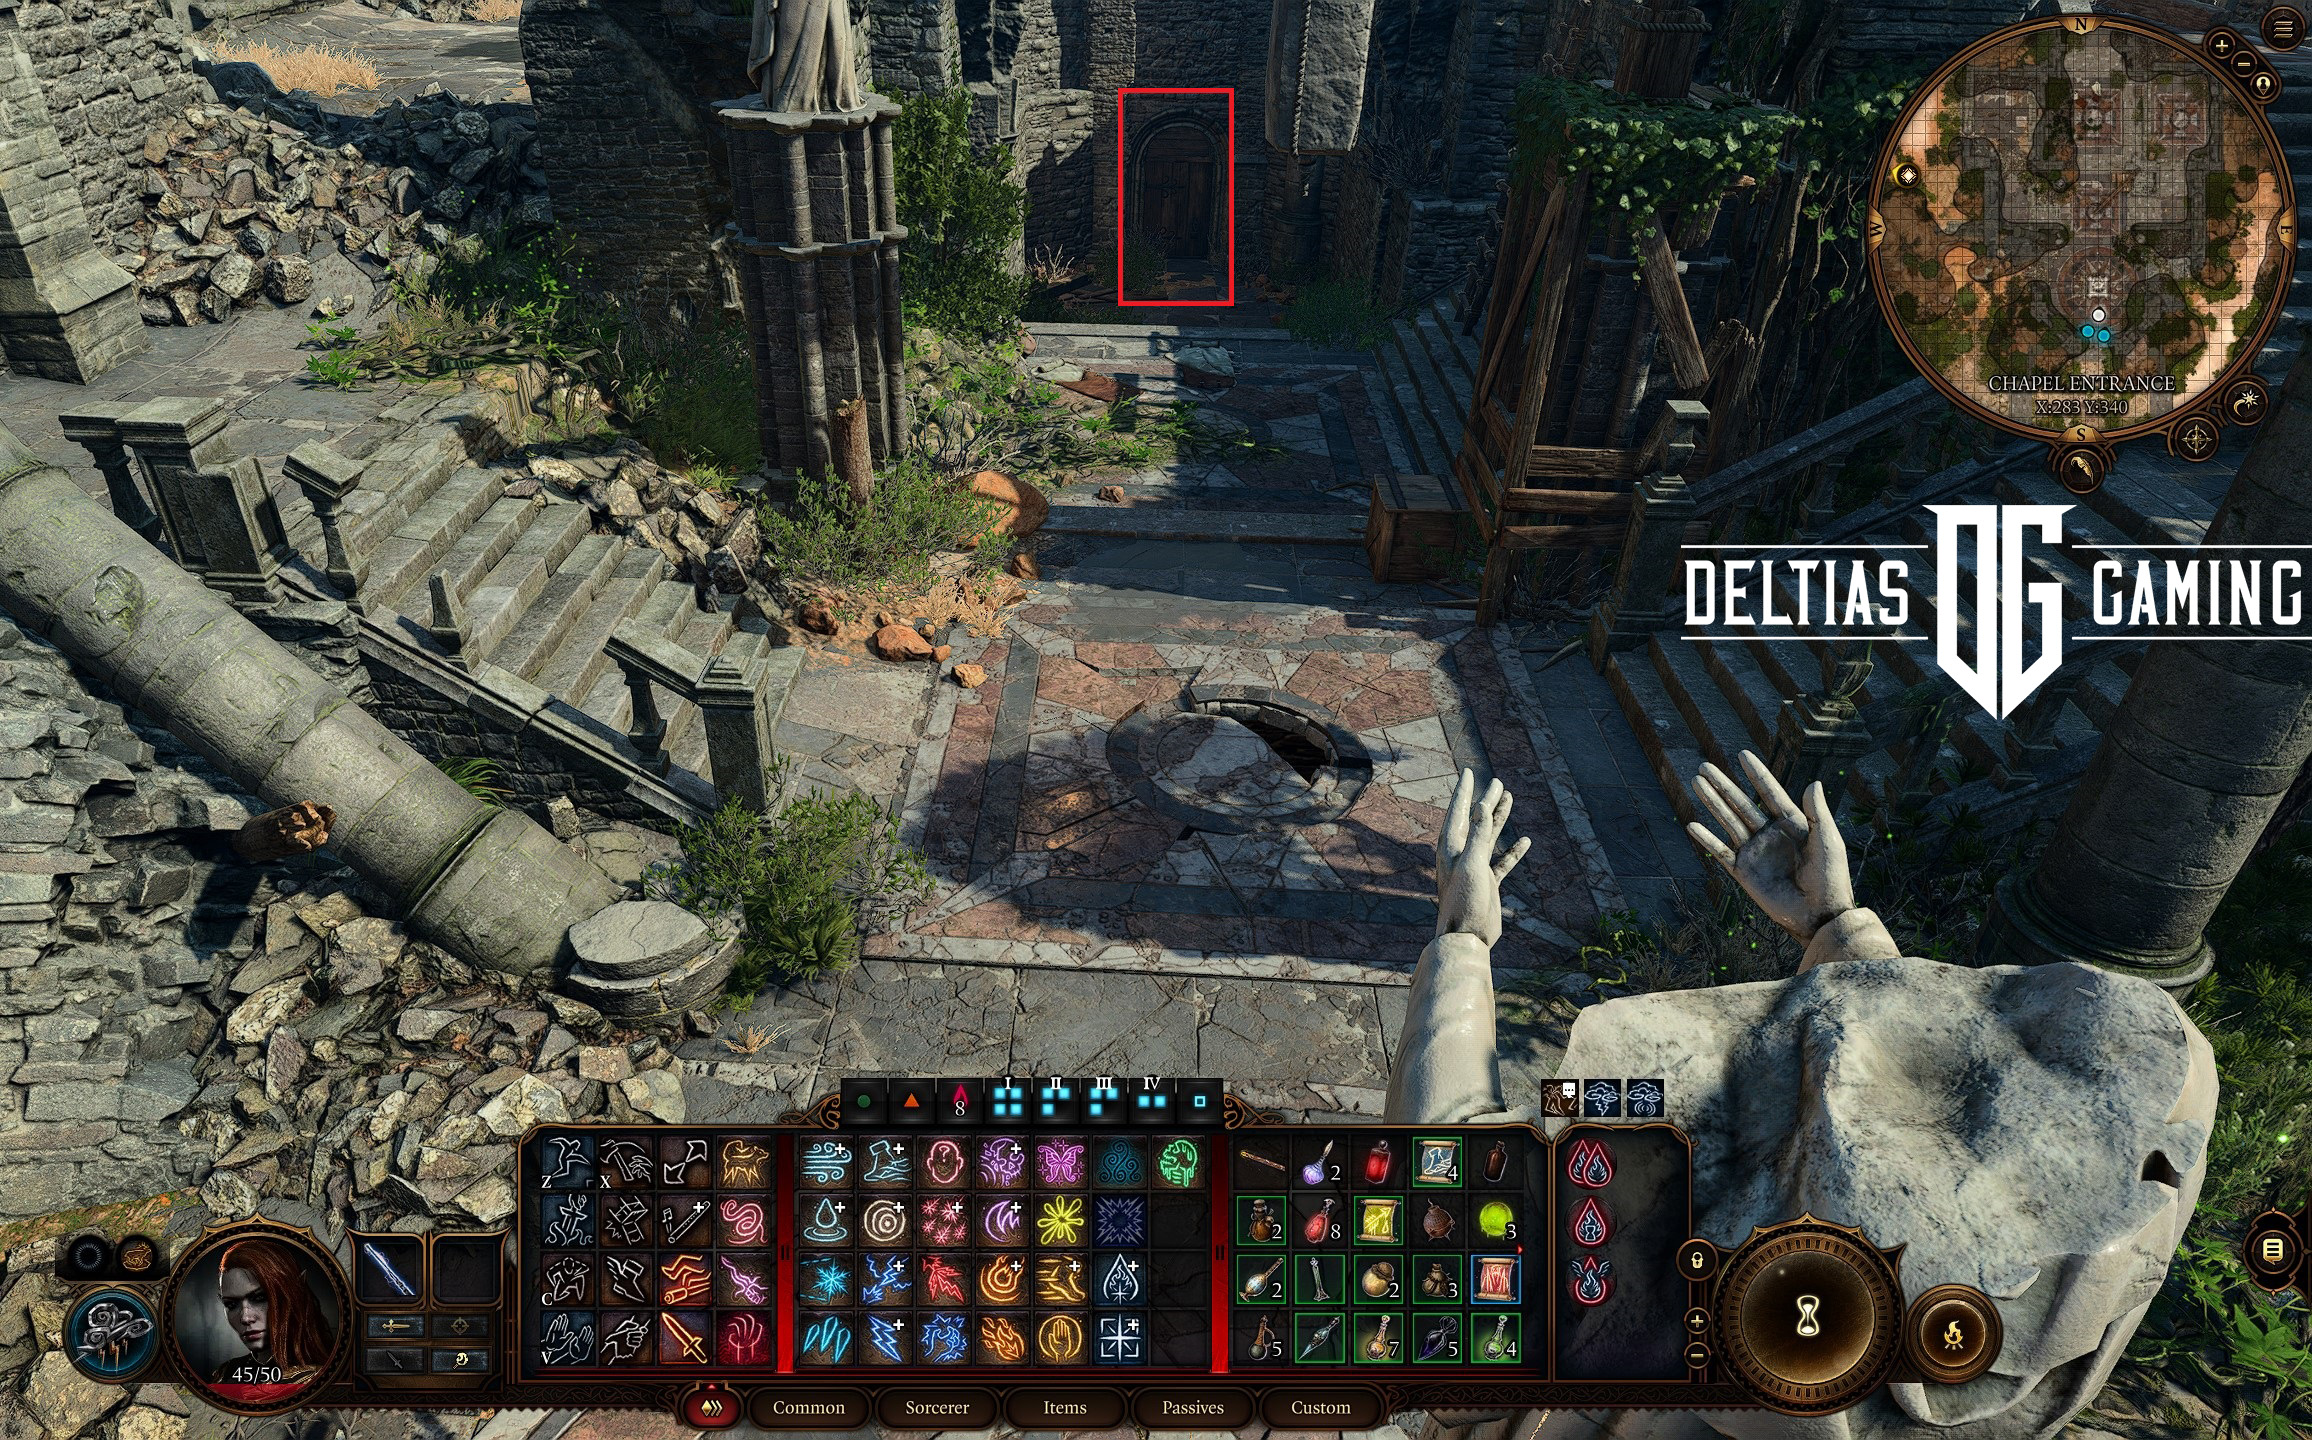
Once you’re inside the crypt, save the game and locate and uncover the gas traps in the room. In the room, there are 6 gas traps that require perception to spot. To bypass them, you’ll need to cover the traps somehow. We used the jars scattered around the crypt as shown in the picture above. If you miss one and can’t disarm it, it will activate, so be sure you found them all. Now loot the area, but do not touch the sarcophagus in the middle of the room. The Watcher’s Guide spear is inside.
There’s a button on one of the columns, it can also be detected with an automatic perception skill check. Pressing the button will deactivate the trap. Defeat the enemy skeletons and you should be able to safely open the sarcophagus to grab the Watcher’s Guide spear.
How to Use The Watcher’s Guide in BG3?
The best way to use The Watcher’s Guide in BG3 is by equipping it to a Fighter, Paladin, Cleric, or Barbarian in the early-game of Act 1. Although The Watcher’s Guide is not a best-in-slot weapon, it is a good one that you can collect very early on. It will make a good placeholder until you can find something stronger.
Tips and Tricks for The Watcher’s Guide in BG3
These are the best tips and tricks for finding and using The Watcher’s Guide in Baldur’s Gate 3:
- Make sure to disarm all of the traps and cover all of the vents in the sarcophagus room. If even one goes off, the poison can be deadly.
- True Strike has a duration of two turns against your original target. If the enemy dies before the second turn, then the effect is lost.
Related:
FAQs about The Watcher’s Guide in BG3
Where can I find The Watcher’s Guide in Baldur’s Gate 3?
You can find The Watcher’s Guide inside the trapped sarcophagus room inside the Dank Crypt north of the Ravaged Beach in Act 1 of BG3.
Which classes or builds benefit most from The Watcher’s Guide?
A Fighter, Barbarian, Paladin, or Cleric would benefit the most from equipping The Watcher’s Guide in the early stages of BG3.
Looking For More About Baldur’s Gate 3?
Thank you for reading the How to Get The Watcher’s Guide in Baldur’s Gate 3 guide. We also provide the latest news and create guides for Baldur’s Gate 3. Additionally, watch me play games on Twitch or visit my YouTube channel!