 Facebook
 Reddit
 Email
Email
Discover the Best Esiemo Build Guide for The First Descendant and how to create a powerful character with Skills, modules, and weapons.

Creating an effective build in The First Descendant involves carefully selecting and optimizing various components of your character, including modules, reactor stats, weapons, weapon mods, and skills. For an Esiemo build, we will focus on optimizing your skill power and survivability. Let us walk you through creating the best Esiemo Build in the First Descendant with our guide below.
This guide has been updated for Season 1, Hotfix 1.1.0 of the First Descendant.
Best Esiemo Build Guide for The First Descendant
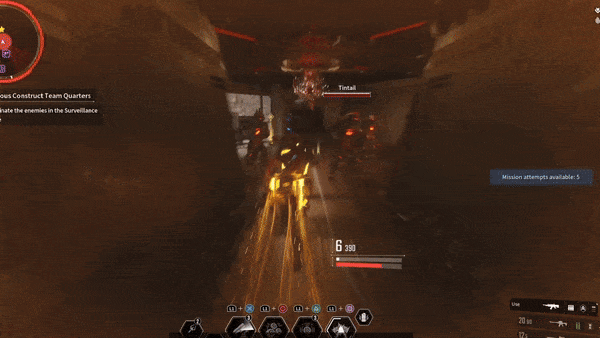
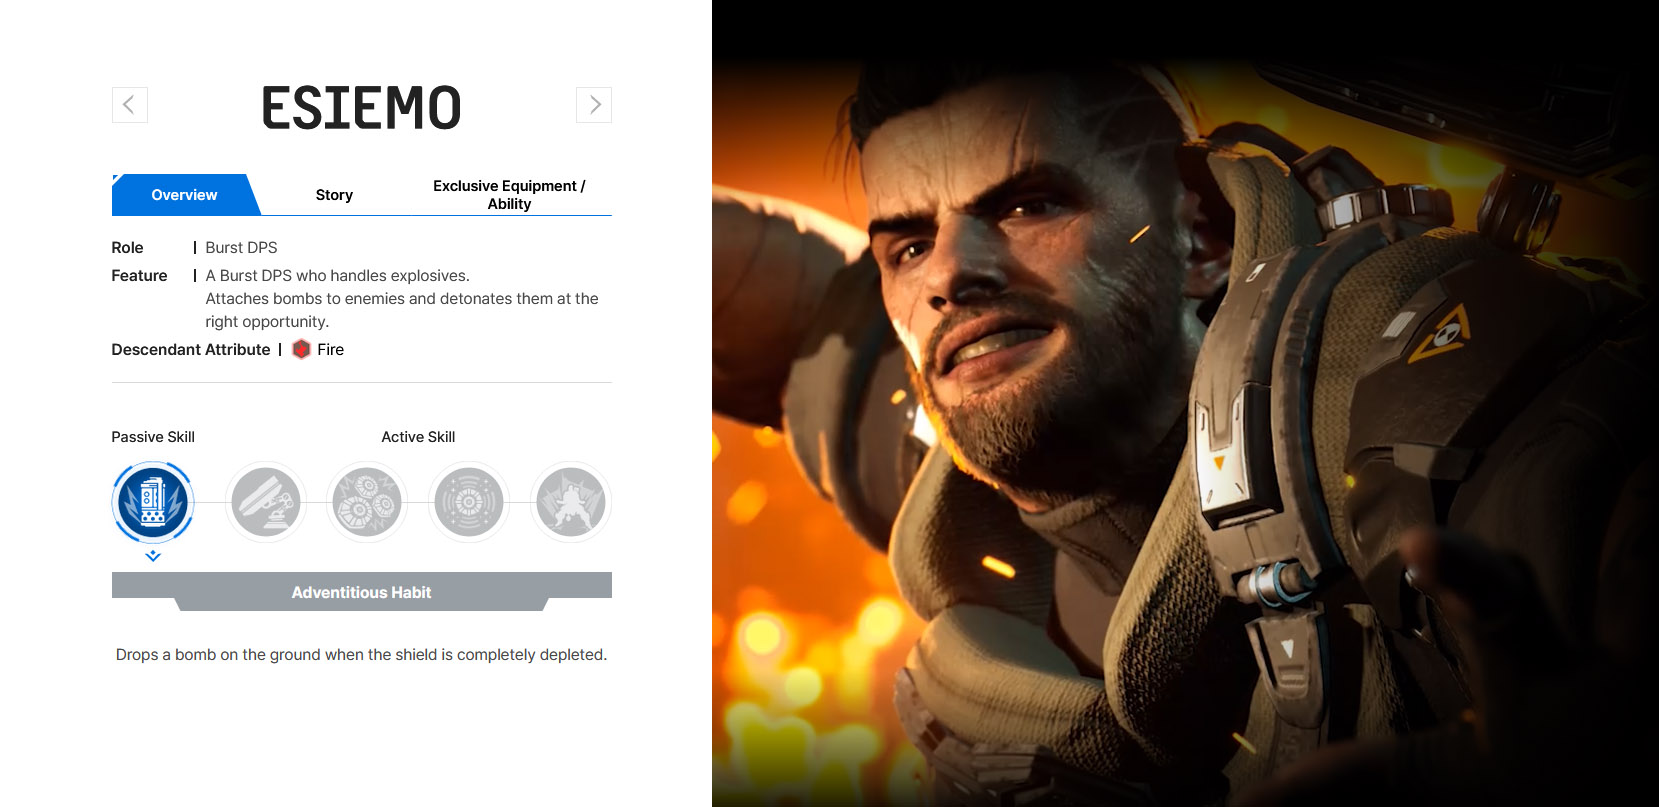
In the First Descendant, Esiemo specializes in timing explosive damage for optimal damage. He has access to powerful area-of-effect damage as well as single-target damage. The build is capable of dealing with all levels of content from taking out trash enemies to nuking bosses’ health bars.
| Esiemo Build Pro | Esiemo Build Cons |
|---|---|
| AOE Explosives | Weak Passive |
| Sticky Explosives | Lacks Survival Skills |
| High Damage Ultimate | Melee Ultimate |
Features and Mechanics for Esiemo Build in The First Descendant
The following list presents all the essential x(character name) Build Features and Mechanics for the First Descendant:
- Best Modules: Focus on Tech, Fire Master, Spear and Shield
- Best Reactors: Burning Mechanics
- Best Weapon: Greg’s Reversed Fate
- Best Weapon Mods: Fire Rate UP, Rifling Reinforcement, Action and Reaction
- Best External Component: Volcanic, Battle Aesthetics
- Skills
- Time Bomb
- Blast
- Guided Landmine
- Arche Explosion
- Adventitious Habit (Passive)
- Playstyle: Burst DPS
- How to Unlock: Research or Buy
- Story: “Exploding enemies, growing fame, and burning love. Is there anything better than explosions to achieve all of these at the same time?”
How to unlock Esiemo in The First Descendant

Unlocking Esiemo works the same for other characters in The First Descendant, where you must research or purchase him from the store. If you want to buy the character with real money Esiemo costs 900 Caliber, which is the premium currency in the game. However, he is available to craft upon gathering the necessary materials.
To craft Esiemo you will need:
- 1x Esiemo Enhanced Cells
- 292x Flectorite
- 462x Shape Memory Alloy
- 76x Deformed Biometal
- 1x Esiemo Enhanced Cells Blueprint
- 1x Esiemo Stabilizer
- 408x Ceramic Composite
- 455x Reverse Charging Coil
- 26x Organic Biogel
- 1x Esiemo Stabilizer Blueprint
- 1x Esiemo Spiral Catalyst
- 290x Semi-permanent Plasma
- 363 Nanopolymers
- 46x Specialized Biometal
- 1x Esiemo Spiral Catalyst Blueprint
- 1x Esiemo Code
- Location 1: Vespers Hard – Abyssal Void Fusion Reactor – Vepsers Moonlight Lake
- Location 2: Kingston Hard – Abyssal Void Fusion Reactor – Kingston Grand Square
- Location 3: Agna Desert Hard – Abyssal Void Fusion Reactor – Agna Desert The Storage
- Location 4: Hagios Hard – Abyssal Void Fusion Reactor – Hagios Corrupted Zone
- 400k Credits
Like all other characters, you must speak to Anais in the Albion Mountains area to craft Esiemo. She will grant you access to the Research Institute, where you can choose to craft additional descendant characters. Currently, there is not an ultimate Esiemo character to unlock. However, one will likely be added in the future.
Esiemo’s Exclusive Equipment

Esiemo’s exclusive equipment is his Archer Reactive Blast-Proof Suit, which is his cosmetic special suit that is automatically given to the player upon acquisition of the Descendant. You can access it by clicking details in the Descendant menu and customizing the appearance of his suit. Below are the details on Esiemo’s Exclusive Equipment:
“In addition to the basic protection that it provides, this suit has the ability to collect chemical particles that Esiemo discharges through various routes and store them in explosion-ready state. With an enormous capacity cost, it can theoretically wipe out an area the size of Kingston in a single blast. The reason Esiemo can make a name for himself without being caught in the explosions he creates is that the Arche particles captured in the suit neutralize all hazardous materials involved in the explosion. It simultaneously offsets the kinetic energy applied to Esiemo.”
Best Skill for Esiemo
Blast is the best skill for Esiemo because it increases the overall damage of your explosives based on how many stacks are detonated. Time Bomb can be thrown up to 5 times, each sticking to a target, and when detonated manually with Blast, gain 25% more damage per stack up to 5. Thus, your gameplay revolves around stacking explosives on individual targets using a Time Bomb or Guided Landmines throughout the area. Below are the skills of Esiemo’s character:
Below are the skills and passive of Esiemo’s character in the First Descendant:
- Time Bomb: Launches a Sticky Bomb forward. The Sticky Bomb attaches to an enemy or terrain feature on contact.
- Blast: Instantly detonates attached bombs. Bomb damage increases with the number of attached bombs.
- Guided Landmine: Place a Guided Landmine at the current location. Once placed, the Guided Landmine will fly to an enemy within its detection range and attach to it.
- Arche Explosion: Starts moving forward fast. On collision with an enemy while charging, inflicts Knockback. When the movement ends, deals damage to nearby enemies and removes buffs from them. After the skill ends, Esiemo enters Madness state.
- Adventitious Habit (passive): Drops a bomb on the ground when the shield is completely depleted.
Time Bomb
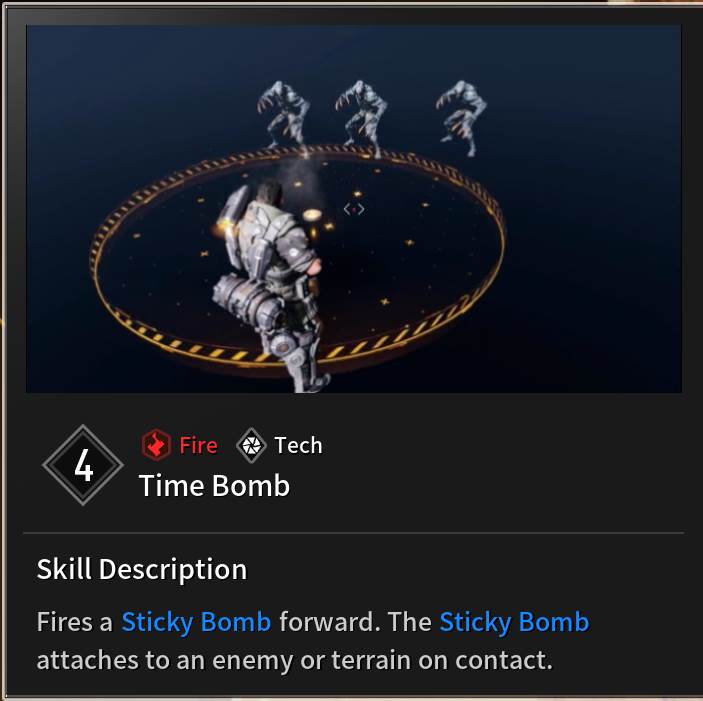
Time Bomb Features in The First Descendant:
- Fire: Tech
- Description: Fires a Sticky Bomb forward. The Sticky Bomb attaches to an enemy or terrain on contact.
- Maximum Stacks: 5
- Stack Cooldown: 12 seconds
- MP Cost: 12
- Burst Damage: Skill Power x 407.3%
- Explosion Damage Range: 3m Radius
- Max Expandable Range: 200%
- Projectile Speed Increase: 0%
How to Use Time Bomb: Like most explosives with Esiemo, we have multiple stacks available and should try to accumulate these on multiple low-health targets or a single large-health enemy. These can detonate on their own after a short time, or be detonated by the Blast skill. Also, any enemies that die with a bomb attached immediately detonate the bomb. This can be great for dealing with a new spawn of enemies by sticking it to the lowest health target, killing it, and watching the resulting explosion.
Blast
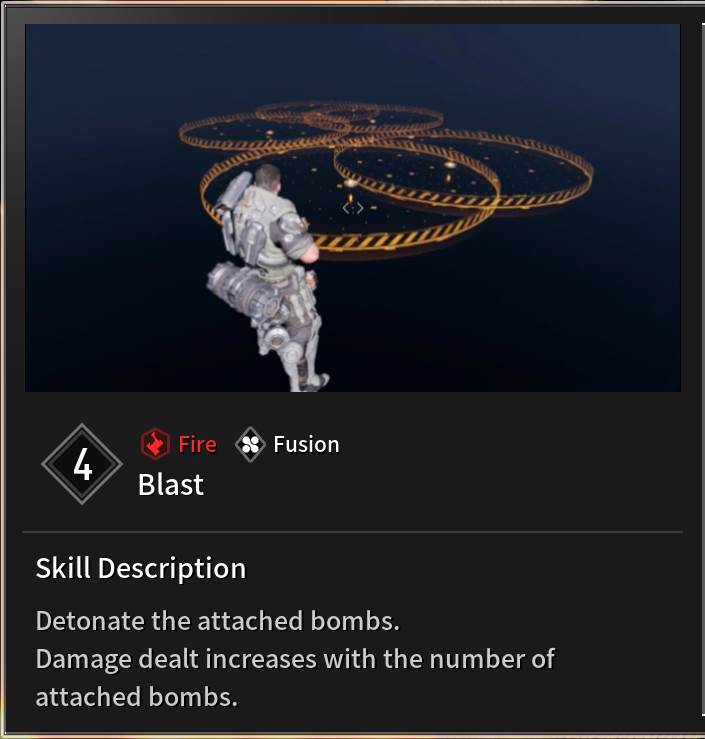
Blast Features in The First Descendant:
- Fire: Fusion
- Description: Detonates attached bombs. Damage dealt increases with the number of attached bombs.
- Cooldown: 10 seconds
- MP Cost: 15
- Damage Increase per Bomb: 25%
- Skill Power Increase: Max 5 Times
How to Use Blast: Blast is a very easy skill to understand, it detonates any attached bombs currently on the field. However, the main usage for it is detonating multiple on a single target for massive damage scaling per bomb exploded. Generally, if you do not need to time your explosives for large damage, you don’t need to activate this so save your MP from activating this unnecessarily.
Guided Landmine
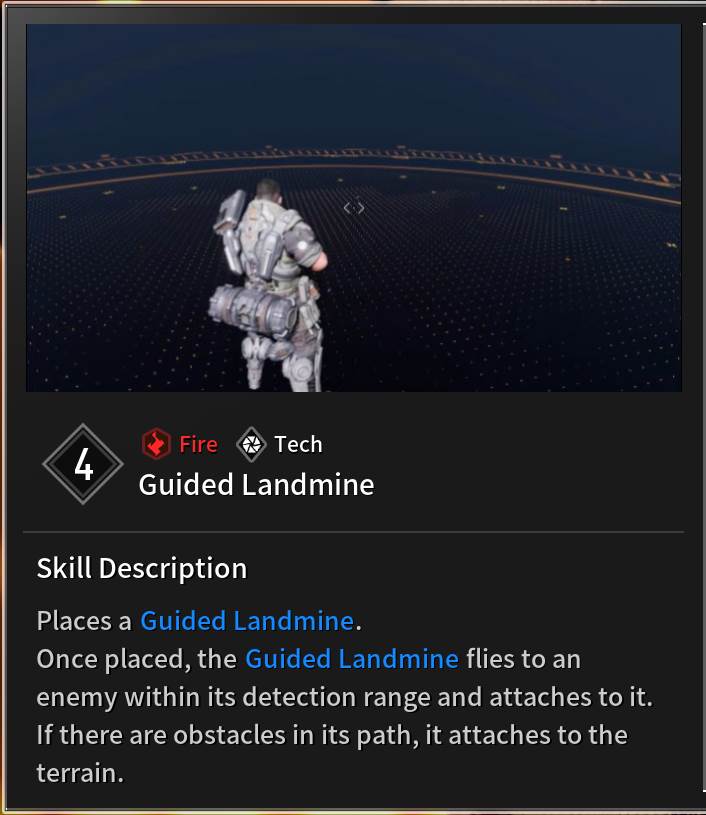
Guided Landmine Features in The First Descendant:
- Fire: Tech
- Description: Places a Guided Landmine. Once placed, the Guided Landmine flies to an enemy within its detection range and attaches to it. If there are obstacles in its path, it attaches to the terrain.
- Maximum Stacks: 3
- Stack Cooldown: 14 seconds
- MP Cost: 18
- Detection Range: 10m Radius
- Decte
- Burst Damage: Skill Power x 407.3%
- Explosion Damage Range: 3m Radius
- Max Expandable Range: 200%
- Projectile Speed Increase: 0%
How to Use Guided Landmine: Guided Landmines may seem useless at first, however, they hold massive explosive damage within them. You do not need to place the bomb right on top of enemies, as long as they walk within the circle, a bomb will attach to them. You can use this to deal with a group of spawning enemies or as you retreat to explode any enemies following you. These can stack just like Time Bombs so getting three on a single target and two Time Bombs still allows for the maximum damage scaling of Blast.
Arche Explosion
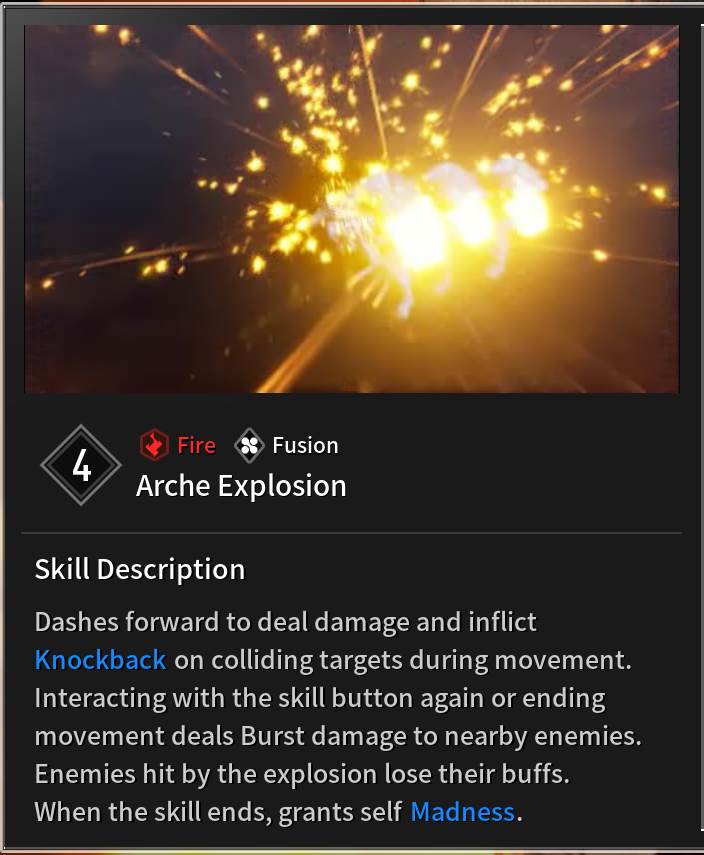
Arche Explosion Features in The First Descendant:
- Fire: Fusion
- Description: Dashes forward to deal damage and inflict Knockback on colliding targets during movement. Interacting with the skill button again or ending movement deals Burst damage to nearby enemies. Enemies hit by the explosion lose their buffs. When the skill ends, grants self Madness
- Cooldown: 80 seconds
- MP Cost: 65
- Movement Speed Increase Amount: 120%
- Damage: Skill Power x 85.8%
- Burst Damage: Skill Power x 7,414.4%
- Explosion Damage Range: 6m Radius
- Max Expandable Range: 200%
- Madness:
- Duration: 10 seconds
- Fireteam ATK Increase Amount: 25%
- Movement Speed Increase Amount: 30%
- DEF Decrease Amount: 30%
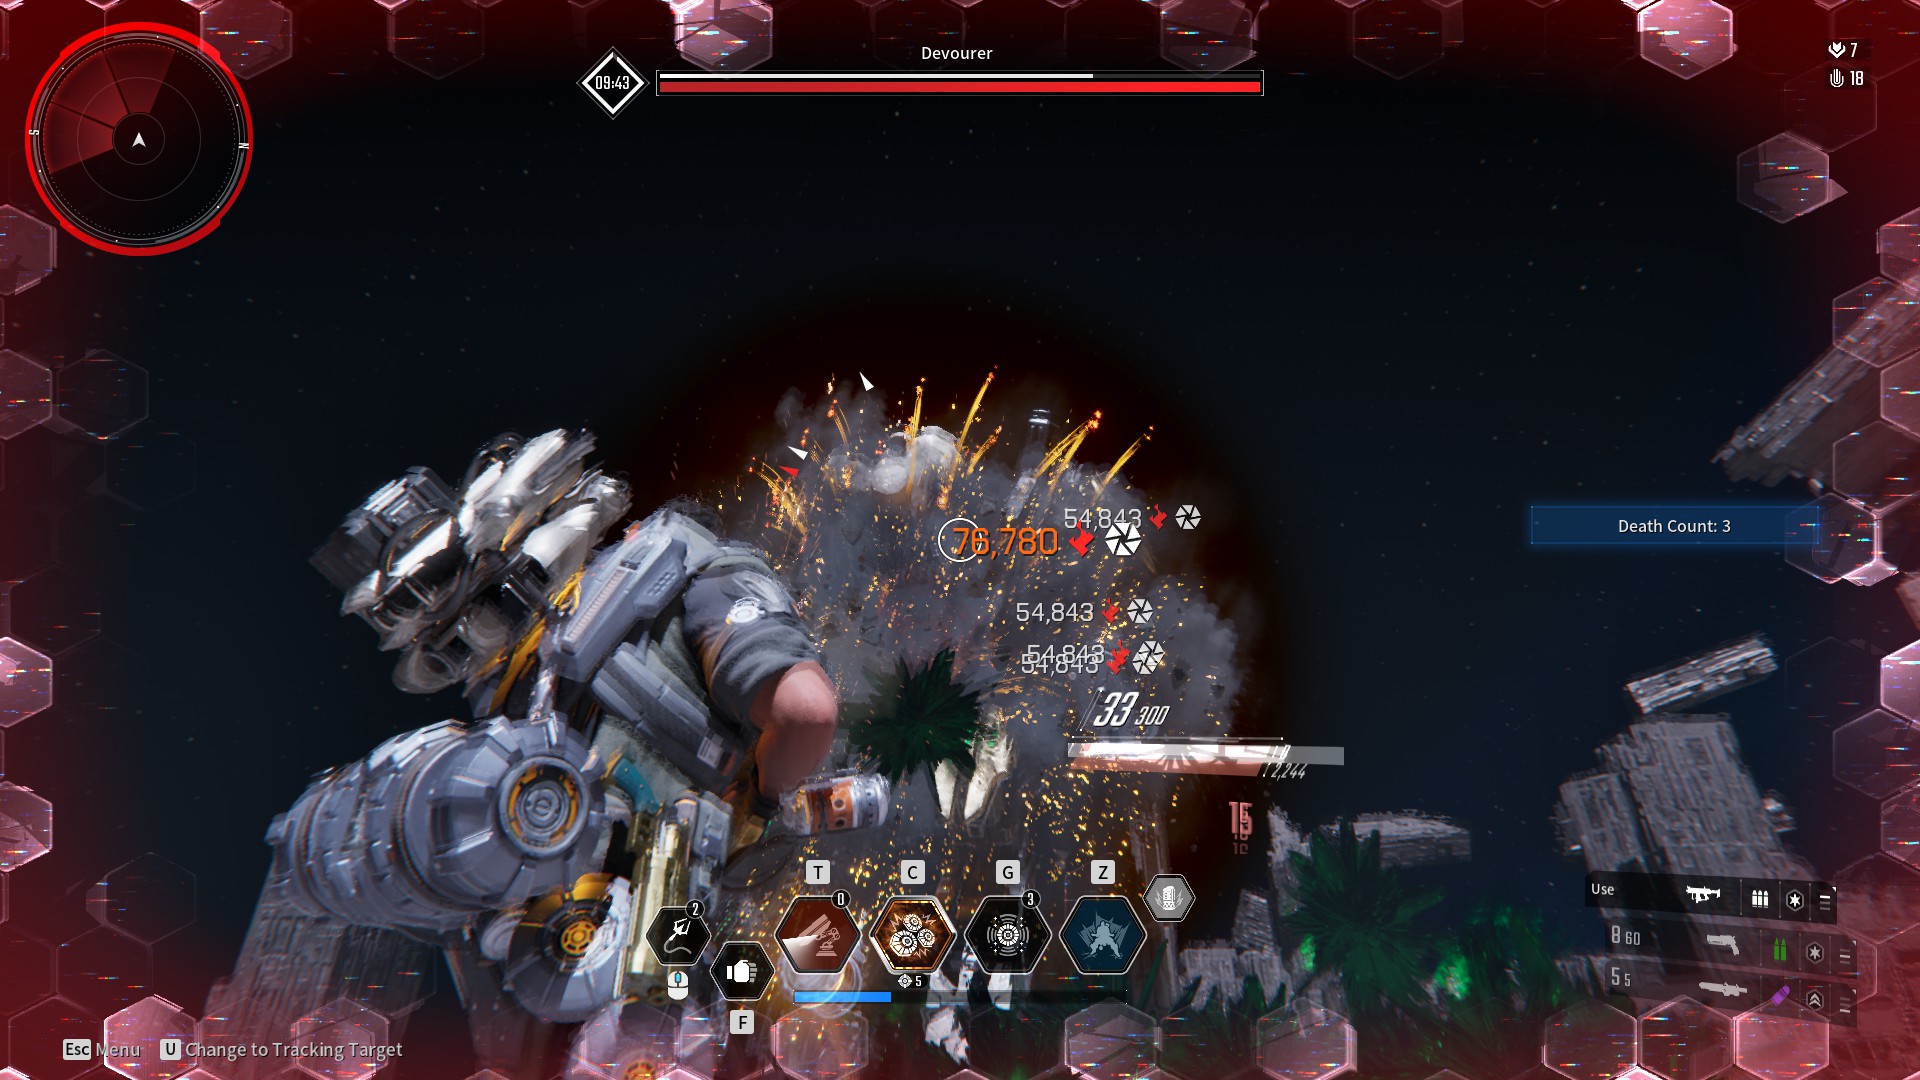
How to Use Arche Explosion: One of the weakest parts of Esiemo’s kit is his ultimate. While its damage multipliers are massive, it requires a small time to charge up, has little control, and requires getting dangerously close to enemies to be effective. Since he has no survivability skills, this ultimate can be very dangerous to use and put your resurrection in a bad position. Also, it deals massive damage and in an area-of-effect that can take out entire waves of trash enemies.
Adventitious Habit (Passive)
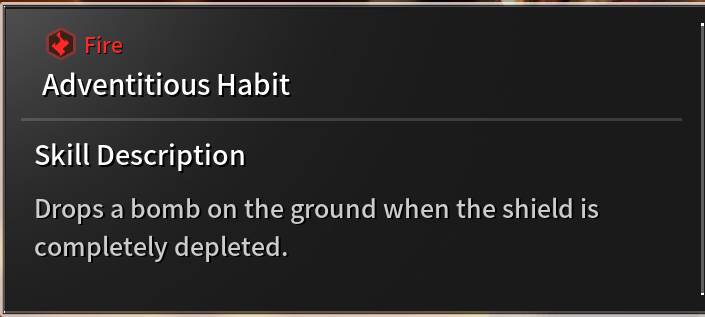
Adventitious Habit Features in The First Descendant:
- Fire
- Description: Drops a bomb on the ground when the shield is completely depleted.
- Cooldown: 30 seconds
- Burst Damage: Skill Power x 1,651.1%
- Explosion Damage Range: 4m Radius
- Max Expandable Range: 200%
How to Use Adventitious Habit: This passive is one of the weakest passives in the game. It simply provides a bomb when your shields are depleting. With so many bombs already available, we don’t want to intentionally take damage just to gain one additional bomb. Also, we have no control over the bomb outside of detonation so it’s just a passive that you don’t even pay attention to. It provides little to the build and Esiemo so don’t worry about when and how to use this passive.
How to play Esiemo in The First Descendant
Esiemo is all about explosions, explosions, and more explosions. Esiemo is a great ranged burst damage dealer capable and has strong trash mod clearing. You want to play Esiemo in mid-range, close enough to stick enemies with bombs and landmines while far enough away you won’t get swarmed and die. The key is maneuvering throughout the battlefield either laying traps for enemies to walk through or bursting out large health targets.
Survivability: Without mobility skills, healing, shields, or tackiness skills, Esiemo can be quite squishy. You want to play cover, feel free to retreat to safety to recharge your shields should you get too much damage. Also, your grapple can be a great tool to allow you to get into a mob of enemies, place bombs, and then retreat to safety before detonating them.
Stacking Damage: The most important part of dealing massive damage with Esiemo is stacking bombs onto a single target. You must stick bombs on a target by throwing them or placing mines for enemies to trigger and have bombs attached. Each bomb attached to a target increases the damage done so it’s extremely worth it to wait until you can place multiple stacks at once. Once enough bombs, up to a maximum of five, are attached, detonate them all at once to deal significant damage.
Descendant Modules for Esiemo Build
Amplification Control, Spear and Shield, and Fire Master are the best modules (mods) for a Esiemo Build in the First Descendant. Amplification Control will increase your skill effect range, allowing you to deal more wide-spread damage, and your shield. Spear and Shield dovetail well with the previous mod, increasing your overall defense and your skill power. Finally, Fire Master is how your going to push the limits of the damage your skills and abilities can do.
In The First Descendant, modules are essential components that enhance and customize your character’s abilities, stats, and overall performance. Modules can be acquired through questing, missions, loot drops, and vendor items. Moreover, you have limited resources to slot mods; therefore, some slots may be empty depending on your chosen setup.
Esiemo Best Modules for Leveling
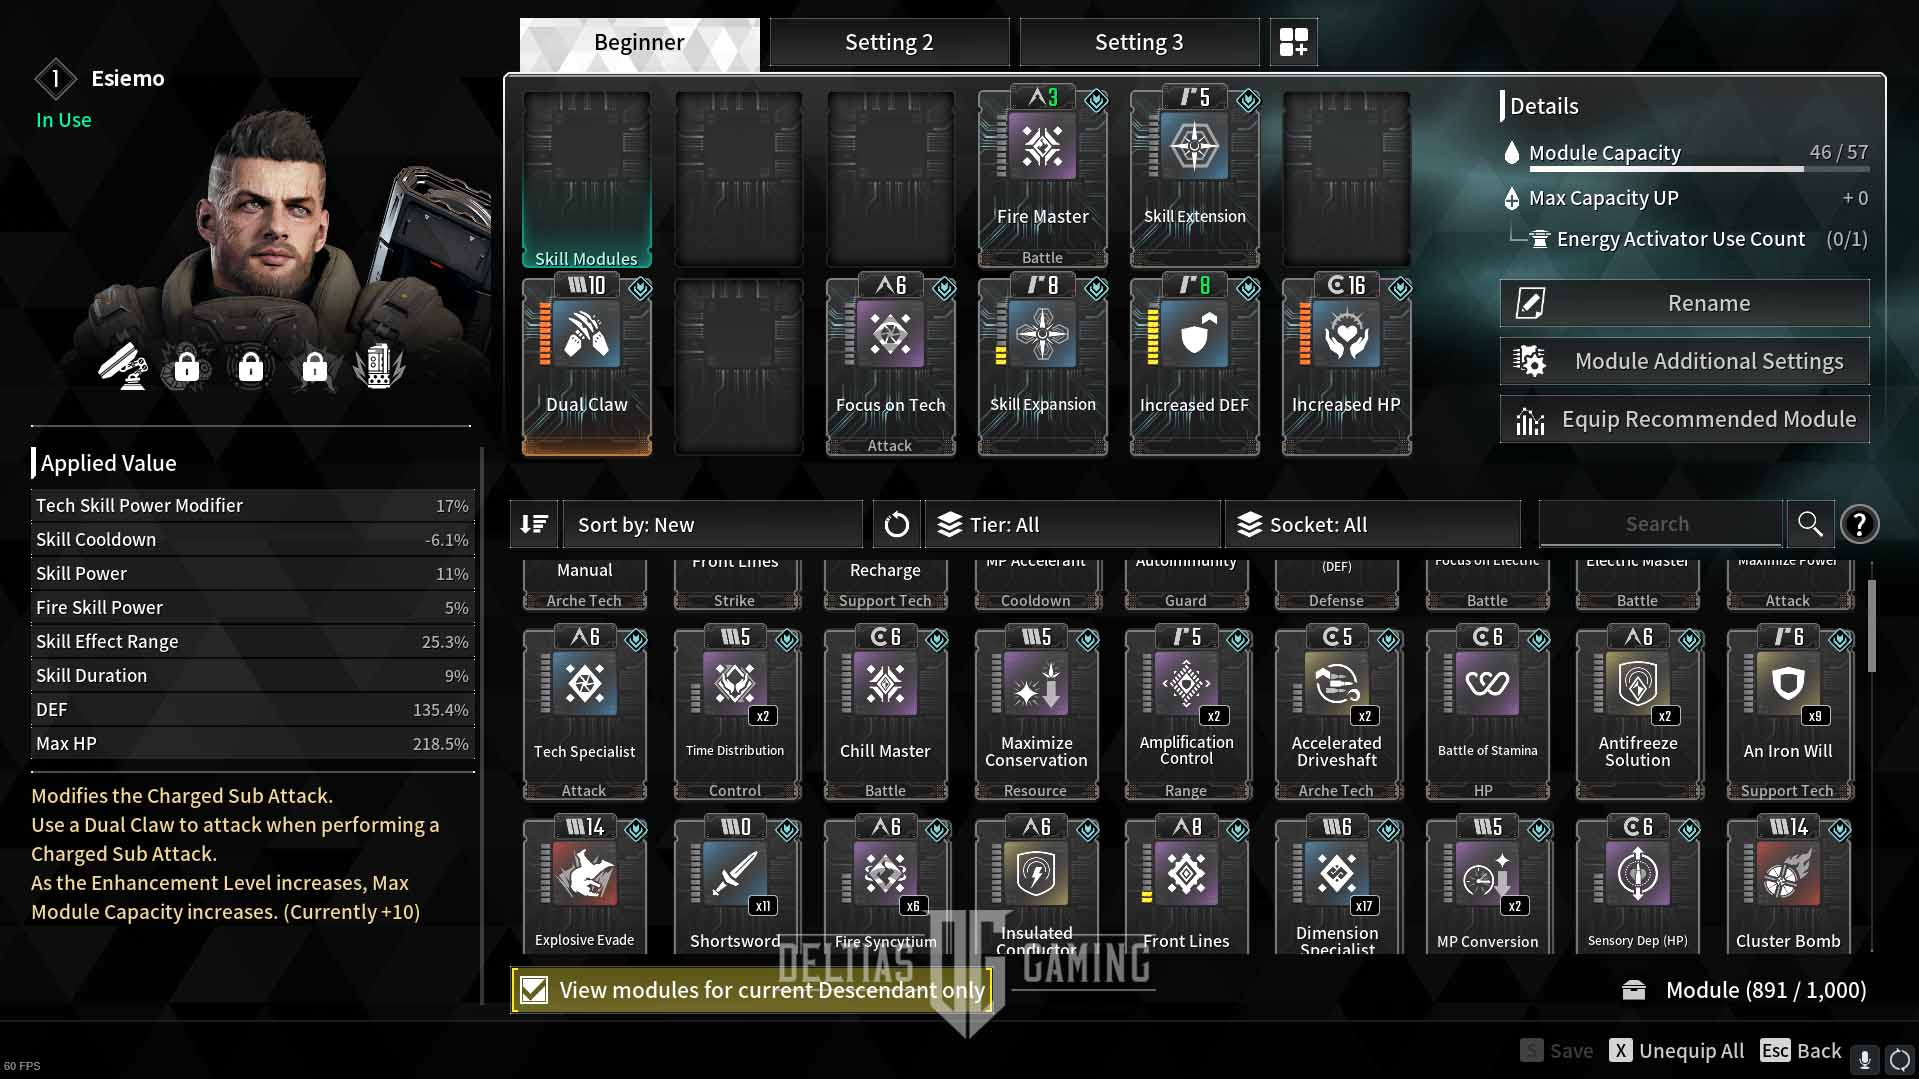
Below is a list of the best leveling mods for Esiemo Build in the First Descendant:
- Fire Master – Skill Power +X%, Fire Skill Power +X%
- Skill Extension – Skill Duration +9%
- Dual Claw – Increases Module Capacity, and changes your Sub Attack to a dual claw attack.
- Focus on Tech – Tech Skill Power Modifier +X%, Skill Cooldown -X%
- Skill Expansion – Skill Effect Range +20%
- Increased DEF – DEF +16%
- Increased HP – Max HP +22%
| Slot | Module | Quality |
|---|---|---|
| 1 (Skill Module) | Empty | N/A |
| 2 | Empty | N/A |
| 3 | Empty | N/A |
| 4 | Fire Master | Rare |
| 5 | Skill Extension | Standard |
| 6 | Empty | N/A |
| 7 (Sub Module) | Dual Claw | Standard |
| 8 | Empty | N/A |
| 9 | Focus on Tech | Rare |
| 10 | Skill Expansion | Standard |
| 11 | Increased DEF | Standard |
| 12 | Increased HP | Standard |
Esiemo Best Modules
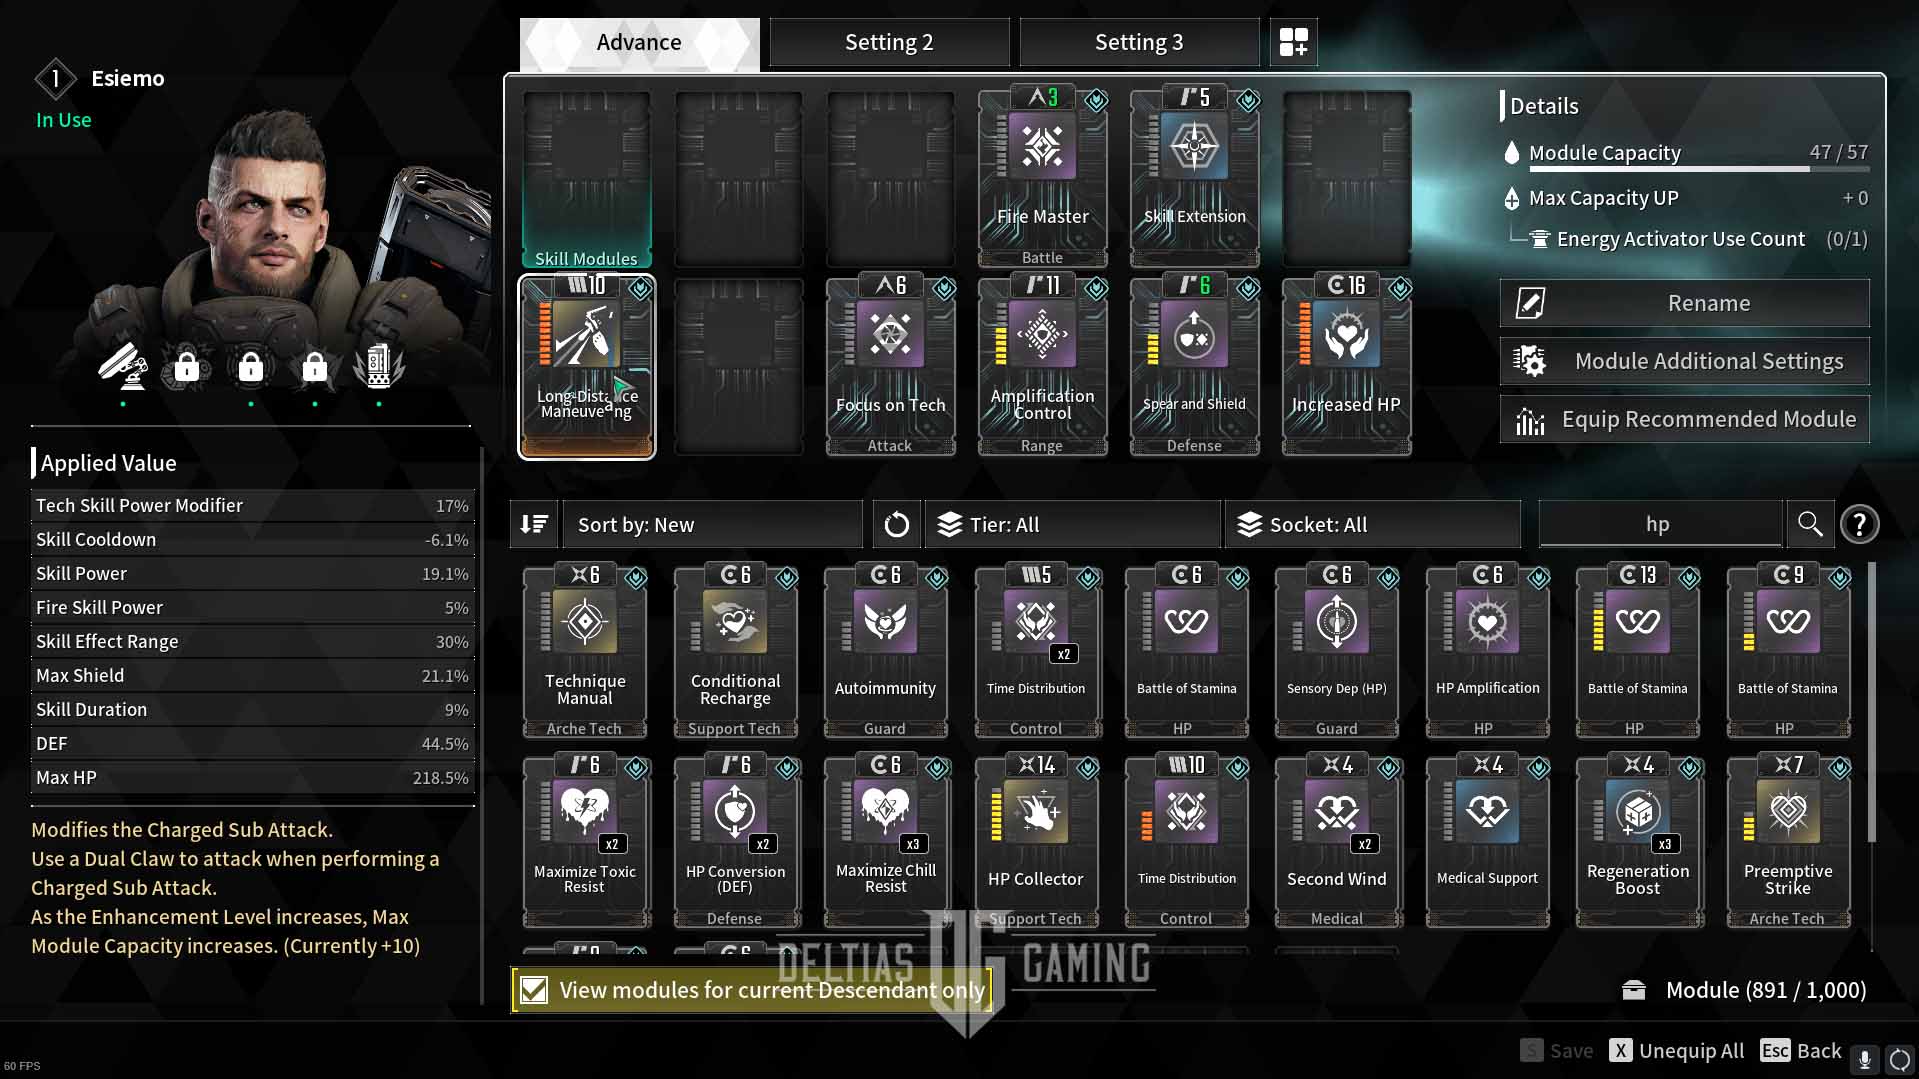
Below is a list of the best mods for Esiemo Build in the First Descendant:
- Fire Master – Skill Power +X%, Fire Skill Power +X%
- Skill Extension – Skill Duration +9%
- Long-Distance Maneuvering: Modifies grappling hook range to 25 meters but increases charge time. Also allows more module capacity.
- Dual Claw remains a good alternative until you find Long-Distance Maneuvering
- Focus on Tech – Tech Skill Power Modifier +X%, Skill Cooldown -X%
- Amplification Control – Skill Effect Range +13%, Max Shield +9%
- Spear and Shield – DEF +22%, Skill Power +8.1%
- Increased HP – Max HP +22%
| Slot | Module | Quality |
|---|---|---|
| 1 (Skill Module) | Empty | N/A |
| 2 | Empty | N/A |
| 3 | Empty | N/A |
| 4 | Fire Master | Rare |
| 5 | Skill Extension | Standard |
| 6 | Empty | N/A |
| 7 (Sub Module) | Long-Distance Maneuvering | Ultimate |
| 8 | Empty | N/A |
| 9 | Focus on Tech | Rare |
| 10 | Amplification Control | Rare |
| 11 | Spear and Shield | Rare |
| 12 | Increased HP | Standard |
Best Reactor Stats for Esiemo in The First Descendant
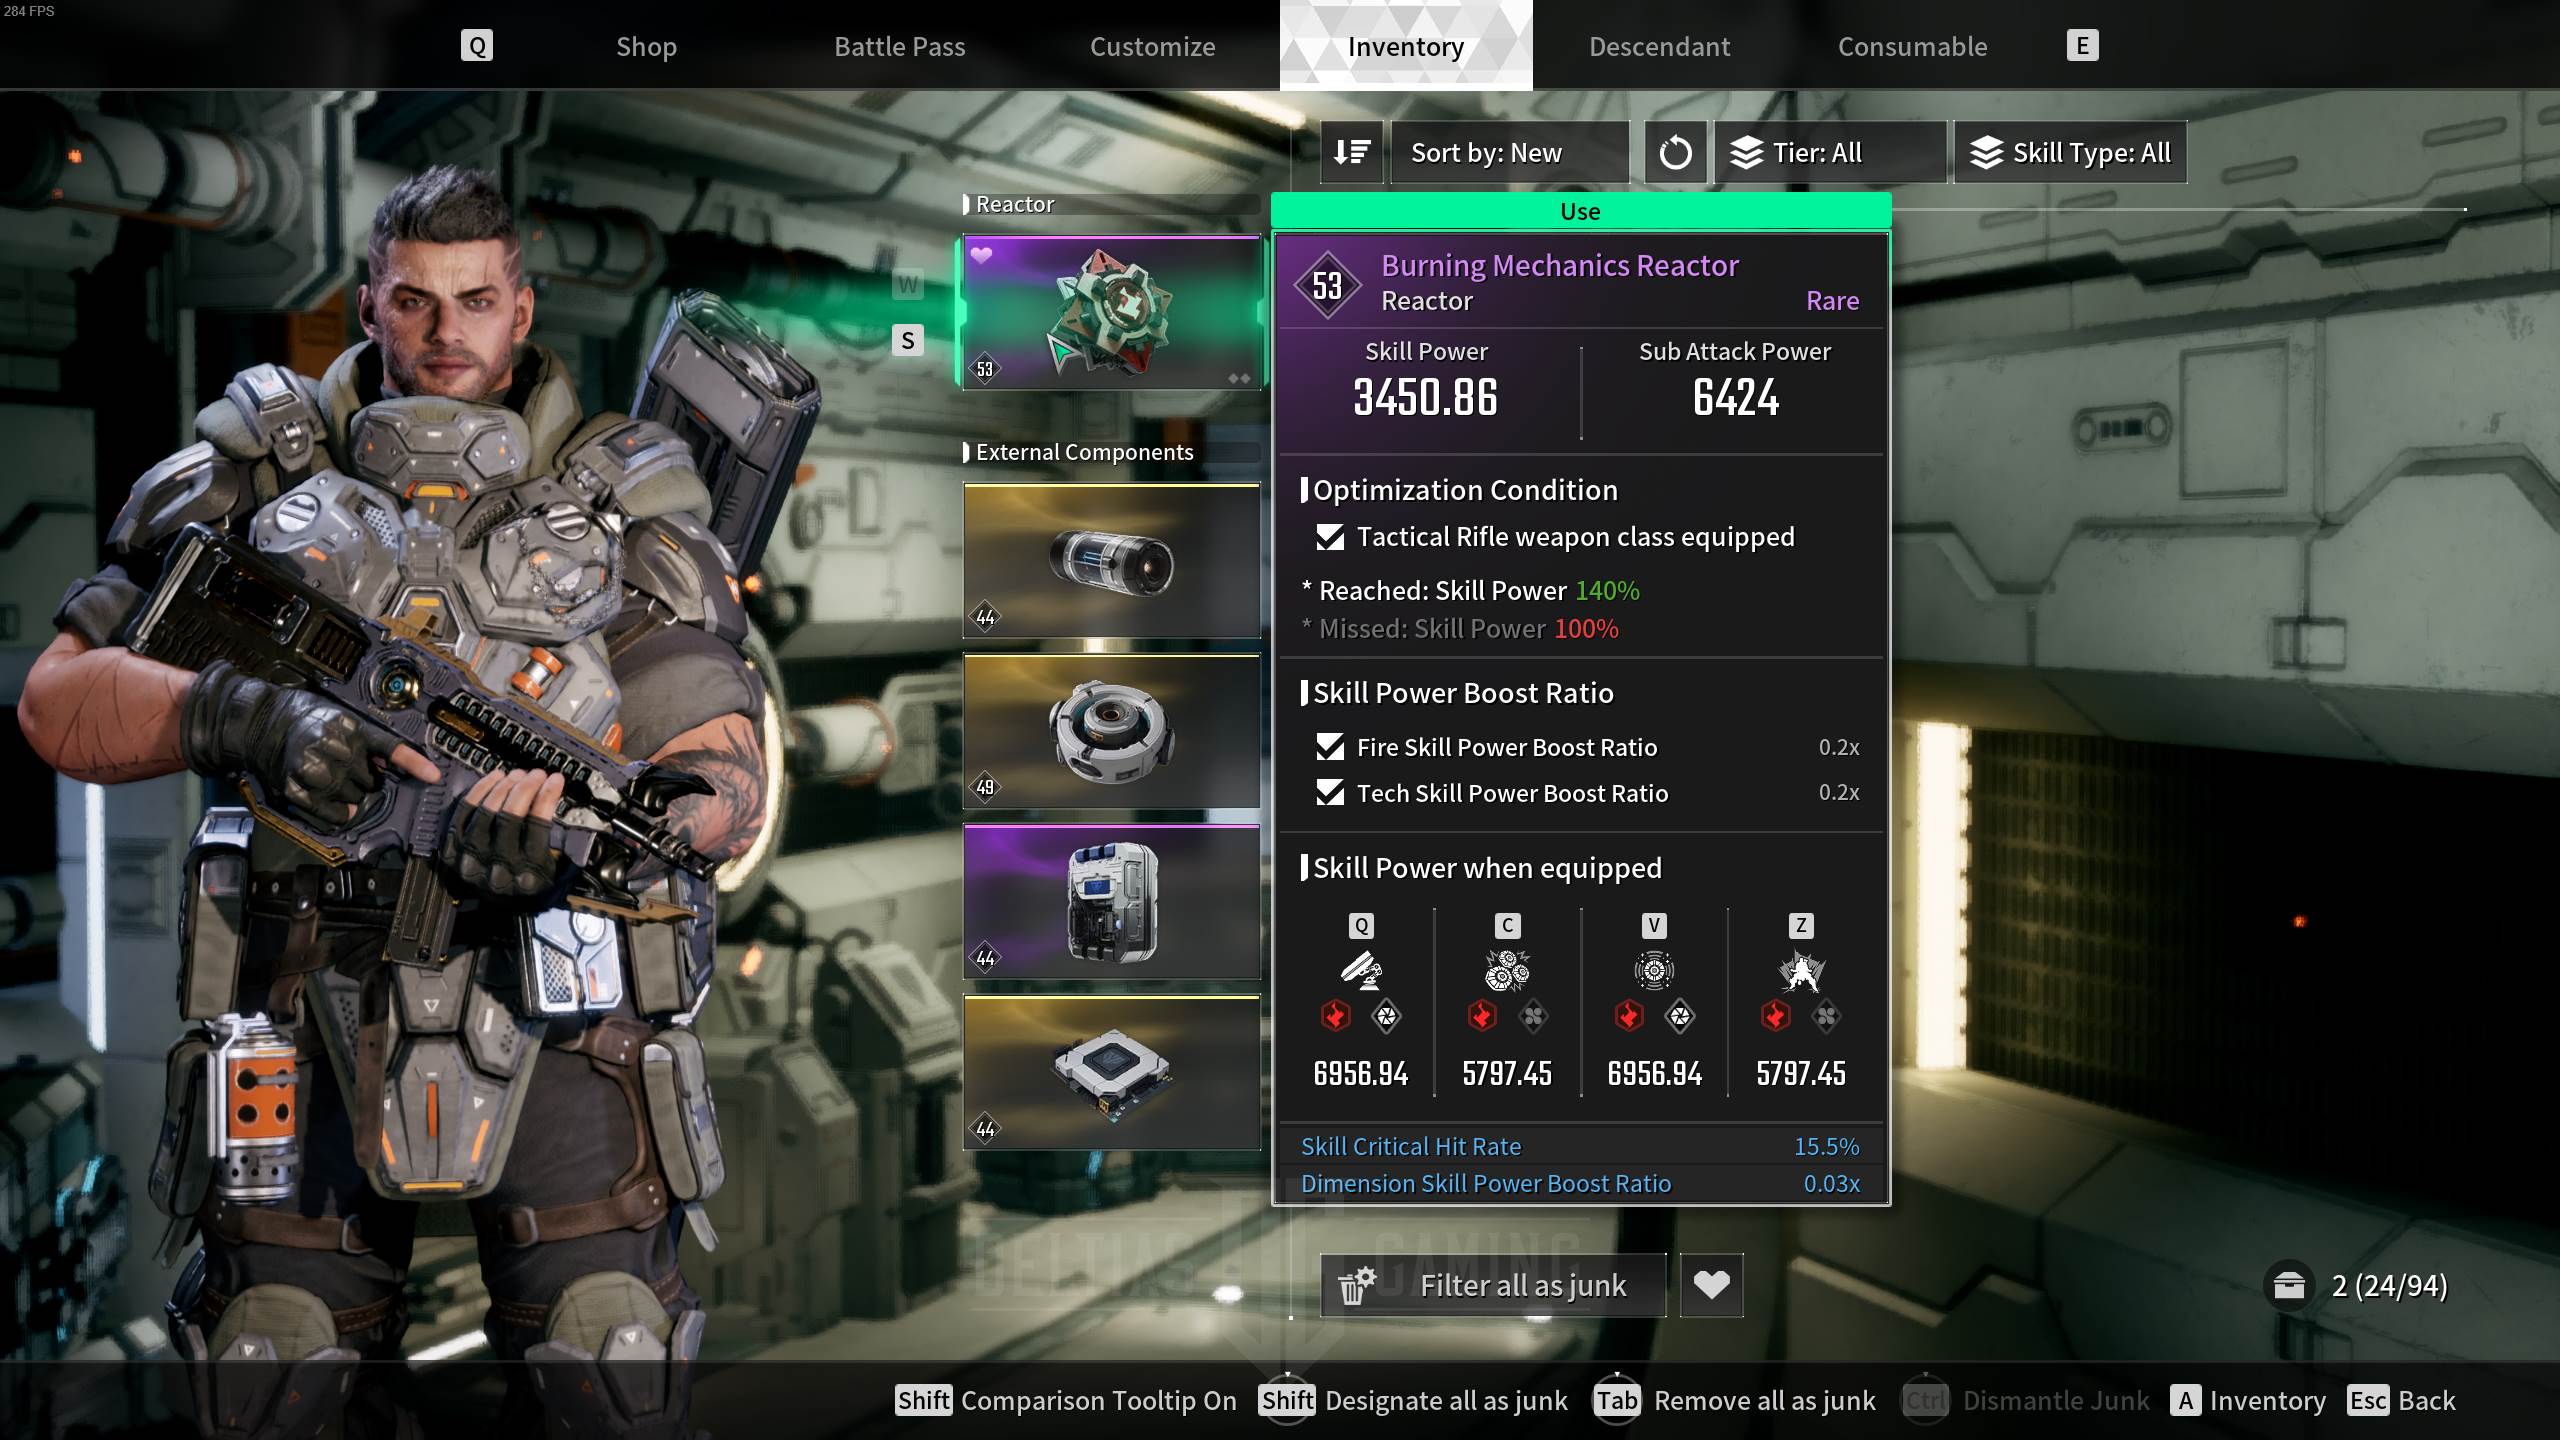
Burning Mechanics is the best reactor for the Esiemo Build Guide in the First Descendant. This gives a boost in Fire and Tech Skill Boosts to enhance our bombs’ base damage. Additionally, you want to prioritize reactors that have additional bonuses for Tech and Fire skill power boost ratios.
- Optimization Condition: Tactical Rifle (Greg’s Reversed Fate)
- Skill Power Boost Ratio: Fire and Tech
- Bonus Conditions: Tech Skill Power Boost and Skill Effect Range
In The First Descendant, reactors are powerful enhancements significantly impacting a character’s abilities, stats, and overall performance. Each reactor comes with an “optimal condition,” which requires a specific weapon type to be equipped to activate. Therefore, this should be your primary weapon for the build. They function as core components that provide substantial boosts and unique effects, enabling players to tailor their characters to specific playstyles and strategies.
Weapons for Esiemo Build
Enduring Legacy is the best weapon for an Esiemo build because the machine gun does incredible damage and debuffs targets, triggering more status effects. Thus, this weapon increases your damage and everyone attacks the boss. Three alternatives are Tamer for bosses, Python for a debuff weapon, or Thunder Cage for mob clear. Your secondary weapon should be Greg’s Reverse Fate for medium range burst damage with bombardment. For range damage, use the Afterglow Sword Sniper Rifle for weak point damage.
The following list presents the best weapon choices for Esiemo Build:
- Enduring Legacy – Machine Gun
- Greg’s Reversed Fate – Tactical Rifle
- Afterglow Sword – Sniper Rifle
Enduring Legacy

Enduring Legacy features in the First Descendant:
- Firearm ATK: 28
- Fire Rate: 571
- Reload Speed: 2.7 seconds
- Effective Range: 35 meters
The strength of the Enduring Legacy is triggering an extra status effect with the Craftsmanship Perk. Additionally, Enduring Legacy will do more damage than the Tamer, which is a good alternative—another alternative if the Python submachine gun or Thunder Cage.
Greg’s Reversed Fate

Greg’s Reversed Fate features in the First Descendant:
- Firearm ATK: 33
- Fire Rate: 342
- Reload Speed: 1.4 seconds
- Effective Range: 55 meters
The tactical rifle Greg’s Reserved Fate is best for burst AOE damage with Bombardment at medium range. The AOE damage explodes and causes burn damage. Below are the recommended mods for Greg’s Reversed Fate:
- Fire Rate Up: Fire Rate +6%
- Better Insight: Firearm Critical Hit Rate +10%
- Better Concentration: Firearm Critical Hit Damage +8%
- Concentration Priority: Firearm Critical Hit Damage +8%, Reload Time Modifier -8%
- Action and Reaction – Firearm ATK +15%, Recoil +5%
- Rifling Reinforcement – Explosive ATK +12%.
- Weak Point Sight: Weak point damage +10%, Accuracy -5%
- Edging Shot: Firearm critical hit rate +11%, firearm ATK -4%
- Spray and Pray: When landing a firearm critical hit, rounds are not consumed for 3 second (25 second cooldown)
Afterglow Sword

Afterglow Sword features in the First Descendant:
- Firearm ATK: 240
- Fire Rate: 66
- Reload Speed: 2.5 seconds
- Effective Range: 55 meters
- Nightmare Reaper: on hitting an enemy’s weak point, inflicts the unique ability death propagation. On hitting an enemy commander or collossi, increase firearm critical hit rate and apply the effect to the attack.
The Afterglow Sword Sniper Rifle is the best choice for ranged precision weak point damage. Once you trigger Death Propagation, you gain increased reload and damage on weak points. Use this weapon for ranged headshots if possible. Below are the recommended mods for the Afterglow Sword Sniper Rifle:
- Special Sight – Movement Speed when Aiming -8%, Weak Point DMG when Aiming +8%
- Action and Reaction – Firearm ATK +15%, Recoil +5%
- Rifling Reinforcement – Explosive ATK +12%
- Better Insight – Firearm Critical Hit Rate +10%
- Edging Shot – Firearm Critical Hit Rate +8%, Firearm ATK -4%
- Better Concentration – Firearm Critical Hit Damage +19%
- Concentration Priority – Firearm Critical Hit Damage +30%, Reload Time Modifier -8%
- Fire Rate Concentration – Fire Rate +8%, Firearm Critical Hit Damage +6.5%
- Focus Fire – Weak Point Damage +8%, Firearm Critical Hit Damage +6.5%
- Weak Point Sight – Weak Point Damage +9%
External Component
Volcanic and Battle Aesthetics are the best External Component sets for an Esiemo build because they boost fire skill power damage and skill critical hit rate. Regarding stats, prioritize Max HP, DEF, and elemental resistance like Toxic, Chill, Fire, or Electric Resistance. Below are the best External Component bonuses to prioritize for the Esiemo Build guide in the First Descendant:
First Bonus:
- HP
- DEF
- Shields
Second Bonus
- Max Resource (HP, MP, DEF, Shields)
- Elemental resistance (fire, chill, electric, toxic)
| Auxiliary Power | Sensor | Memory | Processor |
|---|---|---|---|
| First Bonus Priority | First Bonus Priority | First Bonus Priority | First Bonus Priority |
| HP DEF Shields | HP DEF Shields | HP DEF Shields | HP DEF Shields |
| Second Bonus Priority | Second Bonus Priority | Second Bonus Priority | Second Bonus Priority |
| Max HP Fire Resistance | Max MP Chill Resistance | DEF Electric Resistance | Max Shields Toxin Resistance |
Recent Updates and Changes for Bunny Build
The biggest change and update to Bunny during Season One is the addition of Invasions and Inversion Reinforcement. Unfortunately, the new Season doesn’t bring anything new or good for Esiemo, so he still isn’t a great choice. Players are rewarded for completion time and materials used for the newest Descendant Hailey. What you should know is to work towards unlocking the Inversion and completing Invasions to progress this new piece of equipment.
Esiemo Story in the First Descendant
When Esiemo was enlisted to become a Descendant, his parents said these parting words as they embraced him: “Be proud of your Arche. No more tears. This officer here also needs to get back to work, okay?” No sooner had those words left their lips, the Bomb Squad in blast suits carefully collected Esiemo’s tears. Due to his unique Arche, even a single teardrop from Esiemo is a dangerous explosive.
Ever since he was a child, Esiemo was bullied by other children because his body would smell like gunpowder. Without the warm love of his parents, it would have been difficult for him to withstand the torment. Although his parents loved him immensely, once his sneezes started to cause actual explosions, as loving parents, they understood that they had no other choice. At this rate, not only would they be unable to hide the suspiciously frequent explosions that were occurring in the Albion residential area, but their beloved neighbors, who they cared for as much as they did their child, would have to deal with the disruption in their daily lives.
Esiemo’s Story Continued
In the end, Esiemo’s parents reported his potential Arche ability to HQ, and the Magisters succeeded in uncovering Esiemo’s Arche though corresponding tests. The distinctive scent and excretions produced from his body were actually explosive Arche substances.
It was a miracle that no major incident had occurred so far. Now, not only was Esiemo isolated from the residential area, but as a Descendant candidate, he had no other choice but to leave his parents’ side. However, his parents embraced him tightly; they were proud of their son.
Esiemo, who had decided to accept his destiny, made a promise to his parents. Not only would he become an outstanding Descendant and the best son to them, but he would grow up and become someone who could love even those who had bullied him in the past.
Esiemo was confident. Exploding enemies, growing fame, and burning love. Is there anything better than explosions to achieve all of these at the same time?
Best Esiemo Build Guide Summary – The First Descendant
- Reactor: Burning Mechanics
- Weapons
- Enduring Legacy – Machine Gun
- Greg’s Reversed Fate – Tactical Rifle
- Afterglow Sword – Sniper Rifle
- Weapon Mods
- Rifling Reinforcement
- Fire Rate Up
- Action and Reaction
- External Component Set
- 2x Volcanic
- 2x Battle Aesthetics
- Skills
- Time Bomb
- Blast
- Guided Landmine
- Arche Explosion
- Adventitious Habit (Passive)
Best Mods
- Fire Master
- Skill Extension
- Long-Distance Maneuvering
- Focus on Tech
- Amplification Control
- Spear and Shield
- Increased HP
Looking For More?
Thank you for reading The First Descendant: Best Esiemo Build Guide. We provide the latest news and create guides for Baldur’s Gate 3, Starfield, Fallout 4, Destiny 2, ESO, and more. Also, watch me play games on Twitch or visit my YouTube channel!
- The First Descendant: Best Builds – All Characters
- The First Descendant Guides
- The First Descendants Best Characters (Classes): Tier List
- The First Descendant: Bunny Character and How to Play the Class Guide
- You can support our Website by Linking Account (affiliate): deltia#9684


