Facebook
 Reddit
 Email
Email
In Baldur’s Gate 3, Gauntlet of Shar is a location tied to the main story and Shadowheart’s personal quest, where you will find Nightsong & Balthazar, here is a complete Walkthrough.
Gauntlet of Shar is an important location, part of the main story, Shadowheart’s personal quest, and a way to obtain a powerful legendary weapon at the end of Act 2. This Gauntlet of Shar Baldur’s Gate 3 Daughter of Darkness: The Chosen of Shar – Quest Walkthrough takes you through the intricate and complex trials and dialogue choices to complete it.
Gauntlet of Shar – Quest Walkthrough
The Gauntlet of Shar is an old Shar temple where you need to collect a total of four (more) Umbral Gems that you will place on two pedestals to find Nightsong and complete a long quest that starts in Act 2. Depending on your choices and quest progression, you will be tasked with finding Nightsong and Balthazar.
Nightsong and Balthazar( who is looking for her) are in the Gauntlet of Shar, a location in Shadow-Cursed Lands, which you can enter during Act 2. If you follow the main questline and Shadowhert’s personal quest, you’ll eventually find yourself needing to find Nightsong or Balthazar. However, you can also enter this location regardless of your quests journal as soon as you start Act 2.
Where to find Nightsong and Balthazar? – Gauntlet of Shar
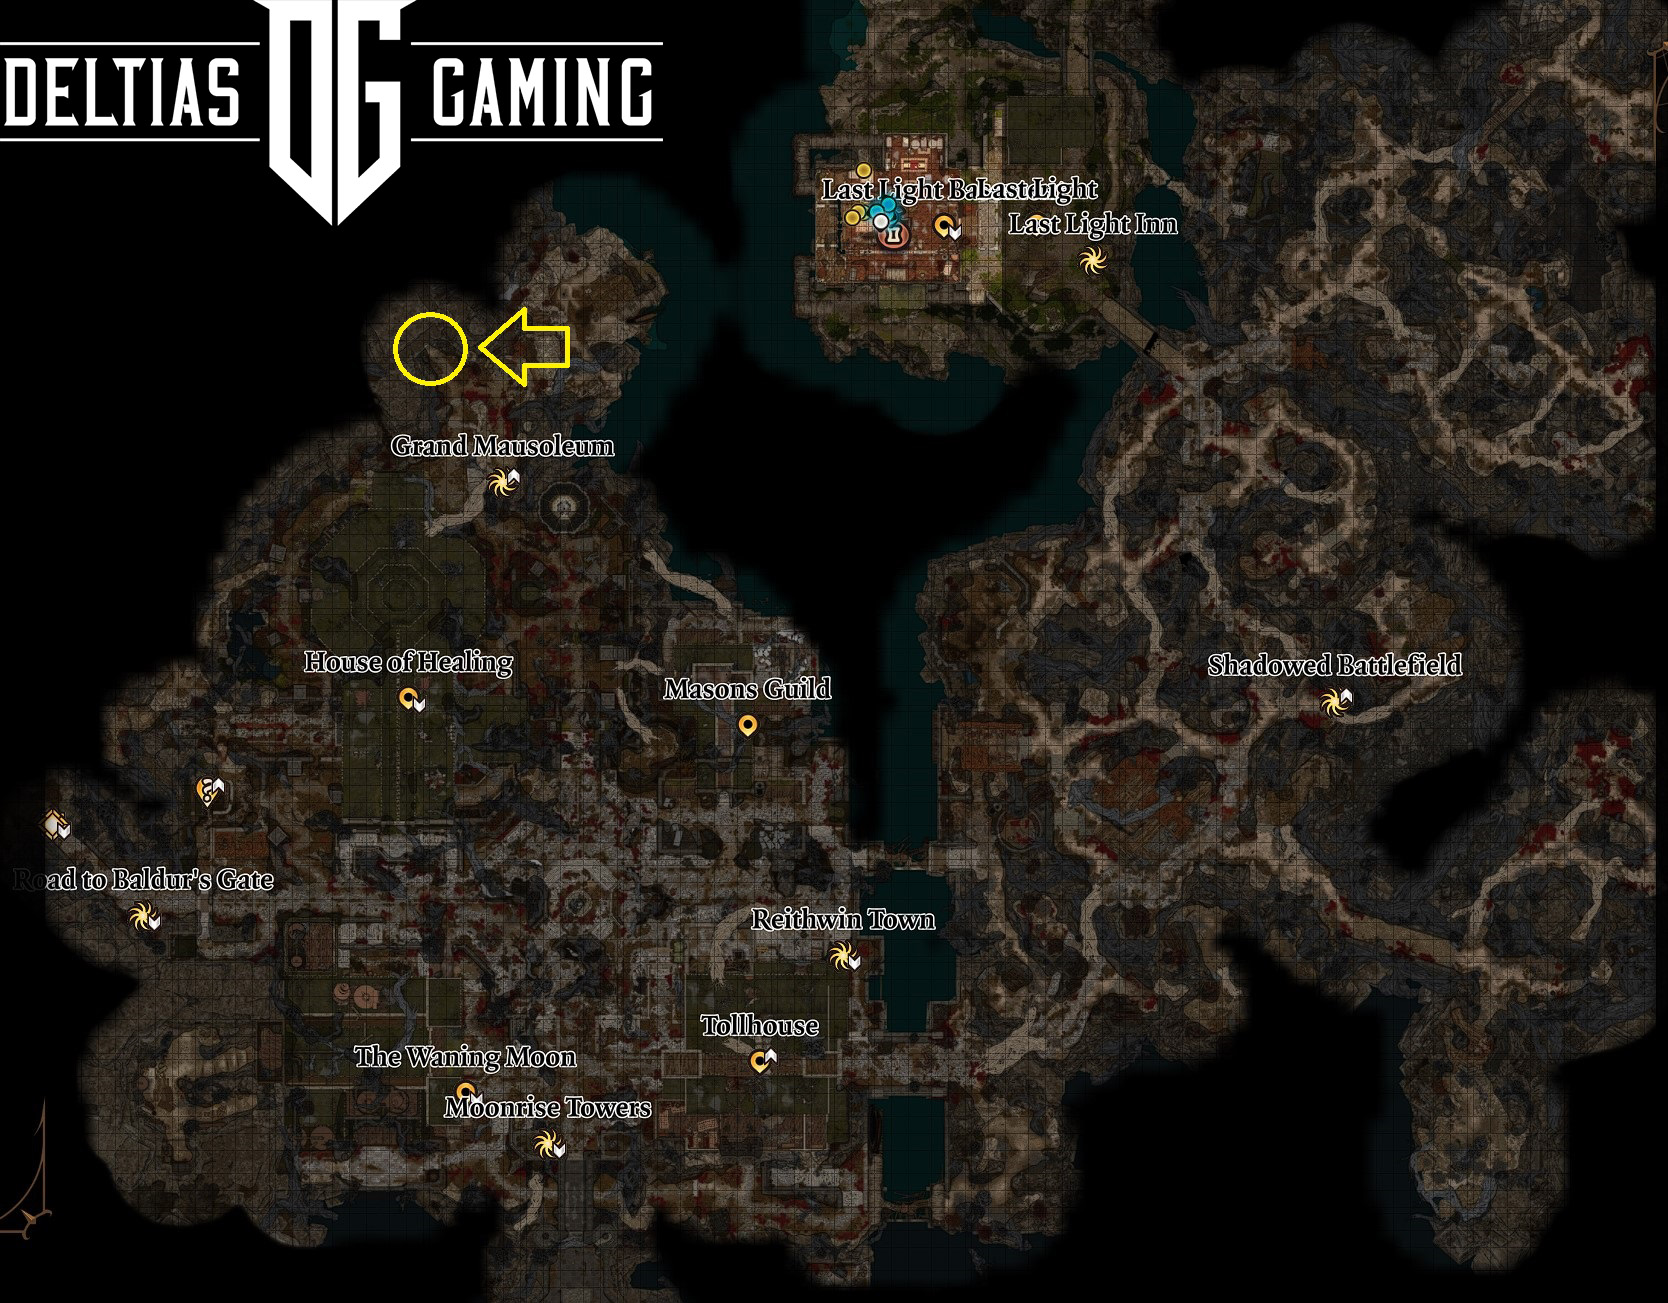
Nightsong is in the Gauntlet of Shar, and the entrance to the temple is located north of the House of Healing next to the Grand Mausoleum fast travel portal. You’ll meet Raphael there, warning you about a terrible beast inside. He will ask you to deal with his old enemy. To find the Nightsong and find the ring, you must confront this powerful being. Regardless of your choices, now you can enter the crypt and ancient temple of Shar. It’s part of the Nightsong Quest.
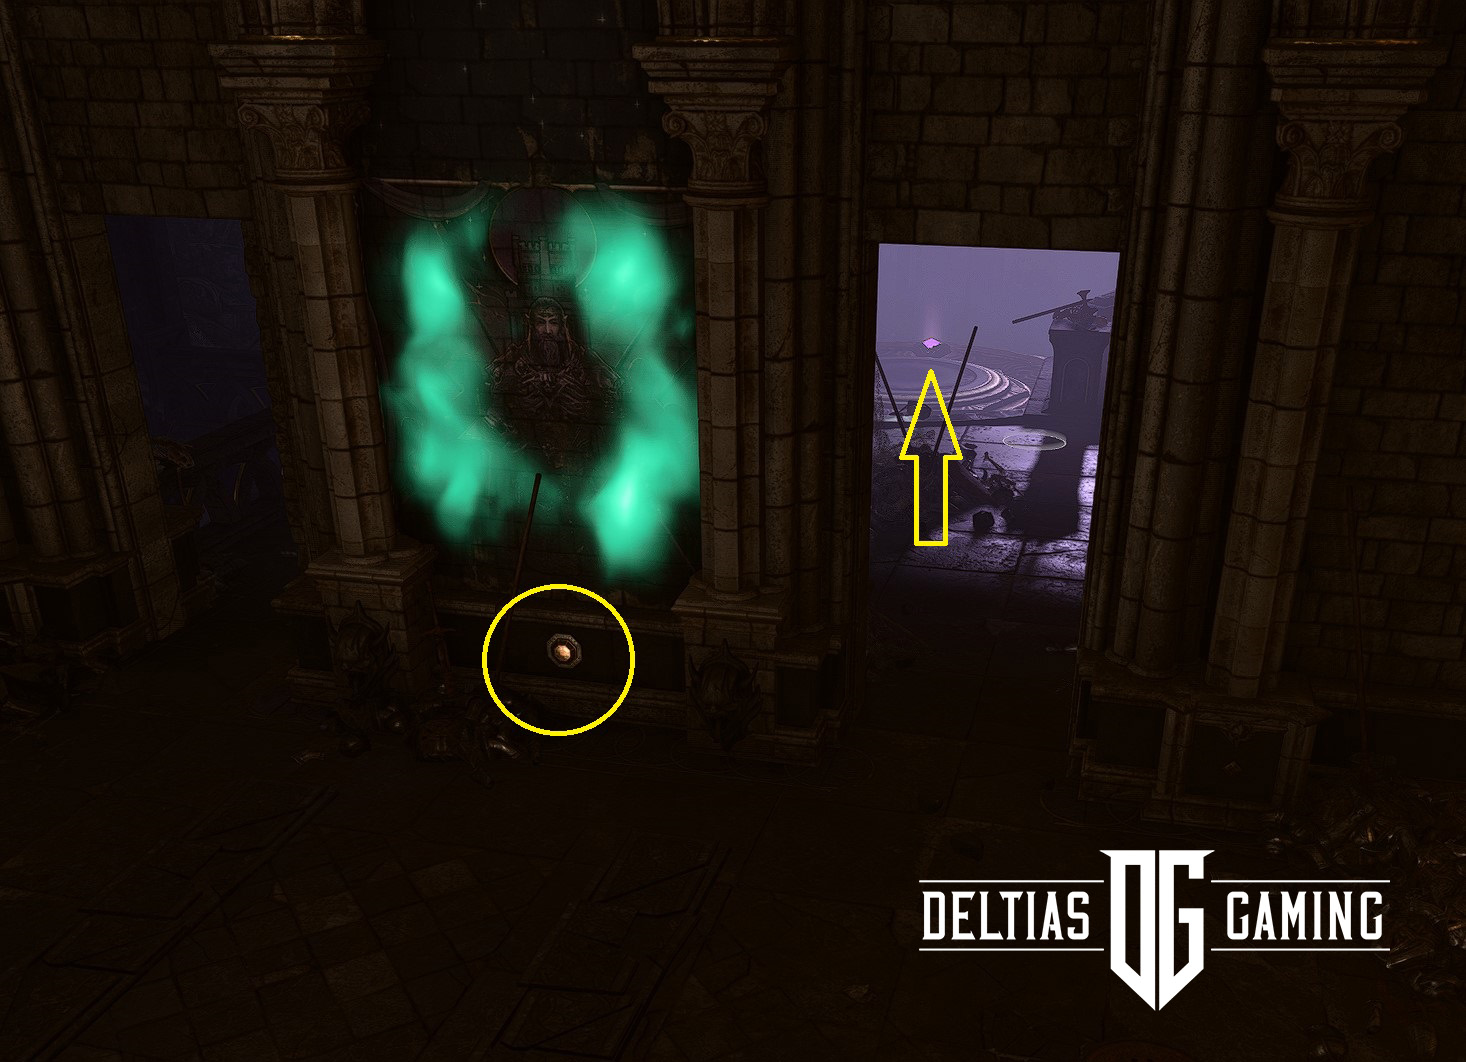
Loot the mausoleum area and go further. The ancient temple of Shar is behind the hidden door next to the Kethrick Thorh Gobelin. To open the hidden door, you’ll need to pass an automatic perception check and uncover the three buttons each under one of the paintings in the room. Press the buttons as follows:
- Moonrise Towers
- Grief
- General
Next, enter the Gountled of Shar by stepping on the platform and pressing the purple gem to be transported inside.
Gauntlet of Shar Puzzle
Now you have two choices: solve the statue Shar Puzlle or take longer proud and go west until you find the share trials.
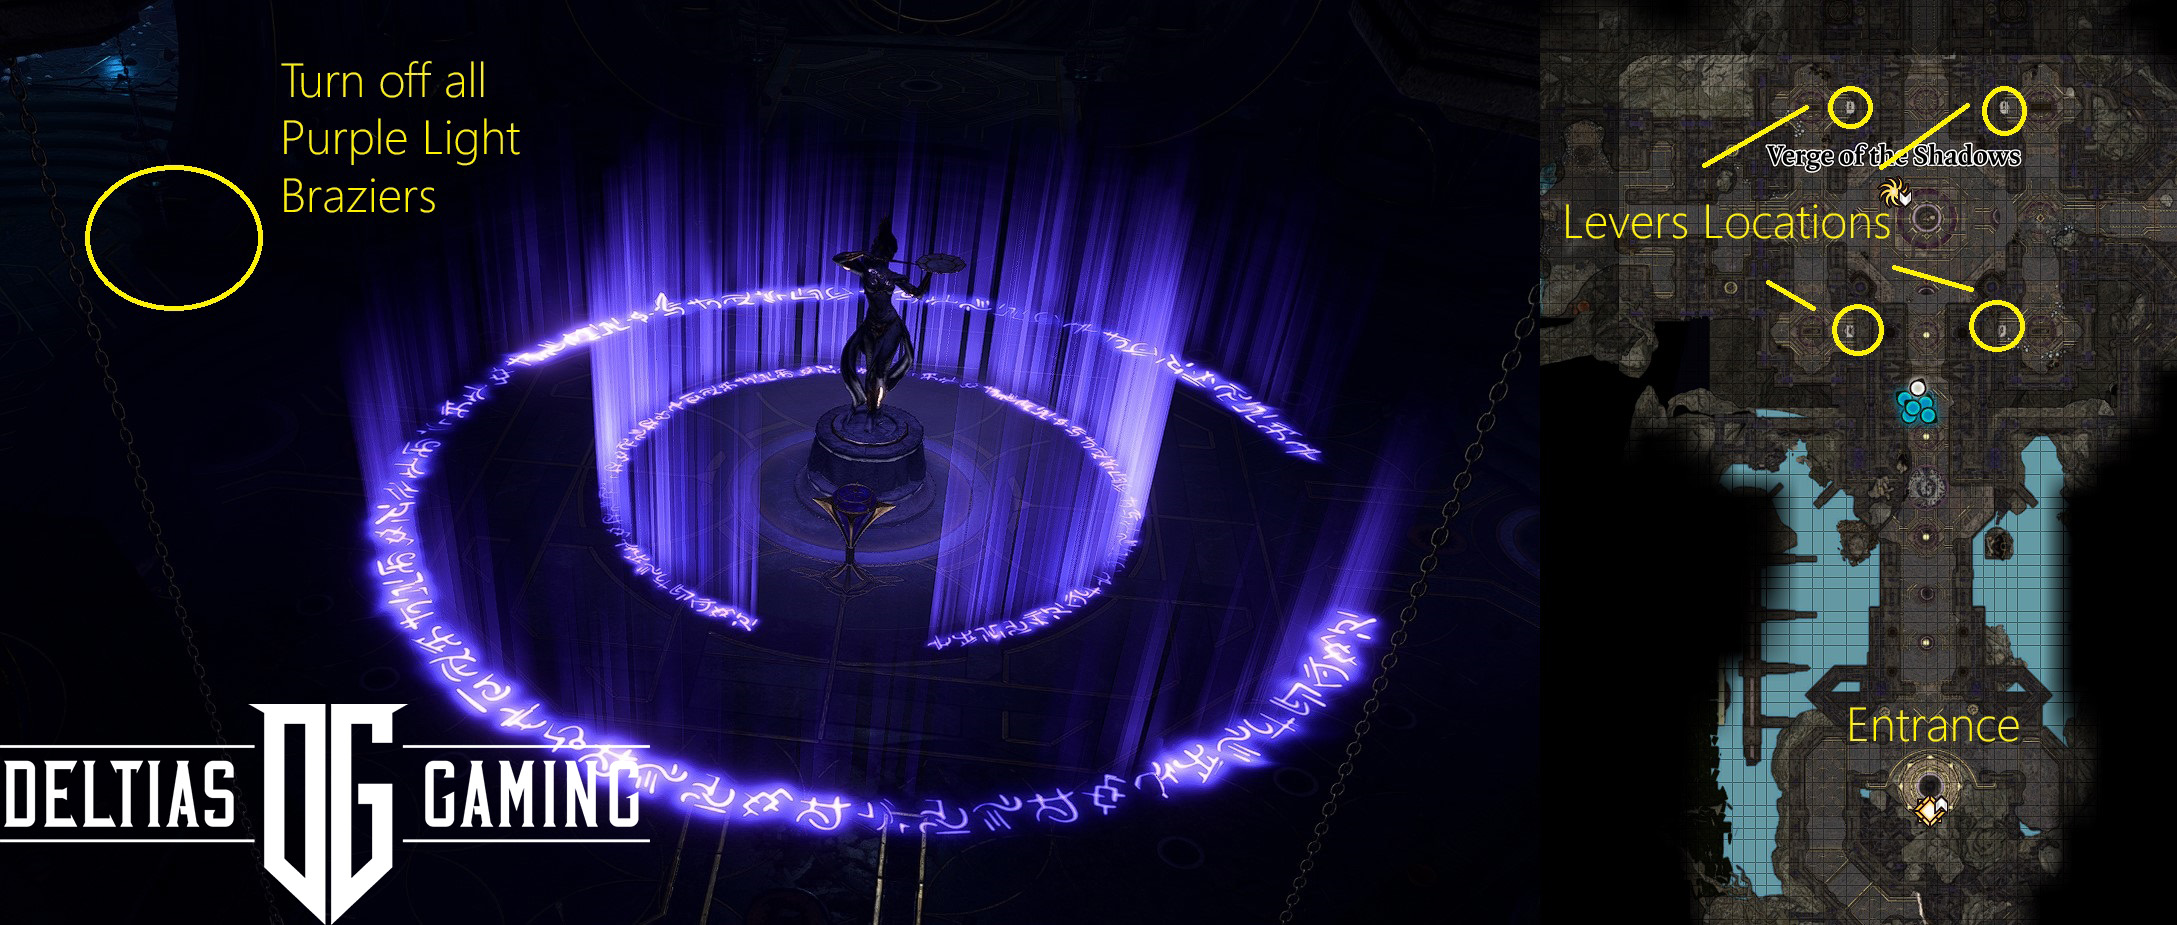
You’ll see a Shar statue with a globe and many side rooms when you enter. You won’t be able to get close to the status. It will knock you out immediately. In each room is a sarcophagus, trap, and lever that can lower the hanging purple braziers in the room around the statue. Your task is to lower all braziers using levers and turn them off until the room is completely covered in the dark. Then, avoiding light from the floor, you can safely interact with the globe in front of the statue and solve the puzzle. Now, the main door behind the statue should open, and you can go deeper into the Gauntlet of Shar.
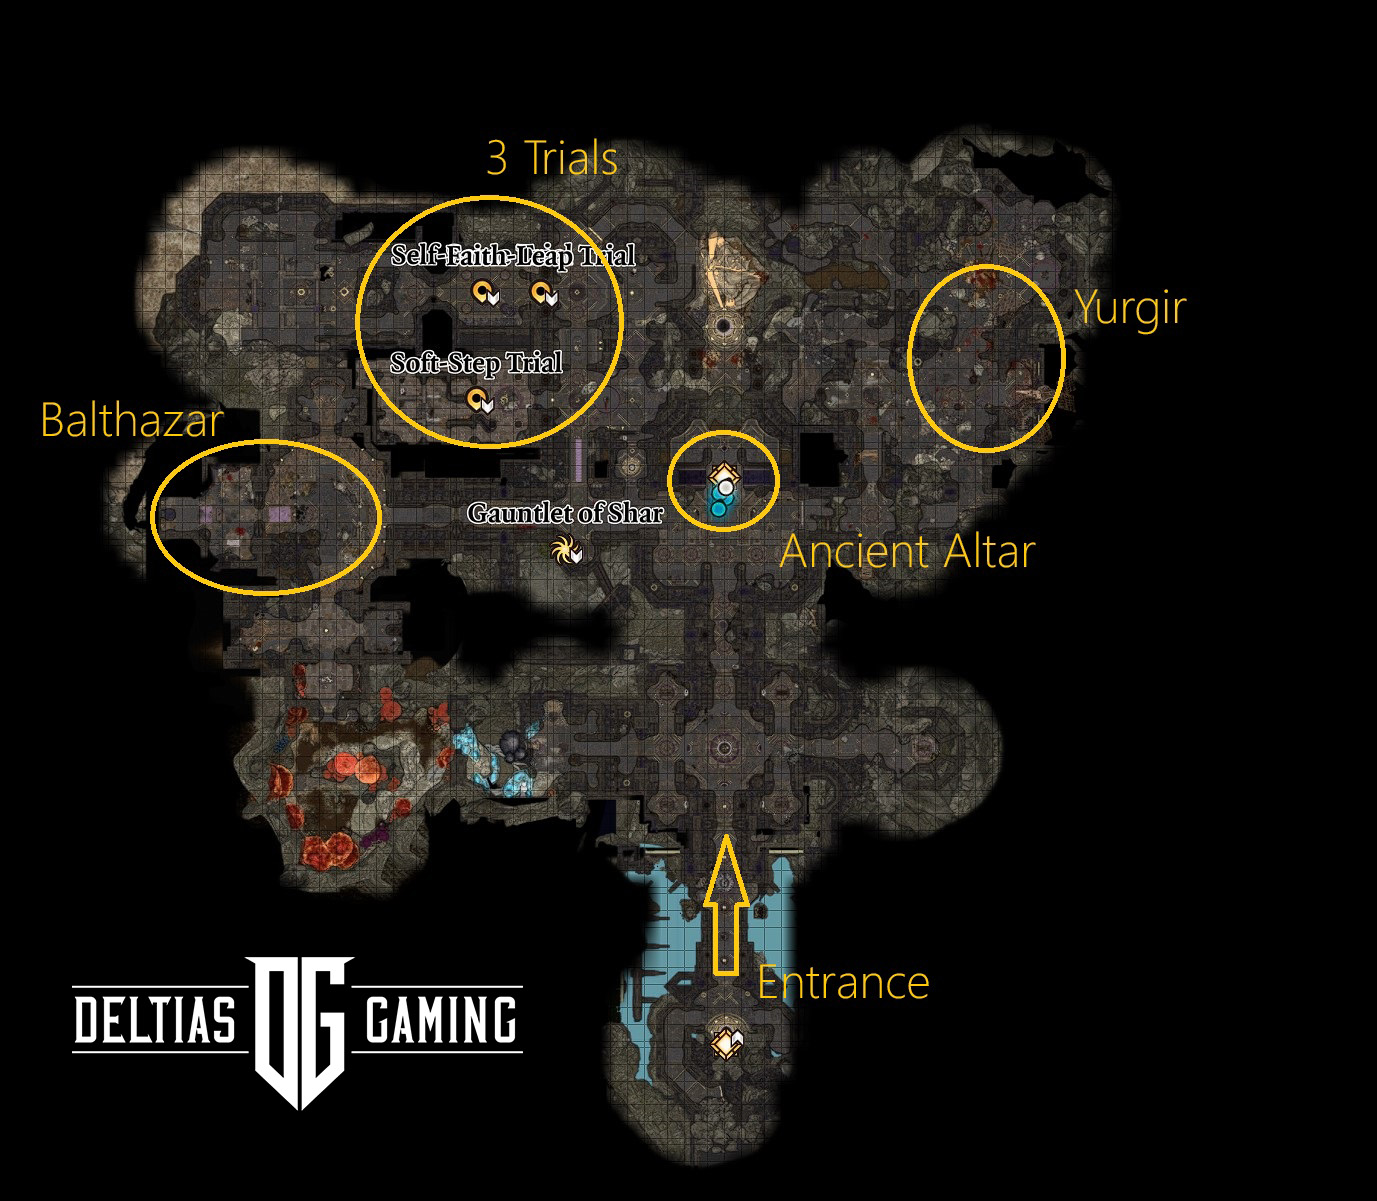
This is not the only puzzle you will need to solve. Further north, you’ll encounter a glowing Ancient Altar in the middle of the temple, with a missing orb called the Umbral Gem. One will be already inserted, and one is missing. You need to find all four to get to the inner sanctum and locate Nightsong.
Meeting Balthazar
Straight ahead is the Ancient altar, where you can pray or leave. If you choose to pray, you’ll need to pass an Intelligence check in Religion with DC 14. If you successfully pass the skill check, you will gain Nightsinger’s Favour and be resistant to necrotic damage until your next long rest. It will become useful later if you decide to fight with Balthazar.
If you go straight north, you’ll first encounter a few skeletons controlled by Balthazar, help them defeat the dark justiciars, and just next, you should be able to unlock Gountlet of Shar’s fast travel portal. You can find Balthazar to the west at X:-852 Y:-785.
The result of the conversation with him will determine which spear you’ll receive at the end. He can share some good information with you, so it’s worth learning more and listening to his part of the story.
If you want to get Selune’s Spear of Night, you must kill or trick Balthazar. Even though fighting an enemy is powerful, I advise you to kill him here. He can rise dead spamming enemies your way, so focus on eliminating him first if possible. After you kill Balthazar, you will achieve the Acolyte: Those for Whom the Bell Tolled. Make sure to loot the area; some good items are inside and behind the locked door.
Also Check:- BG3 Interactive Map
Nightsong and the Sharran Trials
To find Nightsong and complete the quest, you need to obtain the remaining Umbral Gems and complete the four Sharran Trials.
Soft-Step Trial
Trials are relatively easy to pass. Interact with the Shar statue in the middle of the room to be able to access the trial. If you have Shadowheart with you and allow her to do it, you’ll get some approval from her. Soft-Step Trial in Gauntlet of Shar requires you to sneak unnoticed to the back room behind the labyrinth filled with traps, hidden passages, and patrolling shades.
I picked the last door to the right and, while sneaking and avoiding patrolling shade, went straight to the wall and then, on the left in a small room, passed a simple 10 Perception check that revealed the button and the lever. You can activate it, and the wall will move, revealing the straight path to the back of the labyrinth. The wall will close eventually, but you have a few chances to get there. Once you pass the Soft-Step Trial, you can get the orb and use the portal to come back to your companions.
Self-Same Trial

This time, your task is to defeat the mirror images of your team. It can be a challenging fight because you’ll essentially be fighting yourself. After the fight, go up to the balcony with the brazier, and don’t forget to pick up the Killer’s Sweetheart ring, which will be on the bench next to it. Grab the orb, and let’s get to the last, the hardest task.
Faith-Leap Trial
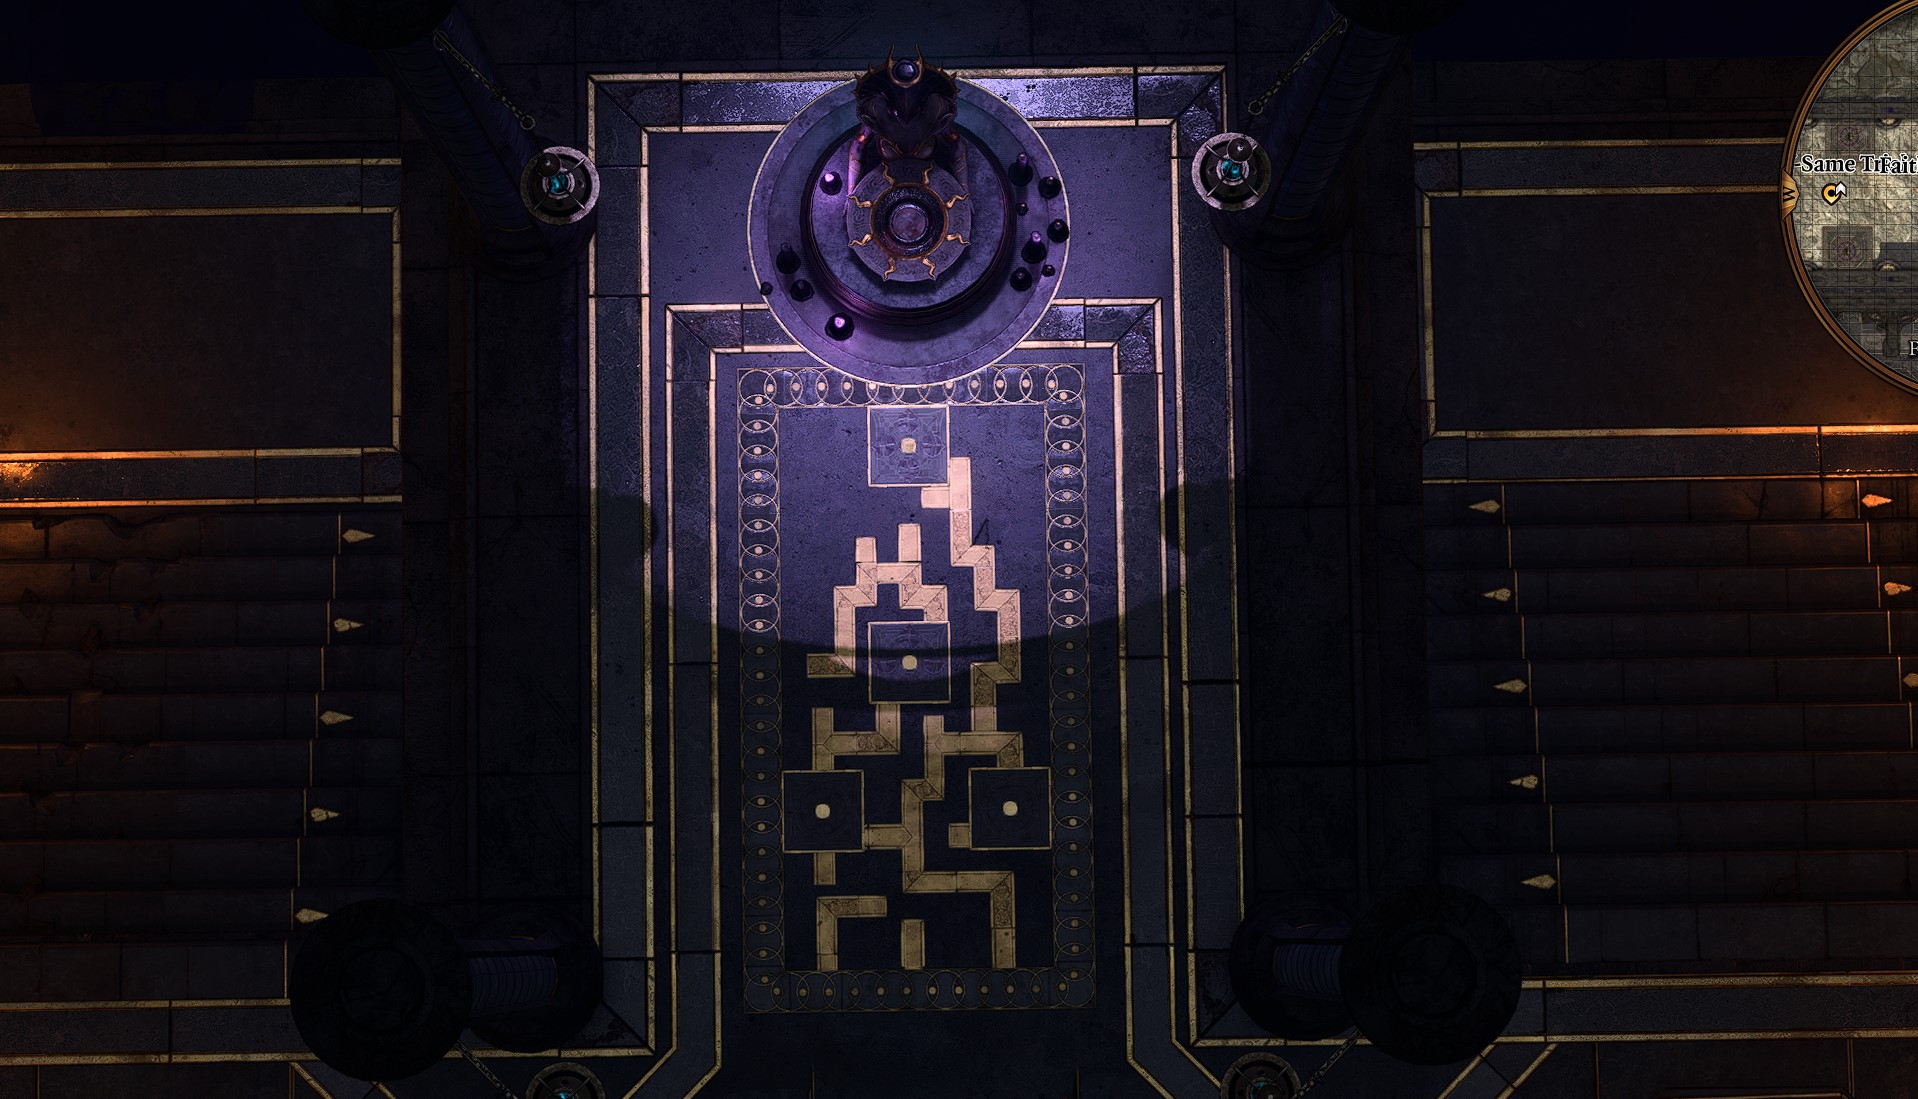
The last trial is on the lower level, underneath the previous two. Take the stairs down to get to it. The room will be filled with darkness. Make blood offerings, and take a look at the floor in front of the blood altar. It shows the map of how to proceed through the shadows to get to the other side of the room and get the umbral gem. Your task is to take the path on the left side and retrieve the gem. Make sure you save the game before entering the trial’s shadow path, as it can sometimes be a little buggy.
Meet Raphael’s Enemy – Confront Yurgir
You may wander there already as you see and follow a Displacer Beast seemingly running away from you. Follow it down the stairs, jump, and proceed to the east to find a sad sight of corpses and what’s left of previous temple inhabitants. You’ll be surprised by Yurgir, a Hell’s Orthon and Raphael’s enemy there. Ask questions and learn more about Raphael’s deal and both creatures’ history because there are two solutions to it. Kill Yurgir and claim his Umbral Gem, or use persuasion to convince him to kill all his allies and himself. The first approach requires a strong team because the enemy is very challenging, so make sure to come prepared. Second, you must pass many persuasion, history, and insight checks to achieve your goal.
The fight will be long and focus on the hardest enemy first, Yurgir, but send one or two party members to simultaneously kill his minions because, from range, they can deal serious damage.
If you decide to go the persuasion path, you’ll get less experience but avoid hard fights. In a peaceful solution (kind of), you must first learn more about the deal that Raphael and Yurgir signed. After he sings the song to you, you must pass an automatic insight check to receive an option to tell him that you know the solution to his problem. You can save the game after each successful roll(load the saved game if necessary) and slowly convince him that he cannot leave the place because there are still those who can hear his song. The Displacer Beast, his minions, and himself…
Regardless of how you deal with the Yurgir, get the Umbral Gem from his bed made of corpses, then come back to the pedestal to insert all gems, and finally find Nightsong in the inner sanctum.
Silent Library
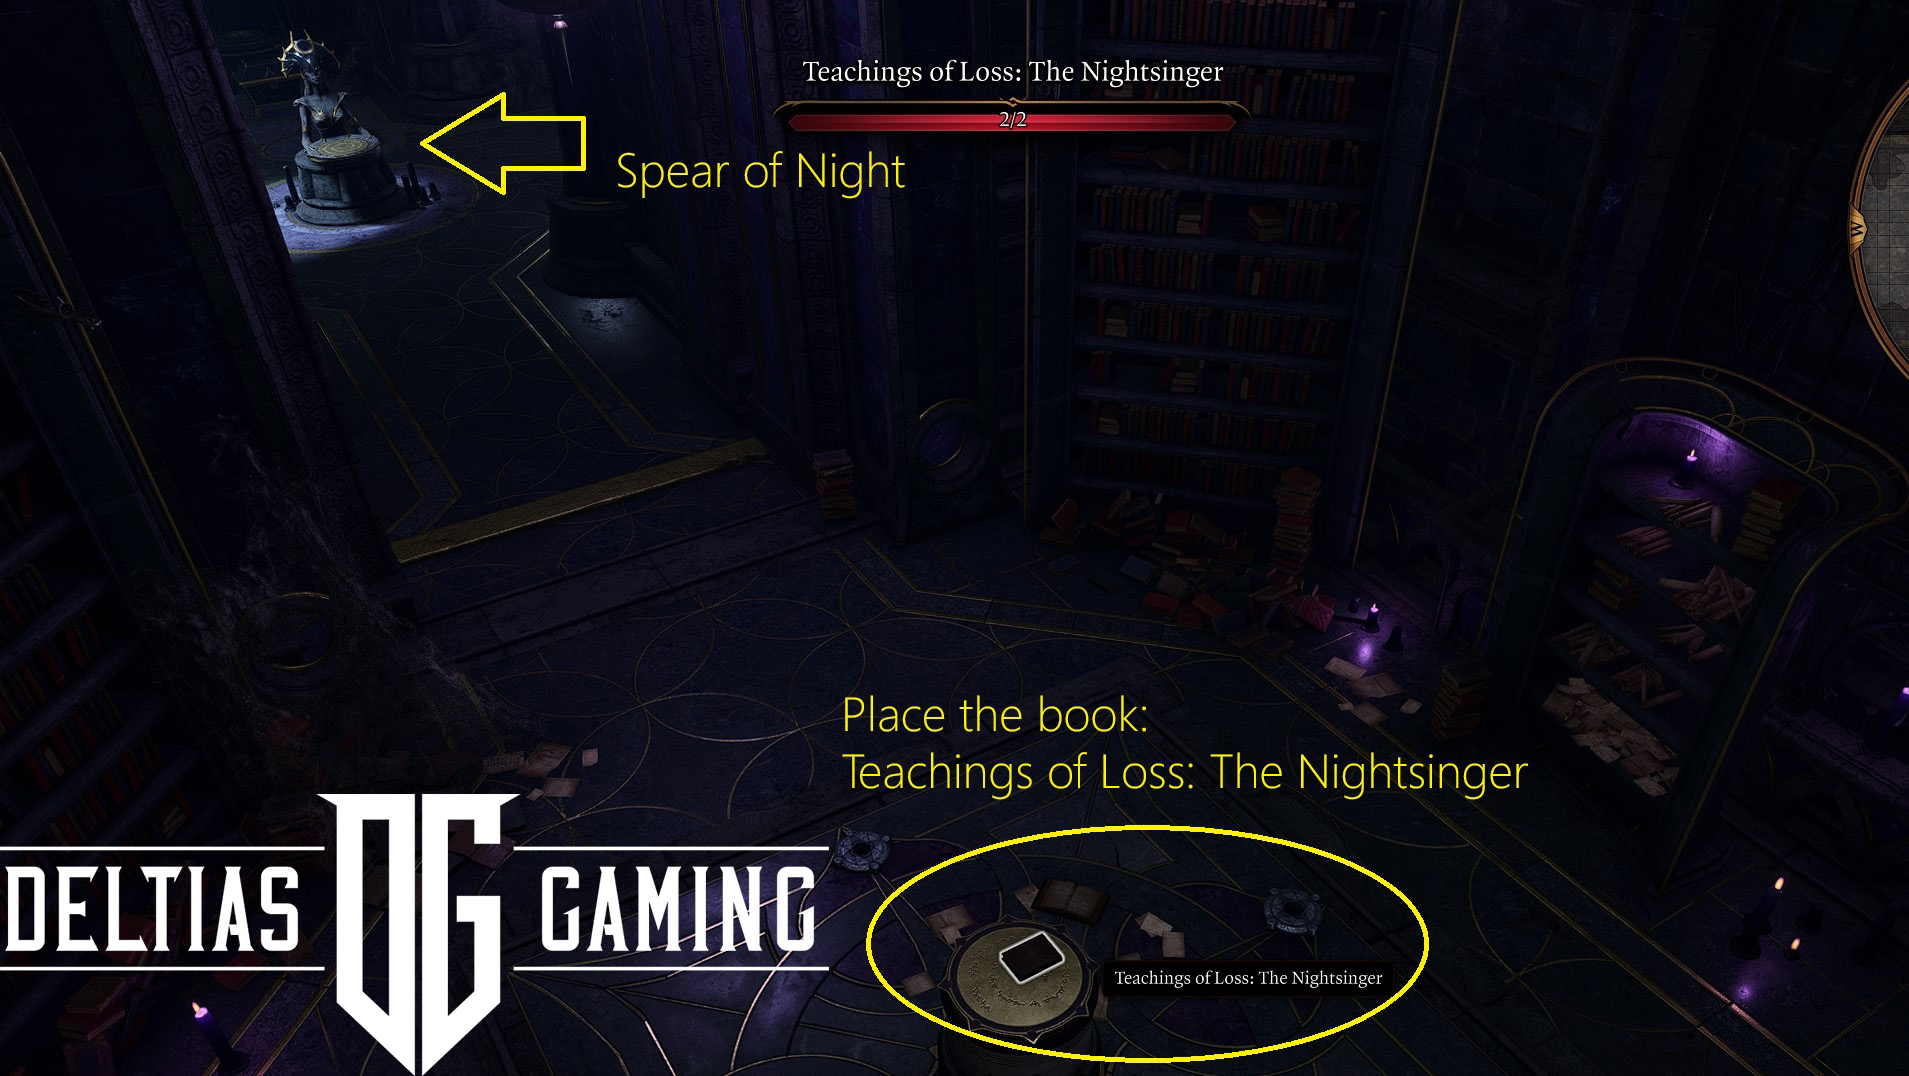
Silent Library is our last step. It’s located next to the Faith-Leap Trial X:-756 Y:-753. Inside, you’ll encounter dark justiciars enemies, and you can’t use spells until you destroy the portal of the librarian in the middle of the room. During the fight, you can stay on the stairs leading to the library and let enemies come to you. After the fight, scout the area. There are various traps, but you should easily pass the perception checks. The weapon to kill Nightsong is in the Treasure room deeper into the library. To open it, you must lockpick the gate and find the book Teachings of Loss: The Nightsinger. The book is on one of the bookshelf, alongside many other fantastic lore stories and entries.
Lockpick the gate, but be aware of traps and disarm them if possible. Place the Teachings of Loss: The Nightsinger book on the pedestal in the middle. It will open the treasure room. Inside, you’ll find the Dark Justiciar Helmet, Dark Justiciar Half-Plate, and the weapon to kill the Nightsong – Spear of Night. Now, you are ready to confront Nightsong.
The Rats
There is one more secret worth discovering that may later help you get Yurgir’s help and approval in Act 3. While exploring the area, you’ll come across a group of unusual rats. If you try talking to them, you’ll discover that they’re not ordinary rats. Just after you level the library and look at the giant statue of Shar, you notice that the area around their feat is accessible, and behind her, there is an odd altar and symbol on the ground. Go down using the Cragged Rock and approach the star in a circle symbol.
Here, you’ll find a Broken Effigy and a book. Reading the book and speaking with one of the rats will reveal their story – they are victims of Raphael, the last remaining Dark Justiciar. The rat will also share the whereabouts of Sharrn Provisions if you agree not to harm it.
If you choose to support Yurgir, you can eliminate the rats and the last Justiciar, which can help you avoid a confrontation with Yurgir later when you sneak into Raphael’s House of Hope to confront the archdevil. Yurgir is a potential ally in the “Gather Your Allies” quest, and even if you decide to kill him, you can still persuade him to join you. On the other hand, if you decide to assist the Orthon in breaking their contract, you’ll gain more insights into Raphael’s deceitfulness after dealing with the rat swarm at this location.
The Nightsong

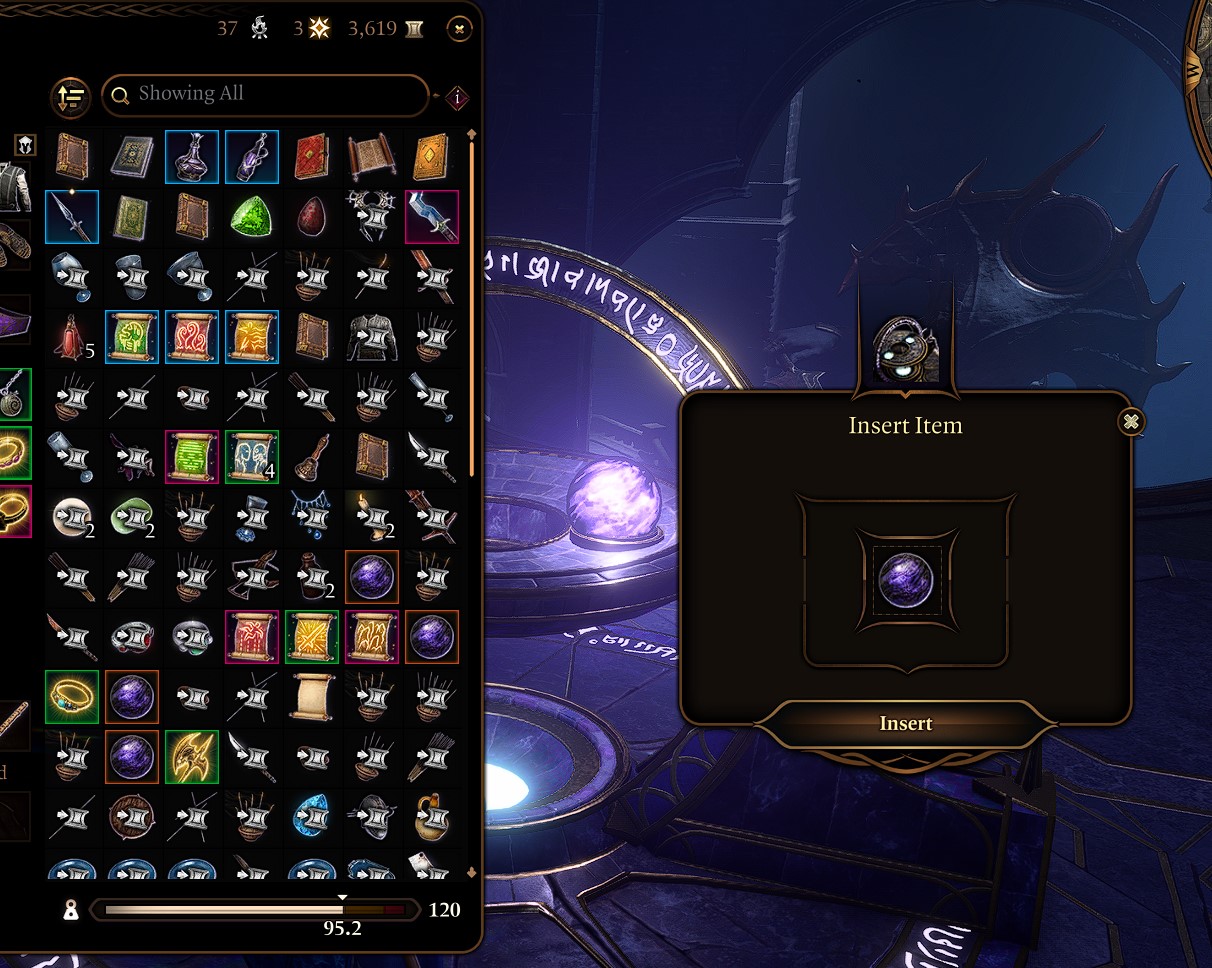
Insert Umbral Gem into the Ancient Altar, the platform will take you to the next location. Again, insert the gems into the next altar and proceed until you discover the Verge of the Shadows waypoint at this location (X:-717 Y:-842). Enter the glowing pool of water and prepare for the confrontation with Nightsong in the realm of Shar. Jump down on the rocks to get to the center. Don’t worry, and there is no fall damage there.
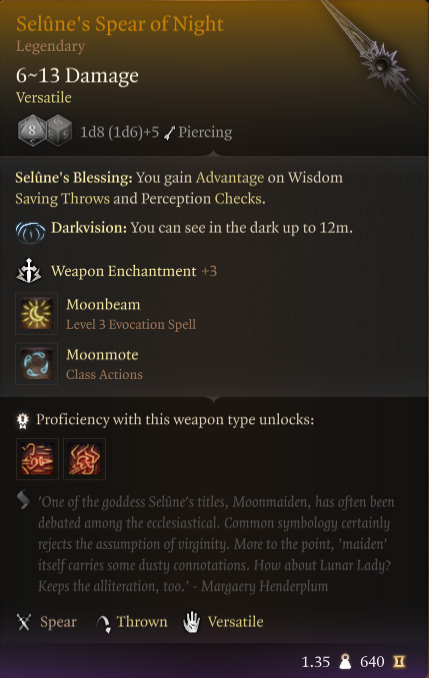
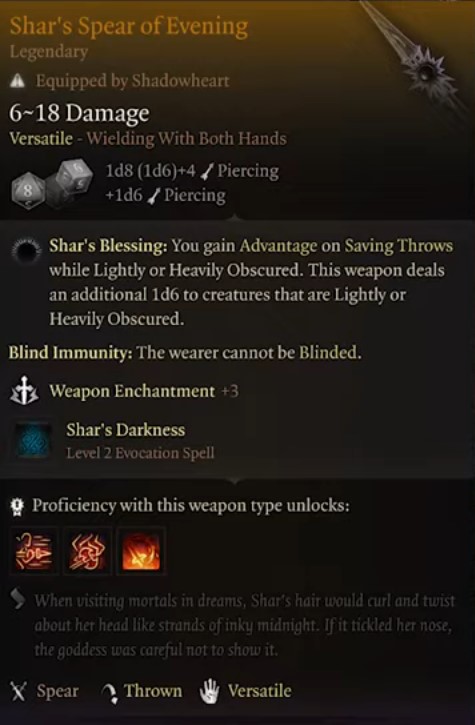
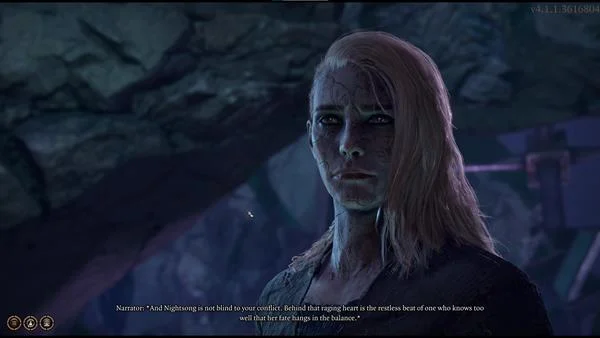
This conversation is important. Nightsong will tell Shadowheart that her memories are locked and hidden from her, and there is more to her story than Shar is letting her know. You have two options: let Shadowheart kill her or persuade her otherwise. It will be an easy task to convince Shadowheart not to kill Nightsong. She is already in doubt and uncertain of what to do, yet she still wants to kill Nightsong. If you want to get BG3 Selune’s Spear of Night – Legendary Weapon. At the end of Act 2, Nightsong must survive, if you want Shar’s Spear of Evening – Legendary Weapon, let Shadowheart kill Nightsong.
Dialogue With Nightsong
If you choose not to kill her, your choices will look like this:
- Trust Shadowheart – do not interfere.
- Do as you must.
- Is this truly what you want?
- Choose your own way, Shadowheart. You cannot allow your goddess to control you.
- Please, Shadowheart. Don’t do this.
If you choose the two bottom options, she will say that this is her life’s purpose. Next, pick 2nd option that will require a high persuasion check (30):
- [PERSUASION] No, it’s not. Your life is whatever you make it – don’t give up on yourself.
The next set of choices doesn’t matter that much. I advise you to lean towards persuading Shadowhart and supporting her in the process.
After the sort dialogue, you have two choices: again, pick persuasion check, but you can fail it, and she will kill Nightsong, or choose third and gain some approval from Karlach or Halsin if you have them in your group.
- Kill her. Let’s finish the ritual.
- [PERSUASION] Don’t do it, Shadowheart. Don’t kill her – you’ll regret it.
- She knows something about you. Spare her and see what she has to say.
- Say nothing.
Shadowheart will now hesitate even though she wields a spear already. Eventually, she will throw it away, and Nightsong will show you both her true nature and power. You gained a new ally in the fight against the Kethric and the Absolute.
Looking For More About Baldur’s Gate 3?
Thank you for reading Baldur’s Gate 3: Gauntlet of Shar Walkthrough – Find Nightsong Guide. We provide the latest news and create guides for Baldur’s Gate 3. Also, watch me play games on Twitch or visit my YouTube channel!