Facebook
 Reddit
 Email
Email
Selune’s Spear of Night is a reflection of your choices in Baldur’s Gate 3; here is what you must do and what path to follow to obtain this Legendary Weapon in BG3.
Selune’s Spear of Night is a reward at the end of Act 2, and you can receive it only if you decide to side with Nightsong instead of Killing her. There are a few key decisions to make and skill checks during the quest. Alternatively, if you decide to kill Nightsong, you’ll receive Shar’s Spear of Evening. Each of those weapons is powerful, but you can get only one. In this guide, we’ll explore Selune’s Spear of Night, how to acquire it, and tips for using it effectively in Baldur’s Gate 3.
What is Selune’s Spear of Night in BG3?
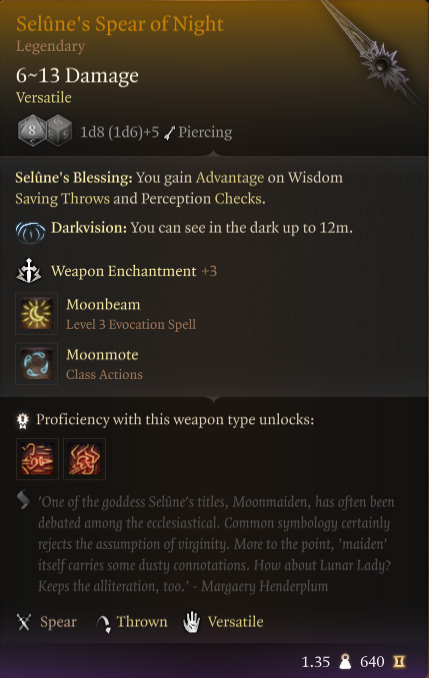
In Baldur’s Gate 3, Selune’s Spear of Night provides good damage and a Selune’s Blessing bonus that can be useful, especially for wisdom-based classes. You gain an advantage on Wisdom and Perception checks with the spear equipped in addition to 3 fantastic spells. This spear can support the Cleric playstyle because the class’s primary statistic is Wisdom, and it pairs well with Shield for more protection and utility for group cleric healers.
Related:
Selune’s Spear of Night Abilities and Effects
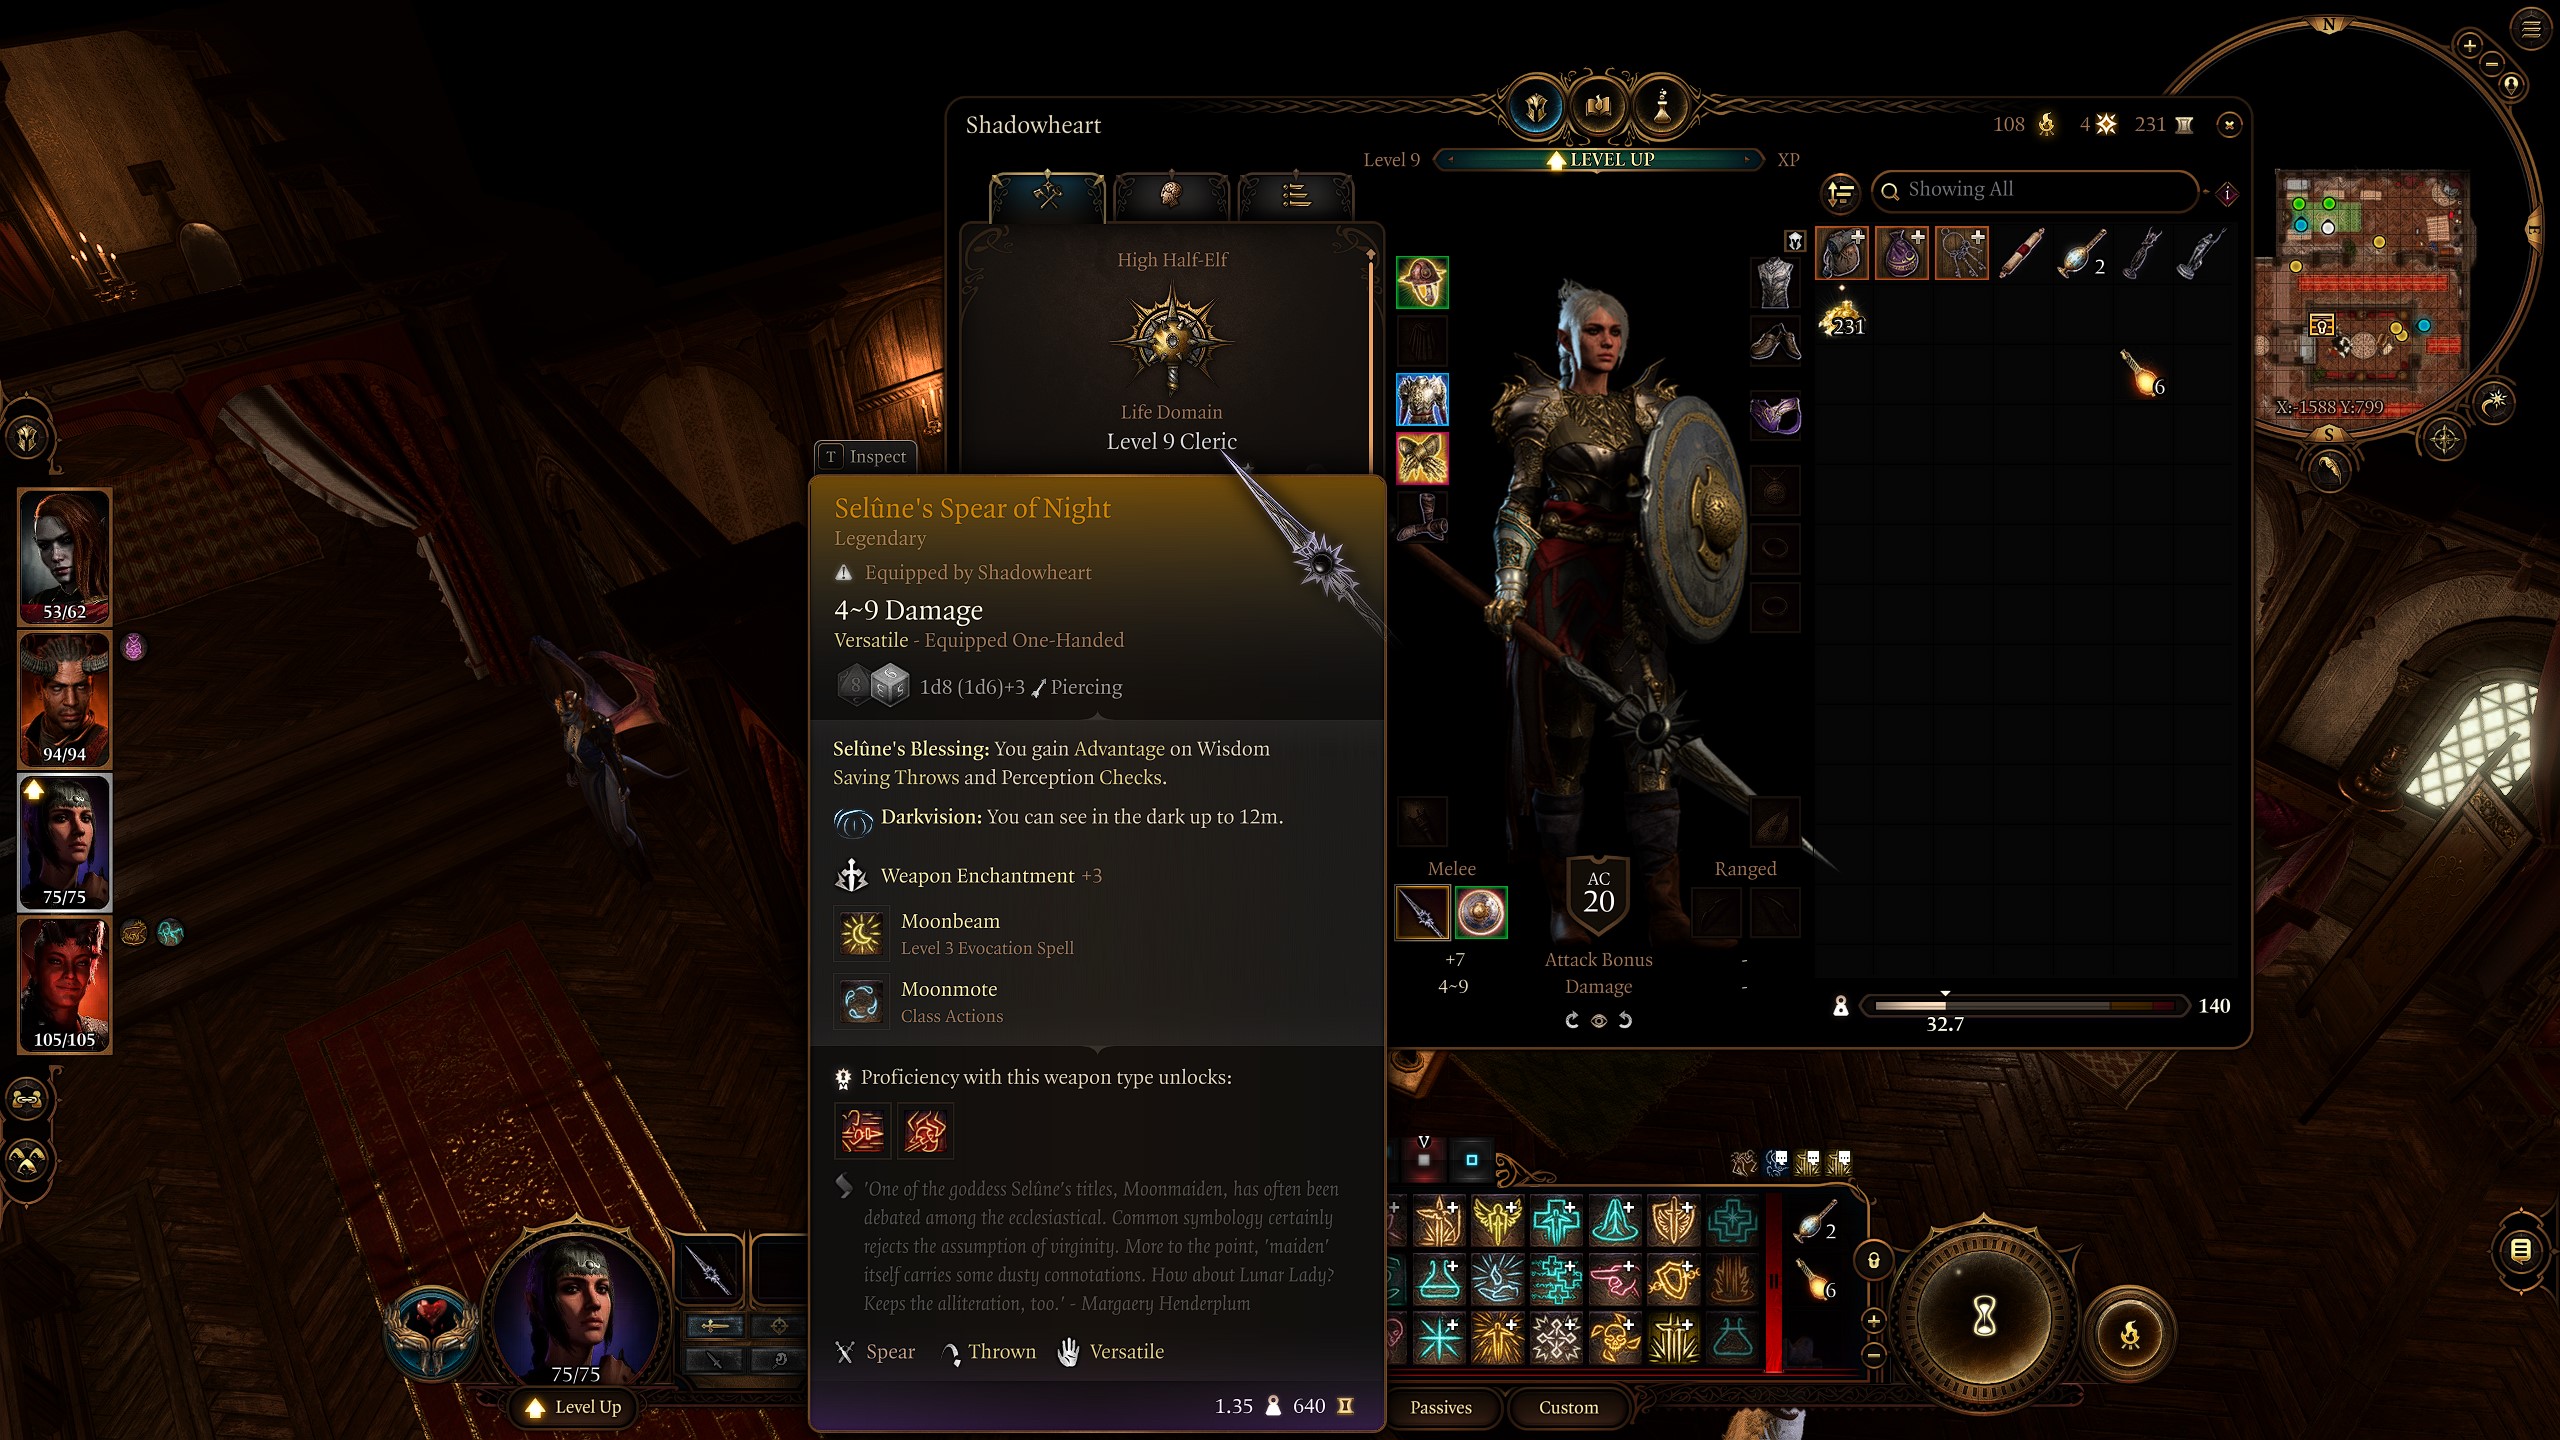
Here are all Selune’s Spear of Night features in BG3:
- Weapon Type: Versatile, Separ
- Damage: 1D8 Piercing (Two-Handed), 1D6 (One-Handed)
- Requirements: Simple Weapon proficiency
- Rarity: Legendary
- Location: From Nightsong At Your Camp, End of Act 2
- Weight: 1.35 kg
- Value: 640
- Bonuses:
- Selune’s Blessing: You gain an advantage on Wisdom Saving Throws and Perception Checks.
- Darkvision: You can see in the dark up to 12m.
- Moonbeam: (Level 3 Evocation Spell)
- Moonmote: (Class Actions)
- Weapon Enchantment +3
- Classes with Simple Weapons Proficiency: Bard, Cleric, Fighter, Ranger, Rogue, Paladin, Warlock
- Races with Simple Weapons Proficiency: Human, Half-Elf
- Companions Who Can Use This Weapon: Lae’zel, Minthara, Minsc, Astarion, Shadowheart, Wyll
Where to Find Selune’s Spear of Night in Baldur’s Gate 3
In Baldur’s Gate 3, Selune’s Spear of the Night is found by completing the Gauntlet of Shar, saving the Nightsong, and then receiving the weapon from the Nighsong in your camp after the events of Act 2. You will need to play through all of the main story of Act 2, but make sure to find the Temple of Shar and complete the Gauntlet before the final assault on Moonrise Towers.
Additionally, it’s advised that you do not fully complete the Gauntlet of Shar until you are ready to end Act 2. The events at the end of the Gauntlet will push the main story forward into the fight at Moonrise Towers. Therefore, you will be unable to complete any other side quests you have left unfinished.
Should You Get Selune’s Spear of Night?
Selune’s Spear of the Night is one of two weapons you can receive at the end of the Gauntlet of Shar, and each is a reflection of the final choice Shadowheart makes about the fate of the Nightsong. You will receive Selune’s Spear of the Night if you save the Nightsong, or can receive Shar’s Spear of Evening if you chose to destroy the Nightsong. The damage stats on each of these spears is exactly the same. What makes them different is the blessings and spells that the user gets access to.
Selune’s Spear of the Night gives you the Moonbeam and Moonmote spells, along with Darkvision, and a blessing that grants you Advantage on Wisdom Saving Throws and Perception Checks. On the other hand, Shar’s Spear of the Evening grants you the Shar’s Darkness spell, immunity from Blindness, and a blessing that gives you Advantage on Saving Throws while Obscured.
Ultimately, your choice of which spear to claim will likely be more heavily based on how you are playing out the story and what narrative path you want Shadowheart to take.
How to Get the Selune’s Spear of Night in BG3? Explained
To get Selune’s Spear of Night in Baldur’s Gate 3, you need to find Nightsong, have Shadowhart with you during the confrontation with Nightsong, convince her to spare the woman, defeat Kethric Thorn, and at the end of Act 2, you’ll receive the weapon as a reward. Nightsong is in the Gauntlet of Shar, a location in Shadow-Cursed Lands, which you can enter during Act 2. If you follow the main questline and Shadowhert’s personal quest, you’ll eventually find yourself needing to find Nightsong. However, you can also enter this location regardless of your quests journal as soon as you start Act 2.
Where to find Nightsong? – Gauntlet of Shar
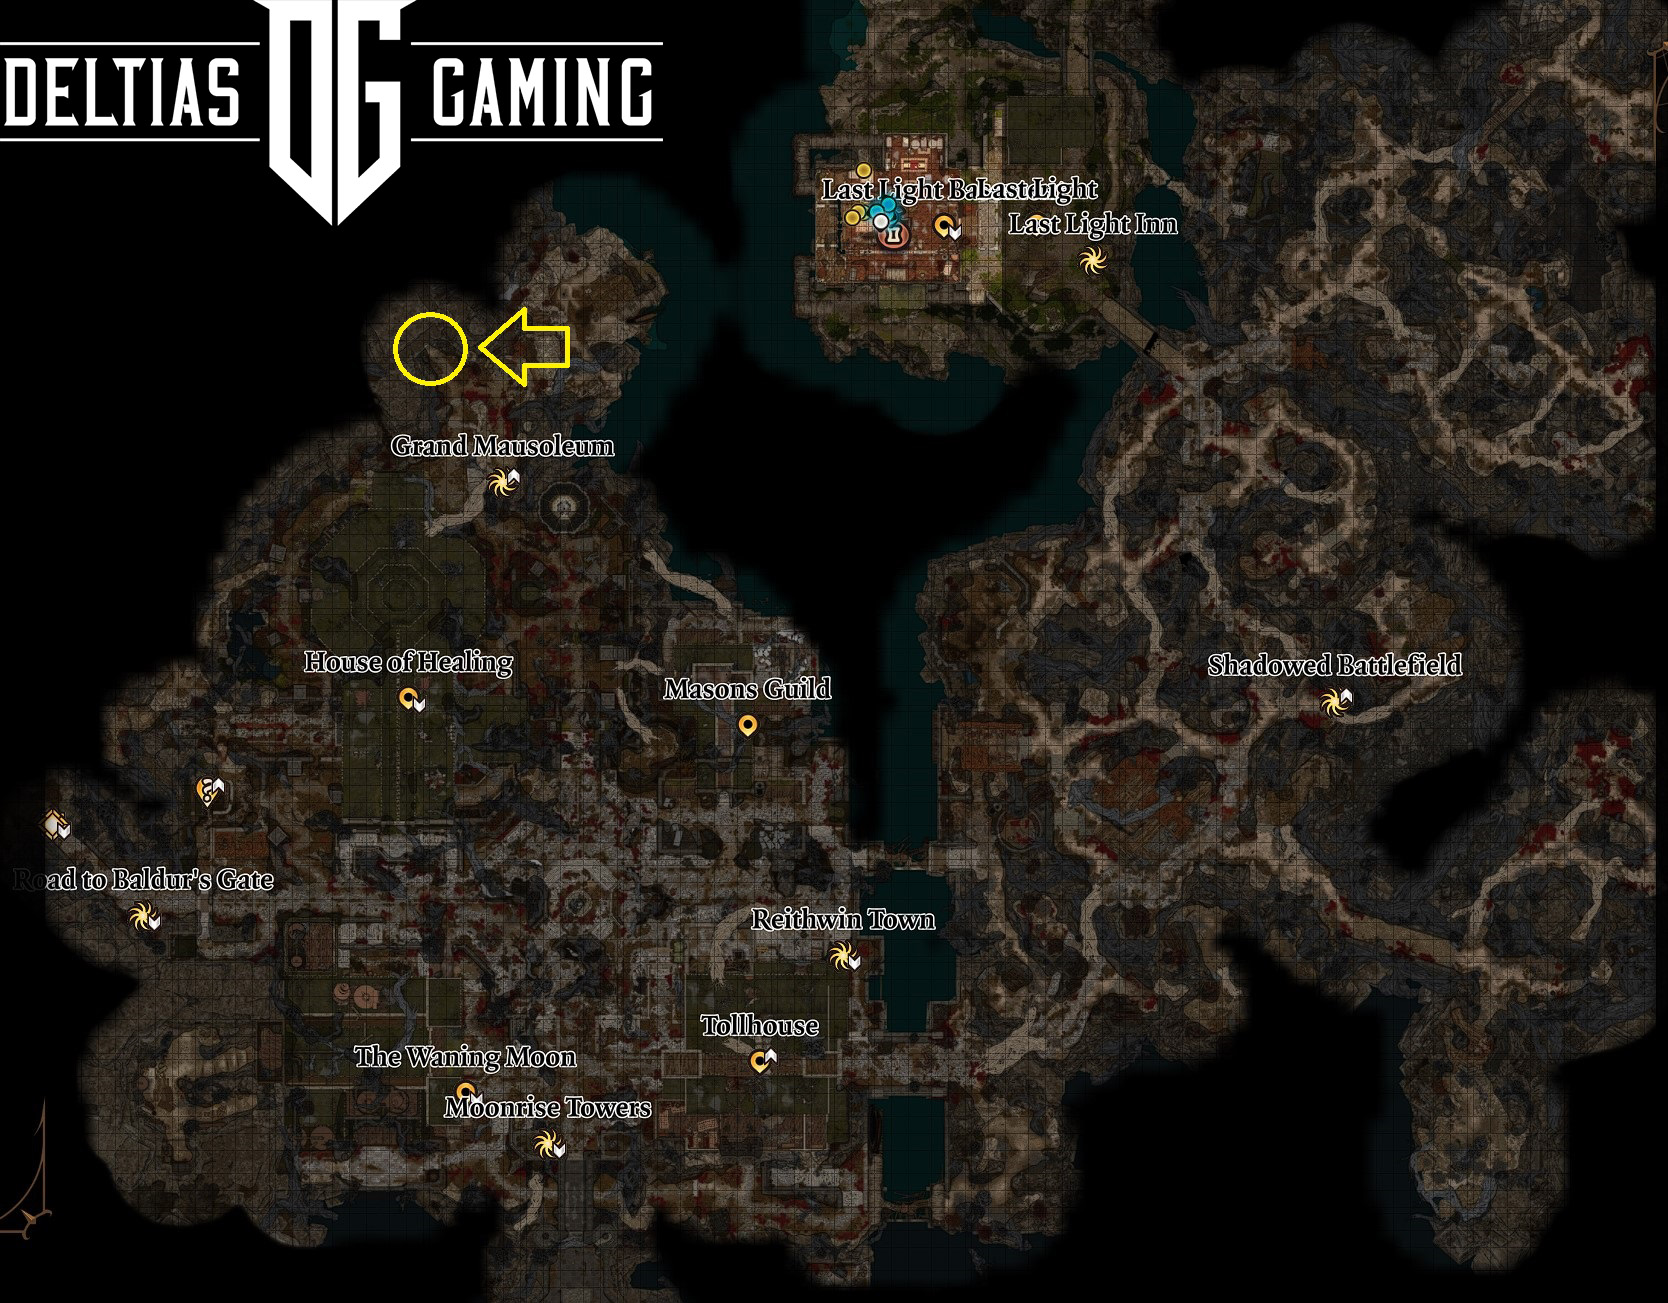
Nightsong is in the Gauntlet of Shar, and the entrance to the temple is located north of the House of Healing next to the Grand Mausoleum fast travel portal. You’ll meet Raphael there, warning you about a terrible beast inside. He will ask you to deal with his old enemy. To find the Nightsong and find the ring, you must confront this powerful being. Regardless of your choices, now you can enter the crypt and ancient temple of Shar. It’s part of the Nightsong Quest.
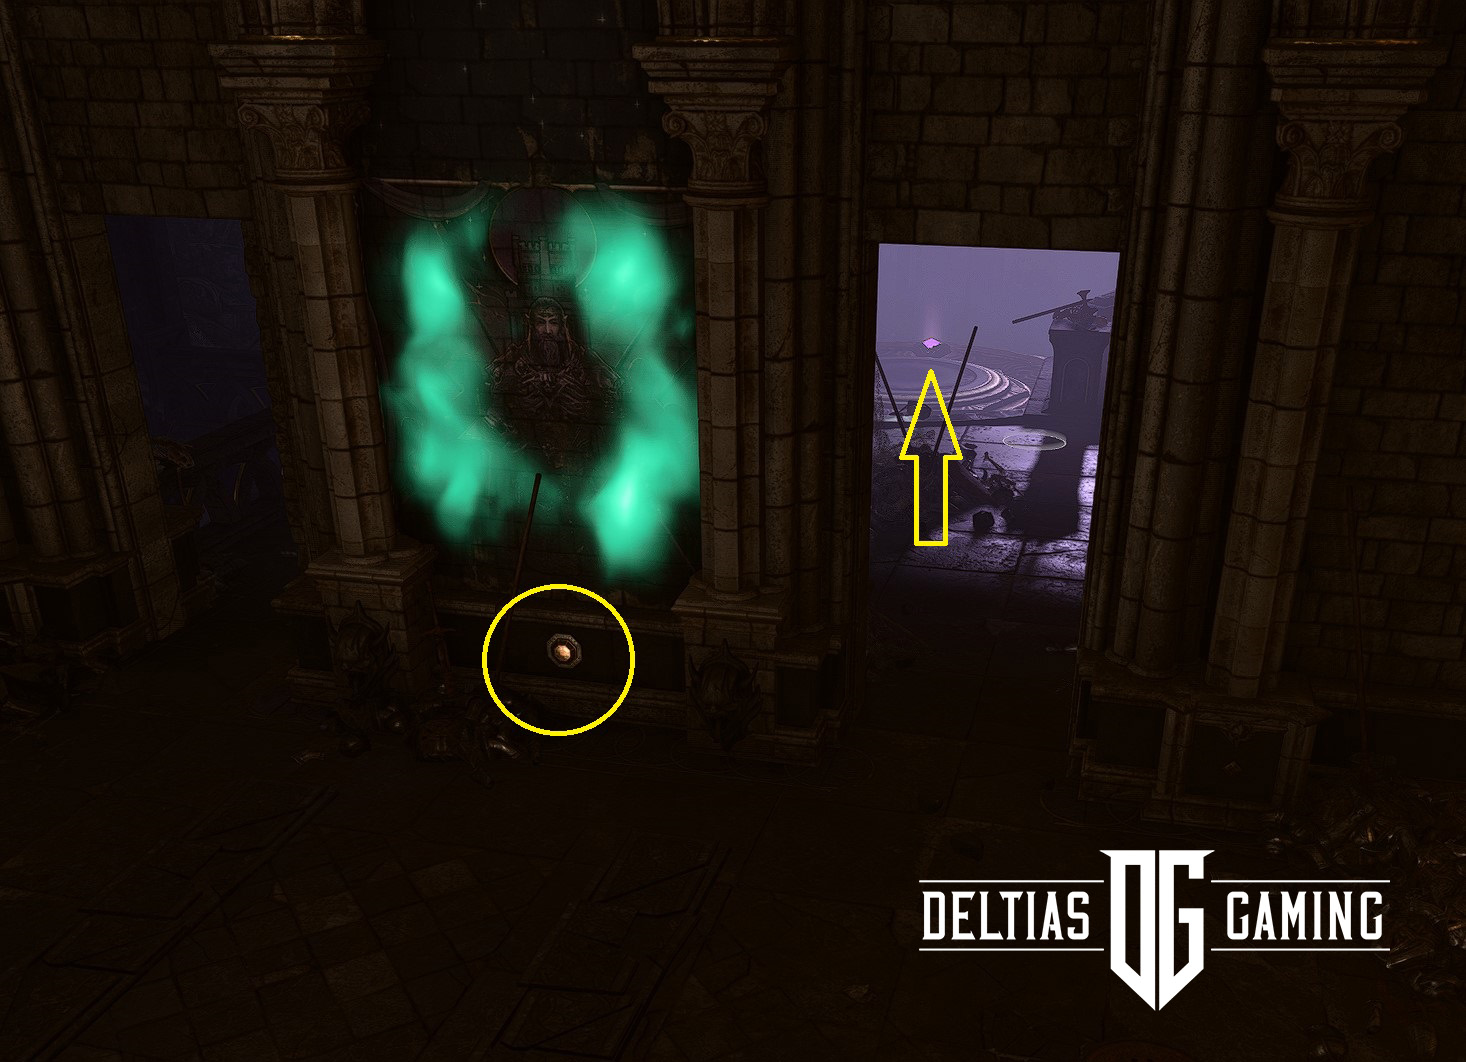
Go inside the mausoleum, and you’ll find an old crypt with sarcophaguses inside. Loot the area and go further. You’ll find the ancient temple of Shar behind the Kethrick Thorh Gobelin. To open the hidden door, you’ll need to pass an automatic perception check and uncover the button. Next, enter the Gountled of Shar by entering the platform and pressing the purple gem on it to be transported inside.
Gauntlet of Shar Puzzle
Now you have two choices: solve the statue Shar Puzlle or take longer proud and go west until you find the share trials.
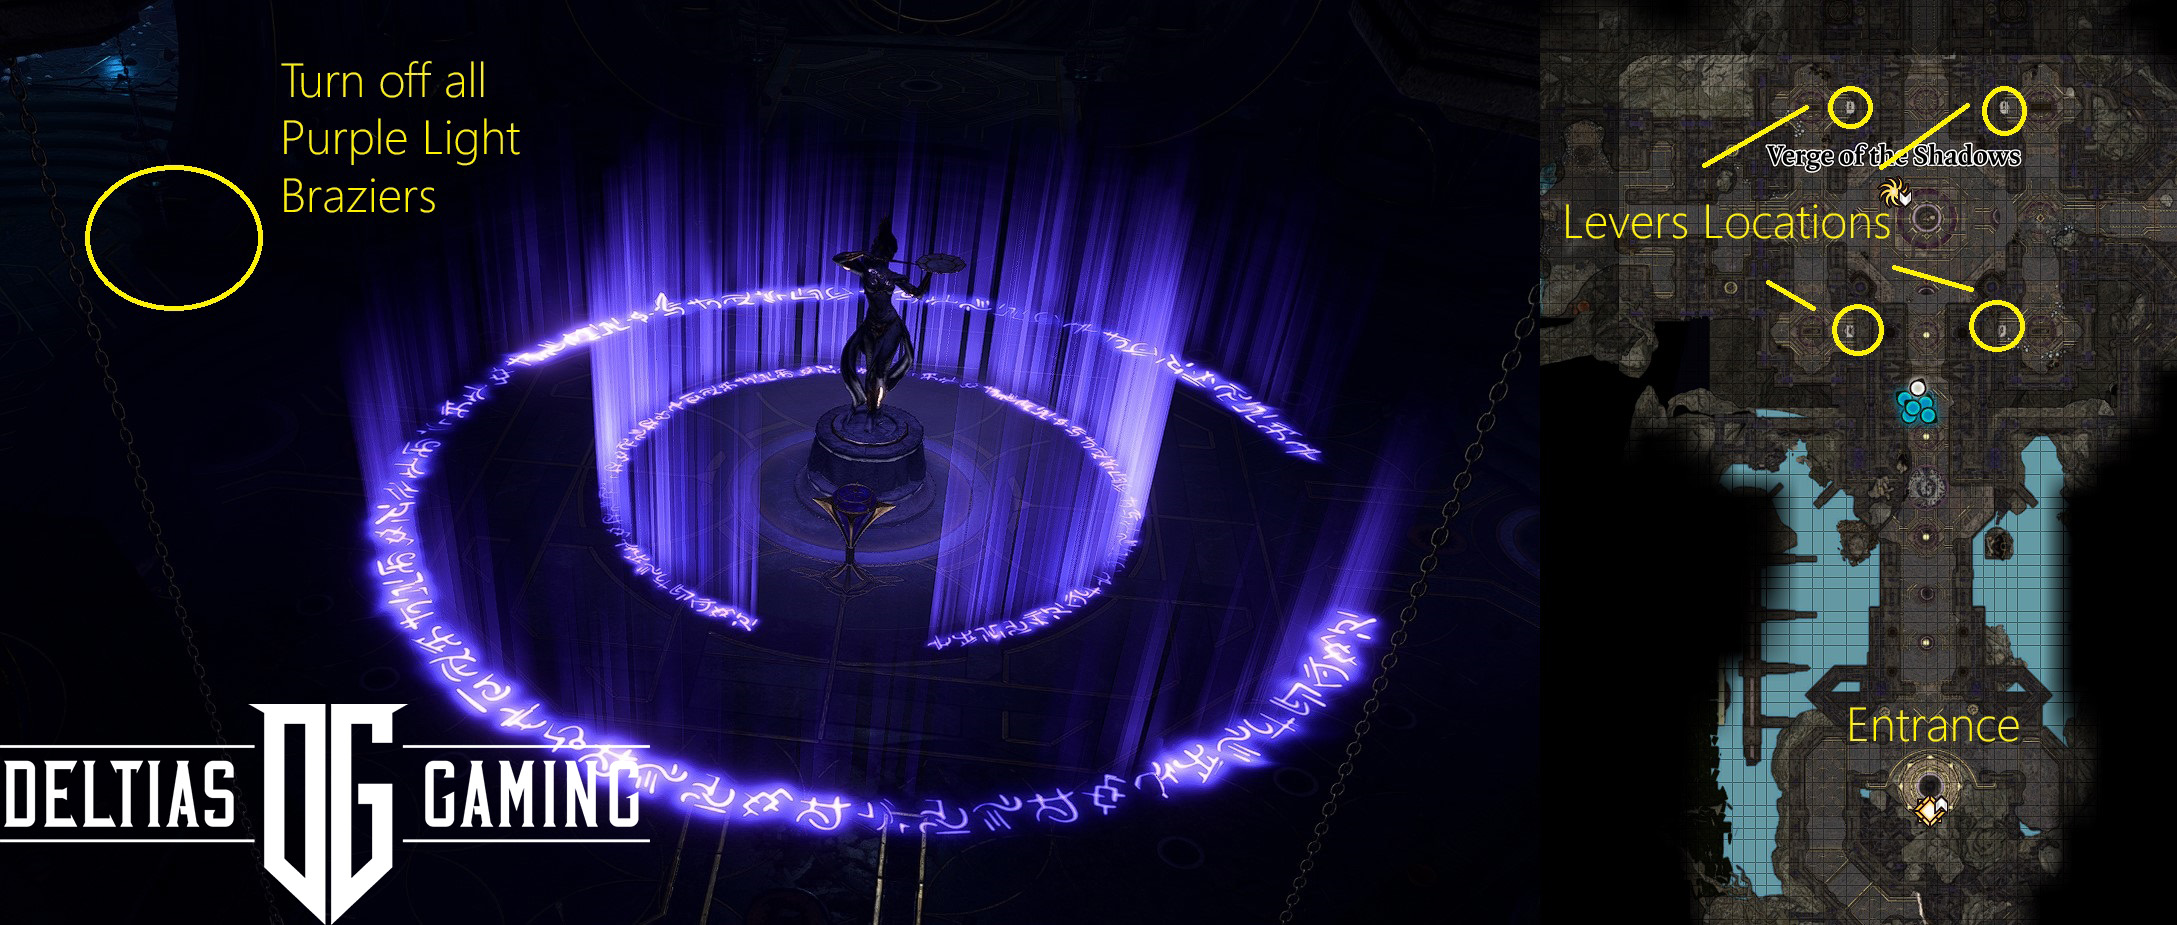
You’ll see a Shar statue with a globe and many side rooms when you enter. You won’t be able to get close to the status. It will knock you out immediately. In each room is a sarcophagus, trap, and lever that can lower the hanging purple braziers in the room around the statue. Your task is to lower all braziers using levers and turn them off until the room is completely covered in the dark. Then, avoiding light from the floor, you can safely interact with the globe in front of the statue and solve the puzzle. Now, the main door behind the statue should open, and you can go deeper into the Gauntlet of Shar.
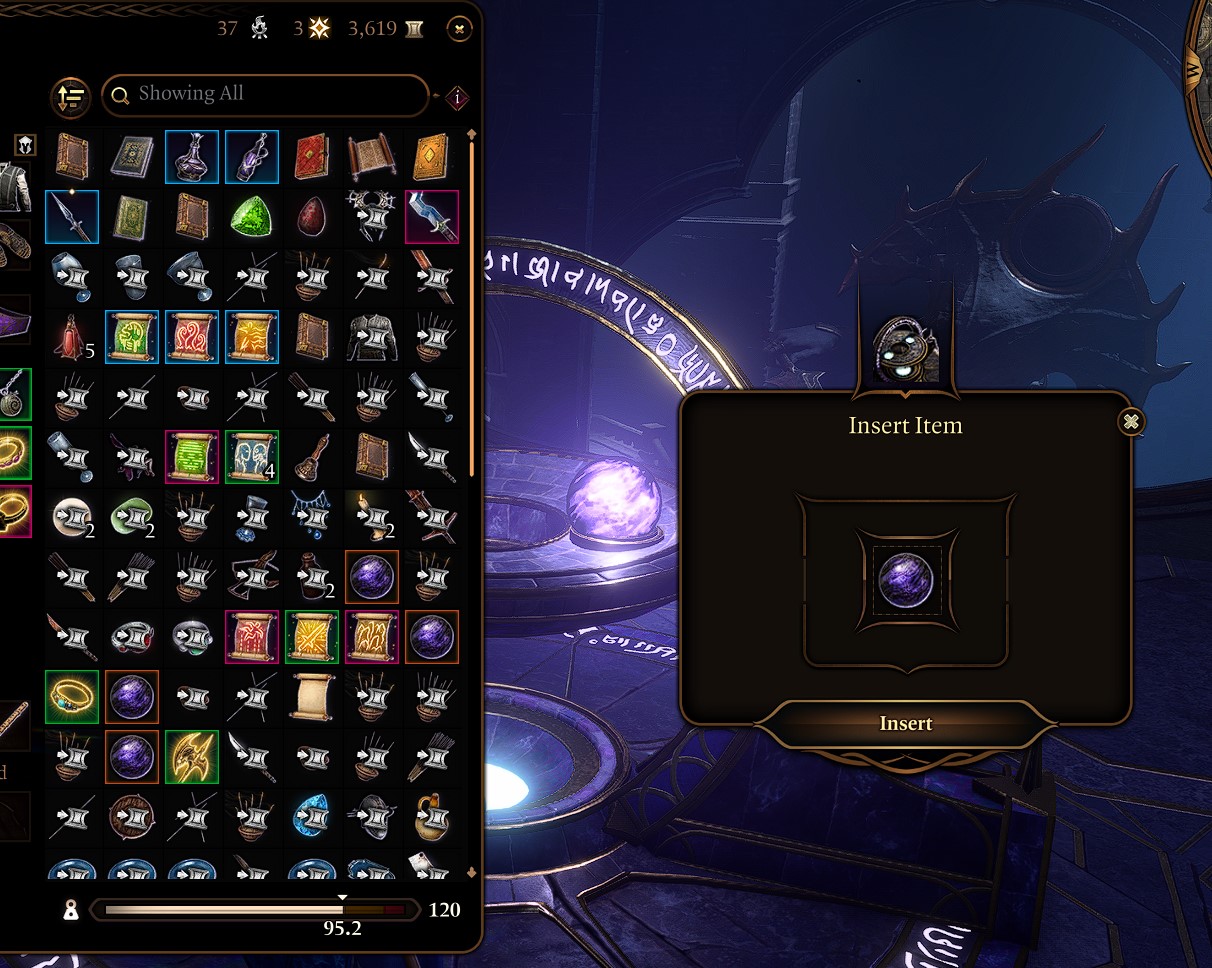
This is not the only puzzle you will need to solve. Further north, you’ll encounter a glowing Ancient Altar in the middle of the temple, with a missing orb called the Umbral Gem. One will be already inserted, and one is missing. You need to find all four to get to the inner sanctum and locate Nightsong.
Meeting Balthazar
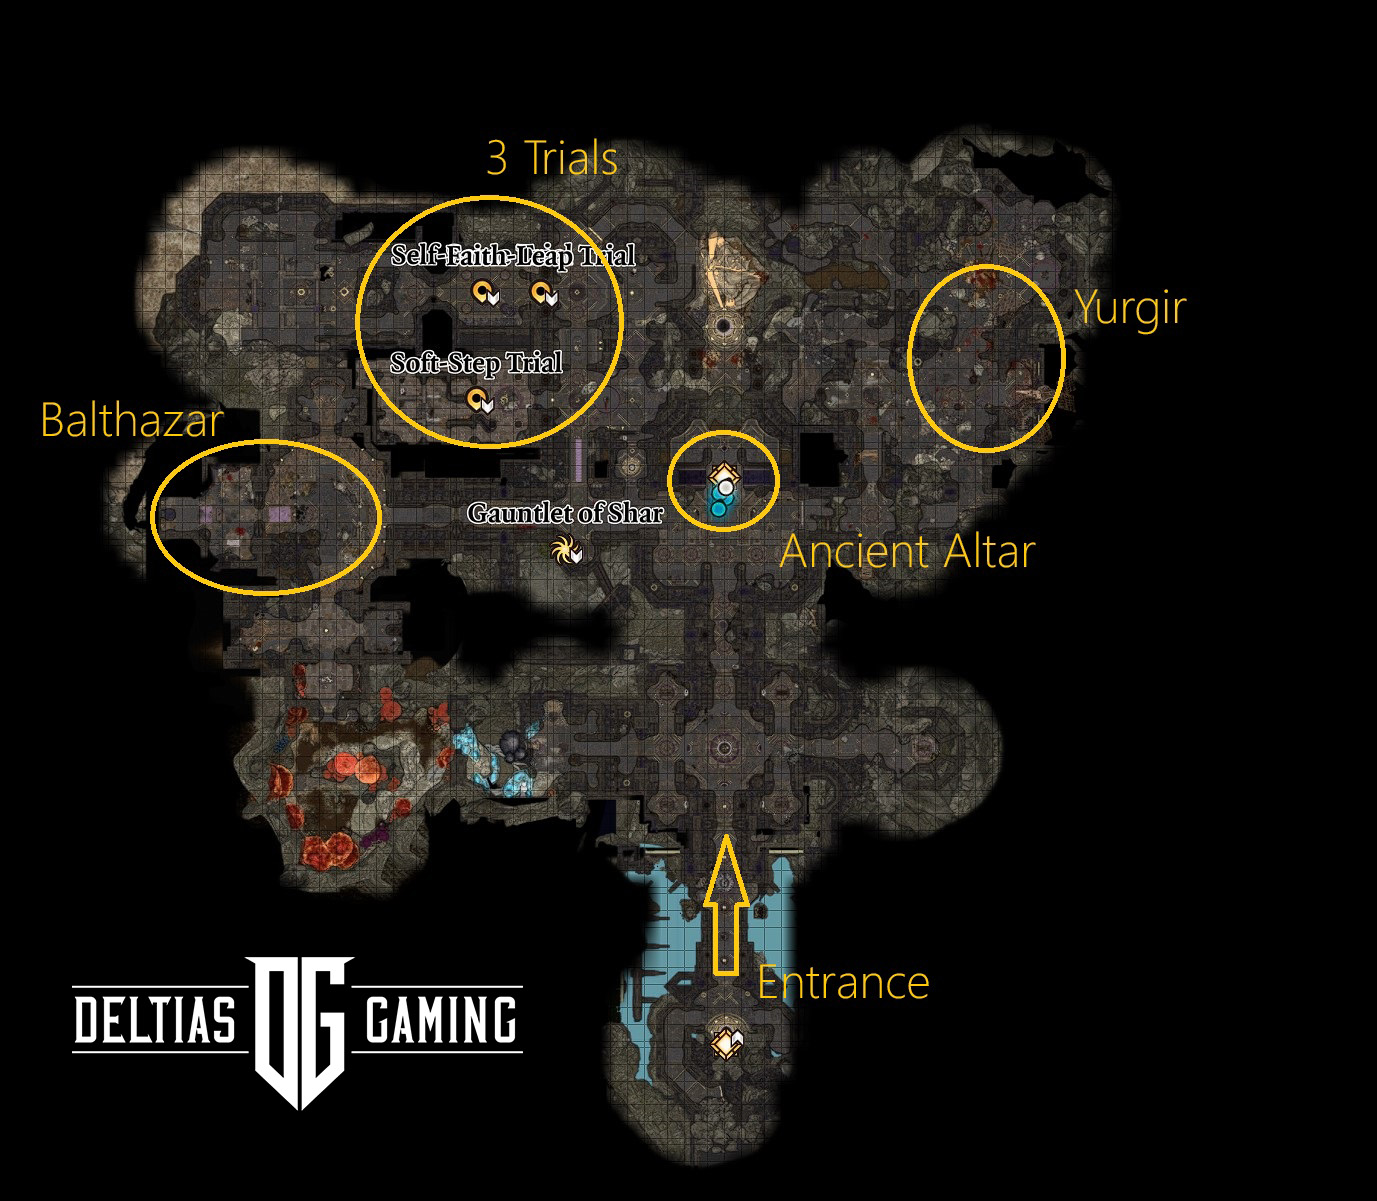
If you go straight north, you’ll first encounter a few skeletons controlled by Balthazar, help them defeat the dark justiciars, and just next, you should be able to unlock Gountlet of Shar’s fast travel portal. You can find Balthazar to the west at X:-851 Y:-786.
The result of the conversation with him will determine which sper you’ll receive at the end. If you want to get Selune’s Spear of Night, you must kill or trick Balthazar. Even though fighting an enemy is powerful, I advise you to kill him here. He can rise dead spamming enemies your way, so focus on eliminating him first if possible. Make sure to loot the area, there are some good items inside and behind the locked door.
Related:
Soft-Step Trial
Trials are relatively easy to pass. Interact with the Shar statue in the middle of the room to be able to access the trial. If you have Shadowheart with you and allow her to do it, you’ll get some approval from her. Soft-Step Trial in Gauntlet of Shar requires you to sneak unnoticed to the back room behind the labyrinth filled with traps, hidden passages, and patrolling shades.
I picked the last door to the right and, while sneaking and avoiding patrolling shade, went straight to the wall and then, on the left in a small room, passed a simple 10 Perception check that revealed the button and the lever. You can activate it, and the wall will move, revealing the straight path to the back of the labyrinth. The wall will close eventually, but you have a few chances to get there. Once you pass the Soft-Step Trial, you can get the orb and use the portal to come back to your companions.
Self-Same Trial

This time, your task is to defeat the mirror images of your team. It can be a challenging fight because you’ll essentially be fighting yourself. After the fight, go up to the balcony with the brazier, and don’t forget to pick up the Killer’s Sweetheart ring, which will be on the bench next to it. Grab the orb, and let’s get to the last, the hardest task.
Faith-Leap Trial
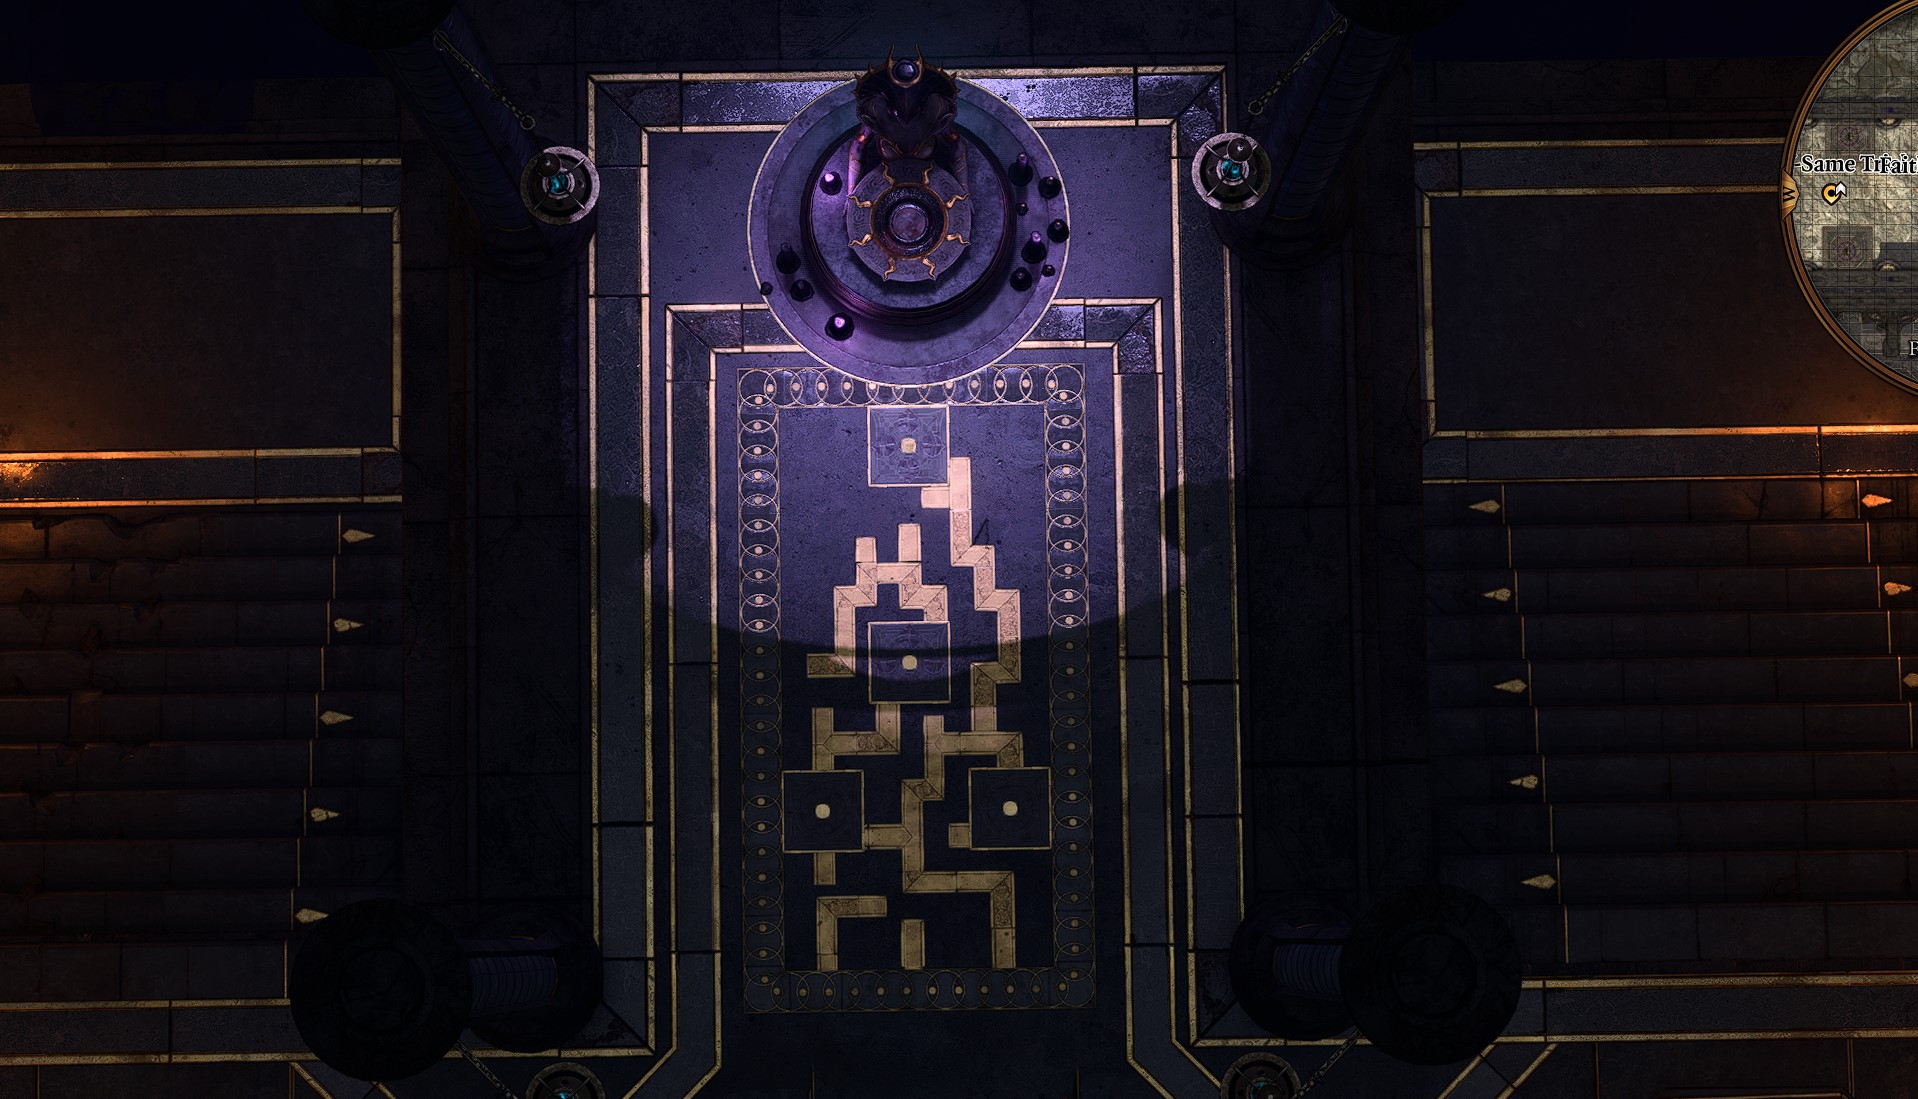
The last trial is on the lower level, underneath the previous two. Take the stairs down to get to it. The room will be filled with darkness. Make blood offerings, and take a look at the floor in front of the blood altar. It shows the map of how to proceed through the shadows to get to the other side of the room and get the umbral gem. Your task is to take the path on the left side and retrieve the gem. Make sure you save the game before entering the trial’s shadow path, as it can sometimes be a little buggy.
Read more:
Meet Raphael’s Enemy – Confront Yurgir
You may wander there already as you see and follow a Displacer Beast seemingly running away from you. Follow it down the stairs, jump, and proceed to the east to find a sad sight of corpses and what’s left of previous temple inhabitants. You’ll be surprised by Yurgir, a Hell’s Orthon and Raphael’s enemy there. Ask questions and learn more about Raphael’s deal and both creatures’ history because there are two solutions to it. Kill Yurgir and claim his Umbral Gem, or use persuasion to convince him to kill all his allies and himself. The first approach requires a strong team because the enemy is very challenging, so make sure to come prepared. Second, you must pass many persuasion, history, and insight checks to achieve your goal.
The fight will be long and focus on the hardest enemy first, Yurgir, but send one or two party members to simultaneously kill his minions because, from range, they can deal serious damage.
If you decide to go the persuasion path, you’ll get less experience but avoid hard fights. In a peaceful solution (kind of), you must first learn more about the deal that Raphael and Yurgir signed. After he sings the song to you, you must pass an automatic insight check to receive an option to tell him that you know the solution to his problem. Convince him that he cannot leave the place because there are still those who can hear his song. The Displacer Beast, his minions, and himself…
Regardless of how you deal with the Yurgir, get the Umbral Gem from his bed made of corpses, then come back to the pedestal to insert all gems, and finally find Nightsong in the inner sanctum.
Silent Library
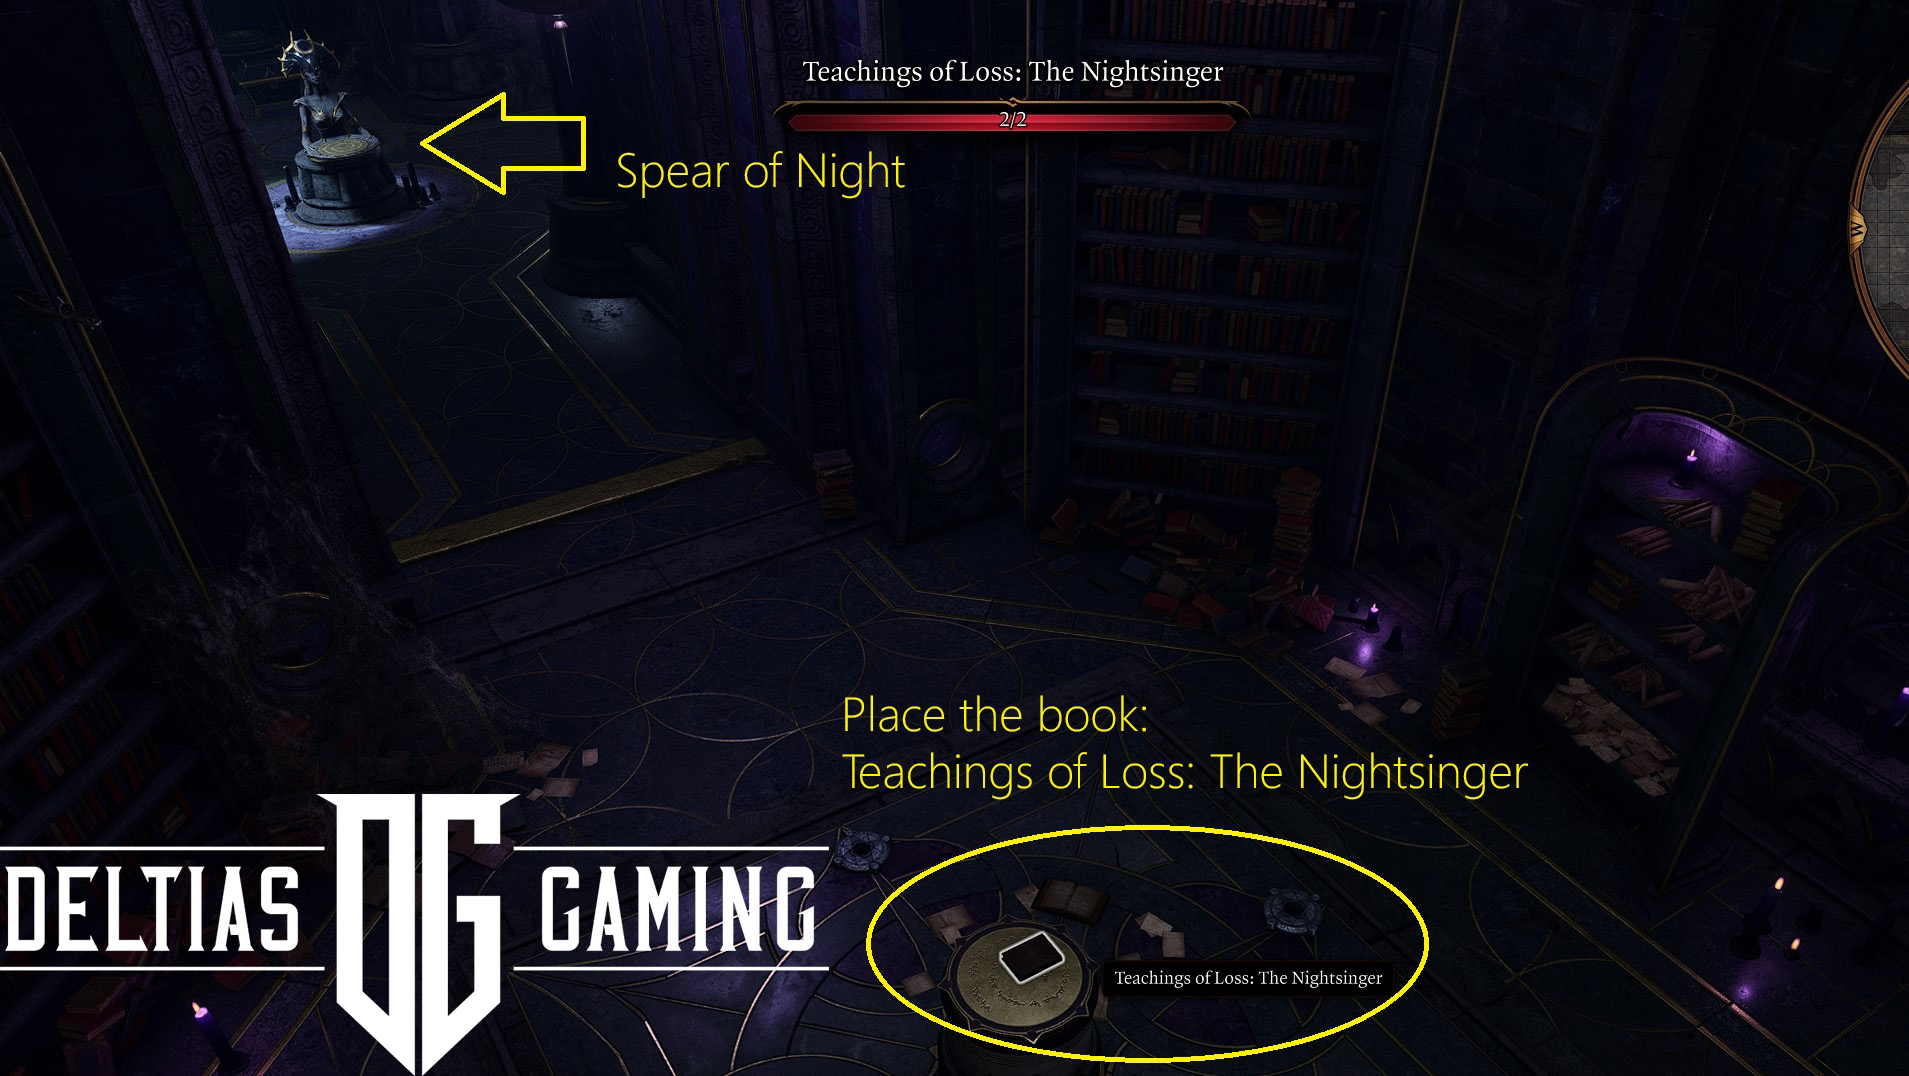
Silent Library is our last step. It’s located next to the Faith-Leap Trial X:-756 Y:-753. Inside, you’ll encounter dark justiciars enemies, and you can’t use spells until you destroy the portal of the librarian in the middle of the room. During the fight, you can stay on the stairs leading to the library and let enemies come to you. After the fight, scout the area. There are various traps, but you should easily pass the perception checks. The weapon to kill Nightsong is in the Treasure room deeper into the library. To open it, you must lockpick the gate and find the book Teachings of Loss: The Nightsinger. The book is on one of the bookshelf, alongside many other fantastic lore stories and entries.
Lockpick the gate, but be aware of traps and disarm them if possible. Place the Teachings of Loss: The Nightsinger book on the pedestal in the middle. It will open the treasure room. Inside, you’ll find the Dark Justiciar Helmet, Dark Justiciar Half-Plate, and the weapon to kill the Nightsong – Spear of Night. Now, you are ready to confront Nightsong.
Do NOT Kill Nightsong

Insert Umbral Gem into the Ancient Altar, the platform will take you to the next location. Again, insert the gems into the next altar and proceed until you discover the Verge of the Shadows waypoint at this location (X:-717 Y:-842). Enter the glowing pool of water and prepare for the confrontation with Nightsong in the realm of Shar. Jump down on the rocks to get to the center. Don’t worry, there is no fall damage there.
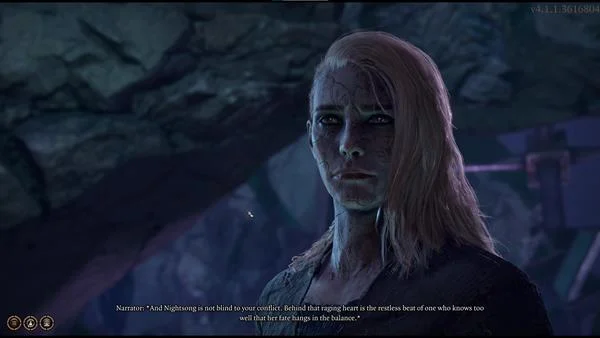
This conversation is important. Nightsong will tell Shadowheart that her memories are locked and hidden from her, and there is more to her story than Shar is letting her know. It will be an easy task to convince Shadowheart not to kill Nightsong. She is already in doubt and uncertain of what to do, yet she still wants to kill Nightsong. You must persuade her to get BG3 Selune’s Spear of Night – Legendary Weapon.
Dialogue With Nightsong
Your choices will look like this:
- Trust Shadowheart – do not interfere.
- Do as you must.
- Is this truly what you want?
- Choose your own way, Shadowheart. You cannot allow your goddess to control you.
- Please, Shadowheart. Don’t do this.
If you choose the two bottom options, she will say that this is her life’s purpose. Next, pick 2nd option that will require a high persuasion check (30):
- [PERSUASION] No, it’s not. Your life is whatever you make it – don’t give up on yourself.
The next set of choices doesn’t matter that much. I advise you to lean towards persuading Shadowhart and supporting her in the process.
After the sort dialogue, you have two choices: again, pick persuasion check, but you can fail it, and she will kill Nightsong, or choose third and gain some approval from Karlach or Halsin if you have them in your group.
- Kill her. Let’s finish the ritual.
- [PERSUASION] Don’t do it, Shadowheart. Don’t kill her – you’ll regret it.
- She knows something about you. Spare her and see what she has to say.
- Say nothing.
Shadowheart will now hesitate even though she wields a spear already. Eventually, she will throw it away, and Nightsong will show you both her true nature and power. You gained a new ally in the fight against the Kethric and the Absolute.
Kill Kethrick Thorn
Killing Kethric Thorn and dealing with him is a long process and part of the Mian quest. To not spoil anything, let’s move to the part that matters on our quest to obtain Selune’s Spear of Night Legendary Weapon in BG3. However, while progressing through the Act 2 main mission, there are no crucial decisions, only a lot of fights where one of your allies can die. Ensure that Isabell, Nightsong, and Shadowheart survive the confrontation, and all three will be waiting for you in your camp at the end of Act 2.
Claim your Reward – Selune’s Spear of Night
After you defeat Kethric Thorn and everyone survives in the camp, invite Shadowheart to your group and speak with Nighsong. She will finally have answers for Shadowheart, and at the end of the conversation, you’ll receive the reward – Selune’s Spear of Night, one of the BG3 Legendary Weapons.
Making your way through the Gauntlet of Shar in Baldur’s Gate 3 and completing all of the trials is a long journey, but the weapon and story rewards at the end are incredibly worth it! Moreover, the conclusion is also a pivotal point in the game where your choices have consequences. It’s definitely worth a second playthrough to discover how things will go if you take a different path.
How to Use the Selune’s Spear of Night in BG3?
The best way to use the Selune’s Spear of Night in Baldur’s Gate 3 is by equipping it to a Barbarian, Fighter or Paladin. Thematically it would go well with a Life or Light Cleric, especially given the strong spells you gain access to by equipping it. However, to get the most out of the base damage this weapon does, you’ll want to use a class that has a high Strength score. This is because your Strength modifier is added to the base damage the Selune’s Spear of Night does.
You can equip it to your character’s main hand weapon slot in the inventory, providing additional bonuses and buffs. The user needs Simple Weapon proficiency or suffers penalties while wearing the weapon. You can equip it on any class, companion, or character that has Simple Weapon proficiency.
Tips and Tricks for Selune’s Spear of Night in BG3
These are the best tips and tricks for finding and using Selune’s Spear of Night in Baldur’s Gate 3:
- Selune’s Spear of Night isn’t give to you until you meet with Dame Aylin at camp after the events at the end of Act 2.
- Both Moonbeam and Moonmote can only be cast once per Long Rest.
- As a spear, the weapon is classifed as ‘Thrown’. However, it does not have a passive bonus that will automatically return it to you.
Related:
FAQs About Selune’s Spear of Night in Baldur’s Gate 3
Q1: Should I let Shadowheart get the Spear of Night?
Answer: Selune’s Spear of Night is what you get if you save the Nightsong and persuade Shadowheart to take the morally ‘good’ path in the game. There is a corresponding weapon that you will receive from Shar if you choose the other path. Both weapons have their benefits, but the real decision lies with how you want to see Shadowheart’s story play out. It’s worth a second playthrough to see the other outcome, as well.
Q2: What stat does Selune’s Spear of Night use?
Answer: The base Piercing damage that you can deal when using Selune’s Spear of Night will calculate using your Strength ability modifier. However, it also makes a good weapon for a Cleric because the Selûne’s Blessing trait gives the wielder Advantage on Wisdom Saving Throws and Perception Checks.
Q3: What happens if you don’t have the Spear of night?
If you do not have the regular Spear of Night before discovering the Shadowfell, then Shadowheart will refuse to enter. Furthermore, she will leave your party completely if you move forward and resolve the quest for the Nightsong without her.
Looking For More About Baldur’s Gate 3?
Thank you for reading How to Get the Selune’s Spear of Night in Baldur’s Gate 3 Guide. We provide the latest news and create guides for Baldur’s Gate 3. Also, watch me play games on Twitch or visit my YouTube channel!