• Skip to main content
  • Skip to primary sidebar
  • Skip to footer

Deltia's Gaming

The best games, the best guides!

  • HOT 🔥Latest
    • Destiny 2 Ghosts of the Deep: Loot Table
    • Destiny 2 Arc Hunter PvE Build
    • Zelda: All Mounts and Horses
    • ESO Stam Dragonknight PvP Build
    • Destiny 2 Arc Warlock PvE Build
    • ESO One Bar Sorcerer Build
  • Destiny 2 Season of the Deep
    • Into the Depths Walkthrough Guide
    • Release Date – Season of the Deep
    • Guide & Weapons – Season of the Deep
    • All Weapons List – Season of the Deep
    • Best Destiny 2 Builds – Season of the Deep
    • Best Raid Weapons Ranked: PvE Tier List
    • PvE Class Tier List: Which Class is Best for Endgame?
    • Armor Tunning Preview – Exotics Revamp
    • Weapon Changes Preview
    • TWAB: Economy Changes and Season of the Deep Preview
    • TWAB: Season of the Deep Trailer and New Dungeon
  • ESO Necrom
    • Everything You Need to Know About the New Changes
    • Essential Tips to Prepare for the Arcanist
    • How to Enter the Apocrypha Zone?
    • Arcanist Class Guide
    • Arcanist Gameplay, Combo System and More!
    • First Look at Necrom Chapter
    • Best Arcanist Builds
    • Two New Companions!
    • Official Cinematic Trailer
    • All Gear Sets
    • Cryptcannon Vestments
    • Velothi Ur-Mage’s Amulet
    • Esoteric Environment Greaves
    • All Mythic Set Items
    • All Arcanist Skills and Passives
      • Runemend Skill
      • Abyssal Impact Skill
      • Apocryphal Gate Skill
      • Runeblades Skill
      • Fatecarver Skill
      • Unblinking Eye Skill
      • Vitalizing Glyphic Skill
      • Gibbering Shield Skill
    • Best Solo Class PvE - Tier List
    • Best One Bar Build for PvE - Tier List
    • Best Classes for PvP - Tier List
  • Games & Guides
    • Destiny 2
      • Lightfall & Season 20
        • All Lightfall Legendary Weapons
        • All Lightfall Exotic Weapons & How to Get Them
        • All Strand Weapons & How to Get Them
        • Season 20 Weapons & How to Get Them
        • How to Get the Terminal Overload Keys
        • The Best War Table Upgrades
        • How to Complete Destiny 2 From Zero – Quest Guide
        • How to get The Revision Zero Catalyst
        • The Revision Zero how to get and unlock the weapon
        • How to Unlock Season 20 Artifact
        • New Origin Traits Season 20
        • Season Pass Rewards Season 20
        • New Seasonal Vendor Season 20
        • New Destiny 2 Lightfall Mods
        • Strand Warlock: Abilities, Aspects & Fragments
        • Strand Hunter: Abilities, Aspects & Fragments
        • Strand Titan: Abilities, Aspects & Fragments
        • All Destiny 2 Lightfall Editions Explained
        • "How to get Exotic Gear" Guides
          • Final Warning how to get and unlock the weapon
          • Winterbite how to get and unlock the weapon
          • Deterministic Chaos how to get and unlock the weapon
          • How to Get the Quicksilver Storm Exotic Catalyst
          • Cyrtarachne’s Facade how to get and unlock the Armor
          • Abeyant Leap how to get and unlock the Armor
          • Swarmers how to get and unlock the Armor
      • How to Get Vexcalibur Exotic Glaive
      • How to Unlock Strand Subclass
      • God Roll Weapons
      • Xur Locations Guide
      • Xur Guide
      • Beginner Guide
        • Gear & Weapon Mods
        • Weapon Crafting Guide
        • Legacy Exotics Guide
        • Armor Guide
        • Lost Sector Guide
        • Recommended Weapon Rolls
      • Iron Banner Guide
      • Returning Player Guide
      • How to Link Twitch and Bungie accounts
    • Baldur's Gate 3
      • Baldur's Gate 3 News
        • Where You Can Buy BG3?
        • PSN Release Date
        • PC/Mac Release Date
        • Will BG3 be on Xbox?
        • How Far Can You Play in Early Access?
        • System Requirements For Windows and Mac
        • Crossplay
        • Best Wallpapers & Images
        • Achievements and Trophies
      • Comprehensive Guides
        • Collector’s & Deluxe Editions: Which Should You Buy?
        • How Multiplayer Works in BG3?
        • How to Play Co-op With Friends? Guide
        • Builds – All Classes and Companions
        • Companion Approval Quest Walkthrough
    • Redfall
      • Builds and Hero Guides
        • Remi de la Rosa Guide and Best Builds
        • Devinder Crousley Guide and Best Builds
        • Jacob Boyer Guide and Best Builds
        • Layla Ellison Guide and Best Builds
      • Comprehensive Redfall Guides
        • Abilities Attributes and Heroes Customisation
        • Quests Walkthrough and Missions
        • All Weapons and Gear
        • Best Weapons Against Vampires and Stakes
        • What is Max Level and How to Level up Quickly?
        • How to Respec Your Character Skill Points and Upgrades?
        • How Long the Campaign and How Many Hours to Finish the Game?
        • How to Use Find and Unlock Safehouses?
        • How to Fast Travel? – Exploration Guide
        • How to Save the Game?
        • Enemies
        • Classes
        • Does Redfall have Character Creation?
      • Hero characters Ranking – Strengths & Backgrounds Guide
      • Achievement and Trophy List
      • Is Redfall Crossplay?
      • Bite Back Edition
      • Redfall Game Pass
      • Pictures & Wallpapers
    • The Legend of Zelda
      • Comprehensive Guides
      • List of Powers and Abilities
        • Ultrahand Ability
        • Recall Ability
        • Fuse Ability
        • Ascend Ability
      • Complete Armor and Weapon Guide
        • How to Increase Weapon Durability
        • How to Upgrade Armor
        • How to Use the Master Sword
        • How to Find the Master Sword
      • All Mounts and Horses
        • How to Get and Tame a Horse
        • How to Transfer Your Horse to Zelda: Tears of the Kingdom?
        • Pony Points
      • All amiibo Figures and Bonuses
      • Device Dispensers and How to Use Them
      • How to Increase Heart Containers and Stamina Vessels?
      • Cooking Guide and All Recipes
      • Ultrahand Ability and Crafting
      • How to Start a New Game
      • Bosses and Enemies
      • How to Make a Campfire
      • How to Level Up
      • How to Fast Travel
      • How to Become Fireproof
      • How to Survive Cold and Freezing Temperatures
      • How to Farm Rupees
      • How to Get the Paraglider
      • Dragon’s Tears and Geoglyphs Guide
      • How to Save Your Game
    • Hogwarts Legacy
      • Hogwarts Legacy Builds
        • Plant & Cabbage Build
        • Dark Arts Build
        • Spell Build
        • Stealth Build
        • Protego Build
        • Ancient Magic Build
        • Fire Build
      • Which House should you choose
      • Hogwarts Legacy Houses
        • Hufflepuff
        • Slytherin
        • Ravenclaw
        • Gryffindor
      • Important Professors
        • Headmaster Phineas Nigellus Black
        • Professor Matilda Weasley
        • Professor Eleazar Fig
        • Professor Aesop Sharp
        • Professor Mirabel Garlick
        • Professor Dianah Hecat
        • Professor Abraham Ronen
      • Hogwarts Legacy Classes Guide
        • Classes – Beasts
        • Classes – Potions
        • Classes – Herbology
        • Classes – Charms
        • Classes – Defence Against the Dark Arts
        • Classes – Broomstick Flying
      • Can you be an evil Dark Wizard? Guide
      • How to Unlock and Enter Dark Arts Battle Arena
      • Max level & Talents Cap
      • Talents Guide
      • Quest Guides & Walkthrough
      • Merlin’s Trials & How to Increase Inventory Slots
      • Wand Guide and Customisation
      • How to unlock all Mounts
      • Fantastic Beasts Guide
      • Character Creation and Cosmetics Guide
      • How to Identify Gear Items Guide
      • Spells Guide
      • Plants Guide
      • How to change the Time of The Day?
      • Time Period
      • Combat Guide
      • How to Solve Puzzle Door?
    • Starfield
      • Starfield Release Date Announced!
      • Starfield Guides
        • Skill Guide
          • Social Skills Guide
          • Tech Skills Guide
          • Physical Skills Guide
          • Science Skills Guide
          • Combat Skills Guide
        • Backgrounds Guide
        • Character Creation Explained
        • Exploration
        • Factions Explained
        • Procedurally Generated Planets
        • Endings
      • Starfield News
        • Pre-Release Content
        • Bethesda releases Second Episode of “Into the Starfield”
        • Gameplay Breakdown
      • Starfield Builds (coming soon)
      • Starfield Quest Walkthroughs (coming soon)
    • ESO
      • Solo PvE Tier List
      • One Bar Build PvE Tier List
      • PvP Tier List
      • Character & Leveling
        • Complete Beginners Guide
        • Character Creation
        • Race Guide
        • Class Guides
          • Dragonknight
          • Nightblade
          • Templar
          • Sorcerer
        • Power Leveling & Grinding Guide
        • Skill Points Guide
        • Attribute Points Guide
        • Psijic Order Leveling Guide
        • Champion Points System
        • Champion Point Grinding Tips
      • Combat & Solo
        • How to Light Attack Weave
        • 5 Tips for Increasing Your DPS
        • What Tanks Should Know
        • Magicka DPS Gear Guide
        • SOLO Stamina Class Guide
        • SOLO Magicka Class Guide
      • PvP Guides
        • How to unlock Alliance War Skills
        • PvP Beginner Guide
        • PvP Campaigns, what to choose, CP or no-CP?
        • How to farm Alliance Points (AP)
        • How to farm Tel Var Stones
        • How to PvP in ESO Guide and Tips – All Classes
        • Cyrodiil guide for Beginners
        • Imperial City Guide for Beginners
        • Battlegrounds for Beginners
        • Battlegrounds objectives and strategies
        • Siege Guide
        • PvP Survival Tips
        • PvP Tips, Tricks and Hints
          • The best PvP Tips, Tricks and Hints
          • Best PvP Ultimates
          • How to “Stop a Ganker"
      • Crafting
        • Alchemy Potions & Recipes
        • Crafting Writs Guide
        • Master Crafting Writs
        • Fishing Guide
        • Crafting Trait Research Guide
      • ESO Tools
        • ESO Server Status
        • ESO Daily Endeavors Tool
        • ESO Golden Vendor
      • Tales of Tribute
        • Tales of Tribute Guide
        • Tales of Tribute Decks Guide
        • Tales of Tribute Strategies
        • Tales of Tribute Tutorial
      • Daily Routine Guides
        • Daily Priorities Guide
        • Daily Dungeon Guide
        • Undaunted Daily Pledges
        • Daily Job Brokers Guide
        • Daily Guild Quests Guide
        • Mount Training & Increase Speed
        • Daily Login Rewards
        • Endeavors Guide
      • Companions Guides
        • Full Companions Guide
        • Isobel Velois guide.
      • Addons, UI, and Keybinds
      • How to Link ESO Account to Twitch
      • How to Use the Public Test Server
    • Star Wars Jedi Survivor
      • Comprehensive Guides
        • How to Save the Game in Star Wars Jedi Survivor
        • Puzzle: How to Jump and Climb Marked Walls
        • How to Change Lightsaber and Kyber Crystal Color – Customization Options
        • How to Change Cal’s Appearance – Customization Options
        • Skill Trees
        • Meditation Puzzles
        • Lightsaber Stances
        • Cal Kestis
        • Enemies
        • Star Wars Jedi: Survivor Story
      • Quest Guides
        • Koboh First Tar Pit
        • Chamber of Duality
      • 10 Things You Should Know about Jedi: Survivor
      • What Difficulty Settings Should You Choose
      • Star Wars Jedi: Survivor Collector’s Edition
  • ESO Builds
    • Beginner & Leveling PvE
      • Arcanist
        • Magicka DPS
        • Stamina DPS
      • Dragonknight
        • Magicka DPS
        • Stamina DPS
      • Nightblade
        • Magicka DPS
        • Stamina DPS
      • Sorcerer
        • Magicka DPS
        • Stamina DPS
      • Templar
        • Magicka DPS
        • Stamina DPS
      • Warden
        • Magicka DPS
        • Stamina DPS
      • Necromancer
        • Magicka DPS
        • Stamina DPS
    • Solo PvE
      • Arcanist
        • Magicka DPS
        • Stamina DPS
      • Dragonknight
        • Magicka DPS
        • Stamina DPS
      • Necromancer
        • Magicka DPS
        • Stamina DPS
      • Nightblade
        • Magicka DPS
        • Stamina DPS
      • Sorcerer
        • Magicka DPS
        • Stamina DPS
      • Templar
        • Magicka DPS
        • Stamina DPS
      • Warden
        • Magicka DPS
        • Stamina DPS
    • Group PvE
      • Arcanist
        • Magicka DPS
        • Stamina DPS
        • Healer
        • Tank
      • Dragonknight
        • Magicka DPS
        • Stamina DPS
        • Healer
        • Tank
      • Necromancer
        • Magicka DPS
        • Stamina DPS
        • Healer
        • Tank
      • Nightblade
        • Magicka DPS
        • Stamina DPS
        • Healer
        • Tank
      • Sorcerer
        • Magicka DPS
        • Stamina DPS
        • Healer
        • Tank
      • Templar
        • Magicka DPS
        • Stamina DPS
        • Healer
        • Tank
      • Warden
        • Magicka DPS
        • Stamina DPS
        • Healer
        • Tank
    • PvP
      • Arcanist
        • Magicka DPS
        • Stamina DPS
        • Healer
      • Dragonknight
        • Magicka DPS
        • Stamina DPS
        • Healer
      • Necromancer
        • Magicka DPS
        • Stamina DPS
        • Healer
      • Nightblade
        • Magicka DPS
        • Stamina DPS
        • Healer
      • Sorcerer
        • Magicka DPS
        • Stamina DPS
        • Healer
      • Templar
        • Magicka DPS
        • Stamina DPS
        • Healer
      • Warden
        • Magicka DPS
        • Stamina DPS
        • Healer
    • One Bar PvE
      • Arcanist
        • DPS
        • Healer
        • Tank
      • Dragonknight
        • DPS
        • Healer
        • Tank
      • Nightblade
        • DPS
        • Healer
        • Tank
      • Sorcerer
        • DPS
        • Healer
        • Tank
      • Templar
        • DPS
        • Healer
        • Tank
      • Warden
        • DPS
        • Healer
        • Tank
      • Necromancer
        • DPS
        • Healer
        • Tank
    • One Bar PvP
      • Arcanist
        • Magicka DPS
        • Stamina DPS
        • Healer
        • Tank
      • Dragonknight
        • Magicka DPS
        • Stamina DPS
        • Healer
        • Tank
      • Nightblade
        • Magicka DPS
        • Stamina DPS
        • Healer
        • Tank
      • Sorcerer
        • Magicka DPS
        • Stamina DPS
        • Healer
        • Tank
      • Templar
        • Magicka DPS
        • Stamina DPS
        • Healer
        • Tank
      • Warden
        • Magicka DPS
        • Stamina DPS
        • Healer
        • Tank
      • Necromancer
        • Magicka DPS
        • Stamina DPS
        • Healer
        • Tank
    • Companion Builds
      • Azandar Al-Cybiades
        • Ranged DPS builds
        • Melee DPS builds
        • Healer build
        • Tank build
      • Sharp-As-Night
        • Ranged DPS builds
        • Melee DPS builds
        • Healer build
        • Tank build
      • Ember
        • Ranged DPS builds
        • Melee DPS builds
        • Healer build
        • Tank build
      • Isobel Velois
        • Ranged DPS builds
        • Melee DPS builds
        • Healer build
        • Tank build
      • Mirri Elendis
        • Ranged DPS builds
        • Melee DPS builds
        • Healer build
        • Tank build
      • Bastian Hallix
        • Ranged DPS builds
        • Melee DPS builds
        • Healer build
        • Tank build
  • Destiny 2 Builds
    • Solo
      • Hunter
        • Arc Hunter
        • Solar Hunter
        • Stasis Hunter
        • Strand Hunter
        • Void Hunter
      • Titan
        • Arc Titan
        • Solar Titan
        • Stasis Titan
        • Strand Titan
        • Void Titan
      • Warlock
        • Arc Warlock
        • Solar Warlock
        • Stasis Warlock
        • Strand Warlock
        • Void Warlock
    • PvE
      • Hunter
        • Arc Hunter
        • Solar Hunter
        • Stasis Hunter
        • Strand Hunter
        • Void Hunter
      • Titan
        • Arc Titan
        • Solar Titan
        • Stasis Titan
        • Strand Titan
        • Void Titan
      • Warlock
        • Arc Warlock
        • Solar Warlock
        • Stasis Warlock
        • Strand Warlock
        • Void Warlock
    • PvP
      • Hunter
        • Arc Hunter
        • Solar Hunter
        • Stasis Hunter
        • Strand Hunter
        • Void Hunter
      • Titan
        • Arc Titan
        • Solar Titan
        • Stasis Titan
        • Strand Titan
        • Void Titan
      • Warlock
        • Arc Warlock
        • Solar Warlock
        • Stasis Warlock
        • Strand Warlock
        • Void Warlock
  • Contact
    • Support
    • Streaming Setup

Apr 30 2023

How to PvP in ESO Guide and Tips – All Classes

How to PvP in ESO Guide gives you Tips and tricks for All Classes. Playing against other players is challenging in every game, and ESO has truly skilled and knowledgeable gamers, so let’s ensure you are one of them!

I’ve learned much about survival, healing and damage over years of playing ESO! I have one goal from this guide that you walk away with a clear understanding of how to be successful in ESO PvP. 

I’ll be talking about picking the right class, skills, gear, combat basics and important stats to aim for. Nextly, we will discuss what you need to survive and dominate!

How to Pick the Right ESO PvP Build?

The first step in being a PvP sweatlord is being honest with your capabilities and reaction time. PvP is about burst damage and healing, so the slower you react, the more difficult time you may have with certain classes and playstyles. Pick a build that matches your playstyle and combat capabilities.

Related: Best ESO Classes: PvP Tier List

If you have slower reflexes, it’s okay, you can still be good at PvP but don’t expect to pick up, for example, a Magicka Nightblade 1vX build and assume you will dominate. Gear, mythic or Champion Points won’t change that. You simply need to pick something that matches you.

How to PvP in ESO Guide - All Classes and Tips
How to PvP in ESO Guide – All Classes and Tips

Each ESO Class Breakdown

Here’s the breakdown of each ESO class in PvP.

  • Dragonknight is the most dominant class for the average player. 
    • With insane healing, AoE and single-target damage, along with ungodly survivability. Whether you play Magicka/Stamina or hybrid, it is amazing.
  • Nightblade heavily depends on the players’ skill level. You need ultra-fast reaction times and good experience with the class to be the apex predator on the battlefield.
    • Nightblades have the highest burst single target, AoE damage, and insane survivability and stealth ONLY if you play it right.
  • Sorcerer class has insane burst potential but is absolutely punishing for beginners, whether you play Magica or Stamina. Why?
    • It’s the only class without a reliable burst because Twilight Matriarch pet will often get killed within 10 seconds, leaving you exposed and likely dead. Pick this up if you love high mobility classes but be warned is unforgiving.
  • Templar remains one of the game’s most durable and survivable classes, and I highly recommend it for beginners or players with longer reaction times. Also, a great choice if you want simple tanky gameplay.
    • Slot Living Dark, equip a shield and hold a block when enemy players attack you. Templars also currently excel at range DPS with the strongest range execute.
  • Warden is similar to the Templar but with a lot more offensive capabilities. Wardens are nearly mandatory in high-octane groups but also good in solo play.
    • Classes’ crowd control and buffs bring tons of utility to the group and are the meta healings and group buff play. It has great self-healing but lacks high-end resources sustain. 
  • Necromancer is currently very weak in ESO PvP. Deep fissure warden is a better version, and Nightblade is a better bomber. Regardless class is tanky but requires mastery rotation and constant buffing to bring its full potential.
    • Blastbones, which is your main delayed bursting tool, has all sorts of problems landing and hitting targets. With low mobility, predictable damage, and more access to the Major Vulnerability, you rarely see a lot of necros in Cyro currently.
  • Arcanist class is the newest addition to ESO and will most likely change over the upcoming months. As of now, I like the class for status effect damage and utilising arena weapons. Outside of that, it felt pretty lacklustre. 
    • It has massive range damage but is predictable and easy to counter.

Must-Have Skills for PvP in ESO

When you’re starting PvP, I highly recommend setting up your build for survivability first. No one has fun dying every 3 seconds, and you’ll get frustrated and quit. Firstly, We list the skills you will need and classes-specific equivalents. 

Survival Skills – PvP Tips for all Classes

The most important skill has an armor buff that grants Major Resolve. This will provide almost 6,000 physical and spell resistance, equating to roughly 7 or 8% damage reduction.  Here are class examples.

  • Dragonknight: Spiked Armor Skill
  • Nightblade: Shadow Barrier Passive
  • Sorcerer: Lighting Form Skill
  • Templar: Rune Focus Skill
  • Warden: Frost Cloak Skill
  • Necromancer: Bone Armor Skill
  • Arcanist: Fatewoven Armor Skill

Also, you can stack this buff with the Minor Resolve. For example, from the Alliance War Assault skill tree, the Resolving Vgor, gives you nearly 3,000 more armor.  Typically both buffs need to be recast every 20 seconds, so they have a decently long duration and reduce damage significantly.

Even if you play a magicka build, it’s important to have a decent stamina pool to sustain Resolving Vgor, assuming your spell damage and max magicka are high. It’s a decent heal over time, and with hybridization, skills scale with your max stats, regardless if it’s Magicka or Stamina build.

Speed PvP Tips for all Classes

Have you ever fought those super annoying rock humpers that seem to have a speed hack on? You can get access to the Major Expedition buff increasing your speed by 30%, as a result, drastically increasing your survivability too. Pop the skill, run for cover, sustain resources and healing and get back into the fight.

Classes that have the Major Expedition buff in-class skills.

  • Dragonknight: Fiery Grip Skill
  • Nightblade: Path of Darkness Skill
  • Sorcerer: Lighting Form Skill
  • Templar: Doesn’t have Major Expedition in-class skill
  • Necromancer: Doesn’t have Major Expedition in-class skill
  • Warden: Falcon’s Swiftness Skill
  • Arcanist: Fleet Footed Gate Skill
ESO Essence of Speed Potion
The essence of Speed Potion

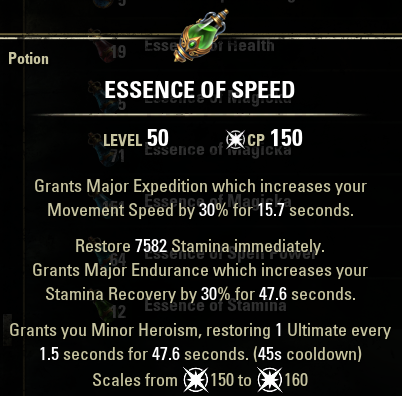
You can also get the Major Expedition from gear sets, bow passive when you dodge roll and even potions. Two specific instances of Major Expedition stand out from the rest. Firstly, the Race Against Time from Psijic Order skill line gives you a brief speed boost and removes snares and immobilization. Keeping you from getting locked in place and eventually killed.

Crowd Control Immunity

It’s also important to note when you get stunned, you can break free using stamina and get roughly 7 seconds of Crowd Control immunity. This is shown by a circle at your feet.

ESO PvP Tips and Tricks - CC immunity
The CC Immunity Circle

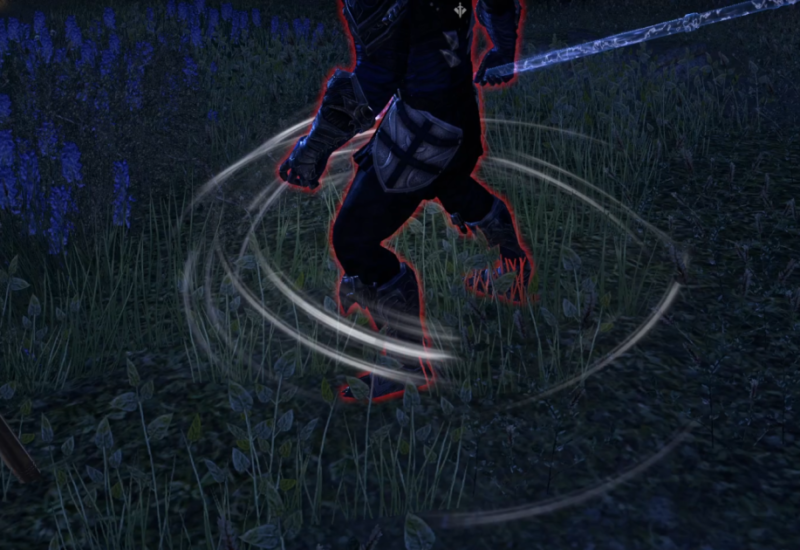
This is your window to escape. But the downside is while you are CC immune, you ARE NOT immune to immobilizations. So, you can be stunned and immobilized back-to-back requiring you to break free and dodge roll consuming a huge chunk of stamina. No stamina, no break free, and you are dead. 

My other favorite mobility tool currently is Vampire skill Elusive Mist.  This gives you a semi-teleport away and Major Expedition. You can use it repeatedly to travel massive distances quickly.  And it’s a perfect combination for builds like the Dragonknight or Templar, who are, in nature, very sluggish.

Vmpirisim

However, Vampirism comes with upsides but also downsides. While at least stage three vampirism, the undeath passive will give you up to 30% damage mitigation as your health lowers. You can also get 300 Weapon or Spell Damage from leaving sneak, invisibility or mist form for 6 seconds. 

Yet, you take a lot more fire damage and sustaining your resources is much harder. Vampire works great with stealth Nightblade, Magicka Dragonknight, or anything that lacks mobility and has good resource sustain built-in.

ESO PvP Tips and Tricks - Swift Jewelry trait
Swift Jewelry trait

Lastly, you can stack major and minor expedition buffs along with the Swift Jewelry trait. Gold quality items increase your movement speed by 7% per piece worn. Remember, the sprint speed cap is 200% (you can find statistics on your character screen).

If you struggle with survivability, the simplest solution is to crank up your speed with a skill that gives Major Expedition, 3x swift jewelry, and simply run away when the fight gets overwhelming.

Burst Healing – PvP Tips for all Classes

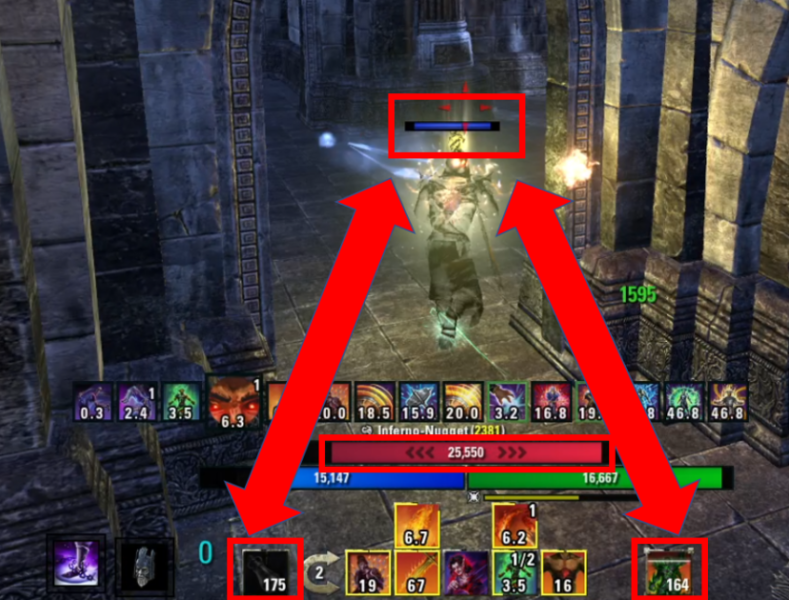
The most important tip I can give you is to monitor your health, always. This isn’t PvE, where someone is going to snuggle up to the enemies, tank them for you, and heal for you. All of it is down to you.

ESO PvP Tips and Tricks - Health bar on when injured - in gameplay settings
Health Bar “on” When Injured – In Gameplay Settings

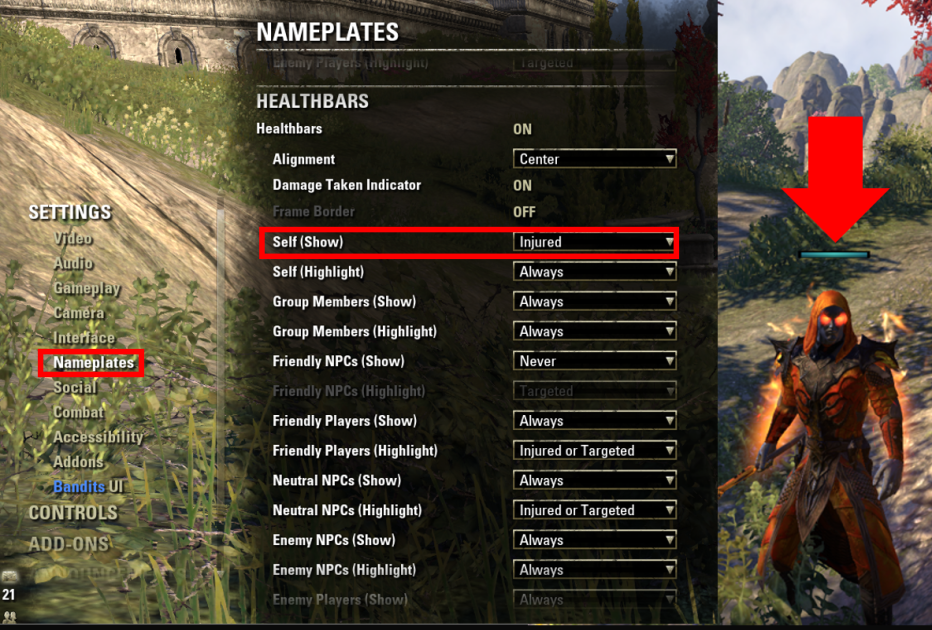
Firstly, turn your health bar “on” when injured” in gameplay settings. This will display the health pool over your head, so when you fall below 70% or lower, STOP WHAT YOU DO AND HEAL YOURSELF! 

I constantly see people at 25% health just light attacking, beaming, and wandering around. And skilled in PvP players will destroy them like a little lamb if they notice them. You should always be looking at your health bar, potion and ultimate, it’s the most important triangle

ESO PvP Tips and Tricks - Health bar, Potion and Ultimate Triangle
Health bar, Potion and Ultimate Triangle

Here are good healing skills for each ESO class:

  • Dragonknight: Coagulating Blood
  • Nightblade: Healthy Offering
  • Sorcerer: Twilight Matriarch 
  • Templar: Breath of Life
  • Warden: Arctic Blast
  • Necromancer: Resistant Flesh
  • Arcanist: Evolving Runemend  

Combine your in-class burst heal with Resolving Vgor to get good heal over, and those skills will pop you up.  Do not get tunnel vision and keep attacking when your HP is low, it will make a HUGE difference.

Crowd Control 

Lastly, crowd control like CC, stunning a target serves a few purposes for us. It can be used to prep a target for a kill shot. Load them up on damage and DOTs, stun and execute. Or it can be used as an escape tool while taking a ton of pressure, stun and zip away. It’s great as a defensive mechanism for teammates too.  Stuns and CC drain resources from other players, and it’s also a small window of opportunity to burst them down. 

A rookie mistake is to “ramboing in” and immediately stun a target.  Sure, it’s annoying to the player, but the killer move is to load them up with all sorts of DoTs, get their HP low and stun them with an insane deadly combo like 3x stack Molten Whip for the kill shot.  Use crowd control in these ways, and your kills and survival will increase dramatically.

Here are some good choices of Crowd Control for each class:

  • Dragonknight: Fossilize
  • Nightblade: Mass Hysteria
  • Sorcerer: Streak
  • Templar: Binding Javelin
  • Warden: Arctic Blast
  • Necromancer: Bone Totem
  • Arcanist: Rune of Colorless Pool

Quickly here’s an example of my Magicka Dragonknight Skill Bar front bar duel wield:

ESO PvP Tips and Tricks - Magicka Dragonknight Skill Bars
Magicka Dragonknight Skill Bars

You can check the full Magica Dragonknight PvP build here.

Also, to touch on it briefly, it’s important to have a source of major brutality or sorcery for weapon and spell damage, along with critical chance, major prophecy and major savagery. You can use potions, slot skills, gear sets and so on.

Choosing the Right Gear to PvP in ESO

ESO PvP Tips and Tricks - Efficient Methods of setting up a Build Example
Efficient Methods of Setting up a Build Example

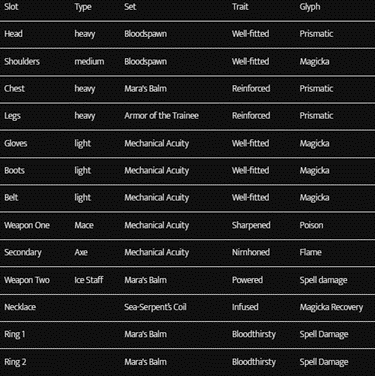
The easiest way to explain gear is to show you a build chart of efficient methods of setting up a build.  It’s not the only way but one common meta loadout. This is how you setup an efficient two-bar build.  You aim to find the sweet spot between damage, resource sustain and healing. In this particular loadout, here’s how it works.

  • Mechanical Acuity carries my burst damage when I Rambo in.
    • You start with a 5pc offensive gear set, this is for MagDK, and we have high burst damage Mechanical Acuity. It is only active when you switch to your front bar, which should be most of your offensive skills.
  • Then you have a back bar set, currently, Mara’s Balm though Daedric Trickery will replace that in Update 38 because it’s being nerfed.  Once I flip to my back bar, I can get a cleanse, and a huge burst heals with it.
  • Bloodspawn is a resource sustain tool because the Dragonknight gets resources back when using ultimate via Battle Roar passive
  • Sea-Serpent’s Coil is essentially two 5pc offensive sets in one active at all time. It’s that powerful, and I counter the snare with Vampire Elusive mist.
  • My back bar defensive set is what saves my life when I’m in trouble and need a burst heal, and a cleanse.
  • And 1pc trainee just for extra stats. 

Now I have high burst damage, great survivability, and resource sustain.  You can also use arena weapons vs mythic, and all sorts of different combinations, including one bar builds with Oakensoul. Check my website for specifics; otherwise, there will be too many sets and combinations to list out.

Armor Weight

I prefer to be tanky, so I usually use 3 heavy pieces. Typically chest/legs and Helm if the item sets support it. Chest and Legs I like because of the armor values and reinforced trait that gives me an enormous amount of armor with major and minor resolve up at all times.  And with this build, if the Bloodspawn procs, I’m well over 30,000 resistance with high damage.

Traits

I’m not a big fan of impenetrable and rarely run it if I can. As a solo player, it doesn’t provide much value to me. Even with super high impen, you can still get nuked by a stealth Nightblade so what’s the point? I’d rather have a nearly free dodge roll with well-fitted for 100% evades or low block cost with Sturdy.

Another great option is the Divine trait with Warrior Mundus stone because weapon damage also affects your healing. High weapon and spell damage, high self heals.

And it’s pretty logical to go with 1 or 2 reinforced in the chest/legs.

Running three heavy, I usually aim for 3 extra gear pieces of my main stat and one of off-stat. I want to take advantage of the undaunted mettled passive, giving 6% stats if you wear at least one of each armor choice. So for Magicka users, 3 light, and stamina users, 3 medium.  And that leaves one extra slot for the off-stat, magicka user 1 medium, stamina user 1 light. 

ESO PvP Tips and Tricks - Prismatic Glyph
Prismatic Glyph

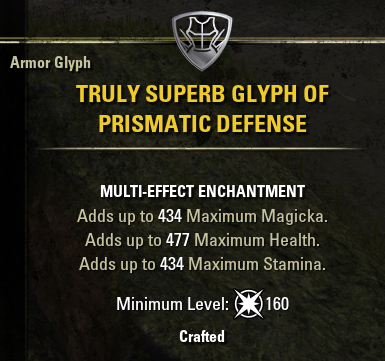
You can then run prismatic glyphs in your large pieces: head/chest/legs. This gives you big tri-stats, which helps with resource sustain. Even magicka builds want a lot of stamina for breaking free, dodging and Resolving Vgor. 

Stats to Aim For in ESO PvP

People constantly ask me about stats, recovery, penetration, max magicka, etc.

Health

The lower your reaction time and skill, the more health you need.  When you increase your health, you lower your main stat, thus decreasing your damage and healing.  Running around in Cyrodiil with 18,000 health will be the worst experience of your life. Typically, when I coach people, I start them at 32,000 health.  I see their reaction time and adjust from there. Start high with training wheels on, and lower as you learn.  

Penetration

Penetration, “in general,” gives you the most overall damage per stat. However, weapon and spell damage not only adds to your overall damage BUT healing as well.  Don’t believe me?  Great experiment time!  Let’s jump on the Mag DK build.

  • First example: will look at Coagulating Blood heal tooltip with the Atronach Mundus stone, which adds magicka recovery.  8733
  • Second example: will switch the Lover giving us offensive penetration and heal is 8733 no change.
  • Third example: let’s switch to Warrior Mundus stone now we hit 9176

This is one reason high-end players can run two five-piece damage sets that buff raw damage because it significantly increases your healing and damage.  Does that mean penetration is a dead stat? Absolutely not, and it remains the highest and most coveted stat in general for adding pure damage.  But remember, you want to be sweatlord, insane survivable with high damage, so factor that into your builds.

Your goal with penetration is to be around 10-12,000, typically with Major Breach built into your skills.

Sustain

For resource sustain, it goes back to the health debate. You need more reaction time, better at the game, and lower resource sustain.  Same with using Stage 3 vampire, another trick will help you leveling your alchemy and take the medical use passive for longer recovery via potions. You’ll also see many of my builds run Dual Wield and Frost staff. This gives me a way to resource sustain both pools using just fully charged heavy attacks.

I typically aim for around 1,500 or so recovery depending on my build. I generally run Smoked Bear Haunch or Jewels of Misrule food. This gives me tri-recovery and health. With hybrid gameplay, I find my survivability and sustain skyrocket though it will lower your damage compared to Bewitched sugar skulls or bi-stat food. Another option is an incredible new monster helm Roksa which replaces Engine Guardian as the dominant two-piece of resource sustain set.

Weapon or Spell Damage is up next, and it’s pretty easy to get to 5,500 self-buffed.  You can do this same sort of ways, mundus stone, gear sets, major and minor buffs, weapon enchants increase it, and infused jewellery will get it very high.

My typical stats I am for

ESO-PvP-Tips-and-Tricks-Typical-Stats-to-aim-for-in-ESO-PvP
Typical Stats to Aim for -Example
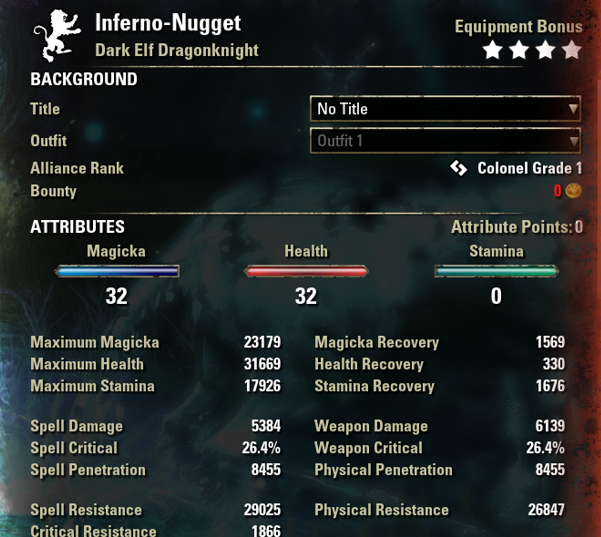
  • 32,000 health depending on reaction times
  • 10-12k pen with major Breach
  • 1,500 recovery
  • Around 5,500 weapon or spell damage self-buffed
  • Around 25% weapon or spell critical self-buffed

These numbers will be much different without CP.

Basics of ESO PvP Combat

PvP in ESO is the exact opposite of PvE. It’s all about short 3-5 second burst damage and healing windows. You need to rewire your brain to act suddenly and VIOLENTLY, and if you do not kill the target, reset and try again.

Buff cycling is the first priority and something you need to get used to. Just like a PvE sweat, you must constantly refresh your buffs even when you don’t anticipate any combat. Your armor buff, Resolving Vgor, weapon and spell damage buff, etc. Because you will get attacked unexpectedly, this will save you 3-5 seconds of global cooldowns, keeping you alive when you would have been dead.  Make it a practice to cycle your buffs.

Don’t tank your resources but get prepared. You never know when it’s going to get popping!

Line of sight is up next, AKA rock humping. This is when you fight me outside of Nikel, and I’m constantly running around hugging rocks with major expedition limiting your ability to target me. Alongside rock hump and buff cycling, you must constantly evaluate your terrain.

When I was in the army, I learned about bounding, constantly looking and thinking about “if I got attacked right now, where would I go and why?” I constantly think, where do I go next, am I close enough that I can get away quickly?  Being out in the wide open is dangerous unless you’re a sorcerer and know how to zip out with a streak.

How to effectively kill players in ESO PvP?

Now it’s all about burst damage and how to nuke players down.  You can do this with a combination of gear and skills, but I’ll use my Dragonknight, for example. You aim to time as much damage in as short as possible window.

In a group context. One Soul Tether Nightblade, one Shifting Standard DK and one Corrosive armor DK. Our goal is to countdown ultimate timing 3, 2, 1 DROP, the Soul Tether goes out, stuns targets and provides a synergy. The DK uses Talons, drops Shifting, providing two HUGE damage synergy, and the Corrosive DK goes into 100% pen mode and starts spinning, destroying everyone in a few short seconds.

This also can be done with solo gameplay and is great to illustrate on a Necromancer.  While not the apex build, Necros currently have Blastbones, which is a delayed ability. So you can cast it and rip off a fully charged heavy attack on a two-handed build to proc the follow-up passive, giving you 10% more damage and a Dawnbreaker.  If done correctly, you will do damage with a heavy attack, your weapons enchant, Dawnbreaker, Blastbones.  Combine this with Balorgh monster helm and Clever Alchemist, and burst window is incredibly violent. Giving you a huge flood of weapon damage and penetration exactly what you need in conjunction with multiple forms of damage. If you do it right, poof, the target is eliminated.


More ESO Articles, Guides and Builds

Thank you for reading the How to PvP in ESO Guide and Tips – All Classes! Check out more companion builds and a comprehensive companion guide and video. Also, consider watching me on Twitch, feel free to ask me questions about my builds and games I play or check out my YouTube Channel.

  • Complete Beginners Guide
    • Skill Points Guide
    • Champion Point System Guide
  • PvP Beginner Guide
    • How to farm Alliance Points (AP)
    • How to farm Tel Var Stones
  • Addons, UI, and Keybinds Guide for ESO
  • Tales of Tribute Guide

Written by Deltia · Categorized: Dragonknight Builds, Elder Scrolls Online, ESO Builds, ESO Guides, ESO PvP, ESO Solo PVP, Necromancer Builds, Nightblade Builds, Sorcerer Builds, Templar Builds, Warden Builds · Tagged: Elder Scrolls Online, elder scrolls online gameplay, ESO, ESO Builds, ESO Classes, ESO Gear, eso guide, ESO Healing, ESO Mythic, ESO Passives, ESO PvP, ESO PvP Guide, ESO Skills, ESO Strategies, TESO, zenimax online studios, ZOS

Primary Sidebar

Youtube Channel

Deltia's Gaming

Deltiasgaming the player & coach simple writing guides for RPGs & MMOs. Our goal is to give you the information needed, to enjoy your favorite games, without having to spend countless hours. The best games, the best guides.

Deltia's Gaming
Why You Shouldn't Quit Your Day Job to Stream

đź’ś Twitch: https://www.twitch.tv/deltiasgaming
❤️ Patreon be in the ending credits: https://www.patreon.com/deltiasgaming
🔵 Follow me on Twitter https://twitter.com/Deltiasgaming1 
✔️ Check out our Website:  https://www.deltiasgaming.com/ 


🎥PRODUCT LINKS (Commission Earned)
My Streaming Setup https://deltiasgaming.com/deltias-gaming-streaming-setup 

Deltiasgaming the MMO and RPG player & coach writes guides for MMO, MMORPGs,  RPGs, focusing on walkthroughs, hints, tricks, builds, news and guides
Load More... Subscribe

Latest Post

Best ESO Builds: Update 38 and Necrom chapter

ESO: Arcanist Class Guide and Best Builds

Best Destiny 2 Builds: Season 21 – Season of the Deep

ESO Necrom Chapter Story

Best ESO Builds: Update 38 Necrom Chapter

Baldur's Gate 3 Companion Approval Quest Walkthrough

Baldur’s Gate 3 Settings for Controller

Baldur’s Gate 3 Guild Artisan - Background and Inspiration Goals

Baldur’s Gate 3 Guild Artisan: Background and Inspiration Goals

UESP.net


We are proud to partner with the Unofficial Elder Scrolls Pages (UESP) for some of our content. Check out their ESO Build Editor or support them through Patreon.

Footer

Logo

Deltia’s Gaming is your home for the best games & the best guilds. builds, Guides and walthroughs for your favorite video games daily!

  • Address : Deltia's Gaming, LLC, PO Box 460721, Papillion, NE 68046
  • Email : info@deltiasgaming.com
Follow us

Privacy

Deltia's Gaming Privacy Policy.

WATCH LIVE

Copyright © 2023 · Deltias Gaming · Log in