Facebook
 Reddit
 Email
Email
Discover everything you need to know about the 10 best shields in Avowed and what makes them the best and worst one.
Avowed is a first-person RPG developed by Obsidian Entertainment and published by Xbox Game Studios. Set in the Pillars of Eternity universe, the game occurs in the Living Lands, where you uncover a secret mystery. Shield in Avowed is a defensive tool that helps block attacks, reduce incoming damage, and provide unique passive abilities. This is a one-handed weapon to enhance survivability in tough encounters. Blocking allows you to mitigate damage taken from attacks.
The enchantments of shields include regenerating health, summoning allies, or dealing damage to the enemies. Upgrading the shield allows you to improve its stats and effectiveness. Shield offers unique benefits, allowing players to choose one that suits their playstyle. Choosing the best shield is crucial as a tank player because your gameplay mostly depends on it. In this guide, we’ll discuss the best 10 shields in Avowed along with their attributes and how to get them while exploring the world.
Top 10 Best Shields in Avowed Ranked
A shield is a kind of tool that can make you tankier and allow you to handle multiple enemies more effectively. Shields allow you to block incoming attacks and possibly counter enemies in melee combat. It provides damage reduction against melee and ranged attacks. However, timing is crucial here as it helps you to mitigate the damage. It also helps you manage stamina better by allowing you to absorb hits without depleting stamina. You can also use it as stagger resistance because it prevents you from being easily knocked back or stunned. Certain shields may offer protection against magic, so choosing the best one is important here.
Putting a shield in your off-hand gives you the best defensive playstyle where you can use it to block, parry, deflect, and protect. Early on, unlocking the Shield Bash passive is super helpful to interrupt enemies and build stun. Furthermore, passives like Parry and Reflect give you great survivability. Therefore, it’s one of the best combos to use on your back bar even if you don’t intend to play a tanky style. The downside to a shield is that it requires a ton of passive skills to make the defensiveness worth it and a little offensive upside.
Ranking Best Shields in Avowed
Below are the 10 best Shields in Avowed ranked from best to worst:
- Tree of Life- The best Shield that provides regenerates health and reduces incoming elemental damage.
- Sun and Moon- Regenerates health during the day and essence at night.
- Bastion of Solace- It provides a chance to inflict fire damage on attackers when blocking and increases health and stamina.
- Unflinching Duty- This shield provides you a chance to avoid melee damage and increases maximum stamina.
- Sun of Black Heaven- It provides you a chance to restore essence when blocking and increases maximum essence.
- Beetle’s Bulwark- This shield summons a beetle companion when parrying below 75% health and offers fire resistance.
- Wind and Wave- It increases movement speed and provides frost resistance.
- Nimanna’s Ward- It provides temporary health on successful parries and reduces damage from spirits.
- Spindlewalker- This shield resists slowing by webs and has a chance to lay slowing webs when parrying.
- Nature’s Ward- This lower-tier shield deals damage to attackers when blocking and has a chance to remove the poisoned effect.
10) Nature’s Ward
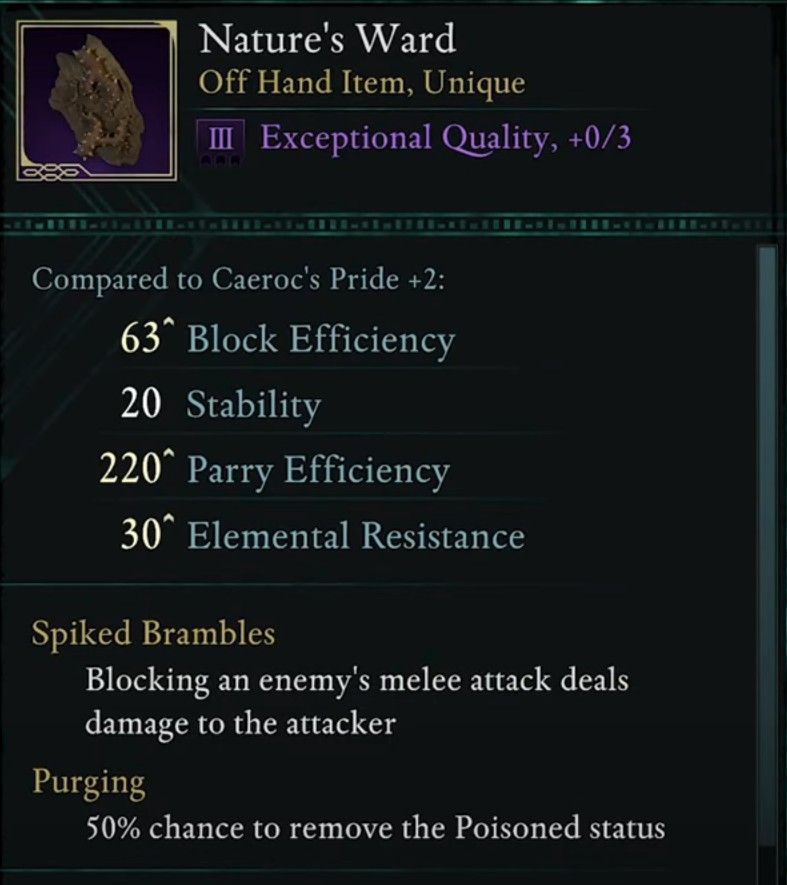
- Block Efficiency: 63
- Stability: 20
- Parry Efficiency: 220
- Elemental Resistance: 30
Nature’s Ward is the lower-tier shield in our ranked list due to its lower blocking capability, along with the lower elemental resistance potential. Although this shield offers decent parry efficiency, allowing you to counter the enemy attacks. Nature’s Ward comes with two unique bonuses that increase its effectiveness in combat. Spiked Brambles allows you to block an enemy’s melee attack to deal damage to the attacker. Purging allows you to gain a 50% chance of removing the Poisoned status. You can get the Nature’s Ward in a Locked Tower in Delemgan Glade, in the Emerald Stair region.
Travel west from the Roch Arch Beacons to reach the Locked Tower. Make your way to the right until you see a wooden path after you see a tower. Move straight on the wooden pathway. Find the button and press it to unlock the door. You can find Nature’s Ward inside the coffin in the Tower. Nature’s Ward is a solid shield that is particularly suited for defensive and tanky playstyles. We place this shield in the lower tier in our ranked list due to its low blocking efficiency and it’s not ideal for aggressive playstyles.
9) Spindlewalker
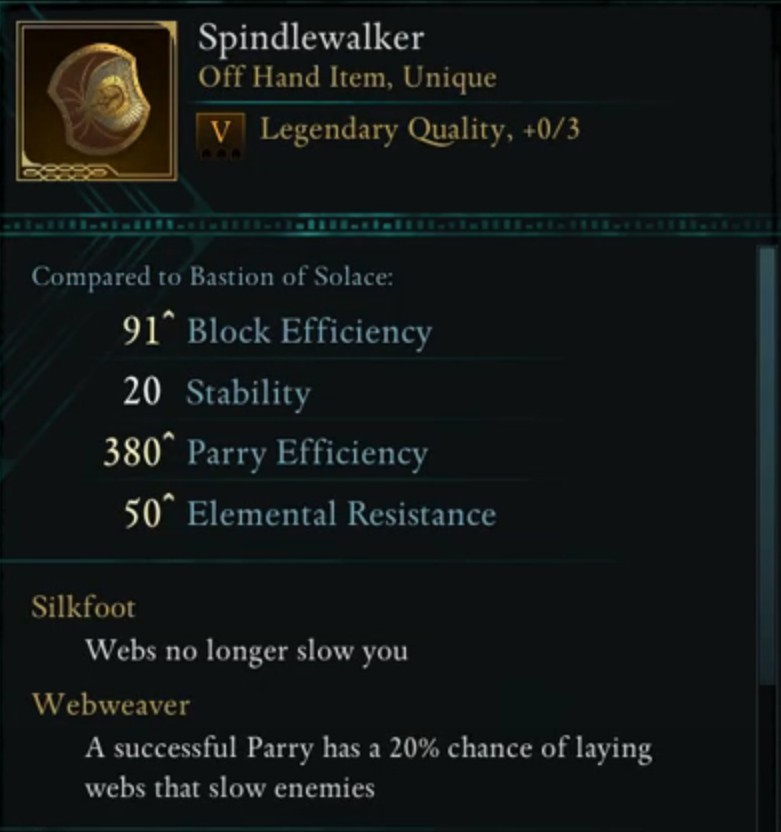
- Block Efficiency: 67
- Stability: 20
- Parry Efficiency: 240
- Elemental Resistance: 33
Spindlewalker is in the second-last position in our shield-ranked list due to its moderate blocking efficiency and excellent parry efficiency. This damage-absorbing shield has two bonuses that increase its effectiveness in combat. Silkfoot bonus allows the webs to not slow your movement. Webweaver enchantment gives your parry a 20% chance of laying webs that slow enemies. Spindlewalker is located in the Researcher’s House at Scaedclef, Shatterscarp. You can get the Researcher’s House Key from the nearby house up north. Make sure you have three lockpicks to enter inside.
Acquiring the key will spawn Ash Blight outside the house. Upgrading this shield allows you to increase its block efficiency and parry parrying capability. We recommend you use this shield in early to mid-game combats. You can use the Spindlewalker for crowd control, and it is useful against enemies that use web-based attacks. We place the Spindlewalker below the Nimanna’s Ward and above the Nature’s Ward due to its minimal defensive bonuses and moderate stability in combat.
8) Nimanna’s Ward
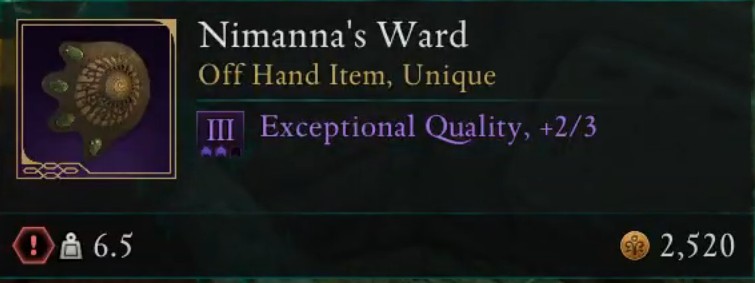
- Block Efficiency: 77
- Stability: 20
- Parry Efficiency: 300
- Elemental Resistance: 40
Nimanna’s Ward is the 8th best shield in our ranked list due to its high parry efficiency and low block efficiency. This shield has two unique bonuses that increase its effectiveness in combat. Soulkeeping Parry allows your successful parry to give you temporary health, making your character stronger for a short amount of time. Spirit Ward bonus allows you to gain -5% damage from spirits. Nimanna’s Ward is located in Naku Kubel in Shatterscarp during the events of Shadows of the Past. Speak with the Ryngrim in her domain during Face Your Fears to initiate the quest.
Turn right on the first room after completing the Trial of Wisdom. You will find a treasure chest that has Nimanna’s Ward in it. You also get your hands on the Corrupted Adra from this treasure chest. This shield is effective for players seeking additional protection against spirit-type enemies. Pair your shield with the Shield bash to increase your blocking efficiency and effectiveness in tough encounters. We place the Nimanna’s Ward below the Wind and Wave due to its situational enchantments and block efficiency.
7) Wind and Wave
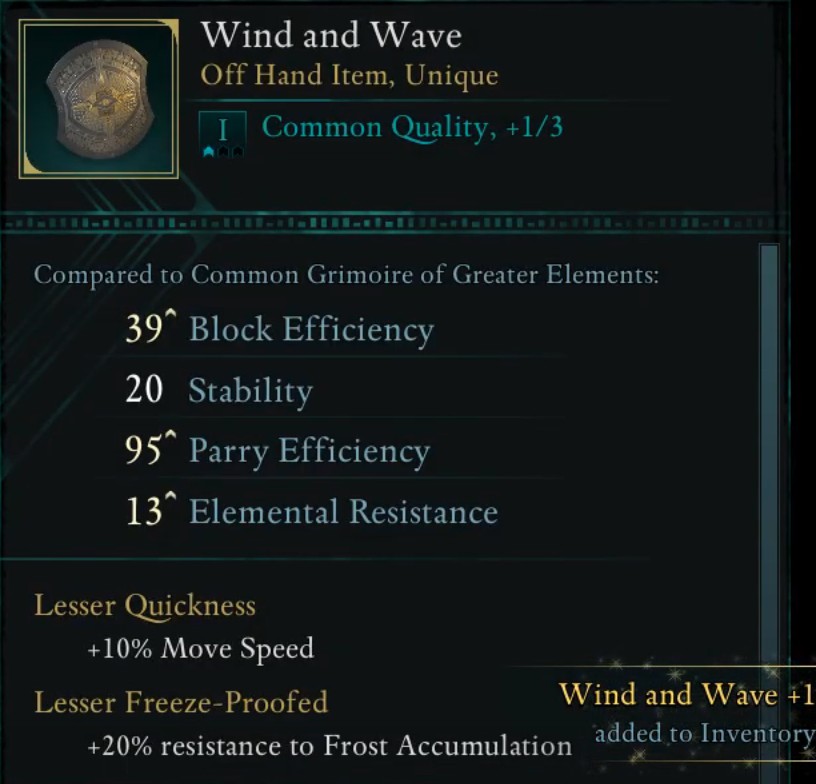
- Block Efficiency: 49
- Stability: 20
- Parry Efficiency: 140
- Elemental Resistance: 20
Wand and Wave offer enhanced defensive capabilities, allowing you to reduce the incoming damage from the enemies. This shield comes with two bonuses that increase its effectiveness in combat. Lesser Quickness allows you to gain +10% move speed, making your character fast on a battlefield. Lesser Freeze-Proofed allows you to gain +20% resistance to Frost Accumulation, making it useful against frost-based attacks. Wind and Wave is found in the Dawnshore region, northeast of the Old Pargrun Wall, near the River. Make your way to the lighthouse in Claviger’s Landing. You can move to the top by navigating the scaffolding on the side as the main entrance is blocked. You get your hands on the map at the top.
The map points north from Claviger’s Landing, along the river, towards a bridge east of the Old Pargrun Wall. You need to follow the river northward. Find a group of roots along the edge. Now, dive underwater near these roots to find a small passage. There you will find the hidden treasure, which includes the Wind and Wave shield and a chest filled with useful items. This is a good shield to use in early to mid-game as it provides decent protection without being too heavy. It also helps against enemies that deal frost damage. The buff in movement speed allows you to reposition quickly, increasing your agility in tough combat. We place this shield below the Beetle’s Bulwark because it’s not the best for tanking and lacks high defense and parry efficiency.
6) Beetle’s Bulwark
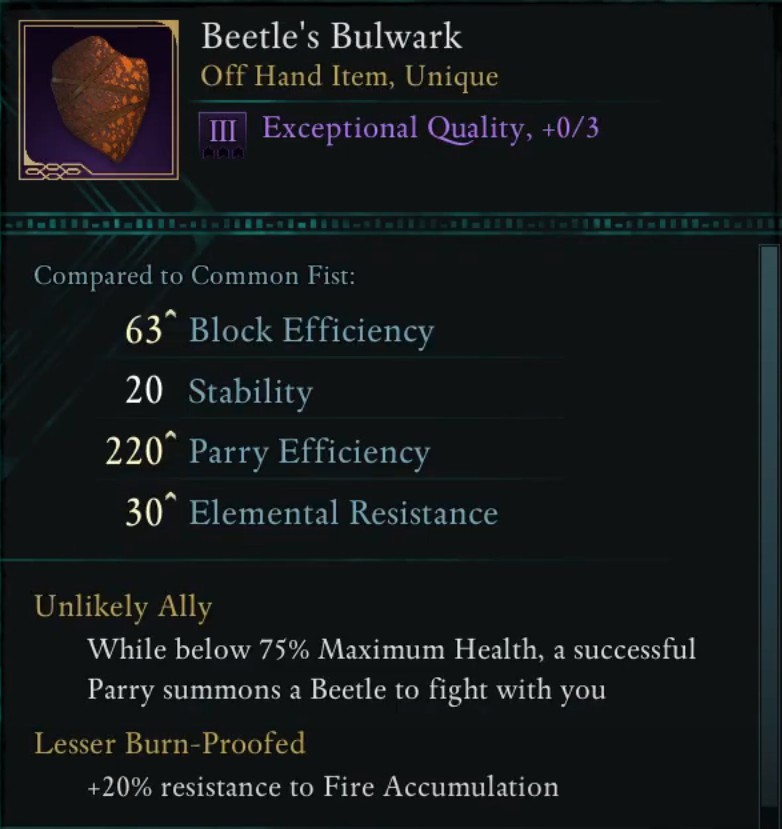
- Block Efficiency: 49
- Stability: 20
- Parry Efficiency: 140
- Elemental Resistance: 20
Beetle’s Bulwark stands below the Sun of Black Heaven, with its low block efficiency and parrying capability in tough encounters. Using this shield against high-level enemies in the end game can leave you vulnerable as it will not absorb much damage. Beetle’s Bulwark comes with two unique perks that increase its capability in the game. Unlikely Ally allows you to summon a beetle to fight alongside you after a successful parry while below 75% Maximum Health. Lesser Burn-Proofed perk grants you a 20% resistance to Fire Accumulation. The Beetle’s Bulwark can be purchased from the merchant Sanza who is located at Sanza’s Makeshift Emporium in Paradis Hightown, Paradis City in the region of Dawnshore.
You can also buy it from Sanza from Sanza’s Makeshift Emporium, they are located in High Market, Paradis City in Dawnshore. Upgrading this shield allows you to increase its effectiveness in combat, making it a more damage-absorbing tool. You start the Beetle’s Bulwark with Fine quality and can be upgraded to Exceptional, Superb, and Legendary. This is especially for early to mid-game stages and provides additional combat support by summoning a beetle. We place this shield below the Sun of Black Heaven due to its lower block and parry efficiency along with the minimal elemental resistance.
5) Sun of Black Heaven
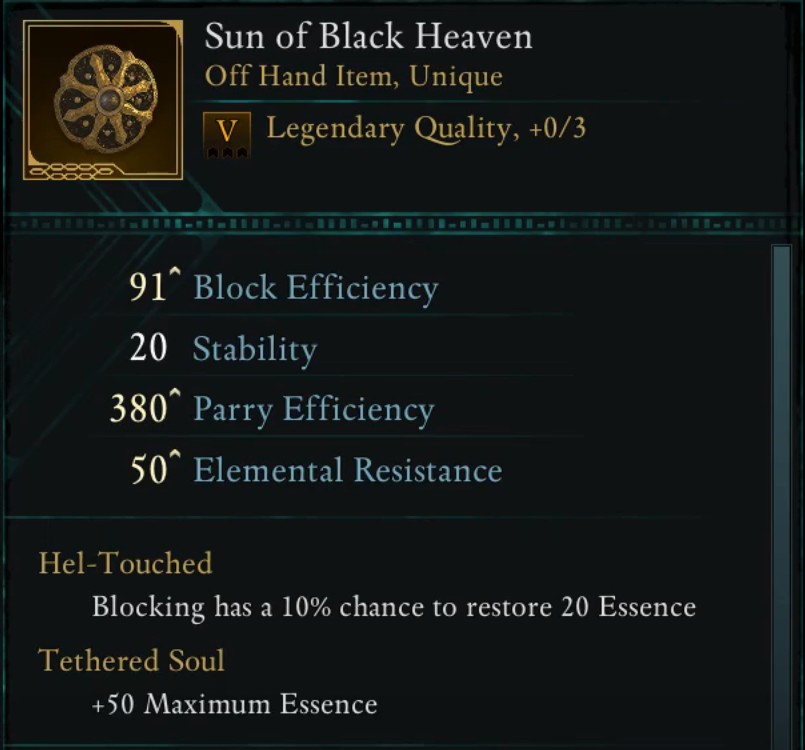
- Block Efficiency: 91
- Stability: 20
- Parry Efficiency: 380
- Elemental Resistance: 50
Sun of Black Heaven stands on the fifth in our ranked list due to its decent block efficiency and high parry efficiency. This shield is ideal for players who rely heavily on Essence. You can purchase the Sun of Black Heaven from Quartermaster Yorgu at Solace Keep in the Galawain’s Tusks region for 73,125 Skeyt. Sun of Black Heaven is highly regarded for Essence-focused builds, offering both defensive capabilities and Essence management benefits.
This unique shield comes with two unique perks called Hel-Touched and Tethered Soul. Hel-Touched is a unique bonus that blocks a 10% chance to restore 20 essence. Tethered Soul allows you to gain maximum Essence. You can pair it with a skill like Shield Bash to increase its effectiveness in combat. It provides excellent damage mitigation with 91 Block Efficiency and 380 Parry Efficiency. However, this unique shield is expensive and is less useful for pure tanks.
4) Unflinching Duty
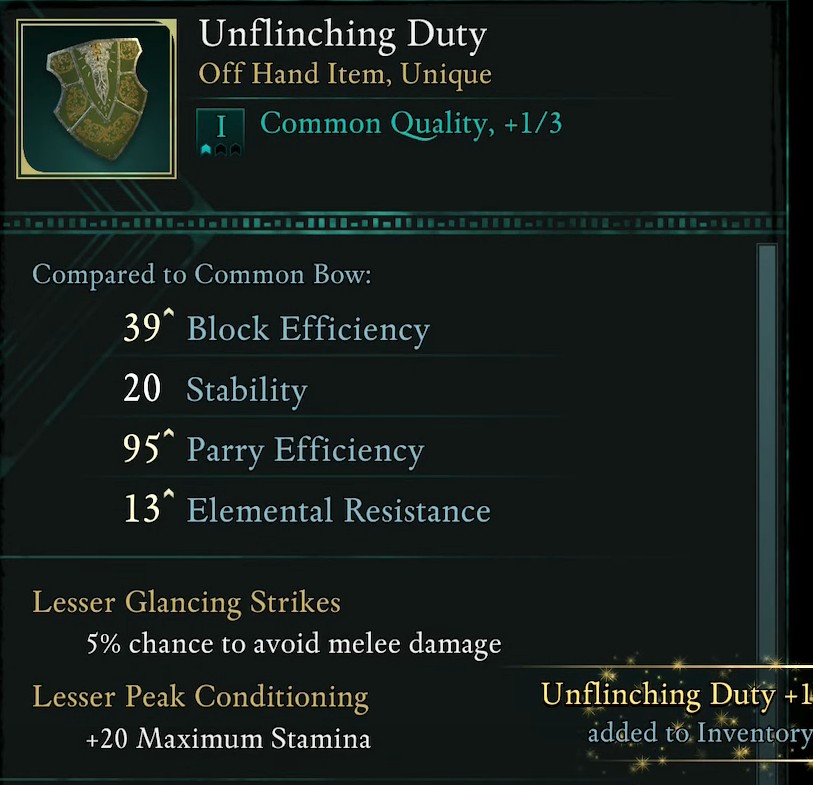
- Block Efficiency: 39
- Stability: 20
- Parry Efficiency: 95
- Elemental Resistance: 13
Unflinching Duty is the number four in our ranked list because it offers decent protection against enemy attacks. This shield gives you a chance to avoid taking melee damage and boosts your overall Stamina. First, the Lesser Glancing Strikes enchantment bonus will give you a 5% chance to avoid melee damage. This percentage is small, but it’s a nice early-game boost that can add to your survivability. Lesser Peak Conditioning enchantment bonus boosts your overall Stamina by 20 points. This is another nice buff and will help you take extra actions in combat, including using this shield. Primary enchantment on weapons can be upgraded in Avowed. Therefore, you cannot upgrade the Lesser Glancing Strikes enchantment on the Unflinching Duty shield. However, you can upgrade the shield at the Workbench to higher qualities, so that the base stats increase.
Location
You will start a main quest called Message From Afar that sends you looking for the Ambassador after you land at the docks after the tutorial area. The soldier at the docks tells you that he and the claviger (mayor) are missing after they went to The Strangleroot. This dense forest is north of the Old Pargrun Wall. Find a fast-travel beacon just outside the entrance to The Strangleroot.
Command Kai (or use your spell/grenade) to burn down the brambles and head inside. It will take a bit of time to wind through the forest, but keep heading north. The bear has some powerful swiping attacks, which you should dodge. Use Kai’s first ability to draw aggro away from you whenever you are under too much pressure. The ambassador will come out after you kill the bear. Find the body of the dead soldier, and next to him, you will see the Unfliching Duty shield outlined in gold.
Unflinching Duty doesn’t drain stamina as quickly and it gives a 5% chance to avoid melee damage. You also gain +20 Maximum Stamina, allowing for more blocks, dodges, and attacks. However, this shield lacks offensive perks and is purely defensive. We place this shield below the Bastion of Solace due to its slightly low defensive capability.
3) Bastion of Solace
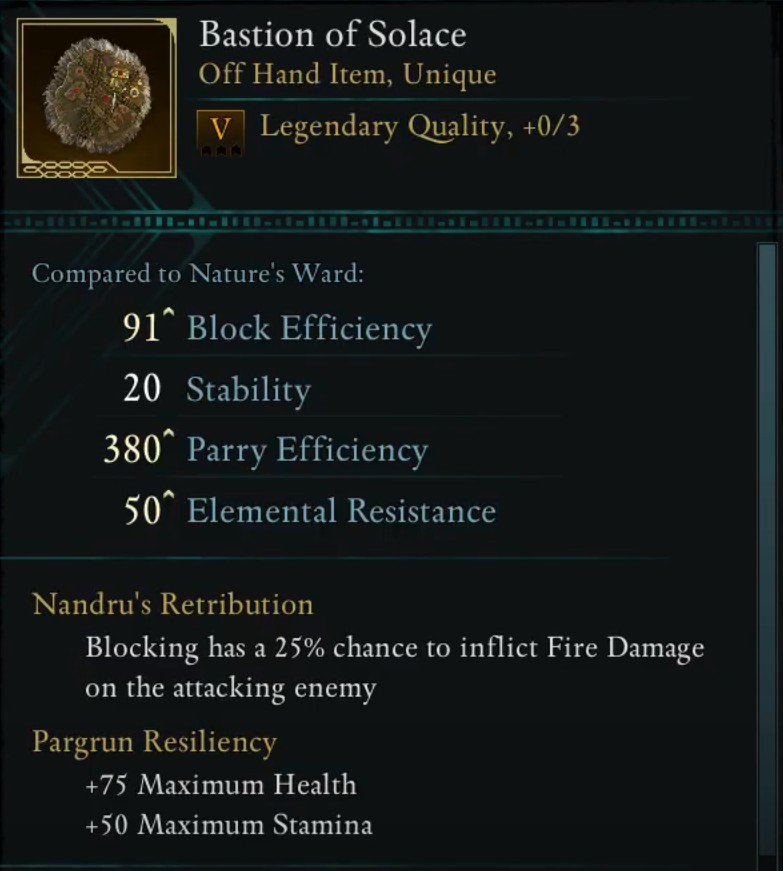
- Block Efficiency: 91
- Stability: 20
- Parry Efficiency: 380
- Elemental Resistance: 50
Bastion of Solace is the third-best shield on our list due to its solid defensive and offensive benefits. This is one of the best shields to use in the tough encounter as it has high blocking and parrying efficiency. This shield is rewarded from the main quest Our Dreams Divide Us Still in the Galawain’s Tusks region. You need to choose to save Solace Keep when you get a choice to Doom or Save Solace Keep. After making this choice, speak with Mihala at Solace Keep to receive the shield as a reward. Bastion of Solace comes with two unique perks and each one provides unique bonuses to your character. Nandru’s Retribution gives you 25% chance of your blocking to inflict Fire Damage on the attacking enemy.
Pargrun Resiliency boosts Maximum Health by 75 and Maximum Stamina by 50. You start with the Superb quality of this shield and upgrade it to higher tiers at a workbench. You need Blackwood Branches and Cave Coral for the initial upgrades. Bastion of Solace has high defensive stats along with the bonus and stamina. This is a great choice for tank builds and ideal for melee warriors who want to absorb damage. We place this shield below the Sun and Moon because it’s heavier than some shields and is less suited for magic-heavy builds.
2) Sun and Moon
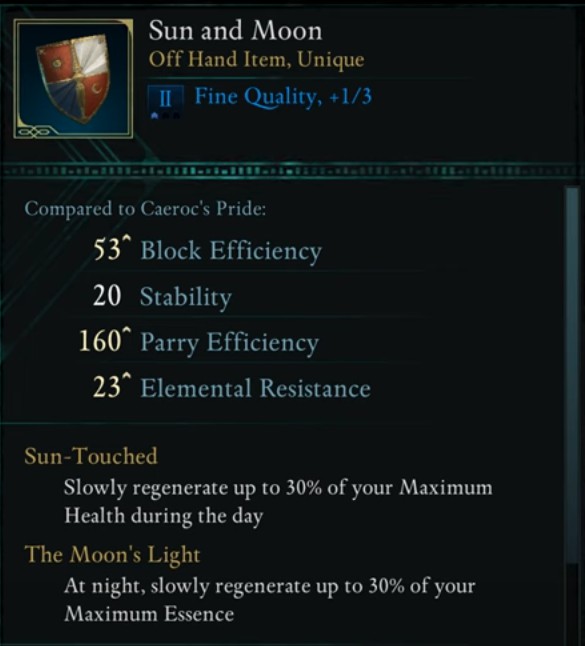
- Block Efficiency: 53
- Stability: 20
- Parry Efficiency: 160
- Elemental Resistance: 23
Sun and Moon is the second in our Shields ranked list due to its stunning block and parry efficiency along with the regeneration of maximum health. This shield comes with two unique bonuses called Sun-Touched and The Moon’s Light. The first one allows you to slowly regenerate up to 30% of your maximum health during the day. The Moon’s Light slowly regenerates up to 30% of your maximum essence at night. This is also the best shield to use for the late game content as it provides you with enough defense.
To obtain the Sun and Moon, make your way to Felipe’s Depression in the Emerald Stair region, southwest of Maxim’s Claim. Move south from Fior mes Iverno to get to Felipe’s Depression. Jump into the sinkhole and ensure you have sufficient health to survive the fall. Now, move toward the tree root leading to an opening, where you’ll encounter enemies. You will find a coffin once you move straight ahead. This coffin is covered in webs containing the Rusty Key. Move up the stairs to a locked door with etchings. You need to use the rusty key to unlock it. You’ll find the Sun and Moon shield inside it.
Sun and Moon is an excellent choice for sustained fights without needing to rely on potions. This is particularly useful for hybrid playstyles that use both health and essence. This is ideal for spellblade characters who use both melee combat and magic. It offers solid protection, but this is not the tankiest shield, so we place it below the Tree of Life.
1) Tree of Life

- Block Efficiency: 63
- Stability: 20
- Parry Efficiency: 220
- Elemental Resistance: 30
Tree of Life is the best Shield in our ranked list due to its effective defensive capabilities. It offers you high block efficiency along with elemental resistance, making your character more powerful. The parry efficiency allows you to block the enemy attack and deliver a powerful counterattack. Upgrading Tree of Life allows you to increase its block efficiency, stability, parry efficiency, and elemental resistance. This unique shield comes with the perks that make it more effective in tough encounters. Unending Regrowth allows you to slowly regenerate up to 30% of your maximum health. All Season perk reduces the incoming Fire, Frost, and Shock damage by 15%.
Location
You can get the Tree of Life by completing all the bounties available in the Emerald Stair region. Move to Fior mes Iverno to initiate all five bounties. You will come across the Bounty Board near the Fior Plaza Beacon once you reach this location. Move to the Naku Tedek Grounds at the southern part of Emerald Stair to locate the Belderreno bounty. The Trantons’ bounty is found in the Western Forest. Trantons are high-level enemies because they consume potions to heal themselves. You can find the Old Nuna inside The Grotto, northwest of Fior mes Iverno. Move to the Western Forest within the Wildwoods area to get to the Delemgan bounty. Make your way to the Abandoned Farms to find The Xaurips bounty. Once you complete all five bounties, you can claim the Tree of Life from Bounty Master Martella in Fior mes Iverno.
Collect all the required materials to upgrade the Tree of Life on the workbench, enhancing its effectiveness in combat. You start with the Exceptional quality and upgrade it to the Superb and Legendary. This is the best shield for players who prefer passive healing and elemental resistance. Tree of Life is the best shield to use in the endgame combats because it reduces the incoming damage from the enemies and gives you opportunities to parry their attacks.
FAQs about 10 Best Shields in Avowed Ranked
What is Shield in Avowed?
Shields allow you to block incoming attacks and possibly counter enemies in melee combat. It provides damage reduction against melee and ranged attacks.
Which is the best Shield in Avowed?
Tree of Life is the best shield in Avowed because it offers you the high block efficiency along with elemental resistance, making your character more powerful.
Can upgrading the Shield increase its effectiveness?
Yes, you can upgrade the shield to increase its blocking and parrying efficiency. The more you upgrade, the more you increase its effectiveness in tough encounters.
Looking For More About Avowed?
Thank you for reading the 10 Best Shields in Avowed Ranked Guide. We provide the latest news and create guides for Avowed. Also, watch me play games on Twitch or visit my YouTube channel!