Facebook
 Reddit
 Email
Email
Discover ESO Top 5 Tips to Increase Your DPS for beginners and more advanced players, we explain rotation, parsing, and more!

Top 5 Tips to Increase Your DPS in ESO 2024
The easiest way to increase your damage per second in ESO is to understand DOTs, bar setups, rotation, resource sustain, and light attack weaving. In this ESO Top 5 Tips to Increase Your DPS 2024 guide, we will explain each section in a non-class-specific way so you can walk away and apply it to your builds. Let us start with the foundation of damage per second and that’s Damage Over Time or DOTS.
Related:
#5 Understanding Damage Over Time
Most people look at a build page, whether from me or another content creator, and have zero clue why the build casts and or maintains certain damage over time abilities. The simplest reason I can explain this to you is to understand Elder Scrolls Online has a one-second global cooldown system. In general, when an ability is cast, you’ll have a one-second animation before you can cast another ability. This excludes channeled abilities which you must finish casting before using another skill.
Below are some classic main spammable abilities examples:
- Nightblade: Surprise Attack or Concealed Weapon
- Templar: Puncturing Sweeps or Biting Jabs
- Dragonknight: Molten Whip
All of these have a one-second-long animation before the next ability can be used. The idea here is that you want to use the most damage-producing attack every time you have a global cooldown available. Here’s an experiment to illustrate this and how you can use this premise to change your builds.
DPS Experiment
Let’s say a single cast of Surprise Attack on a stamina Nightblade hits for 10,000 as a noncritical strike. Now what if we cast a damage-over-time ability like Twisting Path? This will produce around 30,000 DPS after the entire duration of the ability and only cost you one second, the same as Surprise Attack.
Both skills take up one global cooldown, but by prioritizing Twisting Path, in this example, you can increase your overall DPS output. This is the premise behind casting damage over time (DoT) effects.
When deciding to cast a DoT instead of your spammable, you’ll want to consider two things:
- Does it do more damage over its duration than your spammable? In our previous example, applying a Twisting Path instead of using another Surprise Attack will result in a greater DPS output, assuming the full duration of the DoT can be used. That’s the key though, if a boss will die before your DoT expires, it may still result in more damage to hit your spammable instead of keeping every DoT ticking.
- What additional damage buffs does the DoT give you? An example is the Templar skill Solar Barrage. Yes, it does some decent damage, but the skill increases the damage your class abilities do by 5%. Maintaining this skill becomes a priority not because its damage necessarily but because of the additional 5% damage to your class abilities.
Templar DOT Experiment
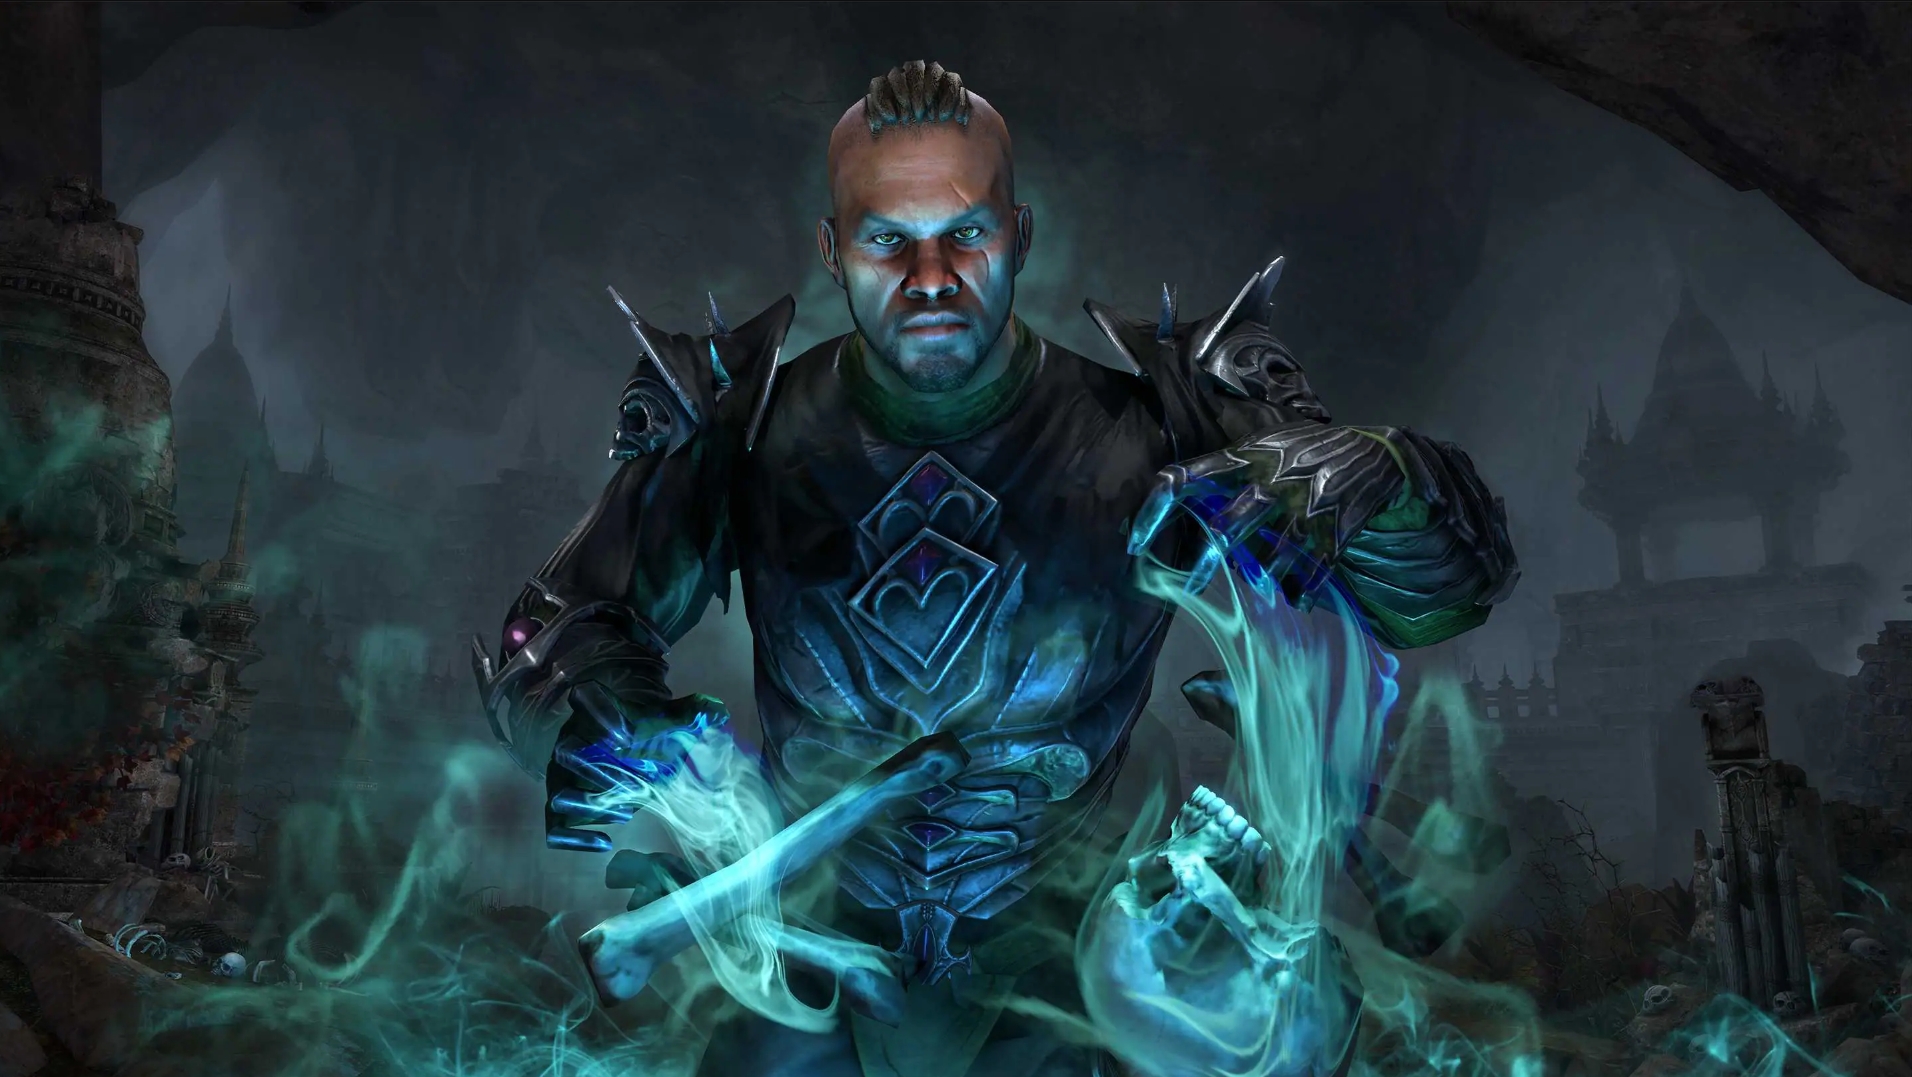
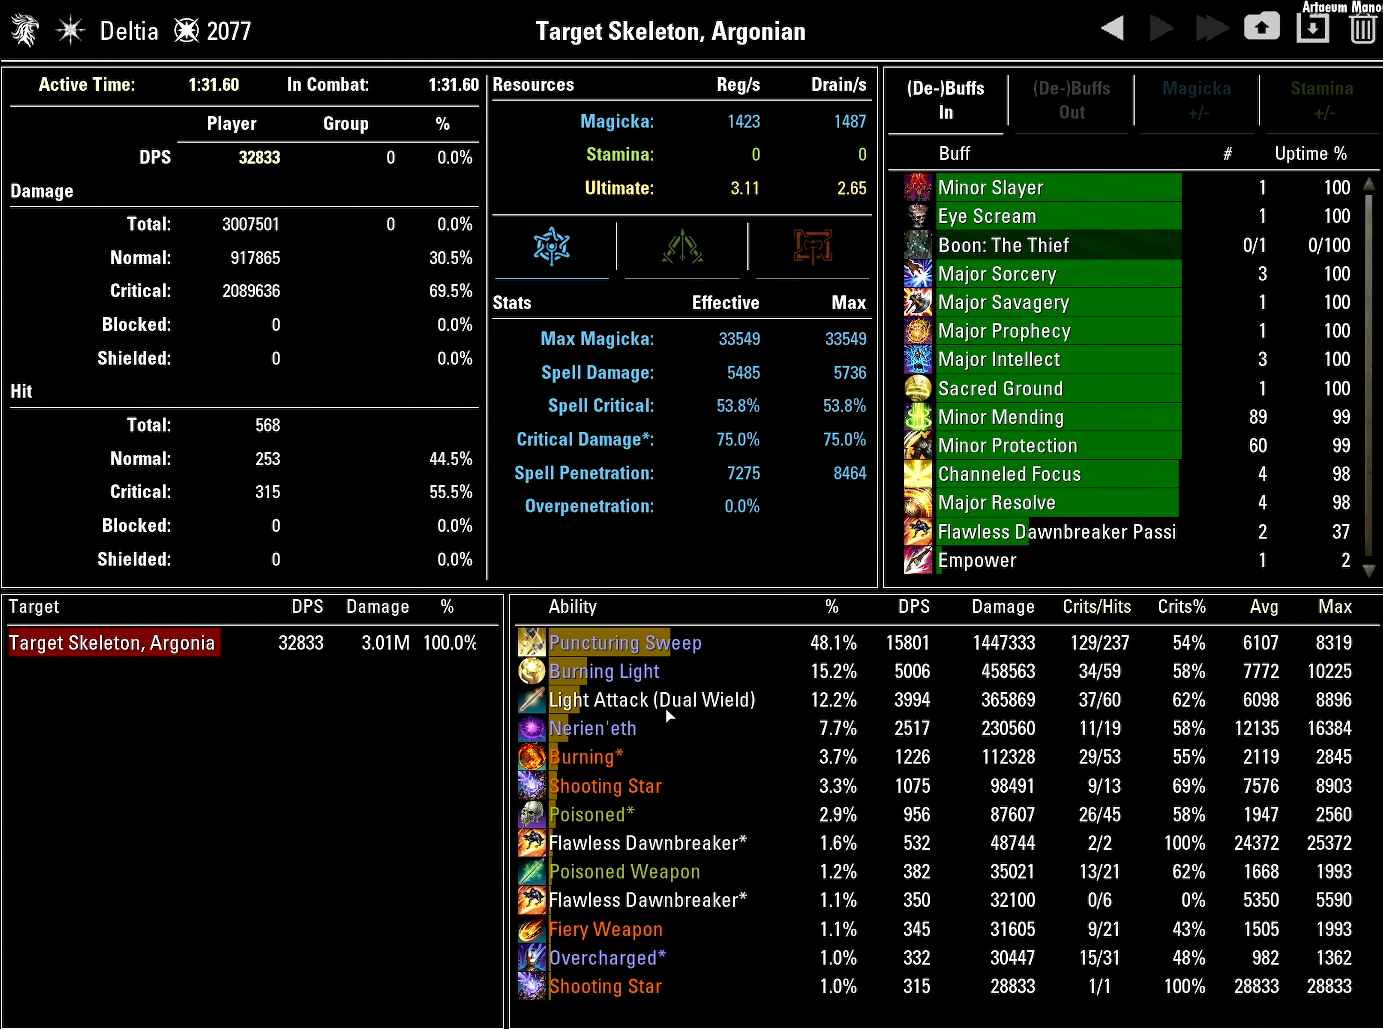
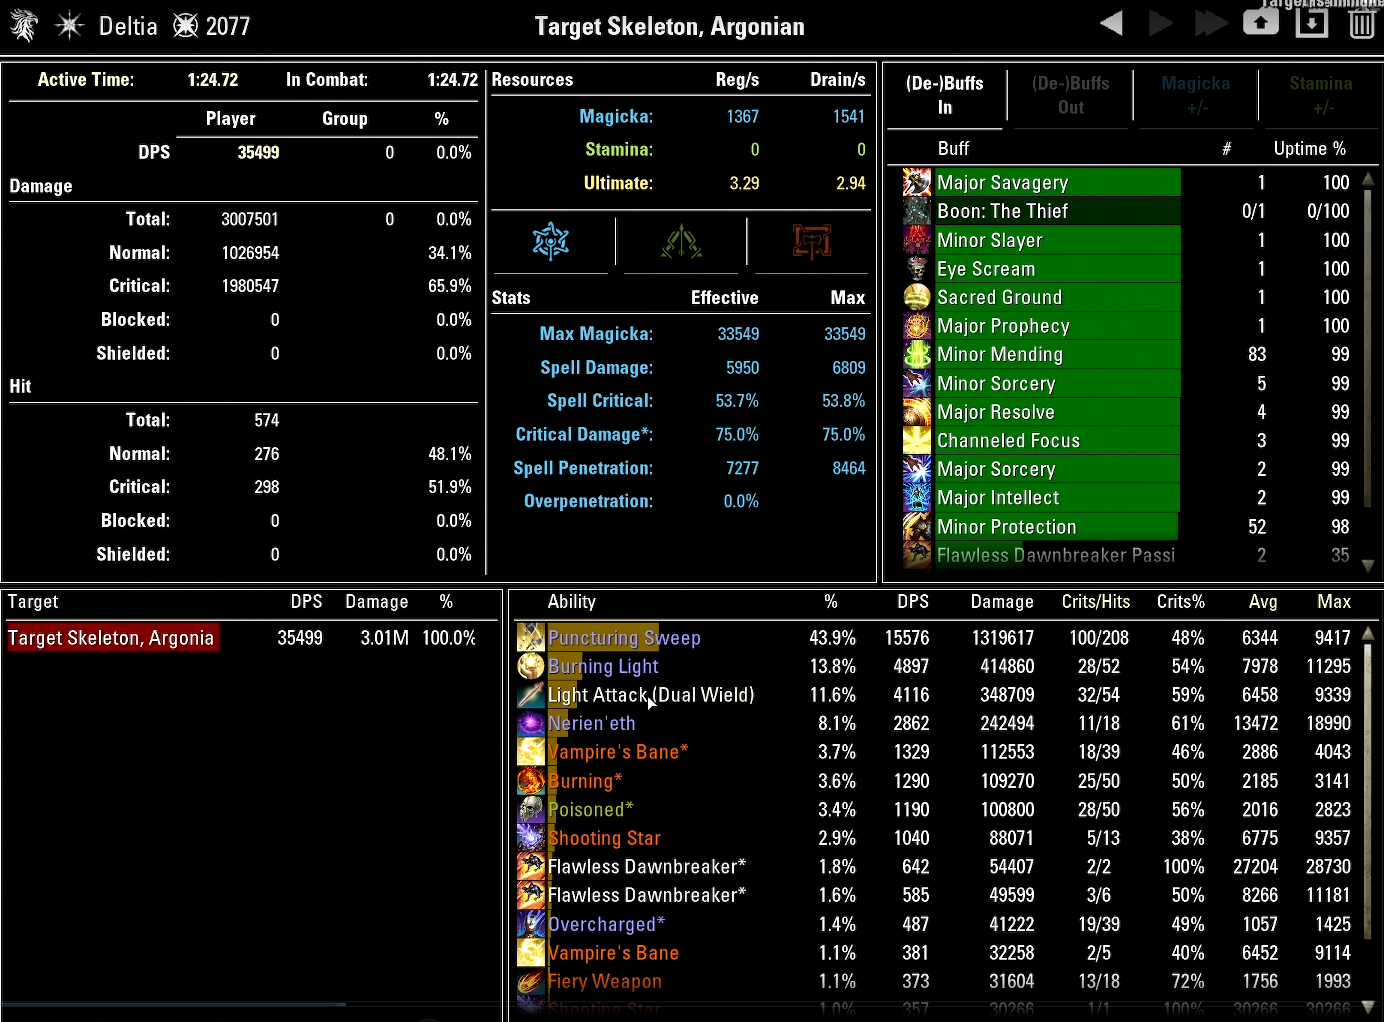
Let’s experiment on a 3 million HP dummy to illustrate this point clearly. The first parse will do just spam jabs (Puncturing Sweeps). The second will add the damage over time Vampire’s Bane. And the third will add another DoT, Degeneration from the Mages Guild:
DPS and DOT Result:
- TEST 1: Base just Jabs = 32,833
- TEST 2: 1x DoT Vampire’s Bane then Jabs = 35,499 (8.11% increase)
- TEST 3: 2X DoTs, Vamp + Degeneration = 36,466 (11.06% increase)
Keep in mind these DoTs are contextual.
If you’re in a trial and fighting a large group of enemies, applying a single-target DoT to a single enemy will result in fewer DPS than if you were to use an aoe spammable that hits the entire pack.
DPS is Contextual
Or if you’re playing solo and no one is providing major breach, you might swap in Elemental Drain skill from the destruction staff skill line in, because the armor reduction of 5948 provides a huge boost to overall DPS as opposed to just another DoT.
You can and should do experiments on your build to form your own opinions and build modifications for the context of play you enjoy: solo, group content like four-player arenas/dungeons or trials. The best players experiment often to see how certain skills and abilities perform. When you see a “meta” build, like my Stamina Arcanist build, these builds are the result of many different tests and experiments.
Sit with your build and experiment over and over on various target dummies. Does using Unstable Wall of Fire increase my DPS or is it a loss? Run the same setup, plus or minus one ability and see, not from me or another creator but for you. By learning to change your build, you can make these adjustments throughout every build gaining a better understanding of how doing damage works and you can make changes accordingly for different boss fights.
#4 Bar Setup to Increase DPS
Some skills can give you even more DPS depending on if they’re slotted on your front or back bar. Reading about your skills will not only help you put them on one bar versus the other, but it will also help you understand which skills might be better than others.
“Deltia why do you run Barb Trap instead of Channeled Acceleration for most of your solo builds?”
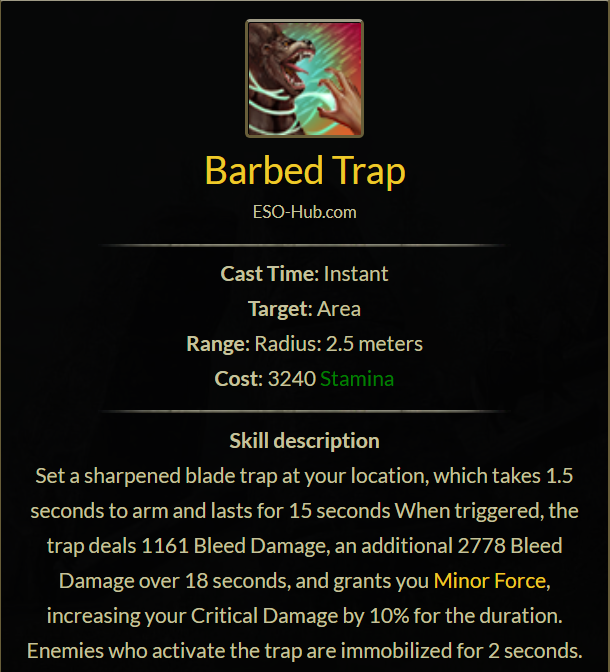

It’s due to the passive benefit slotting the skill provides. The reason most folks run Channeled Acceleration is for the minor force buff giving 10% critical damage for an enormous amount of time of 60 seconds. This is ideal for solo arenas or fights with a lot of targets. But what if we could get the same buff with MEGA damage increase? We can and that’s the Fighter’s Guild ability Barb Trap.
Additional Passive Bar Setup Damage
This ability not only gives the buff minor force but it does damage, a lot of damage.
In addition to the DoT itself, Barbed Trap has two additional benefits that make it one of the best DoTs in the game. It not only applies guaranteed Hemorrhaging, giving it an additional status effect DoT on your target but it also includes additional damage buffs from the Fighter’s Guild passives Slayer and Banished the Wicked.
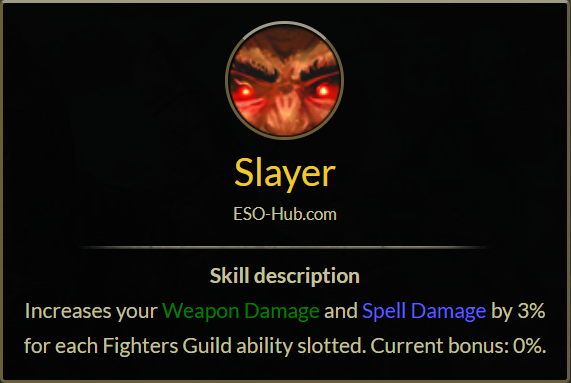
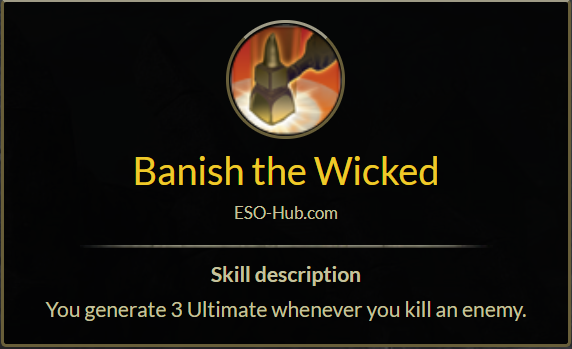
The Slayer passive gives you increased weapon or spell damage by 3% making it great to add on your front bar. Moreover, the Banished the Wicked passive gives you 3 ultimate whenever you kill an enemy. During trash pulls you’ll generate an enormous amount of ultimate allowing you to, well you guessed it, do more DPS.
Now we can use the Fighter’s Guild ability Barbed Trap on our front bar to boost our ultimate generation and spell/weapon damage. You’ll also want to make sure you’re sourcing Major Savagery and Prophecy from one of your skills, giving you a huge boost in critical strike chance.
Important Guild Skills
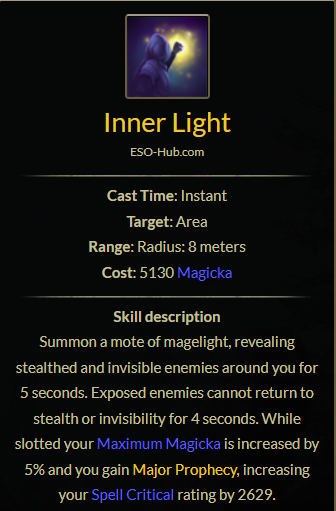
You can choose between either Inner Light from the Mage’s Guild for an extra 5% magicka for magicka users or throw on Camo Hunter from the Fighter’s Guild for minor berserk, if you can do damage to an enemy’s flank, not to mention the juicy Fighter’s Guild passives we mentioned.
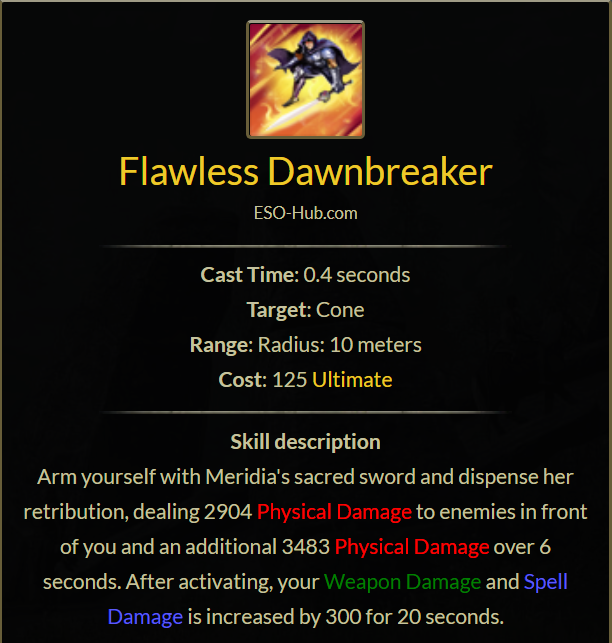
Why stop there? Many players will activate their ultimate off their back bar, allowing them to slot an additional Fighter’s Guild ability, the Flawless Dawnbreaker ultimate on the front bar for another 3% weapon and spell damage boost. Now we’re utilizing our bar space!
DPS Experiment
Then let’s do an experiment running the exact same DoTs on the Magplar. The first example will remove the abilities that passively boost our damage on a 3 million dummy. The second will add them and see how much our DPS improved.
DPS Experiment:
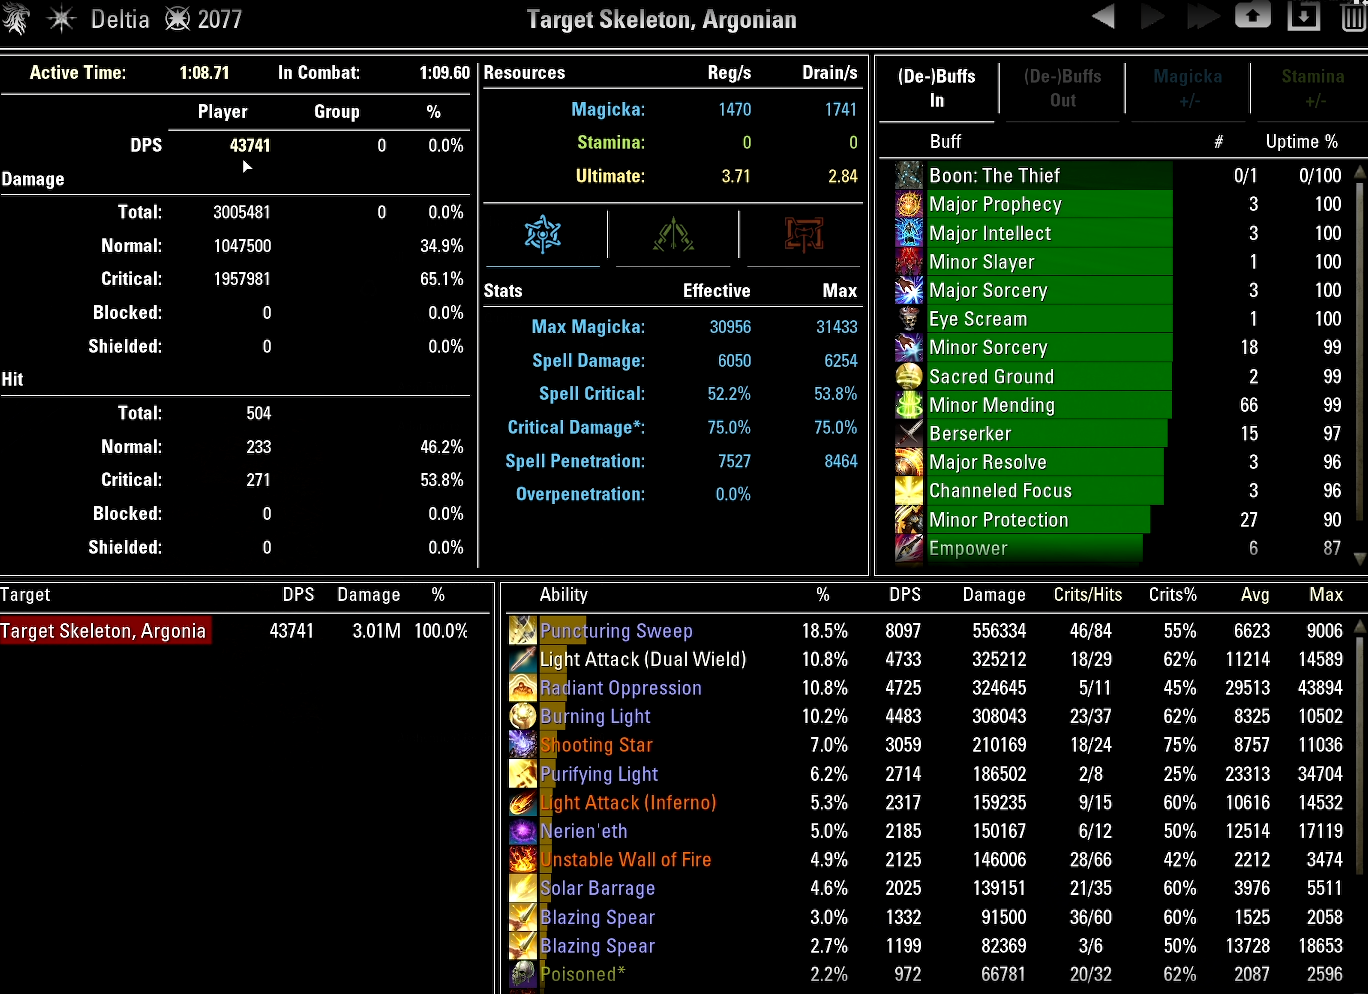
- TEST 1: No damage amp skills (DPS 43,741) [Parse Without Skills]
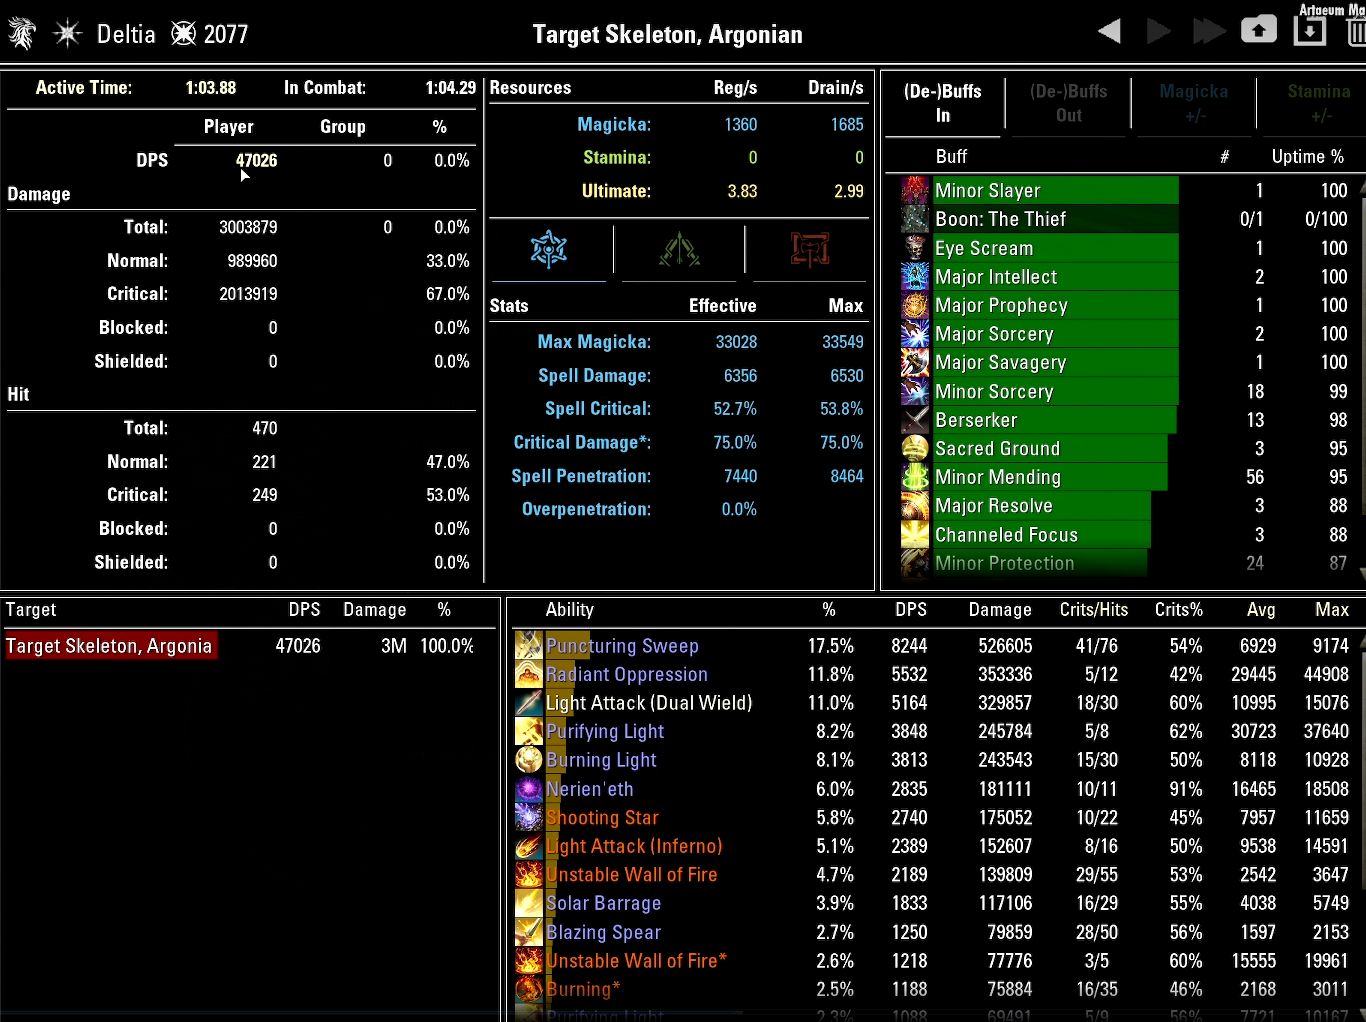
- TEST 2: added three damage amp SLOTTABLES (DPS 47,026 – 7.5% increase) [Parse With Skills]
You’ll also want to check your class passives to make sure you’re slotting specific abilities to increase damage. Take the templar for example, if you don’t slot an Aedric Spear ability on your bar, you’re losing out on 10% critical damage via the Piercing Spear passive. Put jabs on the front, spear or something else on the back to optimize your loadout for huge damage.
Now that you know how to evaluate and load out your bar with damage over time effects that improve your DPS and you fill in the blanks spaces with skills that passively boost your damage, you’re starting to do big DEEPS! But we are not done. How do we manage our buffs, debuffs and rotations? I’m glad you asked, that’s tip number 3!
#3 Rotations That Increase DPS
Think of your rotation to have three phases: buff or pre-fight, priorities and execute phase (which doesn’t apply to classes without “execute” abilities that ramp damage as the enemy’s health gets lower).

Pre-Buff Guide
In the pre-buff phase, you’re casting everything longest to shortest first, especially those that do not require a target. In solo content as a Magicka Templar, it could be Elemental Drain on a boss, then Channeled Focus and Solar Barrage, which don’t require an enemy. You can keep these skills active even without pulling the boss. You continue that sort of ritual before every fight to get the muscle memory down for an ideal pull. That way, when you start, you have your buffs and debuffs activated and you can utilize what are essentially free global cooldowns since you’re not fighting yet.
I constantly see people standing around in dungeons right before the tank pulls doing nothing, but you’ll see good players constantly cycling their pre-buff abilities, which do not aggro the boss, waiting for a pull. Thus, when the engagement does happen, you will have saved 3-4 cooldowns (3-4 seconds), and that’s a lot of damage. If you get anything from this, pre-buff every fight and cycle through your pre-buff ritual from longest to shortest constantly and make it muscle memory.
Fight Priorities
Next you enter the initial phase of combat, which could also be its own 20 minute video. You’ll want to land as much damage in a short window as possible to spike the damage at the start before entering the priority phase. Take a magplar running Shooting Star as their backbar ultimate. Casting this doesn’t land right away, so you have a second before it does any damage. When my pre-buff phase is done, I’ll hit Shooting Star, then toss a Blazing Spear and immediately light attack. Now instead of a clunky pull you’ll have three attacks landing almost simultaneously SPIKING your damage.
Combat has been initiated, and you have already cast two damage abilities before the boss was even pulled. Now you cycle through your initial cast of all your buffs, DoTs and debuffs and manage them until the execution phase, which can be different for every class. You also need to know which skills should be prioritized over others on your bar. That’s where reading your abilities comes in handy.
Using my Templar as an example again, Power of the Light is my number one priority on my front bar. Not only does it do great damage, but it applies minor breach to the target, reducing their resistances, and it procs two important dawn’s wrath passives which generate ultimate and increase group spell damage.
Back Bar priority
Then my number one priority on my back bar is Unstable Wall of Fire paired with a Destruction Staff from Maelstrom Arena. This will not only do great AoE and single target damage, but it will also proc my back bar weapon enchant. Almost all builds run an infused back bar weapon with a Berserker enchant because as long as any weapon ability on your back bar is doing damage, you’ll receive a major weapon and spell damage increase from that enchant that persists even when you switch to your front bar.
If I’m not under pressure, I can add even more DoTs and setup my bar working left to right from longest to shortest. Depending on the DoTs run, you can also line up your front bar skills with bar back skills so you have DoTs with similar cooldowns in the same spots. That way, regardless of what bar you are on, you can apply those DoTs at similar times, while keeping your button presses manageable.
The Execute Phase
Last thing before moving on and that’s the execute phase. Execute abilities do more damage the lower the target’s health. Especially during longer fights and with high-health bosses, you’ll want to start using your execute ability when it begins to out-pace certain abilities in damage. You’ll let certain DoTs “fall off” because your execute ability gets so powerful, a single cast might do more damage than the entire duration of a DoT ability.
Of all classes, Templars are the most dependent on their execute phase. With a lot of practice and experimenting, Templars can hit crazy damage bursts during execute because of Radiant Oppression (J-Beam). It begins outpacing Puncturing Sweeps at around 40% HP. You’ll still want to cast buffs/DoTs/Debuffs until certain HP thresholds, but Templars should drop Jabs after 40% and gradually stop applying DoTs until about the last 10%, where you can exclusively spam your Beam.
This is getting pretty advanced, but this is why experimenting with different strategies and knowing your skills is so important. If you know your J-Beam damage ramps, you can test out different strategies and see if your damage goes up or down. For example, if you think about the execute as accelerating the end of a fight, you might want to make different decisions when you know the fight is ending soon. On a Templar, you might reapply a DoT early because it will allow you to beam more later when the boss’s health is lower.
#2 How-to Resource Sustain
Regardless of if you’re a magicka or a stamina-based build. You need to understand how to sustain and why it’s so important.
Picking the Right Food
High Skill Cap = Consider these two foods the absolute best for resource sustaining long duration fights like Hardmode trials and parsing. These options give a large boost to your primary resource and the highest recovery, but it comes at a cost and that’s zero HP.
Lava Foot for stamina users and Ghastly Eye Bowl for magicka users gives both your main stat and recovery of that stat at huge values. I very rarely run these in content because you have zero room for error and sitting at 18,000 health, you better not stand in one circle or you’ll be a death flopping soul gem.
Great = consider this food expensive but the best all around, with health, recovery and max stats but expensive.
Artaeum Takeaway Broth for stamina users and Clockwork Citrus Filet for magicka users are a great way to sustain and get up around 21-23,000 health, giving you some room for screw ups.
Good = a cheaper alternative is the following drinks with less stats but less hit on your pocket book.
Dubious Camoran Throne for stamina users and Witchmother’s Potent Brew are great alternatives with a little less stats across the board, but can get you started at any level for dirt cheap.
Suustain and Damage
If sustain is no issue at all, you can run Bi-stat food, which has become much more popular with the introduction of the Arcanist or even Necromancer dps. Bi-stat foods, like Braised Rabbit for stamina users or Mistral Banana Bunny Hash for magicka users, give huge amounts of your resource and health. The trade off if they don’t give you any sustain at all. As long as you’re not running out of resources in a fight, the biggest dps loss apart from dying, these are technically the best foods to run in content.
For newer players, going for either Dubious or Witchmother’s will give you a little bit of everything.
Choose Your Weapon!
Remember, running out of resources is the biggest dps loss next to dying.
If you want to run meta weapons, like dual-wield front bar and inferno staff back bar, those will often be the highest damage. Especially solo players, however, you should be aware of different options that can still hit big numbers but might give you a little boost in resource management or utility.
When you heavy attack with a weapon, you restore resources, but the resource you restore depends on the weapon. Staves (both destruction and restoration) restore magicka, while all other weapon types restore stamina.
For magicka users don’t sleep on lighting staff. Is this meta backbar set for DPS? No, but it’s much easier to channel a fully charged heavy attack. It does AoE damage and you can apply status effects like Concussion and Off-Balance if you’re running Wall of Elements as a back bar DoT.
Weapons Can Give Resources
When I started over on PC EU, I used a lightning staff on my back bar with the shield ability harness magicka from the light armor skill line. When I was OoM (out of magicka), I could go to my back bar, rip off a fully charged heavy and hit a shield if I was under pressure. You can do this over and over and reliably land the attack, constantly do both single target and AoE damage, while not getting panicky when OoM.
For stamina-based users, consider front barring a Two Handed weapon. Again, is this meta damage front bar weapon? No that’s dual wield but there’s a juicy passive Battle Rush that gives 30% stamina recovery for 10 seconds after you kill a target. Now imagine playing solo and constantly keeping this up, combined with a good solid food choice you’ll have much more gas in the tank.
Touching on gear sets briefly, magicka users can use either Overwhelming Surge from Tempest Island or False Gods Devotion from Sunspire trial. While Stamina users can use Vicious Serpent from Hel Ra or Sanctum Ophidia.
Skills that Sustain
There’s a couple of skills you can use, Elemental Drain for magicka users, which gives magicka sustain to your whole group, and Consuming Trap, a universal skill from the soul magic skill line. It does decent damage, and when a mob dies you get a flood of resources back and healing. Consuming Trap becomes less relevant in trials but for solo and beginners it’s a life saver.
Keep in mind the Mage’s Guild passive Magicka Controller. For any Mage’s Guild skills you run on your bar, you’ll receive an extra 2% magicka recovery. Combine this with Inner Light, a great skill for sourcing your major weapon and spell damage buffs, and you’ll receive that boost to magicka recovery while gaining an extra 5% magicka overall. More total resources also means skills are easier to sustain!
Champion Points and Passives
You’ll also need to max out medical use passive via the alchemy skill line for the Medical Use Passive. When using potions, resulting effects last 30% longer. You combine this with an Spell Power Potion for magicka users and get 47.3 of major intellect increasing magicka recovery by 30%. With a 45 second cooldown, you’ll be able to keep 100% up time on key buffs including sustain.
In group play, you’ll also want to constantly proc and smash synergies. Activating a synergy restores 4% of your Max Health, Stamina, and Magicka via Undaunted Command passive in the Undaunted skill line. The higher the values, the more resource sustain and with each synergy on a 20 second cool down, you should have plenty of sustain coming in, especially with a more coordinated group. Consider maxing out this skill line a priority along with the Undaunted Mettle passive giving you an increase in max stats by 2% per type of armor worn.
Important Champion Points
As you continue to level, you will also start to rack up Champion Points for every level after 50. In the Fitness (red) tree, you have a lot more options for sustain. A lot of the passives in the Fitness tree will reduce resource costs, but the slottables are the best sources of sustain.
There are four primary slottable passives that you can use to increase your sustain. Two give you a passive boost to resources: Rejuvenation and Sustained by Suffering. Keep in mind that Sustained by Suffering requires you to have a negative effect on you, so while it gives you more sustain, it’s best for either solo play or fights where the entire group receives negative effects. The other two restore either stamina or magicka when you kill an enemy: Bloody Renewal or Siphoning Spells.
Combine potions, passives, synergies, gear, skills and weapon choices and you should have an easy time sustaining resources, increasing your time on target and increasing DEEPS. Now let’s get to the mother of all DPS increases and that’s light attack weaving.
#1 Light Attack Weaving
Before I get another comment about Light Attack Weaving being an exploit, STOP it’s not. This is part of the game’s mechanics. Remember me constantly talking about a global cooldown for abilities being a fundamental part of ESO? Well, abilities and light attacks are on separate global cooldowns. That means you can sync them up like a heart beat essentially getting free damage.
Let me say that clearly again, think of light attack weaving as syncing up the separate global cooldowns almost simultaneously. You end up clicking your light attack key, then immediately skill, then light attack, immediately skill. Da da, da da, da da, like a heartbeat. Your character will have this weird animation if you’re syncing it up tightly. The tighter you can sync up the more DPS you’re doing.
Parse Experiment
Take a look at this parse I did of 91,000 on my magplar. No, this isn’t as good as the hardest hitters out there, but look at how much damage light attacks are doing. Because light attacks and skills are on separate global cooldowns, that’s 11,000 dps that I wouldn’t have otherwise if I wasn’t light attack weaving.
The raw damage of light attacks isn’t the only benefit to weaving well, however. Light attacks also restore ultimate when you land one on a target. That means weaving well will also give you more ultimates over the course of a fight, meaning BIG damage!
Another tip is to think of light attack weaving as rhythmic, 120 beats per minute, which you can find some songs to pair up with. This helps me get in rhythm of the fight, pair my cooldowns and light attacks easier. Again it’s the pairing of these two together, getting free DPS using the timing and mechanics of the game to stack two global cooldowns on top of each other.
Velothi Ur-Mage’s Amulet
One Caveat is that with the introduction of Necrom, many damage dealers are running the mythic item Velothi Ur-Mage’s Amulet. This mythic is a fantastic option for many classes, giving you penetration, permanent minor force and an overall 15% boost to your overall damage.
The trick is this is all at the expense of light and heavy attack damage, which is reduced by 99%! Now, that doesn’t mean light attacking is useless, you still gain that juicy ultimate back from your light attacks when you’re using this, but it’s not as impactful when you choose to run Velothi.
Bar Swap Canceling

A final bonus tip that falls in line with light attack weaving is bar swap cancel. Take a long winded animation like elemental blockade/unstable wall. You can cast this, and immediately hit your bar swap which will clip/cancel the animation saving time and thus increasing your dps. Then when you’re finished with your rotation on the front bar, do the exact same thing, bar swap as soon as your last front bar ability has finished its effect. You can practice this while doing your pre-buff phase to get it down to muscle memory and adding a TON of DPS.
When playing around with bar swap canceling, you may notice some skills cancel better than others. Channeled abilities, like the Templar’s jabs or the Arcanist’s beam, have an animation that cannot be canceled, or you’ll lose damage. If you can, setting yourself up to bar swap off of your skills that don’t require channels will mean better cancels.
The 2h skill Stampede is another great example. When you hit stampede, the jump animation makes it really difficult to bar swap, resulting in a clunky bar swap. When you hit stampede, moving slightly will break your character out of the jump animation and allow you to bar swap cancel correctly.
Summary of ESO Top 5 Tips to Increase Your DPS 2024
Below is a summary of ESO Top 5 Tips to Increase Your DPS 2024:
- Damage Over Times: start experimenting with DoTs, buffs, debuffs and see what really adds DPS or lowers it depending on what you play. Start by simplifying your build, then add one extra ability at a time to judge the impact.
- Bar Setups: Set up your bar the most efficient and effective way. Fill your bar up with DoTs and buffs, then fill in the blanks with damage amplifying abilities that give you a passive bonus. Make sure to understand your passives and slot abilities on each bar to take advantage.
- Rotation: Think of your rotation as three phases: pre-buff out of combat, fight priorities and executes. Know what’s the most important and why and slowly add abilities and chunk them together to optimize DPS.
- Resource Sustain: Use the proper food for the content you’re playing in, select an appropriate weapon type for your level and max out important passives to take full advantage of DPS and sustain.
- Light Attack Weaving: Think of the light attack weaving like a heartbeat, syncing up to abilities together for increased DPS.
Thanks for reading our Top 5 Tips for Increasing Your DPS in ESO. Please make sure to come watch me live on Twitch and interact with me on Twitter!
Looking For More About ESO?
Thank you for reading ESO: Top 5 Tips to Increase Your DPS 2024 Guide. We provide the latest news and create guides for ESO. Also, watch me play games on Twitch or visit my YouTube channel!