• Skip to main content
  • Skip to primary sidebar
  • Skip to footer

Deltia's Gaming

The best games, the best guides!

  • HOT 🔥Latest
    • Destiny 2 Ghosts of the Deep: Loot Table
    • Destiny 2 Arc Hunter PvE Build
    • Zelda: All Mounts and Horses
    • ESO Stam Dragonknight PvP Build
    • Destiny 2 Arc Warlock PvE Build
    • ESO One Bar Sorcerer Build
  • Destiny 2 Season of the Deep
    • Into the Depths Walkthrough Guide
    • Release Date – Season of the Deep
    • Guide & Weapons – Season of the Deep
    • All Weapons List – Season of the Deep
    • Best Destiny 2 Builds – Season of the Deep
    • Best Raid Weapons Ranked: PvE Tier List
    • PvE Class Tier List: Which Class is Best for Endgame?
    • Armor Tunning Preview – Exotics Revamp
    • Weapon Changes Preview
    • TWAB: Economy Changes and Season of the Deep Preview
    • TWAB: Season of the Deep Trailer and New Dungeon
  • ESO Necrom
    • Everything You Need to Know About the New Changes
    • Essential Tips to Prepare for the Arcanist
    • How to Enter the Apocrypha Zone?
    • Arcanist Class Guide
    • Arcanist Gameplay, Combo System and More!
    • First Look at Necrom Chapter
    • Best Arcanist Builds
    • Two New Companions!
    • Official Cinematic Trailer
    • All Gear Sets
    • All Mythic Set Items
      • Cryptcannon Vestments
      • Velothi Ur-Mage’s Amulet
      • Esoteric Environment Greaves
    • All Arcanist Skills and Passives
      • Runemend Skill
      • Abyssal Impact Skill
      • Apocryphal Gate Skill
      • Runeblades Skill
      • Fatecarver Skill
      • Unblinking Eye Skill
      • Vitalizing Glyphic Skill
      • Gibbering Shield Skill
    • Best Solo Class PvE - Tier List
    • Best One Bar Build for PvE - Tier List
    • Best Classes for PvP - Tier List
  • Games & Guides
    • Destiny 2
      • Lightfall & Season 20
        • All Lightfall Legendary Weapons
        • All Lightfall Exotic Weapons & How to Get Them
        • All Strand Weapons & How to Get Them
        • Season 20 Weapons & How to Get Them
        • How to Get the Terminal Overload Keys
        • The Best War Table Upgrades
        • How to Complete Destiny 2 From Zero – Quest Guide
        • How to get The Revision Zero Catalyst
        • The Revision Zero how to get and unlock the weapon
        • How to Unlock Season 20 Artifact
        • New Origin Traits Season 20
        • Season Pass Rewards Season 20
        • New Seasonal Vendor Season 20
        • New Destiny 2 Lightfall Mods
        • Strand Warlock: Abilities, Aspects & Fragments
        • Strand Hunter: Abilities, Aspects & Fragments
        • Strand Titan: Abilities, Aspects & Fragments
        • All Destiny 2 Lightfall Editions Explained
        • "How to get Exotic Gear" Guides
          • Final Warning how to get and unlock the weapon
          • Winterbite how to get and unlock the weapon
          • Deterministic Chaos how to get and unlock the weapon
          • How to Get the Quicksilver Storm Exotic Catalyst
          • Cyrtarachne’s Facade how to get and unlock the Armor
          • Abeyant Leap how to get and unlock the Armor
          • Swarmers how to get and unlock the Armor
      • How to Get Vexcalibur Exotic Glaive
      • How to Unlock Strand Subclass
      • God Roll Weapons
      • Xur Locations Guide
      • Xur Guide
      • Beginner Guide
        • Gear & Weapon Mods
        • Weapon Crafting Guide
        • Legacy Exotics Guide
        • Armor Guide
        • Lost Sector Guide
        • Recommended Weapon Rolls
      • Iron Banner Guide
      • Returning Player Guide
      • How to Link Twitch and Bungie accounts
    • Baldur's Gate 3
      • Baldur's Gate 3 News
        • Where You Can Buy BG3?
        • PSN Release Date
        • PC/Mac Release Date
        • Will BG3 be on Xbox?
        • How Far Can You Play in Early Access?
        • System Requirements For Windows and Mac
        • Crossplay
        • Best Wallpapers & Images
        • Achievements and Trophies
      • Comprehensive Guides
        • Collector’s & Deluxe Editions: Which Should You Buy?
        • How Multiplayer Works in BG3?
        • How to Play Co-op With Friends? Guide
        • Builds – All Classes and Companions
        • Companion Approval Quest Walkthrough
    • Redfall
      • Builds and Hero Guides
        • Remi de la Rosa Guide and Best Builds
        • Devinder Crousley Guide and Best Builds
        • Jacob Boyer Guide and Best Builds
        • Layla Ellison Guide and Best Builds
      • Comprehensive Redfall Guides
        • Abilities Attributes and Heroes Customisation
        • Quests Walkthrough and Missions
        • All Weapons and Gear
        • Best Weapons Against Vampires and Stakes
        • What is Max Level and How to Level up Quickly?
        • How to Respec Your Character Skill Points and Upgrades?
        • How Long the Campaign and How Many Hours to Finish the Game?
        • How to Use Find and Unlock Safehouses?
        • How to Fast Travel? – Exploration Guide
        • How to Save the Game?
        • Enemies
        • Classes
        • Does Redfall have Character Creation?
      • Hero characters Ranking – Strengths & Backgrounds Guide
      • Achievement and Trophy List
      • Is Redfall Crossplay?
      • Bite Back Edition
      • Redfall Game Pass
      • Pictures & Wallpapers
    • The Legend of Zelda
      • Comprehensive Guides
      • List of Powers and Abilities
        • Ultrahand Ability
        • Recall Ability
        • Fuse Ability
        • Ascend Ability
      • Complete Armor and Weapon Guide
        • How to Increase Weapon Durability
        • How to Upgrade Armor
        • How to Use the Master Sword
        • How to Find the Master Sword
      • All Mounts and Horses
        • How to Get and Tame a Horse
        • How to Transfer Your Horse to Zelda: Tears of the Kingdom?
        • Pony Points
      • All amiibo Figures and Bonuses
      • Device Dispensers and How to Use Them
      • How to Increase Heart Containers and Stamina Vessels?
      • Cooking Guide and All Recipes
      • Ultrahand Ability and Crafting
      • How to Start a New Game
      • Bosses and Enemies
      • How to Make a Campfire
      • How to Level Up
      • How to Fast Travel
      • How to Become Fireproof
      • How to Survive Cold and Freezing Temperatures
      • How to Farm Rupees
      • How to Get the Paraglider
      • Dragon’s Tears and Geoglyphs Guide
      • How to Save Your Game
    • Hogwarts Legacy
      • Hogwarts Legacy Builds
        • Plant & Cabbage Build
        • Dark Arts Build
        • Spell Build
        • Stealth Build
        • Protego Build
        • Ancient Magic Build
        • Fire Build
      • Which House should you choose
      • Hogwarts Legacy Houses
        • Hufflepuff
        • Slytherin
        • Ravenclaw
        • Gryffindor
      • Important Professors
        • Headmaster Phineas Nigellus Black
        • Professor Matilda Weasley
        • Professor Eleazar Fig
        • Professor Aesop Sharp
        • Professor Mirabel Garlick
        • Professor Dianah Hecat
        • Professor Abraham Ronen
      • Hogwarts Legacy Classes Guide
        • Classes – Beasts
        • Classes – Potions
        • Classes – Herbology
        • Classes – Charms
        • Classes – Defence Against the Dark Arts
        • Classes – Broomstick Flying
      • Can you be an evil Dark Wizard? Guide
      • How to Unlock and Enter Dark Arts Battle Arena
      • Max level & Talents Cap
      • Talents Guide
      • Quest Guides & Walkthrough
      • Merlin’s Trials & How to Increase Inventory Slots
      • Wand Guide and Customisation
      • How to unlock all Mounts
      • Fantastic Beasts Guide
      • Character Creation and Cosmetics Guide
      • How to Identify Gear Items Guide
      • Spells Guide
      • Plants Guide
      • How to change the Time of The Day?
      • Time Period
      • Combat Guide
      • How to Solve Puzzle Door?
    • Starfield
      • Starfield Release Date Announced!
      • Starfield Guides
        • Skill Guide
          • Social Skills Guide
          • Tech Skills Guide
          • Physical Skills Guide
          • Science Skills Guide
          • Combat Skills Guide
        • Backgrounds Guide
        • Character Creation Explained
        • Exploration
        • Factions Explained
        • Procedurally Generated Planets
        • Endings
      • Starfield News
        • Pre-Release Content
        • Bethesda releases Second Episode of “Into the Starfield”
        • Gameplay Breakdown
      • Starfield Builds (coming soon)
      • Starfield Quest Walkthroughs (coming soon)
    • ESO
      • Solo PvE Tier List
      • One Bar Build PvE Tier List
      • PvP Tier List
      • Character & Leveling
        • Complete Beginners Guide
        • Character Creation
        • Race Guide
        • Class Guides
          • Dragonknight
          • Nightblade
          • Templar
          • Sorcerer
        • Power Leveling & Grinding Guide
        • Skill Points Guide
        • Attribute Points Guide
        • Psijic Order Leveling Guide
        • Champion Points System
        • Champion Point Grinding Tips
      • Combat & Solo
        • How to Light Attack Weave
        • 5 Tips for Increasing Your DPS
        • What Tanks Should Know
        • Magicka DPS Gear Guide
        • SOLO Stamina Class Guide
        • SOLO Magicka Class Guide
      • PvP Guides
        • How to unlock Alliance War Skills
        • PvP Beginner Guide
        • PvP Campaigns, what to choose, CP or no-CP?
        • How to farm Alliance Points (AP)
        • How to farm Tel Var Stones
        • How to PvP in ESO Guide and Tips – All Classes
        • Cyrodiil guide for Beginners
        • Imperial City Guide for Beginners
        • Battlegrounds for Beginners
        • Battlegrounds objectives and strategies
        • Siege Guide
        • PvP Survival Tips
        • PvP Tips, Tricks and Hints
          • The best PvP Tips, Tricks and Hints
          • Best PvP Ultimates
          • How to “Stop a Ganker"
      • Crafting
        • Alchemy Potions & Recipes
        • Crafting Writs Guide
        • Master Crafting Writs
        • Fishing Guide
        • Crafting Trait Research Guide
      • ESO Tools
        • ESO Server Status
        • ESO Daily Endeavors Tool
        • ESO Golden Vendor
      • Tales of Tribute
        • Tales of Tribute Guide
        • Tales of Tribute Decks Guide
        • Tales of Tribute Strategies
        • Tales of Tribute Tutorial
      • Daily Routine Guides
        • Daily Priorities Guide
        • Daily Dungeon Guide
        • Undaunted Daily Pledges
        • Daily Job Brokers Guide
        • Daily Guild Quests Guide
        • Mount Training & Increase Speed
        • Daily Login Rewards
        • Endeavors Guide
      • Companions Guides
        • Full Companions Guide
        • Isobel Velois guide.
      • Addons, UI, and Keybinds
      • How to Link ESO Account to Twitch
      • How to Use the Public Test Server
    • Star Wars Jedi Survivor
      • Comprehensive Guides
        • How to Save the Game in Star Wars Jedi Survivor
        • Puzzle: How to Jump and Climb Marked Walls
        • How to Change Lightsaber and Kyber Crystal Color – Customization Options
        • How to Change Cal’s Appearance – Customization Options
        • Skill Trees
        • Meditation Puzzles
        • Lightsaber Stances
        • Cal Kestis
        • Enemies
        • Star Wars Jedi: Survivor Story
      • Quest Guides
        • Koboh First Tar Pit
        • Chamber of Duality
      • 10 Things You Should Know about Jedi: Survivor
      • What Difficulty Settings Should You Choose
      • Star Wars Jedi: Survivor Collector’s Edition
  • ESO Builds
    • Beginner & Leveling PvE
      • Arcanist
        • Magicka DPS
        • Stamina DPS
      • Dragonknight
        • Magicka DPS
        • Stamina DPS
      • Nightblade
        • Magicka DPS
        • Stamina DPS
      • Sorcerer
        • Magicka DPS
        • Stamina DPS
      • Templar
        • Magicka DPS
        • Stamina DPS
      • Warden
        • Magicka DPS
        • Stamina DPS
      • Necromancer
        • Magicka DPS
        • Stamina DPS
    • Solo PvE
      • Arcanist
        • Magicka DPS
        • Stamina DPS
      • Dragonknight
        • Magicka DPS
        • Stamina DPS
      • Necromancer
        • Magicka DPS
        • Stamina DPS
      • Nightblade
        • Magicka DPS
        • Stamina DPS
      • Sorcerer
        • Magicka DPS
        • Stamina DPS
      • Templar
        • Magicka DPS
        • Stamina DPS
      • Warden
        • Magicka DPS
        • Stamina DPS
    • Group PvE
      • Arcanist
        • Magicka DPS
        • Stamina DPS
        • Healer
        • Tank
      • Dragonknight
        • Magicka DPS
        • Stamina DPS
        • Healer
        • Tank
      • Necromancer
        • Magicka DPS
        • Stamina DPS
        • Healer
        • Tank
      • Nightblade
        • Magicka DPS
        • Stamina DPS
        • Healer
        • Tank
      • Sorcerer
        • Magicka DPS
        • Stamina DPS
        • Healer
        • Tank
      • Templar
        • Magicka DPS
        • Stamina DPS
        • Healer
        • Tank
      • Warden
        • Magicka DPS
        • Stamina DPS
        • Healer
        • Tank
    • PvP
      • Arcanist
        • Magicka DPS
        • Stamina DPS
        • Healer
      • Dragonknight
        • Magicka DPS
        • Stamina DPS
        • Healer
      • Necromancer
        • Magicka DPS
        • Stamina DPS
        • Healer
      • Nightblade
        • Magicka DPS
        • Stamina DPS
        • Healer
      • Sorcerer
        • Magicka DPS
        • Stamina DPS
        • Healer
      • Templar
        • Magicka DPS
        • Stamina DPS
        • Healer
      • Warden
        • Magicka DPS
        • Stamina DPS
        • Healer
    • One Bar PvE
      • Arcanist
        • DPS
        • Healer
        • Tank
      • Dragonknight
        • DPS
        • Healer
        • Tank
      • Nightblade
        • DPS
        • Healer
        • Tank
      • Sorcerer
        • DPS
        • Healer
        • Tank
      • Templar
        • DPS
        • Healer
        • Tank
      • Warden
        • DPS
        • Healer
        • Tank
      • Necromancer
        • DPS
        • Healer
        • Tank
    • One Bar PvP
      • Arcanist
        • Magicka DPS
        • Stamina DPS
        • Healer
        • Tank
      • Dragonknight
        • Magicka DPS
        • Stamina DPS
        • Healer
        • Tank
      • Nightblade
        • Magicka DPS
        • Stamina DPS
        • Healer
        • Tank
      • Sorcerer
        • Magicka DPS
        • Stamina DPS
        • Healer
        • Tank
      • Templar
        • Magicka DPS
        • Stamina DPS
        • Healer
        • Tank
      • Warden
        • Magicka DPS
        • Stamina DPS
        • Healer
        • Tank
      • Necromancer
        • Magicka DPS
        • Stamina DPS
        • Healer
        • Tank
    • Companion Builds
      • Azandar Al-Cybiades
        • Ranged DPS builds
        • Melee DPS builds
        • Healer build
        • Tank build
      • Sharp-As-Night
        • Ranged DPS builds
        • Melee DPS builds
        • Healer build
        • Tank build
      • Ember
        • Ranged DPS builds
        • Melee DPS builds
        • Healer build
        • Tank build
      • Isobel Velois
        • Ranged DPS builds
        • Melee DPS builds
        • Healer build
        • Tank build
      • Mirri Elendis
        • Ranged DPS builds
        • Melee DPS builds
        • Healer build
        • Tank build
      • Bastian Hallix
        • Ranged DPS builds
        • Melee DPS builds
        • Healer build
        • Tank build
  • Destiny 2 Builds
    • Solo
      • Hunter
        • Arc Hunter
        • Solar Hunter
        • Stasis Hunter
        • Strand Hunter
        • Void Hunter
      • Titan
        • Arc Titan
        • Solar Titan
        • Stasis Titan
        • Strand Titan
        • Void Titan
      • Warlock
        • Arc Warlock
        • Solar Warlock
        • Stasis Warlock
        • Strand Warlock
        • Void Warlock
    • PvE
      • Hunter
        • Arc Hunter
        • Solar Hunter
        • Stasis Hunter
        • Strand Hunter
        • Void Hunter
      • Titan
        • Arc Titan
        • Solar Titan
        • Stasis Titan
        • Strand Titan
        • Void Titan
      • Warlock
        • Arc Warlock
        • Solar Warlock
        • Stasis Warlock
        • Strand Warlock
        • Void Warlock
    • PvP
      • Hunter
        • Arc Hunter
        • Solar Hunter
        • Stasis Hunter
        • Strand Hunter
        • Void Hunter
      • Titan
        • Arc Titan
        • Solar Titan
        • Stasis Titan
        • Strand Titan
        • Void Titan
      • Warlock
        • Arc Warlock
        • Solar Warlock
        • Stasis Warlock
        • Strand Warlock
        • Void Warlock
  • Contact
    • Support
    • Streaming Setup

May 16 2023

10 Best ESO Gear Sets for Solo Players

Our Best 10 Gear Sets for Solo Players in ESO lists incredibly powerful item sets that you should obtain for PvE.  These sets are designed to help you conquer the Elder Scrolls Online solo content like Overland Zones, Story, Dungeons and Solo Arenas like Vateshran Hollows and Maelstrom Arena.

The top 10 list will comprise a variety of gear coming from different sources.  We’ve tried to keep this list with as many base game sets as possible and not requiring Mythic, Monster helms or Trials gear.  As a solo player, hitting the sweet spot between resource sustain, damage, and healing is imperative.  Especially playing stamina, you lack healing initially without a mythic and monster helm. These items below will fill in the gap of what players lack most, with honourable mentions at the end if you want more “hardcore” gear setups that require trials, mythic, etc.

Table of Contents

  • What’s the Best PvE Gear Set for Solo Players in ESO?
      • 10 Briarheart
      • 9 Robes of the Withered Hand
      • 8 Vengeance Leech
      • 7 Deadly Strike
      • 6 Mother’s Sorrow
      • 5 Telvanni Efficiency
      • 4 Overwhelming Surge
      • 3 Essence Thief 
      • 2 Pillar of Nirn
      • 1 Order’s Wrath
      • Honourable Mentions
  • ESO Articles, Guides and Builds

What’s the Best PvE Gear Set for Solo Players in ESO?

The best PvE Gear Set for a solo player in ESO is Order’s Wrath. This set has everything you want, critical chance, critical damage and healing with a blend of stats.  The best part about this set is you can use it both in PvE and PvP and obtain it early in the game.  Even in late-game scenarios, this set excels because the stats perform nearly the same as a trial set that requires 12 players to complete. 

RELATED: The Best Craftable Set in ESO: Order’s Wrath

The following list presents the top 10 Best Solo PvE Gear Sets in ESO ranked (Last updated: May 15th, 2023, Necrom Chapter):

  1. Order’s Wrath
  2. Pillar of Nirn
  3. Essence Thief 
  4. Overwhelming Surge
  5. Telvanni Efficiency
  6. Mother’s Sorrow
  7. Deadly Strike
  8. Vengeance Leech
  9. Robes of the Withered Hand Set
  10. Briarheart

Read on to learn details about each individual set and when to use it.

10 Briarheart

Image of gear set and location

  • Type: Overland
  • DLC Requirement: Orsinium
  • Items: Jewelry, Weapons and Medium Armor
  • Location: Wrothgar

Stamina builds solo and typically lacks a lot of healing, especially early in the game.  This set aims to solve the problem, giving you a 10-second window of increased weapon and spell damage and healing when your critical strike. Since this is a proc set, you can front bar it with weapons and use another two-piece item set on your back bar for even more damage, like Maelstrom Arena Bow or Two-Handed Greatsword.

ESO Briarheart Set
Briarheart

As you progress to the mid and late end-game, the set because weaker because there are much better-damage-performing sets. You want to use this early on or if you struggle with survivability and obtain a higher-producing set as you progress through the game.  Briarheart requires DLC, but since it’s an Overland set, you can purchase the gear from traders, and it is very cheap overall.

9 Robes of the Withered Hand

Image of gear set and location

  • Type: Overland
  • Base Game
  • Items: Jewelry, Weapons and Light Armor
  • Location: Alik’r Desert

Magicka builds are much simpler and easier to use for solo play in the Elder Scrolls Online. They shine with nearly all classes having some passive healing or shield while doing damage.  They usually struggle with resource sustain, and this set, Robes of the Withered Hand, is a perfect solution. You regain your primary stat and health when killing enemies within a 28-meter radius.  In solo PvE, you are constantly flooded with small minions that can be used to feed your survivability and resource sustain.

ESO Robes of the Withered Hand
Robes of the Withered Hand

The downside of this set is the 3-second downtime which hurts when killing 3-5 mobs.  Moreover, a trial set, the Perfected False Gods, is better but requires trials to get. Its core strength is it’s so easy to get being base game and Alik’r Desert.  There’s always a Dolmen group going, look and zone chat and follow the leader. You’ll get purple jewellery immediately and a very good Magicka sustain set early in the game.

8 Vengeance Leech

Image of gear set and location

  • Type: PvP
  • Base Game
  • Items: Jewelry and Weapons
  • Location: Cyrodiil, Bruma Elite Gear Vendor (random bags purchased with Alliance Points)

Vengeance Leech is a unique three-piece item set that gives back resources for all your stat pools upon kills.  Unlike Robes of the Withered Hand, this item set doesn’t have a cool down.  And in a hybrid ESO world, you most likely need your off-stat resource pool.  Meaning magicka builds want a bit of stamina recovery, and stamina builds want a bit of Magicka recovery to sustain both pools and use them effectively. With no cooldown and all three resource pools, it’s an amazing set. 

ESO Vengeance Leech
Vengeance Leech

The big downside of the set is the lack of a five-piece, and the two-piece gives health.  Early in the game, this isn’t a big deal, but later on, you will lose out on damage when optimising your build.  You can buy this off traders if you’re not a PvPer and don’t have Alliance Points to spend.  But this set will carry your survivability early and mid-game until you can get better five-piece item sets for higher damage.

7 Deadly Strike

Image of gear set and location

  • Type: PvP
  • Base Game
  • Items: Jewelry, Weapons, and Medium Armor
  • Location: Cyrodiil, Bruma Elite Gear Vendor (random bags purchased with Alliance Points)

Speaking of higher damage five pieces, here’s another Cyrodiil set Deadly Strike.  This set has a huge 15% damage bonus to your damage over time and channels.  This set goes very well with the Templar class due to the main spammable Biting Jabs and execute Radiant Oppression skill, both being channels.  And in the Necrom Chapter, the Arcanist will have two abilities that are channels, with your main spammable, Fatecarver being a 4.5-second long channel.  Throw on Deadly Strike for PvE or PvP on the right build, and it will absolutely destroy enemies.

ESO Deadly Strike
Deadly Strike

The downside of this set is it requires damage over time and channels heavy builds and classes.  It just won’t fit every class, especially if your main spammable ability is instanced-based.  Also, it comes in medium armor, so typically light armor users will have to get jewellery and weapons, which can be expensive or rare.  Worth collecting for specific builds, and expect high damage.

6 Mother’s Sorrow

Image of gear set and location

  • Type: Overland
  • Base Game
  • Items: Jewelry, Weapons, and Light Armor
  • Location: Deshaan

Mother’s Sorrow remains of the highest-producing damage sets for base game content in the Elder Scrolls Online. This set gives you great Critical Chance, which ESO doesn’t have a cap on.  Meaning you can stack as much critical chance as you want and will not experience diminishing returns.  This set comes from the base game Deshaan and can be collected right away or also bought from traders for very cheap prices.

ESO Mother's Sorrow
Mother’s Sorrow

The downside of the set is the two-piece bonus gives max magicka, so you don’t traditionally use it for stamina builds. It also doesn’t have any resource sustain or weapon and spell damage, so it has an uneven stat pool built for high critical damage.  But if you start the game and your solo PvE survivability is high, this is a must to collect early on in the game.

5 Telvanni Efficiency

INSERT VIDEO

  • Type: Craftable
  • DLC Requirement: Necrom
  • Items: Jewelry, Weapons, Light, Medium and Heavy Armor
  • Location: Telvanni Peninsula

The next set is a bit unique, and it’s built for solo players who use Telvanni Efficiency companions.  This significantly reduces your companions’ cooldowns, giving them much greater survivability, damage and utility.  I have a separate video on this, and Companions become a powerhouse with this set, making them a viable combat companion rather than just a mere storytelling battle buddy.

ESO Telvanni Efficiency
Telvanni Efficiency

The main disadvantage is, well, this set isn’t for everyone since companions can’t be used in specific content.  Moreover, you must sacrifice a five-piece item set for damage, healing or resource sustain and order to optimize your companions.  And it does require the Necrom chapter or someone with the crafting station in their home. But it’s worth mentioning for those people who love companions but want more power from them.

4 Overwhelming Surge

Image of gear set and location

  • Type: Tempest Island Dungeon
  • Base Game
  • Items: Jewelry, Weapons, and Light Armor
  • Location: Tempest Island

What if I told you there was a set that gave back resources and did significant area damage?  That would be Overwhelming Surge, coming from Tempest Island dungeon, base game.  When using a class ability, the set’s bonus deals shock damage in 8 meters and 15% of the damage you deal restores magicka. It rewards aggression and is incredible for solo arenas when you play in melee range. The set has a high uptime, so you’ll constantly be sustaining your resource and doing damage, unlike other sets that just resource sustain.

ESO Overwhelming Surge
Overwhelming Surge

The downside of the set is you need to play in the melee range.  This works great for specific builds like Templar and Dragonknight, but others may find it annoying to be up close and personal.  And when you compare the damage with other sets on the list, it is a bit lower but still incredible for a balanced build. You can also run the dungeon on normal mode, so getting the gear early in the game is easy.

3 Essence Thief 

Image of gear set and location

  • Type: Dungeon
  • DLC Requirement: Imperial City (which is free for everyone in crown store)
  • Items: Jewelry, Weapons, and Medium Armor
  • Location: White-Gold Tower

The next setup on the list has application for both PvE and PvP and that’s Essence Thief.  This spawns a green circle or essence that gives you a unique damage increase of 10% along with health and stamina.  The set basically carries your survivability and the 10% damage buff is unique and not a named buff.  Meaning, that damage buff of 10% can stack on top of minor and major beserk for essentially a 25% damage increase.  The set also can proc every 10 seconds and the buff last 10 seconds so you can have a high uptime with it.

ESO Essence Thief
Essence Thief

The major downside is, well, you need to chase the essence. This isn’t terribly hard in solo PvE, but in PvP, it can be a challenge.  The set comes from the White Gold Tower, which is now a part of the base game, you need to claim the Imperial City DLC in the Crown Store, and everyone has access.  While most don’t mention this set, it buffs your damage, heals you and gives you a ton of stamina.  Consider farming White Gold Tower if you struggle with sustain and damage.

2 Pillar of Nirn

insane damage, not base game, but absolutely god mode damage that you should get 

Image of gear set and location

  • Type: Dungeon
  • DLC Requirement: Horns of the Reach
  • Items: Jewelry, Weapons, and Medium Armor
  • Location: Falkreath Hold

Pillar of Nirn Set is next on our list for those looking for huge damage. This set currently is a meta DPS set and is great for anyone looking for big damage.  The set procs from any damage, leaving a fissure (small to the eye) and doing instant damage and damage over time.  The set is so powerful that most end-game players use it for trials and hardcore content.  While it comes in medium, even light armor users can run it with jewellery and weapons.  Throw on a mythic and a monster helm, and you’ll be an absolute wrecking ball in solo PvE.

ESO Pillar of Nirn
Pillar of Nirn

The major downside to the set is it can be hard to obtain.  This set requires a DLC Horns of the Reach, and Falkreath Hold isn’t the most pleasurable dungeon. Also, for beginning players, this set won’t help you with resource sustain or survivability, so you’ll need to be good with that aspect of the game.   For everyone else, this is a must-have set for huge damage once you progress through PvE solo or group content.

1 Order’s Wrath

Image of gear set and location

  • Type: Craftable, three traits
  • DLC Requirement: High Isle
  • Items: Jewelry, Weapons, Light, Medium and Heavy Armor
  • Location: High Isle and Amenos

My number one overall favourite set in the game, and especially for solo play, is Order’s Wrath.  A craftable set, only requiring three traits with a perfect blend of stats for critical chance, damage and healing.  This set can compete with trials in terms of DPS and outside the best PvE gear, which has the minor slayer buff as a three-piece, is ultra simple to use and is useful for literally every player.  You can use this as magicka, stamina, and even healing, and it can be crafted very early in the game.

ESO Stamina DragonKnight Solo PvE World Boss
Order’s Wrath

The downside of the set is that it requires the High Isle Chapter, but there are ways around that.  Currently, the game has Attunable crafting stations, which allow you or another player to bring the crafting stations to their house.  Then anyone who enters the home can use the stations with or without the DLC. Moreover, you can also buy this gear set from traders or have someone in your guild craft it for you for a very low cost.  It’s a simple set-and-forget set that works in nearly all contexts of ESO PvE and is amazing in solo.

Honourable Mentions

There are some sets worth mentioning that weren’t on this list.  I didn’t list trial sets, monster helmets and mythic options since those are difficult for the average player to obtain.

  • Vicious Serpent: coming from base game trials, this set absolutely carries your survivability and resource sustain with an added speed bonus!
  • Perfected False God’s Devotion: is the equivalent of Vicious Serpent just with magicka builds coming from Sunspire trial, Veteran or Normal.
  • Mechanic Acuity: a five-piece craftable gear set that gives you a flood of critical strike chance every 25 seconds.  You can essentially reach 100% critical with this set, giving you an unbelievable burst window that pairs well with the Balorgh monster helm.
  • Balorgh: a monster helm coming from March of Sacrifice that gives you a flood of weapon, spell damage and penetration per the ultimate spent. Thus, allowing you to save up to 500 ultimate and nuke bosses within seconds for solo play.
  • Thrassian Stranglers: a one-piece mythic item requiring an antiquity system, giving you stacks upon killing enemies.  This gives you a huge amount of weapon and Spell Damage but sacrifices max health, ideally for speed runners wanting the most damage possible. 
  • Pale Order: another one-piece mythic item that gives you healing when you deal damage.  This makes you nearly unkillable in solo play but requires the antiquity system.

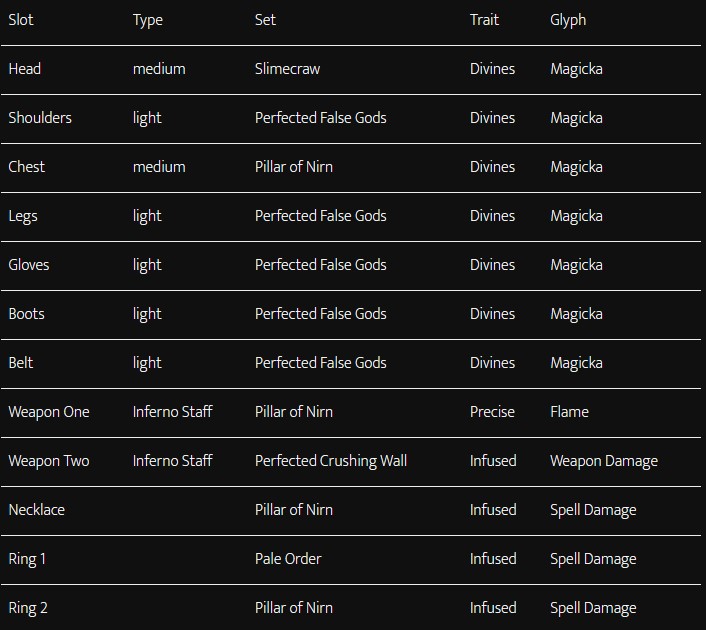
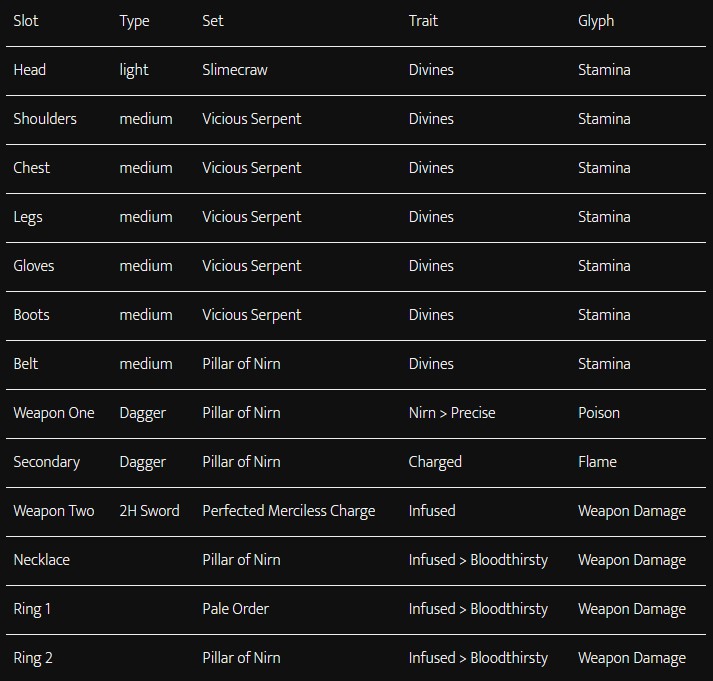
Below are some gear charts for min-maxed solo builds designed to destroy solo arenas with little effort.   Also, a gear chart for those wanting to run Oakensoul one bar mythic, which I did not include in this list because it requires the Antiquities system and Chapter.

ESO Solo Magicka Gear Setup Example
Solo Magicka Gear Setup Example Chart
ESO Magicka Sorcerer One Bar Gear Chart
Magicka Sorcerer One Bar Gear Chart
ESO Solo Stamina Gear Setup Example
Solo Stamina Gear Setup Example Chart

ESO Articles, Guides and Builds

Thank you for reading the 10 Best ESO Gear Sets for Solo Players article! Check out the Best ESO builds, including PvP, PvP one bar and beginner. Also, consider watching me on Twitch. Feel free to ask me questions about my builds and the games I play, or check out my YouTube Channel.

  • Complete Beginners Guide
    • Skill Points Guide
    • Champion Point System Guide
  • PvP Beginner Guide
    • How to farm Alliance Points (AP)
    • How to farm Tel Var Stones
  • Addons, UI, and Keybinds Guide for ESO
  • Tales of Tribute Guide

Written by Deltia · Categorized: Elder Scrolls Online, ESO Guides, ESO Solo PVE · Tagged: Elder Scrolls Online, ESO, ESO Best gear, ESO Briarheart, ESO Essence Thief, ESO Gear, ESO Gear Sets Items, ESO Mother's Sorrow, ESO Order's Wrath, ESO Overwhelming Surge, ESO Pillar of Nirn, ESO PvE, ESO Solo Gear, ESO Solo PvE, ESO Telvanni Efficiency, eso tier list, ESO Top Ten, ESO Vengeance Leech, ESO Withered Hand, MMORPG, The Elder Scrolls Online

Primary Sidebar

Youtube Channel

Deltia's Gaming

Deltiasgaming the player & coach simple writing guides for RPGs & MMOs. Our goal is to give you the information needed, to enjoy your favorite games, without having to spend countless hours. The best games, the best guides.

Deltia's Gaming
The Best Races for Arcanist Damage Dealers in ESO

Important Links
Written Guide: https://deltiasgaming.com/eso-necrom-chapter-essential-tips-to-prepare-for-the-arcanist-class/ 
Full Video: https://youtu.be/dZMoO6vKeWo
Power Leveling: https://youtu.be/AwDPYUeuRXw
PvE Tier List: https://deltiasgaming.com/eso-solo-pve-tier-list-2023/
PvP Tier List: https://deltiasgaming.com/best-eso-classes-pvp-tier-list/
Arcanist Class Guide - https://deltiasgaming.com/the-elder-scrolls-online-arcanist-class-guide/
Necrom Builds: Update 38 - https://deltiasgaming.com/best-eso-builds-update-38-necrom-chapter/
Beginner Magicka Arcanist Build: https://deltiasgaming.com/builds/eso-beginner-magicka-arcanist-build/
Beginner Stamina Arcanist Build: https://deltiasgaming.com/builds/eso-beginner-stamina-arcanist-build/
Solo Arcanist Magicka: https://deltiasgaming.com/builds/eso-solo-arcanist-magicka-build-for-pve/
Solo Arcanist Stamina: https://deltiasgaming.com/builds/eso-solo-arcanist-stamina-build-for-pve/
Arcanist PvE Healer: https://deltiasgaming.com/builds/eso-arcanist-pve-healer-build/
Arcanist PvE Tank: https://deltiasgaming.com/builds/eso-arcanist-pve-tank-build/
Magicka Arcanist PvP:  https://deltiasgaming.com/builds/eso-magicka-arcanist-pvp-build/
Stamina Arcanist PvP: https://deltiasgaming.com/builds/eso-stamina-arcanist-pvp-build/
One Bar PvE Magicka Arcanist: https://deltiasgaming.com/builds/eso-one-bar-pve-magicka-arcanist-build/

đź’ś Twitch: https://www.twitch.tv/deltiasgaming
❤️ Patreon be in the ending credits: https://www.patreon.com/deltiasgaming
🔵 Follow me on Twitter https://twitter.com/Deltiasgaming1 
✔️ Check out our Website:  https://www.deltiasgaming.com/ 

🎥PRODUCT LINKS (Commission Earned)
My Streaming Setup https://deltiasgaming.com/deltias-gaming-streaming-setup 

Deltiasgaming the MMO and RPG player & coach writes guides for MMO, MMORPGs,  RPGs, focusing on walkthroughs, hints, tricks, builds, news and guides 

#eso #theelderscrollsonline #teso 

ESO,Elder Scrolls Online,TESO,ESO Builds,TESO Build,TES Builds,The Elder Scrolls Online,eso,elder scrolls online,deltia's gaming,eso 2023,arcanist eso,arcanist,eso arcanist class,eso arcanist gameplay,eso arcanist build,eso arcanist skills,teso,the elder scrolls online,deltia,Arcanist Class Guide,arcanist gameplay,arcanist guide,eso arcanist,eso build,eso necrom,necrom,eso necrom chapter,elder scrolls online arcanist build,eso builds
Load More... Subscribe

Latest Post

Destiny 2 The Ghosts of the Deep Dungeon Weapons Loot Table

Destiny 2 Ghosts of the Deep: Loot Table – Full list

Best Destiny 2 Builds: Season 21 – Season of the Deep

ESO Necrom Chapter Story

Best ESO Builds: Update 38 Necrom Chapter

Baldur's Gate 3 System Requirements Windows and Mac

All Baldur’s Gate 3 Trailers

Baldur's Gate 3 character 1 screenshot Larian Studios

When Can You Pre-Load Baldur’s Gate 3?

UESP.net


We are proud to partner with the Unofficial Elder Scrolls Pages (UESP) for some of our content. Check out their ESO Build Editor or support them through Patreon.

Footer

Logo

Deltia’s Gaming is your home for the best games & the best guilds. builds, Guides and walthroughs for your favorite video games daily!

  • Address : Deltia's Gaming, LLC, PO Box 460721, Papillion, NE 68046
  • Email : info@deltiasgaming.com
Follow us

Privacy

Deltia's Gaming Privacy Policy.

WATCH LIVE

Copyright © 2023 · Deltias Gaming · Log in