 Facebook
 Reddit
 Email
Email
This guide explains how to use the best Elder Scrolls Online (ESO) Stamina Sorcerer PvP Build, skills, gear, champion points, and more!

This build has been updated for the Updated 42, the Gold Road Chapter of the Elder Scrolls Online (ESO).
Why Should You Play ESO Stamina Sorcerer PvP Build?
The ESO Stamina Sorcerer PvP Build is unique amongst PvP builds in the Elder Scrolls Online due to its speed and killing potential. This Stam Sorc build guide will give you a bow loadout and traditional dual wield for massive AoE. Realize with a Stam Sorc, your primary survivability comes from mobility, not sheer burst healing. Moreover, your killing potential comes from very quick and sudden strikes.
If you’re playing this class right, you will appear like a blur. Charging in suddenly and violently, destroying 2-3 players, then retreating to reset the fight as any good Stam Sorc would do. This build will require constant situational awareness, but the upside is the best mobility ESO PvP offers and some of the greatest damage in a single target or area!
Related:
ESO Stamina Sorcerer PvP Features and Mechanics

Below are some of the features found using the ESO Stamina Sorcerer PvP in the Elder Scrolls Online:
- Class – Sorcerer
- Weapon One – Bow
- Weapon Two – Bow
- Armor Types: 1 Light, 3 Medium, 3 Heavy
- Race: Orc
- Attributes: 32 health, 32 Stamina
- Mundus Stone: Warrior
- Infection: None
- Best Grimoires: Traveling Knife, Soul Burst, Vault
Skills – Bow Build
Skill Set 1 Front Bar
Streak (Morph of Bolt Escape | Skill Line : Storm Calling) – Stun that cannot be avoided and mobility tool.
Bound Armaments (Morph of Bound Armor | Skill Line : Daedric Summoning) – Boosts our max stats, damage and after 4 stacks you have a burst damage tool paired very well with a heavy attack and Crystal Weapon combo. GROUP: Swap this out for bombard-in-group play from Bow to lock in and immobilize targets.
Crystal Weapon (Morph of Crystal Shard | Skill Line : Dark Magic) – Bursting tool single target, pre-cast into fully charged heavy attack.
Haunting Curse (Morph of Daedric Curse | Skill Line : Daedric Summoning) – Great delayed damage skill.
Camouflaged Hunter (Morph of Expert Hunter | Skill Line : Fighters Guild) – Flex skill used for more damage and counter gank.
Toxic Barrage (Morph of Rapid Fire | Skill Line : Bow) – Huge single target burst. GROUP: swap in Negate for group play.
Back Bar
Hurricane (Morph of Lightning Form | Skill Line : Storm Calling) – Armor buff from Major Resolve that does AoE damage and gives minor expedition.
Critical Surge (Morph of Surge | Skill Line : Storm Calling) – Weapon damage buff and really good healing over time.
Hardened Ward (Morph of Conjured Ward | Skill Line : Daedric Summoning) – Decent damage shield if playing with 30k health or higher. Consider this a flex spot. Poison Injection works great in this position.
Dark Deal (Morph of Dark Exchange | Skill Line : Dark Magic) – Resource sustaining tool and reason we spec food for massive stat pool. You should be using this constantly when full magicka.
Resolving Vigor (Morph of Vigor | Skill Line : Assault) – Burst heal over time.
Temporal Guard (Morph of Undo | Skill Line : Psijic Order) – I use this for a back bar damage reduction and pop if I’m close to being in trouble. GROUP: swap to shooting star from mages guild.
Scribing Skills & Grimoires – ESO Stamina Sorcerer PvP Build
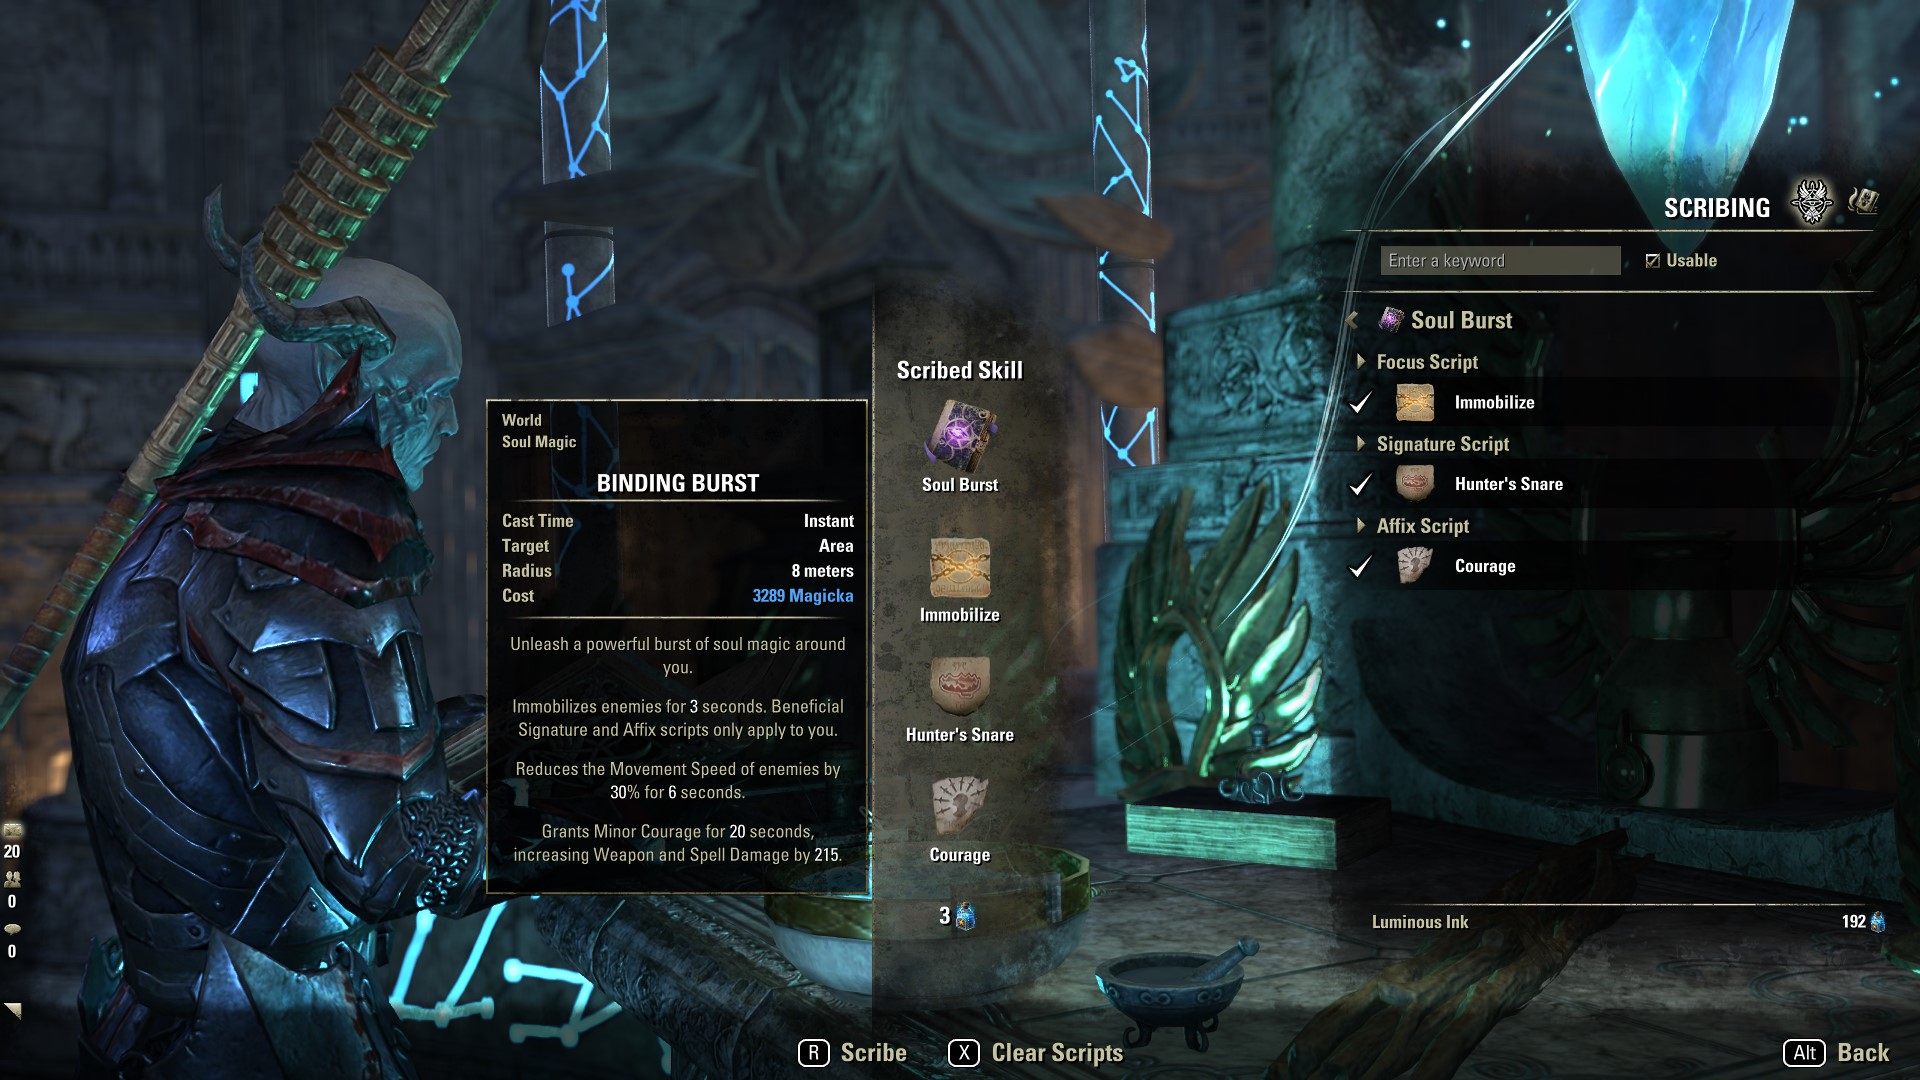
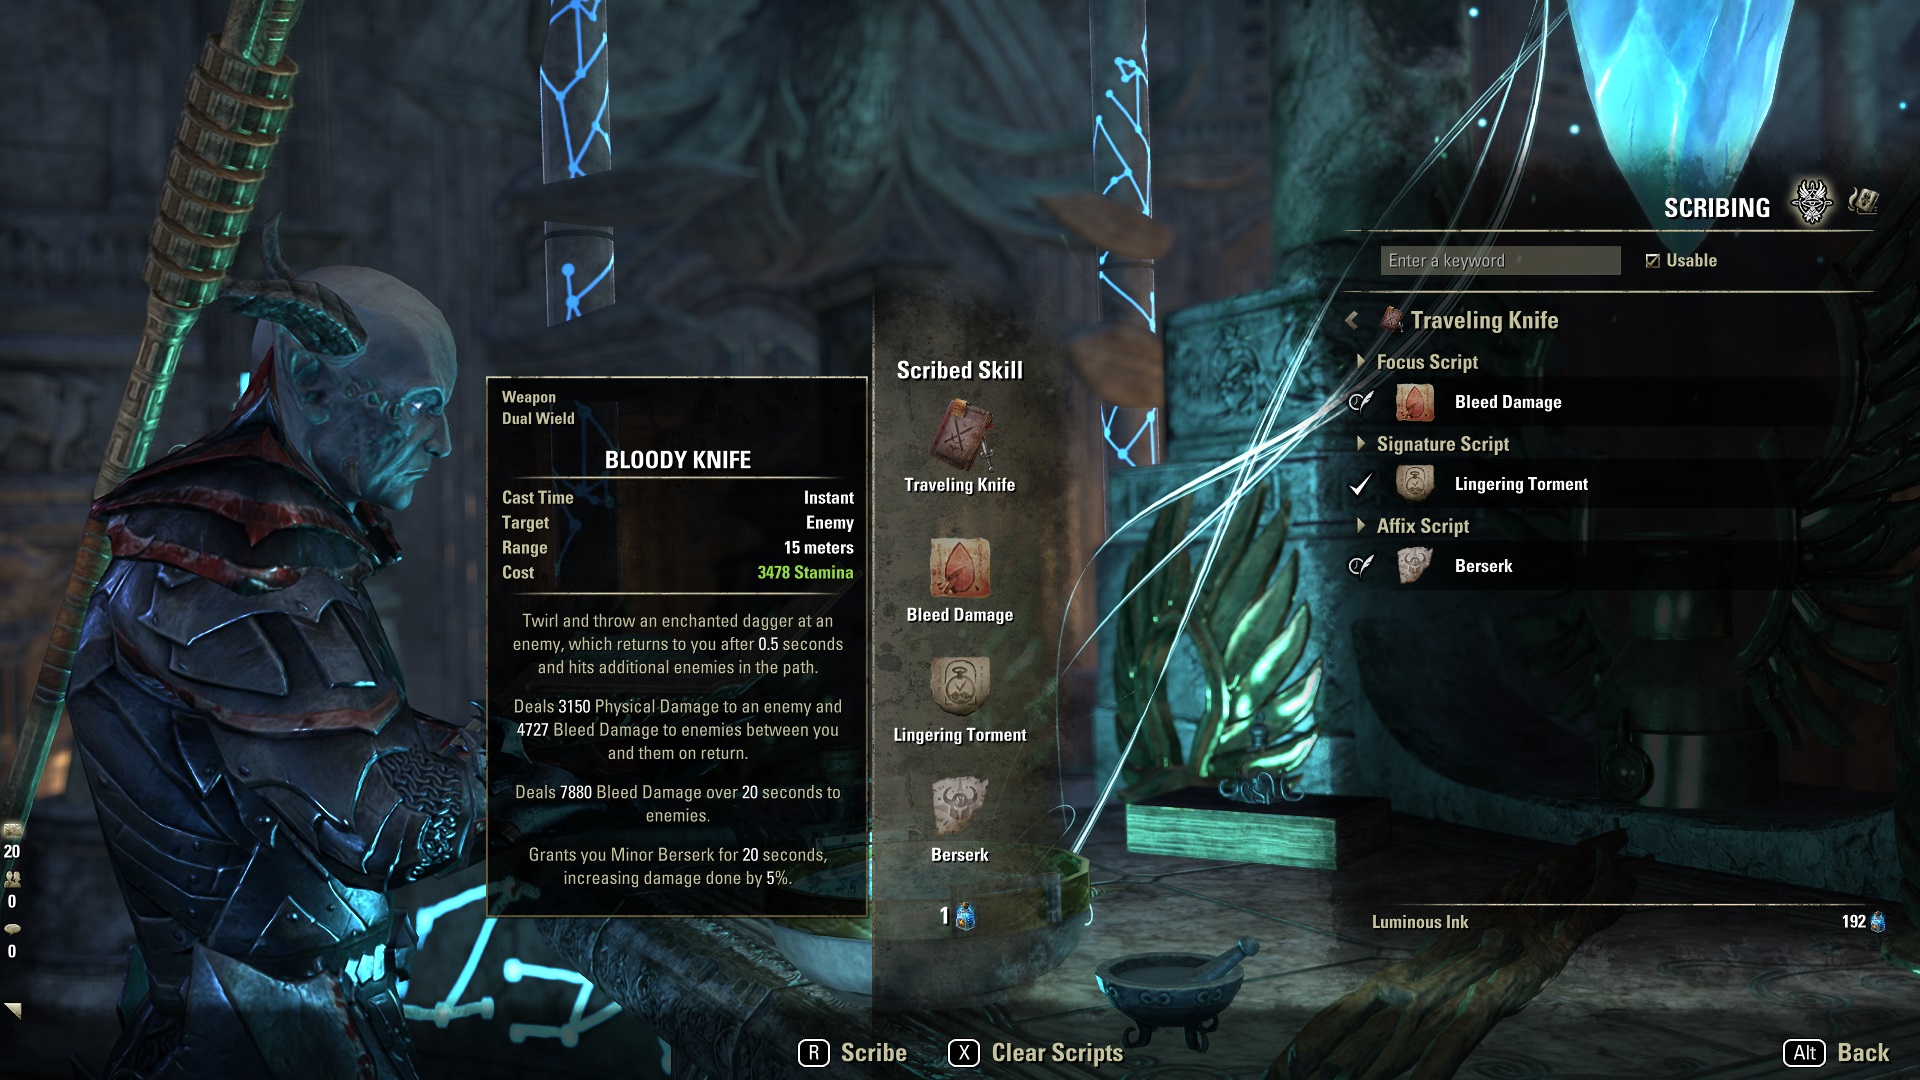
Traveling Knife, Soul Burst, and Vault are the two best Grimoires (skills) for a Stamina Sorcerer PvP build. Traveling Knife gives you a ranged bleed attack that acts like Rending Slashes but doesn’t require Master Dual Wield to be effective. Moreover, Traveling Knife can be given a stun in the focus script for classes lacking a ranged stun. Soul Burst is a helpful crowd control and buff skill. You can immobilize, pull, or snare targets and get your favorite minor buffs.
Below are the suggested combination of Grimoires, focus, signature, and affix scripts:
- Traveling Knife (dual wield) – Bleed or Stun (focus script), Lingering Torment or Assassin’s Misery (signature script), Berserk or Vulnerability (Affix Script)
- Soul Burst (soul magic) – Immobilize or Pull (focus script), Class Mastery or Hunter’s Snare (signature script), Courage or Expedition (Affix Script)
- Vault (bow) – Immobilize (focus script), Thief’s Swiftness (signature scripts), and Evasion (affix script)
The Scribing System utilizes one of 11 new skills from the Gold Road Chapter called Grimoires. With Grimoires, you can customize spells via Scripts. The scribing feature requires the purchase of the Gold Road Chapter (sponsored link). To learn more about scribing, check out our full guide here.
Gear – Bow
Best in-slot ESO PvP Gear for the Bow Sorcerer:
| Slot | Type | Set | Trait | Glyph |
| Head | Medium | Roksa the Warped | Well-fitted | Prismatic |
| Shoulders | Medium | Roksa the Warped | Well-fitted | Stamina |
| Chest | Heavy | Way of Fire | Reinforced | Prismatic |
| Legs | Heavy | Way of Fire | Well-fitted | Prismatic |
| Gloves | Medium | Armor of the Trainee | Well-fitted | Stamina |
| Boots | Light | Rallying Cry | Well-fitted | Stamina |
| Belt | Heavy | Way of Fire | Well-fitted | Stamina |
| Weapon One | Bow | Way of Fire | Sharpened | Flame |
| Weapon Two | Bow | Rallying Cry | Powered | Weapon Damage |
| Necklace | Sea-Serpent’s Coil | Swift | Weapon Damage | |
| Ring 1 | Rallying Cry | Infused | Stamina Recovery | |
| Ring 2 | Rallying Cry | Swift | Weapon Damage |
Monster & Mythic
Roksa the Warped: Obtained from Vet Bal Sunnar; Scribes of Fate DLC. This set carries your resource sustain. Use Engine Guardian if you don’t have this set.
Sea-Serpent’s Coil: Obtained through Mythic System click here for lead locations. This mythic provides two five-piece damage sets in one, with nearly zero drawbacks.
FLEX OPTIONS
- Markyn Ring of Majesty: Great all-around defensive and offensive mythic.
- Torc of Tonal Constancy: Great sustain mythic.
- Malacath’s Band of Brutality: DoT pressure DPS.
Gear Set
Rallying Cry: Rewards of the Worthy set that can bought from traders. This five-piece set provides a great blend of survivability and increased damage.
Way of Fire: Obtained in the Craglorn Overland zone or from traders. Used because it’s one of the strongest proc sets in the game, especially single target.
Armor of the Trainee: Obtained in overland starter areas or guild trader. Added stats with a one-piece item set.
FLEX OPTIONS
- Mara’s Balm: Still the best defensive set, though it doesn’t give any spell damage.
- Powerful Assault: Great set to add damage to you and your group and the buff stacks with Rallying Cry.
- Robes of the Hist: Great back bar healing set alternative to Mara’s Balm.
- Clever Alchemist: Insane burst potential when using potion and combined with Balorgh.
- Plaguebreak: Good for massive AoE bombs, but you’ll need to swap a skill for more AoE with Acid Spray.
- Syvarra’s Scales: Alternative proc set for Plaguebreak.
- Gryphon’s Ferocity: Great counter to Sea-Serpent’s snare.
- Order’s Wrath: Good craftable option.
Gear Setup: Bow Bomber
Use this playing in small sweaty group.
| Slot | Type | Set | Trait | Glyph |
| Head | Light | Gaze of Sithis | Divines | Prismatic |
| Shoulders | Light | Magma Incarnate | Divines | Stamina |
| Chest | Light | Unleashed Terror | Divines | Prismatic |
| Legs | Light | Unleashed Terror | Divines | Prismatic |
| Gloves | Light | Unleashed Terror | Divines | Stamina |
| Boots | Light | Unleashed Terror | Divines | Stamina |
| Belt | Light | Unleashed Terror | Divines | Stamina |
| Weapon One | Bow | Plaguebreak | Nirnhoned | Weapon Damage |
| Weapon Two | Bow | Blessing of Potentates | Powered | Escapist’s Poison IX |
| Necklace | Plaguebreak | Infused | Weapon Damage | |
| Ring 1 | Plaguebreak | Infused | Weapon Damage | |
| Ring 2 | Plaguebreak | Infused | Stamina Recovery |
- Gaze of Sithis: Used for better survivability. Swap to Roksa if you struggle with sustain.
- Plaguebreak: Essential five-piece for bombing.
- Unleashed Terror: Procs hemorrhage status effect and does good damage when streaking through targets.
- Blessing of Potentates: Used for mitigation on back bar.
- Magma Incarnate: One piece with good resource sustain.
Skills – Melee Build
Front Bar Melee
Streak (Morph of Bolt Escape | Skill Line : Storm Calling) – Mobility and stun.
Rending Slashes (Morph of Twin Slashes | Skill Line : Dual Wield) – Hard hitting dot that procs our Master’s Weapon.
Camouflaged Hunter (Morph of Expert Hunter | Skill Line : Fighters Guild) – Critical bonus flex spot on front.
Crystal Weapon (Morph of Crystal Shard | Skill Line : Dark Magic) – Bursty main spammable that can be used to pressure targets.
Whirling Blades (Morph of Whirlwind | Skill Line : Dual Wield) – AoE finisher and AoE spammable.
Dawnbreaker of Smiting (Morph of Dawnbreaker | Skill Line : Fighters Guild) – Our AoE damage ability, though you can use overload if needed.
Back Bar Melee
Hurricane (Morph of Lightning Form | Skill Line : Storm Calling) – Armor buff with movement and massive AoE damage.
Critical Surge (Morph of Surge | Skill Line : Storm Calling) – Weapon power buff with extra healing.
Elemental Susceptibility (Morph of Weakness to Elements | Skill Line : Destruction Staff) – Single target pressure that applies our Vateshran weapon for a laser beam.
Dark Deal (Morph of Dark Exchange | Skill Line : Dark Magic) – Resource sustain and healing.
Resolving Vigor (Morph of Vigor | Skill Line : Assault) – 5 second heal over time.
Absorption Field (Morph of Negate Magic | Skill Line : Dark Magic) – A defensive and offensive ultimate that can be flexed out. Temporal guard is good for damage reduction along with Meteor/Storm Atro for duels.
Gear 2 – Melee Build
This is meant for 1v1 or Playing solo and is disgusting damage playing melee.
| Slot | Type | Set | Trait | Glyph |
| Head | Medium | Maarselok | Well-fitted | Prismatic |
| Shoulders | Light | Maarselok | Well-fitted | Stamina |
| Chest | Heavy | Mara’s Balm | Reinforced | Prismatic |
| Legs | Heavy | Mara’s Balm | Well-fitted | Prismatic |
| Gloves | Medium | Armor of the Trainee | Well-fitted | Stamina |
| Boots | Heavy | Mara’s Balm | Well-fitted | Stamina |
| Belt | Medium | Druid’s Braid | Well-fitted | Stamina |
| Weapon One | Mace | Perfected Stinging Slashes | Sharpened | Flame |
| Secondary | Axe | Perfected Stinging Slashes | Nirnhoned | Poison |
| Weapon Two | Frost | Vateshran’s Perfected Ice | Powered | Weapon Damage |
| Necklace | Sea-Serpent’s Coil | Bloodthirsty | Weapon Damage | |
| Ring 1 | Mara’s Balm | Bloodthirsty | Stamina Recovery | |
| Ring 2 | Mara’s Balm | Bloodthirsty | Weapon Damage |
Monster & Arena Weapons
Maarselok: Obtained in the Lair of Maarselok veteran dungeon. Provides the best single target pressure with medium weave heavy attack. Swap to Roksa if you struggle with sustain.
FLEX OPTIONS
- Balorgh: Burst damage if your resource sustain is good.
- Zaan: Truly god-tier dueling or single-target killer monster helm.
- Ozezan the Inferno: Great paired with heals over time.
- Roksa the Warped: Great resource sustain without Engine Guardian droid.
Perfected Stinging Slashes: Obtained through Veteran Dragonstar Arena in upper Craglorn. One of the best pressure items in the game.
Perfected Wrath of Elements: Obtained in Veteran Vateshran Hollows. Absolute god-tier damage with the destruction staff Elemental Susceptibility skill and Maarselok monster.
FLEX OPTIONS Arena Weapons
If you don’t want to run arena weapons, run a defensive set the back bar, not on at all times, and switch to another 5pc damage set only on the front bar.
- Plaguebreak: AoE kills and bomber playstyle with dual wield.
- Snake in the Stars: Counters players using “heal stacking.”
- Order’s Wrath: Great craftable option.
- Ashen Grip: Early access two-trait craftable proc set.
Gear Sets
Mara’s Balm: Obtained through the Rewards of the Worthy that can be bought from traders. Still a great tanky option even after the nerfs a few updates ago. This is the best option for pure survivability.
FLEX OPTIONS
- Rallying Cry: Great group utility set as well as strong solo with a bonus that increased your offensive and defensive potential.
- Daedric Trickery: A great craftable defensive back bar option because of the major buffs.
- Powerful Assault: Group utility and weapon damage that stacks with Rallying Cry.
- Robes of the Hist: Great back bar healing set alternate to Mara’s Balm.
Armor of the Trainee: Obtained in overland starter areas or trader. This one-piece set bonus gives us extra health.
Druid’s Braid: Craftable high isle gives 1pc bonus just smaller. Another one-piece set bonus that gives us extra health.
Skills Setup 3: Werewolf
Bar One Werewolf
Main Werewolf Bar
Feral Pounce (Morph of Pounce | Skill Line : Werewolf) – Great for closing distance and double cast for execute.
Hircine’s Bounty (Skill Line : Werewolf) – Incredible heal that gives us major brutality
Deafening Roar (Morph of Roar | Skill Line : Werewolf) – AoE stuff that sets off balance and gives major breach and minor maim.
Howl of Agony (Morph of Piercing Howl | Skill Line : Werewolf) – Strong conal damage in front hits harder.
Claws of Life (Morph of Infectious Claws | Skill Line : Werewolf) – Incredible debuff and damage over time that heals very well.
Pack Leader (Morph of Werewolf Transformation | Skill Line : Werewolf) – The ultimate gives you a boost to weapon damage/spell damage via minor courage and you take 10% less damage.
Gear Setup 3: Werewolf
Use this if you wish to run Werewolf in PvP
| Slot | Type | Set | Trait | Glyph |
| Head | Medium | Magma Incarnate | Well-fitted | Prismatic |
| Shoulders | Light | Dragon’s Appetite | Well-fitted | Stamina |
| Chest | Heavy | Dragon’s Appetite | Reinforced | Prismatic |
| Legs | Heavy | Dragon’s Appetite | Well-fitted | Prismatic |
| Gloves | Medium | Unleashed Terror | Well-fitted | Stamina |
| Boots | Medium | Unleashed Terror | Well-fitted | Stamina |
| Belt | Medium | Unleashed Terror | Well-fitted | Stamina |
| Weapon One | Bow | Dragon’s Appetite | Sharpened | Escapist’s Poison IX |
| Necklace | Unleashed Terror | Swift | Weapon Damage | |
| Ring 1 | Unleashed Terror | Swift | Weapon Damage | |
| Ring 2 | Oakensoul Ring | Infused | Stamina Recovery |
Monster and Mythic
Magma Incarnate: Obtained from Veteran Dread Cellar dungeon (Blackwood zone), Waking Flame DLC. Great sustain for a one-piece item set.
Oakensoul: Obtained through ESO Mythics/antiquities system. You need 5 items to be able to create the Mythic item. CLICK HERE FOR LEADS. The best one bar build for DPS.
FLEX OPTIONS
- Pale Order: Best solo heals per second in the game.
- Death Dealer’s Fete: High max stats and requires no effect but in combat.
- Markyn Ring of Majesty: Set-and-forget boost to spell damage and armor.
Gear Sets
Dragon’s Appetite: Obtained through crafting, requiring 7 traits in Western Skyrim. The heals stack with bleeding damage our second 5pc set.
Unleashed Terror: Obtained in Castle Thorn. This is your gap closer heavy hitter.
FLEX OPTIONS
- Plaguebreak: Great burst group option.
- Rush of Agony: Pull and big proc damage on gap closer.
Passives Skills
Consider taking all of the passives in the below skill trees to increase your builds performance without slotting any skills:
- Daedric Summoning (class skill line)
- Dark Magic (class skill line)
- Storm Calling (class skill line)
- Destruction Staff (weapon skill line)
- Bow (weapon skill line)
- Dual Wield (weapon skill line)
- Light Armor
- Medium Armor
- Heavy Armor
- Undaunted
- Fighters Guild
- Mages Guild
- Racial
- Alliance War Support
- Alliance War Assault
- Crafting, Alchemy Medicinal Use
Race
The best race choices for Stamina Sorcerer PvP Build:
- Orc: Gain max stamina, health, and weapon and spell damage. It also reduces the cost of sprint and increases your movement speed.
- Dark Elf: good max stats and weapon and spell damage.
- Khajiit: best overall due to burst critical damage bonus.
Attributes
Consider splitting your attributes into 32 health and 32 stamina. reach at least 32,000 health inside your PvP context. Adjust if not reaching those numbers.
Mundus Stone
The best mundus stone is Warrior, which increases your weapon damage.
Champion Points – ESO Stamina Sorcerer PvP Build
| Craft | Warfare | Fitness |
| Steed’s Blessing | Duelist’s Rebuff | Fortified |
| War Mount | Focused Mending | Pain’s Refuge |
| Gifted Rider | Master-at-Arms | Celerity |
| Rationer | Ironclad | Survival Instincts |
Warfare Constellation Champion Points
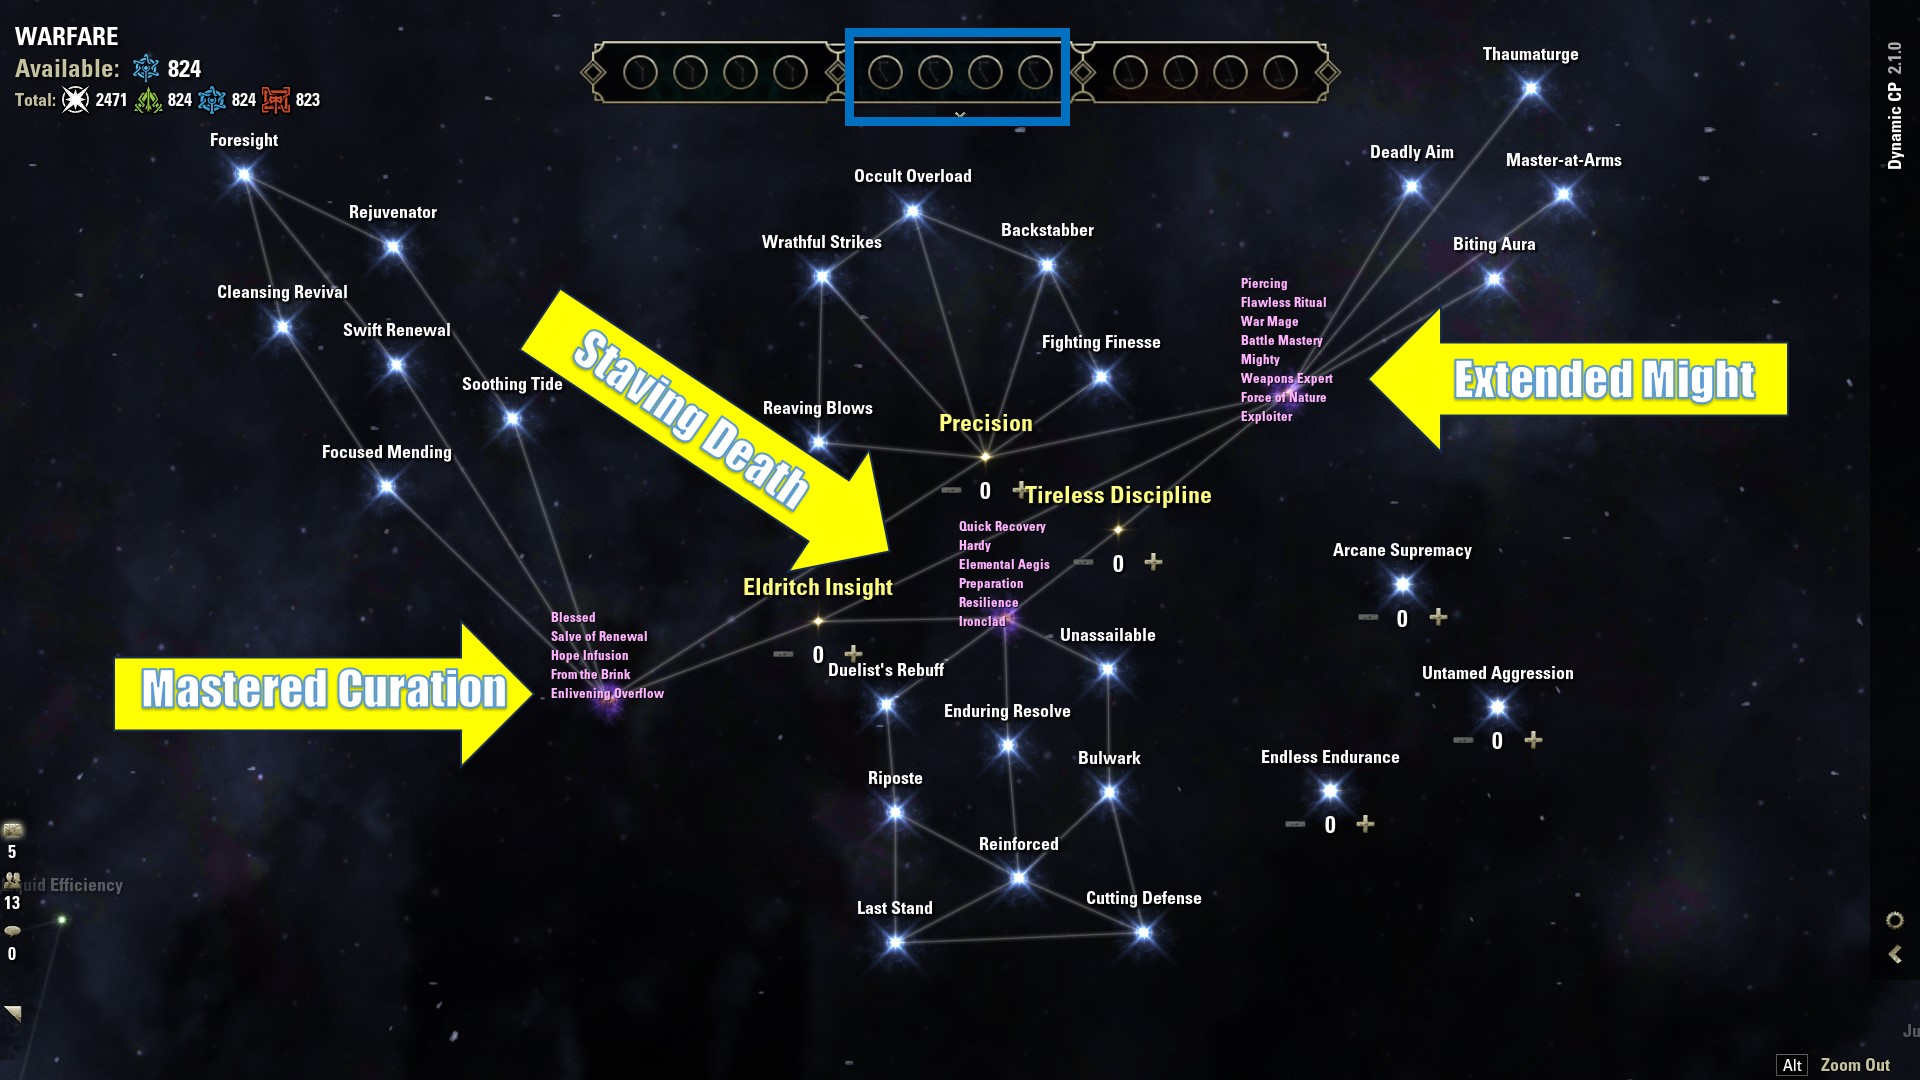
Below is a step-by-step method for slotting your champion points in the Warfare tree (blue). We have used the minimum possible to reach 4 slottable selections all maxed out. If you have more CP, consider taking more in the passives for optimal performance.
Below are recommended Warfare Champion Point selections for the ESO Stamina Sorcerer PvP Build:
- Precision 10
- Extended might – sub constellation – Piercing 10
- Master at arms (slottable) 50
- Eldritch insight 10
- Staving death – sub constellation – quick recovery 10
- Staving death – sub constellation – ironclad (slottable) 50
- Duelist’s rebuff (slottable) 50
- Mastered curation – sub constellation – blessed 10
- Focus mending (slottable) 50
This would be the bare minimum setup, spending 240 CP (720 total required). The next step is to max out passives that do not require a slottable but increase performance.
- Precision 10
- Piercing 10
- Tireless discipline 20
- Eldritch insight 10
- Blessed 10
- Quick recovery 10
- Flawless ritual 40
- War mage 30
- Battle mastery 40
- Mighty 30
- Elemental aegis 20
- Hardy 20
- Preparation 20
This would max out the Warfare tree with all active and passive champion points at 520 spent 1,560 total spent.
Fitness Constellation Champion Points
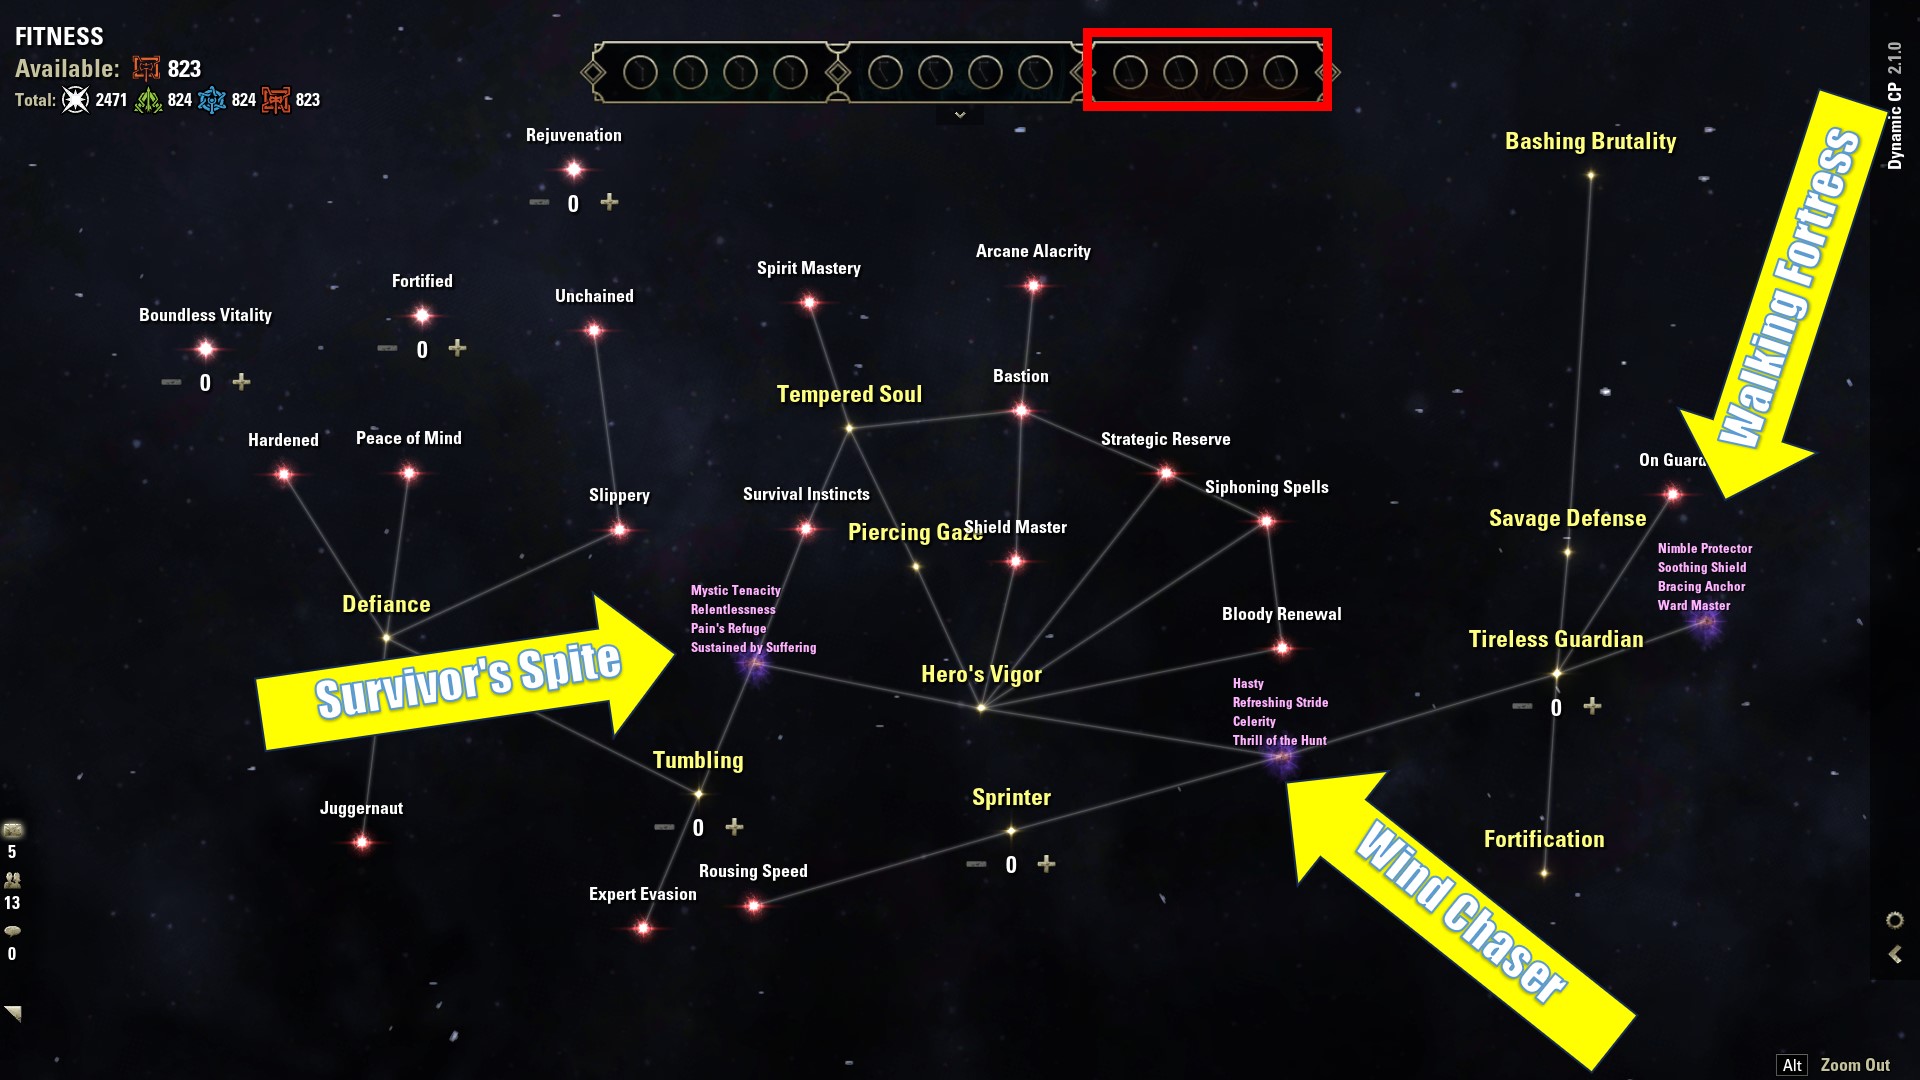
Below are recommended Fitness Champion Point selections for the ESO Stamina Sorcerer PvP Build:
- Fortified (slottable) 50
- Sprinter 10
- Wind chaser -sub con – hasty 8
- Wind chaser -sub con – celerity(slottable) 50
- Hero’s vigor 10
- Survivor’s spite – sub con – mystic tenacity 10
- Survivor’s spite – sub con – pain’s refuge 50
- survival instincts 50
This would be the bare minimum setup, spending 238 CP (714 total required). The next step is to max out passives that do not require a slottable but increase performance.
- Hero’s Vigor 10
- Tumbling 30
- Sprinter 10
- Defiance 20
- Hasty 8
- Tireless guardian 20
- Fortification 30
- Nimble 6
- Mystic tenacity 40
- Tempered soul 25
- Piercing gaze 30
- Savage defense 30
- Bashing brutality 20
This would max out the fitness tree with all active passive champion points at 517 cp spent 1,551 total spent.
Craft Constellation Champion Points
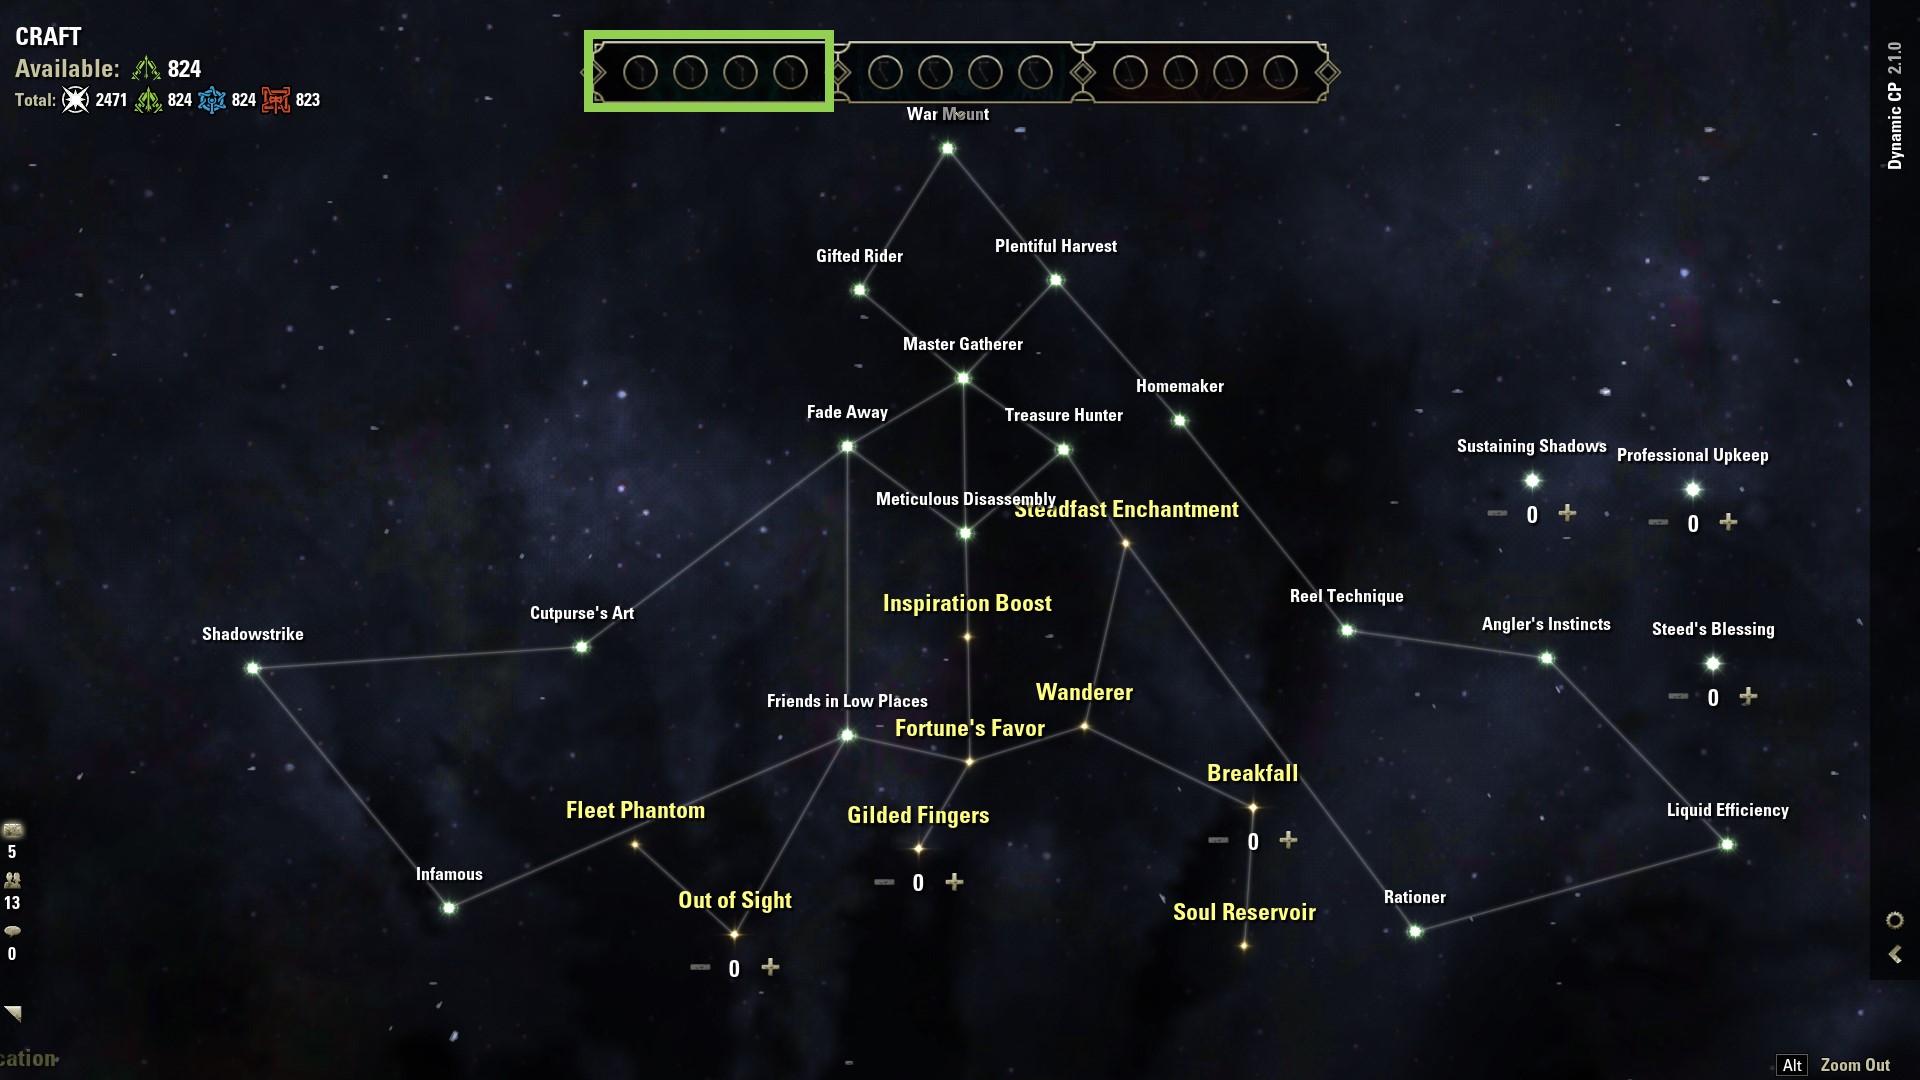
Below are recommended Craft Champion Point selections for the ESO Stamina Sorcerer PvP Build:
- Steed’s blessing (slottable) – 50
- Breakfall 10
- Wanderer 15
- Steadfast 10
- Rationer 30 (slottable)
- Master gatherer 15
- Gifted rider (slottable) 100
- War mount (slottable) 120
This would be the bare minimum setup, spending 350CP (1050 total required). The next step is to max out passives, that do not require a slottable but increase performance.
- Steadfast enchantment 40cp
- Breakfall 40 cp
- Wanderer 60
- Fortune’s favor 50
- Friends in low places 25
- Out of sight 30
- Fleet of phantom 40
- Soul’s reservoir 33
- Gilded fingers 50
- Inspiration boost 45
- Infamous 30
This would max out the crafting tree with all active passive champion points at 793 cp spent 2,379 total spent.
Consumables – ESO Stamina Sorcerer PvP Build
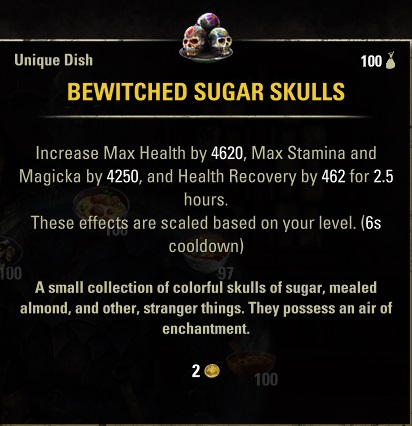
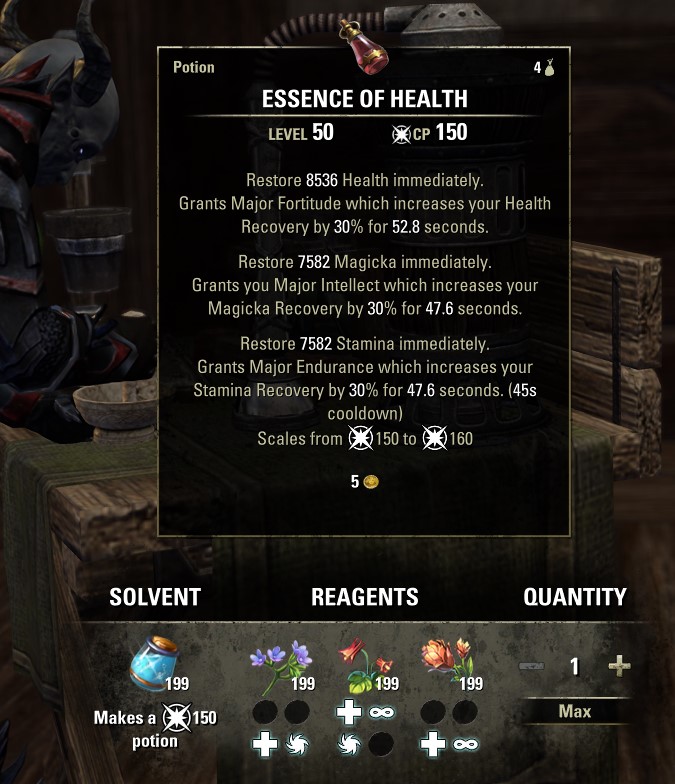
The best consumables for the Stamina Sorcerer PvP build are Bewitched Sugar Skulls food and Essence of Health tri-stat potions. Bewitched Sugar Skulls give a massive boost to overall stats but sacrifices recovery. If you struggle with recovery, use Orzorga’s Smoked Bear Haunch or cheaper Jewels of Misrule. The essence of health or Tri-stat potions is the best to passively give you a flood of resources and tri-recovery with alchemy medicinal use. Immovability potions are also helpful. Below are our recommended food and potion choices:
- Bewitched Sugar Skulls: Increase Max Health by 4620, Max Stamina and Max Magicka by 4250, and Health Recovery by 462 for 2 hours. Ingredients: Scrib Jelly, Flour, Columbine, Bervez Juice, and Honey.
- Orzorga’s Smoked Bear Haunch (recovery): Increase Max Health, Health Recovery, and Stamina and Magicka Recovery (effects are scaled based on your level). Ingredients: Red Meat, Tomato, White Cap, Frost Mirriam, and Perfect Roe.
- Jewels of Misrule (cheap): Increase Stamina and Magicka Recovery and Max Health for 2 hours. Ingredients: Rose, Mint, Lotus, Columbine, and Bervez Juice.
- Essence of Health (tri-stat): Restore 7329 Health, 6618 Magicka, and 6618 Stamina immediately. Grants Major Fortitude, Major Intellect, and Major Endurance, which increase your Health Recovery, Magicka Recovery, and Stamina Recovery by 20% for 31.7 seconds. (Effects are scaled based on your level) Ingredients: Bugloss, Columbine, Mountain Flower.
- Essecene of Immovability: Restores health and stamina and is immune to knockback effects. Ingredients Namria’s Rot, Columbine, and Mountain Flower.
- Escapist’s Poison IX: Immobilizes your target and grants you unstoppable, rendering you immune to control effects for 1.6 seconds. Ingredients: Columbine, Namira’s Rot, Wormwood.
Build Summary – ESO Stamina Sorcerer PvP Build
Class: Sorcerer
Infection: None
Race: Orc
Attributes: 32 Health 32 Stamina
Mundus Stone: Warrior
Weapon One: Bow
Weapon Two: Bow
Armor Set 1: Way of Fire
Armor Set 2: Rallying Cry
Monster Helm: Roksa the Warped
Mythic: Sea-Serpent’s Coil
Armor Weight: 2 Heavy, 3 Medium, 2 Light
Potion: Essence of Health (tri-stat)
Food: Bewitched Sugar Skulls
Skill Bar 1
- Streak
- Bound Armaments
- Crystal Weapon
- Haunting Curse
- Camouflaged Hunter
- Toxic Barrage (Ultimate)
Skill Bar 2
- Hurricane
- Critical Surge
- Elemental Susceptibility
- Dark Deal
- Resolving Vigor
- Absorption Field (Ultimate)
Scribing Grimoires and Scripts
- Traveling Knife
- Bleed Lingering (focus script)
- Torment (signature script)
- Berserk (affix Script)
- Soul Burst
- Pull (focus script)
- Class Mastery (signature script)
- Courage (affix script)
- Vault
- Immobilize (focus script)
- Thief’s Swiftness (signature script)
- Evasion (Affix Script)
Looking For More ESO Builds?
Thank you for reading the ESO Stamina Sorcerer PvP Build Guide. We provide the latest news and create guides for ESO. Also, watch me play games on Twitch or visit my YouTube channel!