 Facebook
 Reddit
 Email
Email
This guide focuses on the best ESO Stamina Dragonknight PvP Build, skills, gear, champion points, and more!

This build has been updated for the Updated 42, the Gold Road Chapter of the Elder Scrolls Online (ESO).
Why Should You Play ESO Stamina Dragonknight PvP Build?
The Stamina Dragonknight PvP Build is an ultra-aggressive melee damage dealer focusing on damage over time (DoT) pressure. This build utilizes multiple damage over time and crowd control effects to destroy single target and AOE enemies. Dragonknights use their Ultimate resource pool to regain resources with the Battle Roar passive. Therefore, you have some of the best resource sustain, damage, and survivability in ESO.
Players who enjoy range damage will not want to play the Stam DK. This class and stamina focus uses melee weapons like dual-wield or two-handed. We give load-outs for multiple playstyles and content in ESO PvP. If you enjoy being aggressive in the melee range with high survivability, the Stam DK PvP build is for you.
ESO Stamina Dragonknight PvP Build Features and Mechanics

Below are some of the features found using the ESO Stamina Dragonknight PvP Build in the Elder Scrolls Online:
- Class – Dragonknight
- Weapon One – Dual Wield
- Weapon Two – Frost Staff
- Armor Types: 3 Heavy, 3 Medium, 1 Light
- Race: Nord
- Monster Helm: Bloodspawn
- Mythic: Sea-Serpent’s Coil
- Attributes: 32 Stamina, 32 Health
- Mundus Stone: Warrior
- Best Grimoires: Traveling Knife, Soul Burst
Related:
Skills
Skill Set 1 Front Bar
Shattering Rocks (Morph of Petrify | Skill Line : Earthen Heart) – Stun that cannot be avoided by dodging and block. Used to setup opponents before a kill shot. I take this morph for increased healing. SMALL GROUP: Use Burning Talons assuming someone in your group has a hard CC like Streak or Mass Hysteria.
Molten Whip (Morph of Lava Whip | Skill Line : Ardent Flame) – Whip gives bonus to weapon damage and a magicka dump offensively. Use this after a stun when an opponent is vulnerable.
Noxious Breath (Morph of Fiery Breath | Skill Line : Ardent Flame) – AoE hard hitting DoT that reduces resistances. This is a must before burst combo to lower resistance and ability status effect.
Flames of Oblivion (Morph of Inferno | Skill Line : Ardent Flame) – Critical buff, 3x targets and instance damage unlike Venomous Claw. Claw is great in longer lasting fights/duels. If you can’t sustain use claw or go with Camo hunter for passive increase damage.
Rending Slashes (Morph of Twin Slashes | Skill Line : Dual Wield) – You want an aggressive DoT in this spot. Rending Slashes with Master Dual Wield has been nerfed, and if you have gold road chapter, Traveling Knife with bleed scripts is a good alternative. Venomous Claw is another good choice or Whirling Blades for AOE.
Ferocious Leap (Morph of Dragon Leap | Skill Line : Draconic Power) – Massive burst damage and great damage shield.
Back Bar
Volatile Armor (Morph of Spiked Armor | Skill Line : Draconic Power) – Major Resolve armor buff that does AoE damage and gives us healing received bonus.
Degeneration (Morph of Entropy | Skill Line : Mages Guild) – Provides more single-target DoT pressure, though Molten Armaments is great when not playing a 1vX build. Apply this on your back bar first before launching into combat. SMALL GROUP: Use igneous weapons to give the group a buff. Cinder Storm is a great flex if someone else is using this skill in you group.
Elemental Susceptibility (Morph of Weakness to Elements | Skill Line : Destruction Staff) – One of the best skills in the game for single target bursting combined with a Vateshran Ice staff is absolutely insane! If you’re not using the Vateshran back bar setup, consider this your flex spot. MOBILITY SKILL: if not using 1vx setup go with these skills. Vampire Elusive Mist, Race Against Time from Psijic Order or Chains of Devastation from Ardent Flame skill line for mobility.
Coagulating Blood (Morph of Dragon Blood | Skill Line : Draconic Power) – Magicka based burst heal. Use this when very low and relay predominately on Resolving Vigor when above 60% health.
Resolving Vigor (Morph of Vigor | Skill Line : Assault) – Burst heal over time. Recast this skill every 20 seconds for Minor Resolve.
Corrosive Armor (Morph of Magma Armor | Skill Line : Earthen Heart) – Defensive ultimate which you’ll need without pocket healers helping you. SMALL GROUP swap to Shifting Standard for more synergy damage.
Scribing Skills – ESO Stamina Dragonknight PvP Build
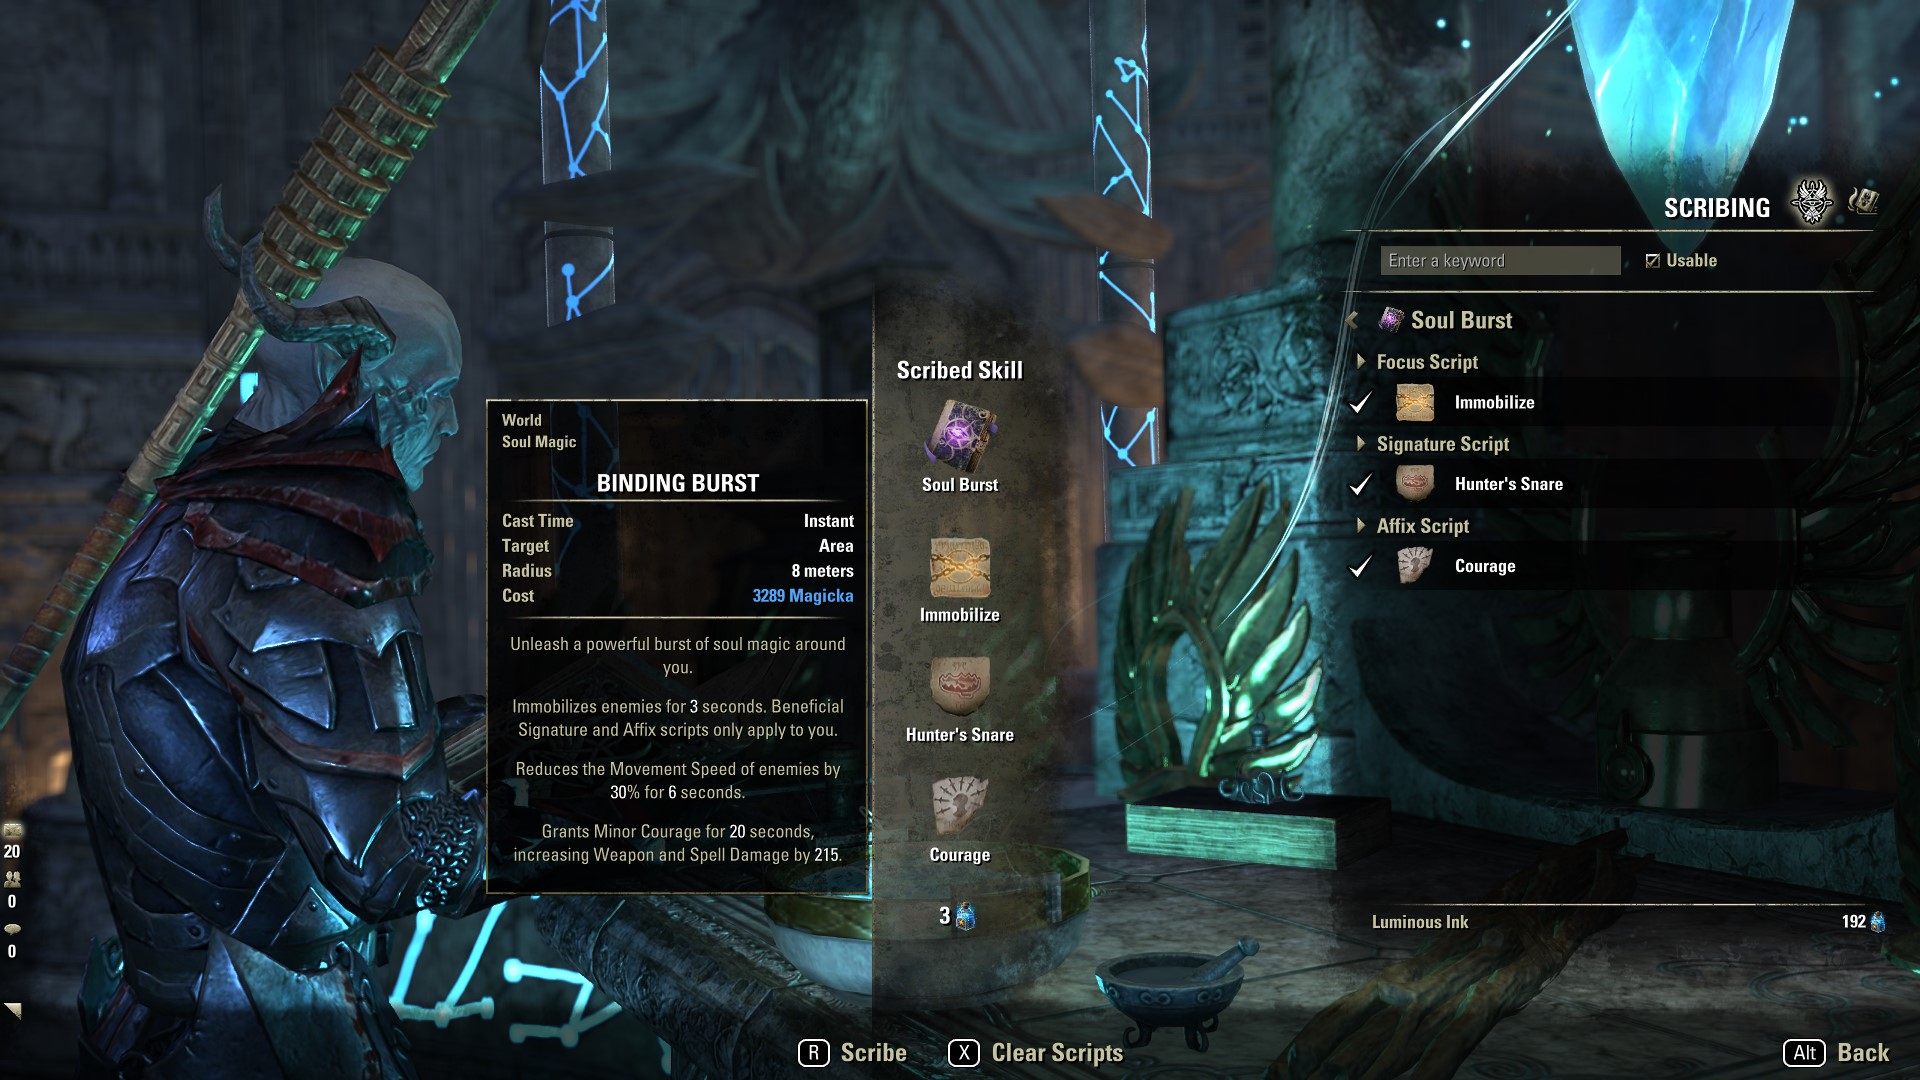
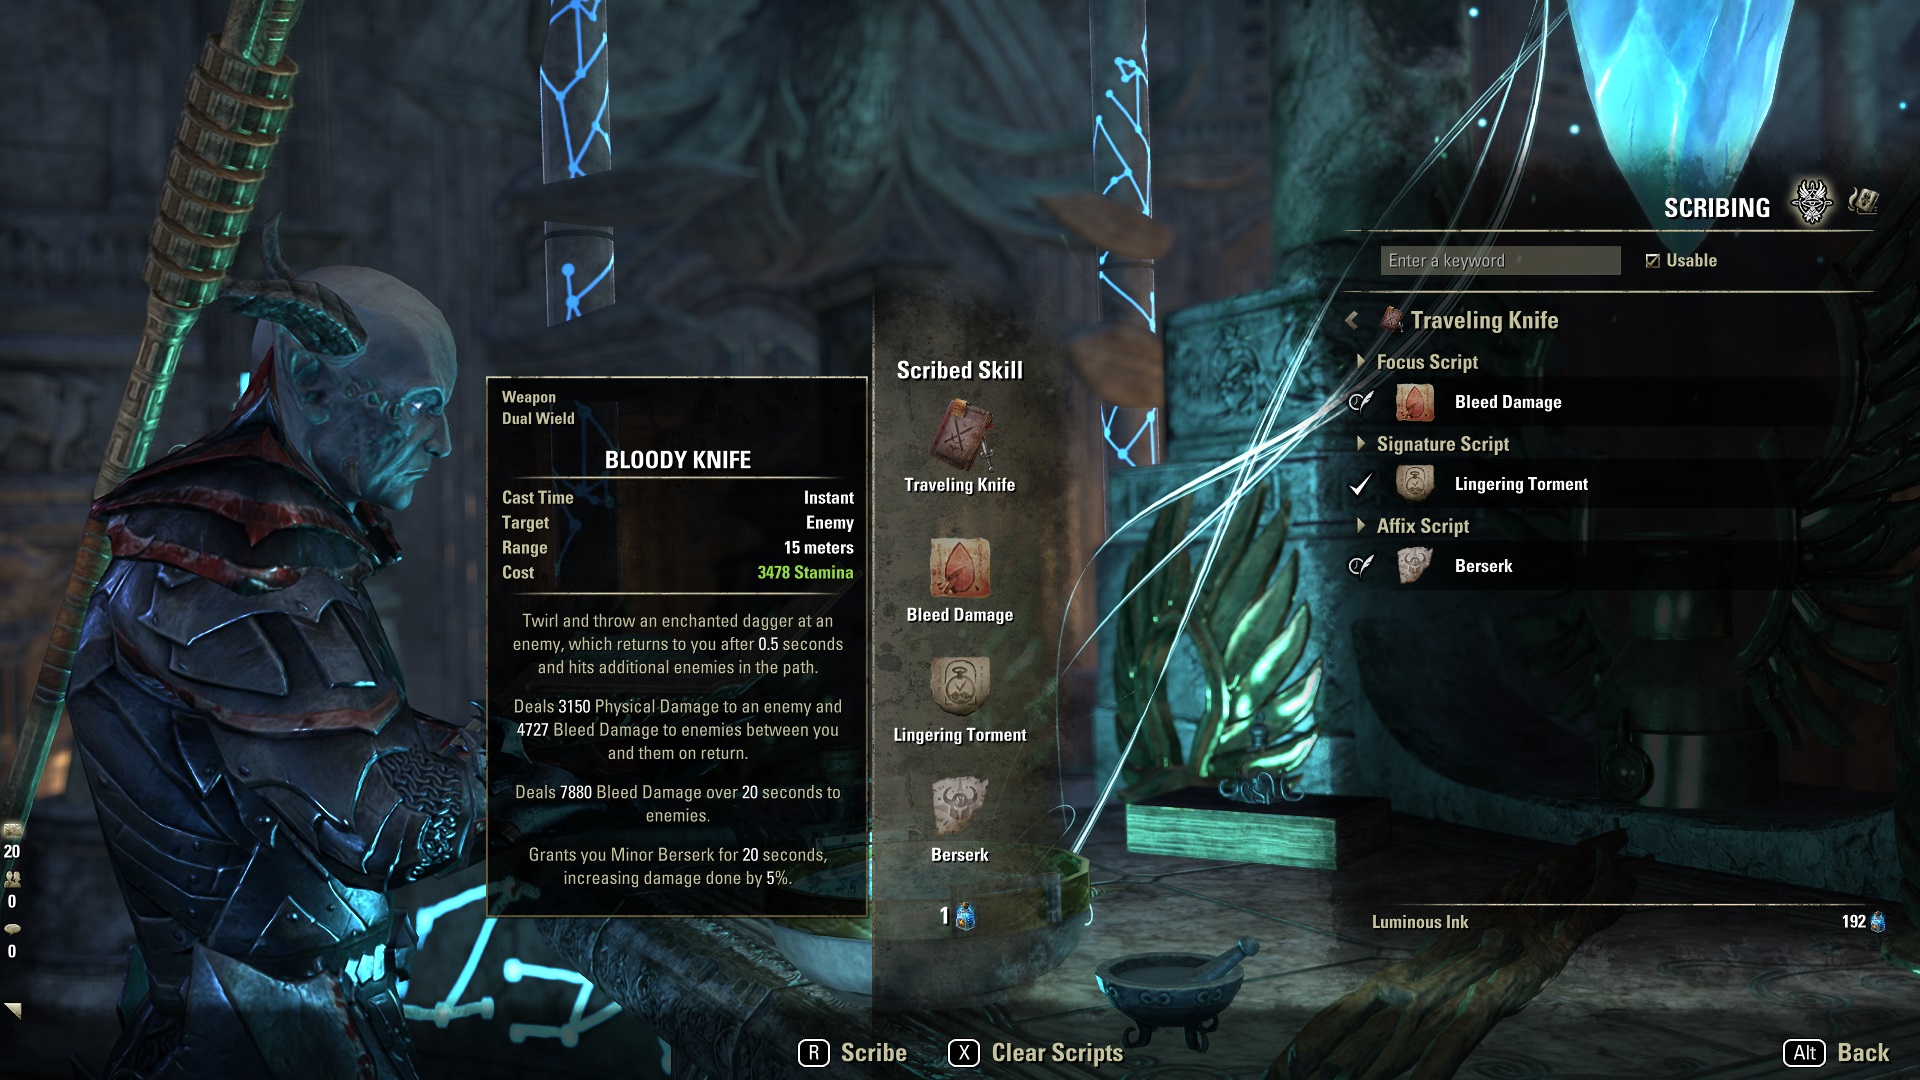
Traveling Knife and Soul Burst are the two best Grimoires (skills) for a Stamina Dragonknight PvP build. Traveling Knife gives you a ranged bleed attack that acts like Rending Slashes but doesn’t require Master Duel Wield to be effective. Moreover, Traveling Knife can be given a stun in the focus script for classes lacking a ranged stun. Soul Burst is a helpful crowd control and buff skill. You can immobilize, pull, or snare targets and get your favorite minor buffs. Below are the suggested combination of Grimoires, focus, signature, and affix scripts:
- Traveling Knife – Bleed or Stun (focus script), Lingering Torment or Assassin’s Misery (signature script), Berserk or Vulnerability (Affix Script)
- Soul Burst – Immobilize or Pull (focus script), Class Mastery or Hunter’s Snare (signature script), Courage or Expedition (Affix Script)
The Scribing System utilizes one of 11 new skills from the Gold Road Chapter called Grimoires. With Grimoires, you can customize spells via Scripts. The scribing feature requires the purchase of the Gold Road Chapter (sponsored link). To learn more about scribing, check out our full guide here.
Passives Skills
Consider taking all of the passives in the below skill trees to increase your builds performance without slotting any skills:
- Ardent Flame (class skill line)
- Draconic Power (class skill line)
- Earthen Heart (class skill line)
- Destruction Staff (weapon skill line)
- Dual Wield (weapon skill line)
- Light, Medium, and Heavy Armor
- Fighter’s Guild
- Mage’s Guild
- Undaunted
- Psijic Guild
- Alchemy Medicinal
- Race
- Assault Alliance
- Alliance Support
- Vampire (optional stage 3)
Gear – Best in Slot
The Stamina Dragonknight PvP Build gear loadout below is used for high single-target damage:
| Slot | Type | Set | Trait | Glyph |
| Head | Medium | Bloodspawn | Well-fitted | Prismatic |
| Shoulders | Light | Bloodspawn | Well-fitted | Stamina |
| Chest | Heavy | Daedric Trickery | Reinforced | Prismatic |
| Legs | Heavy | Daedric Trickery | Reinforced | Prismatic |
| Gloves | Medium | Armor of the Trainee | Well-fitted | Stamina |
| Boots | Heavy | Daedric Trickery | Well-fitted | Stamina |
| Belt | Medium | Druids | Well-fitted | Stamina |
| Weapon One | Mace | Perfected Stinging Slashes | Nirnhoned | Flame |
| Secondary | Mace | Perfected Stinging Slashes | Charged | Poison |
| Weapon Two | Frost Staff | Perfected Wrath of Elements | Powered | Weapon Damage |
| Necklace | Mythic | Sea-Serpent’s Coil | Bloodthirsty | Weapon Damage |
| Ring 1 | Daedric Trickery | Bloodthirsty | Stamina Recovery | |
| Ring 2 | Daedric Trickery | Bloodthirsty | Weapon Damage |
This Stamina Dragonknight PvP Build gear loadout is what I use in open-world Cyrodiil, one-on-one fights. It has the most single-target pressure and damage in the game.
Monster Helm & Mythic
Bloodspawn: Obtained in Veteran Spindleclutch II. It is helpful for resource sustain and ultimate generation.
Sea-Serpent’s Coil: Obtained through Mythic System click here for lead locations. Used because it’s essentially two five-piece damage sets in one, with nearly zero drawbacks if using Vampire Mist Form. Use Markyn in Open World Cyrodiil.
FLEX OPTIONS
- Maarselok: Best for dueling one-vs-one.
- Zaan: Is truly god-tier dueling or single-target killer monster helm.
- Roksa the Warped: Gives great resource sustain without Engine Guardian droid.
- Markyn Ring of Majesty: Great all-around defensive and offensive mythic.
- Torc of Tonal Constancy: A great resource sustain mythic.
Gear Set
Daedric Trickery: 8 trait craftable in Vvardenfell/Morrowind. Used to trigger defensive buffs on back bar that stack even when on your front bar.
Perfected Stinging Slashes: Obtained through Veteran Dragonstar Arena (can do normal for lesser version) in upper Craglorn. One of the best pressure items in the game. You’ll need to drop a skill on your bar for rending slashes master duel wield.
Perfected Wrath of Elements: Obtained in Veteran Vateshran Hollows. Absolutely god tier damage with destruction staff Elemental Susceptibility skill and Maarselok monster. drop a skill on back bar for elemental susceptibility
Armor of the Trainee: Obtained in overland starter areas or trader. One piece set bonus that gives us extra health.
Druid’s Braid: Craftable one-piece set bonus that gives us extra health.
FLEX OPTIONS
- Rallying Cry: Great group utility set and strong solo with a bonus that increased your offensive and defensive potential.
- Mara’s Balm: Good survivability set from Cyrodiil vendors.
- Powerful Assault: Group utility and weapon damage that stacks with Rallying Cry.
- Robes of the Hist: Great back bar healing set alternate to Mara’s Balm.
- Snake in the Stars: A set that counters players using “heal stacking.”
- Order’s Wrath: Good craftable option.
Gear – No Proc PvP
The below gear set is used for no-proc PvP campaigns:
| Slot | Type | Set | Trait | Glyph |
| Head | Medium | Witch-Knight’s Defiance | Well-Fitted | Prismatic |
| Shoulders | Light | Magma Incarnate | Well-Fitted | Stamina |
| Chest | Heavy | Mark of the Pariah | Reinforced | Prismatic |
| Legs | Heavy | Mark of the Pariah | Reinforced | Prismatic |
| Gloves | Heavy | Mark of the Pariah | Well-Fitted | Stamina |
| Boots | Medium | Witch-Knight’s Defiance | Well-Fitted | Stamina |
| Belt | Medium | Witch-Knight’s Defiance | Well-Fitted | Stamina |
| Weapon One | Mace | Witch-Knight’s Defiance | Nirnhoned | Flame |
| Secondary | Axe | Witch-Knight’s Defiance | Charged | Poison |
| Weapon Two | Frost Staff | Blessing of Potentates | Powered | Escapist’s Poison IX |
| Necklace | Torc of Tonal Constancy | Swift | Weapon Damage | |
| Ring 1 | Mark of the Pariah | Infused | Stamina Recovery | |
| Ring 2 | Mark of the Pariah | Swift | Weapon Damage |
- Magma Incarnate: Monster Set – helmet obtained from Veteran Dread Cellar dungeon (Blackwood zone), Waking Flame DLC. Shoulders obtained from Vendor: Urgarlag Chief-bane (Undaunted Pledge Master). Great sustain for a one-piece item set.
- Mark of the Pariah: Obtained from Wrothgar overland, Orsinium DLC or bought from traders. Most tankiness from a 5pc in no proc PvP.
- Witch-Knight’s Defiance: Obtained in Markarth overland, (the Reach zone) or bought from traders. Huge damage increase for no proc PvP.
- Blessing of Potentates: Obtained in Cyrodiil Vlastarus Elite Gear Vendor or bought from traders. Great damage reduction two-piece.
- Torc of Tonal Constancy: Obtained from Mythics system. The best value for resource sustain and works in no proc.
Skill 2: Small Group
SETUP 2: Small Group Bomber Front Bar
- Burning Talons (Morph of Dark Talons | Skill line: Draconic Power) – AoE immobilization and damage synergy for group.
- Noxious Breath (Morph of Fiery Breath | Skill line: Ardent Flame) – AoE damage and major breach. Engulfing flames is also a great morph choice here if you run with a Warden.
- Flames Of Oblivion (Morph of Inferno | Skill line: Ardent Flame) – Critical buff and delayed burst.
- Molten Whip (Morph of Lava Whip | Skill line: Ardent Flame) – Single target spammable that can stack 3x times with ardent flame abilities.
- Whirling Blades (Morph of Whirlwind | Skill line: Dual Wield) – AoE execute.
- Ferocious Leap (Morph of Dragon Leap | Skill line: Draconic Power) – Used a defensive ultimate or gap closer.
SETUP 2: Small Group Back Bar
- Volatile Armor (Morph of Spiked Armor | Skill line: Draconic Power) – Armor buff with a DoT.
- Igneous Weapons (Morph of Molten Weapons | Skill line: Earthen Heart) – Gives you and group major and minor brutality. Flex skill here is Cinder Storm for good healing.
- Elusive Mist (Morph of Mist Form | Skill line: Vampire) – Mobility tool and escape mechanism.
- Resolving Vigor (Morph of Vigor | Skill line: Assault) – Selfish heal, can use echoing for more group synergy.
- Coagulating Blood (Morph of Dragon Blood | Skill line: Draconic Power) – Self burst heal.
- Shifting Standard (Morph of Dragonknight Standard | Skill line: Ardent Flame) – Used for major defile and very strong group synergy.
Gear – Small Group
Used for small groups when you don’t need a pull.
| Slot | Type | Set | Trait | Glyph |
| Head | Heavy | Roksa the Warped | Well-fitted | Prismatic |
| Shoulders | Light | Roksa the Warped | Well-fitted | Stamina |
| Chest | Heavy | Daedric Trickery | Reinforced | Prismatic |
| Legs | Heavy | Armor of the Trainee | Reinforced | Prismatic |
| Gloves | Medium | Plaguebreak | Well-fitted | Stamina |
| Boots | Medium | Plaguebreak | Well-fitted | Stamina |
| Belt | Medium | Plaguebreak | Well-fitted | Stamina |
| Weapon One | Dagger | Plaguebreak | Precise | Decrease Health |
| Secondary | Dagger | Plaguebreak | Precise | Absorb Stamina |
| Weapon Two | Frost Staff | Daedric Trickery | Powered | Weapon Damage |
| Necklace | Daedric Trickery | Infused | Stamina Recovery | |
| Ring 1 | Markyn Ring of Majesty | Bloodthirsty | Weapon Damage | |
| Ring 2 | Daedric Trickery | Bloodthirsty | Weapon Damage |
GEAR SETUP
- Roksa the Warped: Used for better resource sustain.
- Daedric Trickery: Great craftable defensive back bar option because of the major buffs.
- Markyn Ring of Majesty: Great all-around defensive and offensive mythic.
- Armor of the Trainee: Simply adds a little extra health.
- Plaguebreak: Used for a mass explosion on killing one target.
Skill 3: Bomber
SETUP 3: Two-Handed Bomber Front Bar
- Burning Talons (Morph of Dark Talons | Skill line: Draconic Power) – Lock enemies in place with this.
- Noxious Breath (Morph of Fiery Breath | Skill line: Ardent Flame) – AOE debuff and damage.
- Flames Of Oblivion (Morph of Inferno | Skill line: Ardent Flame) – Slotted for critical damage and minor berserk proc.
- Brawler (Morph of Cleave | Skill line: Two Handed) – Your main spammable with Master’s Weapon and tons of players hits super hard.
- Molten Whip (Morph of Lava Whip | Skill line: Ardent Flame) – Big damage for single target kills.
- Ferocious Leap (Morph of Dragon Leap | Skill line: Draconic Power) – Used to stun and knockback.
SETUP 3: Two-Handed Bomber Back Bar
- Volatile Armor (Morph of Spiked Armor | Skill line: Draconic Power) – Armor buff.
- Scalding Rune (Morph of Fire Rune | Skill line: Mages Guild) – Used to pull in targets with Dark Convergence.
- Igneous Weapons (Morph of Molten Weapons | Skill line: Earthen Heart) – Used for weapon damage buff. Swap to Degeneration on the 1vX Build for extra DoT pressure.
- Resolving Vigor (Morph of Vigor | Skill line: Assault) – Heal over time.
- Coagulating Blood (Morph of Dragon Blood | Skill line: Draconic Power) – Burst heal.
- Corrosive Armor (Morph of Magma Armor | Skill line: Earthen Heart) – Pop before charging in for insane damage and damage reduction. Swap to Shifting Standard if you’re playing in a group with a healer.
Gear – Bomber
This is designed for huge plague-break bombs kills and is weak against single target.
| Slot | Type | Set | Trait | Glyph |
| Head | Heavy | Gaze of Sithis | Well-fitted | Prismatic |
| Shoulders | Light | Magma Incarnate | Well-fitted | Stamina |
| Chest | Medium | Plaguebreak | Reinforced | Prismatic |
| Legs | Medium | Plaguebreak | Well-fitted | Prismatic |
| Gloves | Medium | Plaguebreak | Well-fitted | Stamina |
| Boots | Medium | Plaguebreak | Well-fitted | Stamina |
| Belt | Medium | Plaguebreak | Well-fitted | Stamina |
| Weapon One | Greatsword | Perfected Titanic Cleave | Nirnhoned | Weapon Damage |
| Weapon Two | Frost Staff | Dark Convergence | Powered | Escapist’s Poison IX |
| Necklace | Dark Convergence | Bloodthirsty | Weapon Damage | |
| Ring 1 | Dark Convergence | Bloodthirsty | Stamina Recovery | |
| Ring 2 | Dark Convergence | Bloodthirsty | Weapon Damage |
This Stamina Dragonknight PvP Build gear loadout is what I use “bombing” with Two Handed Greatsword.
- Gaze of Sithis: Best survivability mythic for 1pc.
- Magma Incarnate: Great sustain for a one-piece item set.
- Plaguebreak: Used for a mass explosion on killing one target.
- Perfected Titanic Cleave: Makes Carve hit insanely hard.
- Dark Convergence: Used to pull targets in, can swap in Rush of Agony with leap skill.
Race
The best racial choice for the ESO Stamina Dragonknight PvP BuildBuild is below:
- Nord: The most defensive-minded race that can generate ultimate when hit. It causes less damage than others but feeds the ultimate generation.
- Dark Elf: Gain max magicka, stamina, and weapon and spell damage. All around, it is very good, though it doesn’t have an ultimate generation.
- Orc: Gain max stamina, health, and weapon and spell damage. It also reduces the cost of sprint and increases your movement speed.
- Khajiit: This race gets recovery, max stats, and critical damage and healing. Consider the Khajiit the best for burst.
Related:
Attributes
Consider splitting your attributes into 32 health and 32 stamina. Reach at least 32,000 health inside your PvP context. Adjust if not reaching those numbers.
Mundus Stone
The best mundus stone is Warrior, which increases your weapon damage. The Serpent is helpful if you struggle with stamina and resource sustain. The Thief or Shadow can be helpful for burst damage, especially if you’re using the Khajiit Race.
Champion Points – ESO Stamina Dragonknight PvP Build
| Craft | Warfare | Fitness |
| Steed’s Blessing | Fighting Finesse | Fortified |
| War Mount | Focused Mending | Pain’s Refuge |
| Gifted Rider | Occult Overload | Celerity |
| Liquid Efficiency | Ironclad | Survival Instincts |
Warfare
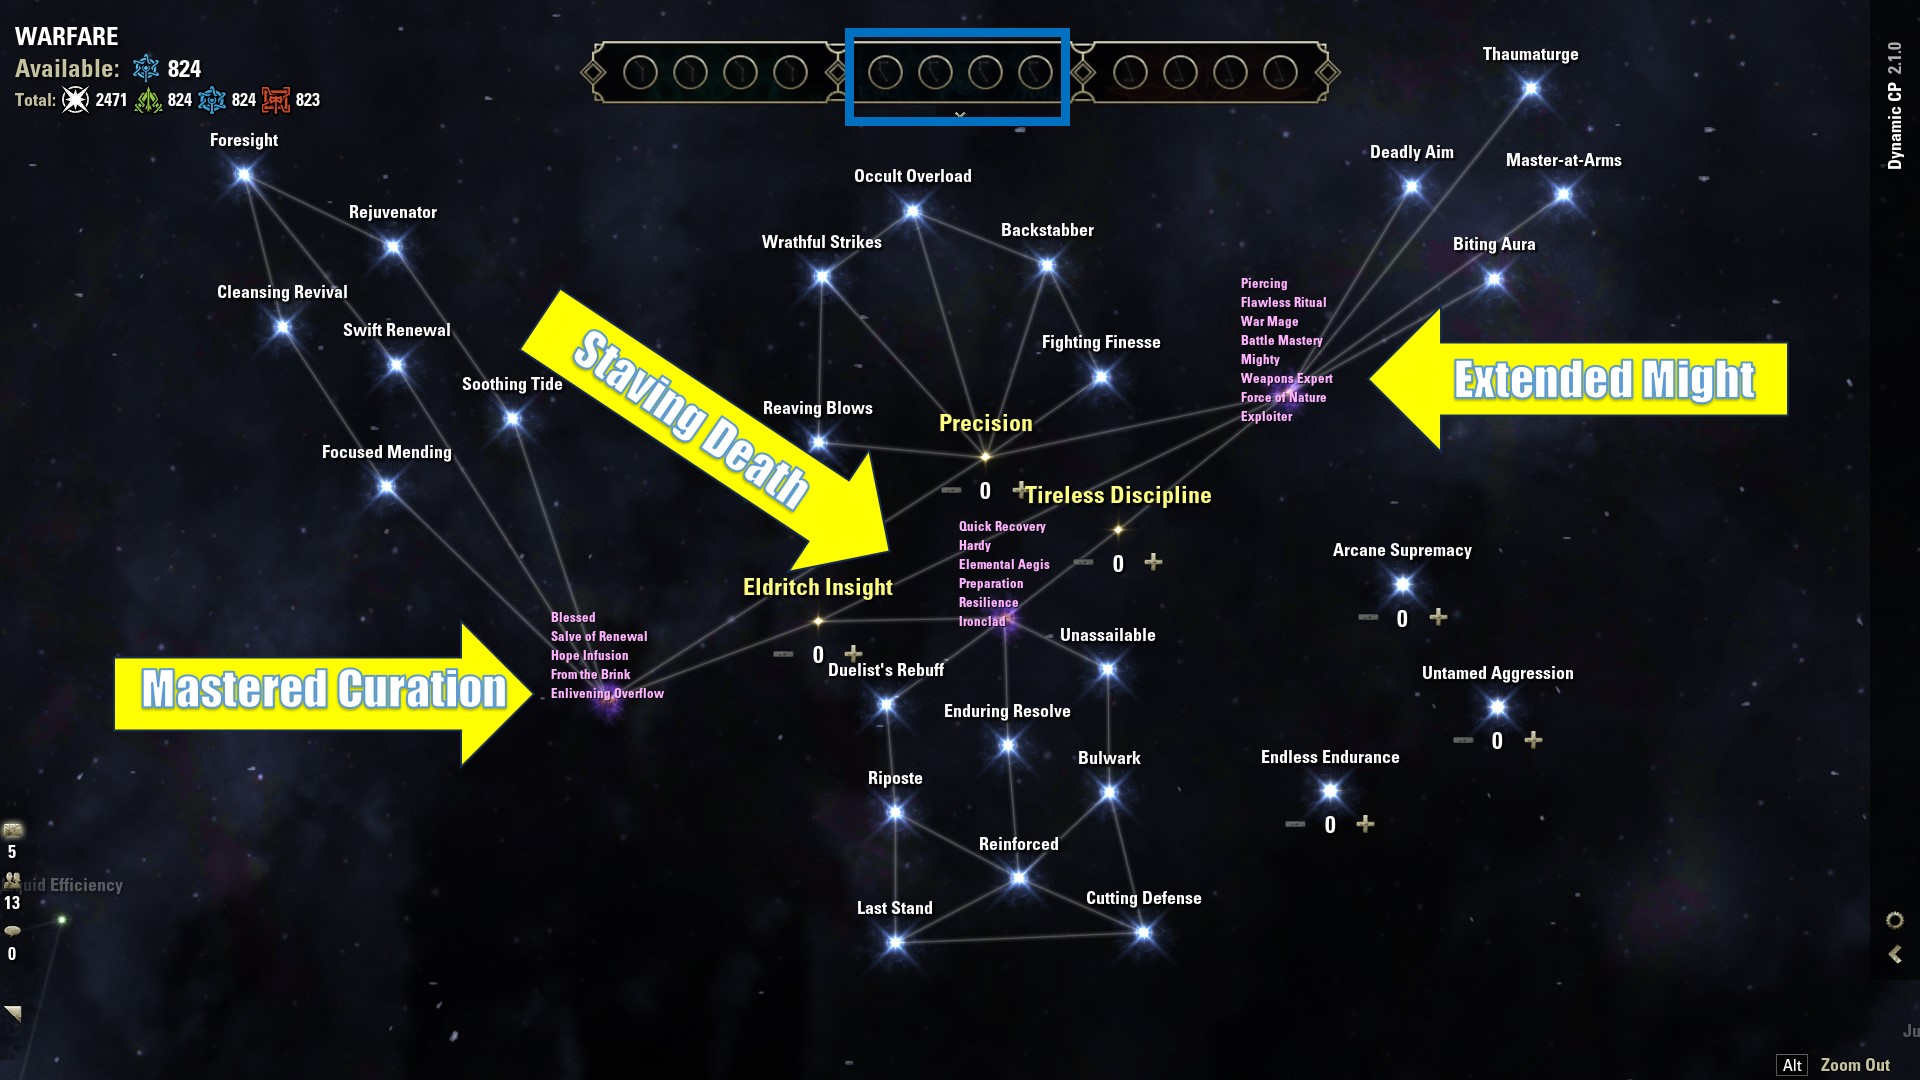
Below is a step-by-step method for slotting your champion points in the Warfare tree (blue). We have used the minimum possible to reach four slottable selections, all maxed out. If you have more CP, consider taking more in the passives for optimal performance.
- Precision 10
- Occult Overload (slottable) 50 – AOE explosions
- Fighting Finesse (slottable) 50 – Critical healing and damage
- Tireless Discipline 10
- Staving Death sub-constellation – Quick Recovery 10
- Ironclad (slottable) 50 – Defensive CP
- Master Curation sub-constellation – Blessed 10
- Focused Mending (slottable) 50 – Defensive CP
This would be the minimum setup, spending 240 CP (720 total required). The next step is to max out passives that do not require a slottable but increase performance.
- Precision 10
- Tireless Discipline 10
- Eldritch Insight 20
- Blessed 10
- Quick Recovery 10
- Piercing 20
- Battle Mastery 40
- Mighty 30
- Flawless Ritual 40
- War Mage 30
- Hardy 20
- Elemental Aegis 20
- Preparation 20
This would max out the Warfare tree with all active and passive champion points at 470 spent 1,410 total spent.
Fitness

Below are recommended Fitness Tree Champion Point selections:
- Fortified 50 (slottable) – Armor
- Sprinter 10
- Wind Chase sub-constellation – Hasty 8
- Wind Chaser sub-constellation – Celerity 50 (slottable) – Speed
- Hero’s Vigor 10
- Survivor’s Spite sub-constellation – Mystic Tenacity 10
- Survivor’s Spite sub-constellation – Pain’s Refuge 50 (slottable) – Damage Reduction
- Survival Instincts (slottable) 50 – Sustain
This would be the bare minimum setup, spending 238 CP (714 total required). The next step is to max out passives, that do not require a slottable but increase performance.
- Sprinter 10
- Hero’s Vigor 10
- Tumbling 20
- Defiance 20
- Hasty 8
- Tireless Guardian 20
- Fortification 30
- Nimble Protector 6
- Tempered Soul 50
- Rousing Speed 50
- Savage Defense 30
- Bashing Brutality 20
This would max out the fitness tree with all active passive champion points at 512 cp spent 1,536 total spent.
Craft

Below are recommended Craft Tree selections:
- Steed’s Blessing (slottable) – 50
- Breakfall 10
- Wanderer 15
- Steadfast 10
- Rationer (slottable) 30
- Treasure hunter 50
- Master gatherer 15
- Gifted rider (slottable) 100
- War mount (slottable) 120
This would be the bare minimum setup, spending 400CP (1200 total required). The next step is to max out passives, that do not require a slottable but increase performance.
- Steadfast enchantment 40cp
- Breakfall 40 cp
- Wanderer 60
- Fortunes favor 10
- Friends in low places 25
- Out of sight 30
- Fleet of Phatom 40
- Soul’s Reservoir 33
- Gilded fingers 50
- Fortunes favor 40
- Inspiration boost 45
- Infamous 30
This would max out the crafting tree with all active passive champion points at 843 cp spent 2,529 total spent
Consumables – ESO Stamina Dragonknight PvP Build
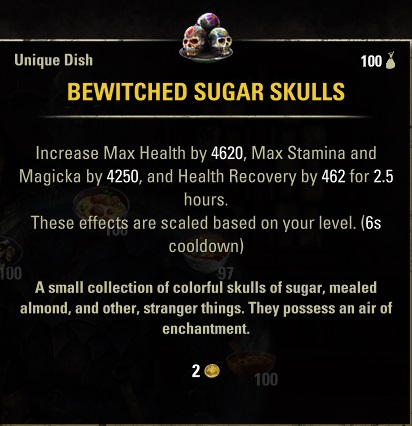
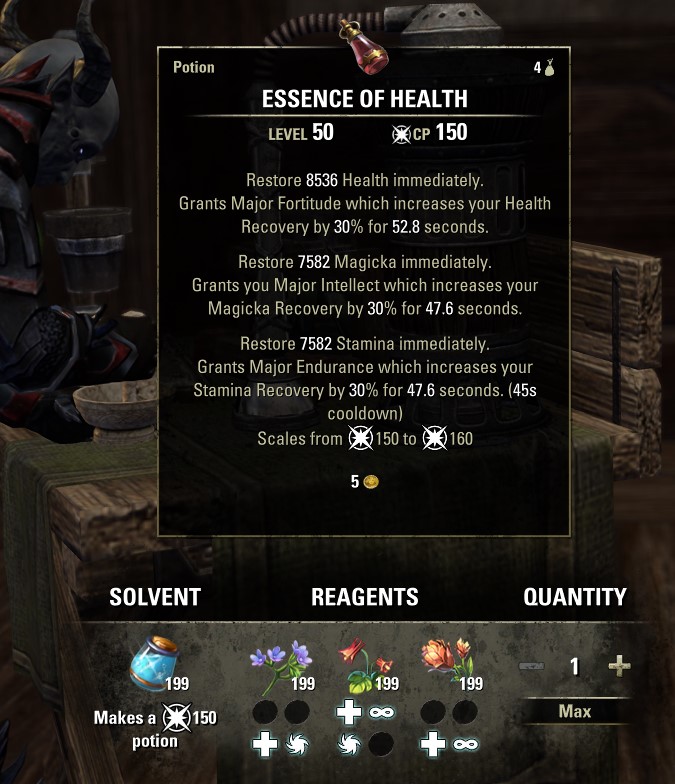
The best consumables for the ESO Stamina Dragonknight PvP build are Bewitched Sugar Skulls food and Essence of Health tri-stat potions. Bewitched Sugar Skulls give a massive boost to overall stats but sacrifices recovery. If you struggle with recovery, use Orzorga’s Smoked Bear Haunch or cheaper Jewels of Misrule. The essence of health or Tri-stat potions is the best to passively give you a flood of resources and tri-recovery with alchemy medicinal use. Immovability potions are also helpful. Below is our recommended food and potion choices:
- Bewitched Sugar Skulls: Increase Max Health by 4620, Max Stamina and Max Magicka by 4250, and Health Recovery by 462 for 2 hours. Ingredients: Scrib Jelly (2), Flour (5), Columbine (2), Bervez Juice (2), Honey (5).
- Orzorga’s Smoked Bear Haunch (recovery): Increase Max Health by 4312, Health Recovery by 406 and Stamina and Magicka Recovery by 369 (effects are scaled based on your level) Ingredients: Red Meat (1), Tomato (1), White Cap (1), Frost Mirriam (1), Perfect Roe (1).
- Jewels of Misrule (cheap): Increase Stamina and Magicka Recovery by 357 and Max Health by 3927 for 2 hours. (effects are scaled based on your level) Ingredients: Rose (1), Mint (1), Lotus(1), Columbine (1), Bervez Juice (1).
- Essence of Health (tri-stat): Restore 7329 Health, 6618 Magicka, and 6618 Stamina immediately. Grants Major Fortitude, Major Intellect, and Major Endurance, which increase your Health Recovery, Magicka Recovery, and Stamina Recovery by 20% for 31.7 seconds. (effects are scaled based on your level) Ingredients: Bugloss, Columbine, Mountain Flower.
- Essecene of Immovability: Restores health and stamina and is immune to knockback effects. Ingredients Namria’s Rot, Columbine, and Mountain Flower.
Build Summary – ESO Stamina Dragonknight PvP Build
Class: Dragonknight
Race: Nord
Attributes: 32 Stamina, 32 Health
Mundus Stone: Warrior
Weapon One: Dual Wield
Weapon Two: Frost Staff
Armor Set: Daedric Trickery
Monster Helm: Bloodspawn
Mythic: Sea-Serpent’s Coil
Armor Weight: 1 Light, 3 Medium, 3 Heavy
Potion: Essence of Health (tri-stat)
Food: Bewitched Sugar Skulls
Skill Bar 1
- Shattering Rocks
- Molten Whip
- Noxious Breath
- Flames of Oblivion
- Rending Slash
- Ferocious Leap (Ultimate)
Skill Bar 2
- Volatile Armor
- Degeneration
- Elemental Susceptibility
- Coagulating Blood
- Resolving Vigor
- Corrosive Armor (Ultimate)
Scribing Grimoires and Scrips
- Traveling Knife
- Bleed Lingering (focus script)
- Torment (signature script)
- Berserk (affix Script)
- Soul Burst
- Pull (focus script)
- Class Mastery (signature script)
- Courage (Affix Script)
Looking For More About ESO?
Thank you for reading the ESO Stamina Dragonknight PvP Build Guide. We provide the latest news and create guides for ESO. Also, watch me play games on Twitch or visit my YouTube channel!