Facebook
 Reddit
 Email
Email
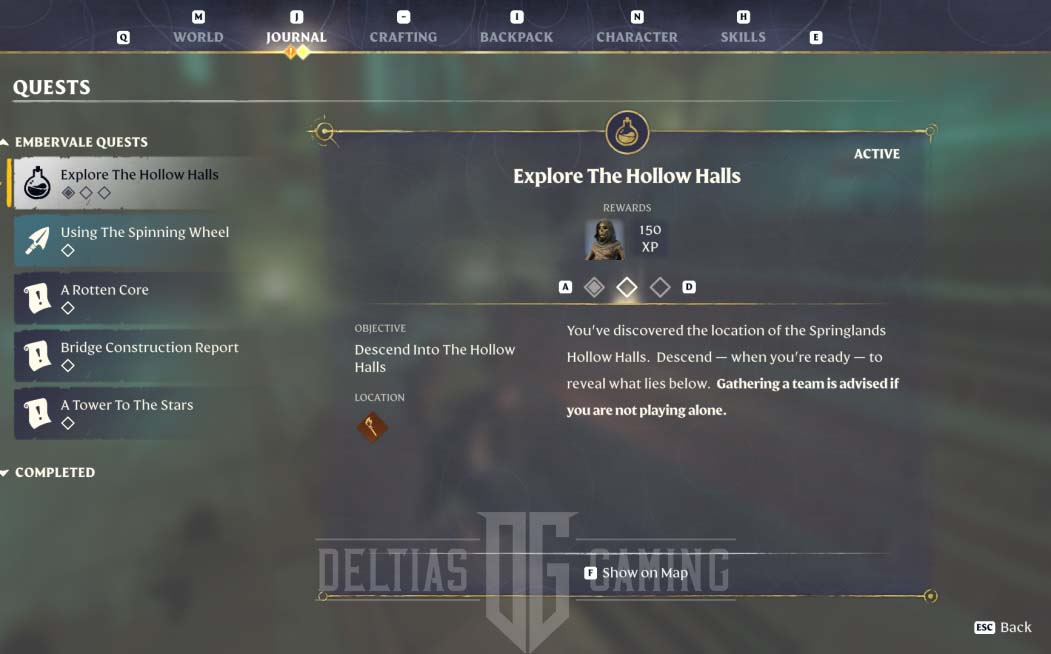
This guide explains how to survive the second Rivelwood Hollow Halls Dungeon solo or with a group in Enshrouded.
Enshrouded Rivelwood Hollow Halls is the second dungeon in the Enshrouded. You should prepare food, tools, and many other items to help you beat it. Players must deal with various mechanics, puzzles, a boss, and larger waves of enemies. The dungeon is located northwest of the map and of the Ancient Spire—Rivelwood Fast Travel. The recommended level for this dungeon is 15.
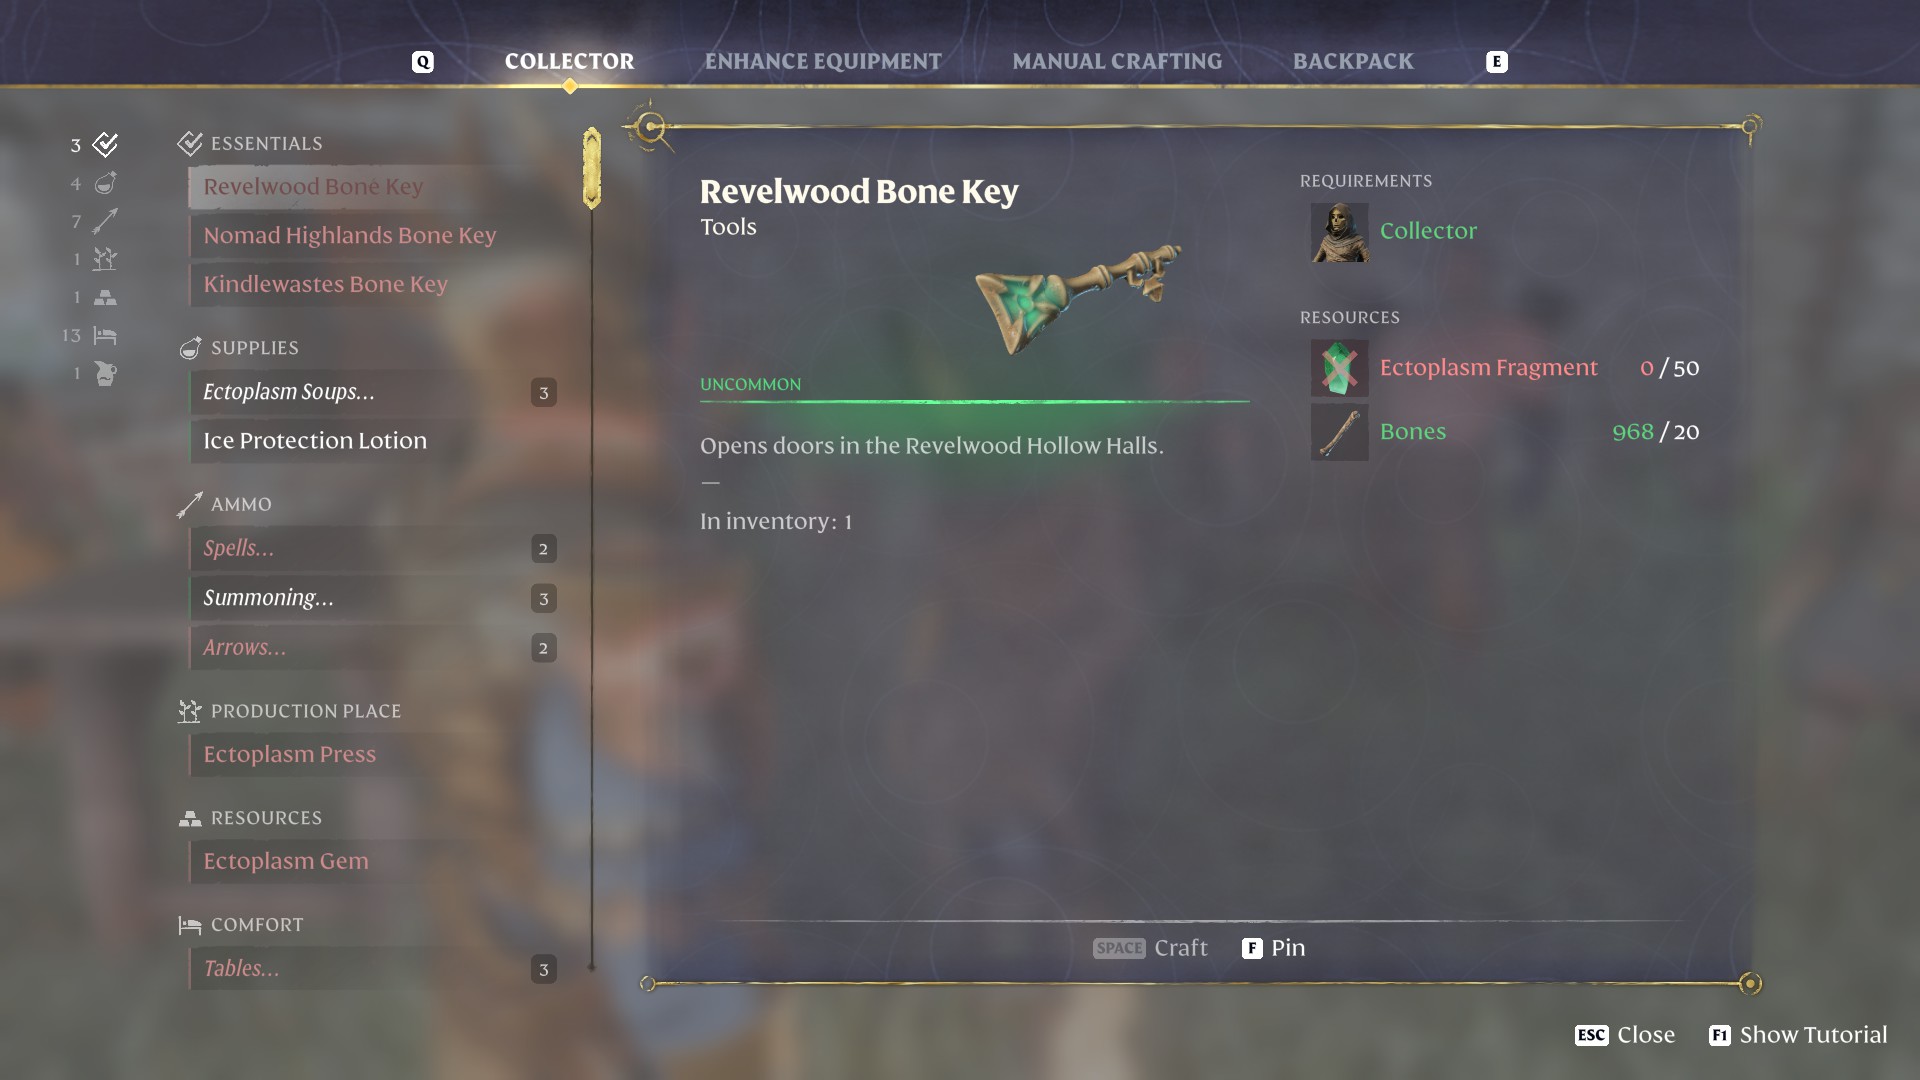
Please note, first, you must complete the Hollow Halls to obtain the ingredients required to create Rivelwood’s Bone Key, which allows you to access this dungeon.
- Rivelwood Hollow Halls Key Mechanics
- Rewards
- Strategies, Tips, and What to Prepare for Rivelwood Hollow Halls
- Rivelwood Hollow Halls Walkthrough
- Find Rivelwood Hollow Halls
- Enter Rivelwood Hollow Halls
- First Magic Barrier
- Lower Levels
- Second Puzzle – First Button
- Sinister Crescent Staff and Bonescourge Mace
- Second Button and Magick Barrier
- Second Magic Barrier and 8 Runes Puzzle Solution
- Find Legendary Silvershot Bow
- Spider Caves
- Veilrift Axe (level 15)
- Third Magic Barrier Puzzle Solution and Hollow Cyclops Boss Fight
- Legendary Snakespine Wand and Silvershot Bow
Rivelwood Hollow Halls Key Mechanics
Here are a few Key mechanics and takeaways from the Rivelwood Hollow Halls dungeon:
- You will unlock magick barriers to proceed through the dungeon by collecting runes.
- You will encounter swarms of undead enemies and sceletons, so we recommend you prepare for big groups of enemies.
- The dungeon might be challenging, depending on your level. The Dungeon Level is 15. So if you are below or close to this level, we advise you to bring some friends or level up before you enter it.
Rewards
- Sinister Crescent Staff (level 15)
- Bonescourge Mace (level 15)
- Veilrift Axe (level 15)
- Silvershot Bow (level 15)
- Legendary Silvershot Bow (level 15)
- Legendary Snakespine Wand (level 15)
- Hollow Cyclops Head
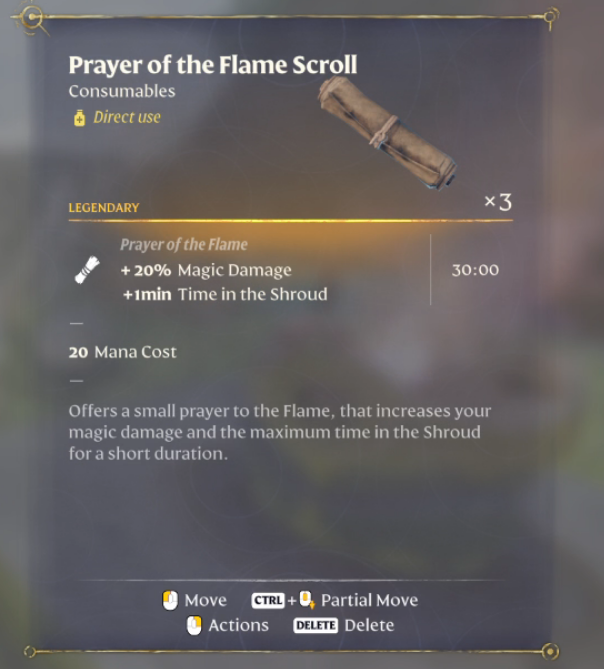
- legendary Prayer of the Flame Scroll
- Bonne Channels
- Bone Arrows
- Ectoplasm Fragments
- Bones
- Giant Bones
Strategies, Tips, and What to Prepare for Rivelwood Hollow Halls


- Ensure you have a glider, preferably a legendary glider, which is the strongest in the game.
- Grappling Hook
- Source of light – torch
- High-level food, bandages, health potions such as Greater healing potions, boiled eggs, and grilled meat.
- Elixir for extra damage, and Prayer of the Flame Scroll if you are a spellcaster.
- Ectoplasm Soup can be crafted from Ectoplasm Shards. This unique food is exceptional for Hollow Dungeons.
- Mages, ensure you have AoE spells like fire staff charges or explosive arrows as an archer.
- Recommended builds and range playstyles: Ranger, Assassin, Healer, Battlemage, or Wizard.
- Bring a stock of arrows, exploding arrows, healing charges, and fire charges.
- Recommended Skills: Updraft, Airborne, Emergency Blink, Double Jump.
- Completing the Hollow Halls dungeon with friends
Rivelwood Hollow Halls Walkthrough
Below is a detailed guide on completing and solving all puzzles in Enshrouded Rivelwood Hollow Halls Dungeon.
Find Rivelwood Hollow Halls in Enshrouded Guide

Teleport from Ancient Spire – Rivelwood Fast Travel fly northwest. It’s the ancient spire in the desert area, and you will need an upgraded level 2 flame altar to get to this location and survive the Rivelwood Hollow Halls Dungeon in Enshrouded. The legendary glider and updraft skill will help you fly as far as possible.
Travel in the northwest ravine of Rivelwood until you reach a red building built into the rocky wall.
Enter Rivelwood Hollow Halls
Use the pre-crafted Rivelwood Bone Key to open the gate and enter the Hollow Halls. As you enter and start to loot, you will quickly notice new items available from this dungeon: bone arrows, staff charges, and other necromancy-related crafting materials, such as ectoplasm fragments.
As soon as you enter, you will find the first red glowing lore note on the table. You can pick it up and proceed inside the dungeon. The undead will start to swarm you behind the iron gate. Ensure your food is active; simultaneously, you can have up to 3 food buffs.
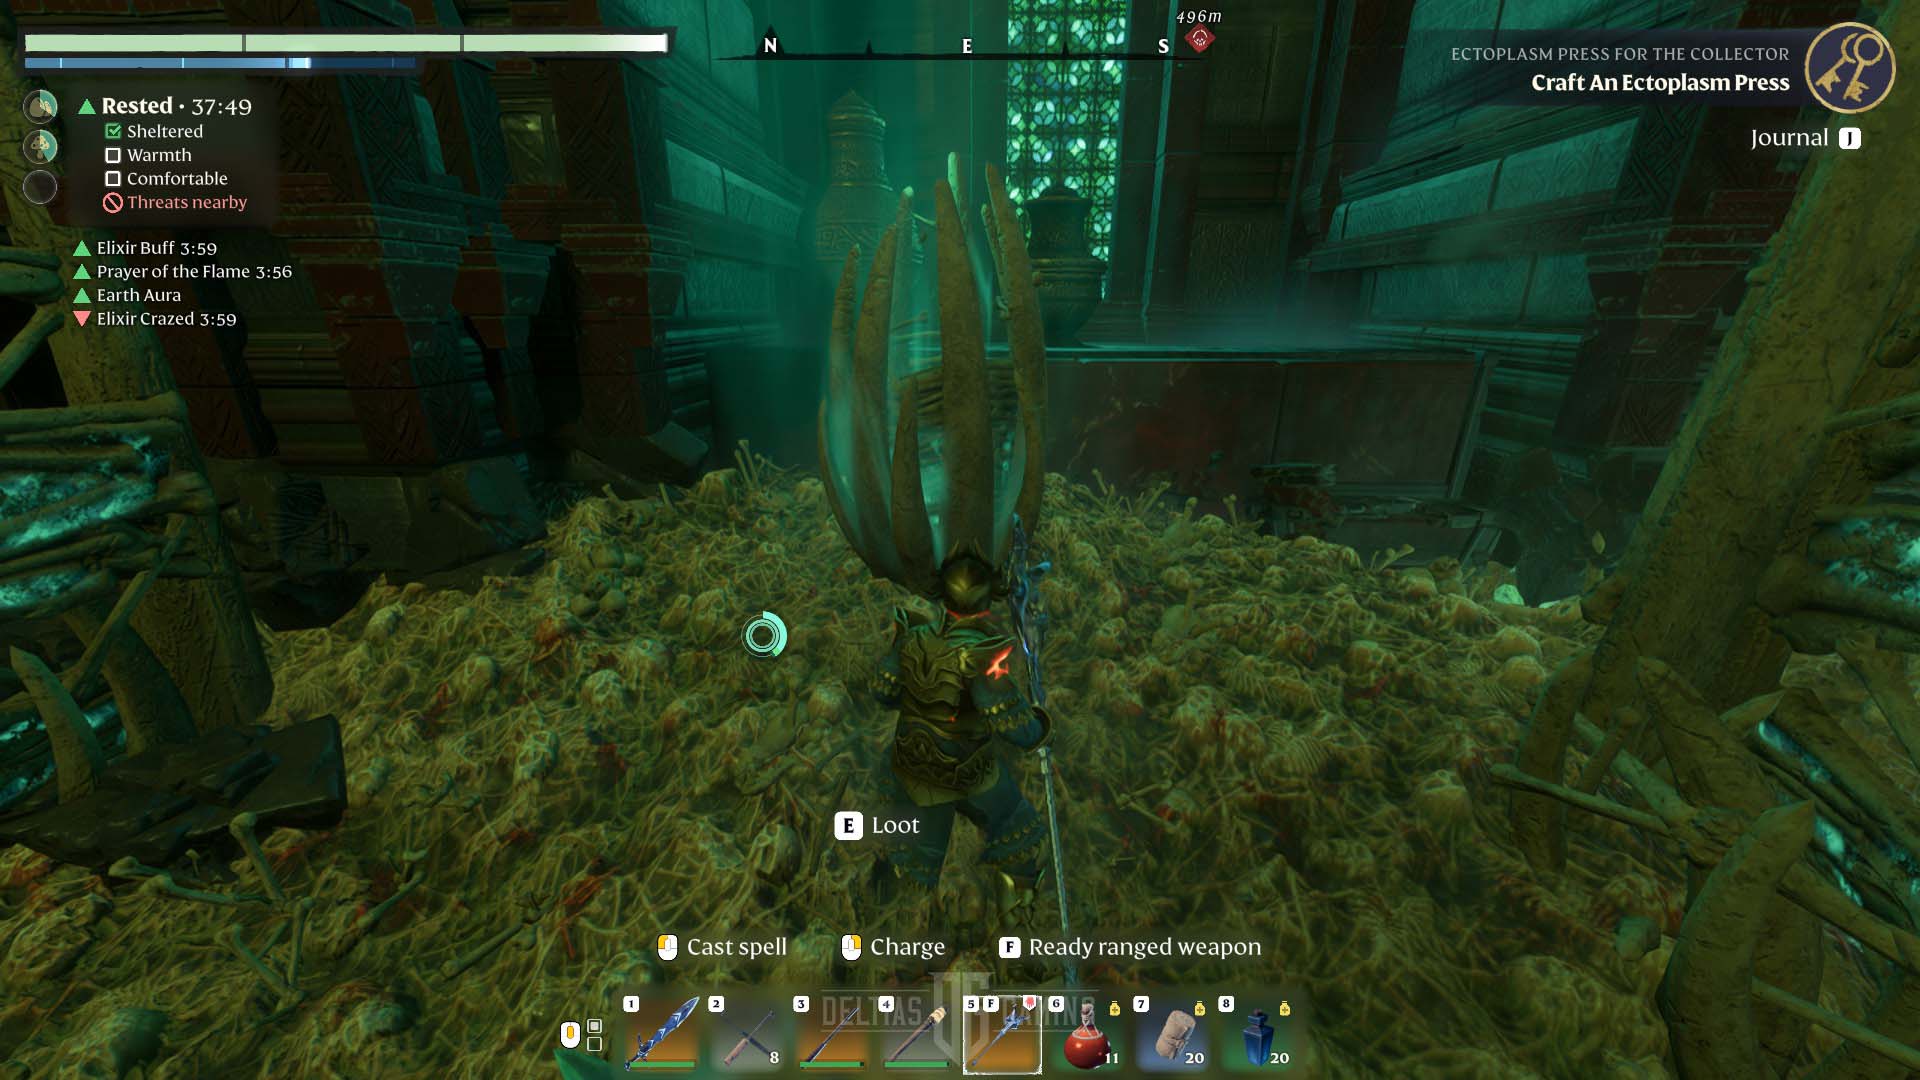
The new resource, Ectoplasm Fragments, drops from enemies with the scythe and more distinct-looking undead. They are also more challenging to defeat. Keep an eye out. Loot the area and pass through the first teleport to start.
First Magic Barrier
You’ll venture through the old corridors until you find the first magic barrier on the right that blocks your way further. Turn around and head towards the corridor on your left while keeping the barrier behind you.
That’s when you should encounter first bone totems that spawn 6-9 skeletons every few seconds. Destroy this totem; otherwise, enemies will swarm you and overwhelm you.
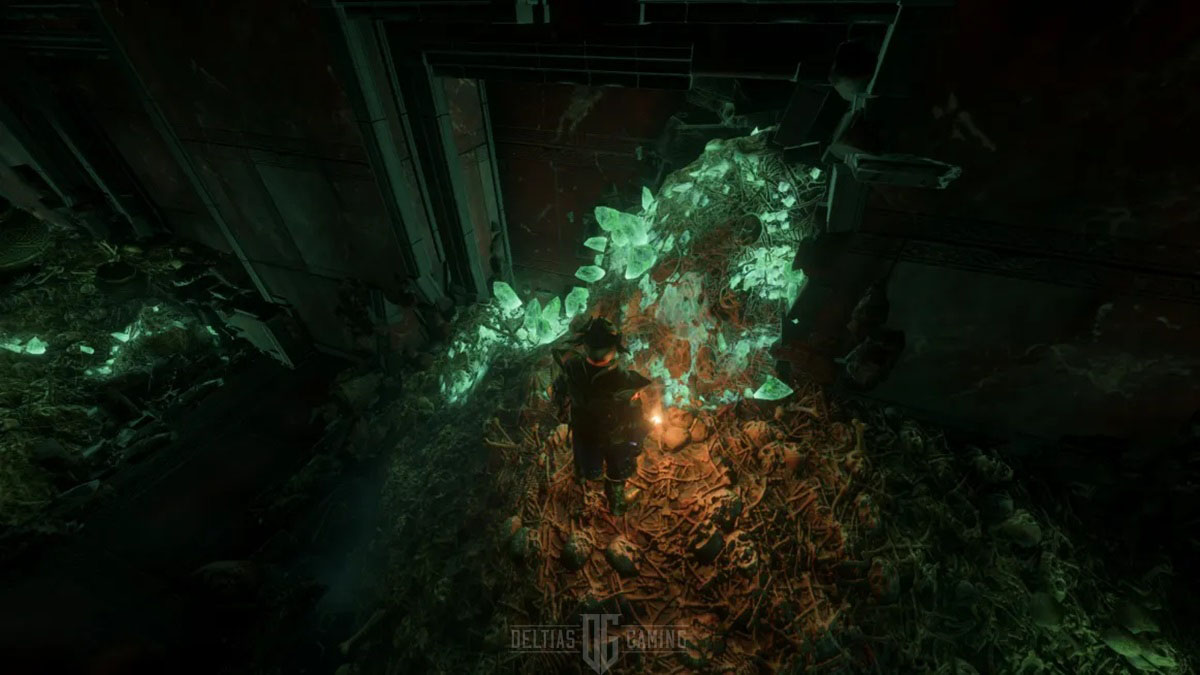
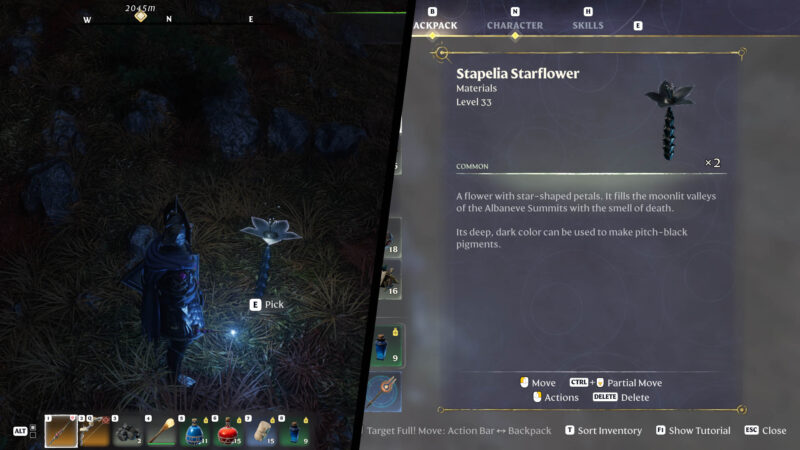
Also, you may notice crystals growing from the bones, which are ectoplasm fragments. You can mine them with your pickaxe, and you will need them for many crafting recipes, including the key for the next Hollow Halls Dungeon.
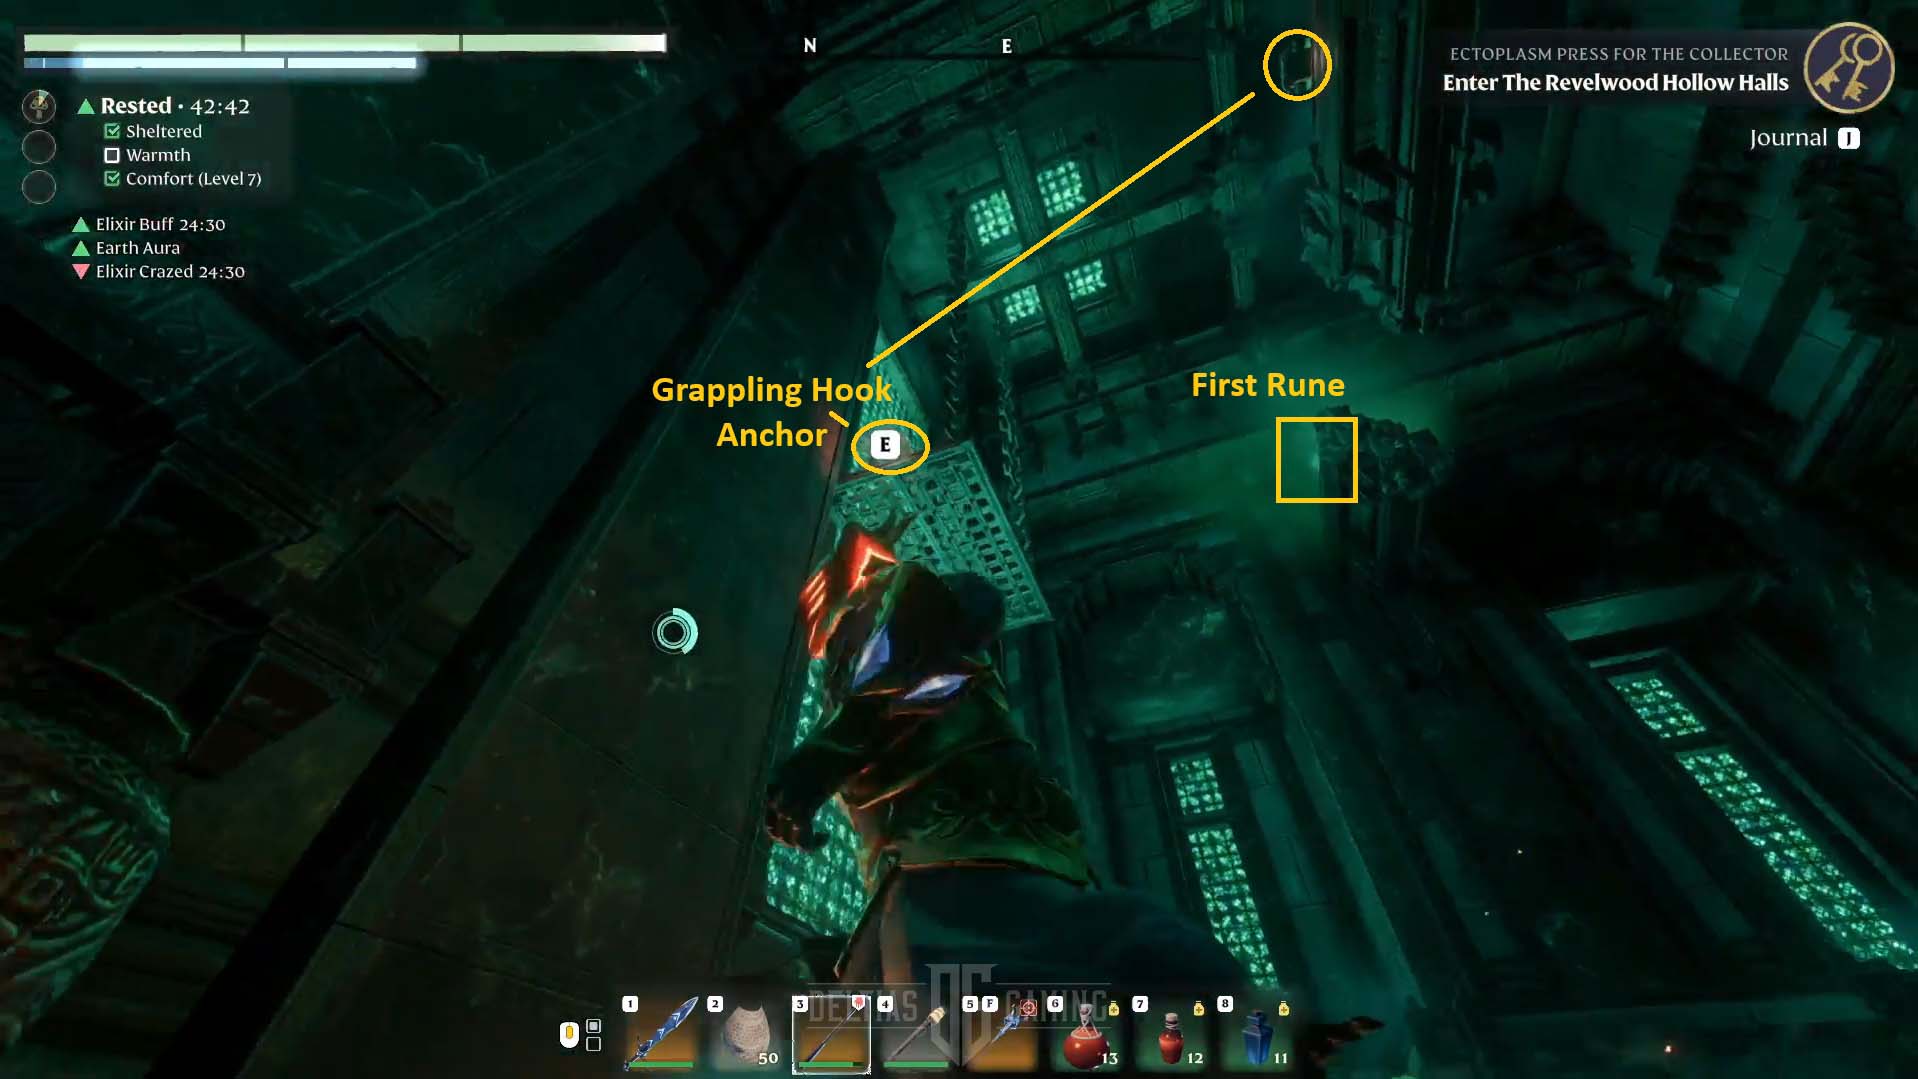
Once enemies are defeated, open the giant door. There are few enemies there and some loot. Next, look up; there is a series of platforms and two grappling hook anchors you must use to climb up on the broken beam under the ceiling. On top, you will find the first blue rune; you need to open the magick barrier door.
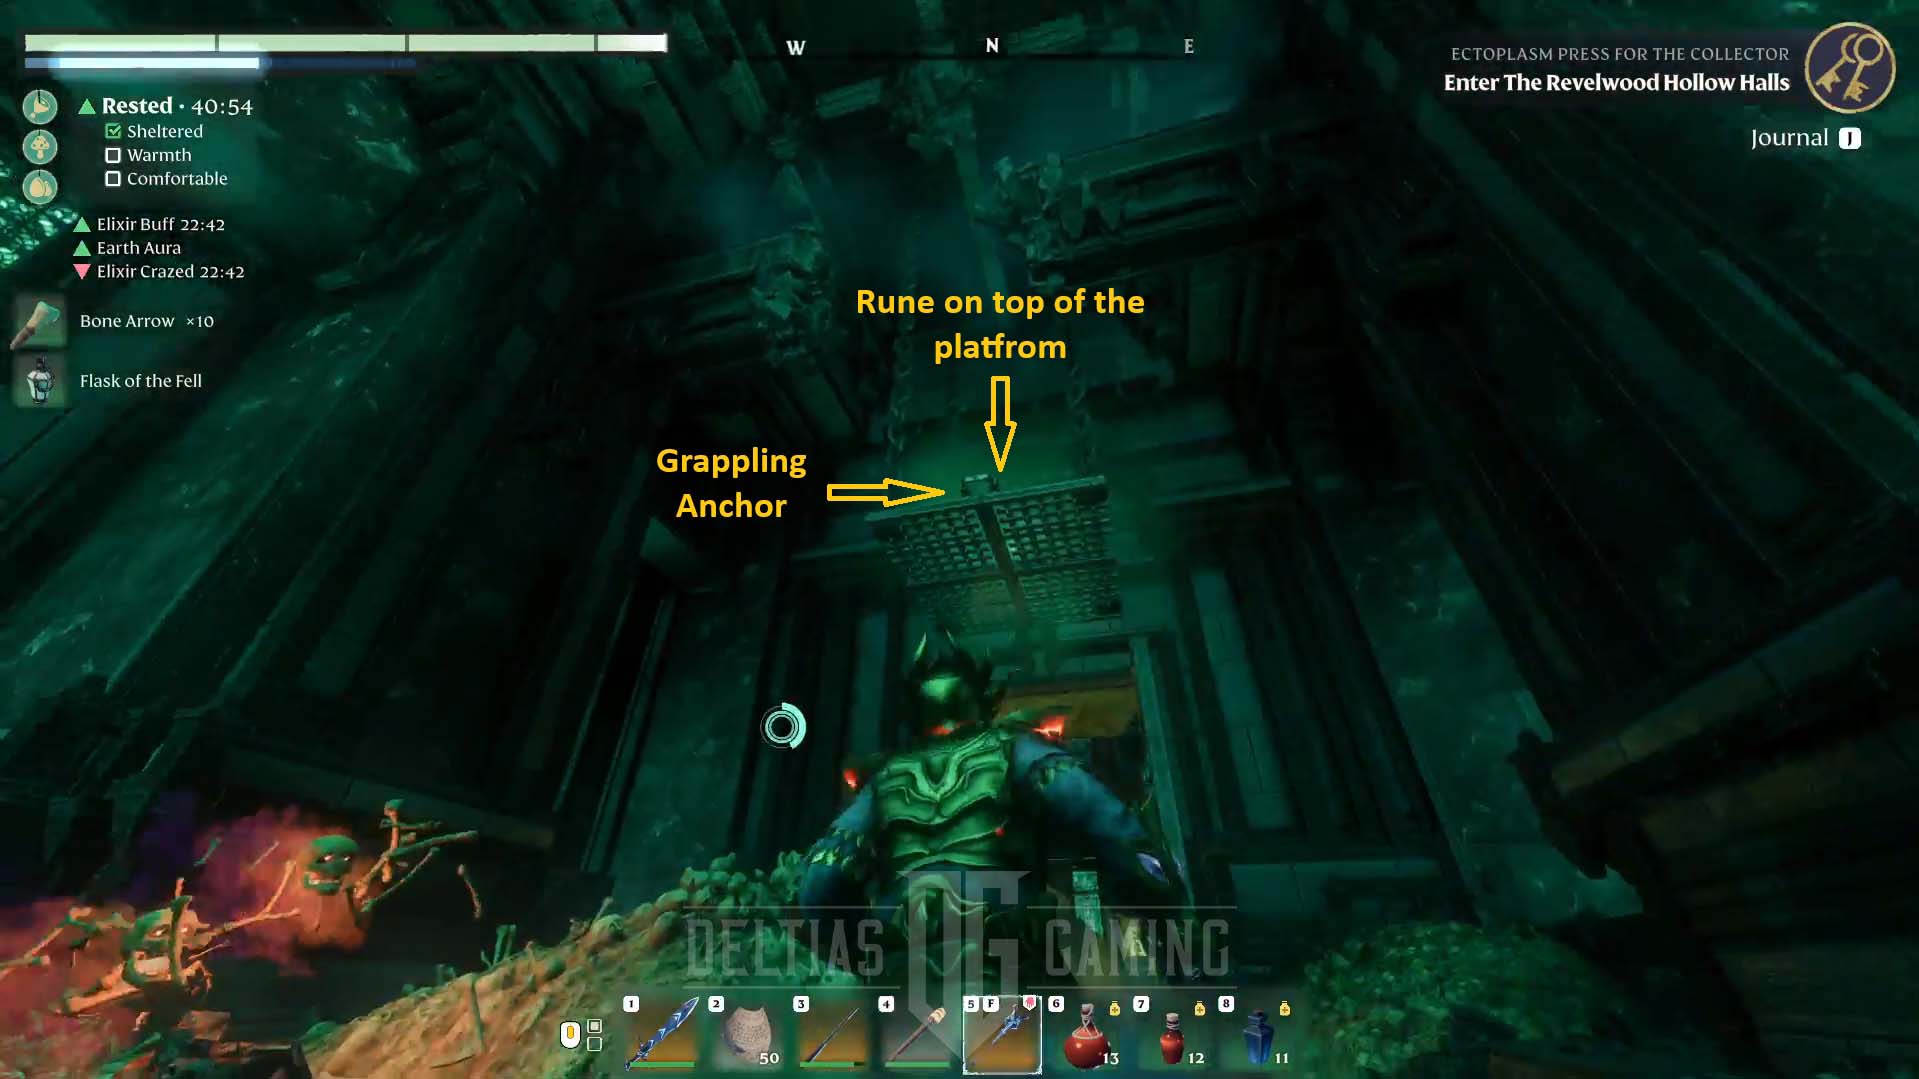
Return to the corridor, turn left, pass the iron gate, and turn right. There should be another closed gate door at the end of this hall. Loot the sarcophagi and again look up. Another jumping puzzle with grappling hook anchors is above you. This time, the rune is on the iron platform.
Return to the magick barrier door (turn left when you level the room), and proceed further into the Enshrouded Rivelwood Hollow Halls dungeon.
Lower Levels
Once you reach a massive chamber with enemies below, you may try to kill a few from the balcony you stand on. Ensure your food is active and glide down. Many undead will attack you instantly. Also, look for bone totems that spawn them. Destroy them as fast as possible. Otherwise, totems will spawn enemies eternally.
Second Puzzle – First Button
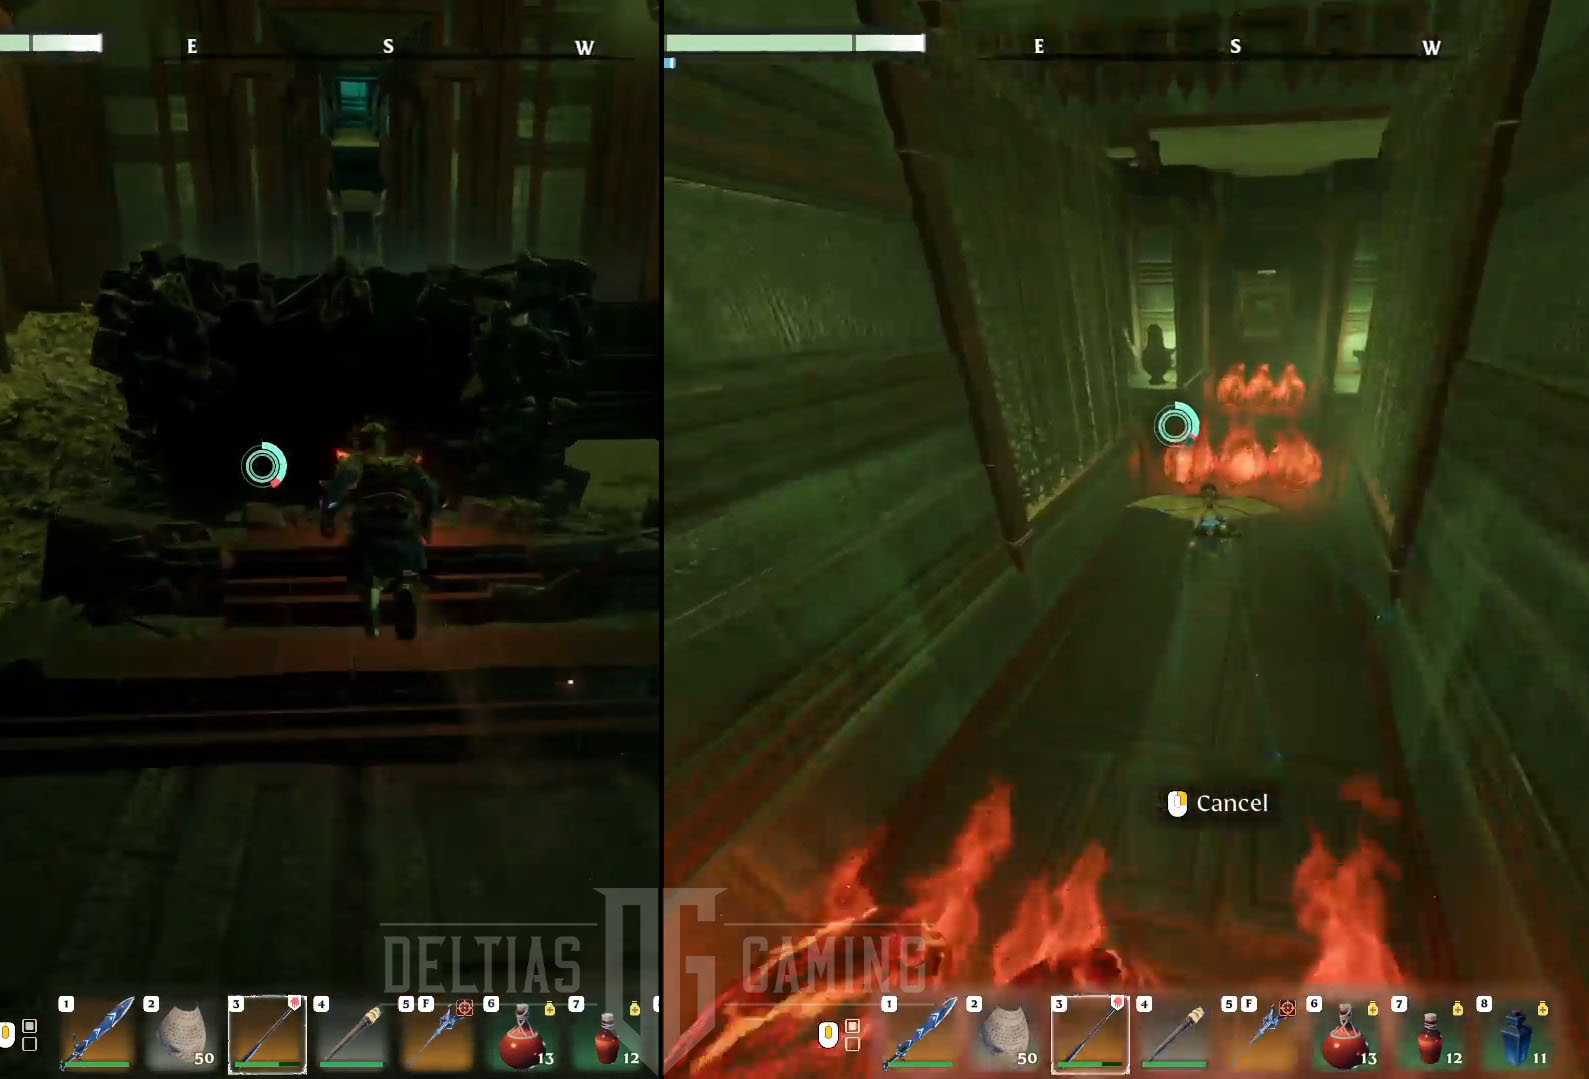
The chamber splits into 4 separate corridors, but one path is blocked. You must activate two golden buttons to open it. Firstly, let’s take the hall behind the destroyed stairs first. Follow the corridors and look for a table with the legendary Prayer of the Flame Scroll on it. Run up the stairs, and you will find the rolling magma stones trap. Glide above them and land on the left or right pocket in the wall.
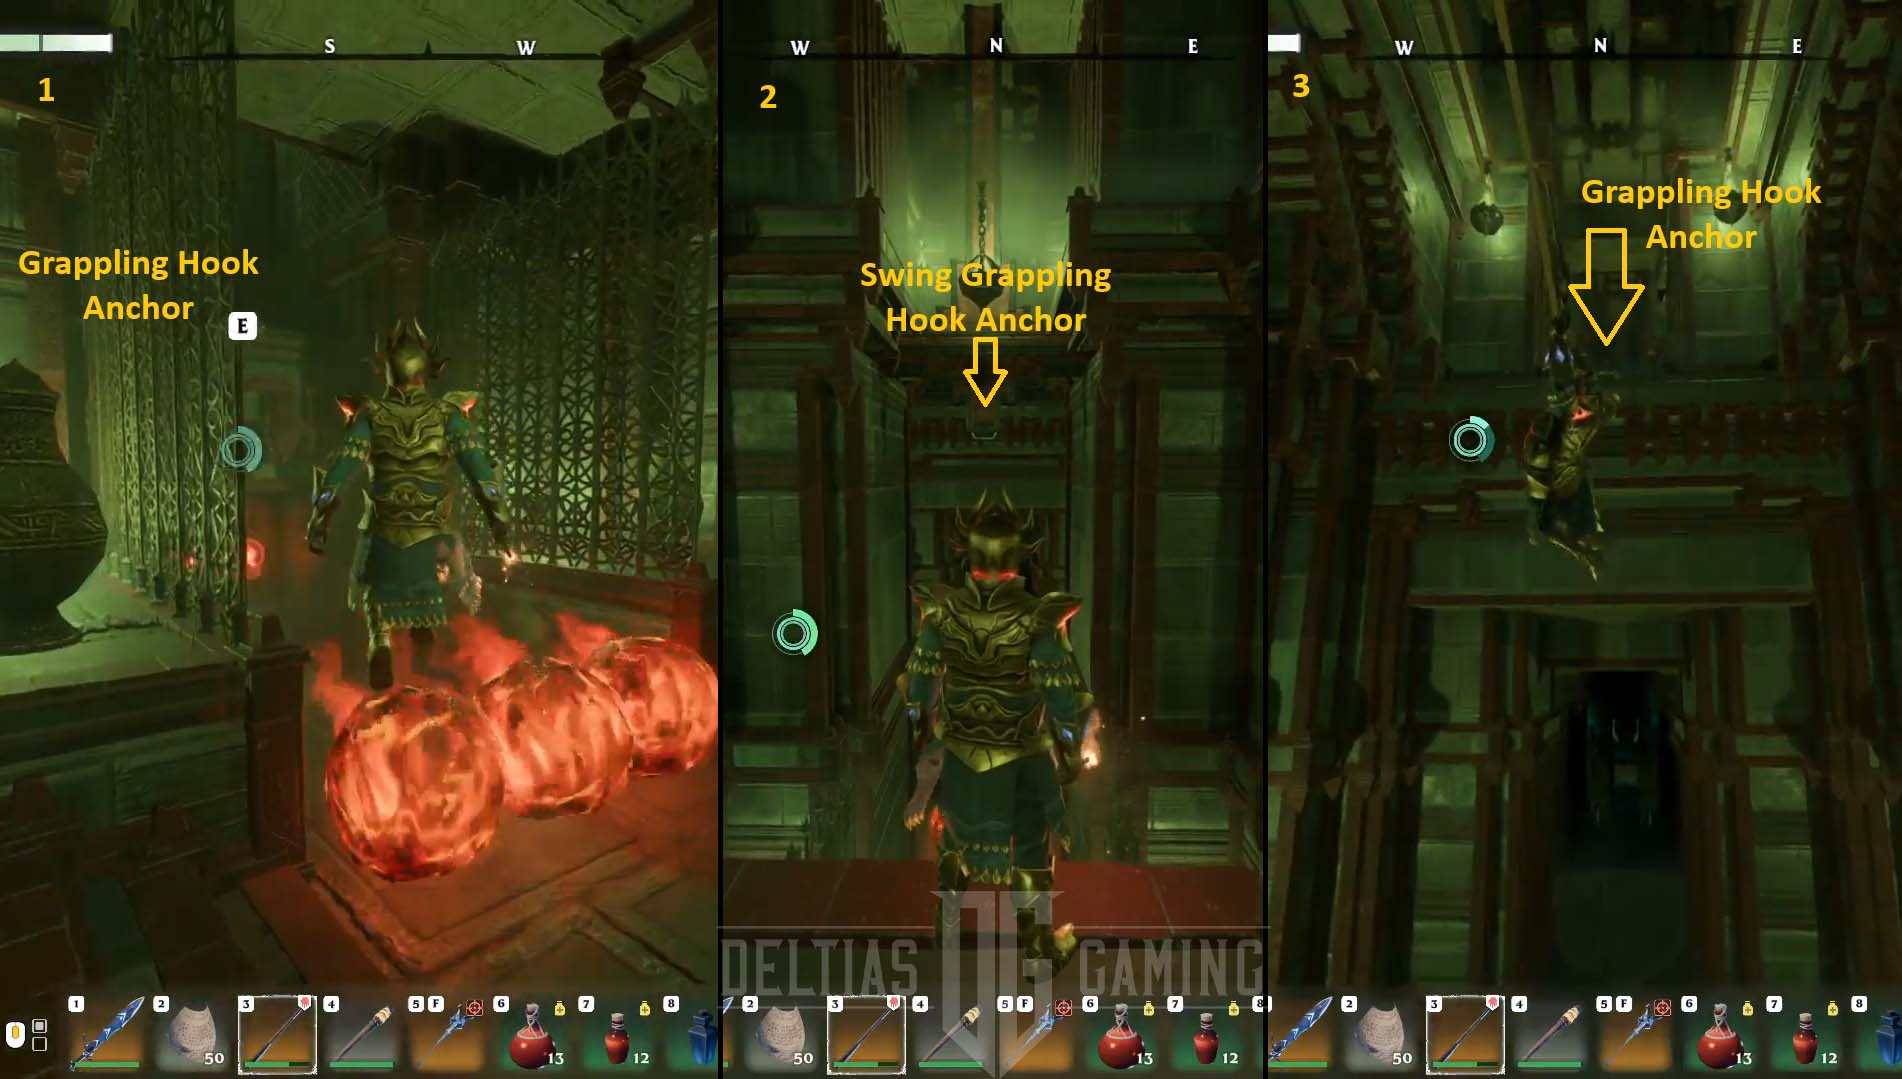
Above where the magma stones start, you should spot the grappling hook anchor. Use it and climb the iron mesh on either side of the wall. The second anchor is a grappling hook that will work like a swing. You will attach to it, and once you reach the maximum height on the other side, cancel and prepare to use the grappling hook again. You must act quickly and jump on the other grappling hook anchos immediately. Double jump might be handy here.
Pass the gate and the corridor, and activate the golden button rune at the end.
Sinister Crescent Staff and Bonescourge Mace
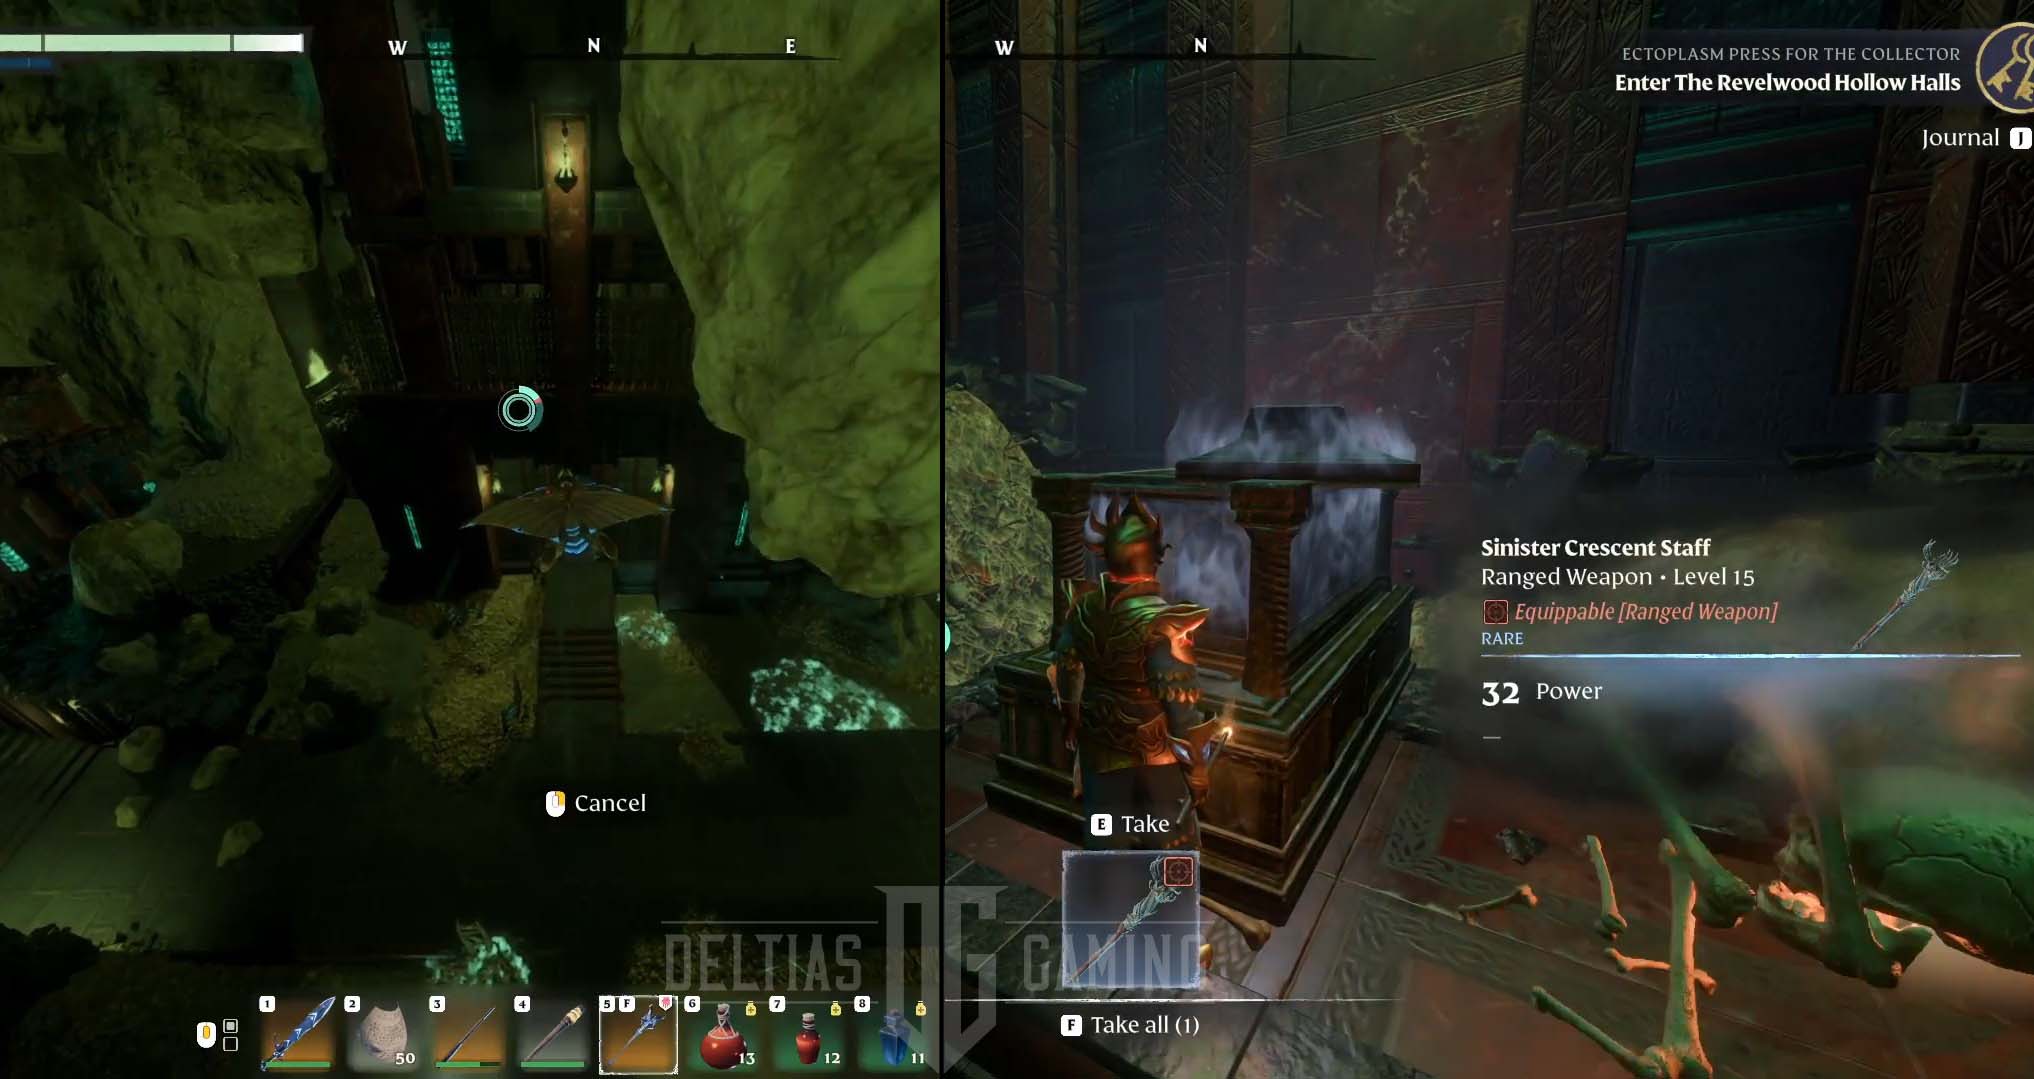
Jump over the iron fence all glide the way to the next corridor across. At the crossroads, go straight first, where you will find a sarcophagus with the sinister crescent staff.
Leave the room and go left, up the stairs. On top is a red glowing book with another lore page. Proceed, but be on your guard; the undead will attack you.

Once you reach the iron gate, stop, turn around, and look up. There is an iron platform with the chest and inside the Bonescourge Mace. Pass the iron gate.
Second Button and Magick Barrier
Behind the gate, turn left and prepare for the fight. There are many undead enemies with a blue rune above their heads. You must defeat all of them to open the magic barrier door at the end. Keep searching and fighting until you receive the information on the screen that the barrier has been unlocked.
Behind the magic barrier is the second golden button. Use it.
Glide down and turn left. The door should now be unlocked, allowing you to proceed to the next room. This room contains a repair table and a beacon. The beacon will save your progress if you happen to die, while the repair table will help you fix your gear if needed.
Second Magic Barrier and 8 Runes Puzzle Solution

Eventually, you will come across another closed door that leads to the large room with stacks of bones, many spiders, a magic barrier door on the opposite side, and 8 runes to collect. You should see the first three easily when you enter. The first on the right is in the small tower, the second is just in front of you as you enter, and the third is floating between two sides of the broken path on the left.
When you collect and move around the chamber, use grappling hook anchors to reach high places. Some drops are high up, so you may die if you aren’t careful.
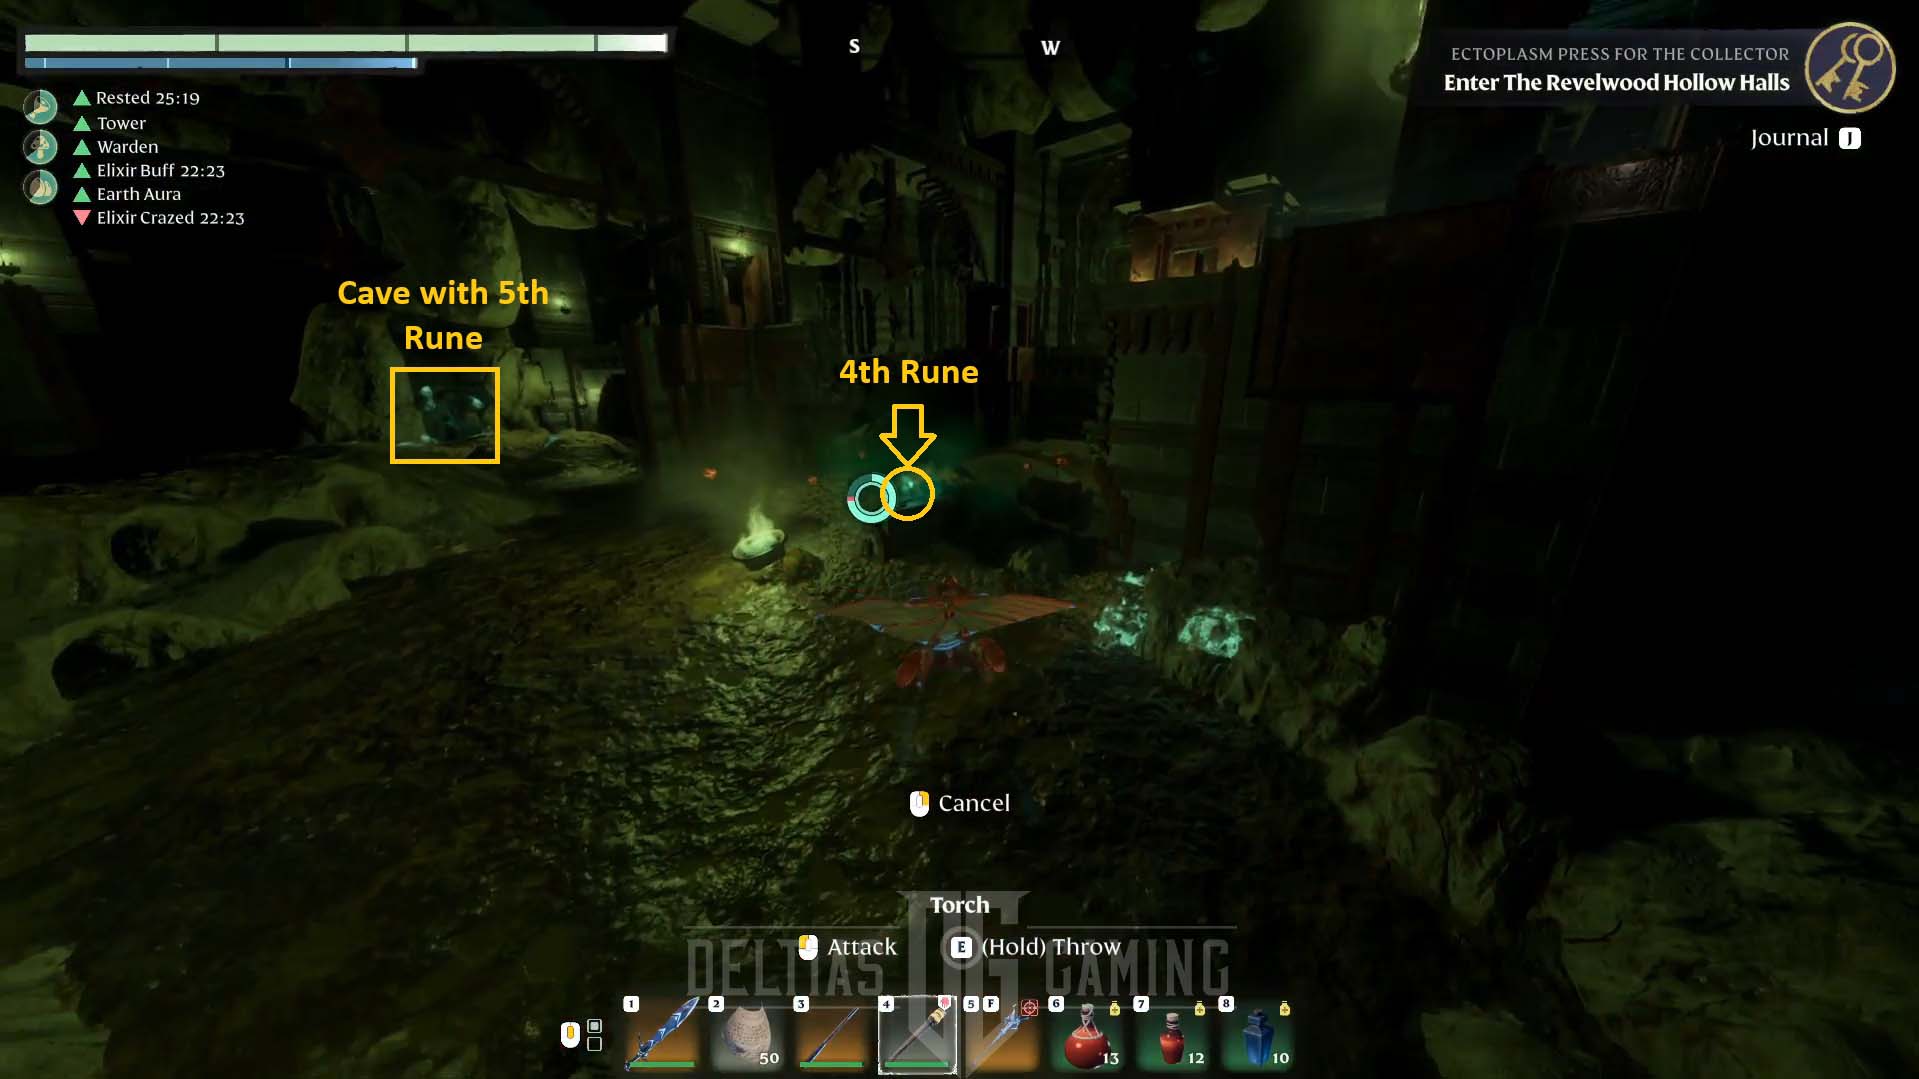
The fourth rune is just underneath on a small platform, easy to spot.

On both sides of the room, you will find one cave with the 5th rune on the left and the 6th rune on the right.
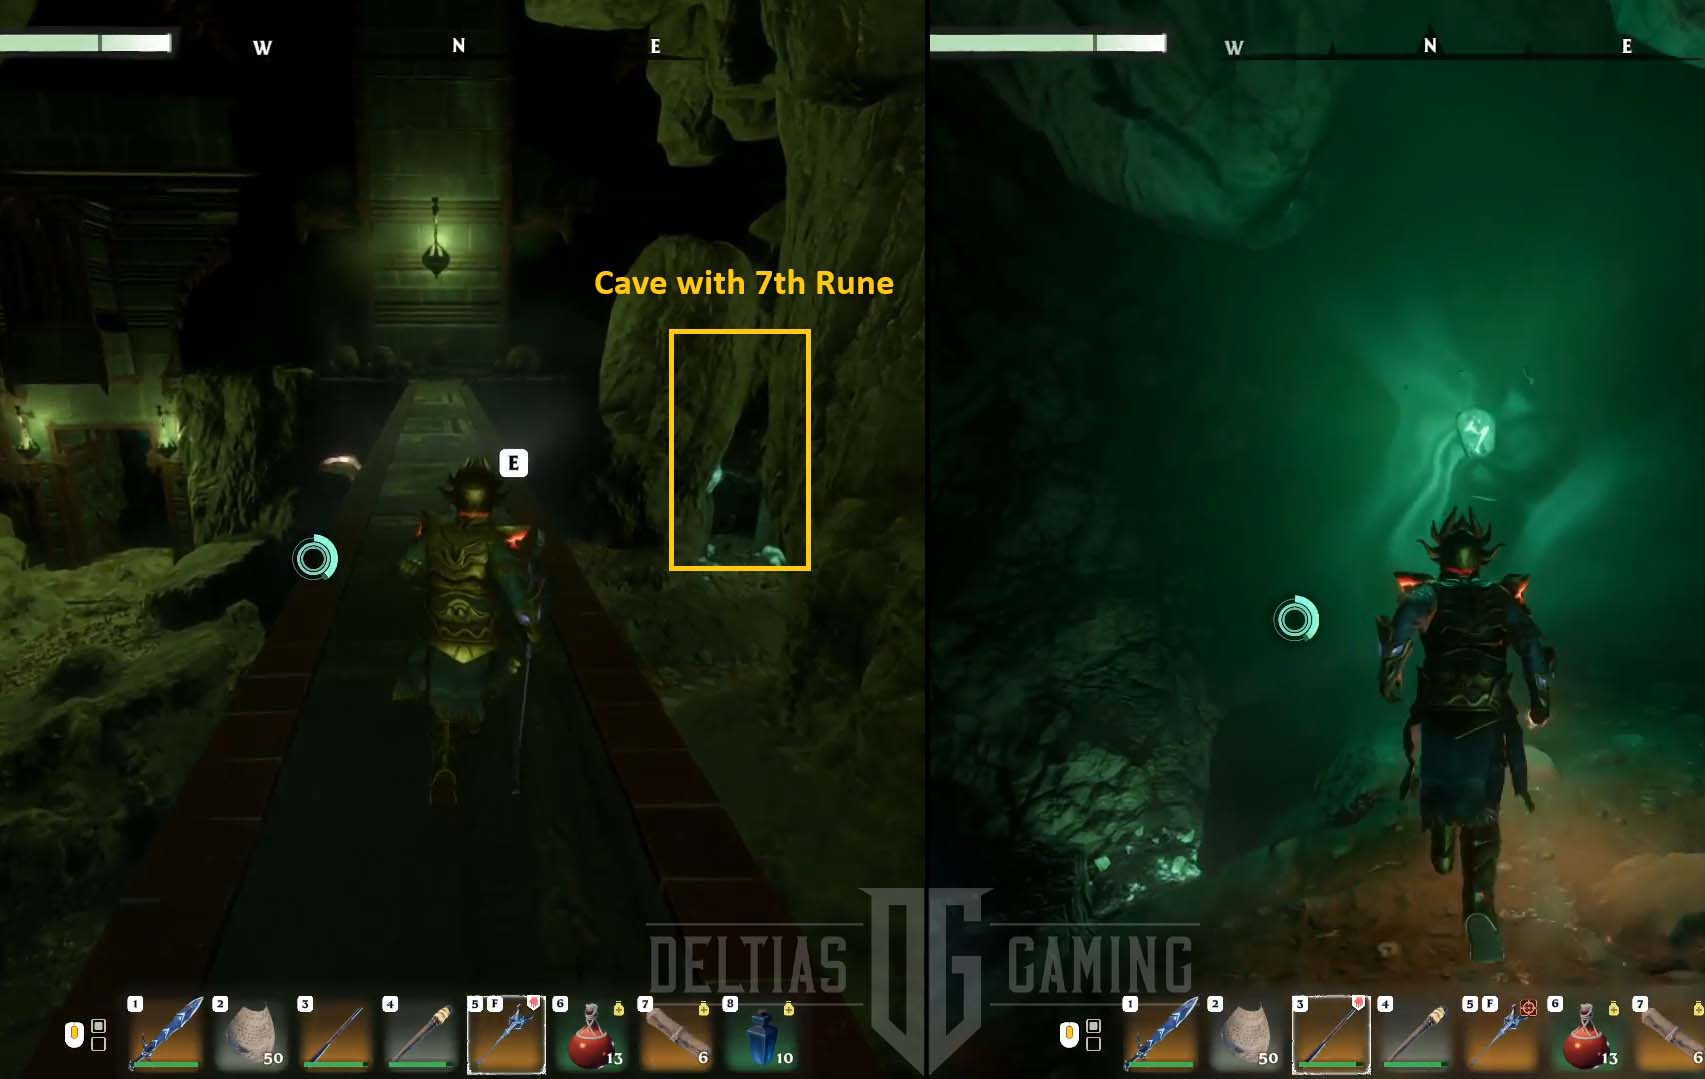
Runes seven and eight are well hidden. Stand on the middle bridge and look at the magic barrier. Turn right and cross the thin bridge. Below, on the right, you will see another cave. This time, you must climb on natural rocky shelves to the top where the 7th rune is hidden.
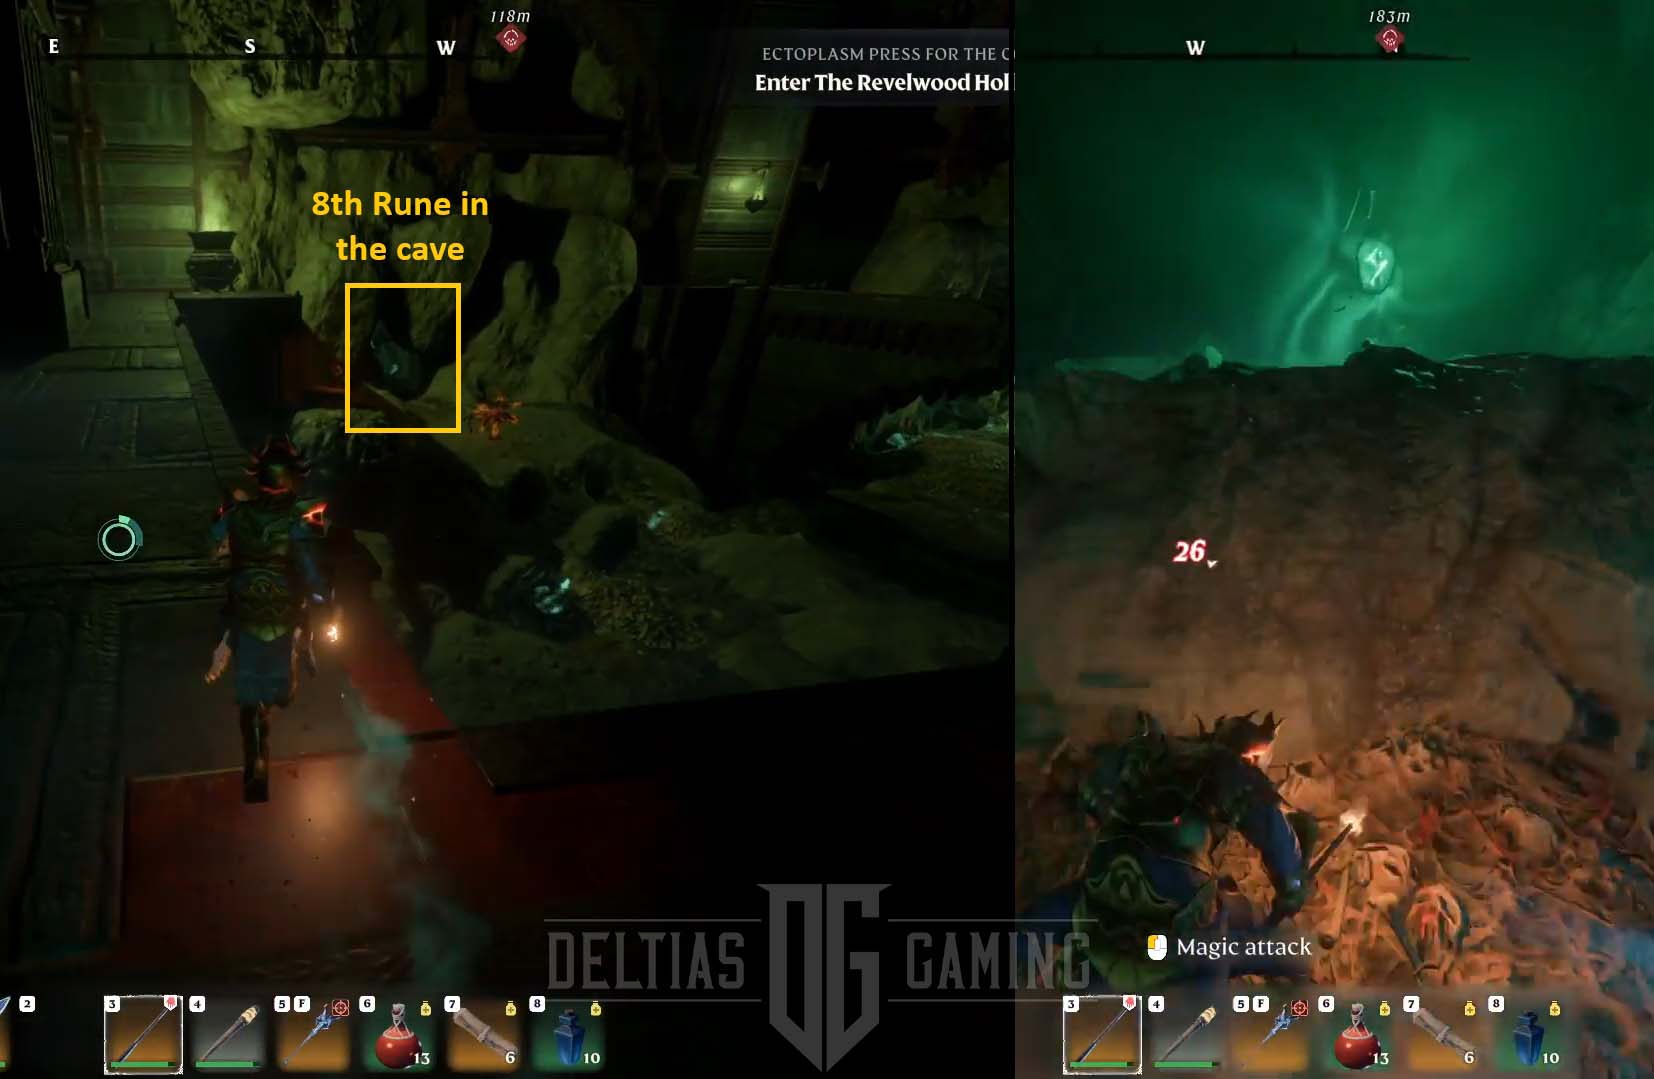
To find eight runes, return to where you came from, turn left, follow the bridge, jump above the destroyed part, and you should see the last cave with the last rune inside. Now you can pass the door because the magic barrier should be deactivated.
Find Legendary Silvershot Bow
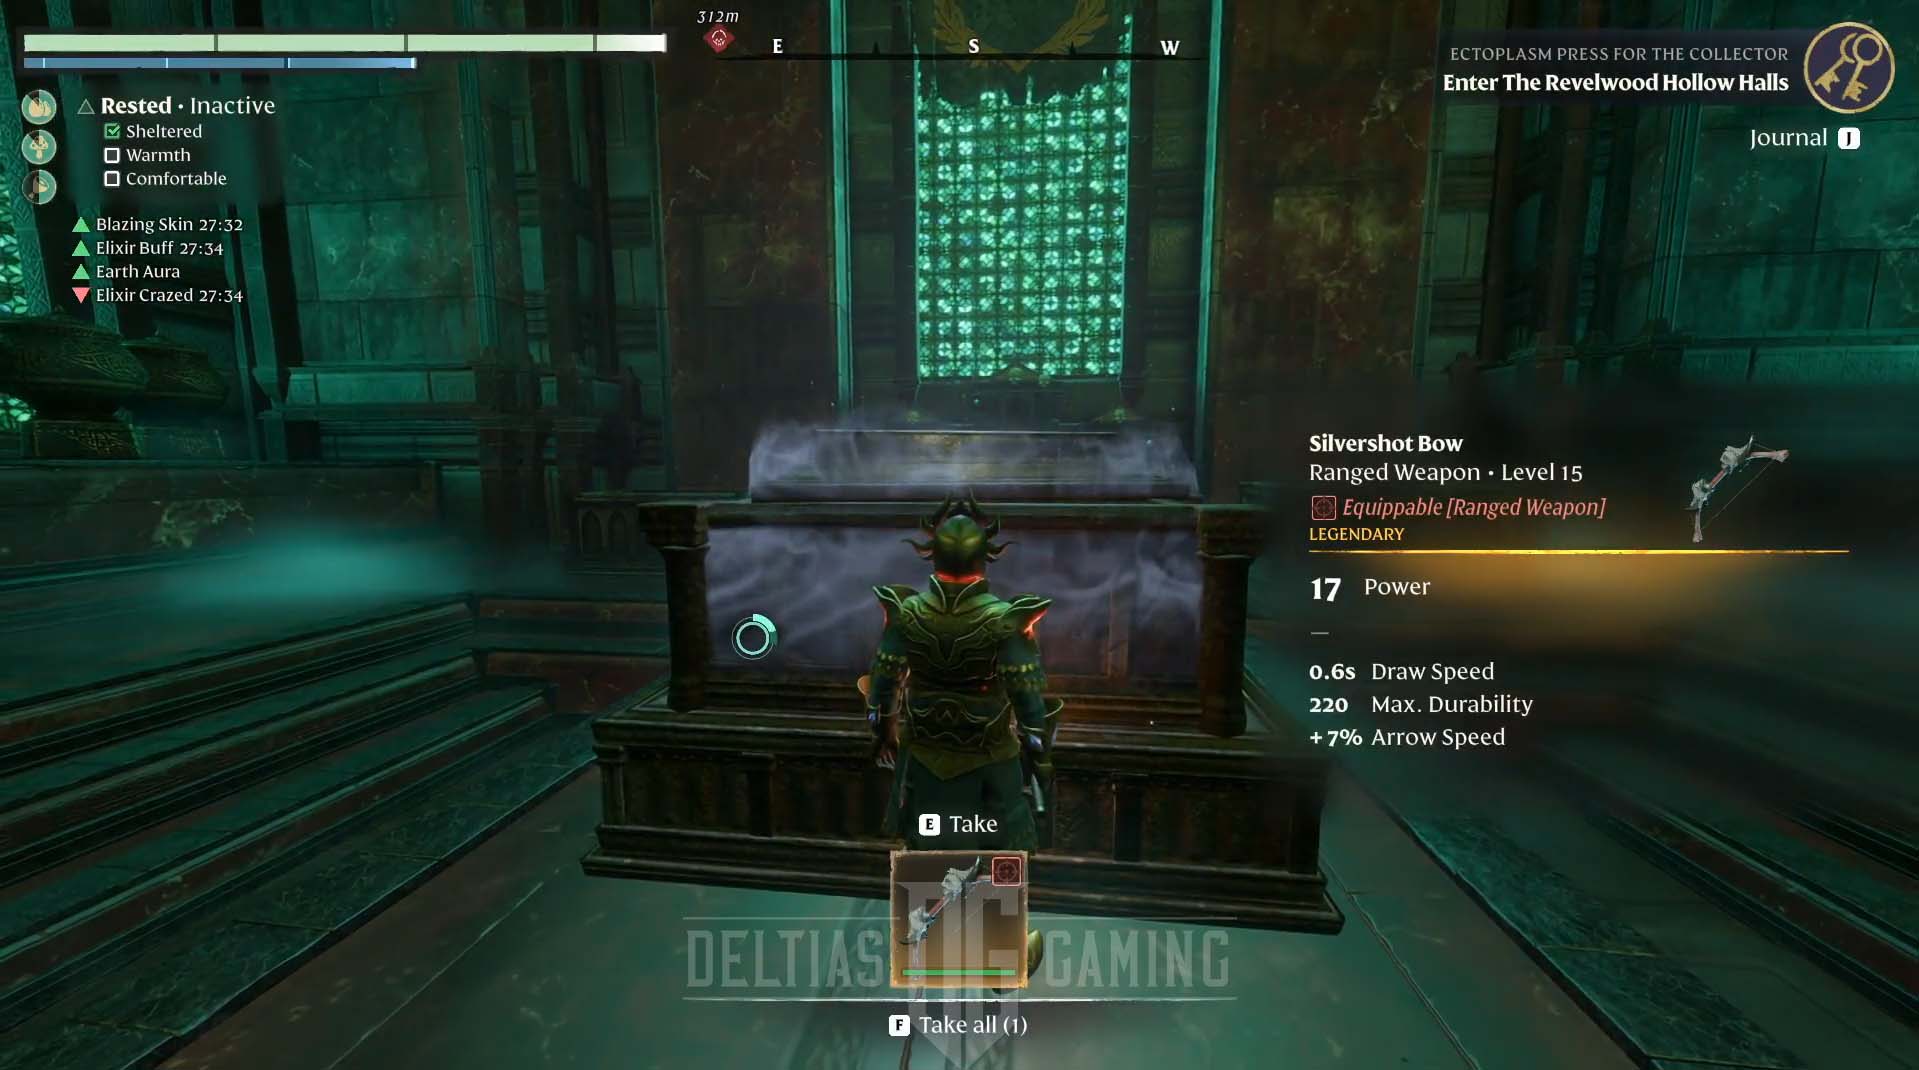
There are beacons and another repair table. Follow the corridors and defeat any enemies you may encounter. In the end, the path will split. Turn left first and open the big gate at the end. Inside the small room, you’ll find glowing sarcophagi with the Legendary Silvershot Bow (level 15).
Spider Caves
Once you level the room, take a path straight that will guide you deeper into the Rivelwood Hollow Halls Dungeon in Enshrouded. There is another closed door and the entrance to the green cave underneath the ruins.
As soon as you slide down, dozens of spiders attack. Use AoE spells or arrows to defeat them. On the right, you will see an iron mesh climb up. Turn right and slide down again, but watch out for the holes in the ground; jump above them or avoid them. If you fall inside, you will die.
Ahead of you are ruins, another door, and enemies. Kill them all and open the door on top of the stairs. Behind is another beacon room.
Veilrift Axe (level 15)
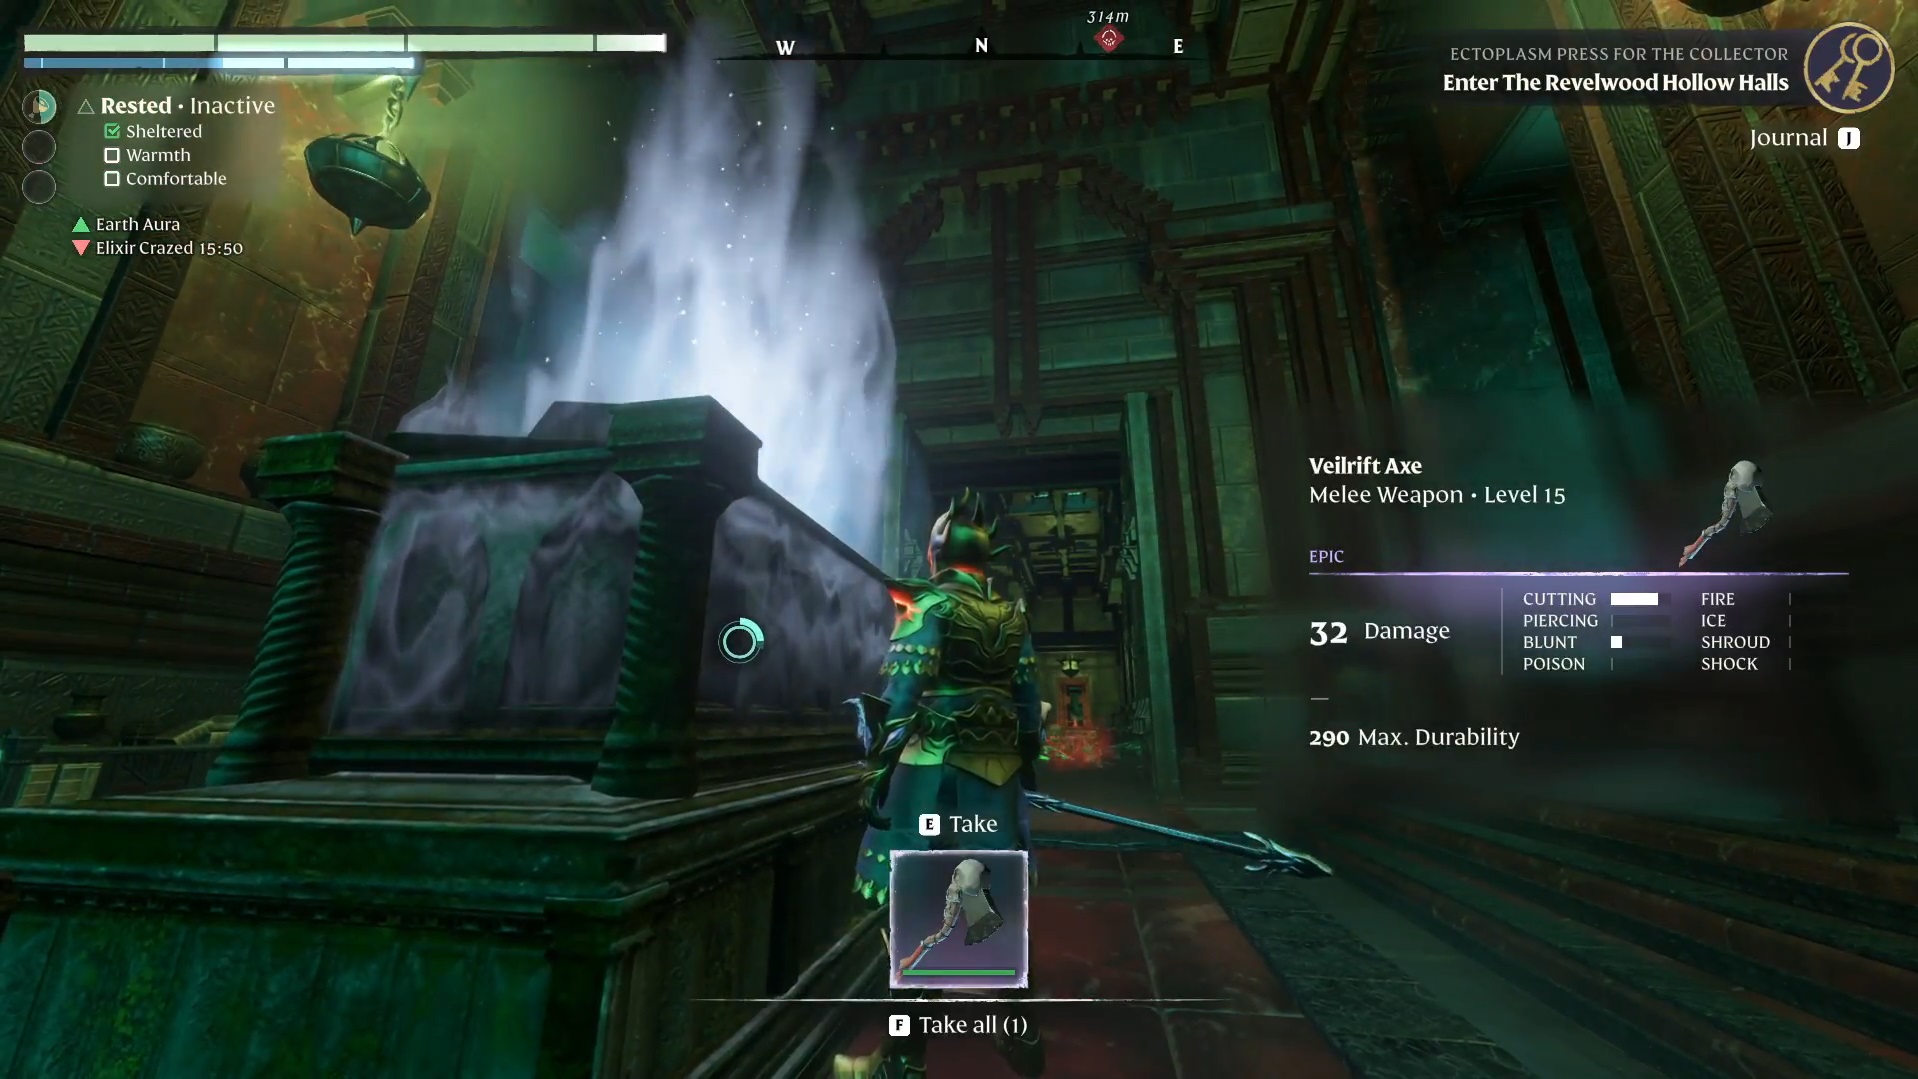
In the next area, avoid vibrant green gel on the floor. It deals damage over time. Go straight first to get Veilrift Axe (level 15) from another sarcophagus, then turn into the corridor on the left.
Begin by following the straight path to reach the room with a chest and building blocks, and then take a left turn to arrive at the next checkpoint room with the beacon.
Third Magic Barrier Puzzle Solution and Hollow Cyclops Boss Fight
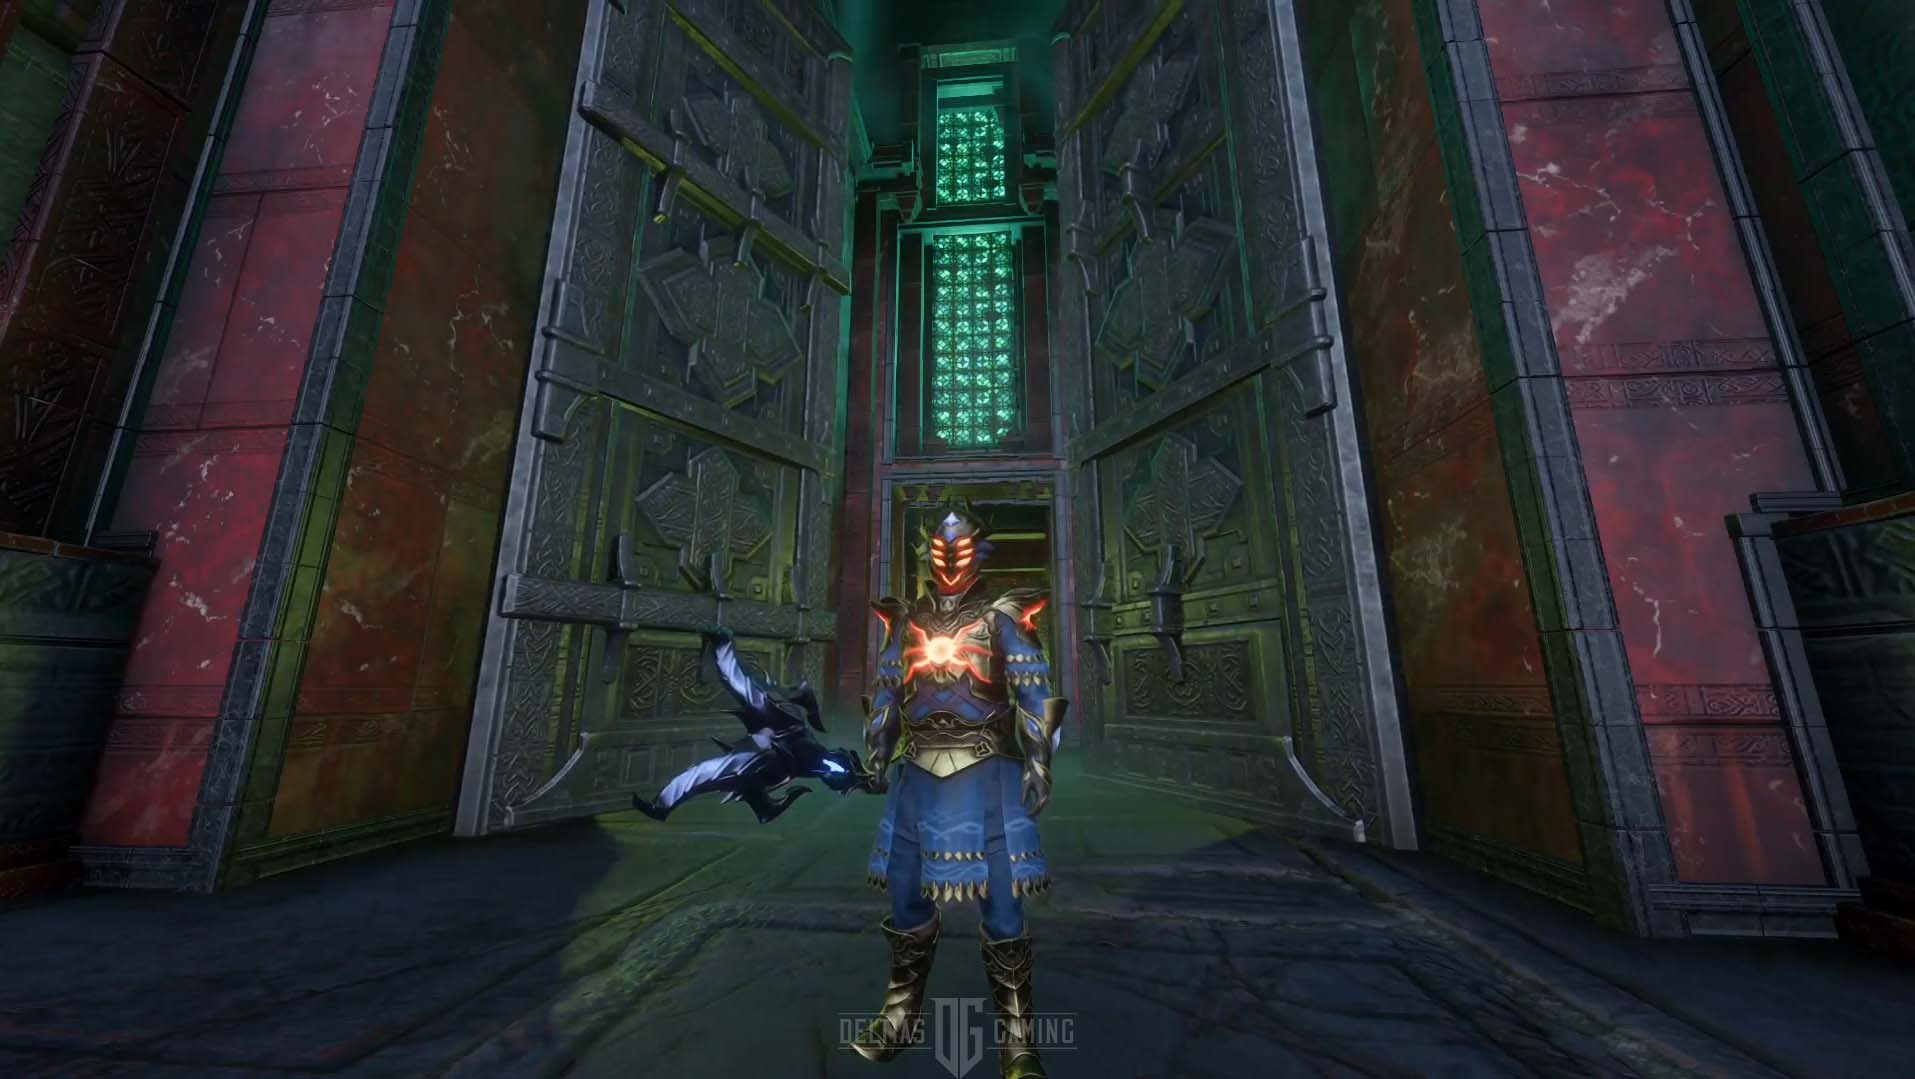
Climb the stairs above the magic barrier puzzle, use a grappling hook to pull yourself to the top of the wall with the iron fence, and jump above it to the room below. There waits for you a Hollow Cyclops Boss, whom you must kill to open the magic barrier.
Boss deals considerable damage with each melee attack, and it has a wide range. Avoid being hit at any cost and heal immediately. We advise using range weapons to defeat Hollow Cyclops.
Legendary Snakespine Wand and Silvershot Bow
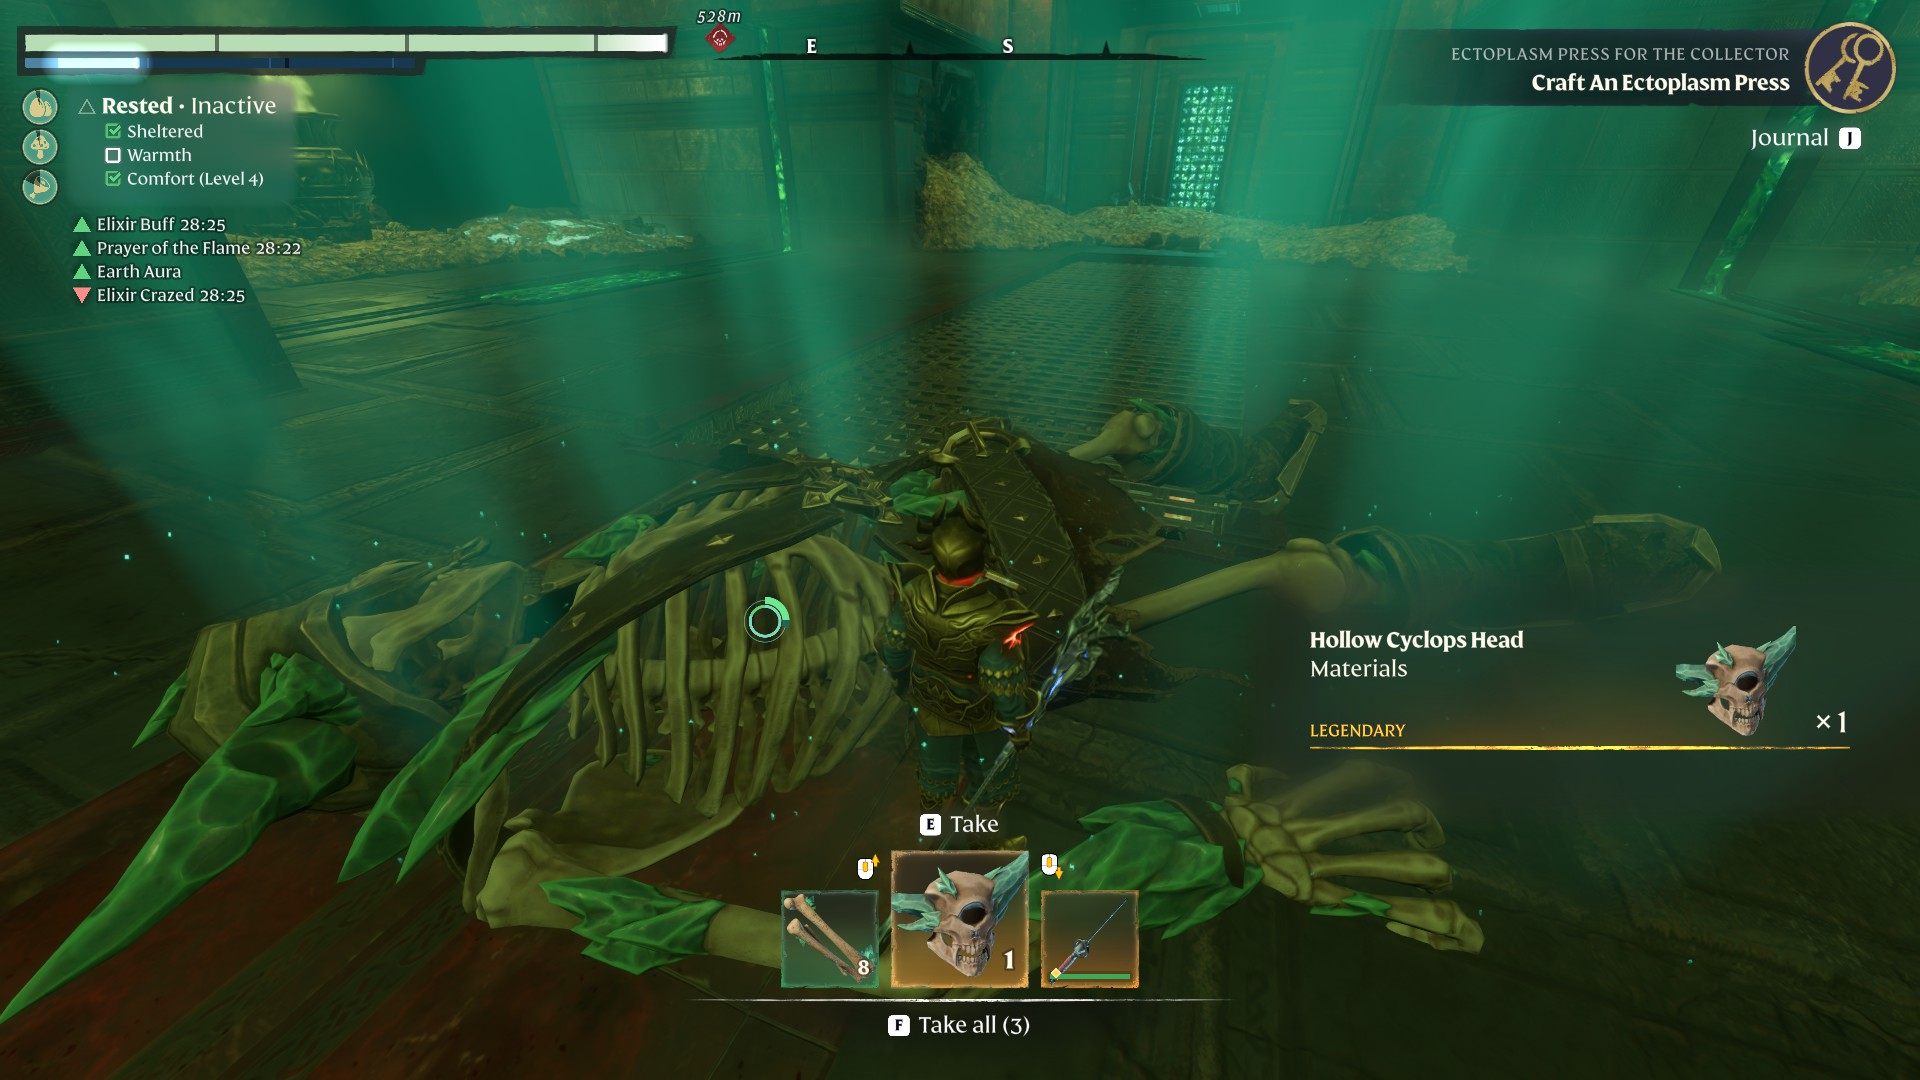
Once defeated, pick up giant bones, Hollow Cyclops Head, and Legendary Snakespine Wand (level 15) from their body. The magic barrier should open. Glide down and go under the boss arena to find the last red sarcophagi with the last weapon, the Silvershot Bow (level 15). Behind you’ll find the portal that will take you to the beginning of the dungeon.
Looking For More About Enshrouded?
Thank you for reading Enshrouded: Rivelwood Hollow Halls Dungeon Guide. We provide the latest news and create guides for Enshrouded, ESO, Baldur’s Gate 3, and More. Also, watch me play games on Twitch or visit my YouTube channel!