We’ve ranked the top 5 best weapons in The First Descendant, along with explanations for how to collect and use them.

In the First Descendant, there are a lot of weapons to choose from, and when you first jump into the game, the options can be overwhelming. Moreover, all the weapons can be upgraded with modules. Therefore, knowing where to invest your time and crafting materials can be hard. This guide will rank the top 5 best weapons to collect, where to find them, which Descendants to equip them with, and how best to use them in The First Descendant.
What are the Top 5 Best Weapons to Collect in The First Descendant?
The Tamer Machine Gun is the best weapon for killing bosses and completing the campaign and Void Intercept Battles. With 100-round magazines, a high fire rate, and great base stats, this machine gun is the best weapon to collect, and the developers confirmed they do not intend to nerf this weapon. The second best is the Thunder Cage for AOE damage and clearing mobs. Eternal Willpower is another great choice because it’s a rare Assault Rifle with some of the highest base damage and can be obtained earlier in the game.
The top 5 best weapons to collect in The First Descendant:
- Tamer – best boss killer Machine Gun.
- Thunder Cage – best for clearing mobs and AOE.
- Eternal Willpower – great non-ultimate Assault Rifle with high base stats.
- Greg’s Reversed Fate – triggers a meteor, dealing extra damage in AOE.
- Sigvore’s Proof – stackable sticky grenades and burning effect.
Related Video:
5. Sigvore’s Proof

Sigvore’s Proof features in The First Descendant:
- Weapon Type: Launcher
- Special Ability: Mad Bomber
- Fires a Sticky Bomb when shooting while aiming. The launched bomb will automatically detonate after a certain period of time after sticking to an enemy. When aim is canceled, all attached bombs will detonate at the same time, regardless of whether the countdown has been completed. Upon detonation, Sticky Bombs will inflict Burn on damaged enemies.
- Best Characters: Esiemo, Blair
- Best Mods: Fire Conductor
- How to Collect: Battle Pass Rewards – Level 1 (Premium only), Levels 16, 40, 64 and 88 (everyone)
- Best Traits: Attribute Status Effect, Explosive Attack, Toxic Attack, Electric ATK

Why Sigvore’s Proof is a Good Weapon
Grenade Attachment and Detonation: When you attach grenades to enemies, they detonate simultaneously, dealing a massive chunk of damage. The detonation always applies a burning status effect, adding continuous damage over time.
AOE Effectiveness: This weapon excels in AOE situations, making it ideal for facing multiple waves of enemies. The ability to attach and detonate grenades on several targets at once can clear groups efficiently.
Status Effect Build: Sigvore’s Proof has a low critical chance, so instead of focusing on crit damage, you build for status effect damage. This makes it a powerful tool for triggering and maximizing status effects, especially burning.
Versatile Firing Modes: The weapon has two firing modes. When aiming down sights, it attaches a bomb that explodes after a duration, allowing you to stack multiple bombs on a single target, such as a boss, for massive burst damage. Hip firing, on the other hand, causes the projectile to explode immediately, providing flexibility in different combat scenarios.
Synergy with Descendants: Sigvore’s Proof is particularly effective when paired with Descendants like Blair, who benefit from applying burning status effects. By focusing on status effects rather than crit chance, you can enhance your damage output significantly.
How to Collect Ultimate Sigvore’s Proof in The First Descendant
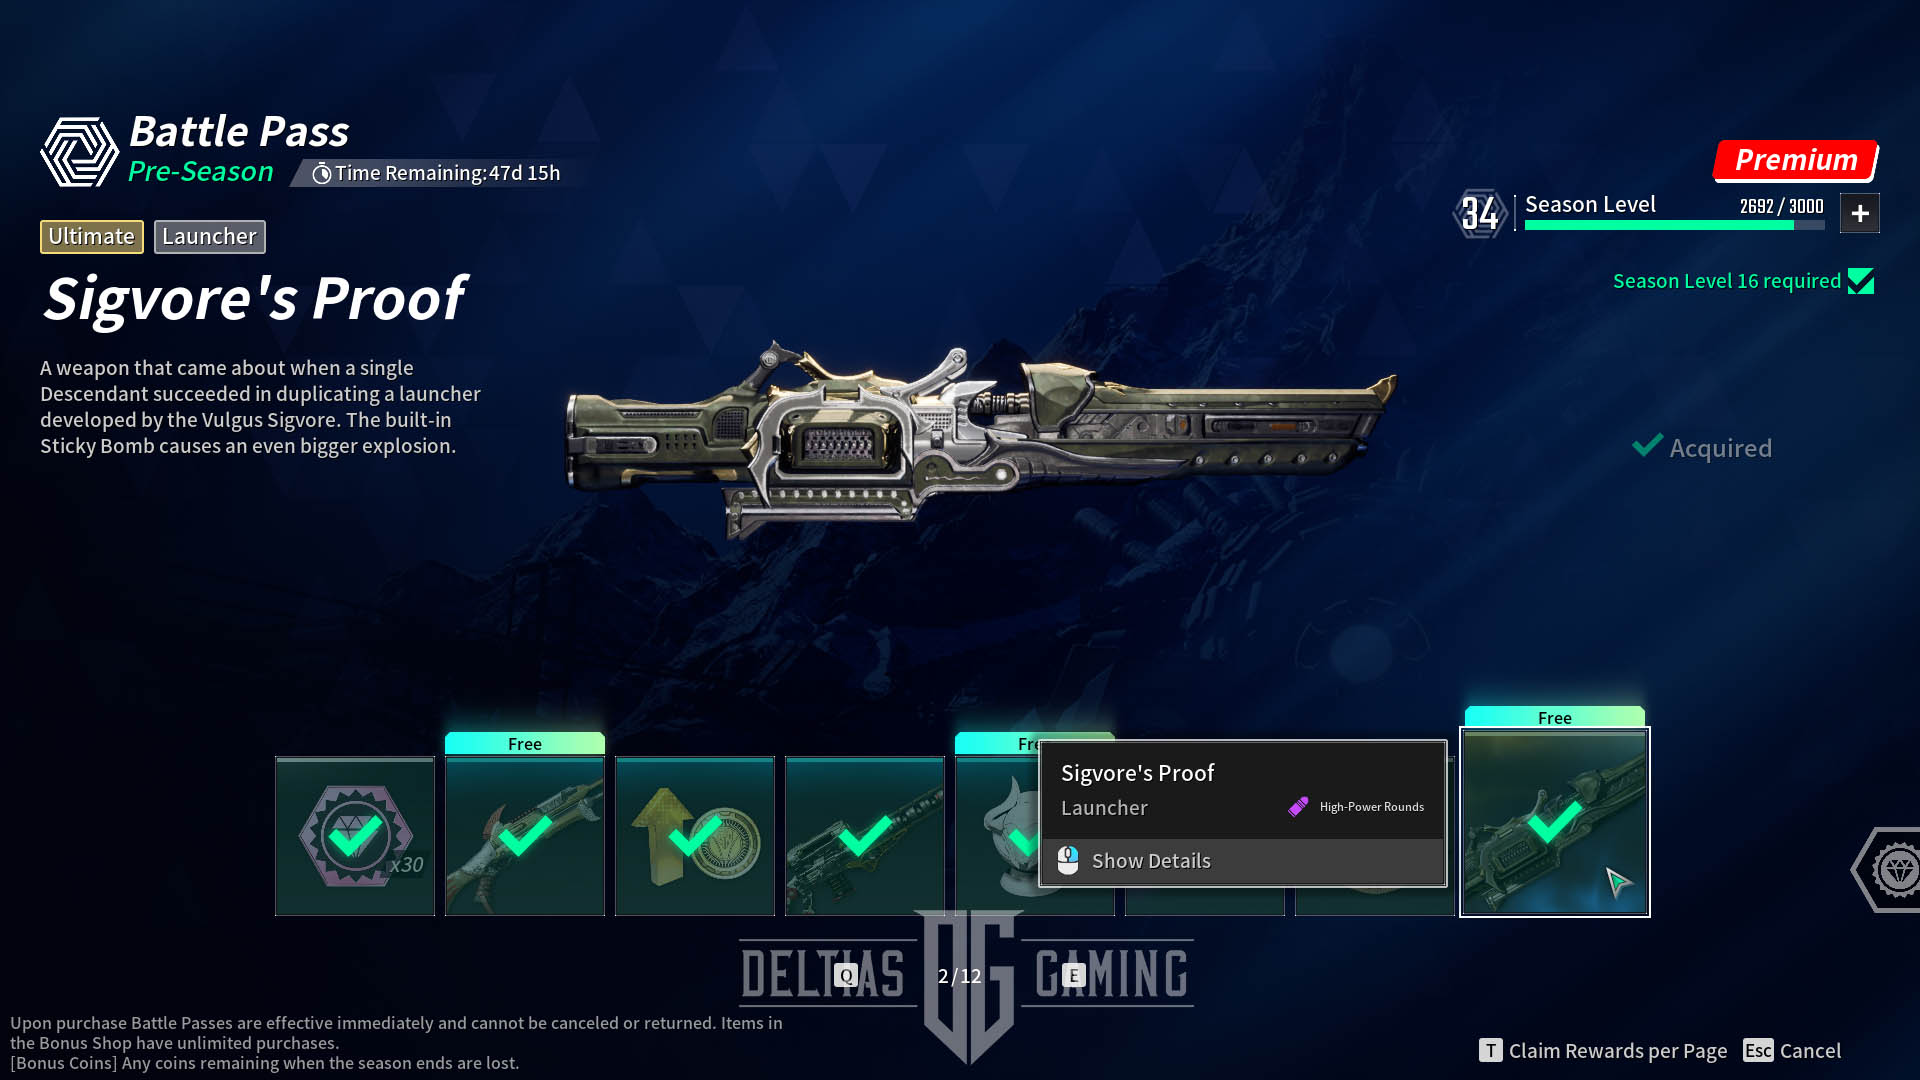
To acquire the Ultimate Sigvore’s Proof in The First Descendant, follow these steps:
- Level Up Your Battle Pass: The Ultimate Sigvore’s Proof is obtained through the current season Battle Pass. If you have purchased the Premium rewards, the launcher unlocks at Level 1. If not, it unlocks for free at Level 16.
- Increase Battle Pass Level: You can increase your Battle Pass level by playing the game regularly. Focus on completing set Challenges, which include daily, weekly, and seasonal tasks. These challenges provide rewards that accelerate your Battle Pass level growth.
- Acquire Additional Copies: Additional copies of Sigvore’s Proof are available at Battle Pass levels 40, 64, and 88. These copies can be used to enhance your initial Sigvore’s Proof, increasing its power and special abilities.
4. Greg’s Reversed Fate

Greg’s Reversed Fate features in The First Descendant:
- Weapon Type: Tactical Rifle
- Special Ability: Shaping Destiny
- On hitting an enemy with Max Shield proc Bombardment on the enemy’s location with a set chance. Inflict Burn on enemies hit by Bombardment.
- Best Characters: Blair
- Best Mods: Action and Reaction, Rifling Reinforcement, and Superheated Gunbarrel
- How to Collect: Fortress zone, Command Relay and Fortress Command Entrance missions; Heart of the Fortress and Quarantine Zone dungeons
- Best Traits: Toxic ATK, Firearm ATK, Bonus Firearm ATK vs. Order of Truth and Legion of Immortality.

Why Greg’s Reversed Fate is a Good Weapon
Meteor Strike: This weapon’s unique Bombardment effect activates when hitting targets with a full shield, unleashing three beams of light that deal significant fire damage and burn status effects. This can devastate groups of enemies if used strategically.
Effective Boss Damage: Greg’s Reversed Fate is particularly useful during boss fights, especially when the boss enters an immune phase where you need to hit canisters or specific weak points. Its pinpoint accuracy ensures you can reliably hit these critical targets.
Pinpoint Accuracy: The weapon’s accuracy makes it highly reliable for hitting specific targets, whether you’re aiming for canisters on a boss or targeting enemies at a distance.
AOE Damage: The 3-meter radius of each Bombardment beam allows you to damage multiple enemies at once. Opening on targets near others can maximize your damage output.
Range: With an effective range of 35 meters, Greg’s Reversed Fate provides a significant reach advantage, allowing you to engage enemies from a safe distance.
Burn Status Effect: Any target hit by the secondary Bombardment effect will be inflicted with the Burn condition, which lasts for 3 seconds and increases damage taken from firearms by 30%. This synergizes well with other weapons that deal status effect damage, like Sigvore’s Proof.
Versatility in Combat: You can hot swap Greg’s Reversed Fate, using it as an opener to inflict AOE damage before switching to a close-range weapon like Thunder Cage. This flexibility allows you to adapt to different combat scenarios effectively.
How to Collect Ultimate Greg’s Reversed Fate in The First Descendant
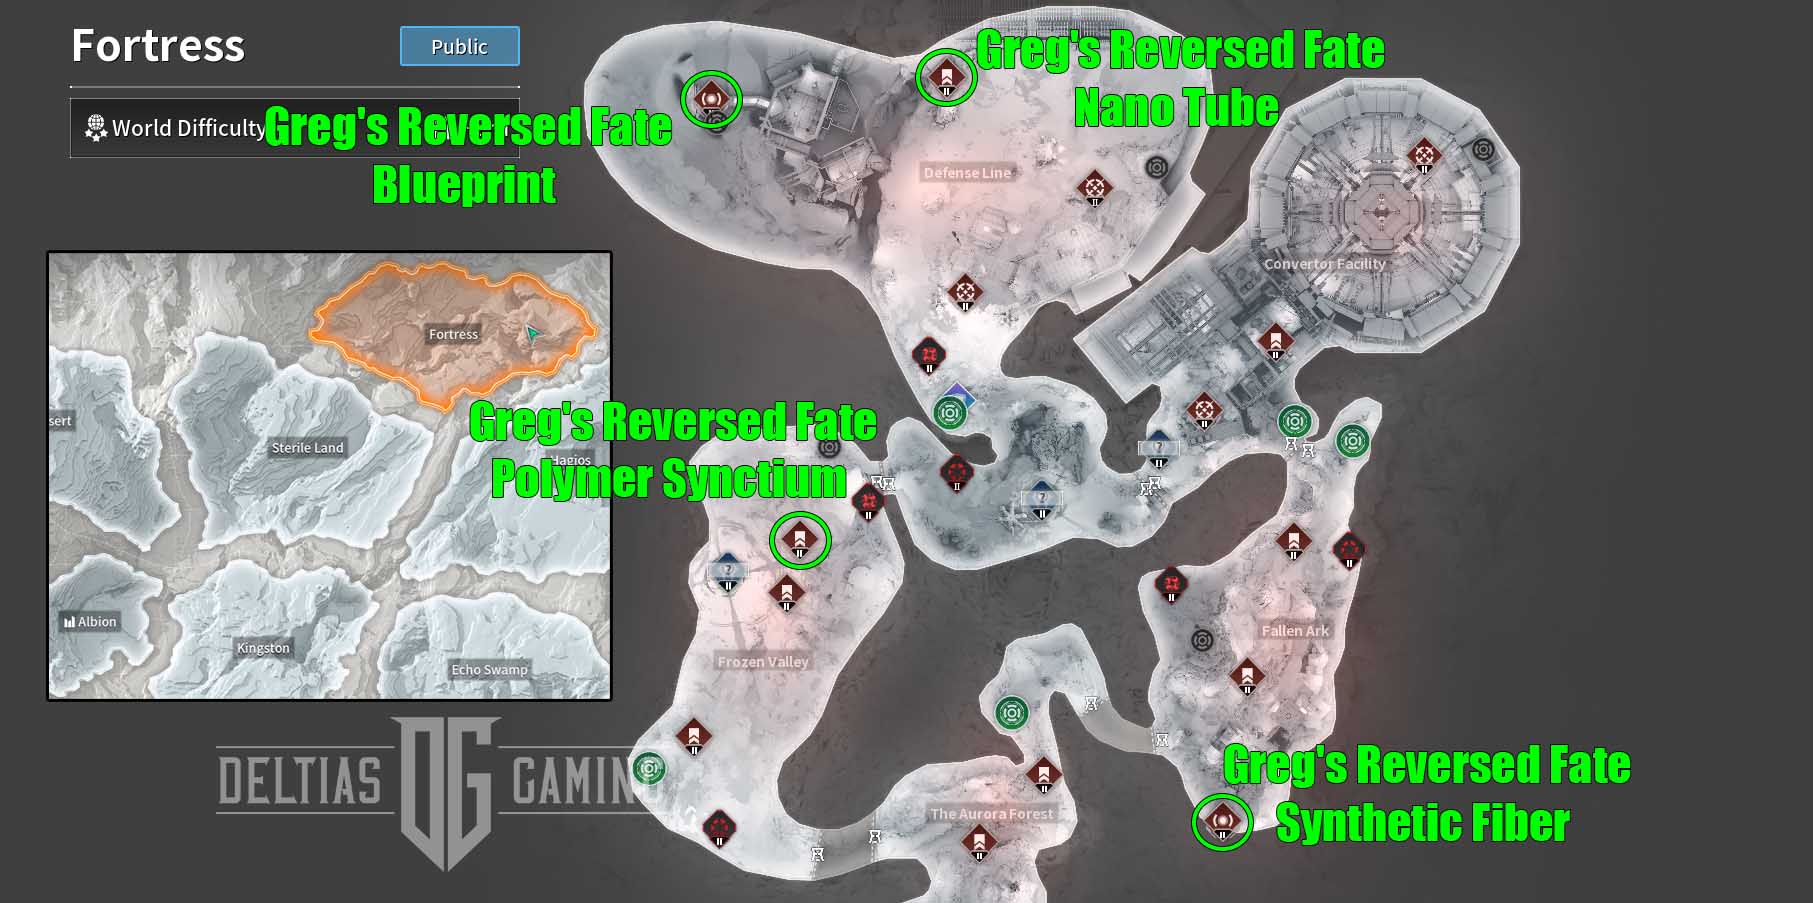
To craft the Ultimate Greg’s Reversed Fate in The First Descendant, follow these steps:
- Reach Mastery Rank Level 1: Before you can craft the Ultimate Greg’s Reversed Fate, you must reach Mastery Rank Level 1.
- Gather Required Materials: Collect the following materials from missions in the final zone of the campaign, called Fortress:
- Greg’s Reversed Fate Polymer Synctium: Obtainable from Fortress, Frozen Valley, and Command Relay Battlefield Mission.
- Greg’s Reversed Fate Synthetic Fiber: Obtainable from Fortress, Fallen Ark, and Quarantine Zone Dungeon.
- Greg’s Reversed Fate Nano Tube: Obtainable from Fortress, Defense Line, and Fortress Command Entrance Battlefield Mission.
- Greg’s Reversed Fate Blueprint: Obtainable from Fortress, Defense Line, and Heart of the Fortress Dungeon.
- Pay Crafting Fee: Once you have collected all the necessary materials, you will need to pay a 100,000 credit/gold fee to Magister Anais in Albion.
- Research Time: It will take 4 hours of research time for the Greg’s Reversed Fate to be completed once crafting begins.
Additional Tips:
- Crafting Limitations: The materials required for Greg’s Reversed Fate can only be collected once. To craft additional Greg’s Reversed Fates, you will need to gather lesser materials to craft the four advanced materials mentioned above.
- Check Acquisition Info: Consult the Acquisition Info at the Research Institute or from the Social screen to locate multiple mission locations where you can find the required materials.
3. Eternal Willpower
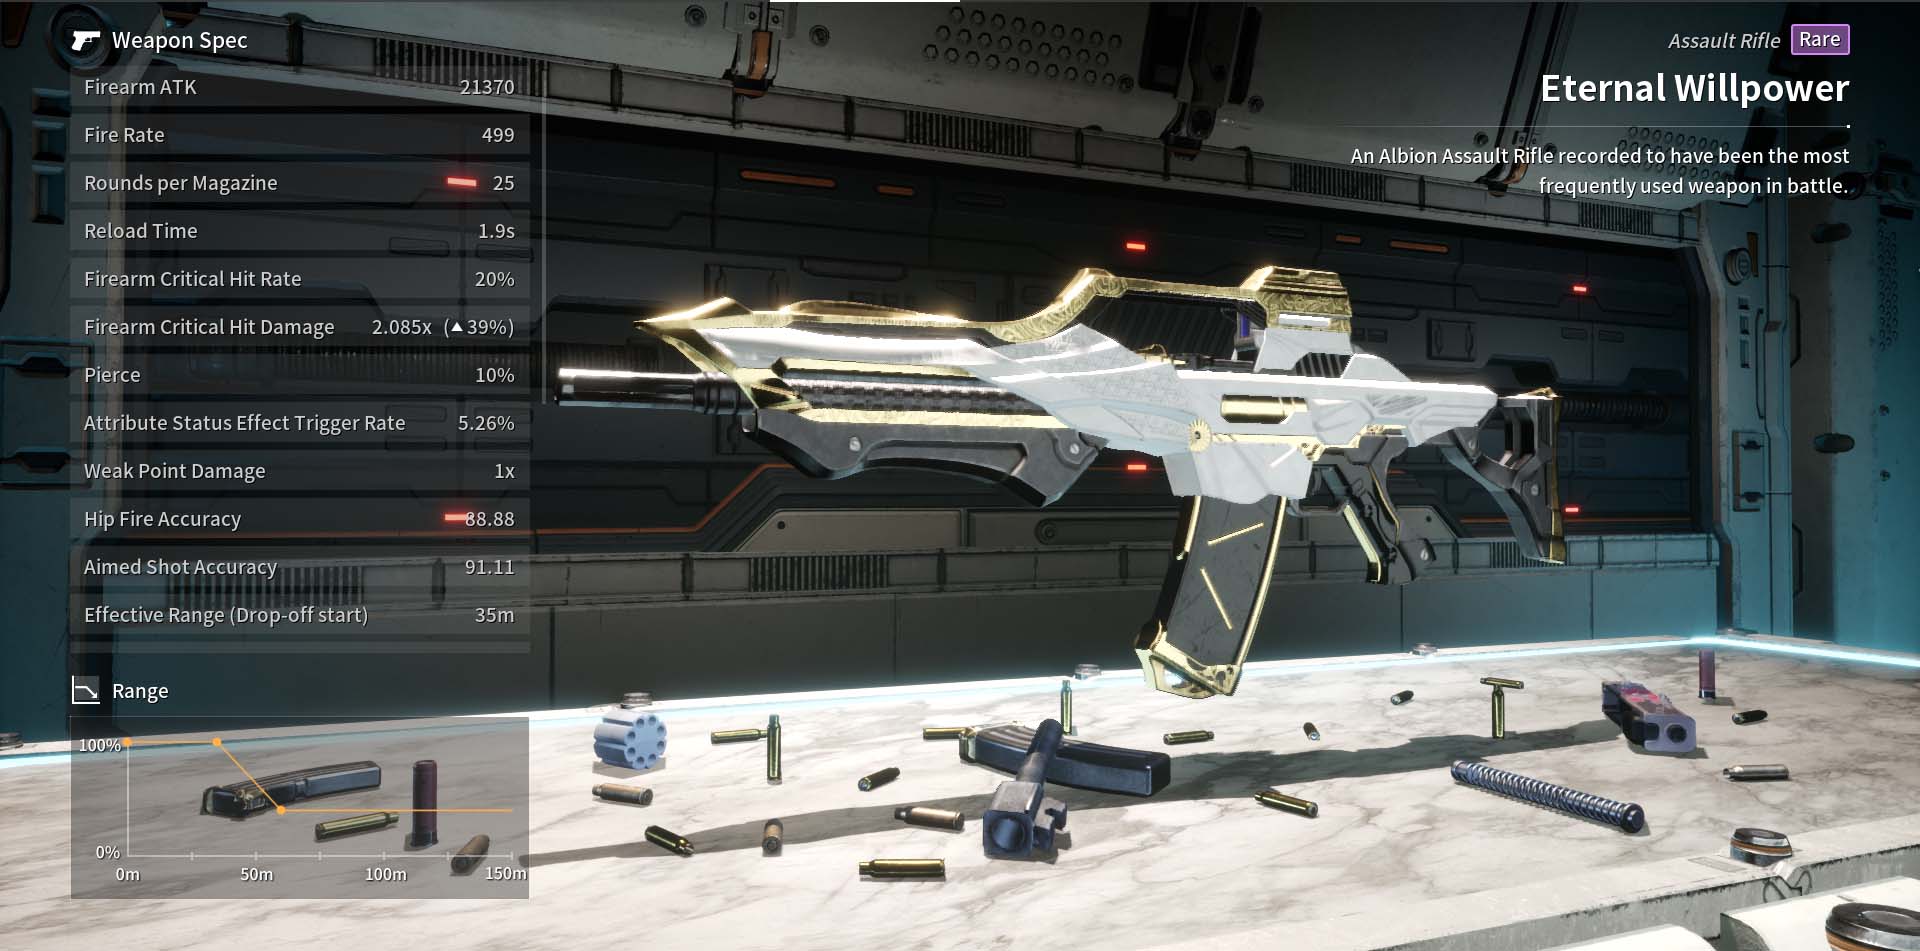
Eternal Willpower features in The First Descendant:
- Weapon Type: Assault Rifle
- Special Ability: None
- Best Characters: Gley, Bunny
- Best Mods: Rifling Reinforcement, Weak Point Sight, and Better Insight
- How to Collect: Agna Desert zone, Miragestone area, Red Sphere mission
- Best Traits: Critical Hit Damage, Critical Hit Rate, Weak Spot Damage, Firearm ATK vs. Colossus

The third best weapon to collect is Eternal Willpower in our The First Descendant – 5 Best Weapons to Collect list.
Massive Base Stats: This weapon boasts impressive base stats, making it extremely powerful even at lower levels. Its strong foundation ensures it can deliver high damage consistently.
Accuracy and Crit: Eternal Willpower excels in accuracy and critical hits, making it highly effective at hitting weak spots and dealing critical damage. This precision is crucial for maximizing damage output.
Compatibility with High-Damage and High-Mobility Characters: Pairing Eternal Willpower with characters like Gley or Bunny enhances its effectiveness. Gley’s frenzied state can boost the weapon’s damage for maximum DPS, while Bunny’s high mobility complements the weapon’s accuracy and allows for more agile shooting and aiming.
Versatility: Eternal Willpower is versatile and suitable for almost any character due to its strong base stats. With solid accuracy, weak point damage, and critical hit potential, it remains effective even when dropped at approximately level 50. By leveling it up with weapon transmission and re-rolling stats with weapon readjustment, you can create a powerhouse weapon for end-game content.
High Rate of Fire: The weapon’s high rate of fire allows for rapid damage output, making it effective in various combat scenarios.
How to Collect Eternal Willpower in The First Descendant
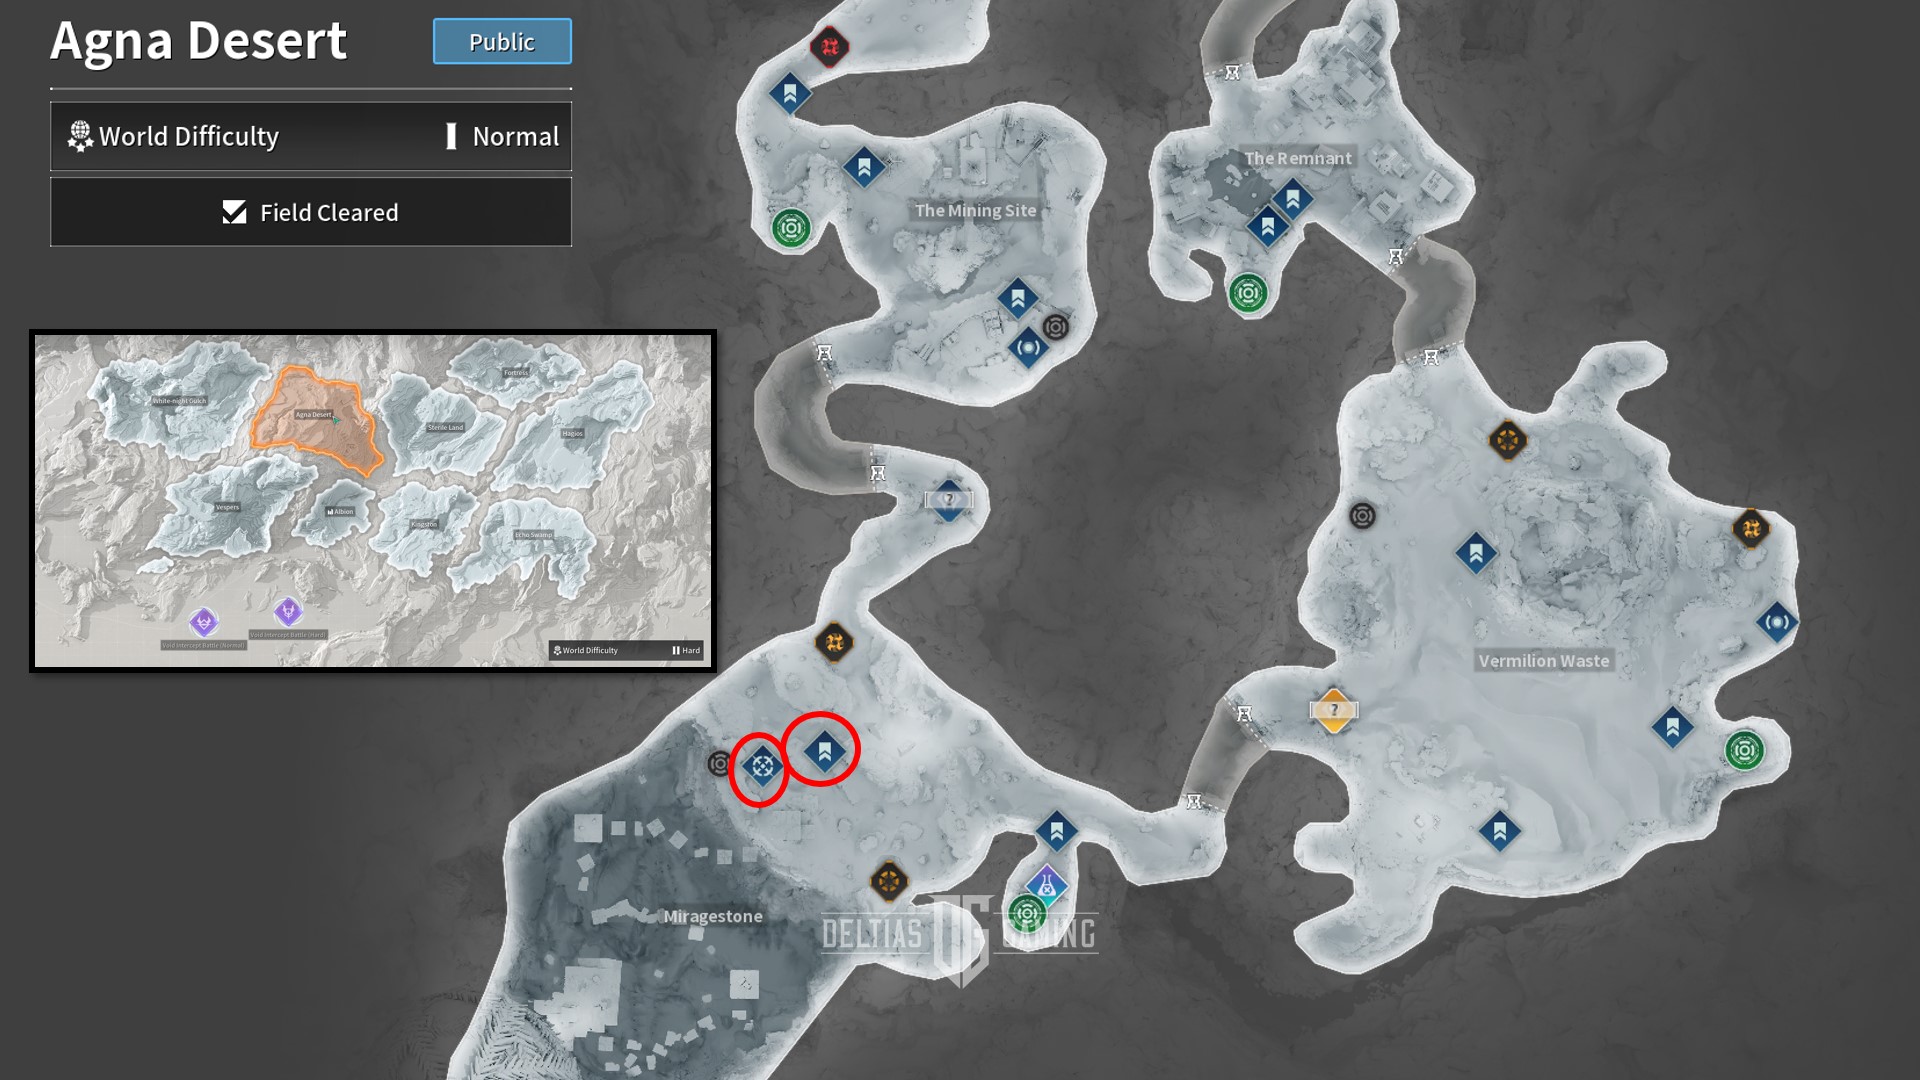
To Collect the Eternal Willpower in The First Descendant, follow these steps:
- Unlock the Agna Desert Zone: The Agna Desert is the fifth overworld zone in the game. You need to progress through the main story campaign to unlock access to this area.
- Reach Level 40: If you’re new to the game and playing with your first character, you must advance your first Descendant to Level 40.
- Defeat the Dead Bride: Before you can access the Agna Desert, you must defeat the Dead Bride. This is a crucial step to unlocking the zone where you can farm the Eternal Willpower.
- Farm in the Miragestone Area: Once you have access to the Agna Desert, head to the Miragestone area. The best spots to farm the Eternal Willpower are:
- Commanding Ground Battlefield Mission
- Red Sphere Normal Mission
- Random Drops: The Eternal Willpower is a rare assault rifle obtained through random drops. Unfortunately, it cannot be crafted at the Research Institute with Anais, so you’ll need to rely on farming and luck to acquire it.
2. Thunder Cage
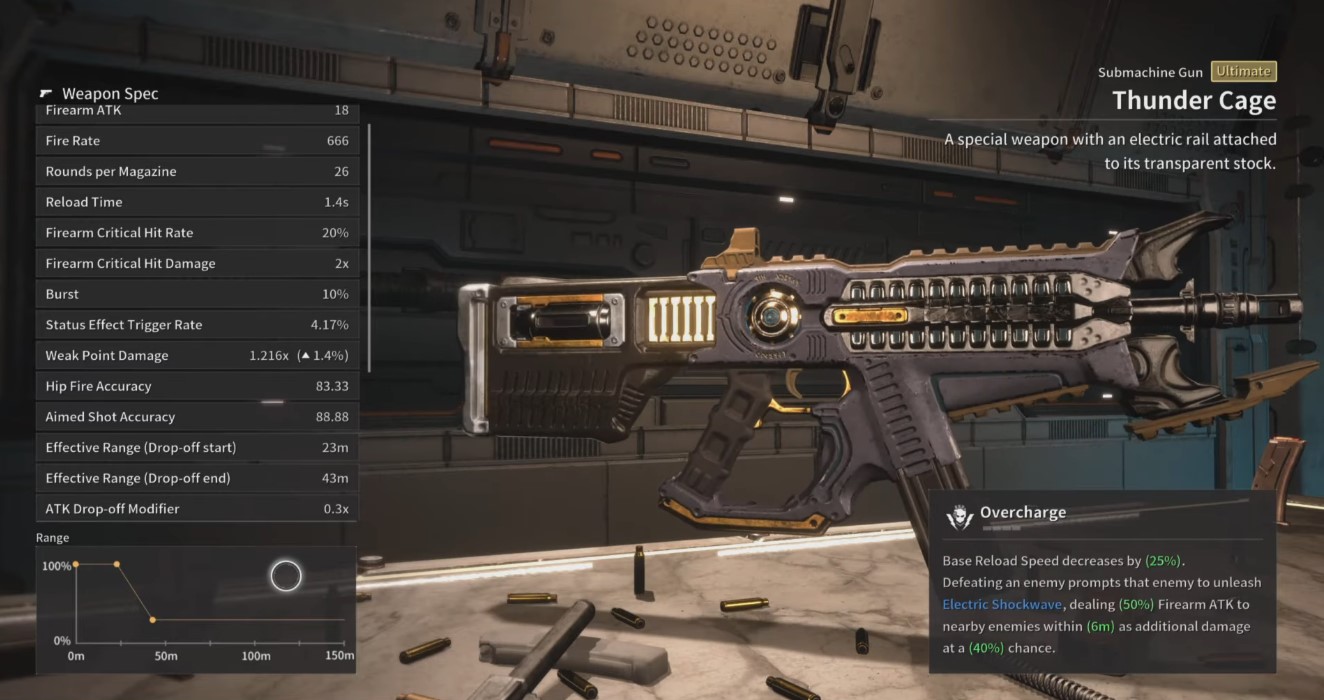
Thunder Cage features in The First Descendant:
- Weapon Type: Ultimate Submachine Gun
- Special Ability: Overcharge
- Base Reload Speed decreases by 25%.
- When defeating an enemy, that enemy has a 40% chance to discharge Electric Shockwave that deals additional damage to nearby enemies.
- Best Characters: Bunny, Kyle, Lepic, Sharen, Valby
- Best Mods: Action and Reaction, Rifling Reinforcement, and Fire Rate Up
- How to Collect: Sterile Lands zone, External Reactor, Kuiper Mine, High-powered Jammer, and Logistics Facility missions
- Best Traits: Fire ATK, Firearm Critical Hit Rate, Electric ATK, Weakpoint Damage

The second best weapon to collect is the Thunder Cage in our The First Descendant – 5 Best Weapons to Collect list.
Area Damage: Thunder Cage excels in dealing area-of-effect (AOE) damage, allowing it to kill multiple enemies at once. This makes it highly effective in crowd control situations.
High Critical Chance: The weapon has a high critical chance, which increases the likelihood of dealing critical hits and maximizing damage output.
SMG Mobility Stats: As a submachine gun (SMG), Thunder Cage offers high mobility stats, enabling fast movement and agile combat. This makes it ideal for characters who need to stay on the move.
Effective Range: Thunder Cage performs best within medium range before its damage falls off at 23 meters. Beyond this point, damage decreases until it reaches 43 meters, so staying close to enemies and aiming for weak points is essential.
Explosive AOE Damage: The main benefit of Thunder Cage is its chance to trigger explosive AOE damage. Targeting enemies with the lowest HP can cause a chain reaction of kills, further enhancing its effectiveness in clearing groups of enemies.
Usage Tips
Medium-Range Combat: Utilize Thunder Cage within its optimal range for maximum damage. Hold down the trigger and aim for weak points to maximize your damage output.
Strafing in Battles: In Void Intercept battles, constant movement is key. Strafe to the side while aiming down sights when the boss isn’t targeting you. If the boss turns towards you or you’re playing solo, hip fire to increase visibility and movement speed.
Weapon Swapping: During boss battles, switch to your high-powered rounds weapon when targeting the boss’s weak points. Use a burst weapon that requires special or heavy ammo for 5-7 seconds of uninterrupted damage.
Complementary Weapons: Pair Thunder Cage with a mid-range weapon that uses special or impact rounds. A Hand Cannon, Beam Rifle, or Scout Rifle are good choices. For heavy impact weapons, a Grenade Launcher or Sniper Rifle is recommended. The Grenade Launcher is effective for add clear when you can’t get close, while the Sniper Rifle excels in long-range Void Intercept boss battles.
How to Collect Ultimate Thunder Cage in The First Descendant
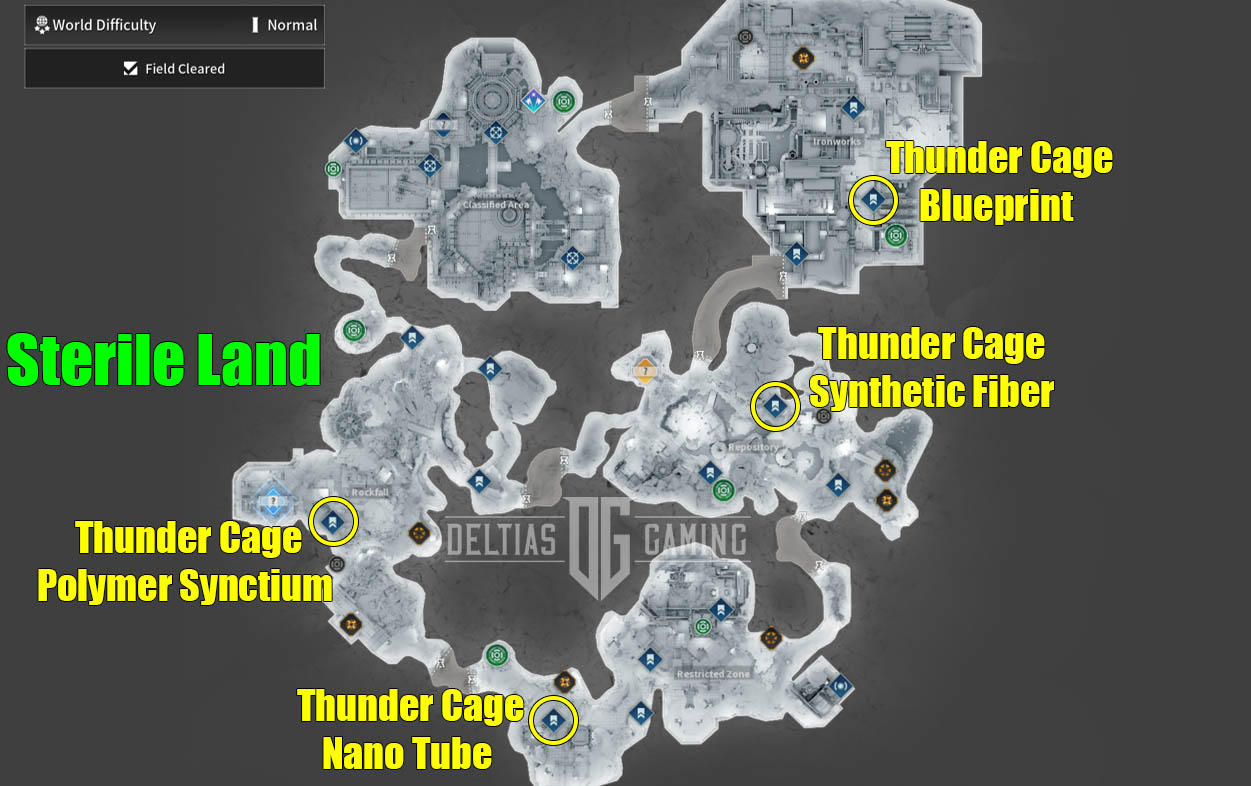
To craft the Ultimate Thunder Cage in The First Descendant, follow these steps:
- Reach Mastery Rank Level 1: Before you can craft the Ultimate Thunder Cage, you must reach Mastery Rank Level 1.
- Gather Required Materials: You will need specific materials from various missions in the Sterile Land zone:
- Thunder Cage Polymer Synctium: Found in Sterile Land Rockfall and External Reactor.
- Thunder Cage Synthetic Fiber: Found in Sterile Land Repository and Kuiper Mine.
- Thunder Cage Nano Tube: Found in Sterile Land Restricted Zone and High-powered Jammer.
- Thunder Cage Blueprint: Found in Sterile Land Ironworks and Logistics Facility.
- Pay Crafting Fee: Once you have all the necessary materials, you will need to pay a 100,000 credit/gold fee to Magister Anais in Albion.
- Research Time: It will take 4 hours of research time for the Ultimate Thunder Cage to be completed.
Additional Tips:
- Complete Basic Weapon Training Sub-Quest: Before heading to the Sterile Land zone for the first time, you will receive a sub-quest called Basic Weapon Training. This will guide you in collecting the required materials for crafting the Ultimate Thunder Cage.
1. Tamer
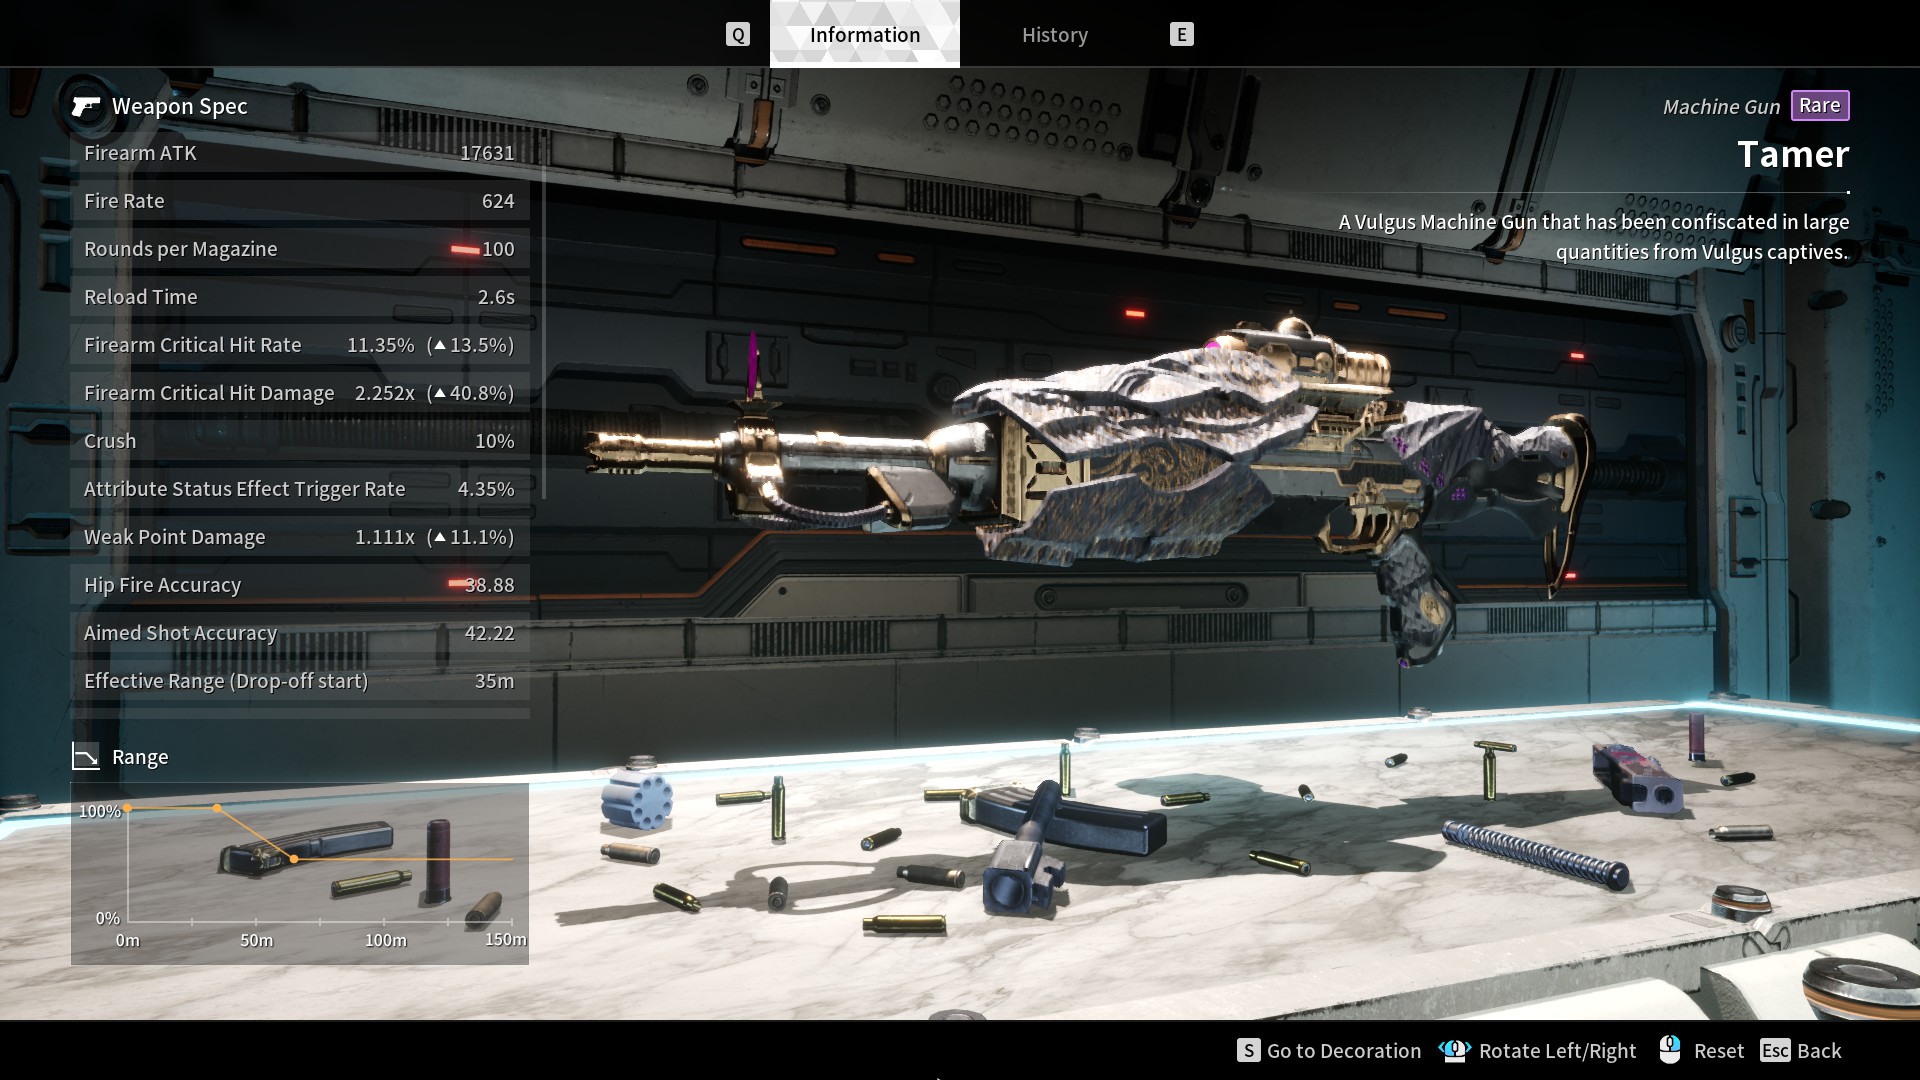
The Tamer features in The First Descendant:
- Weapon Type: Rare Machine Gun
- Special Ability: None
- Best Characters: Kyle, Ajax, Gley, Jaber, Bunny
- Best Mods: Concentration Priority, Rapid Fire Insight, and Better Insight
- How to Collect: Agna Desert zone, Remnant area, Abandoned Reconstruction Site
- Best Traits: Critical Hit Rate, Critical Hit Damage, Weakspot Damage, Firearm ATK vs. Colossus
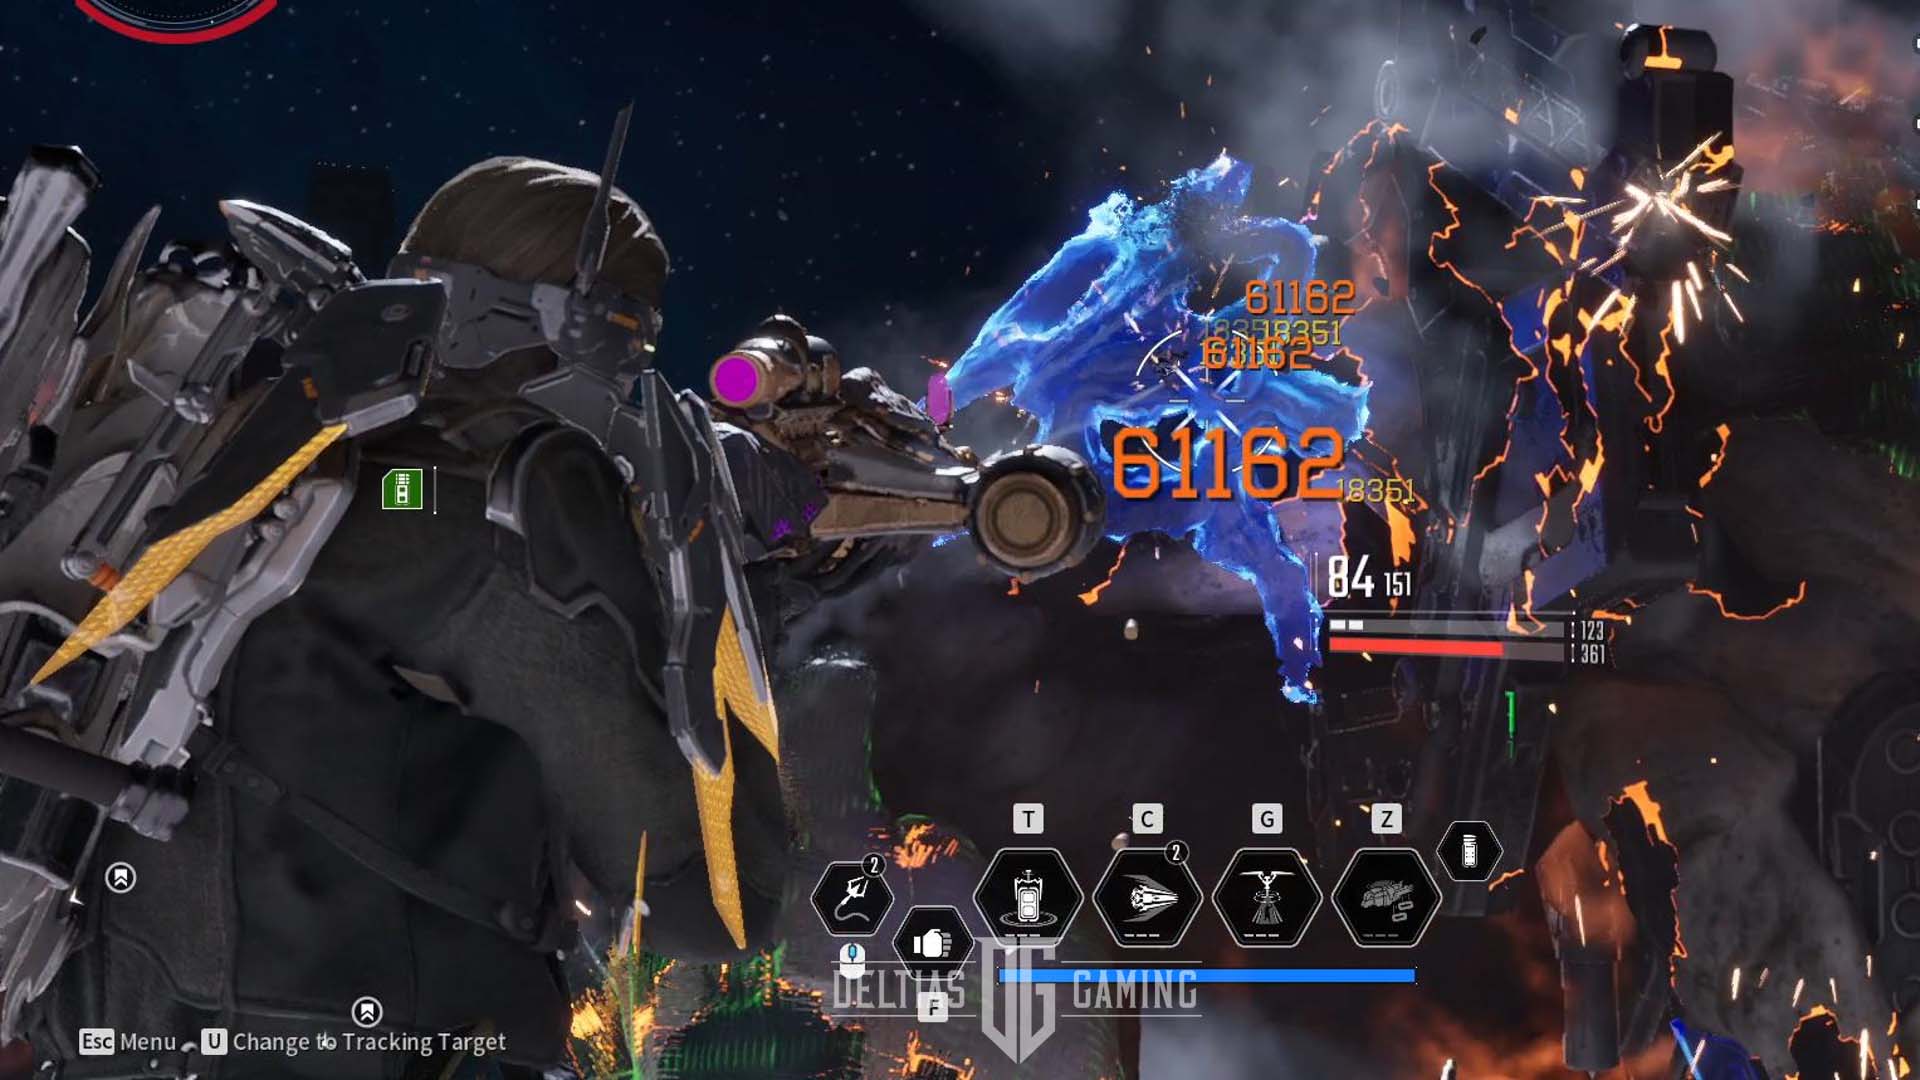
The Tamer is the best weapon to collect in the first Descendant and Ranks best out of 5 due to damage, magazine size, and ease of access.
- High Base Damage: Tamer delivers substantial base damage, making it powerful even at lower levels.
- Fast Fire Rate: With a rapid-fire rate, Tamer can quickly dish out significant damage, especially when targeting weak points.
- Weak Point Damage: The weapon excels in dealing with massive critical hit damage when hitting weak points, making it ideal for boss fights.
- Magazine Capacity: With a 100-round magazine, Tamer allows for sustained fire without frequent reloads, enabling continuous damage output.
- General Rounds: Tamer uses general rounds, which are easy to find, ensuring you can keep firing without running out of ammo.
Usage Tips
- Weak Point Targeting: In Void Intercept boss fights, focus on hitting weak points to maximize your damage. The high magazine capacity allows you to hold down the trigger and maintain pressure on the boss.
- Ammo Management: Since Tamer uses general rounds, look for white ammo bricks on the ground. Pairing with a Descendant like Enzo, who can drop a supply drone with ammunition for you and your team, ensures a steady ammo supply.
- Weapon Pairing: Avoid bringing a secondary weapon that also uses general rounds. Instead, opt for weapons that use special or high-impact rounds, such as sniper rifles or scout rifles, for additional boss damage. A grenade launcher can be useful for clearing adds when you can’t get close.
- Positioning and Mobility: Find a high vantage point during boss fights to get a clear view of weak points. Use the Ecive control (Tab on PC) to highlight weak points in blue or yellow. From this elevated position, you can flank the boss and strafe to avoid damage while maintaining a clear line of sight on weak points.
How to Collect Tamer in The First Descendant
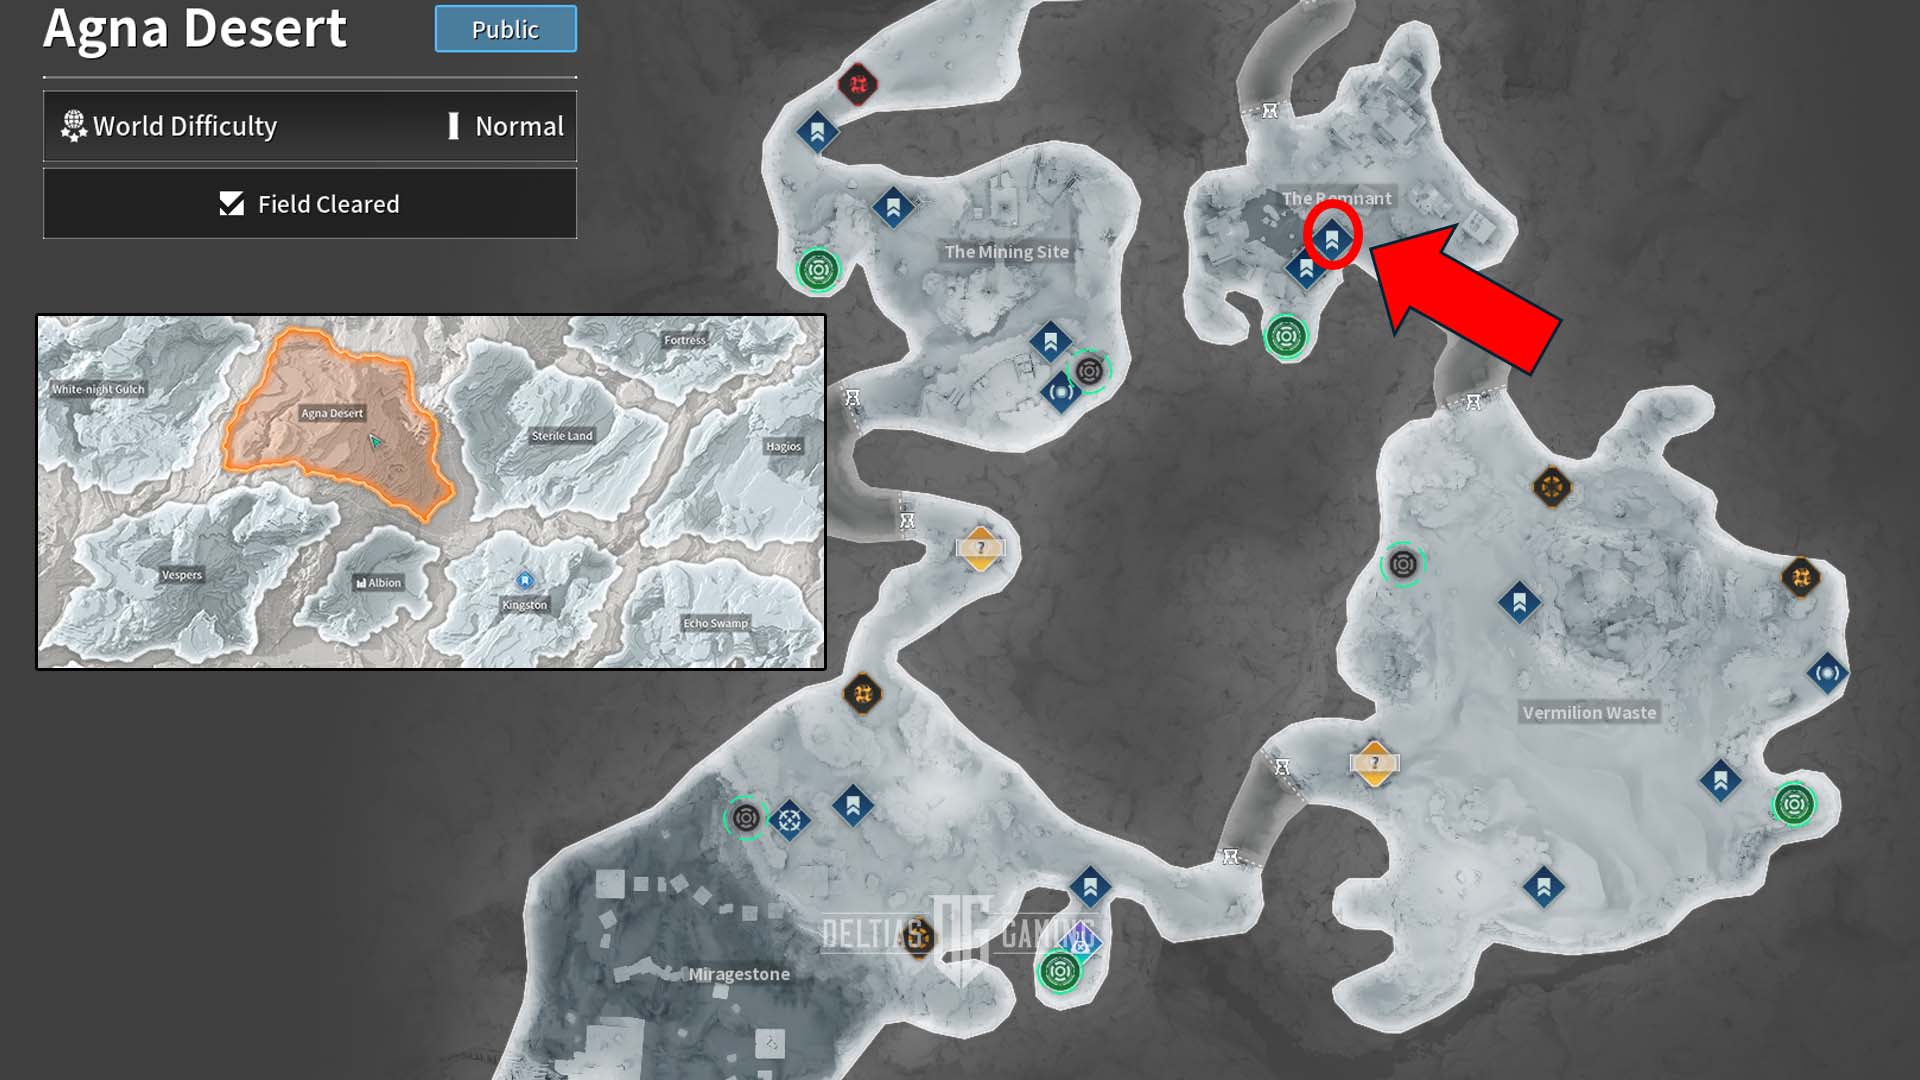
To Collect the Tamer in The First Descendant, follow these steps:
- Unlock the Agna Desert Zone: The Agna Desert is the fifth overworld zone in the game. You must progress through the main story campaign to unlock access to this area.
- Reach Level 40: If you’re new to the game and playing with your first character, you need to advance your first Descendant to Level 40.
- Defeat the Dead Bride: Before reaching the Agna Desert, you must defeat the Dead Bride. This is a key step to unlocking the zone where the Tamer can be farmed.
- Farm the Abandoned Reconstruction Site: Once in the Agna Desert, head to the Remnant area and complete the Abandoned Reconstruction Site mission. This is the best spot to farm for the Tamer.
- Random Drops: The Tamer is a rare machine gun obtained through random drops. It cannot be crafted at the Research Institute with Anais, so you’ll need to rely on farming and luck to acquire it.
Bonus Vestigial Organ
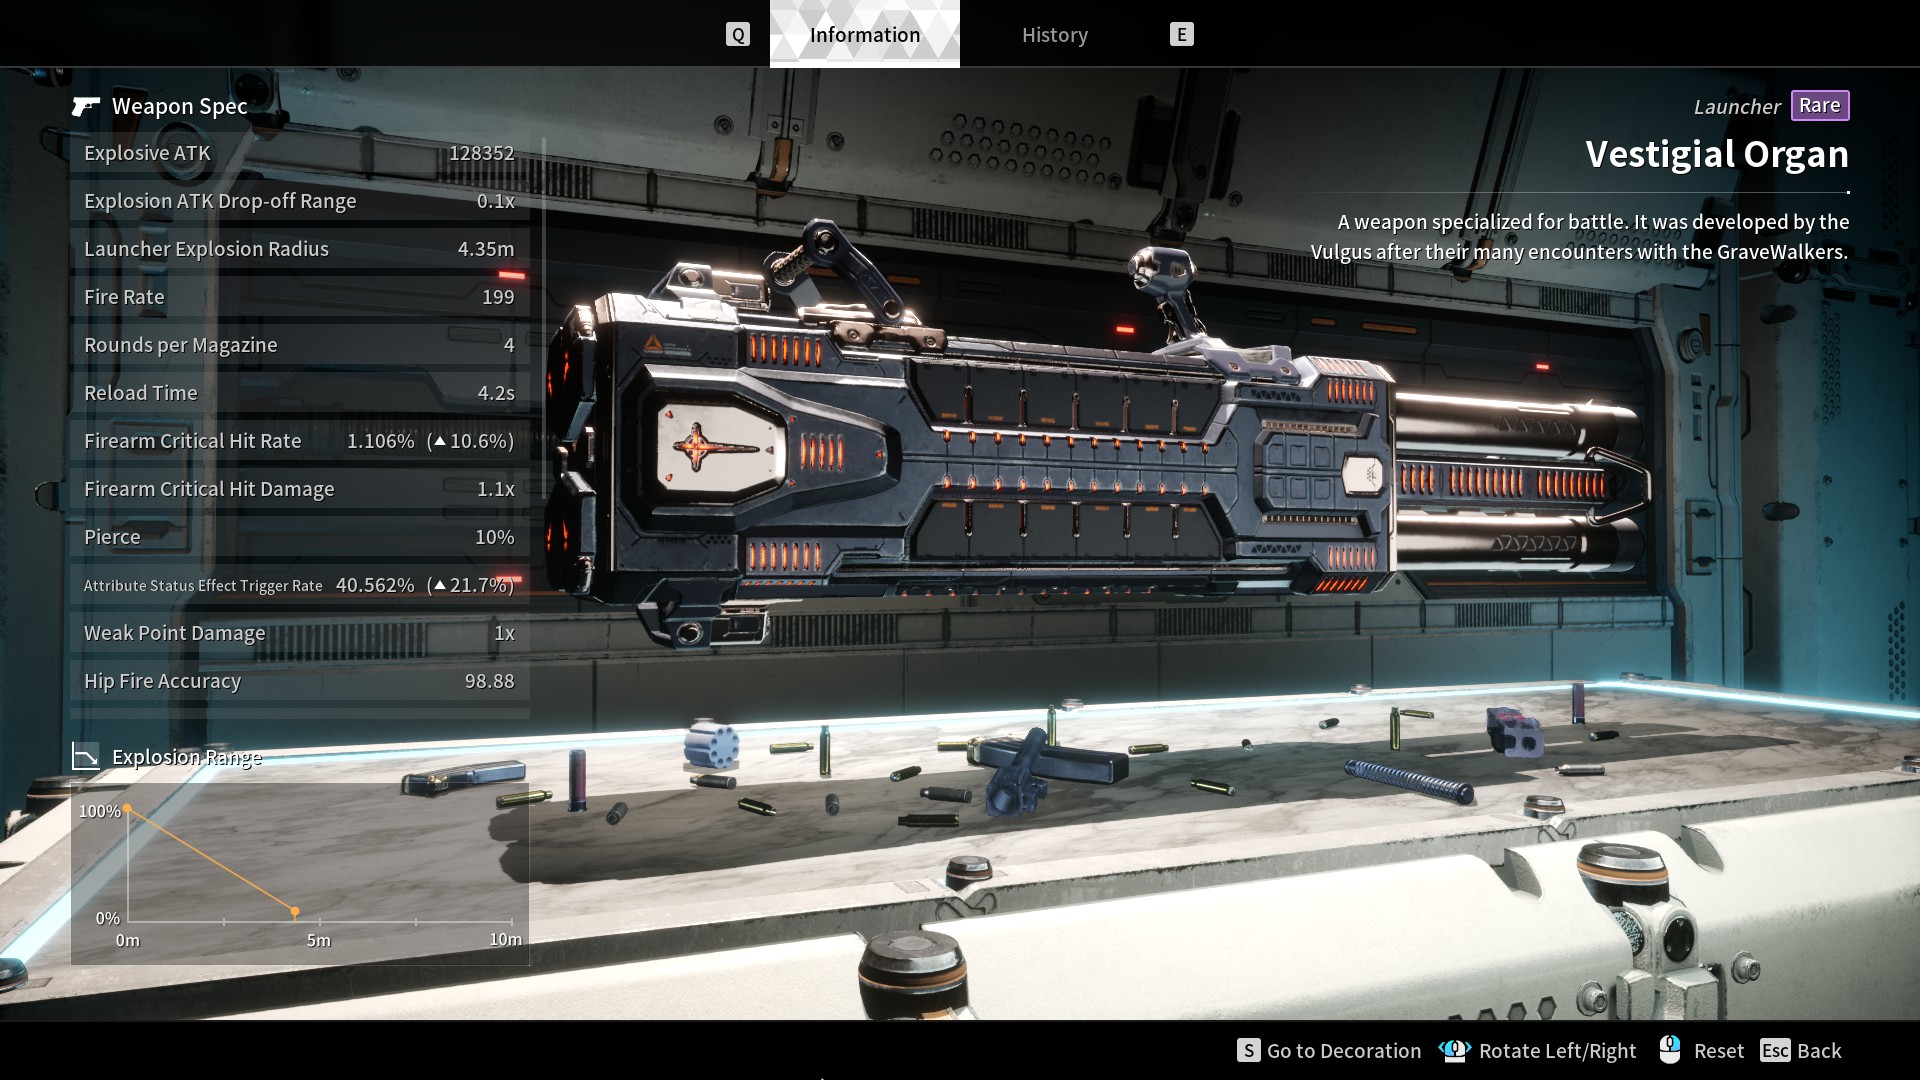
Vestigial Organ features in The First Descendant:
- Weapon Type: Rare Launcher
- Special Ability: None
- Best Characters: Gley
- Best Mods: Concentration Priority, Rapid Fire Insight, and Better Insight
- How to Collect: Agna Desert zone, Remnant area, Miragestone Area
- Best Traits: Explosive ATK, Firearm Critical Hit Rate, Bonus Firearm ATK (vs. Colossus), Attribute Status Effect Trigger Rate
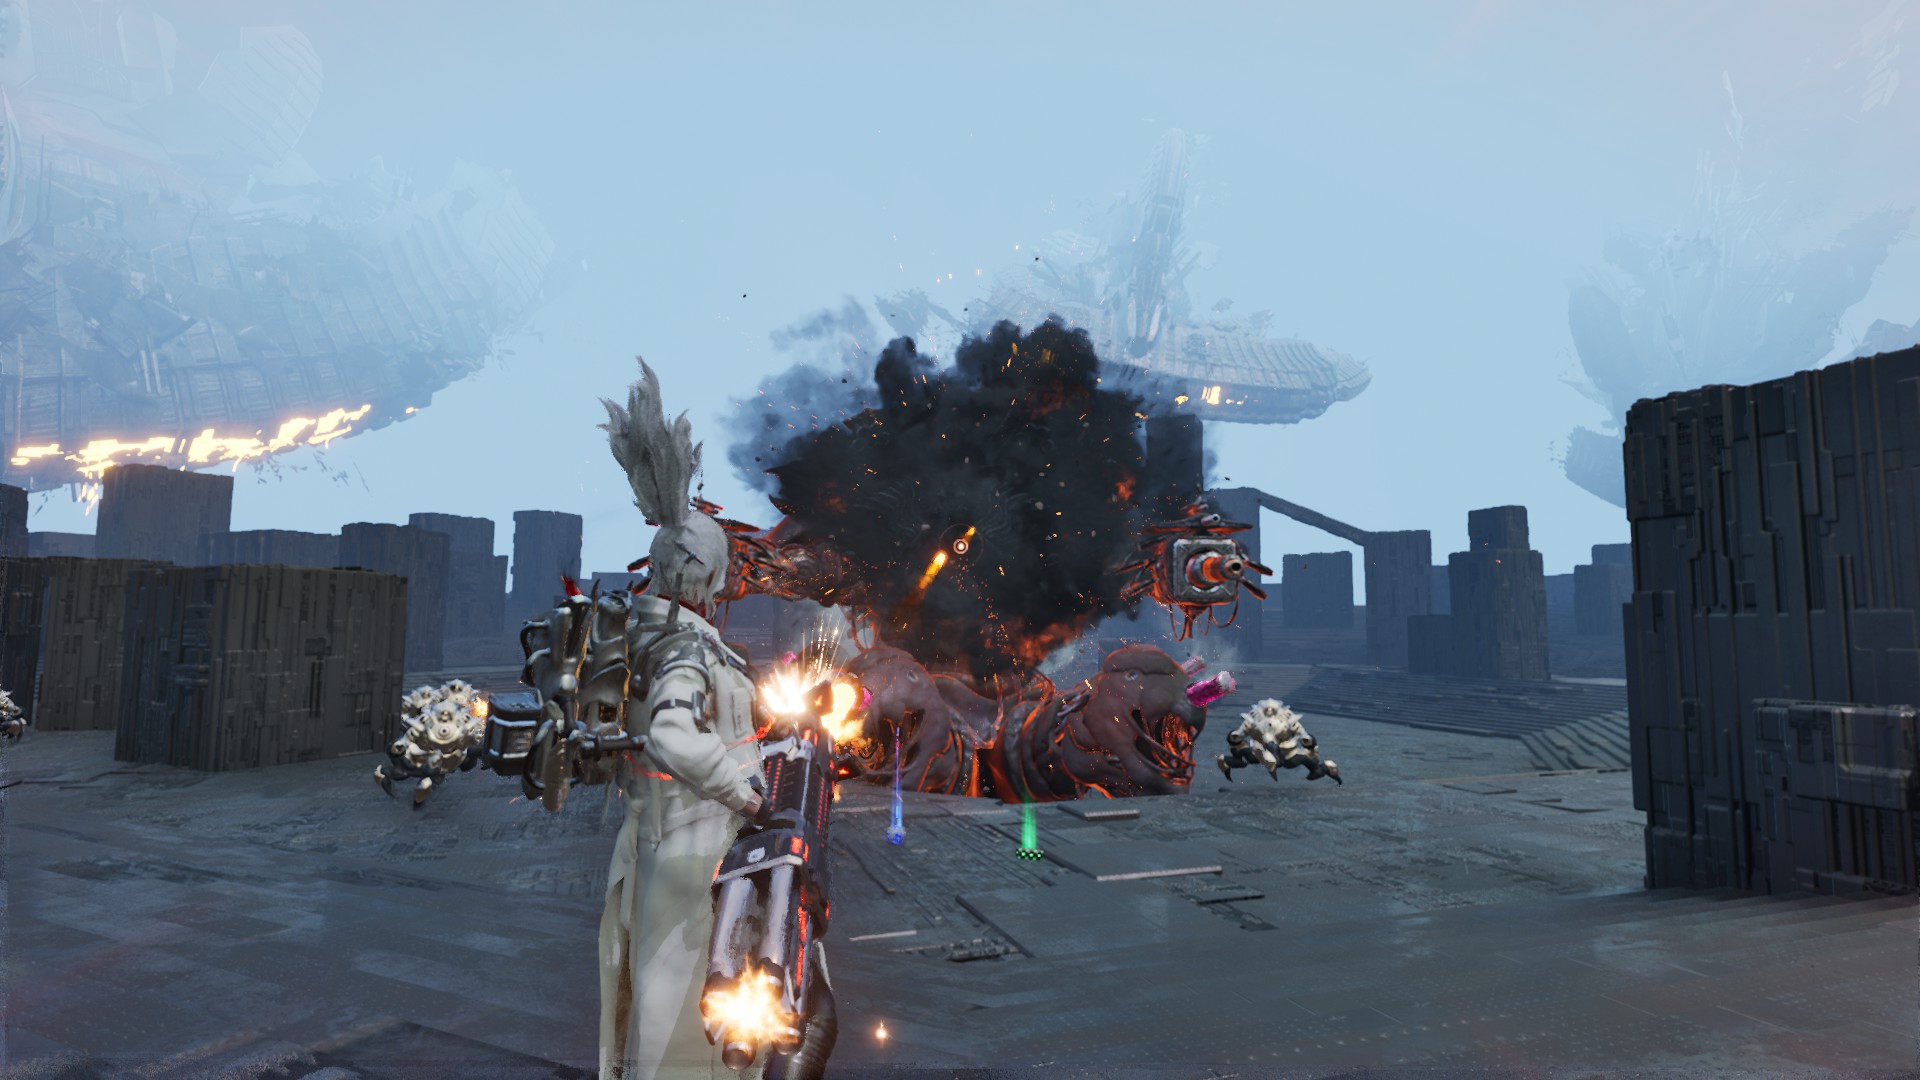
Honourable Mention Organ The First Descendant – 5 Best Weapons to Collect
- High Burst Damage: Vestigial Organ delivers significant burst damage, making it a powerful choice for quickly eliminating enemies.
- Fast Rate of Fire: The weapon’s fast rate of fire allows for rapid damage output, further enhancing its effectiveness in combat.
- Synergy with Gley: When paired with Gley, Vestigial Organ reaches its full potential. Gley’s Increased Sensory skill negates ammo consumption for a short time, allowing for sustained fire without worrying about running out of ammo.
- Unrivaled DPS: Combining Increased Sensory with Gley’s Frenzied state, which boosts weapon damage, provides some of the highest DPS in the game. This combination allows Gley to deal massive damage to bosses and other high-priority targets.
Usage Tips
- Equip to Gley: Vestigial Organ should be equipped to Gley to take advantage of her skills that mitigate its primary downside—ammo consumption.
- Activate Increased Sensory: Use Increased Sensory to eliminate ammo usage temporarily. This allows you to hold down the trigger and maximize your damage output without worrying about ammo depletion.
- Utilize Frenzied State: Pair Increased Sensory with Gley’s Frenzied state to boost the weapon’s damage further. This combination allows you to tear through enemies and deal immense damage to bosses.
- Build for Cooldown and Duration: Focus on building cooldown reduction and duration for Gley to ensure her skills are available as often as possible. This will enable you to use the Vestigial Organ repeatedly for maximum effect.
- Equip HP Collector Mod: Equip the HP Collector Ultimate mod to Gley for added survivability. This mod allows you to recover a percentage of max HP upon defeating enemies, which is crucial for Gley, who lacks shields and is vulnerable in her Frenzied state. This effect procs frequently in fights against groups of enemies, helping to keep Gley alive.
How to Collect Vestigial Organ in The First Descendant
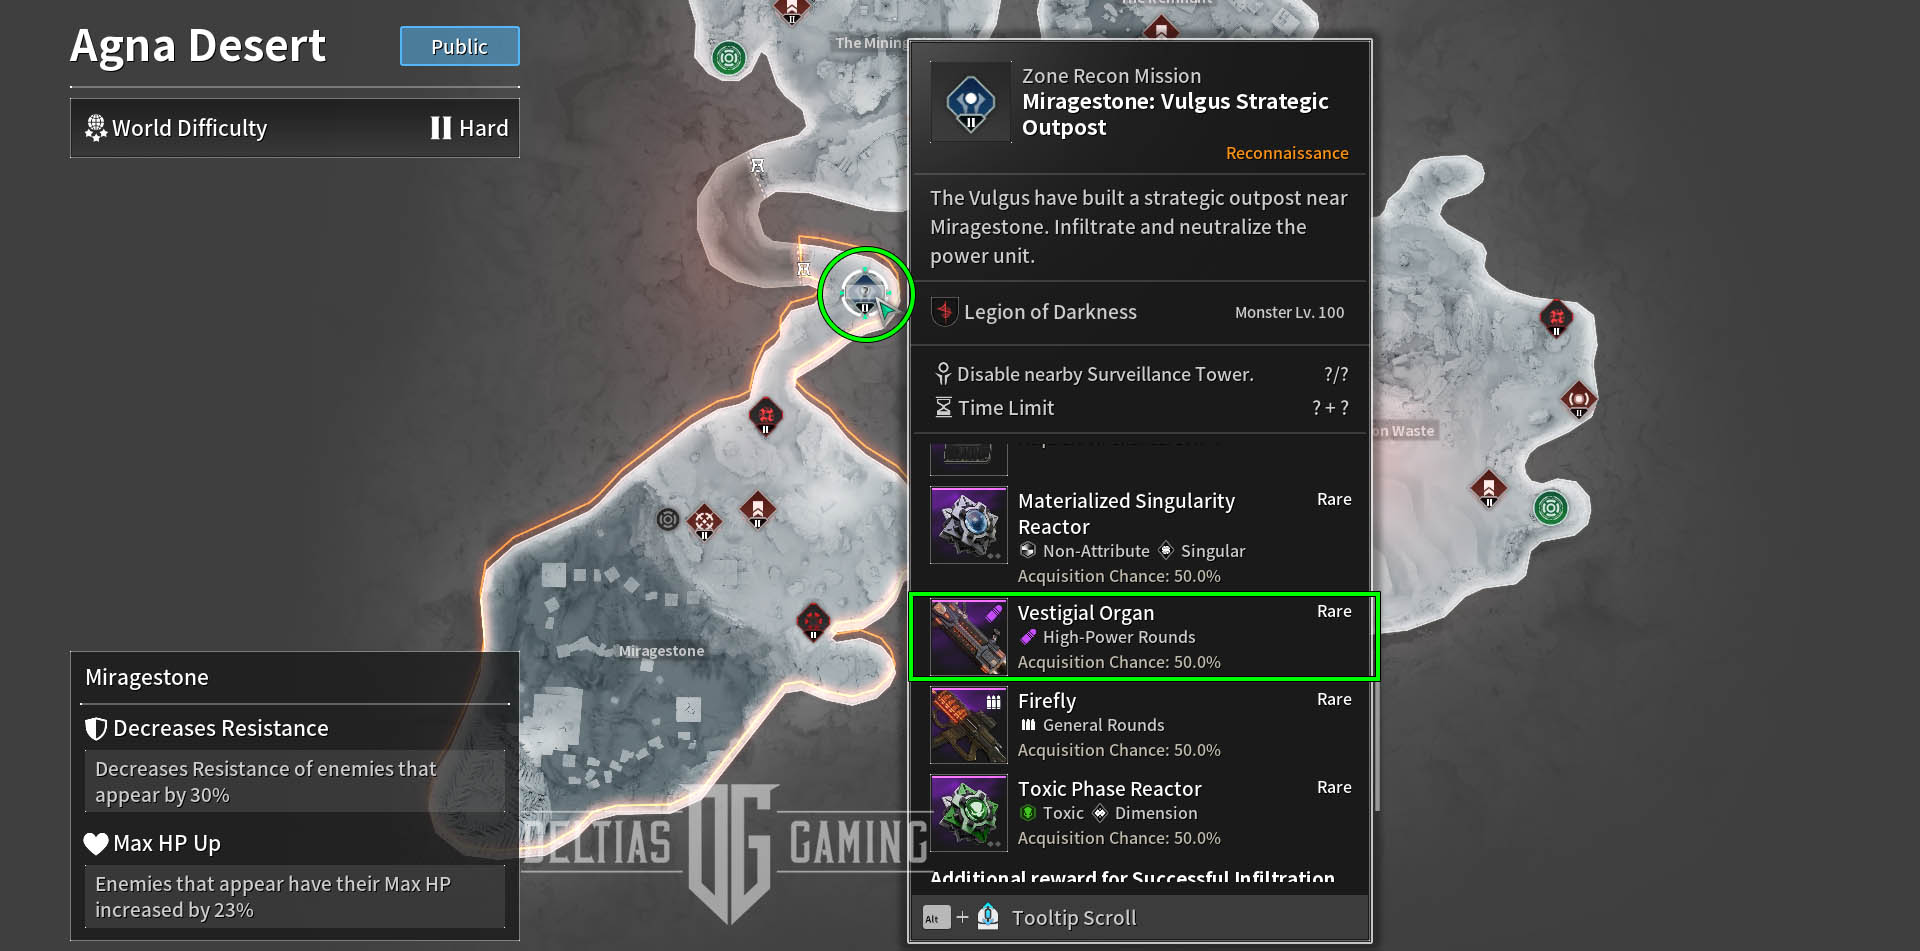
The best place to farm the Vestigial Organ in The First Descendant is in the Agna Desert zone, specifically the Miragestone area, at the Vulgus Strategic Outpost zone recon mission. Here’s a step-by-step guide to unlock and farm this weapon:
- Progress Through the Main Story Campaign: The Agna Desert is the fifth overworld zone in the game. You must advance through the main story to unlock access to this area.
- Reach Level 40: If you are new to the game and playing with your first character, you need to level up your first Descendant to Level 40.
- Defeat the Dead Bride: To unlock the Agna Desert zone, you must defeat the Dead Bride. This is a critical step to gain access to the Vestigial Organ farming area.
- Farm in Agna Desert: Once you have access to the Agna Desert, head to the Miragestone area and complete the Vulgus Strategic Outpost zone recon mission. This is the best spot to farm for the Vestigial Organ.
- Random Drops: The Vestigial Organ is a rare launcher obtained through random drops. Unfortunately, it cannot be crafted at the Research Institute with Anais, so you will need to rely on farming and luck to acquire it.
Looking For More?
Thank you for reading The First Descendant: The 5 Best Weapons to Collect Guide. We provide the latest news and create guides for Baldur’s Gate 3, Starfield, Fallout 4, Destiny 2, ESO, and more. Also, watch me play games on Twitch or visit my YouTube channel!
- The First Descendant: Best Builds – All Characters
- The First Descendant Guides
- The First Descendants Best Characters (Classes): Tier List
- The First Descendant: Bunny Character and How to Play the Class Guide
- You can support our Website by Linking Account (affiliate): deltia#9684
 Reddit
 Email
Email


