Don’t miss a single companion, quest, gear piece, or boss fight in our Baldur’s Gate 3 Act 2 Checklist: All Things to Complete guide!

In Baldur’s Gate 3, Act 2 occurs in the aptly named Shadow-Cursed Lands, where you’ll have to risk the darkness to find Moonrise Towers and reveal the Absolute. However, as in Act 1, there is much more to find on the map than just that singular location. Exploring the whole region will lead you to several eldritch horrors and hidden secrets, expanding the lore, unlocking achievements, and rewarding you with unique gear. Ultimately, you can even help break the curse, banishing the shadows and beginning the land’s restoration by following our Baldur’s Gate 3 Act 2 Checklist.
This guide has been updated for the Patch 8 version of Baldur’s Gate 3.
All Things to Complete in Act 2 of Baldur’s Gate 3
The most important things to do in Act 2 are to recruit two more companions, acquire better gear and weapons, and unlock additional permanent bonuses. Furthermore, you should seek out certain NPCs to follow up on previous quests or receive new ones.
There are a couple of different entrance points into Act 2, with the most commonly used path being the western fork of the Rosymorn Monastery Trail. Using this entrance will put you in the southern portion of the Ruined Battlefield. Additionally, there is another entrance in the Grymforge. An elevator on the east side of the docks (opposite where you first land) will take you to a location in the far northern portion of the Shadow-Cursed Lands.
This guide outlines the crucial locations to explore, from the Ruined Battlefield to the Mind Flayer Colony. It’s listed in the recommended order of approach. However, should you visit areas in a different sequence, you can refer to the relevant section in our guide for the necessary information. This Baldur’s Gate 3 Act 2 Checklist categorizes the map into significant named areas/locations, providing comprehensive details on essential companions, quests, and gear to discover.
Baldur’s Gate 3 Act 2 Major Locations List:
- Ruined Battlefield: Side quests, scattered gear
- Last Light Inn: Major hub location, vendors, and main story
- Reithwin Town: Gateway to Moonrise Towers, Mason’s Guild, and other points of interest
- Tollhouse: Gerringothe Thorm, possible bonus, achievement
- House of Healing: Malus Thorm, side quests, achievement
- The Waning Moon: Thisobald Thorm, side quest
- Moonrise Tower: Second primary hub location, vendors, and main story
- Grand Mausoleum: Raphael/Astarion interaction, secret passage inside
- Gauntlet of Shar: Large temple with trials and puzzles, Shadowheart personal quest
- Mind Flayer Colony: Few bonuses, gear, final Act 2 confrontation
Related:
Ruined Battlefield

The Ruined Battlefield is a massive area with winding pathways where you first enter the Shadow-Cursed Lands. You’ll need to have a light source when traveling through all of the Act 2 maps. To begin with, you can use basic torches or the Light cantrip if needed. The light given off by The Blood of Lathander will also work if one of your party members has it equipped.
Closer to Moonrise Towers, however, you’ll need a stronger, more magical light source. A Moon lantern will provide safe passage everywhere, and there is one main source. A Drider named Kar’niss is leading cultists to the Moonrise Towers using one. You can encounter him in one of two ways:
- Find the Last Light Inn first. You can travel with a group of Harpers to an ambush site where they will attack Kar’niss and the group he leads through the Shadow.
- Enter the Shadow-Cursed Lands from the Rosymorn Monastery Trail. A group of Absolute followers will be waiting for Minthara but can be convinced you’re with them, too. Use the Spider’s Lyre to summon the Drider, and then during the Harper ambush, you can turn on Kar’niss.
Finally, if you don’t wish to kill or turn on Kar’niss, there is another Moonlantern you can find in Moonrise Towers inside Balthazar’s room. Refer to the Moonrise Towers section in our Baldur’s Gate 3 Act 2 Checklist for its location.
Quests
- Lift the Shadow Curse: Only available if you sided against the Goblins and have Halsin as an ally (not companion yet) in your camp. This quest will have several steps to complete along the way, but in doing so, Halsin will join your group as a full companion at the end. Speak to him now in camp, and he will comment on what he sees with the curse and how it might be broken. This will pick up again later at Last Light Inn.
- Punish the Wicked: An exciting side quest you can pick up after meeting He Who Was out in the Ruined Battlefield (coordinates X: 126 Y: 105). His quest will send you towards the Waning Moon in Reithwin Town. Complete the quest to Shadar-Kai’s satisfaction (punish Madeline once or shame her), and he will reward you with Raven Gloves. These allow you to summon a raven familiar once per Short Rest.
- House in Deep Shadows: Started at a farmhouse east of the Shadowed Battlefield waypoint (coordinates X: 276 Y: 297). This location is also part of the Lift the Shadow Curse quest, although that is not apparent initially. You’ll meet a young ‘boy’ here named Oliver, who will ask you to play a game. Successfully find Oliver twice; he will reward you with the Ring of Shadows.
Gear
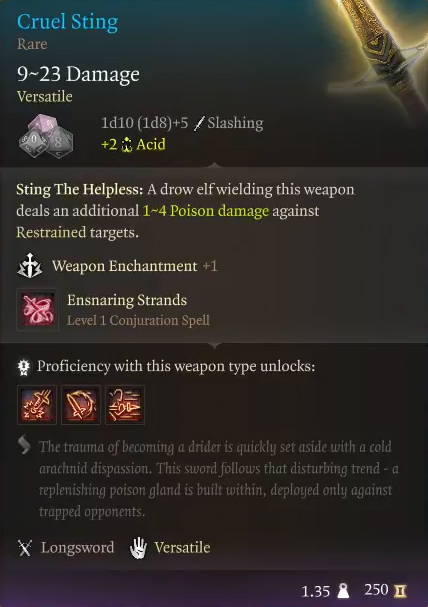
- Cruel Sting: Add poison damage for drow elf and ensnaring strands spell. Looted from Kar’niss at the ambush site.
- Luminous Gloves: Amazing with Light Cleric and Luminous Armor. Watch out for an ambush inside the Potter’s Chest on a ledge.
- Ring of Shadows: Wearer can cast Pass Without Trace once per Long Rest, which grants a +10 bonus to Stealth Checks.
- Thermoarcanic Gloves: Gives Heat, allowing you to consume the buff and increase fire damage. Ideal for fire-based Wizards/Sorcerers/Warlock builds. Looted from the Hobgolin Kansif at the ambush site.
- Ironwood Club: Meant for Druids, grants additional Bludgeoning damage when you cast Shillelagh on the weapon. Dropped by the Shadow-Cursed Shambling Mound. Prepare for ambush site including Lvl 9 Shambling Mound, Lvl 6 Vine Blights, and Lvl 3 Needle Blights.
- Shadow-Cloaked Ring: Increases damage against shadow creatures. It can be looted from the Shadow Mastiff Alpha. Summon the shadow mastiffs by destroying all the lit torches.
Last Light Inn
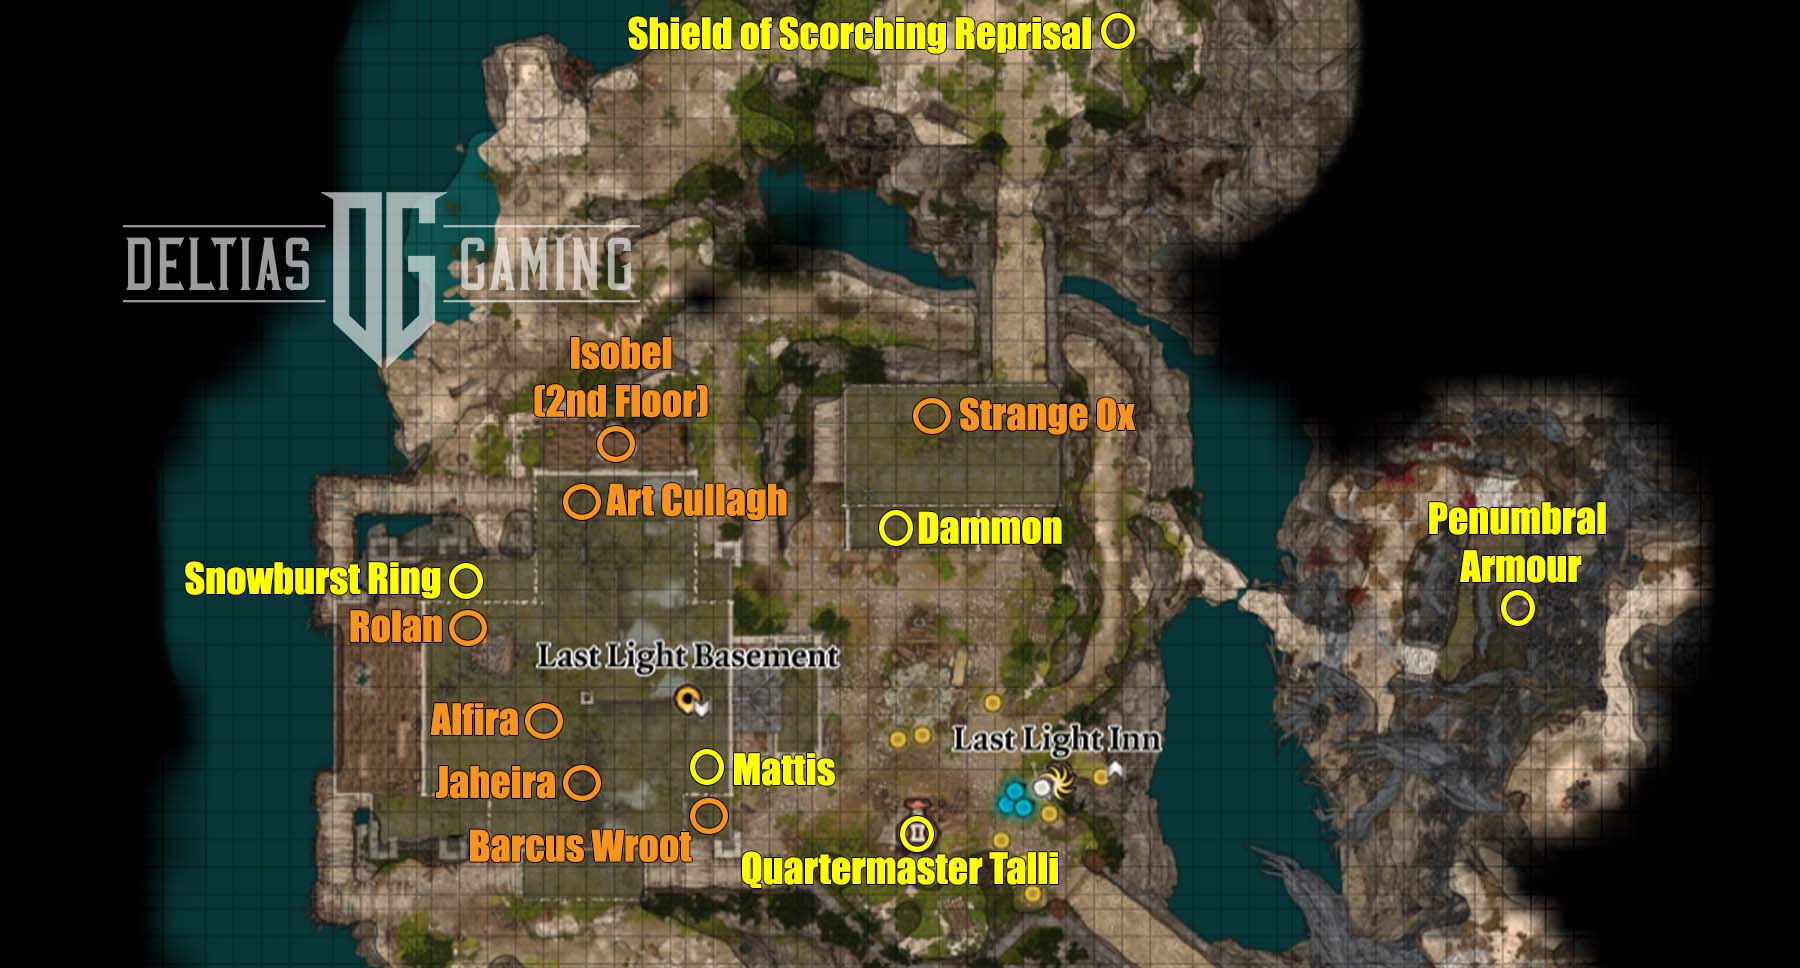
The Last Light Inn is one of two major companions, quest, NPC, and merchant hubs in our Baldur’s Gate 3 Act 2 Checklist. When you first approach, you’ll have to convince Jaheira, the leader of the Harpers, that you are not their enemy. Inside, you’ll find two major traders, Dammon and Quartermaster Talli, who have great equipment for sale. You can follow up with Dammon regarding Karlach’s infernal engine and even give him some of the extra infernal iron you’ve collected for him to make some additional armor.
Additionally, if you sided with the Tieflings and saved the Grove, you’ll find many of them here. However, they’ve fallen into some trouble again, so be sure to pick up the follow-up quest. Furthermore, you can access a Cellar area beneath the Last Light Inn. There are a couple of okay pieces of loot, and you’ll have to fight several Meenlocks, but you can also pick up a hint about the Selûnite Resistance if you read Halfred’s Note.
Companion
- Lift the Shadow Curse (Halsin): The next step in this quest will begin here, with Art Cullagh, a Flaming Fist, trapped in the Shadow-Cursed Lands for too long and unconscious. Interacting with him starts the quest Wake Art Cullagh, which will eventually take you to the House of Healing.
- Jaheria: After the confrontation outside, she wants to continue speaking to you inside. It’s best to be frank with her if you wish to have her as an ally, and she’ll explain that her ultimate goal is to defeat Ketheric Thorm. When it comes time for the assault on Moonrise Towers (we suggest infiltrating it separately first for additional quests/traders/stories), she can join your party temporarily. If successful, she will join as a full companion in Act 3.
- The Hellion’s Heart: Grab any extra Infernal Iron you have on hand, put Karlach in your party, and head over to the stables at the Last Light Inn to speak to Dammon. He’ll be able to make another upgrade for Karlach’s infernal engine, but he’ll also have some difficult news for her.
Quests
- Resolve the Abduction: Jaheira will recommend going upstairs to speak to a Cleric of Selune, Isobel. However, doing so will trigger a very difficult fight. A ‘good’ play-through will want to save Isobel from Marcus. The easiest method is to stun lock Marcus with Hold Person, Command, etc, then nuke other flyers. If you’re struggling, complete other quests/areas so your character levels up.
- Rescue the Tieflings: Only available if you completed Save the Refugees in Act 1. You can pick up this quest by speaking to Alfira inside the Inn. This will eventually lead you to the Moonrise Towers Prison, where you can attempt to rescue both the captured Tieflings and Wulbren (if you’ve been helping Barcus). It can reward you with the Potent Robe if enough Tieflings are saved.
- Find Rolan in the Shadows: If Rolan was convinced to defend the Druid Grove, and the Grove was saved in Act 1, he’ll be at the Inn now. Speak with him to start this quest, and you can find him in trouble later southeast of the Reithwin Tollhouse.
- Wake up Art Cullagh: You can find the unconscious man in a room on the ground floor. Interact with him and then visit your camp to speak to Halsin. Next, meet with Halsin at the Inn, and he will tell you that waking Art up is vital. You can find the means later at the House of Healing.
- Strange Ox: Found in the same stables as Dammon, you can speak to it again using the Speak With Animals spell or potion. You can find the ox again in Act 3 if you don’t instigate a fight.
Gear
- Snowburst Ring: Useful if using cold spells like chromatic orb cold, Cone of Ice, and Ray of Frost. It was found under a loose plank on the northside dock.
- Shield of Scorching Reprisal: A good shield if you didn’t craft one at the Grymforge. Blazing retaliation is proper to buff your AC with a bonus action. Found on the body of a Dead Flaming Fist.
- Penumbral Armour: Enhances Stealth while Obscured, an easier feat in the Shadow-Cursed Lands. It’s nice as backup armor for Rangers or Rogues. Found in a locked chest inside an abandoned house just east of the Inn.
Dammon
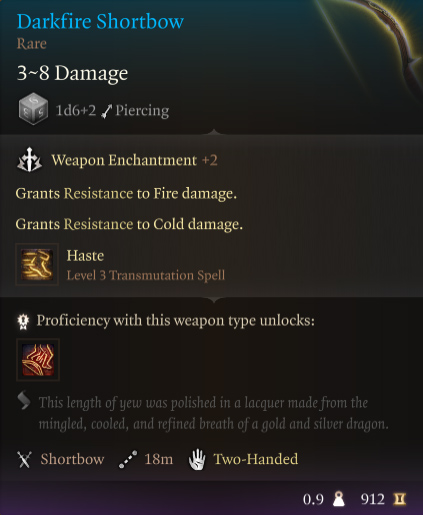
- Darkfire Shortbow: An impressive back bar bow that grants haste spell and fire/cold resistance.
- Sword of Life Stealing: A good shortsword for duel-wielding melee builds like rogues or bards.
- Swordmaster Gloves: Interesting if you like the lore of DND books (Drizzt) and useful if you want to change to a build that doesn’t have weapon proficiency.
- Flawed Helldusk Gloves: Strong gloves that do more passive damage to a weapon or unarmed attacks. Give extra Infernal Iron to Dammon, and he’ll automatically craft it for you.
- Flawed Helldusk Armour: A very good heavy armor set. Give extra Infernal Alloy to Dammon, and he’ll automatically craft them for you.
Quartermaster Talli
- Hat of Uninhibited Kushigo: A unique headpiece for Monks granting spell save DC for unarmed damage.
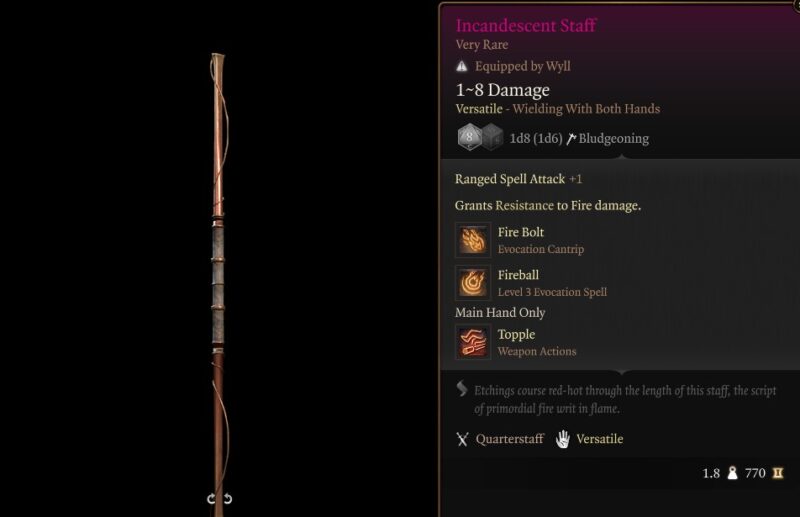
- Incandescent Staff: Cast Fireball once per Long Rest and gain the Fire Bolt cantrip. It can be combined with other Heat sets in Act 2.
- Obsidian Laced Robe: Grants fire resistance and deals return damage on a successful Spell saving throw.
- Amulet of the Harpers: Grants the Shield spell, good defensive ability for a spellcaster without access to Misty Step.
- Shield of Devotion: A great defensive shield with an extra Aid spell. Perfect for Clerics.
- The Mighty Cloth: Can be used by a Barbarian or Tavern Brawler Monk, giving +2 Strength.
- Yuan-Ti Scale Mail: Good for medium armor Rangers because of its full Dexterity modifier, meaning more Armour Class.
- Cloak of Protection: One of the best cloaks in the game and the best for defensives.
Mattis
- Evasive Shoes: Decent boots that give a small bonus to AC and Acrobatics. It can be combined with the Cloak of Protection for +2 AC passively.
- Cloak of Cunning Brume: Good for a Rogue Thief who can use Disengage as a bonus action.
Permanent Bonus
Reithwin Town
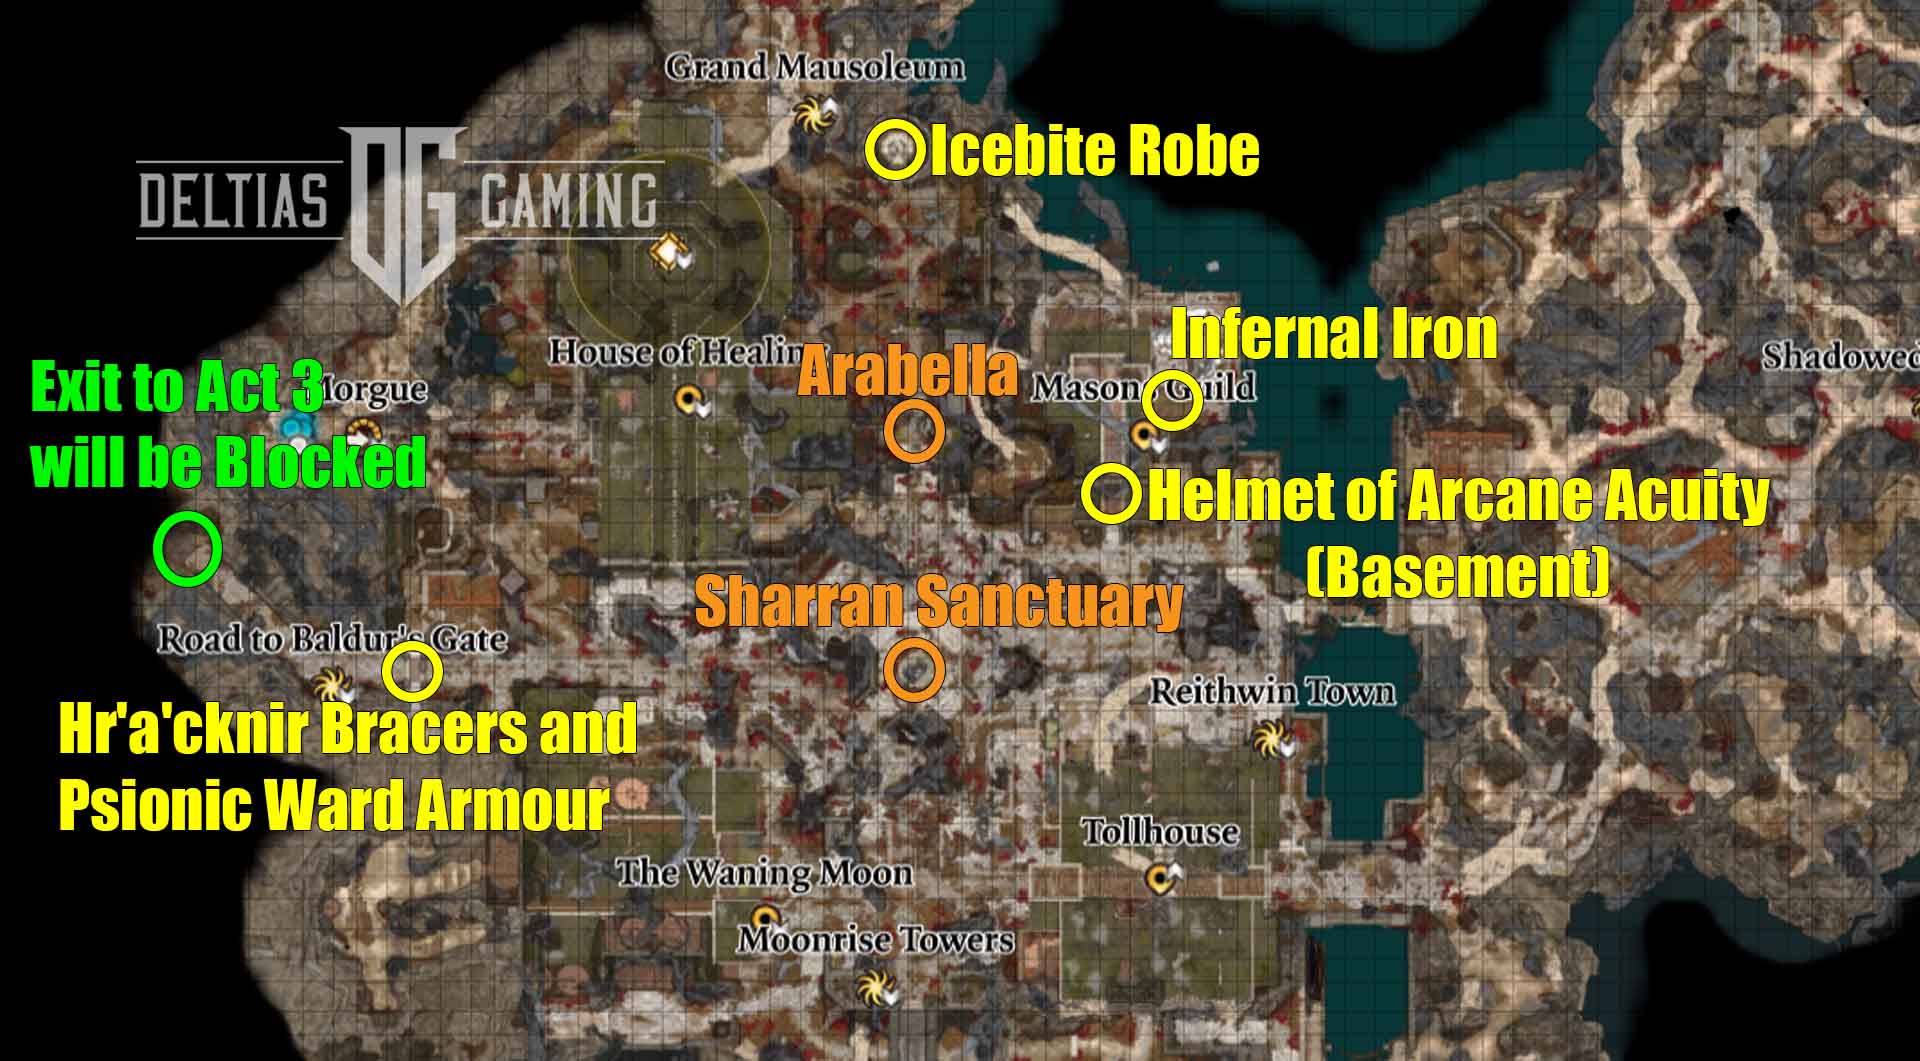
Reithwin Town is the gateway to Moonrise Towers, but you don’t want to rush through it because there are several important locations within. In this Baldur’s Gate 3 Act 2 Checklist, we’ll cover the Tollhouse, House of Healing, and Grand Mausoleum. Each has its secrets; we’ll explain those areas below. In this general Reithwin Town section, we’ll cover the Mason’s Guild, the general streets, and the central plaza.
Quest
- Mason Guild: There is not too much to find inside this building. However, grabbing the piece of Infernal Iron lying on a workbench inside is worth exploring (coordinates X: -103 Y: 19).
- Sharran Sanctuary: In the center plaza north of Moonrise Towers is a statue of Ketheric Thorm (coordinates X: -152 Y: -30). You’ll encounter several shadows and cursed Harpers to fight when you first approach. Afterwards, interact with the plaques on the statue in the following order: north, west, east. This will open a secret door to a small temple below.
- Find Arabella’s Parents: If you save Arabella in Act 1, you’ll find her alone in the streets of Reithwin, west of the Mason’s Guild. Speak to her and agree to look for her parents. You’ll find them in the House of Healing (coordinates X: -185 Y: 12), which we’ll cover below. Completing this quest and speaking to Arabella in camp will reward you with the Shadow Blade Ring and the possibility of Arabella allying with you in the final fight.
- Road to Act 3: Heading directly west of the Ketheric Thorm statue will lead you down the road and out of the Shadow-Cursed Lands. However, your way will be blocked until after the ultimate confrontation with Ketheric Throm. However, it’s important to note that a Githyanki ambush is waiting here at the gateway arch leading out of Reithwin. It’s best to sneak up on them from the sides when the time comes. Additionally, they’ll drop a couple of pieces of gear you don’t want to miss.
Gear

- Helmet of Arcane Acuity: Weapon damage grants Arcane Acuity. Found in a locked and trapped chest in the Mason’s Guild Basement.
- Icebite Robe: A good robe upgrade in Act 2 due to the buff spell and cold resistance. It was found inside a sarcophagus the north of the cemetery in Reithwin Town.
- Hr’a’cknir Bracers: Gives free Telekinesis spell and Quickened Mage Hand as a bonus action. Looted from Ch’r’ai Tska’an at Githyanki ambush point.
- Psionic Ward Armour: It’s not an excellent piece for builds, but it has a great sell price if you’re looking for extra gold. Also looted from Ch’r’ai Tska’an at Githyanki ambush point.
Tollhouse
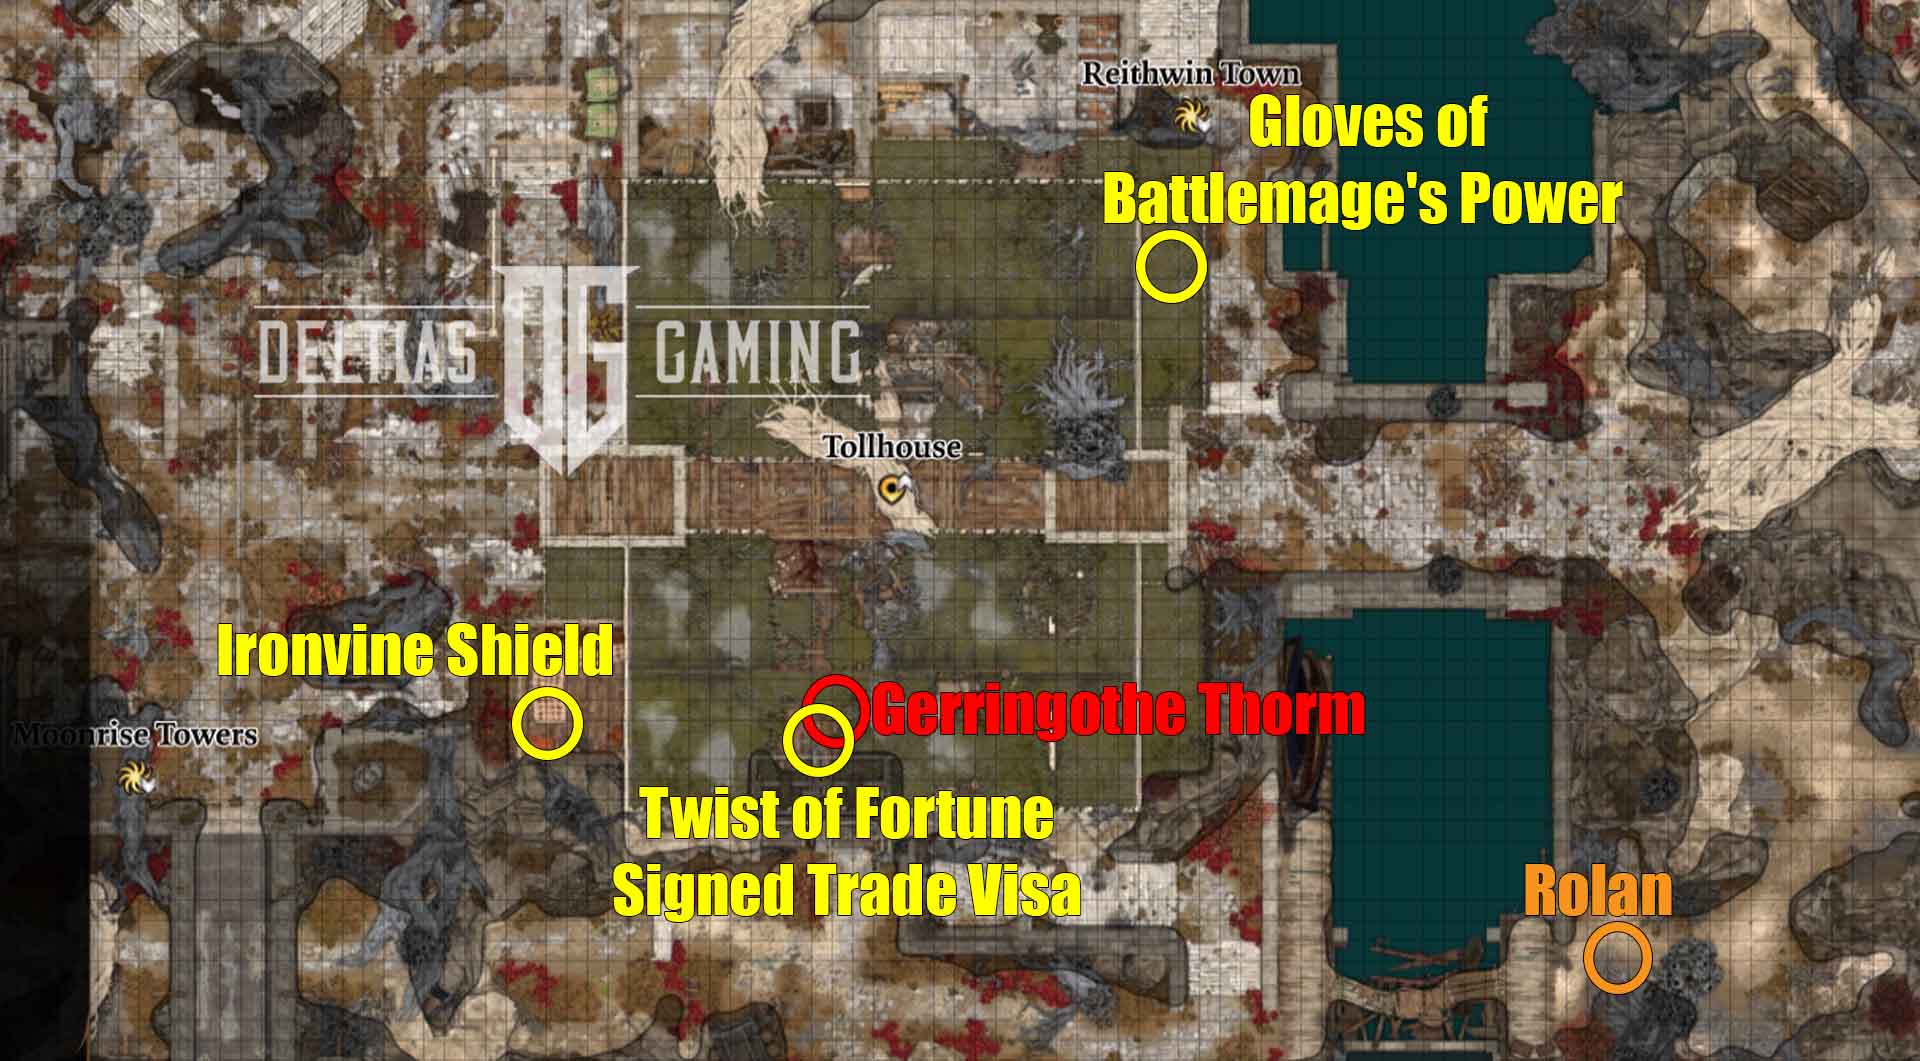
The next location to explore in our Baldur’s Gate 3 Act 2 Checklist is the Tollhouse. Within the Tollhouse, up on the second floor, you will find the large, shambling figure of Gerringothe Thorm. Approaching her will trigger an automatic dialogue cut scene, so don’t get too close until you’re ready. One way to get past her is by paying her, which will cost a LOT (5,000) but reward you with a significant bonus – see below. However, if you don’t wish to spend the gold, you can get past her through certain dialogue choices.
You’ll want to speak to her with a party member with high Charisma, and you can find the necessary difficulty checks in our Twist of Fortune guide.
Additionally, there is a chance to achieve something here. Penny Pincher will unlock if you can defeat the Toll Collector without her using gold against you. This achievement may or may not unlock if you ‘defeat’ her through dialogue choices. It seems to pop for some and not for others.
If you need to fight her, first make sure you walk around and pick up all the piles of gold, which will limit her summons. Additionally, you can knock her off a ledge down to the first floor. This will take a decent portion of her health, and you can kill her more quickly.
Quest
Find Rolan in the Shadows: You’ll find Rolan just outside Reithwin town, east of the Tollhouse docks. As you approach, he’ll be attacked by some Shadows and need your assistance. Help him, and he’ll agree to return to the Last Light Inn while you search for the Tieflings at Moonrise Towers.
Gear
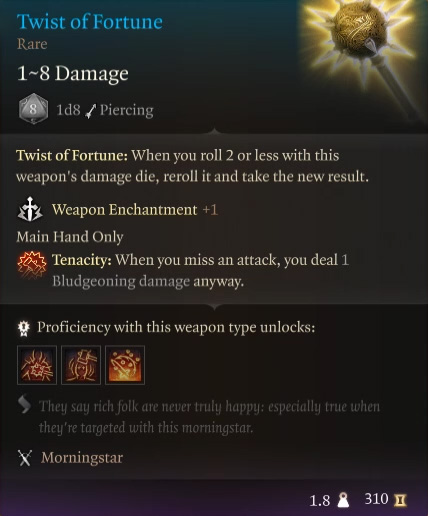
- Twist of Fortune: This can cause extra Piercing damage to foes with a lot of gold in their pockets. It could previously be used for cheese fights, but now, each hit consumes the gold the enemy holds. Therefore, it is impossible to loot after they’re dead. Dropped by Gerringothe Thorm.
- Gloves of Battlemage’s Power: Gain Arcane Acuity whenever you inflict a condition. Found in an Opulent Chest on the second floor.
- Ironvine Shield: Another shield for Druids that retaliate against attackers with Piercing damage when your weapon is infused with Shillelagh.
Permanent Bonus
Signed Trade Visa: This item is given to you by Gerringothe Thorm if you pay her full toll. She will demand ALL of your gold; you must have at least 5,000 on hand to receive the Signed Trade Visa. She’ll take everything if you have more than that, so remove any extra before speaking to her.
The Signed Trade Visa gives you a unique spell Flesh to Gold. Unfortunately, this spell cannot be copied into a Wizard’s spellbook, so this spell will be used once. Casting it will Restrain a target, and after 3 rounds, the target becomes inactive solid gold until the spell ends. The target will Petrify if it does not succeed in its Saving Throw within 3 turns.
Also Check:- BG3 Interactive Map
House of Healing
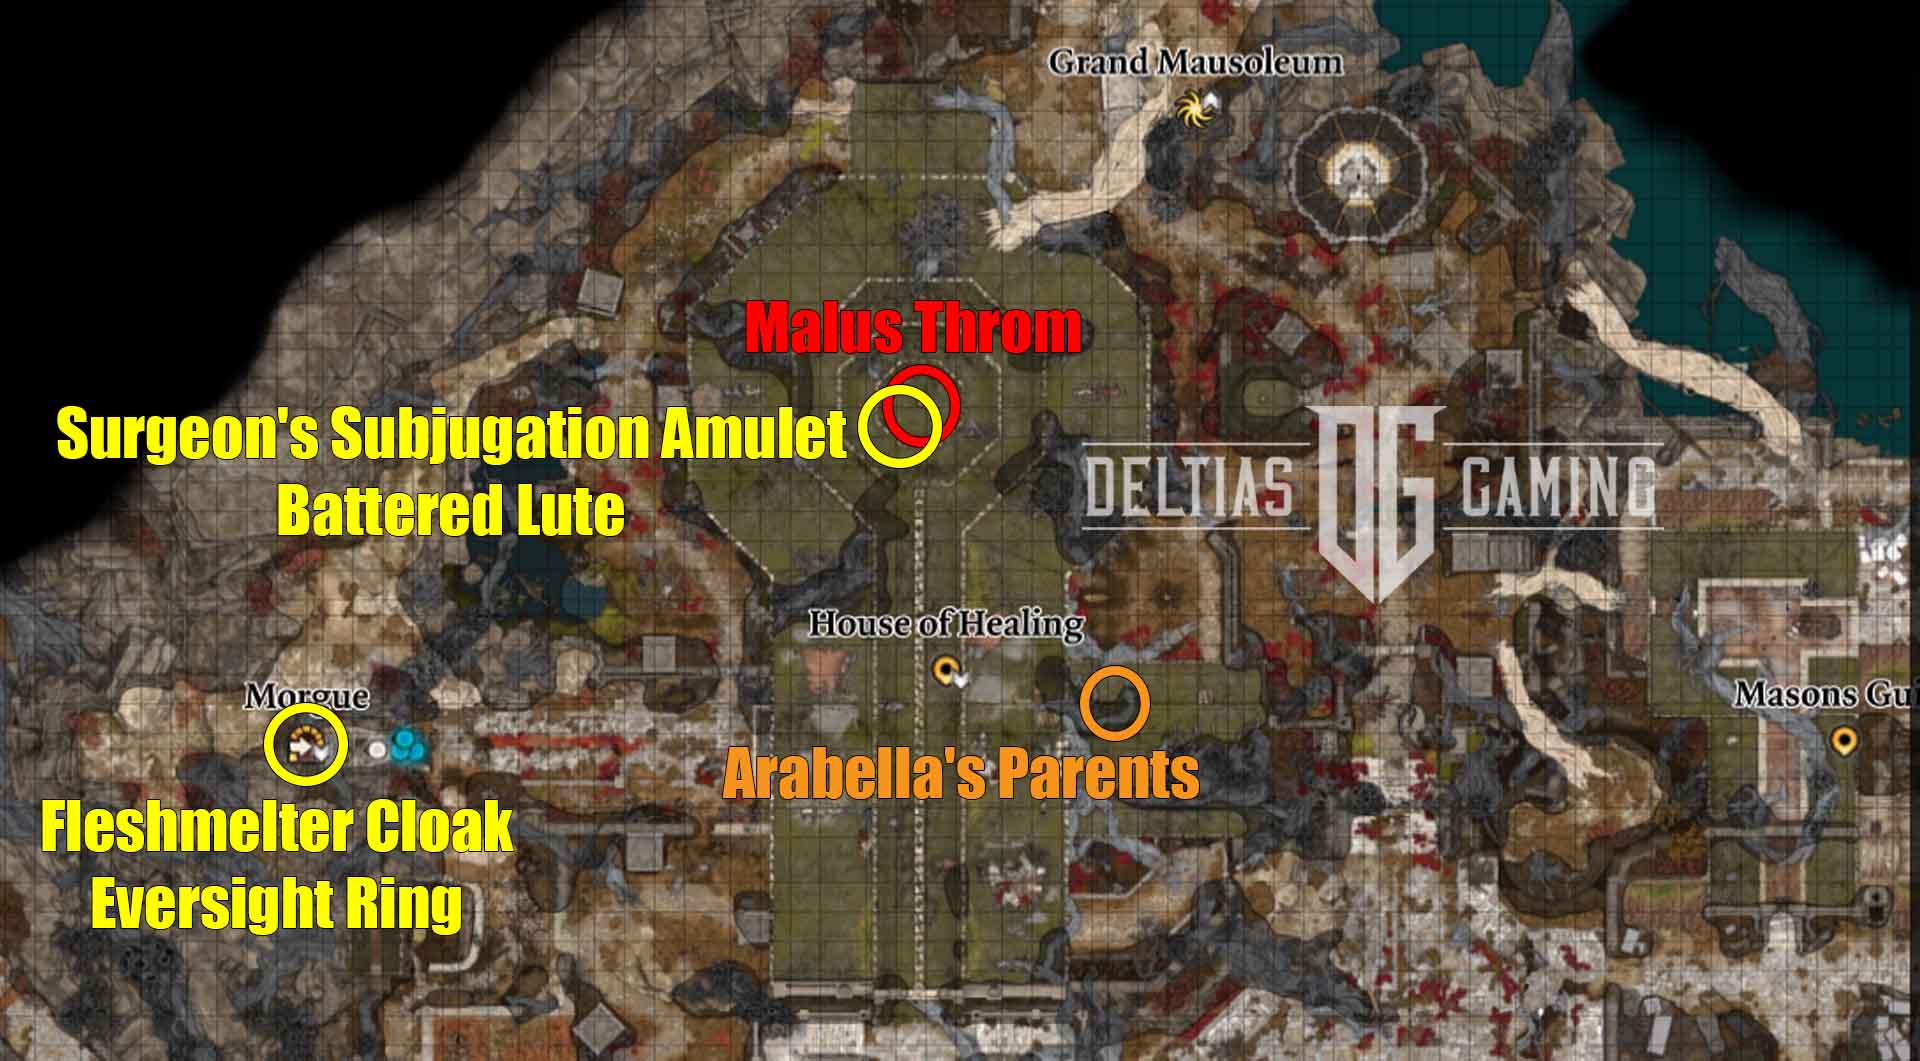
The next stop in our Baldur’s Gate 3 Act 2 Checklist is the House of Healing. Inside, you’ll find another twisted member of the former Throm family. Malus Throm is the surgeon overseeing a gruesome operating room, and once again, you’ll have another opportunity to earn an achievement. Unlocking Non-Invasive Procedure requires you to kill the Surgeon before he performs surgery on you in combat.
However, much like with the Toll Collector, you will also have the opportunity to take care of Malus Throm through dialogue choices and successful dice rolls. Once again, it’s highly recommended that you use a high Charisma character to speak to him because necessary Persuasion and/or Deception checks are very high.
Additionally, near the main House of Healing building, you can find the House of Healing Morgue. This can be entered in several ways – we recommend the back Ominous Crevice route for relatively easy access to the Fleshmelter Cloak.
Quest
- Wake Art Cullagh: A Battered Lute can be taken from Malus Throm, which appears to have Art Cullagh’s initials. Please return to the Last Light Inn and play a tune to wake him up. This will conclude this quest while progressing the larger Lift the Shadow Curse quest.
- Lift the Shadow Curse: After speaking with Art, Halsin will request that you join him at the nearby lakeside. He will create a portal to enter the Shadowfell and ask you to defend the portal until he returns. This is a difficult fight with waves of enemies to contend with. If the portal falls, Halsin is lost, and the quest fails. If you succeed, Halsin will finally join your party as a full companion. Put him in the group and make a return visit to Oliver in the Ruined Battlefield.
- Find Arabella’s Parents: You can find Locke and Komira in a children’s ward being tended to by Sister Lidwin. Use a Deception or Sleight of Hand check to convince her they’re dead. You can cast Speak With Dead on Locke to find out more. Next, you can complete the quest by returning to Arabella. When you tell her the sad news, encourage her to seek out your camp, where she’ll bond with Withers.
Gear
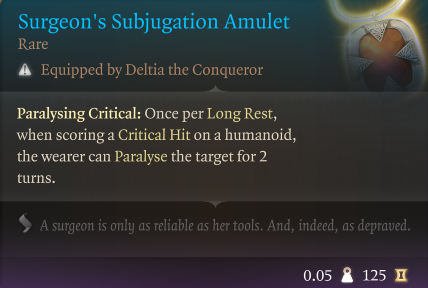
- Surgeon’s Subjugation Amulet: This accessory stuns on a critical hit once per Long Rest and goes well with Killer’s Sweetheart found later in the Gauntlet of Shar. Looted from Malus Throm.
- Shadow Blade Ring: Cast Shadow Blade once per short rest. Rewarded for completing Find Arabella’s Parents.
- Fleshmelter Cloak: Good mid-to-end-game cloak for melee builds. Deals passive Acid damage to all attackers. Taken from a Gilded Chest in the House of Healing Morgue
- Eversight Ring: Looted from Opulent Chest in the House of Healing Morgue. It grants the wearer immunity from Blindness, which can be hugely useful during certain Act 2 fights.
Permanent Bonus
Arabella’s Shadow Entangle – A Concentration spell you can cast upon shadow and undead creatures to Entangle them. This is one of the rewards for the Find Arabella’s Parents quest and can be very useful in the Shadow-Cursed Lands.
The Waning Moon
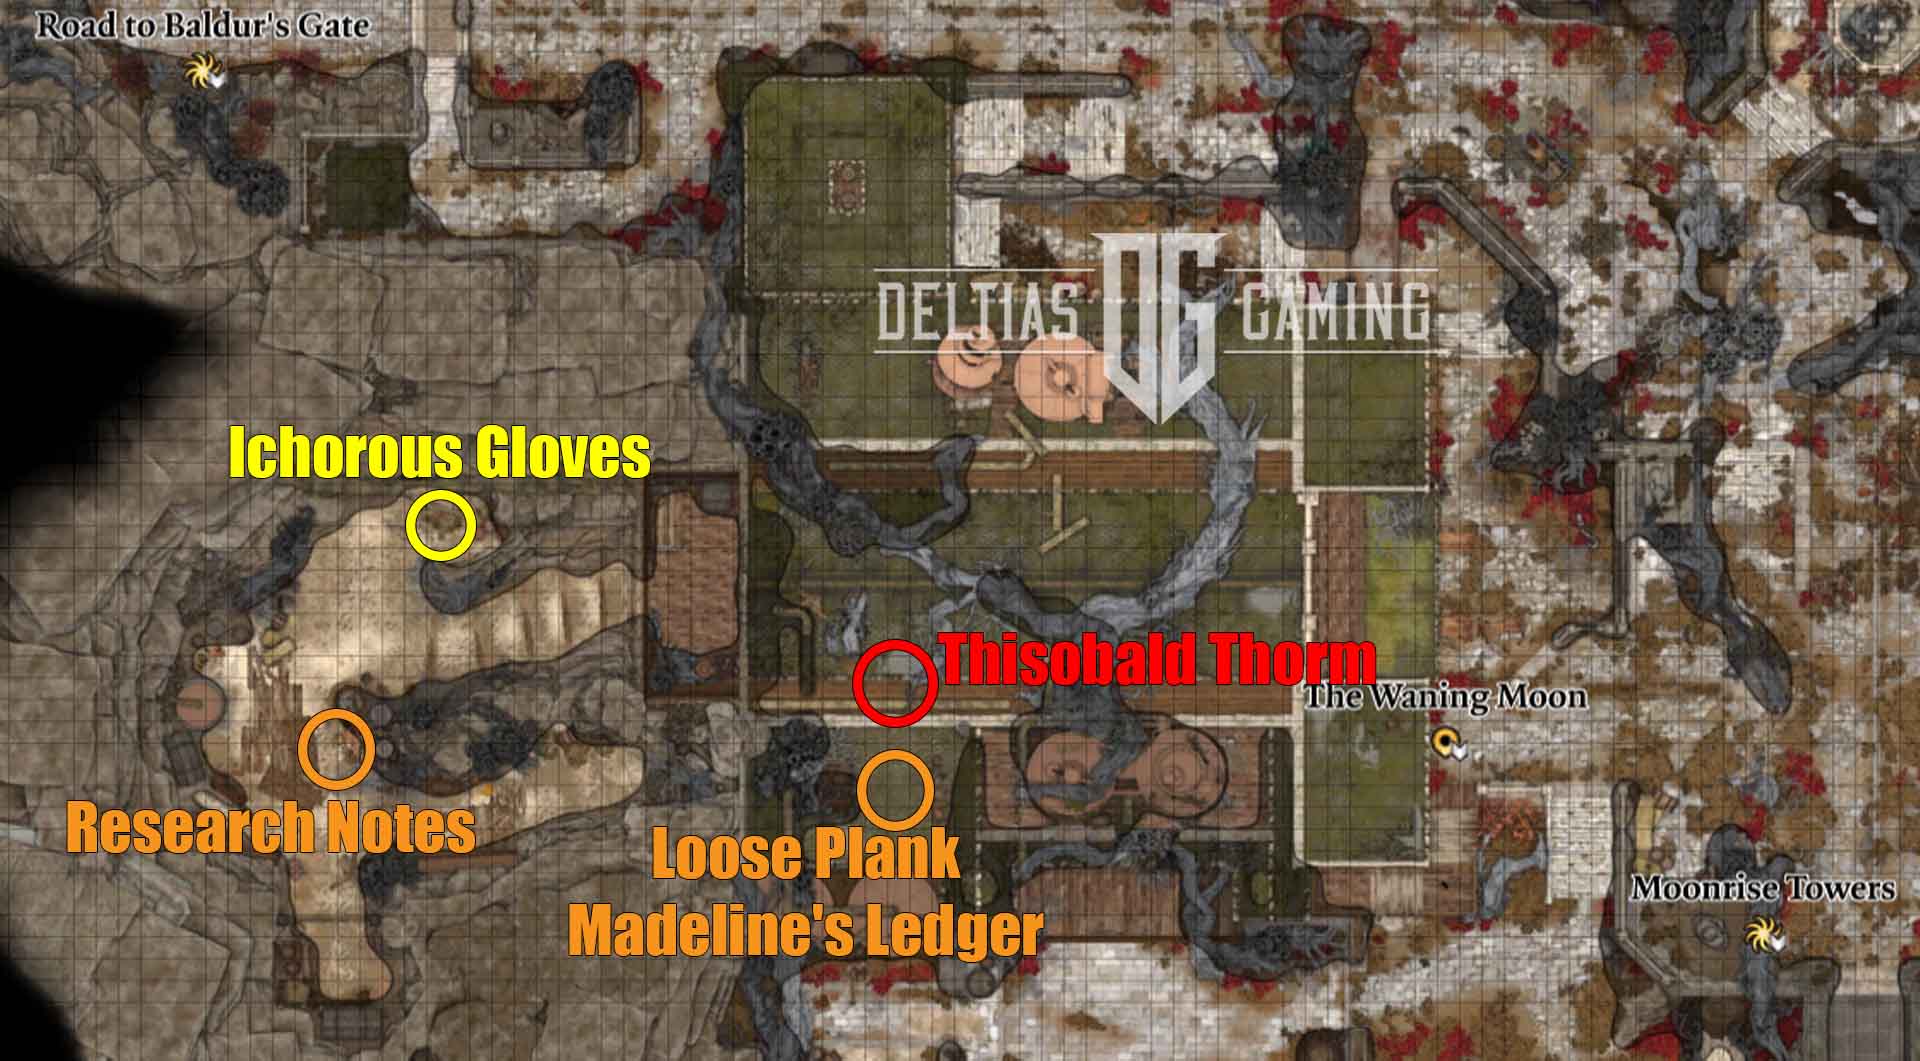
Undead bartender Thisobald Thorm oversees the bar inside the Waning Moon. Unfortunately, unlike the rest of his family, he does not have an achievement associated with him. However, approaching him at the bar will instigate a dialogue cut scene and a ‘drinking game’ where the goal is to get him to drink so much he bursts without a fight. Moreover, speaking to him will reveal additional secrets about Ketheric Thorm.
You’ll want to use a character with a high Constitution score or Sleight of Hand skill to pass the difficulty checks. This can be tricky because, along the way, you’ll also have to pass a Performance or Deception check. If you fail, Thisobald will become hostile, and you’ll be thrown into combat.
Once Thisobald dies, you can loot a Worn Key from him. This will let you into the backroom. Here, you can find some research notes on poison, gear, and a decent collection of alchemy ingredients.
Quest
- Punish the Wicked: The Waning Moon is where you will find Madeline’s Ledger for the quest given to you by He Who Was. You can find it underneath some loose planks. A successful Perception check will reveal them just to the south of where Thisobald Thorm is standing.
- Research Notes: Reading this book will reveal that Thisobald was working on a poison. He needed only one last ingredient and was waiting for a caravan to bring it. The information is smudged, but you can discern the drop-off location if you pass a 14 DC Intelligence check.
Gear
Ichorous Gloves: Generally speaking, there are better pairs of gloves to choose from by Act 2. However, if, for some reason, you need an additional set, these might pair well with the Fleshmelter Cloak.
Moonrise Towers
Moonrise Towers is the second major hub in our Baldur’s Gate 3 Act 2 Checklist, where you can recruit another companion, pick up or continue quests, meet NPCs, and visit several traders. Although the final confrontation and climax of Act 2 will occur at the Towers when you mount an attack, you can approach the Towers initially and get in without arousing suspicion. You will want to do this because there are certain side quests you will want to follow up on and merchants whose gear you don’t want to miss.
Additionally, you can discover a few permanent bonuses in Moonrise Towers.
Companion
Decide Minthara’s Fate: Provided that you either sided with Minthara and destroyed the Emerald Grove or knocked her unconscious in Act 1, Minthara can be found in the central audience chamber pleading her case to Ketheric Thorm. You’ll get an opportunity to give your opinion on the matter, and if you want to recruit her, you should speak her in defense. Nevertheless, Ketheric still decides to condemn her, and she’ll be dragged away to the Prison. You can visit the Prison in the next section and recruit her there.
Quest
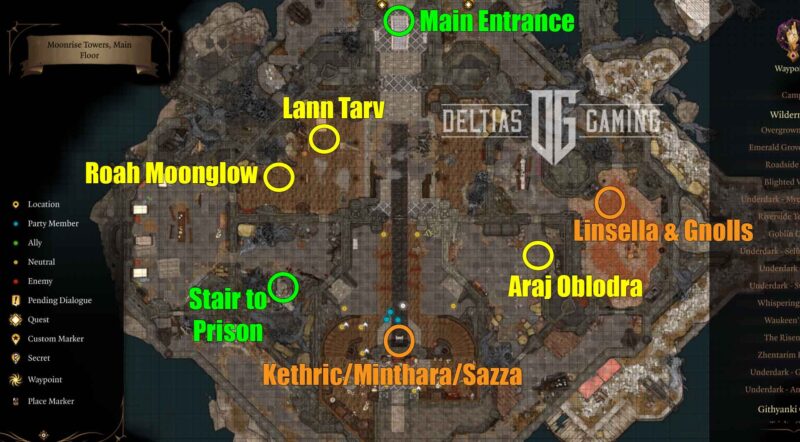
Main Floor
- Infiltrate Moonrise Towers: If you sided with the Absolute cultists during the ambush by the Harpers, then Kar’niss will have already led you safely to Moonrise Towers. If you sided with the Harpers, you must convince the guards you’re a faithful True Soul when you first approach the Towers. Either way, you should be able to walk into the Towers and begin to explore.
- She Cannot Be Caged! You’ll find her in the audience chamber if you save Sazza twice in Act 2 (once from the Grove and then from Minthara in the Shattered Sanctum). Save her a third time here, and an achievement should unlock.
- Free the Gnolls: Three Gnolls are controlled by a True Soul named Linsella in the kitchen. If you pass a 16 DC Wisdom check to sever her control, the gnolls will kill her. They’ll turn on you unless you can pass another 16-difficulty check. Loot Linsella for another tadpole parasite.
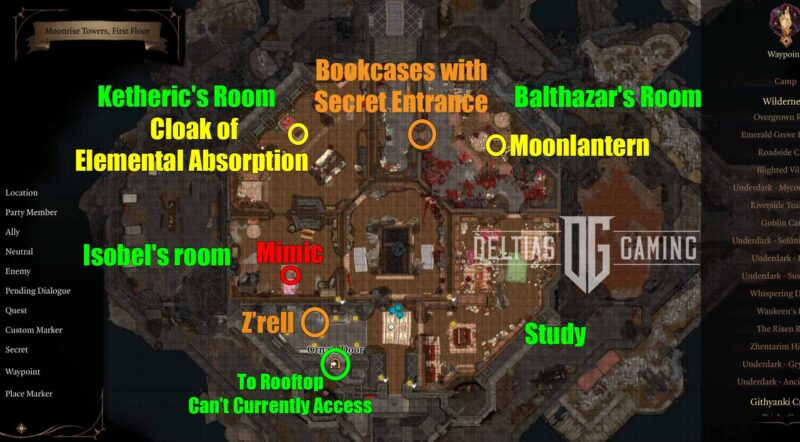
- Unlocking Lann Tarv’s secret stash: Lann is a merchant found on the Main Floor. He’s a trader with some decent gear, but you can unlock additional stock by convincing Z’rell (found on the First Floor above) to give you access. During the conversation, ask: “What exactly was this relic he was sent to retrieve?” You must clear a passive Insight check and an 18 DC Persuasion roll.
First Floor
- Moonlantern: If you followed Kar’niss to the Moonrise Towers and haven’t yet been to Last Light Inn, you’ll need outside protection from the Shadow Curse. You can find a Moonlantern available on this floor in Balthazar’s room. It will be propped up against a chest just below the area with the telescope.
- Balthazar’s Secret Room: as you walk past a bookcase, passing 10 DC Perception checks will highlight some books inside Balthazar’s room. Click only on the upper right, “Musty Tomes.” Then, grab the heart from a nearby corpse and place the heart on the stone altar next to the bookcases. This will open a secret room where you can find a strange ritual circle. With Gale, you can unlock one of two bonuses, detailed below.
- Additional First Floor Finds: Besides Balthazar, other rooms belong to Ketheric and Isobel. Searching through them, you can discover extra details about the family and the main story. You’re not supposed to be in those rooms, however. There will be multiple doors with high DCs, so you’ll want a high Sleight of Hand character to help unlock everything.
Gear
- Cloak of Elemental Absorption: Take half the elemental damage targeting you once per Short Rest. Looted from Opulent Chest in Ketheric Thorm’s room.
- Spineshudder Amulet: Inflict two turns of Reverberation with a ranged Spell Attack. Dropped by Mimic in Isobel’s Room on the First Floor.
Roah Moonglow
- Sharpened Snare Cuirass: Perfect for a Ranger because of the total Dexterity modifier to armour. Additionally, enemies will have a disadvantage in saving throws against ensnaring attacks.
- Gloves of Crushing: Good gloves for increasing damage on Monk builds.
- Armour of Devotion: Gives Paladin an additional Channel Oath charge. It’s also just one of the best-looking armors in the game.
- Drakethroat Glaive: Increases Dragonborn’s breath damage and comes with an elemental weapon spell.
- Ne’er Misser: An excellent crossbow for dual crossbow builds like Rogues and Bards. It also grants a cast of Magic Missile at level 3.
Lann Tarv
- Gloves of The Duellist: A good weapon for Bards using a one-handed dueling build.
- Sentinel Shield: Good for slower characters like Clerics. The +3 Initiative will boost their order of attack.
- Enraging Heart Garb: This gear is for Barbarians and grants +2 Constitution. However, Mighty Cloth increases damage, so choose what works best.
After you convince Disciple Z’rell to give you additional aid in finding Ketheric’s relic:
- Gauntlets of Surging Accuracy: Amazing for a Fighter build using Action Surge on turn one.
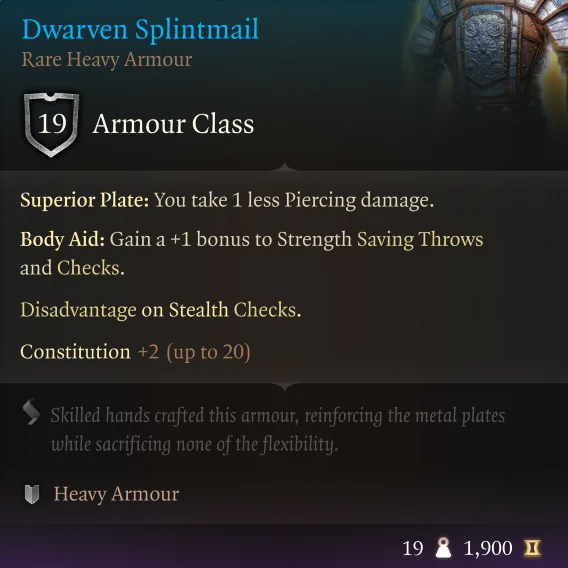
- Dwarven Splintmail: A tremendous heavy armor set with a high Armour Class and +2 to Constitution.
Permanent Bonus
- Potion of Everlasting Vigour: Araj Oblodra is a Drow trader who can be found on the Main Floor. She’ll initially ask for some of your blood to make an Elixir, granting you a race-specific boost until your next Long Rest. Moreover, you’ll be able to find her again in Act 3 for another bonus. Additionally, if you have Astarion at your party, she’ll be very interested in experiencing a vampire spawn bite. If you persuade Astarion to do it, she’ll give you a drink, granting a permanent +2 Strength to whoever consumes it. It’s a fantastic permanent bonus but comes at the cost of Astarion’s extreme disapproval.
- Balthazar’s Ritual Circle: If Gale is in the party, you can make two choices regarding this circle. First, Gale can use the ritual circle to create a Shadow Lantern. This item has a unique summoning spell, Conjure Shadow Lantern Wraith, which you can use once during Long Rest. Secondly, you can choose to destroy it. This will grant you Mystra’s Benevolence, which grants Gale Advantage on Concentration checks and lasts until the next Long Rest.
Moonrise Towers Prison
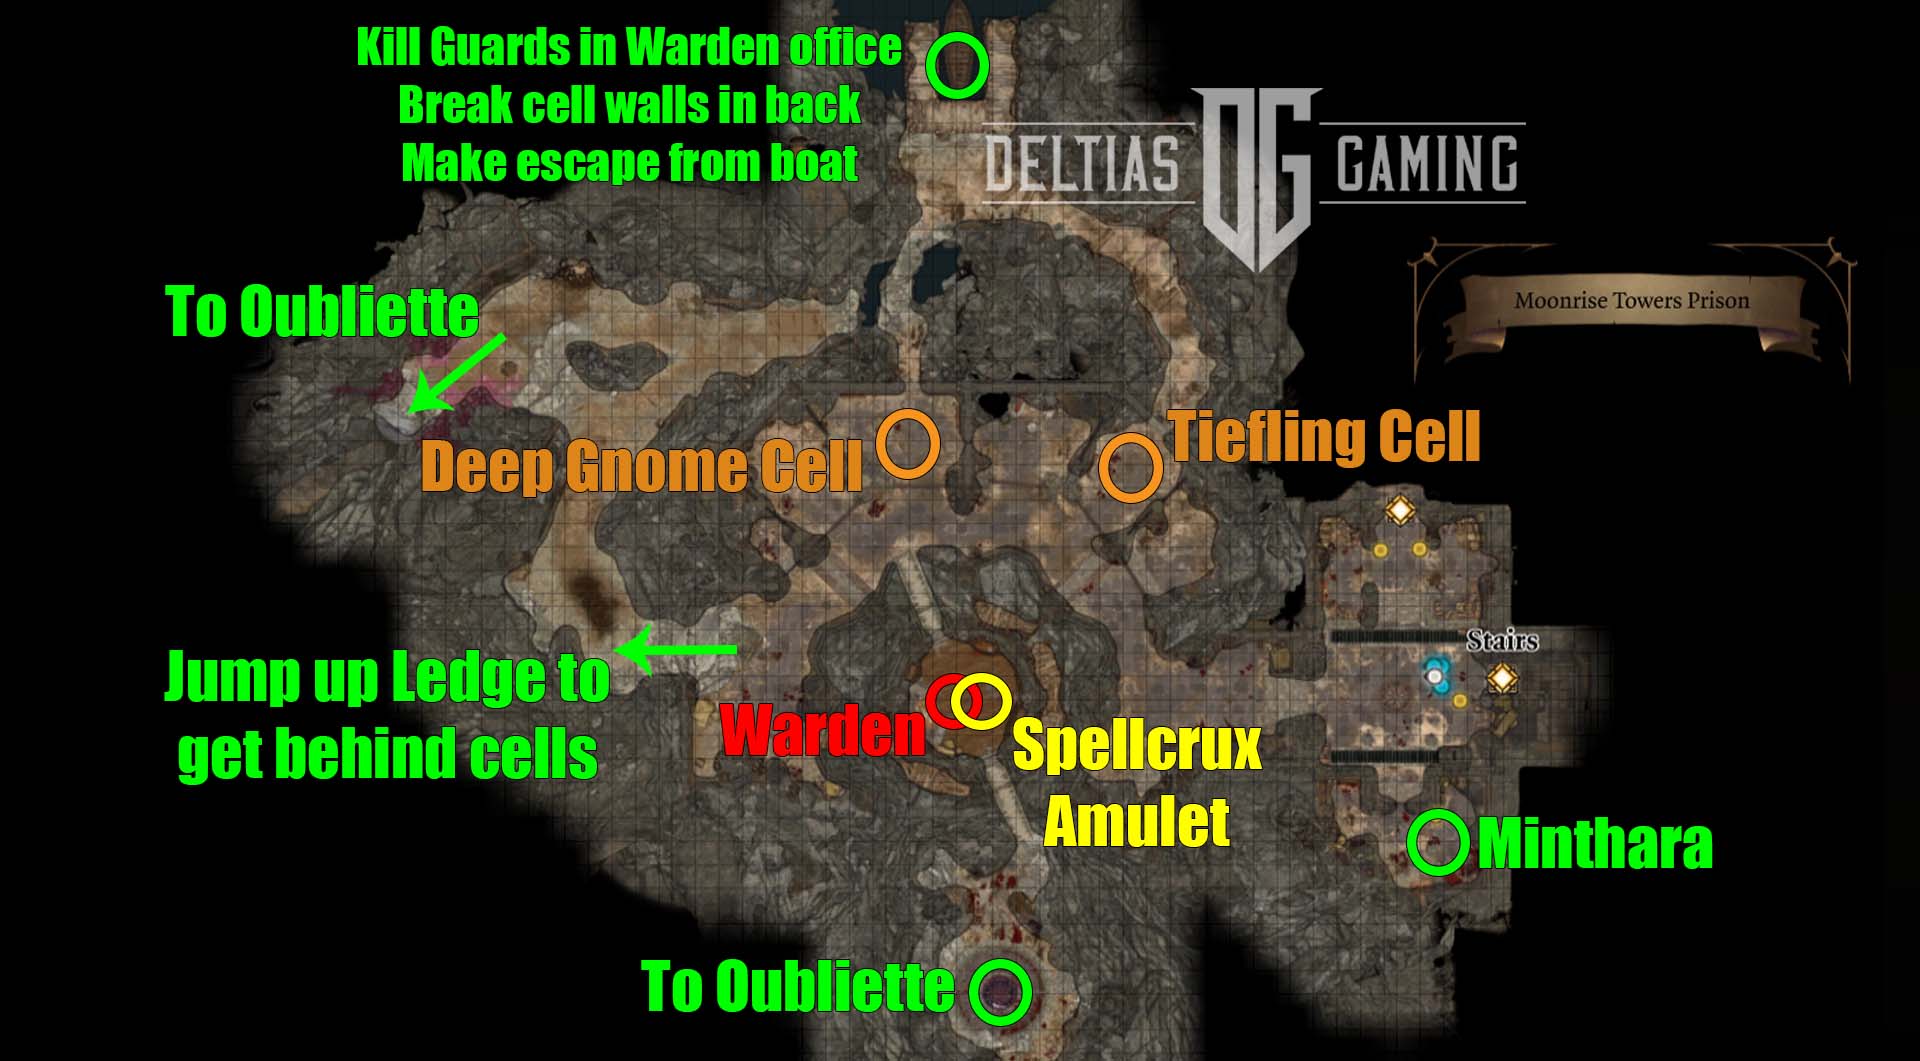
The Prison is easy to miss if you don’t know where the stairs to it are, but there are several reasons in our Baldur’s Gate 3 Act 2 Checklist to visit. The first is Minthara, who you can fully recruit to your party if you’ve followed all the steps. Additionally, depending on your actions during the game’s last Act, you can potentially rescue a couple of different groups.
Finally, even if you didn’t bother with Minthara and don’t care about anyone in the cells, you should still visit the Prison to grab at least one great gear piece for your spellcaster.
Companion
Decide Minthara’s Fate: Minthara is questioned/tortured by two Inquisitors in the prison. Attack them to rescue Minthara, who will be grateful for the assistance. She’ll now need to be escorted out of Moonrise Towers. You can do this by casting Invisibility on Minthara and then walking out freely. Or, you can attempt to walk out without obscuring her. However, you’ll need to pass a series of Intimidation, Deception, or Persuasion checks. Once outside the boundaries of Moonrise, you will speak to Minthara again and can encourage her to join you at camp. At this point, she will finally be a full companion.
Quest
- Rescue the Tieflings: Depending on how many survived, 1 to 4 Tieflings will be imprisoned in a single cell. If you speak to them (you must pass a 14 DC Deception/Persuasion check with the guard), you’ll be told that the Gnomes have a plan. This quest ties in with Rescue Wulbren; you must rescue both groups simultaneously.
- Rescue Wulbren: This friend of Barcus Wroot can be found in the next cell down. He has a plan, but you should take care of this yourself. The easiest route is to enter the Warden’s office. Kill her while she’s there alone, and attack each of the guards as they enter on their patrol. This will clear the guards without alerting the whole Tower. Then, you can jump up the ledge and enter the area behind the cells. Break down the walls, and the Gnomes and Tieflings can escape.
- Oubliette: This is a small area underneath the prison. You can find the easiest entrance behind the cells, where a ledge serves as a ladder down. There isn’t much here, but you can find a tadpole parasite on one of the corpses. You can also find a Harp-Shaped Pin in one of the many piles of viscera. This can be used in Act 3 to enter Jaheria’s basement for some good loot in Act 3.
Gear
- Spellcrux Amulet: One of the best items in the game because it can relieve a spell and equip something else. Looted from the Warden.
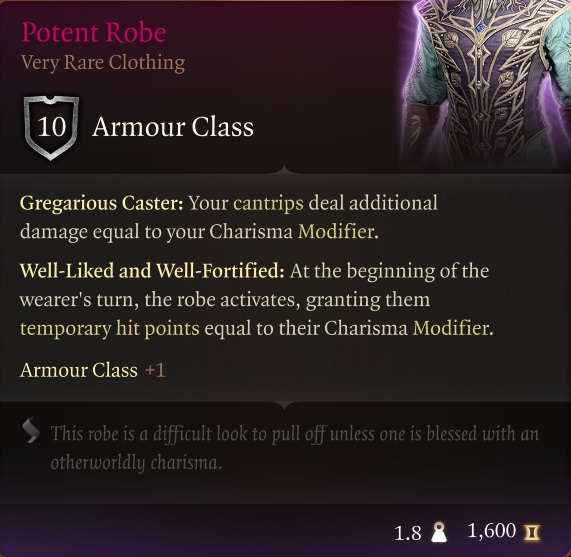
- Potent Robe: A great mid-game robe for Sorcerers or Warolocks that grants a boost to cantrip damage and a temporary increase to health. A reward from Alfira for completing Rescue the Tieflings.
Grand Mausoleum
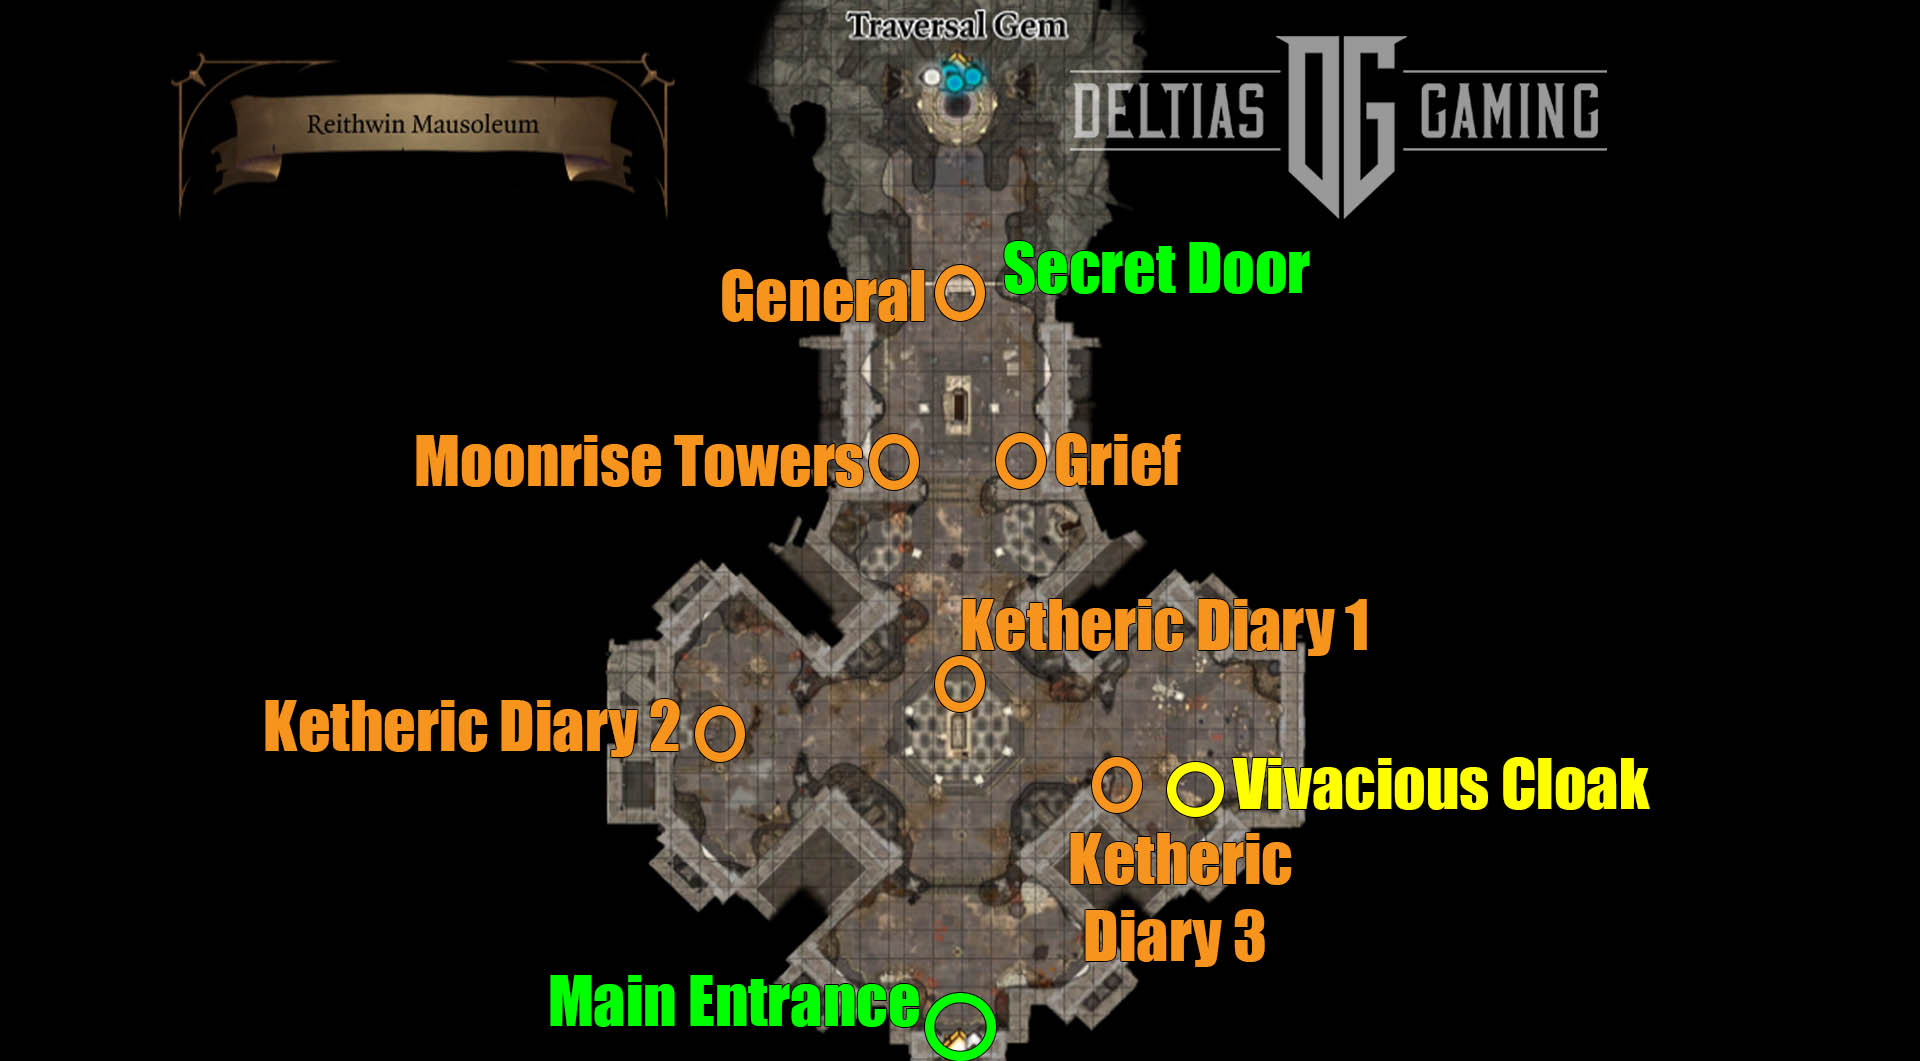
The Grand Mausoleum can be found north of the House of Healing. As you approach for the first time following our Baldur’s Gate 3 Act 2 Checklist, you’ll meet up again with Raphael. He warns you about a certain deadly creature that can be found within (although this creature isn’t in the Mausoleum itself, but an area beyond it). Moreover, Raphael wants you to kill the beast for him and promises that in exchange, he’ll tell Astarion what the arcane tattoos on his back mean.
There isn’t much to find within the Mausoleum itself, though a few Ketheric diaries will give you additional insight into the story. Furthermore, one will give you a clue to solve the puzzle in the backroom and unlock a secret door.
Quest
Unlock the Secret Passage: Before stepping into the back North room, you’ll want to have a party member with high Sleight of Hand skills make their way around the space and disarm many traps. As you do this, you’ll see three large paintings on the wall, all with shiny buttons beneath them. These buttons must be pressed in a certain order. The diaries say “from splendour, to tragedy, to infamy”. Therefore, you’ll want to press the buttons in this order:
- Moonrise Towers/Selunite painting
- Grief/Funeral painting
- General/Shar painting
Gear
Vivacious Cloak: Grants 8 Temporary Hit Points for four turns after casting a spell while in melee. It can be looted from a chest in the Mausoleum.
Gauntlet of Shar
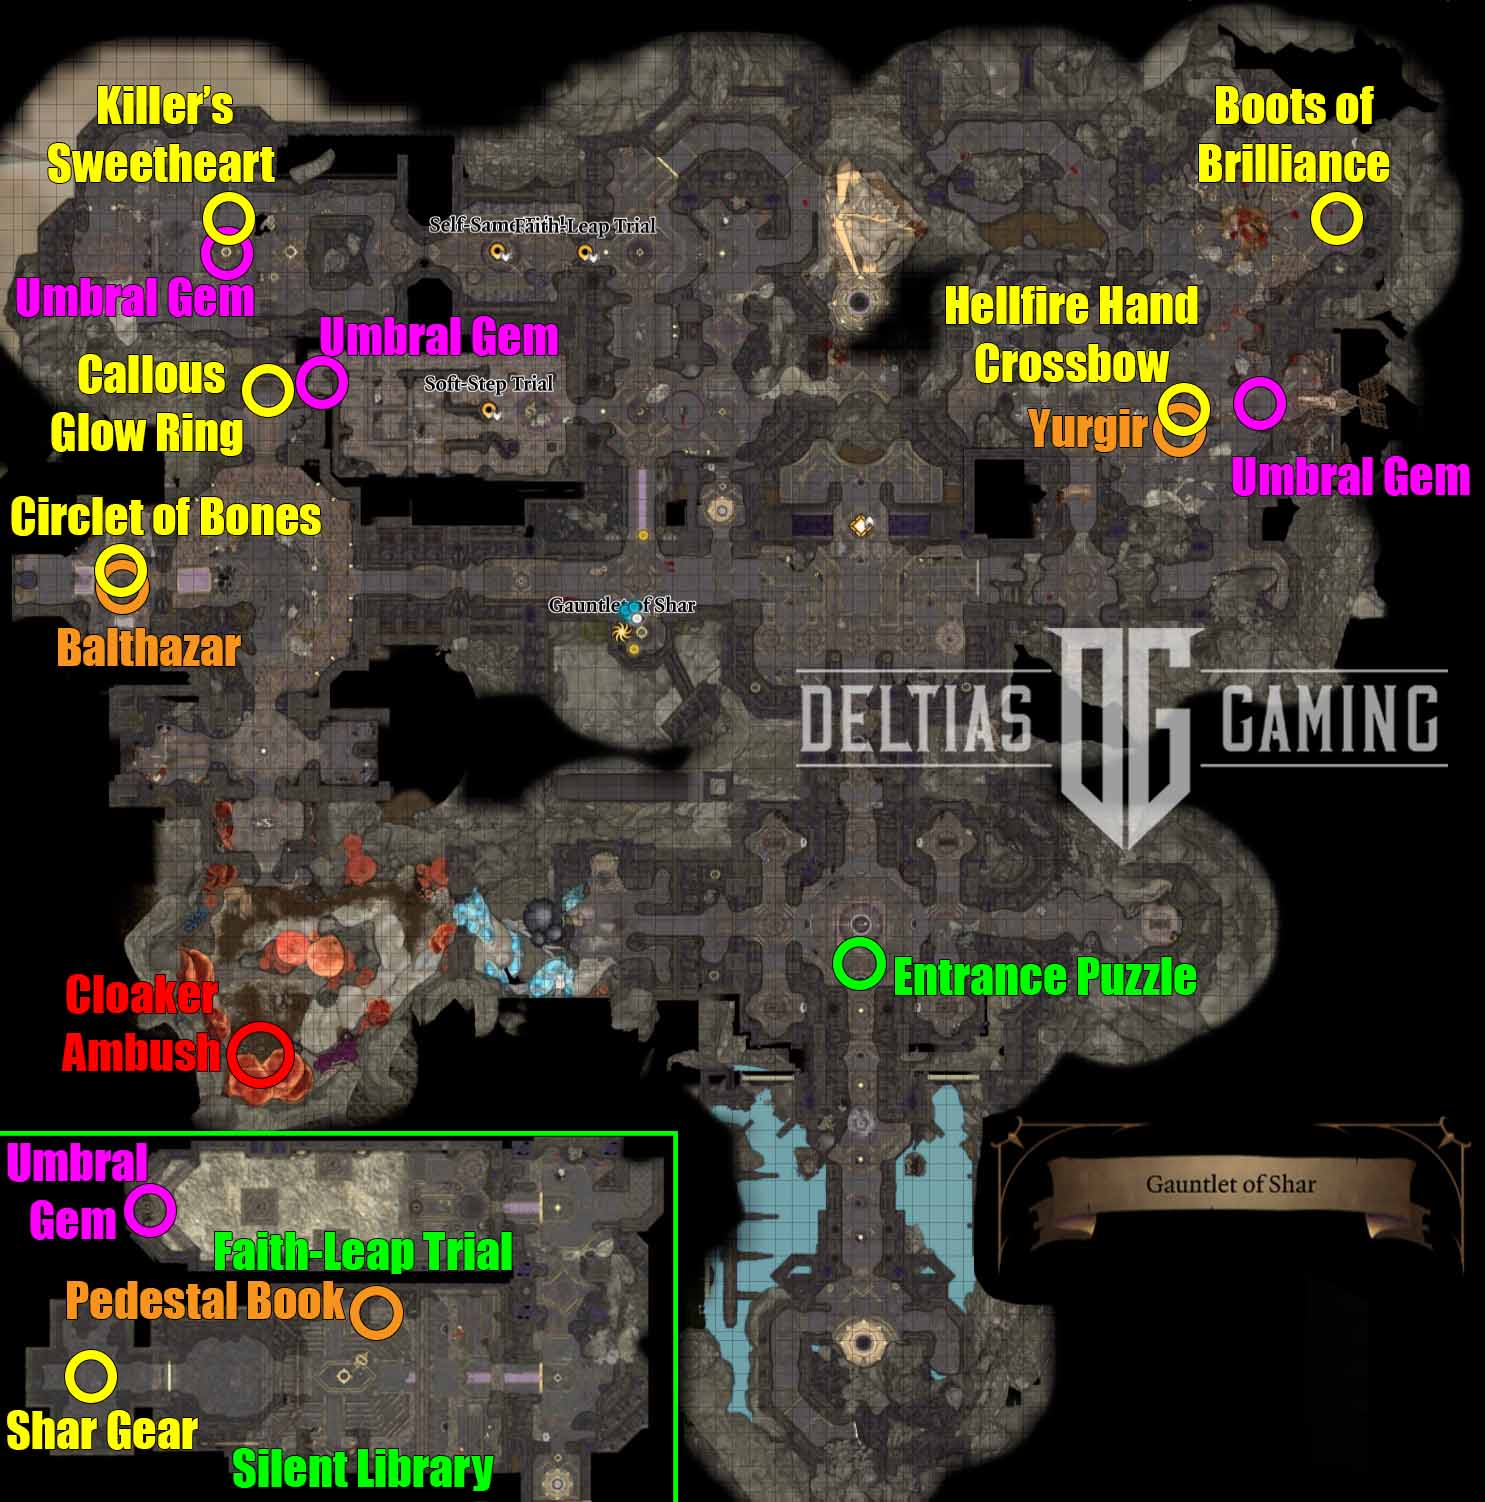
Next in our Baldur’s Gate 3 Act 2 Checklist is the Gaultlet of Shar. This is a huge temple-like area, with several trials and puzzles you must solve to find Ketheric’s relic. We highly recommend bringing Shadowheart to your party if you have her as a companion. This section is hugely important to her quest, and she can gain great gear.
The Gauntlet is where you will find the creature Raphael has asked you to kill. Moreover, you’ll also meet up with Balthazar, a necromancer working for General Ketheric Thorm.
Finally, completing the trials in the Gauntlet will unlock the way to Ketheric’s relic. Crossing the threshold into the Shadowfell will propel the main story forward. Upon your return, you will immediately enter into the final confrontation with Ketheric Thorm. Therefore, before stepping into the portal, ensure you have completed all of the critical Act 2 quests you wanted to finish. These include Rescue the Tieflings/Wulbren, Lift the Shadow Curse, and Decide Minthara’s Fate.
Your task will be to collect four Umbral Gems, which will unlock the way to Ketheric’s relic. For a complete guide to all the trials and puzzles in this area, check out our complete Gauntlet of Shar Walkthrough.
Quest
- Meet with Balthazar: In the large space outside of Balthazar’s location, you will be attacked by Dark Justiciars. Concentrate on destroying the portals they are coming out of. Balthazar will then introduce himself. You can remain friendly and enlist the help of his giant Flesh creature. Or, you can attack. It’s highly recommended that you attack him here. If you do not, he will show up again later in the Shadowfell, and he is much more difficult to deal with there.
- Break Yurgir’s Contract: Yurgir is an Orthon trapped in the Gauntlet of Shar by his contract with Raphael. Moreover, he is the deadly creature Raphael has asked you to deal with. You can spare Yungri, but doing so risks Astarion leaving your party. Moreover, killing Yurgir is the only way to get the powerful Hellfire Hand Crossbow. Additionally, through dialogue, you can convince Yurgir to kill his minions, his Displacer Beast, and finally, himself. But you’ll have to pass a series of Persuasion rolls with 16, 21, and 21 difficulty checks.
- Find the Nightsong: Completing all three trials and defeating Yurgir will give you all four Umbral Gems. When you’re finished exploring, take all four gems to the Pedestal of Reckoning. Use one gem to unlock the elevator and head down. There will be another alter where you place the last three gems, which opens the final doors. Entering the pool beyond will take the group into the Shadowfell.
- The Chosen of Shar: Throughout the trials of the Gauntlet, Shadowheart speaks regularly of Shar and being tested. When the group steps through the portal into the Shadowfell, she will need to make a final choice regarding the fate of the Nightsong. This choice will cement her allegiance to one of two deities.
Gauntlet of Shar Trials
- Entrance Puzzle: Have a character, Misty Step, next to the Umbral Gem before the statute. Quick and easy.
- Soft-Step Trial: Interact with Shar statue. Crouch to sneak and go through the last door on the right. Avoid shadows and traps, head straight to the back wall, and press a button on the right. The wall in front will rise. Head through all the way forward and then to the left.
- Self-Same Trial: Your party will be fighting shadow versions of themselves. You can make the encounter simpler by only having one character go in. We recommend Shadowheart. Have her interact with the basin, then sneak up to her shadow self on the top platform. You won’t be able to see the shadow, so come out of stealth. Hit the shadow with Radiant damage. Spirit Guardians works great here.
- Faith-Leap Trial: Head down the stairs past the giant statue to find the third and final trial. Take a look at the floor in front of the blood altar. It shows the map of how to proceed through the shadows to get to the other side of the room.
- Silent Library: Destroy the Librarian portal located in the center of the room first so you can use spells against the enemies inside. Locate the book “Teachings of Loss: The Nightsinger” on one of the trapped bookshelves to the northeast. Place the book on the pedestal in the middle of the room. This will unlock a secret shrine area with some good gear.
Gear
- Circle of Bones: Cast Animate Dead once per Long Rest. Dropped by Balthazar.
- Callous Glow Ring: Deal additional damage to illuminated enemies, which works with the Blood of Lathander. Found in Opulent Chest behind 30 DC locked door.
- Hellfire Hand Crossbow: A great crossbow with a powerful spell. Furthermore, it can be combined with Ne’er Misser for a duel-wielding crossbow build. Dropped by Yurgir.
- Boots of Brilliance: Restores 1 Bardic Inspiration per Long Rest. Found in a Heavy Chest north of Yurgir.
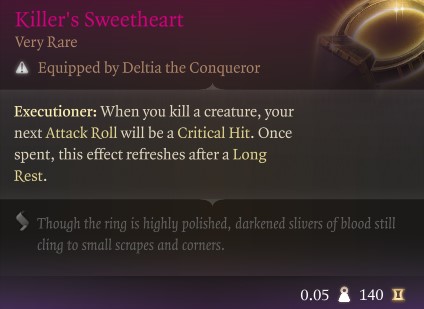
- Killer’s Sweetheart: This ring is one of the best jewelry items in the game due to the Auto Critical. Found on the ground in the Self-Same Trial.
- Spear of Night, Dark Justiciar Half-Plate, and a Dark Justiciar Helmet: A complete gear set best suited for a Lady of Shar. All are found in the Silent Library.
Mind Flayer Colony
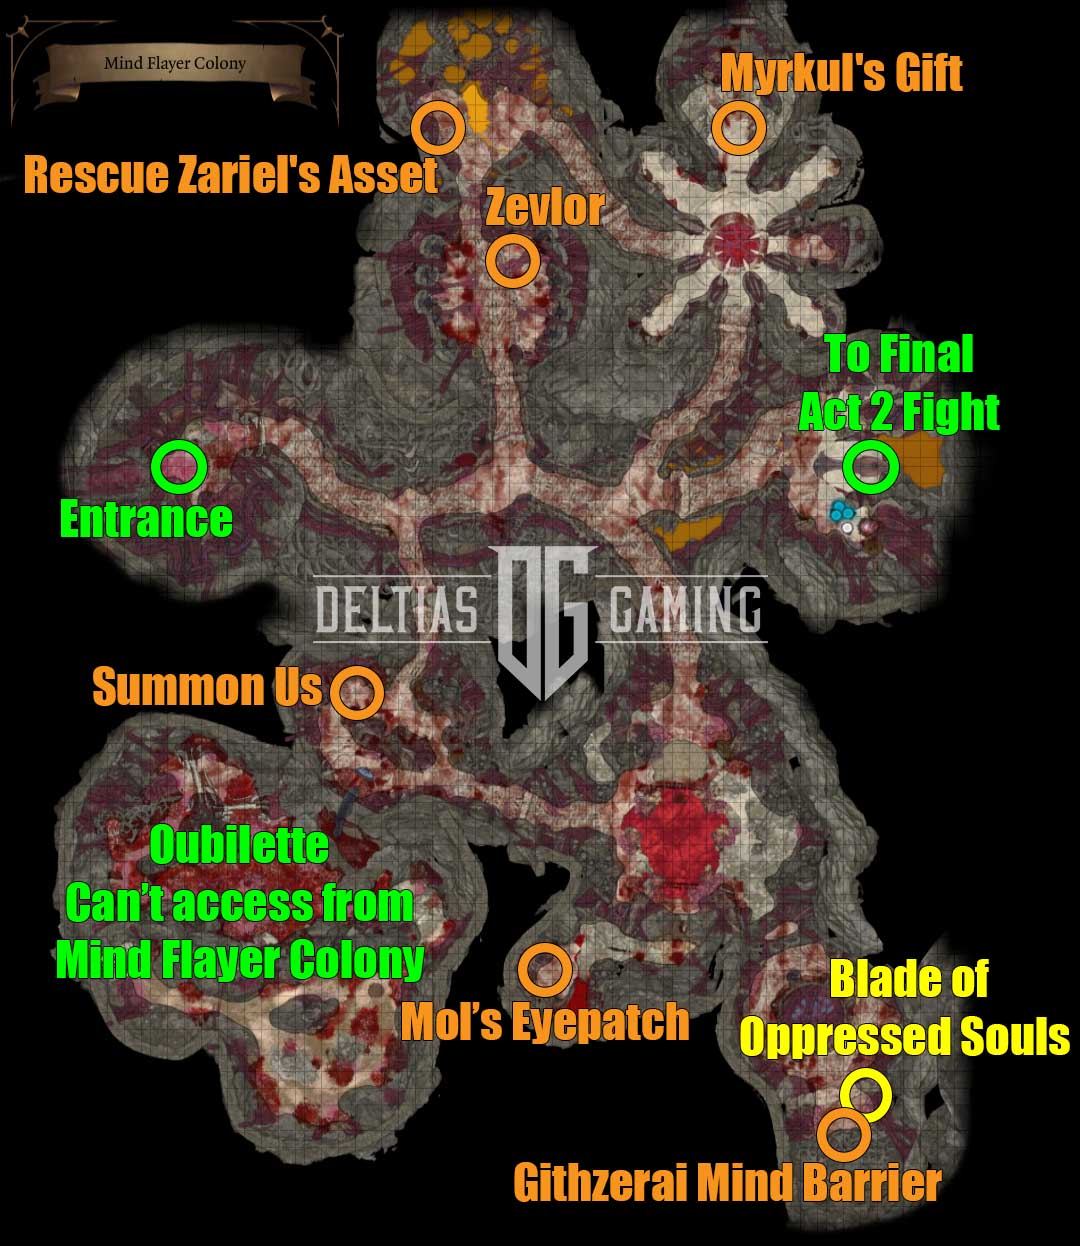
The Mind Flayer Colony is the final section in our Baldur’s Gate 3 Act 2 Checklist. As soon as Find Ketheric Thorm’s Relic/Find the Nightsong is complete, you will return to the Shadow-Cursed Lands to find Jaheira and the Harpers ready to begin their assault on Moonrise Towers. Jaheira can be invited to join your party temporarily, and you’ll fight to the top of the tower for the first confrontation with Ketheric Thorm. Knock his HP down to around 25%, and he’ll flee the fight. After defeating his minions, you can follow him down into the Mind Flayer Colony.
Once you jump into the hole, this will be your final warning that you will be exiting Act 2, the point of no return.
There is an area to explore before your final fight with Ketheric. We highly recommend including Wyll at your party before entering because he has a personal quest. Furthermore, completing this will reward you with one of the best weapons in the game. Let’s see this through with our Baldur’s Gate 3 Act 2 Checklist!
Companion
Jaheira: She can be invited to the party as a temporary companion during the initial assault on Moonrise Towers. She’ll accompany you until the confrontation at the top of the Tower is complete. Afterward, she will remain there while the party continues into the Mindflayer Colony. Nevertheless, she should join your group as a complete companion in Act 3.
Quest
- Rescue Zariel’s Asset: Bring Wyll along to search for the individual Mizora has charged you with saving. You can find them in the Tadpoling Centre and rescue them from their pod. When speaking with Mizora afterward, request a reward. Additionally, you can try to persuade her to end Wyll’s contract.
- Find Mol: Assuming you saved the Tieflings and the Grove, Mol would have been at Last Light Inn talking to Raphael earlier in Act 2. She then gets kidnapped during the attack when Marcus attempts to take Isobel. She’s not in Moonrise Towers, however. She’s not only in the Mind Flayer Colony, but you can find her Eyepatch in the Necrotic Laboratory.
- Find Zevlor: Assuming you saved the Tieflings in Act 1, Zevlor should have been with them at the Last Light Inn or imprisoned in Moonrise Towers. You’ll not find him in the Shadow-Cursed Lands, however. Finally, you can also find him in the Tadpoling Centre. There is a Neural Apparatus that can open or purge pods. Open them to release everything – infected and non-infected alike. This will instigate combat. Your goal is to try not to hit any of the non-infected allies. Be especially careful with area-of-effect spells.
Gear
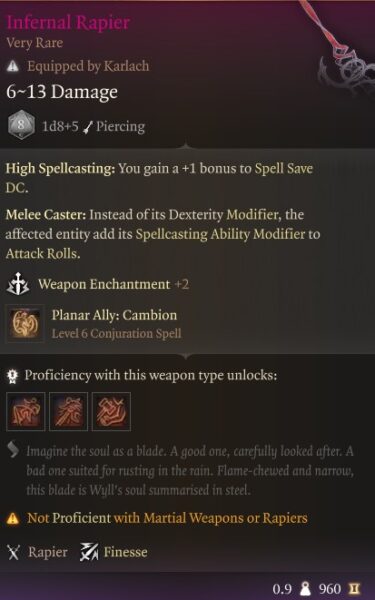
- Infernal Rapier: A fantastic weapon that can summon planar ally. The reward from Mizora is only if Wyll is at the party.
- Blade of Oppressed Souls: Do extra psychic damage, and unique action can instill Crown of Madness on the target. After solving the Necrotic Laboratory light puzzle, I found it inside the door, unlocked.
- Reaper’s Embrace: This a decent heavy armour set to start Act 3 with. Looted from Ketheric Thorm.
Permanent Bonus
- Summon Us: If you freed it during the prologue, then you can find Us in the Mind Flayer Colony. You’ll need to get the key to its cage from a nearby bugbear named Chop or just lockpick it directly. Free Us and you will be able to summon him once per Short Rest.
- Githzerai Mind Barrier: Grants Advantage on Intelligence Saving Throws. There is a mind/light puzzle to solve at the southern end of the Necrotic Laboratory. Completing the puzzle opens up a locked door which contains the Waking Mind. Insert the Waking Mind into the nearby Mind-Archive Interface. Then speak to the Slack-Skinned Head, and agree to purge or consume its mind. This condition can be lost on character death.
- Myrkul’s Gift: Gain 10 temporary HP and deal passive cold damage to any enemy that hits you will melee damage. This condition will only last until the next Long Rest, but can be a nice help during the final battle with Ketheric. To receive it you’ll need to first pass a Deception roll to convince Kressa Bonedaughter to stand down. Next, speak to her again and you can attempt to Persuade her (16 DC) to grant you the buff.
Related:
Looking For More About Baldur’s Gate 3?
Thank you for reading Baldur’s Gate 3 Act 2 Checklist: All Things to Complete guide. We provide the latest news and create guides for Baldur’s Gate 3. Also, watch me play games on Twitch or visit my YouTube channel!
 Reddit
 Email
Email
