Don’t miss a single vital companion, location or piece of equipment in our Baldur’s Gate 3 Act 1 Checklist: All Things to Complete guide!

Baldur’s Gate 3, Act 1 does a lot of heavy lifting as it sets up the story to come, introducing nearly all of your potential companions, and hiding plenty of quality gear behind puzzles and secret doors. Getting a good start in Act 1 is vitally important to the story you will experience in the following two acts of the game. The sheer amount of content in Act 1 can be overwhelming sometimes. Therefore, our comprehensive guide provides a location-wise checklist for all of BG3 Act 1 to ensure you don’t miss important missions, rare items, or secrets, before progressing to Act 2.
This guide has been updated for the Patch 8 version of Baldur’s Gate 3.
All Things to Complete in Act 1 of Baldur’s Gate 3
The most important things to do in Act 1 are recruit companions, find quality gear, and unlock permanent bonuses. Furthermore, you should initiate certain story threads/quests that will have significant follow-ups in the later game.
Act 1 officially begins after the nautiloid ship crashes onto the beach. The short story/tutorial section while on the doomed ship is regarded as the Prologue. It’s fairly straightforward, but don’t forget to grab the Everburn Blade while you’re there.
The official end of Act 1 can be a bit confusing for newcomers to understand. There are a few points where you can leave the main Act 1 map and explore other areas. We’ll explain those below. For now, know that Act 1 officially ends when you enter the Shadow-Cursed Lands. At that point, you can no longer return to any Act 1 area.
This guide will include the most important things to find from the Ravaged Beach to Crèche Y’llek, in the recommended order of approach. However, if you decide to go to another area in a different order, you can still use the relevant section in our guide to find what you need. Our BG3 Act 1 checklist divides the map into the important named areas/locations, and gives you all the information for all the vital companions, quests, and gear you’ll want to find.
Baldur’s Gate 3 Act 1 Major Locations List:
- Ravaged Beach: Companion recruiting
- Dank Crypt: Unlock Withers
- Emerald Grove: Vendors and the main story
- Blighted Village: Apothecary entrance, side quest
- Whispering Depths: Spider boss, entrance to Underdark
- Goblin Camp: Main story, vendor, and gear
- Shattered Sanctum: Permanent bonuses, potential companion
- Sunlit Wetlands/Putrid Bog: Auntie Ethel, permanent bonus, side quest
- Underdark: Vendors, main story, side quests, travel point to Grymforge
- Grymforge/Adamantine Forge: Best Armour in Act 1
- Crèche Y’llek: Legendary Weapon, vendors, permanent bonus
Related:
Ravaged Beach

Our BG3 Act 1 checklist picks up once you wake up on the Ravaged Beach following the Nautiloid opening section. The most important step in the Ravaged Beach is to find your future companions. While some will give you more than one chance to recruit them, you can also fail and lose out on their company for the rest of the game. Moreover, you can even kill them (either accidentally or on purpose). At the least, you’re going to want to have three join you, in order to travel and fight as a full party.
Most of the companions have different classes, and this can help you put together a well-balanced party, which you can customize to tackle different encounters. Finally, many of the main companions such as Lae’zel, Shadowheart, Gale, and Astarion have strong personal quests and arcs which tie in nicely with the main story. To see these stories play out, and to benefit from the potential gear and loot you can find on these side quests, you’ll want to recruit as many of these companions as you can.
Companions

- Daughter of Darkness: If you rescued Shadowheart on the ship, you’ll find her first on the beach. If not, you’ll find her farther ahead next to the Overgrown Ruins waypoint. Shadowheart is hugely important to the main storyline and the game will give you several opportunities to recruit her. Furthermore, her personal story quest, as well as the specific gear you can get for her in Acts 2 and 3 make her worth the effort.
- The Githyanki Warrior: You’ll find Lae’zel farther to the north, embarrassingly caught in a trap set by a couple of Tieflings. Side with Lae’zel here and when you free her, she will join you.
- The Wizard of Waterdeep: You’ll find Gale embarrassingly caught in a portal, and he’s hoping for someone to give him a hand. Do so, and he’ll join your group readily.
- The Pale Elf: Astarion is located over on the west side of the crashed nautiloid, and he’s the sort that acts first and asks questions later. Aggressive right at the start, he’ll back off quickly if you explain yourself. Furthermore, Astarion also has his own strong personal questline. A significant choice in Act 3 can give him a power boost, but it comes at a cost.
Dank Crypt

Next up in our BG3 Act 1 guide is the Dank Crypt. You can find the ruins just north of the crashed Nautiloid, and the most important thing to do here is to find an NPC named Withers. By interacting with him, Withers joins you at your camp. Consequently, you’ll be able to use him to change your or your companion’s class/subclass. Additionally, Withers can revive fallen companions for a small fee of 200 gold.
There are two ways to enter the chapel. The first is through a locked entrance to the south, right next to the Overgrown Ruins waypoint. First, you’ll need to have a lock pick. Secondly, to boost your chances of success, it’s best to have a Rogue class like Astarion in the party. Unless your character is a Rogue, too, he will have the highest Sleight of Hand skill. Moreover, you’ll also need him to disarm a bunch of traps in the room beyond.
Otherwise, the other option for getting inside is by entering from the top. Head east from where you found Lae’zel in the trap. There are some bandits here and you can sneak up on them and attack them with Advantage. Look up and shoot down the big block to kill two of them instantly. The door inside is to the north and you’ll need to trick the person on the other side to get by. There will be more bandits to fight inside.
Also Read: BG3 Interactive Map
Always look around and use the environment to your advantage in combat! Cast the Fire Bolt cantrip at exploding barrels or use Thunderwave and Shove to push enemies off of ledges. Additionally, always loot everything.
Quest
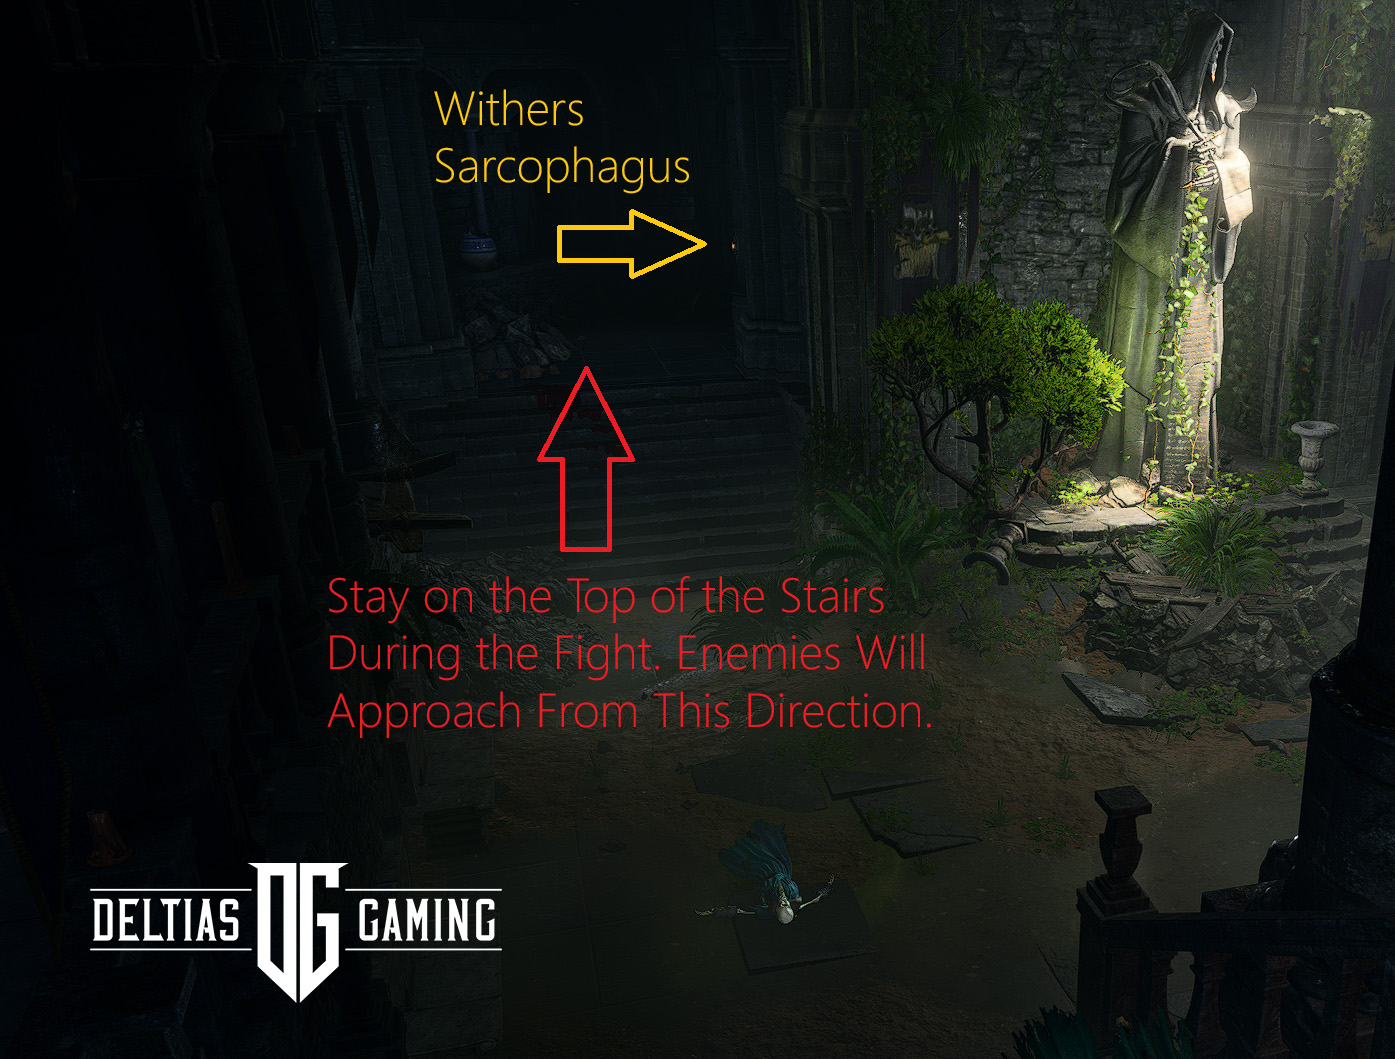
- Explore the Ruins: After killing all the bandits, interact with the skull behind the large statue and use the lever to unlock a stuck door. Once through, on the right will be the room full of traps, and on the right/south. Inside the room to the left/north is where you will find Withers. Press the button up in the northwest corner. Defeat the skeletons and then return to the button to find an open room. Interact with the sarcophagus to wake Withers.
- Book of Dead Gods: You’ll have to pass three checks to open, read and understand the book. Paladins and Barbarians can unlock it without having to pass a skill check. Sorcerers, Wizards, Warlocks, and Clerics will have a 10-difficulty check. All other classes are 15DC. Secondly, you’ll have to pass a 10 DC Religion check to read the book. Finally, the last check requires the Investigation skill. We highly recommend using Gale here.
- Soul Coin: You can find three Soul Coins inside the Dank Crypt, which you can see marked on the map above. These don’t have much use now, but they will provide a possible combat boost for another companion, Karlach, who you’ll find a bit later in Act 1.
Gear
- Amulet of Lost Voices: This necklace will grant the wearer access to the Speak with Dead spell. Keep it in your inventory because this spell will come in handy throughout the game. You can find it in Withers’ room inside a heavy chest.
- The Watcher’s Guide: A decent first weapon for Clerics, which can also be thrown. You’ll need to disarm all of the traps in the room to the south and there are a lot of them. Astarion is a must-have. Take your time making your way around the room. When all traps have been discovered and disarmed, you can open the sarcophagus in the center to get the spear.
Emerald Grove
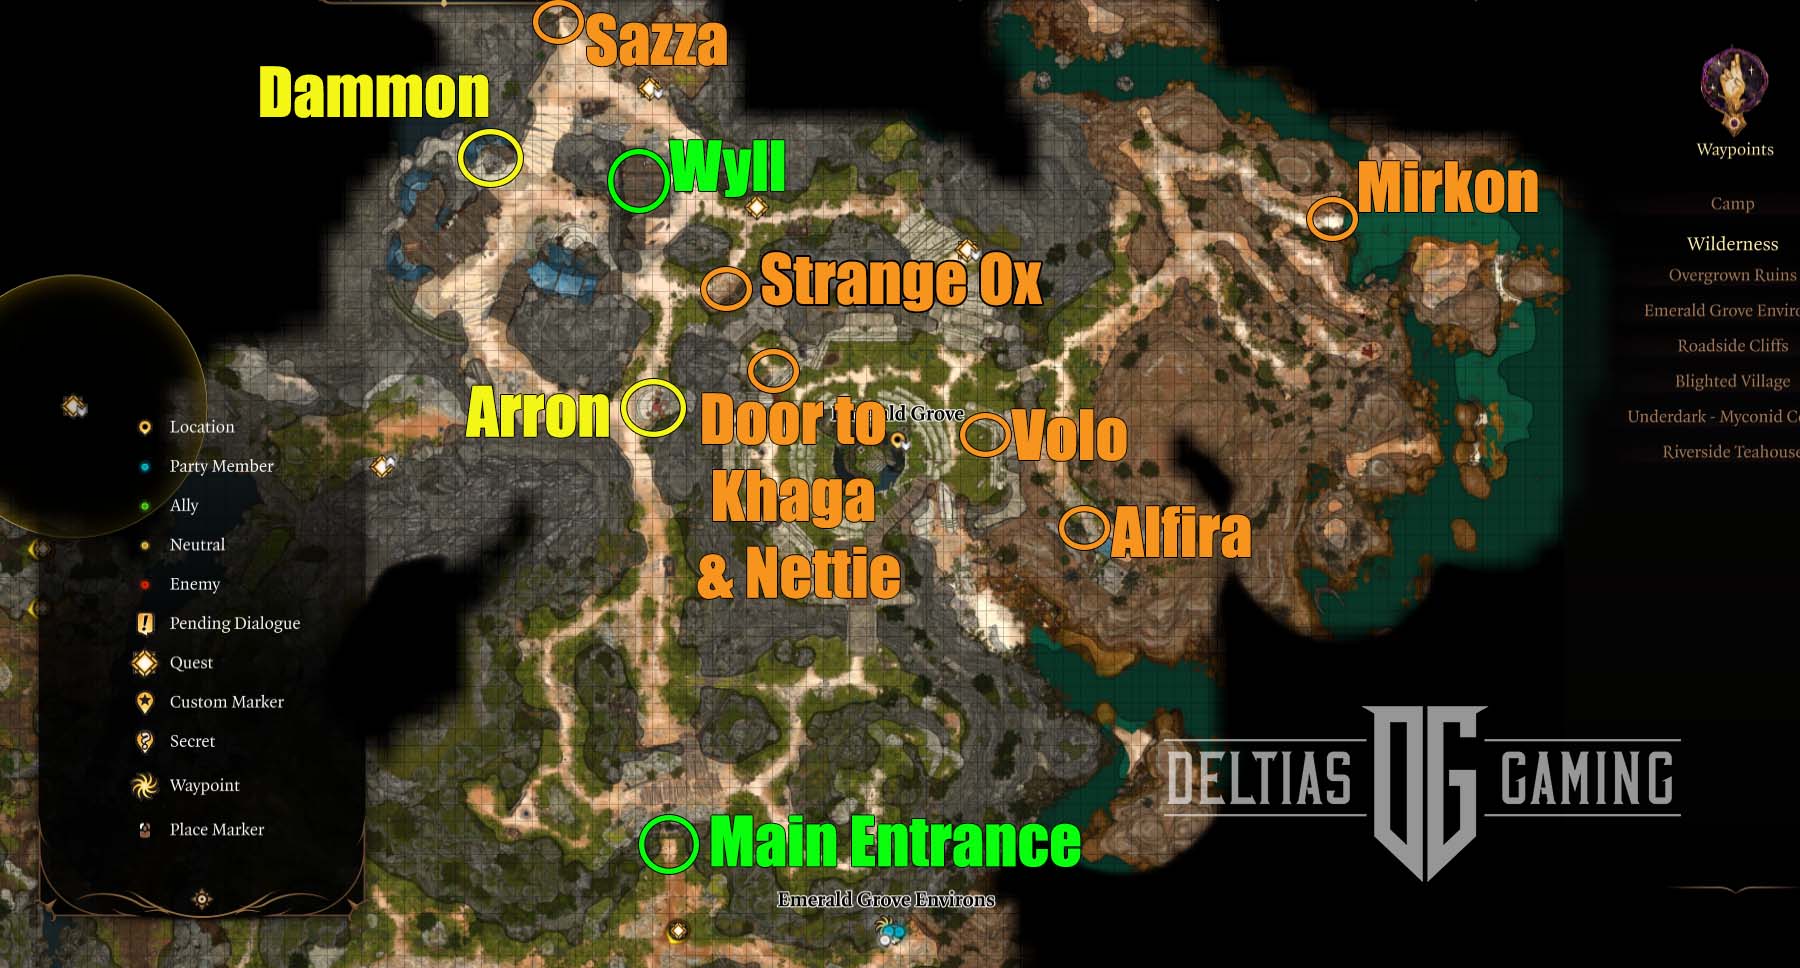
The Druid’s Grove plays a pivotal role in the Act 1 story and is next up in our Baldur’s Gate 3 Act 1 guide. You’ll also have another companion to recruit and important NPCs to meet for the first time. The very first time you approach the gate entrance you’ll join a fight in progress, where some goblins are attacking. Help defeat them and you’ll be allowed into the Grove. Explore and talk to as many NPCs as you can, but take special note of the ones listed below. Additionally, there are two traders here, Arron and Dammon, where you can get some good starting equipment.
Companions
The Blade of Frontiers: You may recognize Wyll, as he just assisted with the fight against the goblins at the gate. Wyll is known as a hero called ‘The Blade of Frontiers’. However, he has his hidden secrets which you’ll slowly uncover. He’s currently on the hunt for a ‘devil’, which will lead you to another potential companion. Wyll’s quest leads to a powerful weapon at the end of Act 2.
Quest
The Hollow
- Save the Refugees: Alfira is one of the Tieflings seeking refuge in the Grove and can be found up the hillside from the Sacred Pool. If you can save the Tieflings and Alfira they will reappear again in Acts 2 and 3. Take the time to meet and interact with her here, and she’ll have a quest for you in Act 2.
- The Hellion’s Heart: Dammon is a blacksmith you can find in the Hollow and he is arguably the most important NPC of Act 1. He’s a blacksmith, and if saved will return in each of the following Acts with better gear to sell. Moreover, he is vital to companion Karlach’s personal quest.
- Strange Ox: Pass a successful Insight check to notice a strange ox. Use Speak with Animals (spell or potion) to talk to it. If you don’t attack it, it will show up again in the future.
- Save the Goblin Sazza: Saving the goblin Sazza thrice throughout two Acts will eventually unlock an achievement. Rescuing her in the Druid Grove is the first step. You’ll need to speak up on her behalf again later in the Goblin Camp.
The Sacred Pool
- Investigate Kagha: Kagha is the temporary leader of the Druids in Halsin’s absence. She wants safety for the Druid Circle and plans to kick out the refugees and cast the Ritual of Thorns. Ideally, you want to stop her without causing bloodshed. Otherwise, you’ll lose the Tiefling refugees. Before you leave, sneak around and unlock Kagha’s Chest.
- Volo: You’ll find the bard Volo at the Sacred Pool talking to a Bear. Speak to him, and you’ll meet him again later at the Goblin camp. Save him there, and he’ll join you as a camp NPC (similar to Withers). He can eventually offer you a permanent eye ‘upgrade’, though you may or may not want it.
- Nettie: This Gold Dwarf Druid is the first healer you can speak to about your condition. She’ll point you in the direction of Halsin, who is a future possible companion. Additionally, there is a nearby tadpole you can choose to steal. Consuming the tadpoles is a character/personal decision, but doing so can unlock a new skill tree.
- Mirkon and Harpies: In the area to the northeast of the Sacred Pool you can find a Tiefling child named Mirkon in a trance. Save him from the Harpies. Speak to him after and he will direct you to Mol. Stay on Mol’s good side and she’ll be available as a trader in this and future Acts.
Gear
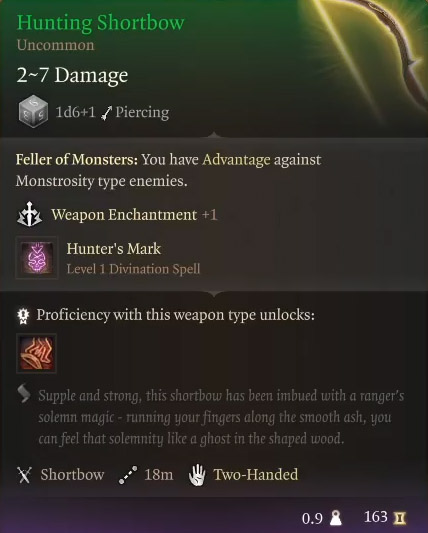
- Hunting Shortbow: A great backup ranged weapon for any martial weapon build such as Ranger, Paladin, or Fighter. Sold by Dammon.
- Safeguard Shield: A starter shield that helps with save throws. Sold by Dammon.
- Gloves of Missile Snaring: Good for any defensive-minded build. Sold by Arron near Hollow entrance.
- Rain Dancer: Quarterstaff that’s good for a water spell and lightning combo. Sold by Arron.
- Ring of Flinging: Good accessory for a Barbarian. Sold by Arron.
- Spellthief: A good starter bow for a Rogue or Ranger. Sold by Arron.
Forest
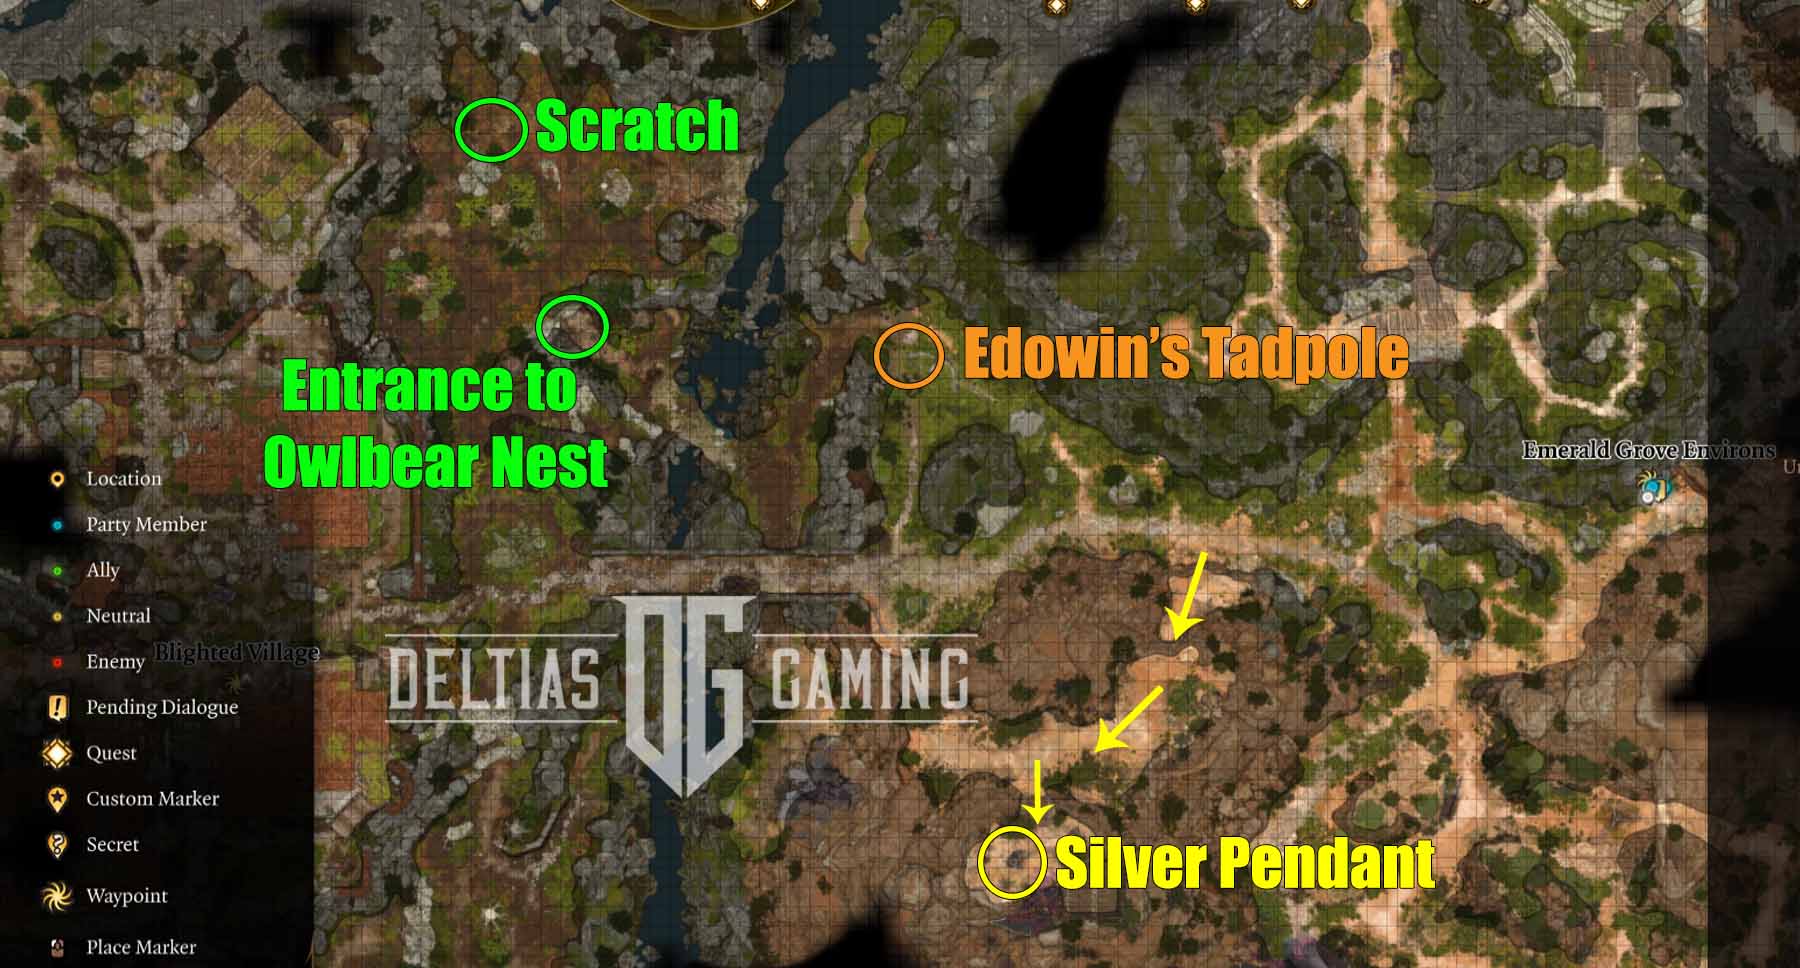
The Forest in BG3 Act 1 is a small section of the map where you can find a couple of potential animal companions, a very helpful necklace, and also pick up another tadpole. This area is between the Emerald Grove and the Blighted Village, and you can reach it easily by walking directly west from the Emerald Grove waypoint.
Quest
- Owlbear Cub: Inside a large cave opening you will find a large mother owlbear guarding her cub. You can use Speak with Animals to talk to her, but if you leave her and the cub alone you can find him later at the Goblin Camp. You can then convince him to join you as a camp companion. Additionally, at the end of the game, the grown cub will join the final battle.
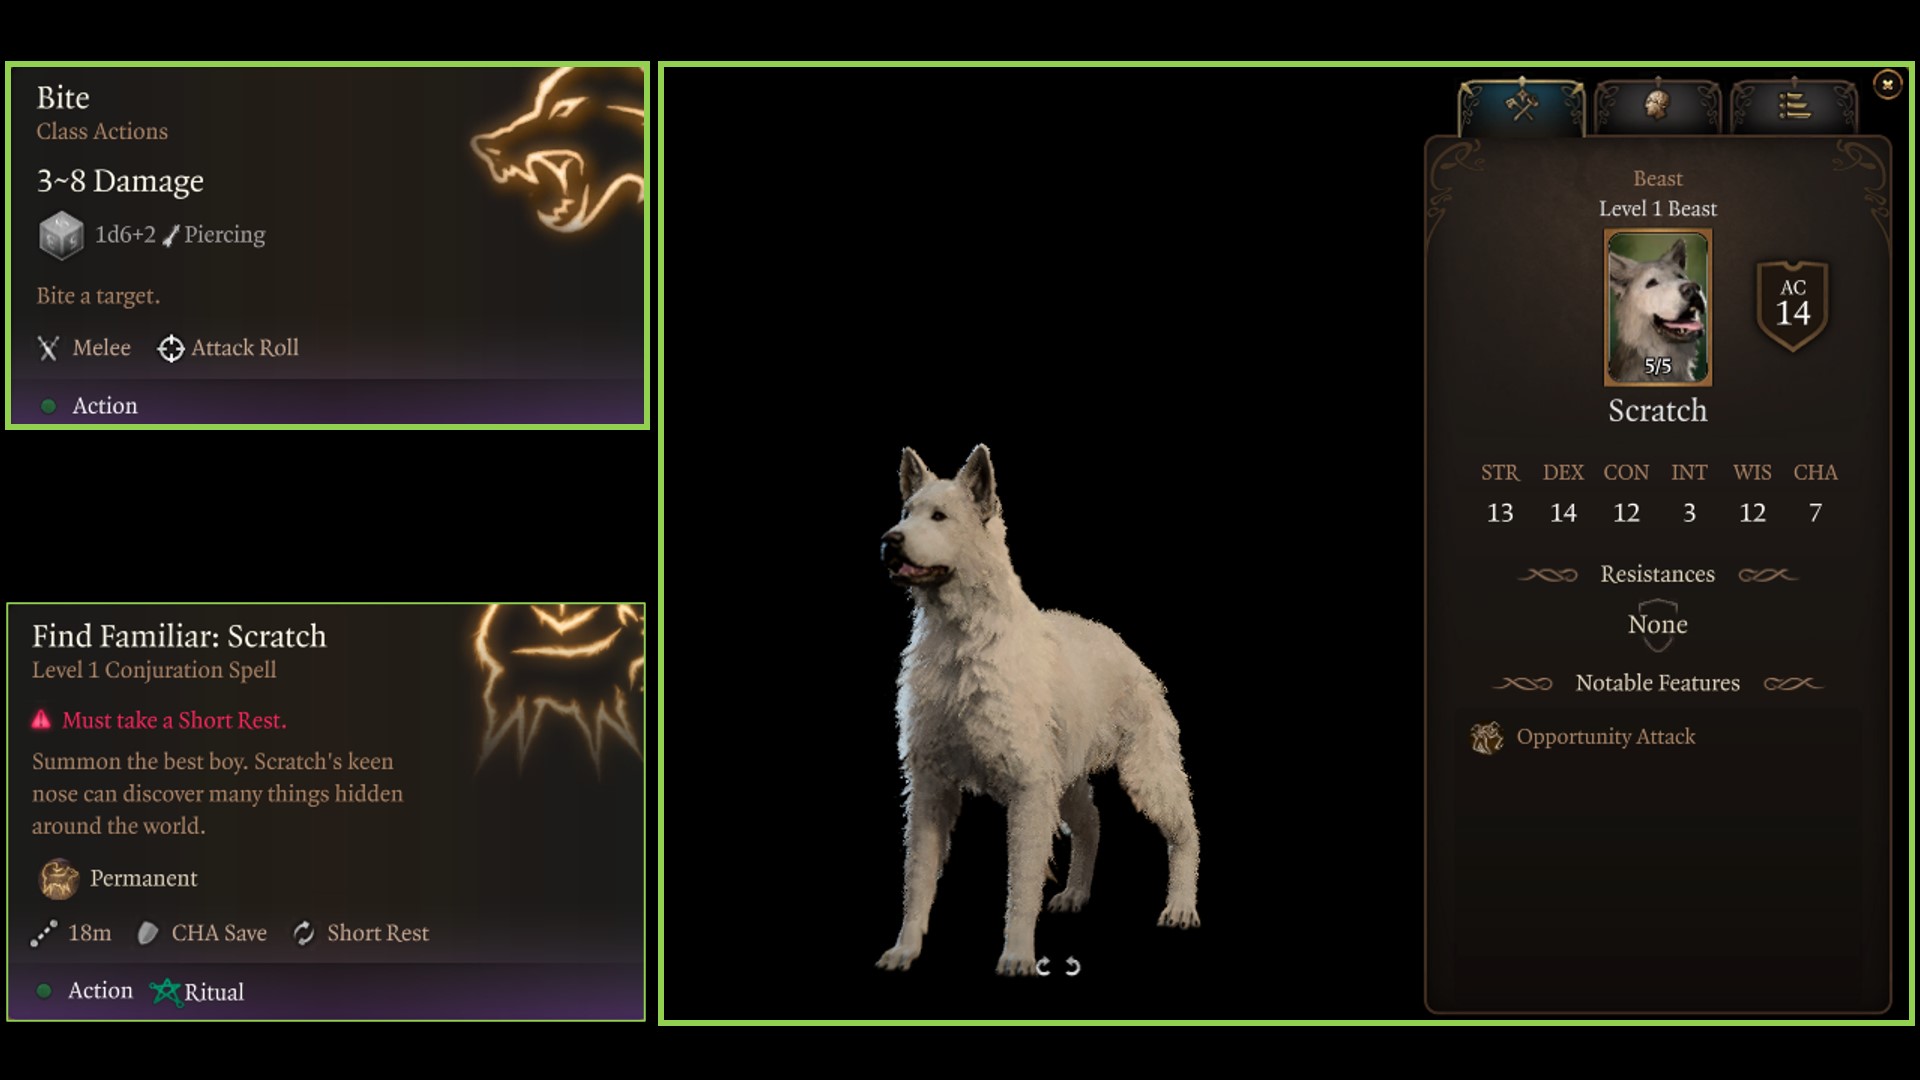
- Scratch: The faithful dog Scratch is another animal companion who can take a more active role in battle. When you find him he won’t want to leave his fallen master but you can convince him to check out your camp if he changes his mind. Once he joins your party, you can summon him for help in battle once per short rest.
- Edowin’s Tadpole: The True Soul Edowin has been fatally injured and his companions are looking for help. You can’t save him, but you can acquire his tadpole if you wish.
Gear
- Silver Pendant: Found by climbing up some ledges and ladders a bit south of the Druid Grove. The necklace gives Guidance, which is great for helping influence dialogue.
- Moondrop Pendant: Found inside the Owlbear Cave by taking the first left inside. You’ll have to dispel the ward on the chest it’s locked in. It’s a good starting amulet that lets the wearer avoid Attacks of Opportunity when below 50% HP.
Blighted Village
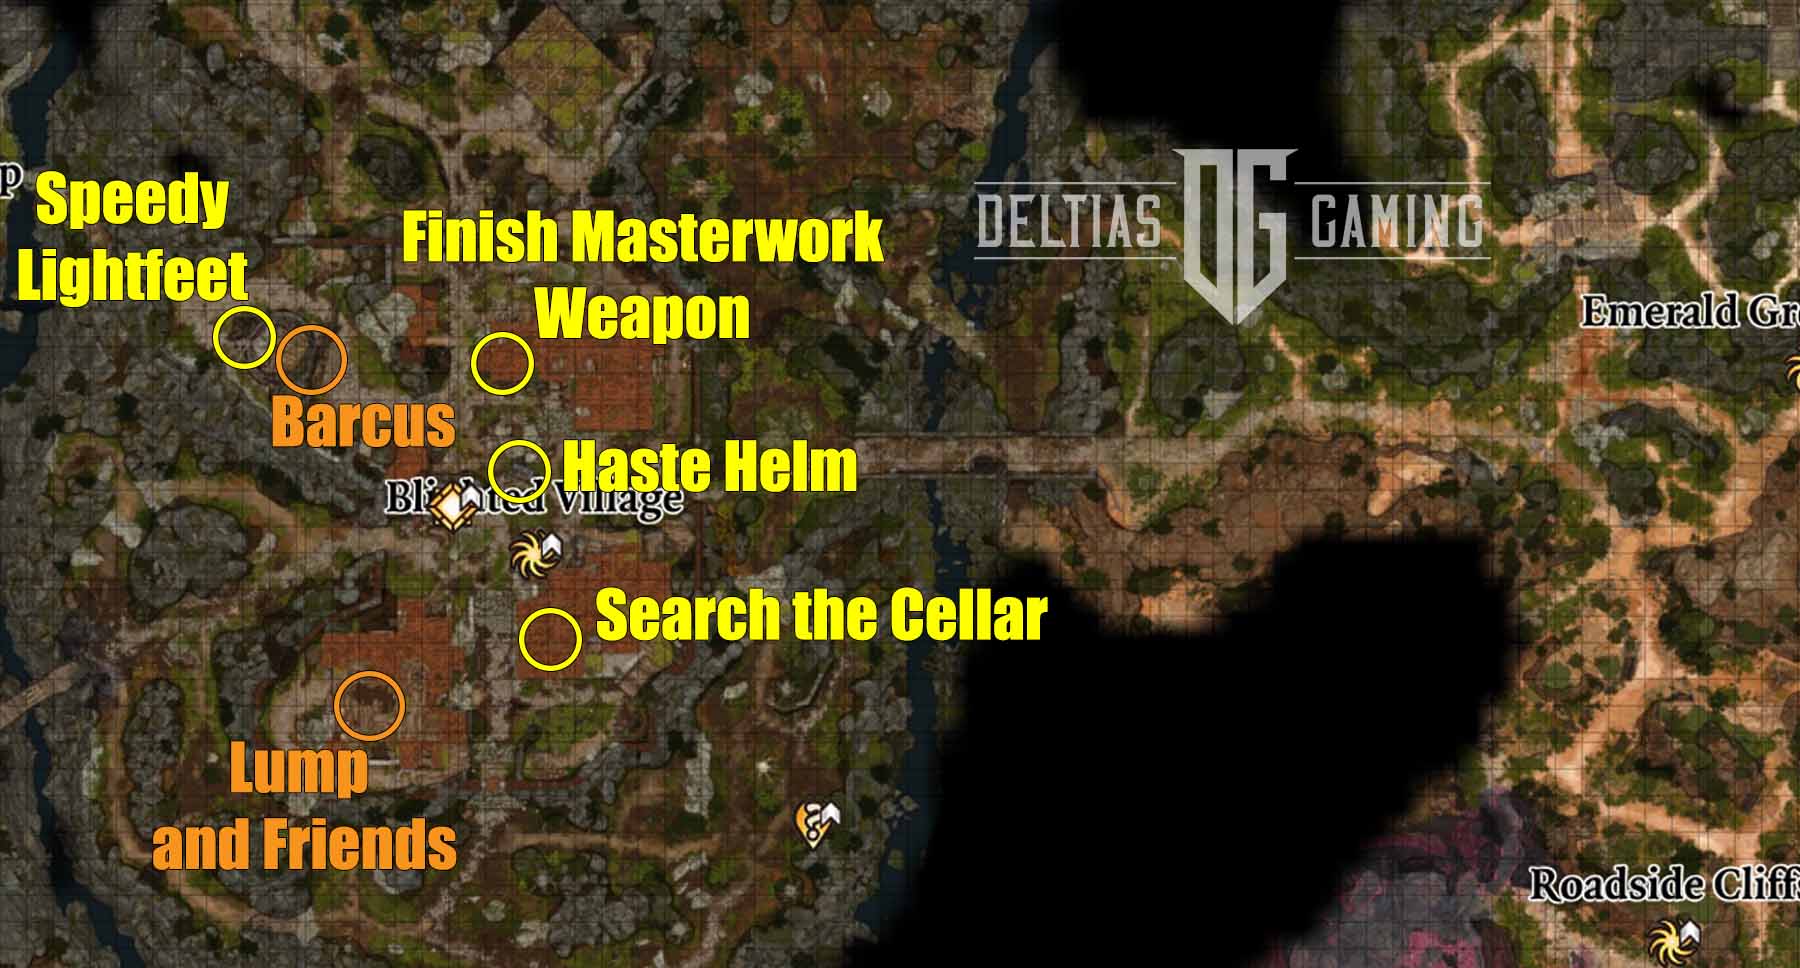
The Blighted Village has a lot going on, with resident goblins lying in wait to ambush you before you can get a chance to search the Apothecary, Blacksmith Forge, and Whispering Depths found inside. The only way to the Blighted Village is by heading directly west over the bridge. Instead of walking straight into the ambush, however, we recommend turning immediately to the left and walking the path that goes down and around the village. At the southern entrance, you can easily sneak up and surprise attack the two goblin guards. Next, sneak in and attack the other nearby goblins from stealth. This won’t get rid of all the goblins but allows you to cut down their numbers.
Quest
- Finish the Masterwork Weapon: For now, you can only pick up the start of the quest by finding Highcliff’s Journal or Highcliff’s Blueprints. The next step will be finding Sussur Tree Bark in the Underdark later on.
- Lump the Enlightened: Ogres are working for the Absolute, and one of the three, named Lump, appears to be unusually smart for his kind. You can approach and speak with him or choose to attack. You can try to convince him to work for you or attack and kill the ogres for the XP and Lump’s Warped Headband of Intellect.
- Rescue the Gnome: Barcus Wroot is a Deep Gnome you find tied to the fan of a windmill by a bunch of taunting goblins. To rescue him you’ll first have to attack and kill all the goblins. Next, walk around to the back of the windmill and pull the BRAKE lever. Pulling Release will send him flying. If safely sent on his way, you’ll meet him again later on.
- Search the Cellar: A location not to be missed, where you can find a summoned familiar, the Necromancy of Thay and Bracers of Defense. Head into the Apothecary and down to the basement. A successful Perception check while you explore will reveal a secret lever leading you further in.
Gear
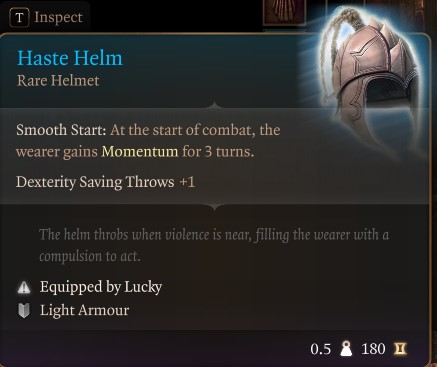
- Haste Helm: Found in a locked chest just sitting out in the middle of the village. Great for any build needing mobility like Paladins’.
- Speedy Lightfeet: Found inside a locked chest in a hidden cellar you access behind the windmill. Grants Lightning Charges when the user Dashes. This piece can be combined with several other weapon/armor pieces centered around Lightning Charges.
- Warped Headband of Intellect: The only way to get this is by killing Lump and looting it from him. It’s a great early-game headpiece that raises the wearer’s Intelligence score to 17.
- Bracers of Defense: Found in the Apothecary’s Basement/Necromancer’s Cellar. A great early arm piece for any class that wears clothing and doesn’t carry a shield such as Barbarians, Sorcerers, or Wizards.
Permanent Bonuses
- Shovel: Shovel is a unique summons you can call to aid the party via the Find Familiar Cheeky Quasit spell. She can be spoken to and interacted with, and like Scratch can be a minor but useful addition in battle.
- Necromancy of Thay: There are two major steps to unlocking the Necromancy Of Thay. The first is acquiring the book itself in the Necromancer’s Cellar. After picking it up, choose to simply tuck the book in your pack. The second step requires finding the Dark Amethyst in the Whispering Depths. Unlocking the Necromancy of Thay can grant you permanent bonuses now and also come into play again during Act 3.
Whispering Depths
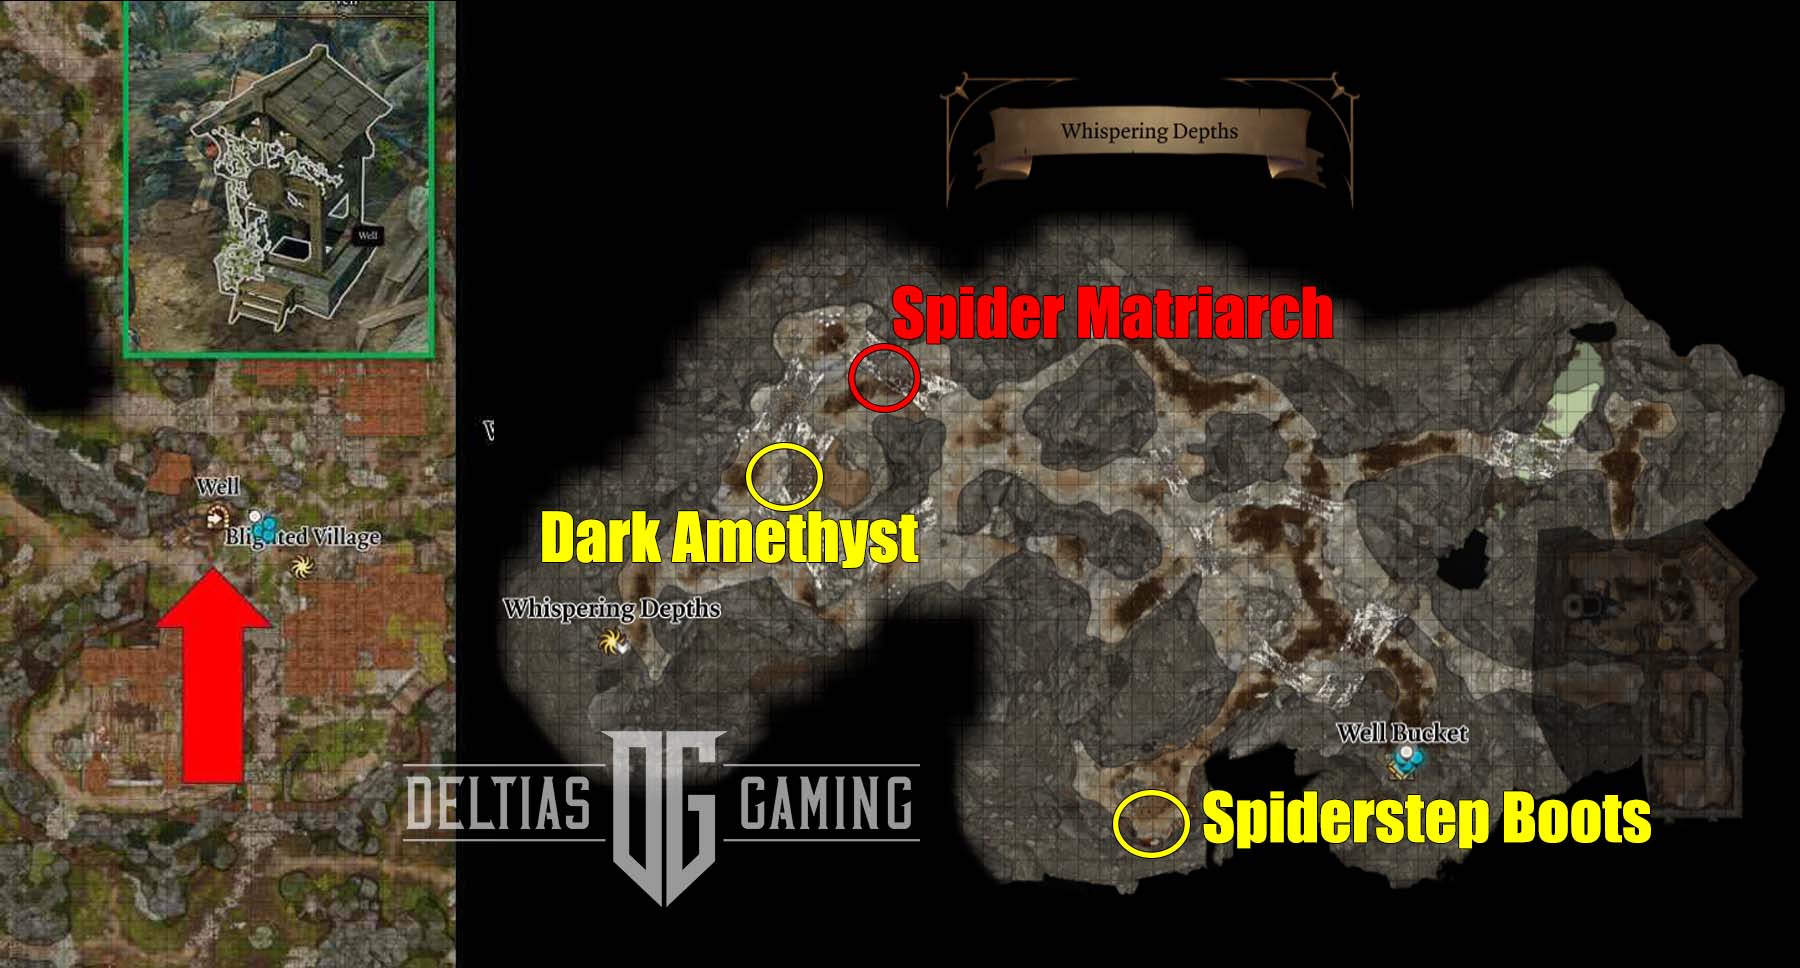
The Whispering Depths is an underground cave area filled with spiders. Our Baldur’s Gate 3 Act 1 guide recommends coming down here for a nifty gear piece and an important item. The smaller spiders which inhabit the caverns aren’t a huge threat. However, the Level 5 Phase Spider Matriarch at the end can be a challenge. If you can defeat her, she will drop the useful Poisoner’s Robe. Moreover, you’ll need to defeat her to safely climb down and get the Dark Amethyst, which unlocks the Necromancy of Thay.
Quest
- Underdark Entrance: You can find the entrance to the Whispering Depth through the well in the Blighted Village. Interact with the well and pass a check to reach the bottom. If you use Feather Fall on the entire party and jump down the giant hole in the middle of the Phase Spider Matriarch area, you will descend into the Underdark.
- Spider Matriarch: This spider boss is a tough customer, with a vast HP pool and the ability to summon smaller spiders to help. Equip the Spiderstep Boots to your strongest melee party member and have them sneak to the lower level. Next, have one party member (Astarion or Rogue) shoot and destroy the eggs from range in stealth. Then, when the Spider Matriarch is in the middle of a web walkway have another character throw a Fire Bolt to destroy it. The boss should take fall damage and can also become Prone. Have your strongest party member attack directly, while other members shoot bows or cast spells. If your party is strong enough, she should fall without too much trouble.
Gear
- Spiderstep Boots: Not a great gear piece for regular builds, but can be very helpful when specifically worn in the Whispering Depths. Can be easily found inside a heavy chest, around to the left from where you came in through the well. These boots will prevent the wearer from being Enwebbed and you can walk across webbing with ease.
- Poisoner’s Robe: A great starting armor for spellcasters, it provides additional Poison damage for any poison spell you cast. Dropped by the Spider Matriarch.
Permanent Bonuses
Dark Amethyst: Once you’ve defeated the Spider Matriarch, you can climb down one of the pillars between the webbing to find the Dark Amethyst below.
The Risen Road
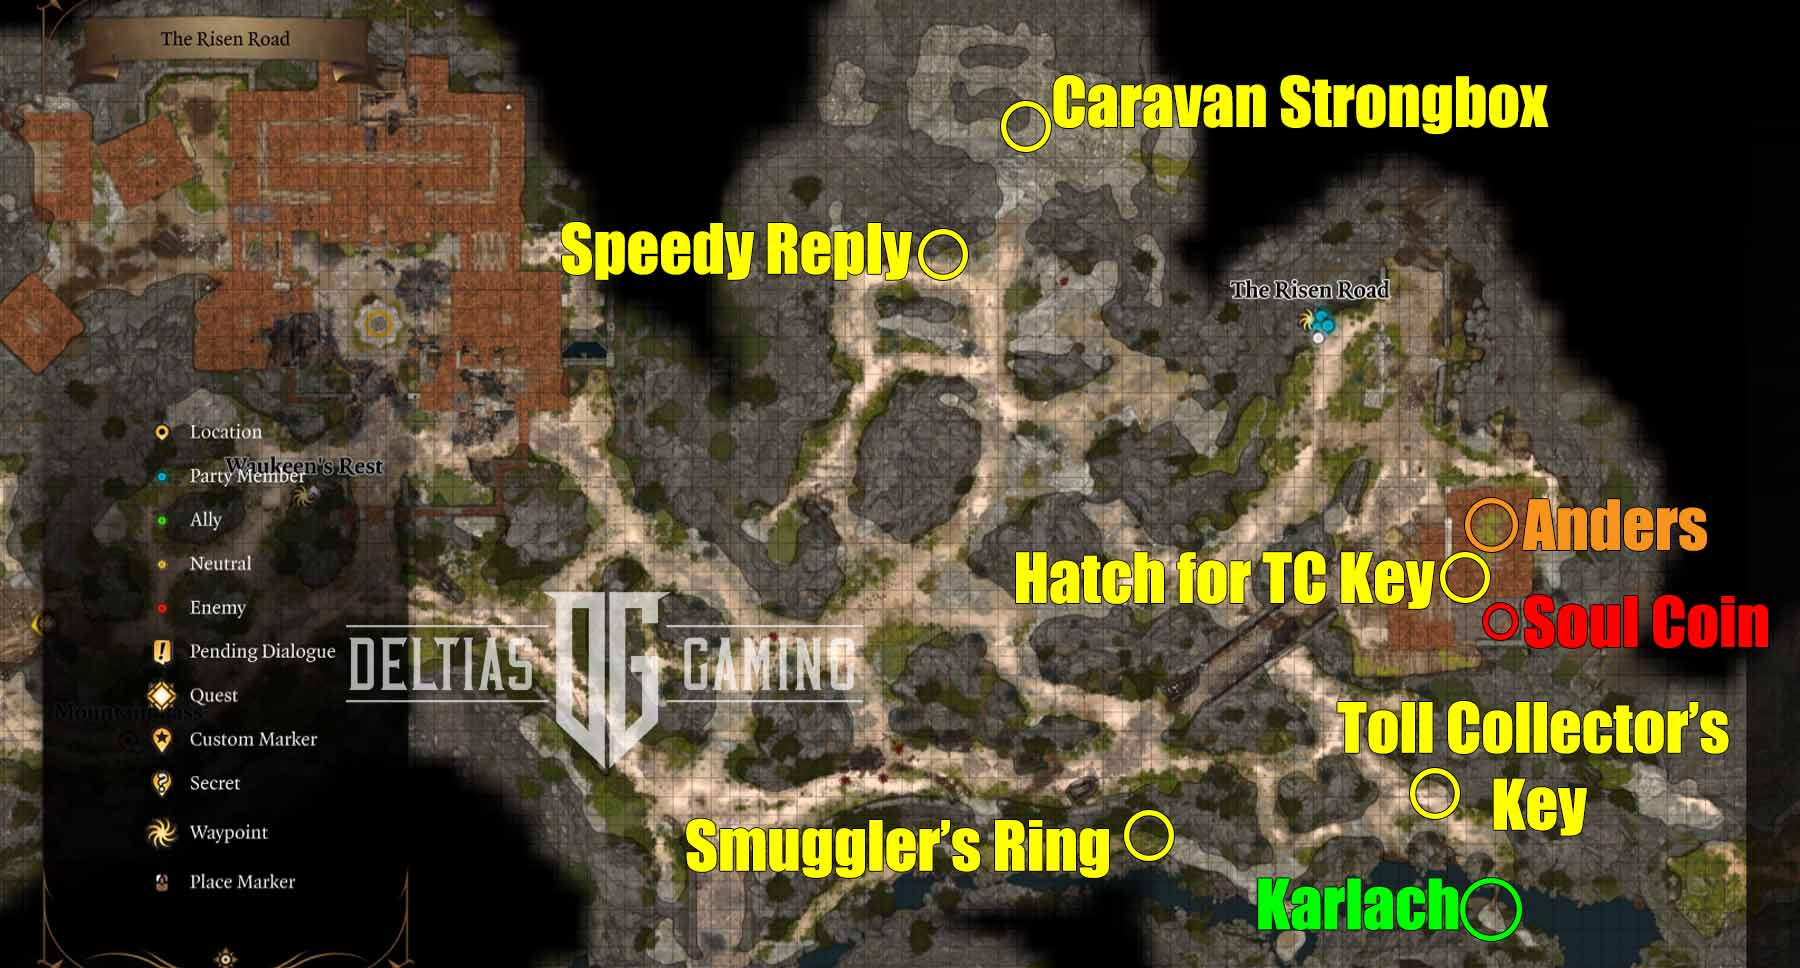
The Risen Road is an area directly north of the Blighted Village, and here you will find another potential companion. Additionally, our Baldur’s Gate 3 Act 1 checklist features several good pieces of gear in this area.
Quest
- Hunt the Devil: You’ll find the NPC Anders and his group at the abandoned Toll House, and it appears they have been sent on the same hunt as Wyll. Anders promises you a reward for taking care of this devil.
- Toll House: The Toll House has a hatch that leads to a secret basement with a puzzle hiding some nice gear. You’ll first need to find the Toll Collector’s Key, which is outside, hidden along the edge of the path below the Toll House itself. Grab the key and then after concluding business with Anders, you can get into the basement. Inside you’ll find a lot of traps to disarm and a puzzle to solve to unlock the Gloves of Heroism.
- Find the Missing Shipment: As you approach the cave to the far north, you’ll come across some caravan agents who are under attack. You can help them or not, however, there is a locked Caravan Strongbox they are protecting. If you open the box you will anger the agents and when you try to return it, they will turn against you. If you return the box to the Zhentarim Basement unopened you will unlock the stock of a special trader named Brem. This is the better path, as Brem has some great gear. Additionally, you can find and open the Strongbox again later in Act 3.
- Zhentarim Basement Password: If you save the caravan agents then Rugan will share the password with you. If he has died you can use Speak with Dead to ask him for it directly.
Gear
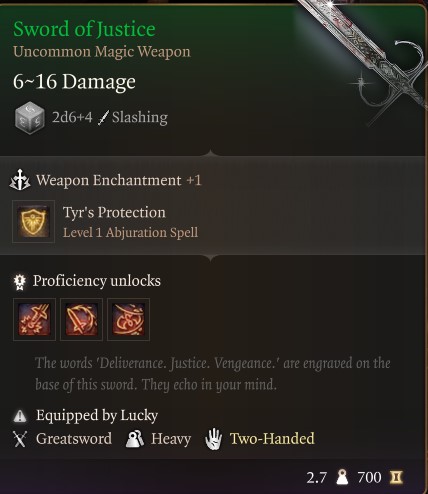
- Sword of Justice: This is a great two-handed sword that provides a free shield spell. Given by Anders as a reward or looted from him after a fight.
- Gloves of Heroism: A good starter gear piece specifically for Paladins. Found in the Toll Collector’s Basement after finding the key outside and then solving the puzzle in the basement.
- Speedy Reply: A great weapon for a College of Sword Bard or anyone with Scimitar proficiency. Found on the body of a Dead Caravan Agent near a cave farther north.
- Smuggler’s Ring: Will boost the Stealth and lockpicking skills of a Rogue. Found on the body of a skeleton near the river.
Companions
Our Fiery Friend: The Risen Road is where you will find the Tiefling Karlach, the supposed ‘devil’ that Wyll is hunting and whom Anders also sent you to kill. You don’t have to bring Wyll with you when you confront her, but it’s usually best to. You’ll have to choose whether you let Wyll kill her to fulfill his contract or let her go. Killing her will eventually reward you with the Infernal Robe, but you’ll lose her as a companion. Not killing her will see Wyll punished.
Waukeen’s Rest
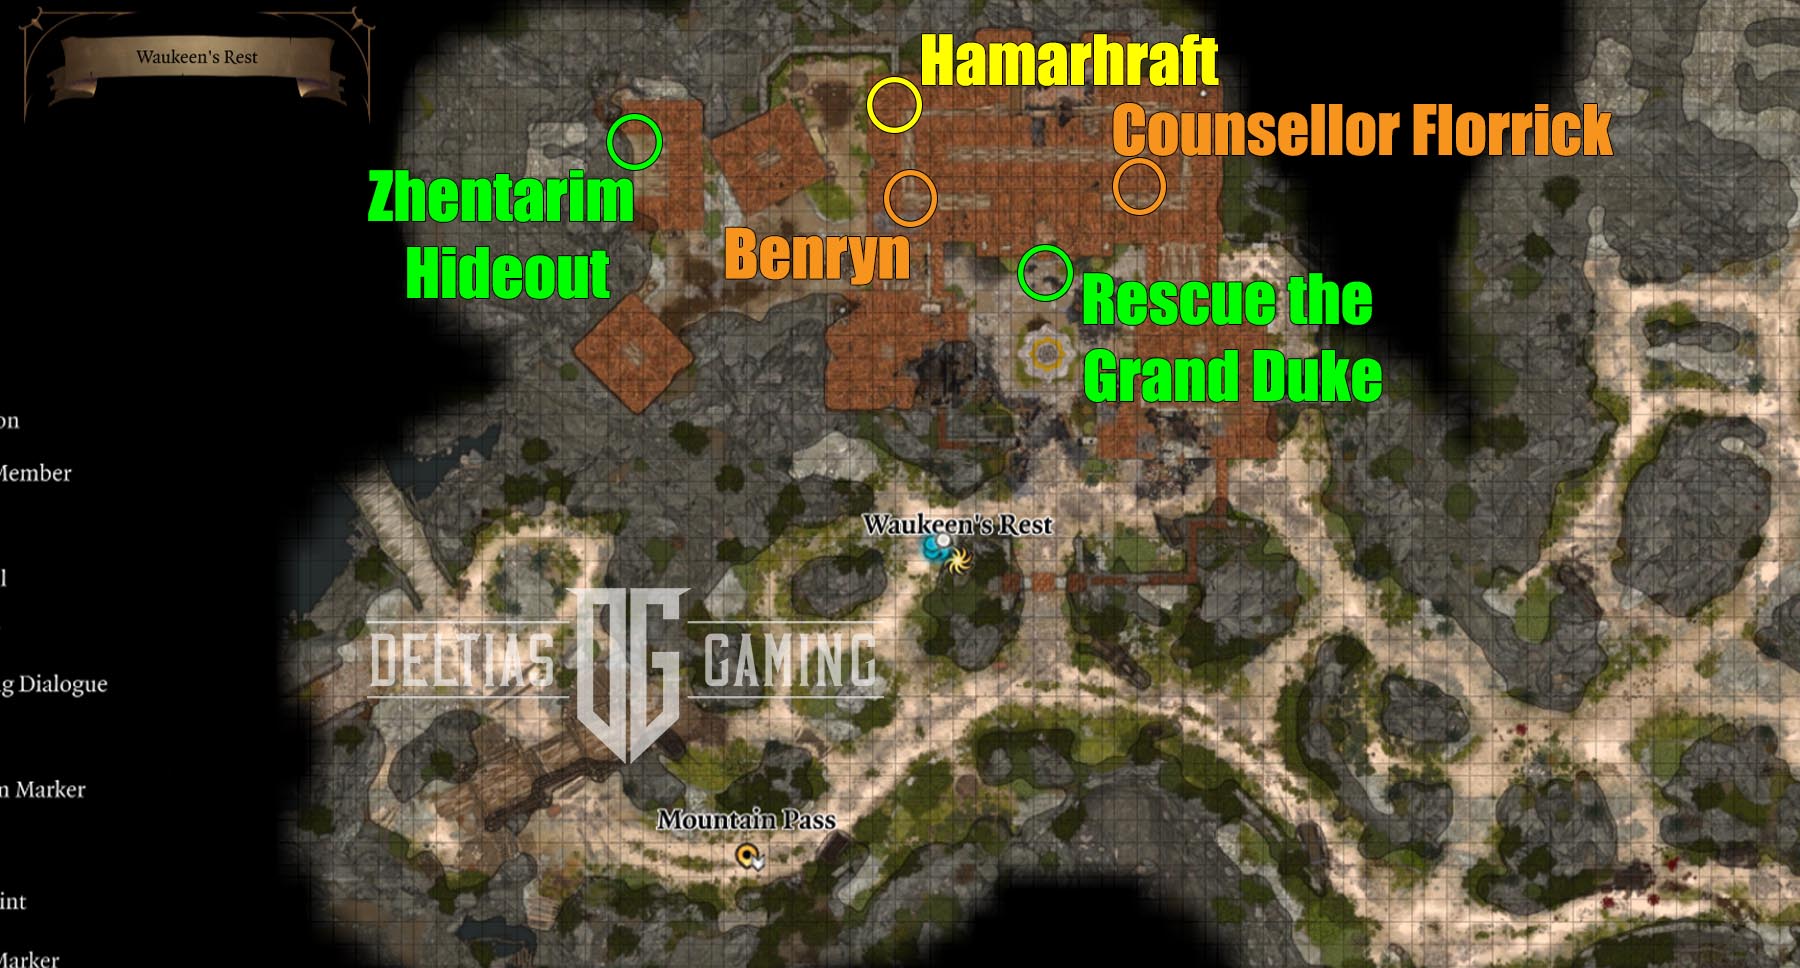
Next in our BG3 Act 1 checklist is Waukeen’s Rest. The location is found to the west of the Risen Road, and you’ll want to initially bring Wyll along for a story quest related directly to his past. Moreover, helping the people here will reward you with your choice of weapon that is centered around Lightning Charges. Finally, you can find the entrance to the Zhentarim Hideout inside.
Quest
- Rescue the Grand Duke: Automatically begins as you approach the burning inn. It’s best to have Wyll in a group for this one. Break down the door for the Fists and head inside to rescue Counsellor Florrick.
- Free Benryn: Also trapped inside the burning inn. Benryn can be found behind the door closest to the top of the stairs. Switch to turn-based mode and send in a character with good Strength to move the splintered beams off of him. Then have another character pull him up with the Help action. Tell Benryn to follow you and exit out the nearby door.
- Zhentarim Basement: The entrance to the Zhentarim Hideout is found within Waukeen’s Rest. You’ll want to head to the west, past the inn. Inside the building north of the stables, you’ll find an NPC there guarding the entrance. Give him the password, if you have it from Rugan earlier. If you don’t, you’ll have to pass other dialogue checks to receive the key to the hideout.
Gear
- Hamarhraft: This is an uncommon two-handed melee weapon that allows the user to deal thunder damage when jumping. Can be found inside a gilded chest in one of the burning rooms on the second story of the inn. The room can quickly become engulfed in flames, so it’s best to switch to turn-based mode before going in.
- The Sparky Points, The Joltshooter, or The Spellsparkler: Choose one as your reward for completing the Rescue the Grand Duke quest. Each of these weapons will have some bonus featuring Lightning Charges.
Zhentarim Basement
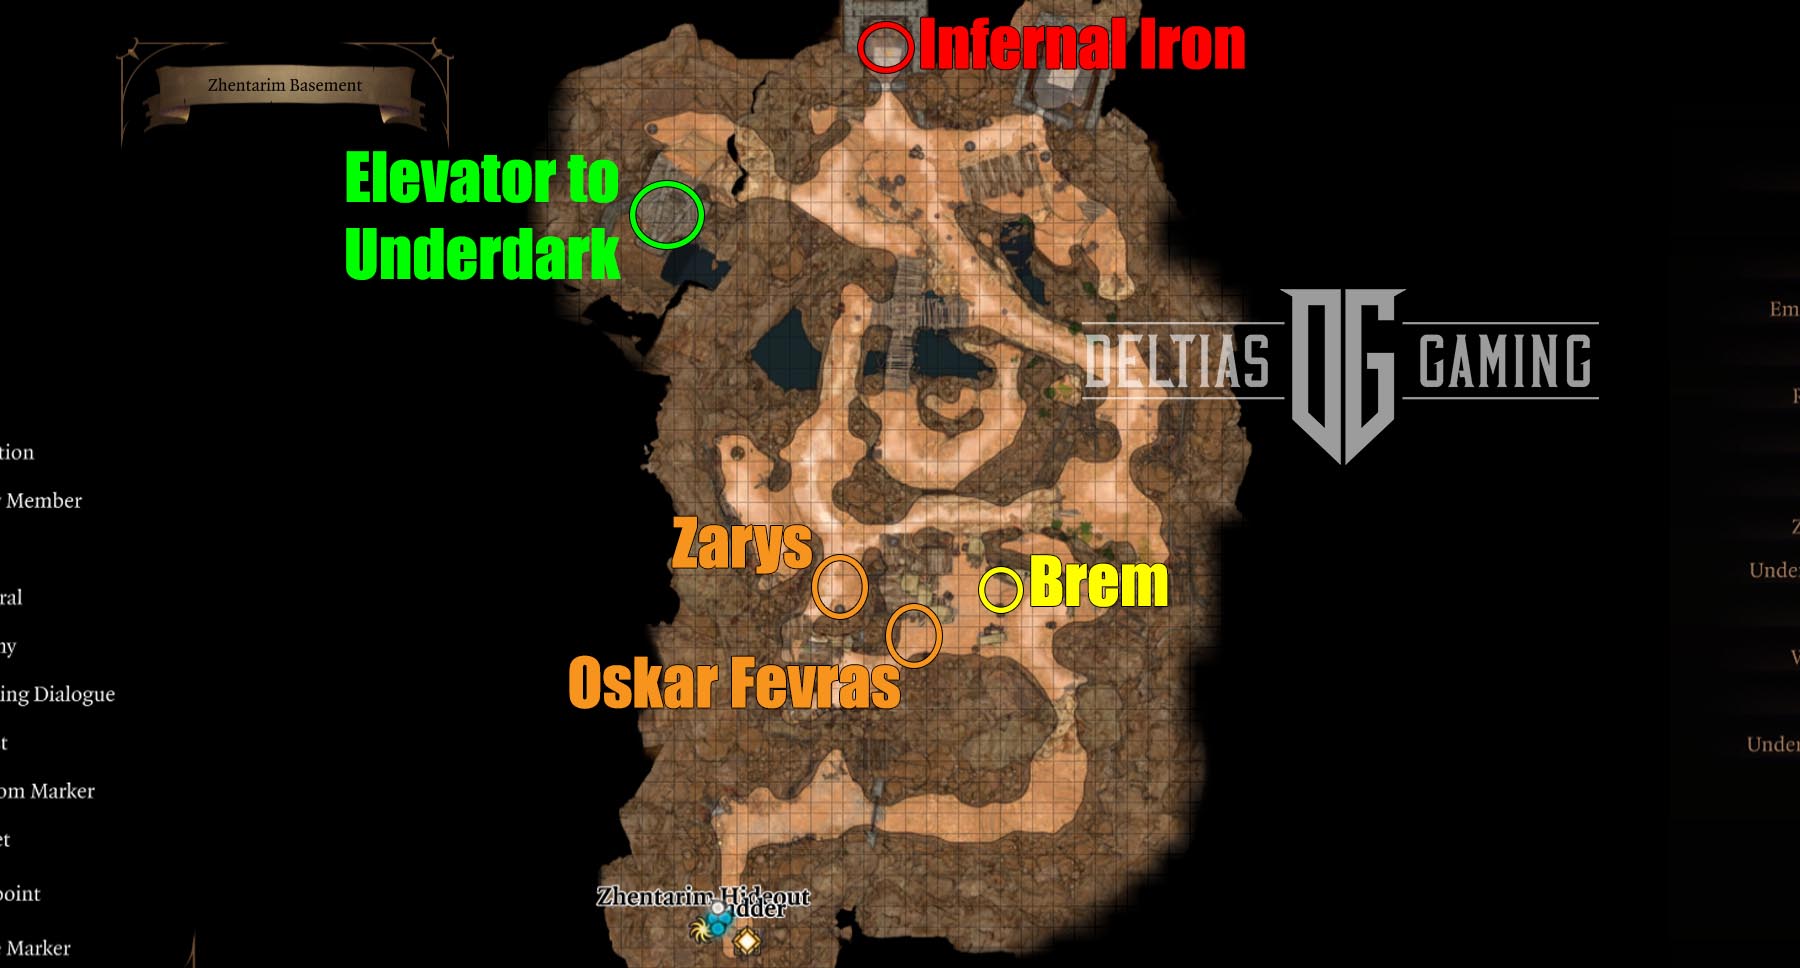
The Zhentarim Hideout is in a surprisingly large cave, and you can find/purchase a variety of good gear if you played your cards right back at the cave along the Risen Road. Additionally, you can find some Infernal Iron for Karlach here, along with another entrance into the Underdark.
Quest
- Find the Missing Shipment: To convince the Zhentarim leader Zarys that you can be trusted (which unlocks Brem’s special stock), you need to give back the Caravan Strongbox without having unlocked it. Another way to achieve this is by not telling Zarys you stole the strongbox. This will require that neither Rugan or Olly is alive to say otherwise.
- Free the Artist: Artist Oskar Fevras is being held hostage by Brem. You can speak to Brem to negotiate his release. It will cost you, although a successful Persuasion/Intimidation roll can bring down the price a bit. If released, you can find him again during Act 3.
Gear
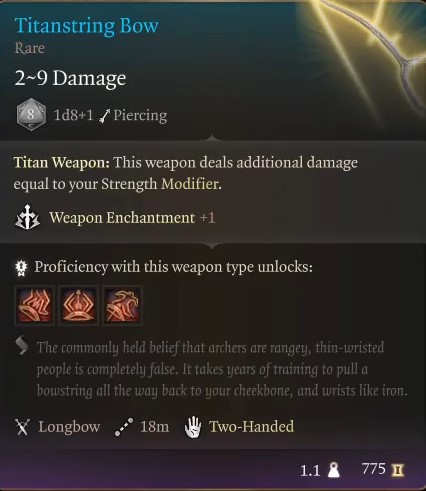
- Titanstring Bow: One of the best bows in the game and works great in combination with the Club of Hill Giant Strength. Part of Brem’s special stock.
- Harold: Provides some nice early-game crowd-control. A reward from Zarys if you bring her back the Caravan Strongbox without having picked the lock open.
- The Jolty Vest: A good medium armor you should pick up if a party member is using items that grant Lightning Charges. Part of Brem’s special stock.
- Giantbreaker: Another ranged weapon with good crowd control. Part of Brem’s special stock.
- Gloves of Hail of Thorns: Gives you a free cast of Hail of Thorns spell once per short rest. Part of Brem’s special stock.
- Rupturing Blade: A rapier weapon with unique actions that can be a good choice if you are playing Wyll as melee. Part of Brem’s special stock.
Mountain Pass
Quest
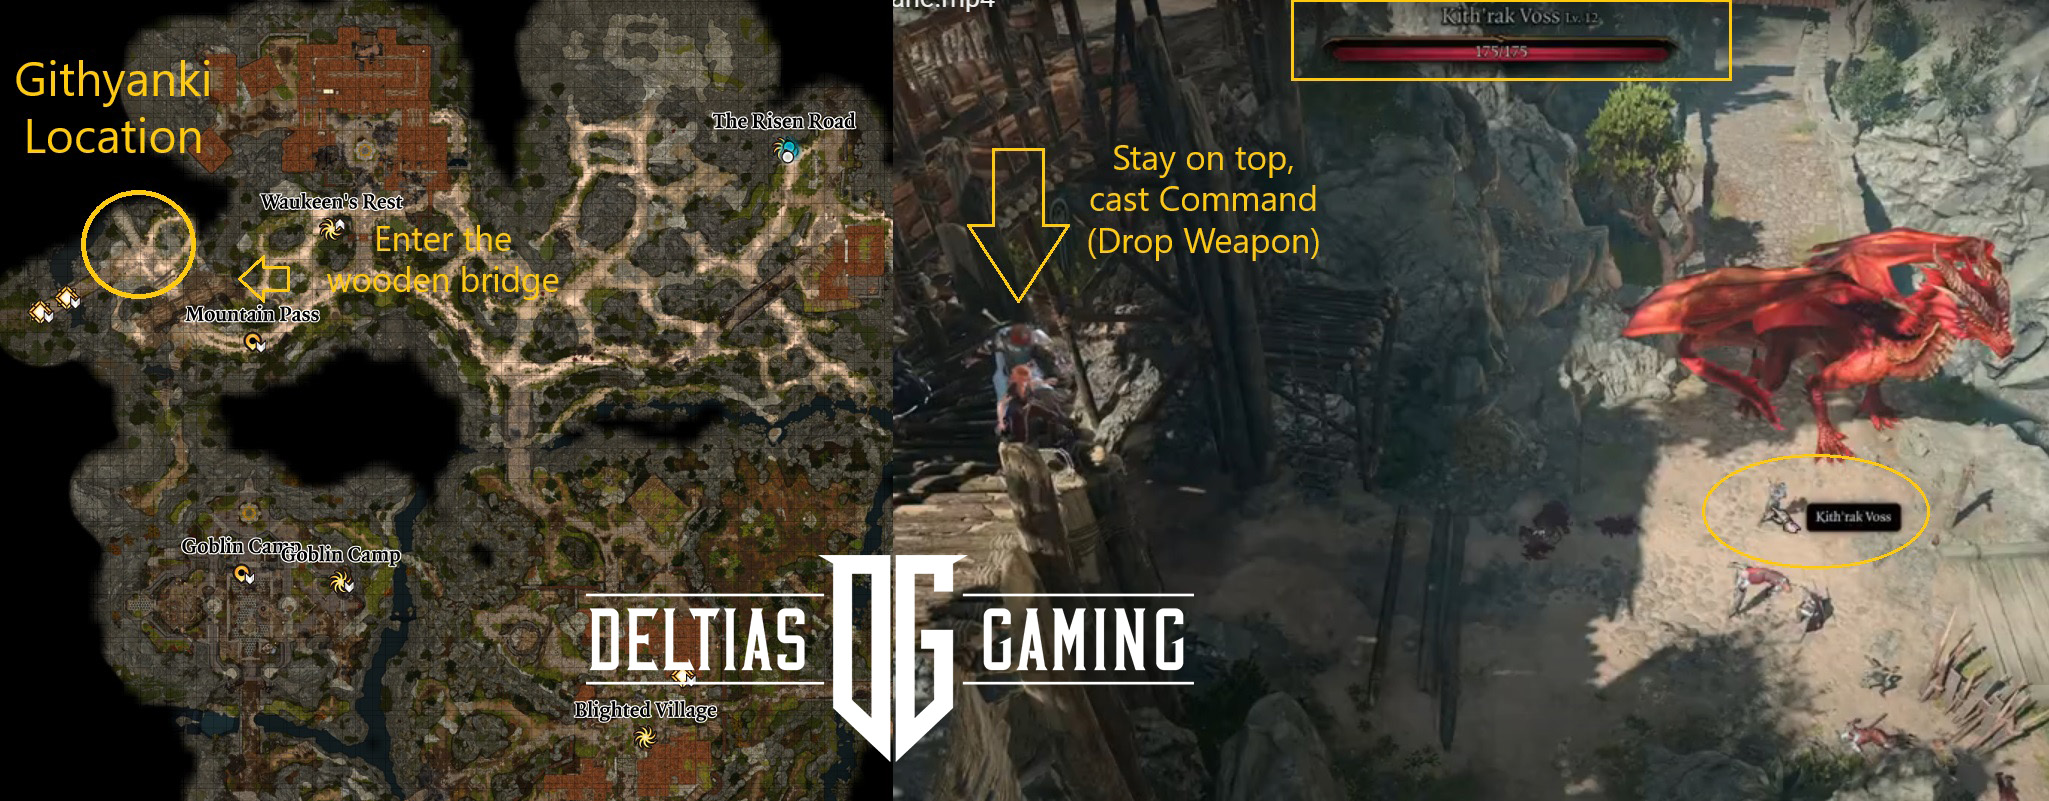
Githyanki: As you approach the bridge you’ll see a red dragon, and a group of githyanki down below. If you have Lae’zel in your party she will break off to go speak with them. If not, you can sneak across the bridge and you’ll have a chance to take an incredibly powerful sword from Kith’rak Voss. This is a very difficult fight, especially on Honour Mode. It’s advised to be level 5 or 6 at the highest difficulty.
Gear
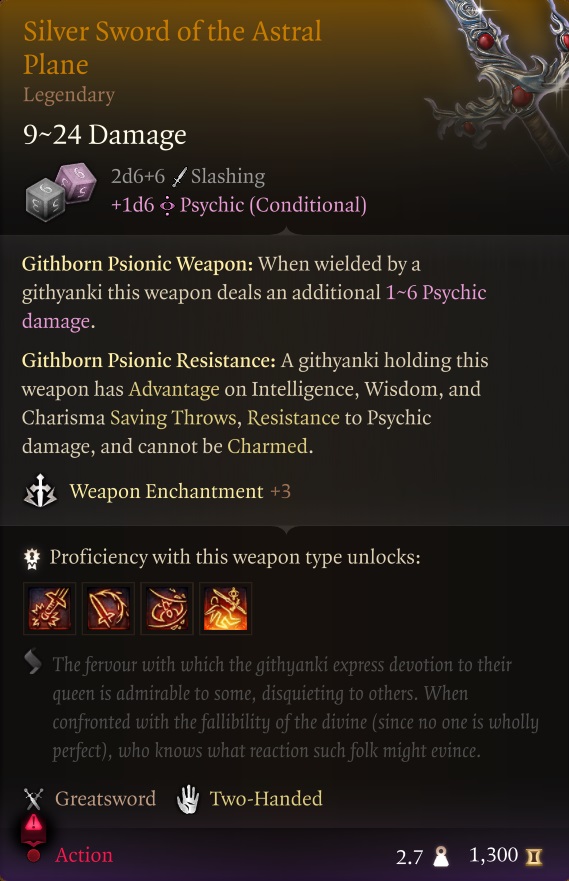
Silver Sword of the Astral Plane: Normally only available in Act 3, you have a chance to get this amazing sword in Act 1! Do NOT bring Lae’zel with you in your party as you approach the bridge above the Githyanki. Additionally, you’ll need a character with the Command spell or a Command scroll. Moreover, you’ll also need to be willing to ‘save scum’ because it will probably take several tries for the spell to be successful. Check out our Guide for full instructions.
Goblin Camp
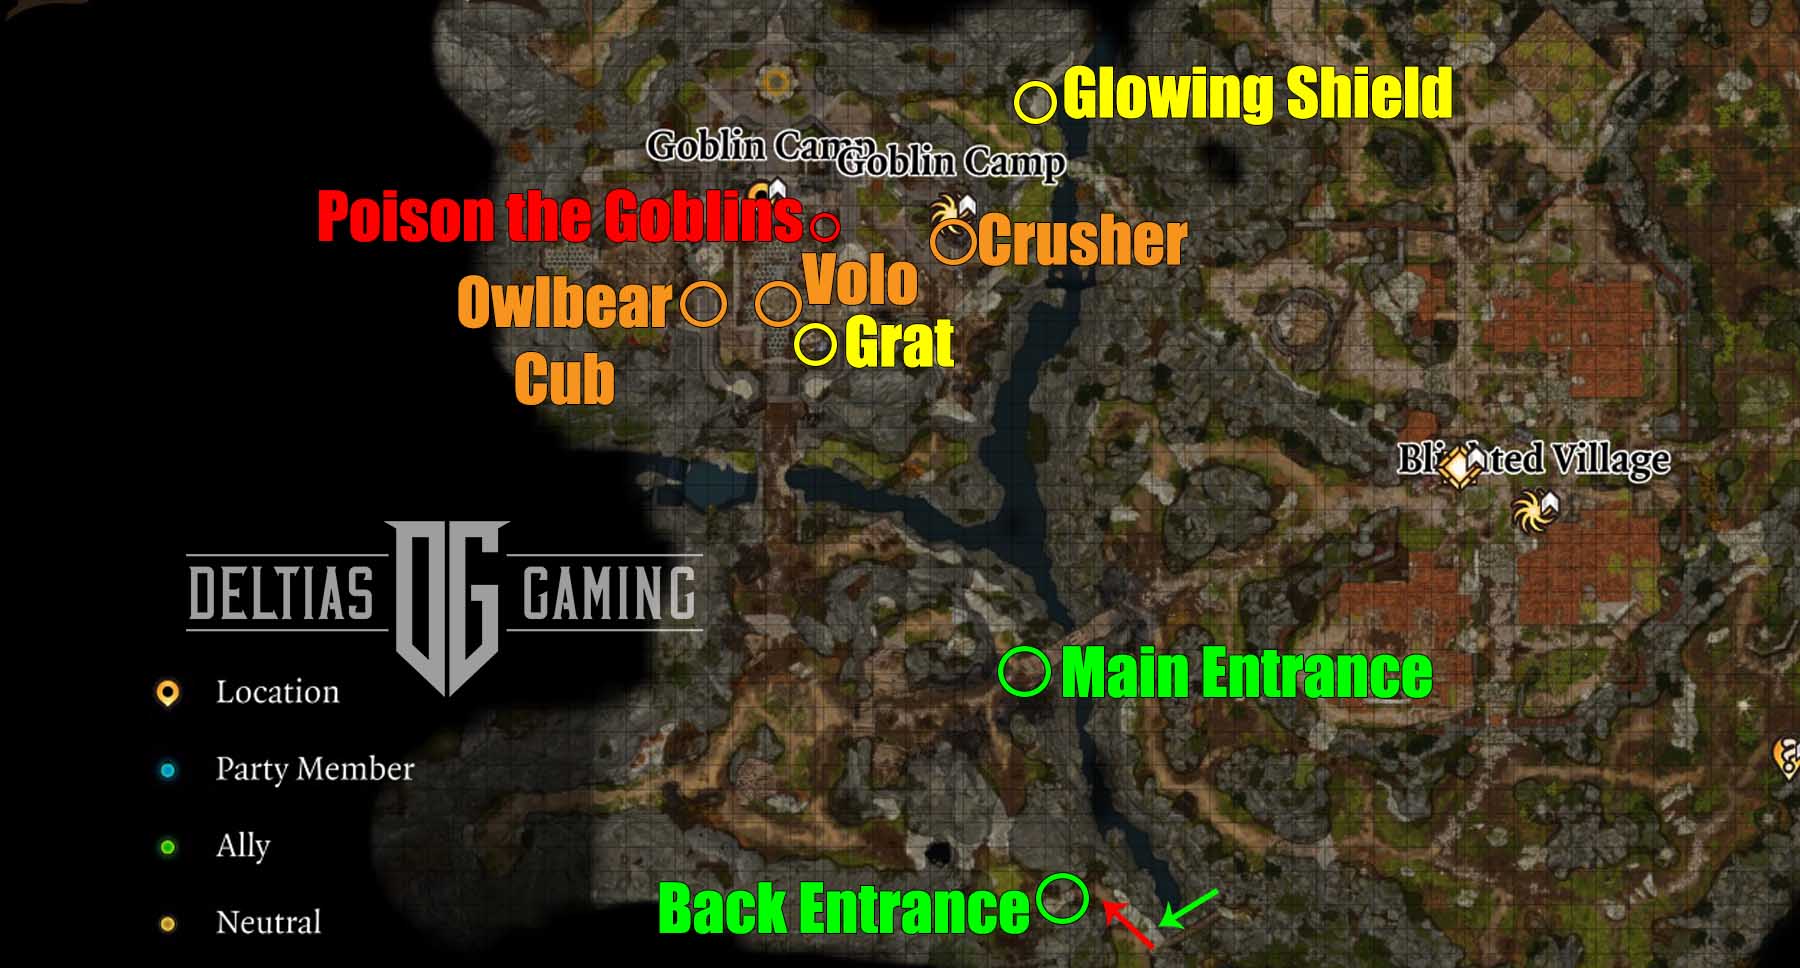
An incredibly important location in our Baldur’s Gate 3 Act 1 Checklist, the Goblin Camp is a major part of the Act 1 storyline. If you’ve already been to the Emerald Grove then you already know about the threat the goblins pose. There are a couple of different ways into the camp. The direct route will have you facing a group of guards at the front gate. You’ll have to convince them to let you pass or fight them all. If you defeat them, this doesn’t bring the whole camp down on you. You can enter without suspicion.
Additionally, there is a second way you can sneak in. Head further south and you should see a fallen tree you can jump onto and walk across. There will be a lot of traps to disarm when going in this back way. However, once you’re past them the goblins will assume someone else legitimately let you in.
Quest
- Grat the Trader: Grat is just inside the main courtyard on the right. Interact with him first, as he has several items worth buying.
- Volo: You’ll meet him for the second time as a prisoner of the goblins. You can watch him try to perform and he’ll be led off into the Shattered Sanctum. You’ll get a chance to rescue him inside.
- Owlbear Cub: If you interacted with the Owlbear at her nest, you should now find the Owlbear cub at the Goblin Camp. You can free it by either agreeing to a game of Chicken Chase or by persuading the goblins to let it go. Talk to it with Speak with Animals and recommend it take refuge in your camp.
- Crusher: You can find the goblin Crusher on the east side of the camp near the waypoint. If you approach him and aren’t a Drow he will attempt to bully you. Insult him back and eventually he’ll demand you kiss his foot. While doing so, you can steal his ring if you pass a 10DC Sleight of Hand check. Killing him and looting his body will also get you the ring, but doing so will also make the whole camp hostile towards you.
- Poison the Goblins: Near to the cooking spit you’ll find an upside-down skull holding all the goblin’s booze. If you have a Basic Poison, Wyvern Toxin, or Drow Poison in your inventory, you can interact with it and poison the drink. You’ll want to do this while in Stealth and if successful several of the goblins will die. The survivors will accuse you and you can either try to persuade them you had nothing to do with it or fight them.
Gear
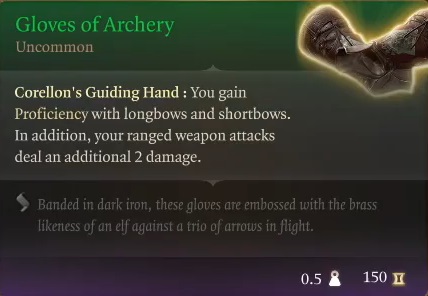
- Gloves of Archery: A good bow for any party member, or a Rogue who needs longbow proficiency. Sold by Grat the Trader.
- Boots of Aid and Comfort: A very helpful set of gear for a healing/support character. Sold by Grat the Trader.
- Hide Armour +2: One of the best chest pieces for Ranger or any other medium armour users. Sold by Grat the Trader.
- Glowing Shield: Very helpful for Clerics or Druids when you drop below 50% HP. Can be found inside a chest on a hillside northeast of the Goblin Camp.
- Crusher’s Ring: A must-have Act 1 accessory that increases mobility. Stolen or looted from Crusher.
Shattered Sanctum
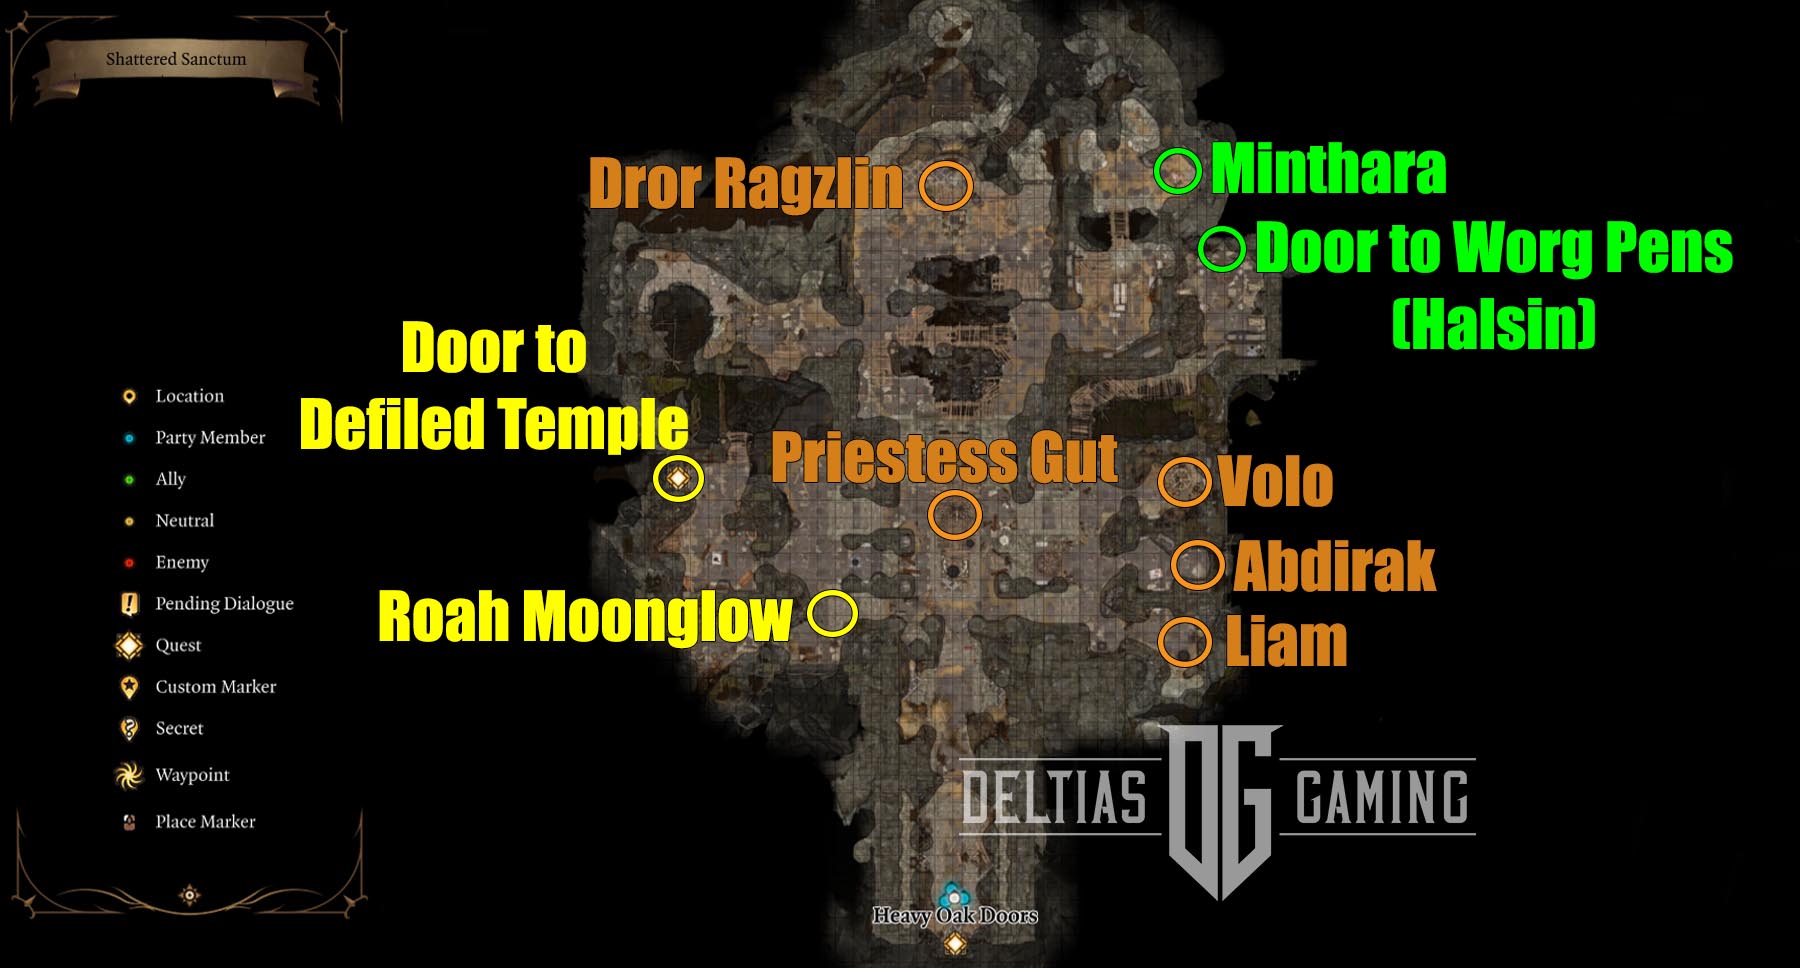
Next in our Baldur’s Gate 3 Act 1 Checklist is the Shattered Sanctum, where the leaders of the Goblin horde reside. Inside you’ll find two potential companions, a couple of permanent bonuses, new NPCs, and some good gear. Additionally, there are a couple more secret areas inside you can discover, such as the Worg Pens and the Defiled Temple.
When you first enter the Shattered Sanctum you’ll have to convince some goblin guards that you’re meant to be there. Once you’re past them you’ll be free to walk around the whole interior. We recommend that you take an immediate left and head up the stairs to meet trader Roah Moonglow. Then go back down and across and up the other set of stairs on the right/east side to meet certain NPCs in order from there.
Quest
- Roah Moonglow: You’ll find Roah at the top of the stairs on the left. She’s a Zhentarim trader who only cares about the money she can make off the goblins. She’ll also have a nice inventory of stuff to sell to you, as well.
- Liam: A human prisoner tied to a torture rack in the first alcove at the top of the east stairs. You can choose to help torture him or help free him. If tortured he will reveal to the goblins the location of the Emerald Grove.
- Abdirak: In the next room you’ll find a fellow standing and facing the wall. Approach and speak to him, and you can potentially gain a bonus called Loviatar’s Love if you pass three consecutive Performance or Intimidation checks. Remember that you will lose Loviatar’s Love upon your character’s death, even if they are revived afterward. So it’s not fully permanent but so long as your character doesn’t die it will remain through any and all Short or Long Rests!
- Volo: You’ll find the Bard Volo in the very next small room, locked inside a cage of bones. Speak to the goblin Viskarra and you can use a Deception or Intimidation line to free him. He’ll use an Invisibility potion to escape, promising to find your camp later.
Goblin Leaders
- Priestess Gut: The easiest way to deal with her is to request a private audience with her and then you can kill her without having to deal with the rest of the goblins. She has some good loot, as well as a tadpole you can take.
- Defiled Temple: The entrance to the Defiled Temple is inside Priestess Gut’s private rooms. Get past the ogre and you can find the Amulet of Misty Step for the taking. Farther on is a room with a puzzle that will reveal an entrance to the Underdark. You can bypass the puzzle by passing a Perception check to discover a lever near a set of stairs to the north. Lockpick the lever to open the passage.
- Dror Ragzlin: One of the goblin leaders, he’s a tough boss with a lot of henchmen, but will give you great loot if you can beat him. Placing exploding barrels around him while he’s talking is a great way to shorten this fight. Climb up into the rafters and rain fire and ranged damage down on everyone.
- Minthara: A potential companion, she’s currently devoted to the Absolute. Can be killed, but then she won’t be available to meet again in Act 2. You can either side with her and against the Grove, or you can knock her unconscious with a non-lethal hit.
Gear
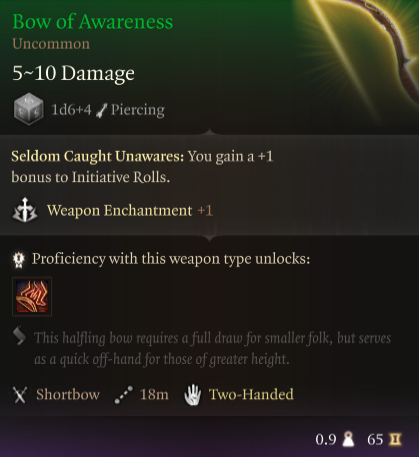
- Bow of Awareness: A great ranged weapon that buffs Initiative. Sold by Roah Moonglow.
- Amulet of Misty Step: The Misty Step spell is fantastic for increasing mobility. Found inside a Gilded chest in the Defiled Temple. You’ll need to either defeat the orge guard in battle or pass a 22-difficulty check to convince her you’re meant to be there.
- Hunter’s Dagger: A good plus-one dagger for dual-wielding builds. Sold by Roah Moonglow.
- Gloves of the Growling Underdog: Great for melee guilds who are often in the thick of a fight. Found inside Dror Ragzlin’s treasure crates.
- Absolute’s Warboard: Grants a +1 bonus to all Saving Throws if the user bears the Absolute’s Brand. Dropped by Priestess Gut.
- Blazer of Benevolence: A must have light armour for Bards. The reward for rescuing Volo, which you’ll receive at your next Long Rest.
Permanent Bonuses
- Brand Of The Absolute: If you wish to become branded with the Absolute’s mark, you can request this from Priestess Gut. She will do so and then request a private audience with you afterward. The brand will help convince other cultists you are trustworthy but will cause distrust in others. Additionally, there is a handful of gear pieces that will give a bonus to those that have been branded.
- Loviatar’s Love: A condition where on 30% Hit Points or less, you gain a +2 bonus to Attack Rolls and Wisdom saving throws. Gaining this bonus will require speaking to Abdirak and accepting his offer. Next, you’ll have to pass three dialogue checks. This condition can be lost character death.
Companions
- Decide Minthara’s Fate: Minthara can be a tricky companion to recruit if you don’t wish to turn on the Emerald Grove. However, Larian has introduced a workaround. You can now choose to knock her out with a non-lethal blow after she becomes temporarily hostile. Non-lethal attacks can be done by turning on non-lethal for melee builds in your toolbar the same area as Great Weapon Master. You can trigger her anger by attempting to steal from the locked chest nearby where she is standing.
- Defeat the Goblins: The true leader of the Emerald Grove, Halsin is currently a prisoner of the goblins. You can find him in his bear form down in the Worg Pens. You’ll have to help free him and then agree to defeat the goblin leaders to protect the Grove. He won’t join your group just yet but will show back up in Act 2.
Sunlit Wetlands
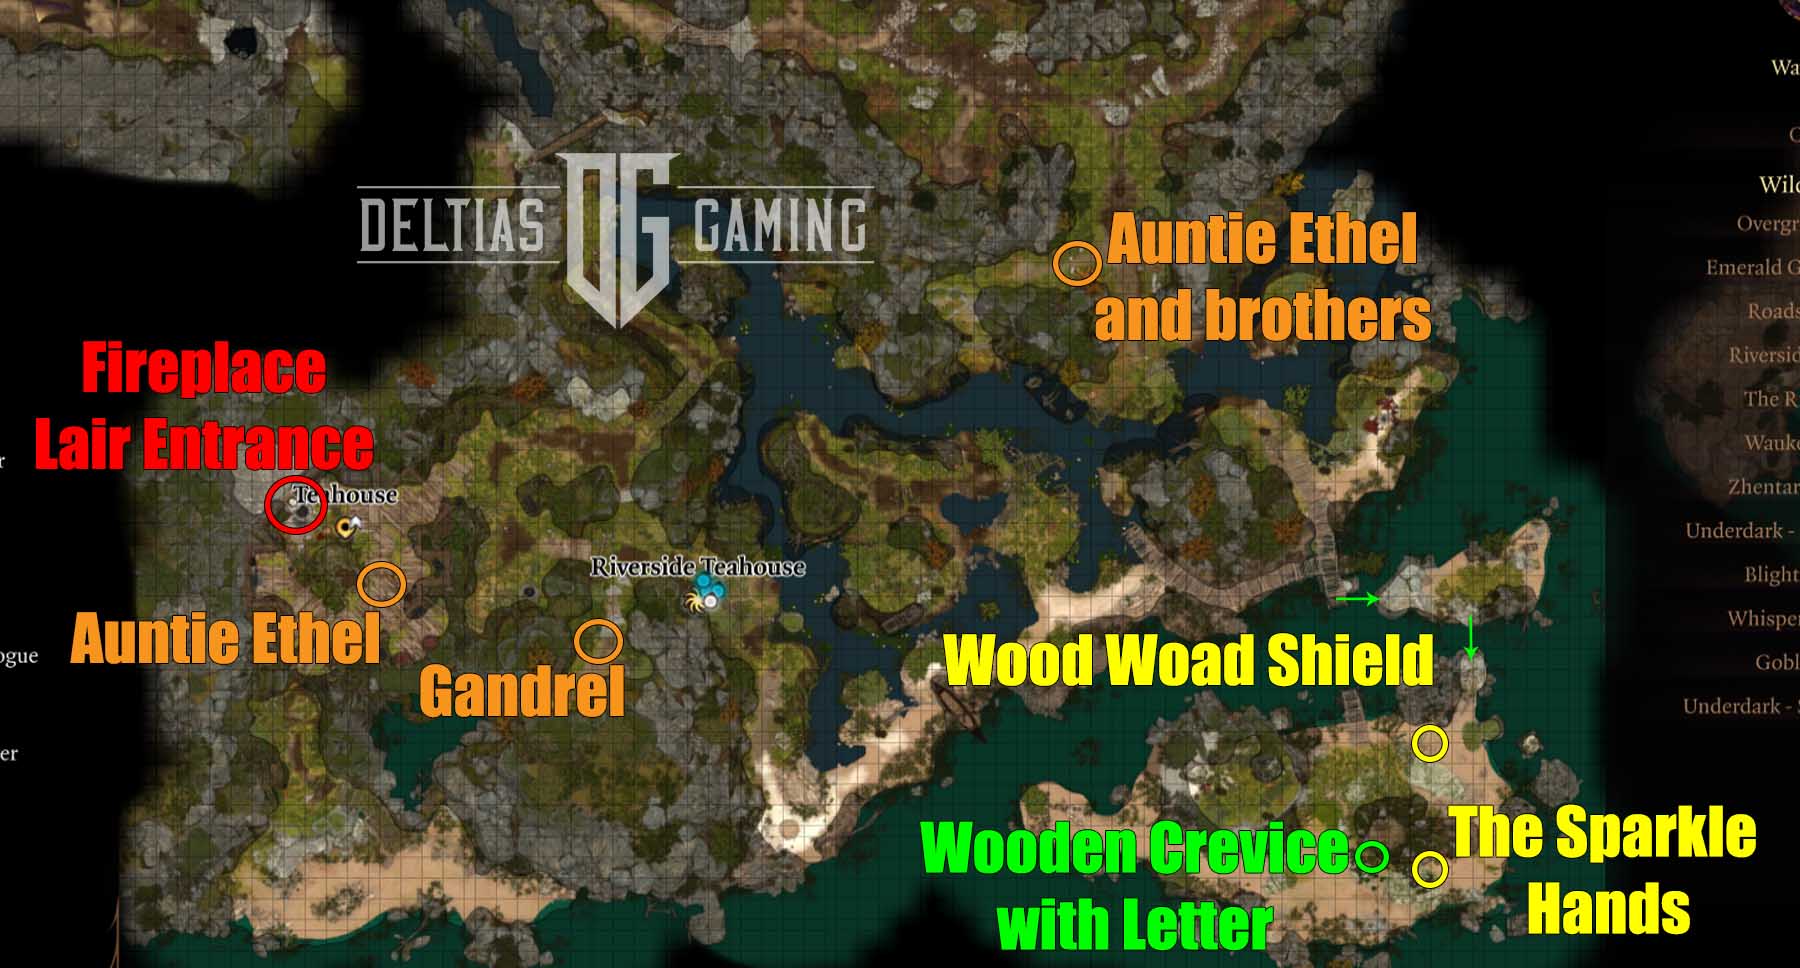
There are several noxious secrets to uncover in this seemingly beautiful, sunny area to the south of the BG3 Act 1 map. A small island that serves as a former Druid Sanctuary holds some critical information involving Kagha and the Emerald Grove. Additionally, visiting Auntie Ethel at her Riverside Teahouse is a must. Doing so will lead to surprising secrets, and a permanent bonus that our BG3 Act 1 guide recommends not missing out on.
Quest
- Kagha Letter: If you found the letter and book in Kagha’s Chest back at Druid Grove, then you’ll want to find the secret location. There is a smaller island to the far south of the Sunlit Wetlands. To access it you’ll have to jump across broken docks and rocks. Additionally, it’s guarded by Wood Woads and Ancient Mud Mephits who can be difficult to fight when your party is lower leveled. When defeated, you can find a secret letter stashed away in a Wooden Crevice in the tree trunk, which can potentially change the outcome at the Grove.
- Gandrel: A Gur monster hunter who is currently on the hunt for a certain vampire spawn. He can show up again in Act 3 if you pretend you don’t know anything and let him go. If you kill him, you can loot a basic crossbow called Gandrel’s Aspiration from him. If you stay on Gandrel’s good side he’s technically a trader but his inventory contains nothing of note, just basic supplies.
- Auntie Ethel: More than what she appears to be, if you antagonize her or discover her secret lair she transforms and becomes hostile. It’s not recommended that you attempt this fight before you are Level 5. When you make it to the end of her lair for a final fight, she’ll offer you a deal once it looks like she’s losing. This is one of the best permanent bonuses in Act 1 and is not to be missed. If you let her go (which the bonus requires) you’ll see her again in Act 3.
- Save Mayrina: Found at the Teahouse with Auntie Ethel. She’s willing to sacrifice her unborn child for her husband, but if you’re willing to go to the trouble of rescuing her you also can find her again in Act 3.
Gear
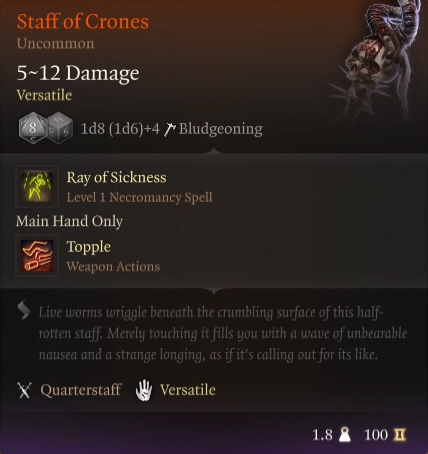
- Staff of Crones: Another great early game staff for any spellcaster, but especially geared towards Necromancy Wizards. Found in Acrid Workshop at the bottom of the Lair after defeating the Hag.
- The Sparkle Hands: Another piece of armour that works with a build centered around lightning charges. Found in a chest next to a large tree trunk in the Druid Sanctuary.
- Wood Woad Shield: A decent uncommon shield early, fits well with Druids. Dropped by Wood Woads in Druid Sanctuary.
- Corellon’s Grace: A good staff for spellcasters due to a +2 bonus to saving throws. Wizards, Sorcerers and some Warlock builds will want this. Purchase from Auntie Ethel.
Permanent Bonuses
- Paid The Price: This potential bonus is something you can get from Auntie Ethel when visiting her in the Teahouse. During the conversation, she’ll offer to try and remove the tadpole for you, but in exchange, you have to let her take your eye. She’ll give it back but you’ll now have a +1 to Intimidation checks. Moreover, you’ll have a Disadvantage on Perception checks and against Hags. It will also change the look of your eye. Cannot be done on Wyll or on a character who has Volo’s Ersatz Eye.
- Auntie Ethel’s Hair: When her health is down to 20% or below, the Hag will stop the fight and offer you a permanent +1 to any ability in exchange for letting her go and taking Mayrina with her. You can agree to this exchange or refuse and continue the fight to kill the Hag. A third option is to try and use the Deception or Intimidation dialogue options which will give you a chance to get the bonus and save Mayrina. Either dialogue choice requires you to pass a 15-difficulty check.
Underdark
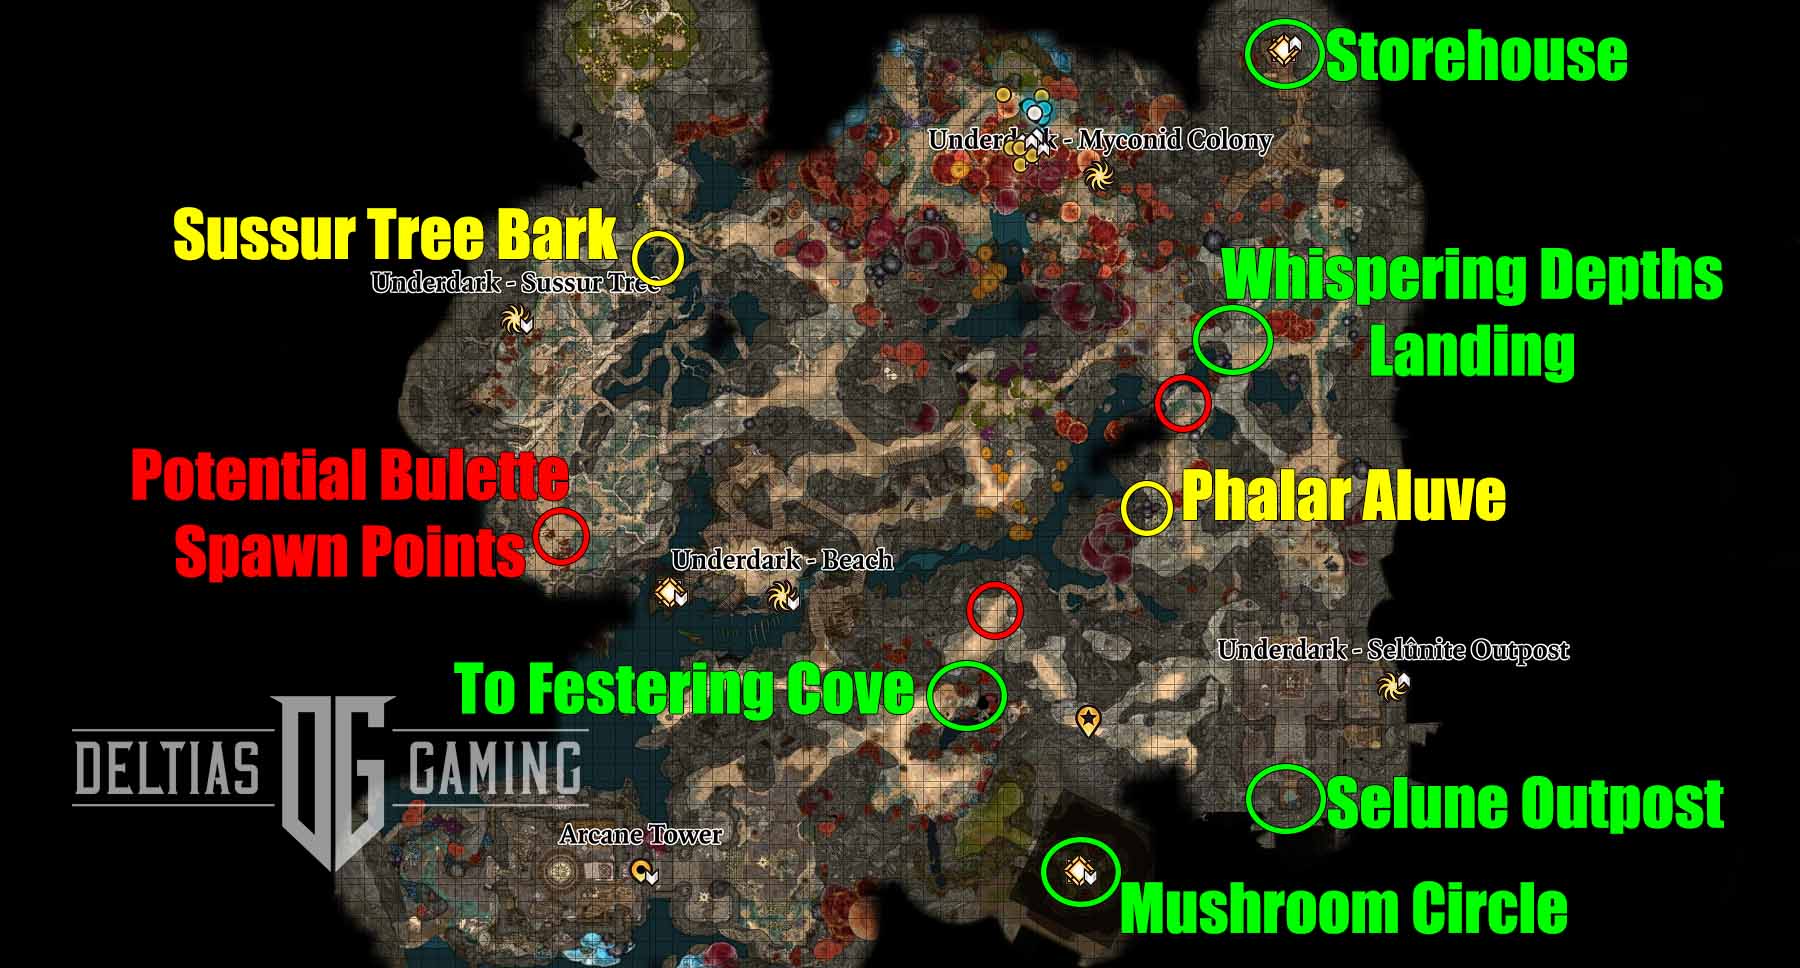
The Underdark is a large underground area below the main overland map, and there are several different ways to enter. Our BG3 Act 1 guide covers everything there is to explore do down here, including the Myconid Colony, the Arcane Tower, the Sussur Tree, and a Decrepit Village. Moreover, exploring the Underdark will eventually lead you to yet another important location called the Grymforge.
Here are the four ways you can enter the Underdark in Baldur’s Gate 3:
- Take the elevator from the Zhentarim Hideout, arriving at the Storehouse in the far north.
- Climbing down the ladder in the Defiled Temple will put you at Selunite Outpost in the southeast corner.
- Use the mushroom circle in the Overgrown Tunnel in the Hag’s lair, which will transport you to a corresponding circle in Torchstalk Gulch (just west of the Outpost).
- Casting Feather Fall and jumping into the glowing hole in the Whispering Depths, which will safely land you amid the Minotaur Hills.
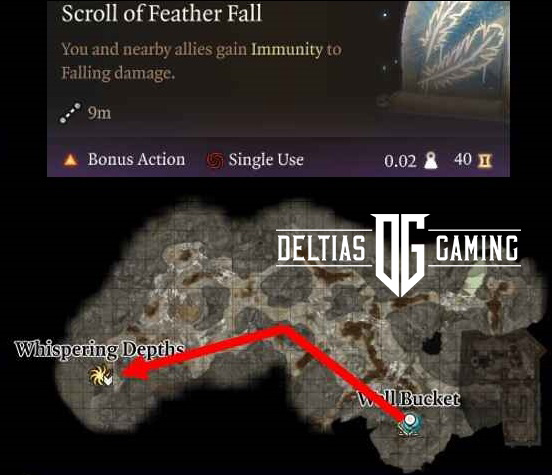
This last option is probably the easiest method to access and use. Assuming you’ve been following our Baldur’s Gate 3 Act 1 checklist and have already visited the Whispering Depths, just use the waypoint to travel directly there. Find the glowing chasm, cast Feather Fall on yourself and your allies, and jump into the Underdark.
If you haven’t made your way into the Whispering Depths yet, then use the Blighted Village waypoint to quickly return. Find the Well and climb down into the caves below. Refer to our section on the Whispering Depths for dealing with the spiders and make your way west to unlock the waypoint. Find the glowing chasm, cast Feather Fall, and jump. You’ll land north of the Selunite Outpost on the east side of the map.
Gear
- Bulette: The Underdark contains several of these monsters which burrow underground and then burst through to attack their enemies. At Level 5 they are formidable enemies, but hopefully by this point your party is of a similar level. The Bulette found west of the Selunite Outpost will drop the Bloodguzzler Garb.
- Phalar Aluve: A great weapon that can boost allies or cause AOE damage to enemies. Requires you to pass a 15 Strength or Religion check to pull from the rock.
Permanent Bonuses
Boooal’s Blessing: This bonus will grant you an Advantage on Attack rolls against Bleeding creatures, as long as there are Kuo-toa to worship BOOOAL. However, you have to permanently sacrifice a companion to gain this buff. BOOOAL is an unusually strong redcap that you can find in the Festering Cove area of the Underdark. You’ll find him and his followers on a small edge and rocky platform underneath with red exploding mushrooms.
You can also gain this buff as a temporary bonus by equipping the Sickle of BOOAL. You can get this weapon via dialogue options that question his god-hood or you can steal it from Pooldripp the Zealous. The buff will only apply to a character when the sickle is equipped.
Ebonlake Grotto

Ebonlake Grotto is an area of the Underdark that is home to the Myconid Colony, a community of humanoid mushrooms that serves as one of the quest and equipment hubs underground. Following our Baldur’s Gate 3 Act 1 guide into the area, you’ll find a couple of traders with good items for sale, as well as some side quests you’ll want to complete for the rewards. When you first approach the Myconid Colony you’ll be stopped by guards, but you only have to pass a 5 DC Charisma check to convince them to let you pass.
Quest
- Find the Missing Boots: As you head up to meet the ruler of the Myconids you’ll find a Deep Gnome named Thulla in distress off to the left. Speak with her to learn she was poisoned. You can choose to cure her (which will reward you with Boots of Speed) or attempt to steal the Boots from her instead.
- Defeat the Duergar Intruders: Sovereign Spaw is the Myconid ruler, and his first request will be that you defeat the Duergar intruders for him. If you complete this, then he’ll have another quest which will lead you to the Grymforge area.
- Sovereign Glut: You’ll meet this displaced former Myconid ruler near the western entrance to the colony. If you’ve already spoken to Spaw, Glut will want to help you defeat the Duergar. If he’s alive when the battle ends, he then asks for your help in taking over the Circle.
Traders
- Blurg: Is a member of the Society of Brilliance Lodge and you can meet up with him in Act 3 later. Here in the Myconid Colony, he’s studying the flora and fauna of the Underdark. He also is a trader and has some equipment you don’t want to pass up. Additionally, be sure to mention your tadpole problem to him, and he’ll introduce you to a friend.
- Help Omeluum Investigate the Parasite: Omeluum is in the Underdark with his friend Blurg and after being introduced will attempt to help you deal with the tadpole if you don’t attack him first. You’ll have to travel to the Arcane Tower (see section below) to complete this quest, but it’s worth doing to unlock his trader inventory.
- Derryth Bonecloak: As you leave the Myconid Colony heading west, you should see a woman named Derryth Bonecloak on the right. She’s a trader and has a stock of items you should check out. Additionally, she’ll tell you about her missing husband who went looking for Noblestalk. You can find her later on at her store in the City of Baldur’s Gate.
Gear
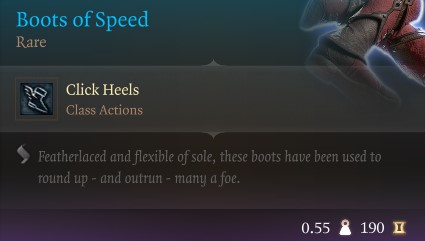
- Boots of Speed: Doubles movement speed with bonus action. Quest reward for curing Thulla.
- Shadow of Menzoberranzan: It grants invisibility for two turns and is a quest reward for defeating the Duergar Intruders.
- Melf’s First Staff: The best staff in Act 1 for all spellcasters. Sold by Blurg.
- Circlet of Blasting: Best helmet in Act 1 for all spellcasters. Sold by Blurg.
- Caustic Band: Best jewelry piece for melee builds in Act 1. Sold by Derryth Bonecloak.
- Cinder Shoes: A good set of footwear for Fire-based spellcasters. Sold by Blurg.
- Boots of Genial Striding: Negates the effect of Difficult Terrain. Sold by Blurg.
- Psychic Spark: Adds dart to Magic Missile, helpful against the Hag. Sold by Blurg.
- Sunwalker’s Gift: A great ring for Humans or Githyanki without dark vision. Sold by Blurg.
- Amulet of Restoration: An amazing amulet for almost any build at this level. Sold by Derryth Bonecloak.
- Gloves of Hail of Thorns: Grants free Hail of Thorns cast once per short rest. Sold by Derryth Bonecloak.
Permanent Bonuses
Survival Instinct: An Illithid power you can cast on an ally that will heal them if their HP reaches 0. You can gain this additional Illithid skill from Omeluum. Follow the quest Investigate the Parasite, collect the items, and return to the friendly mind-flyer. He will attempt to remove the tadpole and you will have to pass some difficulty checks to avoid some temporary conditions. In the end, Omeluum is unsuccessful and has only made the tadpole more powerful.
Selunite Outpost
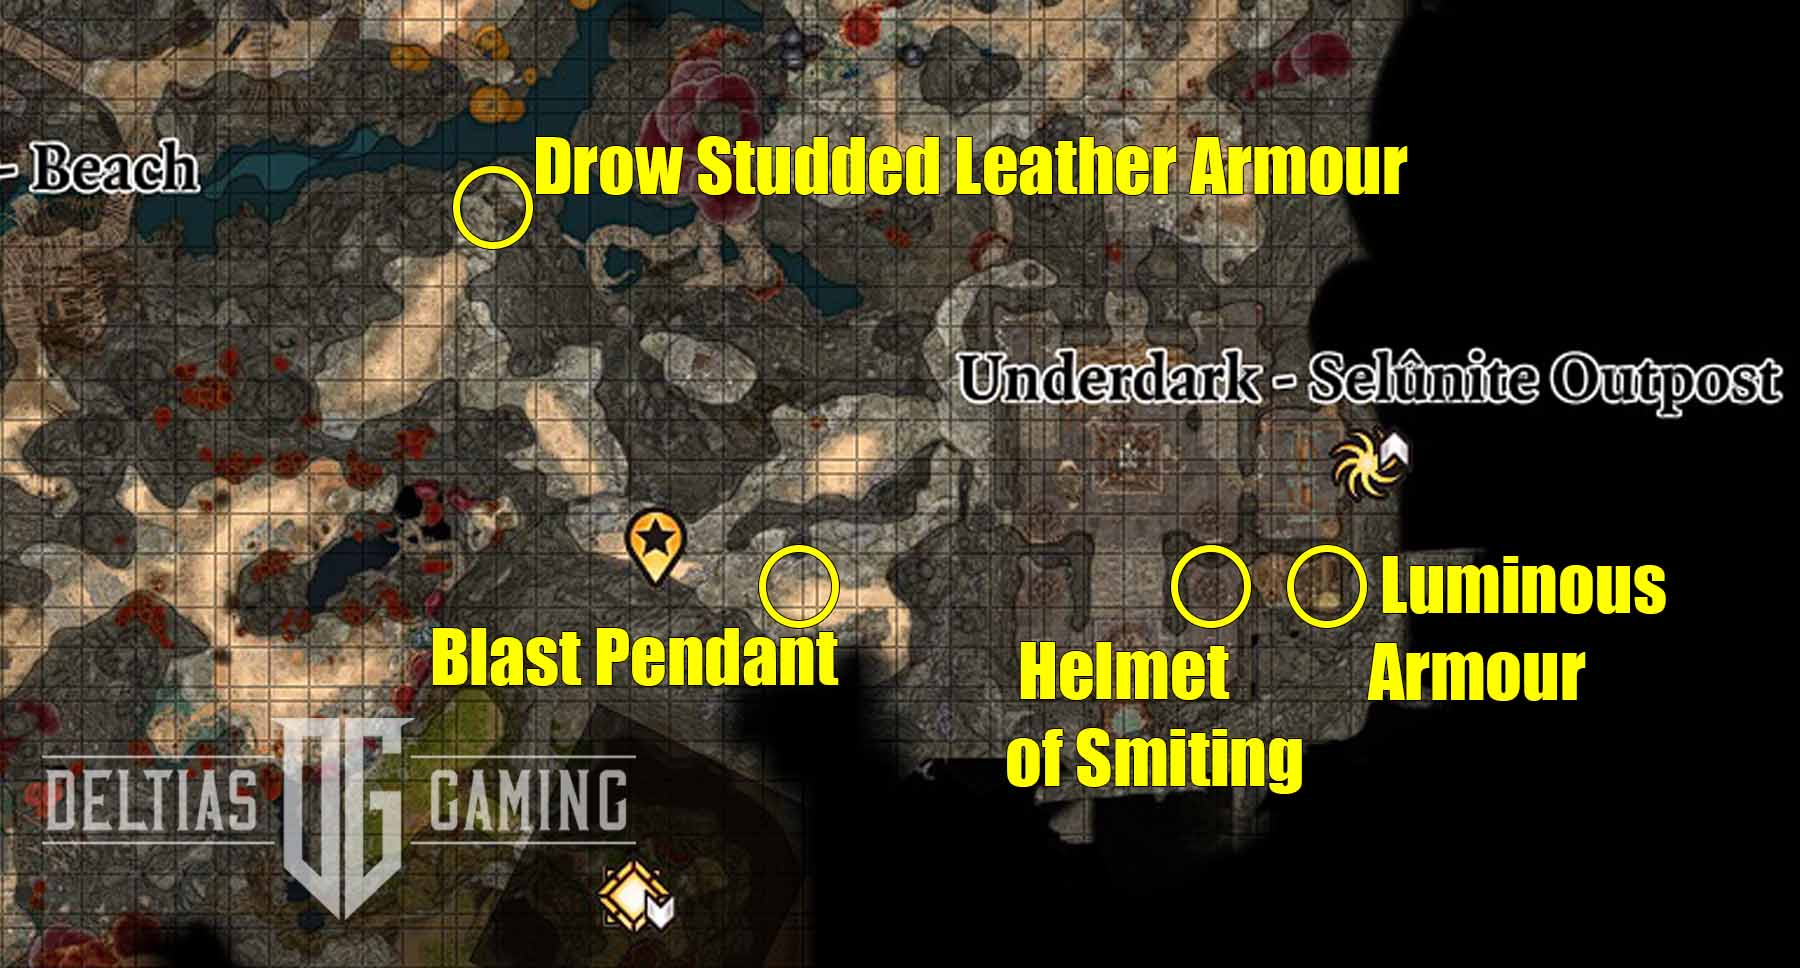
Next up in the Baldur’s Gate 3 Act 1 checklist is the Selunite Outpost, which can be found in the bottom southeast corner of the Underdark map. While you won’t find any NPCs, traders, or quests here you’ll still want to swing by and grab several potent gear items.
Gear
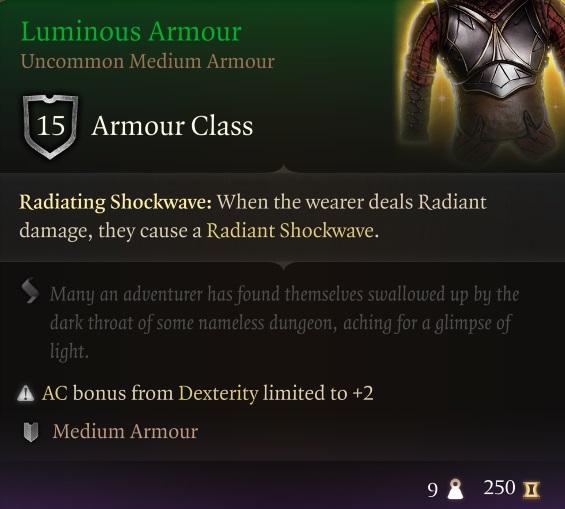
- Luminous Armour: God-tier early game armour for a Light Cleric or Paladin using Radiant damage. Found in the locked chest behind a hidden door at the Outpost.
- Helmet of Smiting: A fantastic headpiece for the Paladin class. Locked in a Gilded Chest inside the Outpost.
- Blast Pendant: Found on the body of the Drow Dhourn, west of the Selunite Outpost.
- Drow Studded Leather Armour: Grants a +1 to Stealth, a good choice for a Rogue or Ranger build. Found inside a Heavy Chest near the entrance to The Festering Cove.
Arcane Tower
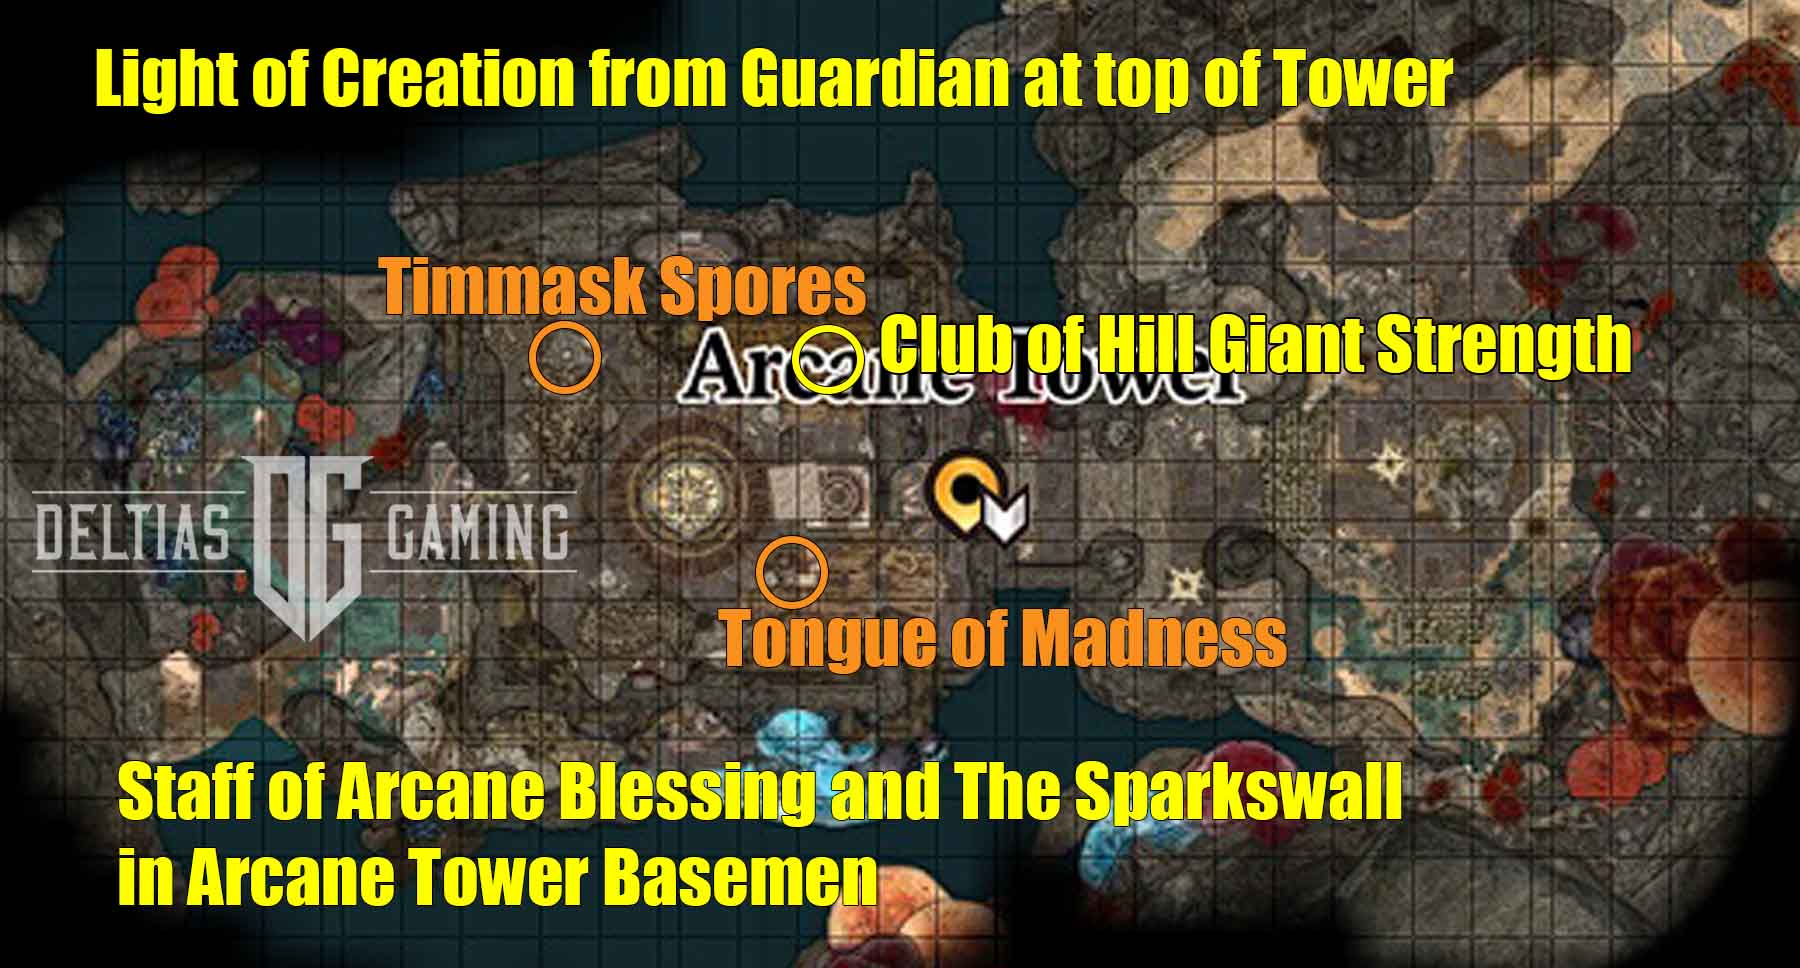
The Arcane Tower is located in the southwestern corner of the Underdark map, and this mysterious place holds a lot of secrets and also some great loot. The only way to get to this area is by heading west from the Selunite Outpost, or by teleporting into the Underdark from the Mushroom circle in the Hag’s Overgrown tunnel. Be careful when approaching the tower, as when you get close there will be automatic turrets that come to life and try to stop your approach. You can use Lightning-based spells and arrows to disable them.
Our How to Unlock the Arcane Tower Basement guide will give you a full explanation of how to fix the tower’s elevator, and how to deal with the guardians at the top.
Quest
Investigate the Parasite: Inside the Arcane Tower, you will find the Tongue of Madness and Timmask Spores that Omeluum has requested. Collect them as you are exploring the tower floors but wait until you’ve finished exploring the space before returning to the Myconid Colony with them.
Gear
- Club of Hill Giant Strength: A must-have melee weapon that increases the user’s Strength to 19. Break the Stool of Hill Giant Strength at the top of the Arcane Tower.
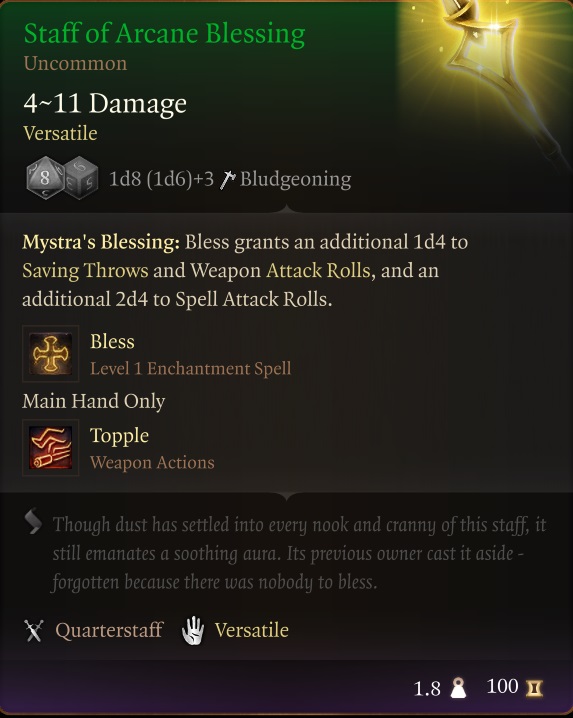
- Staff of Arcane Blessing: A good quarterstaff for spellcasters that provides a bonus to Saving Throws and Attack Rolls. Found in the basement of the Arcane Tower, which can’t be accessed until you have Guiding Light from the guardians.
- The Sparkswall: Resistance to Lightning damage and can’t be Electrocuted. Taken from a locked chest in the basement of the Arcane Tower.
- Light of Creation: A halberd that can be of great use for a boss fight in the upcoming Adamantine Forge. Looted from the guardian at the top of the tower, should you fight and defeat it.
Grymforge
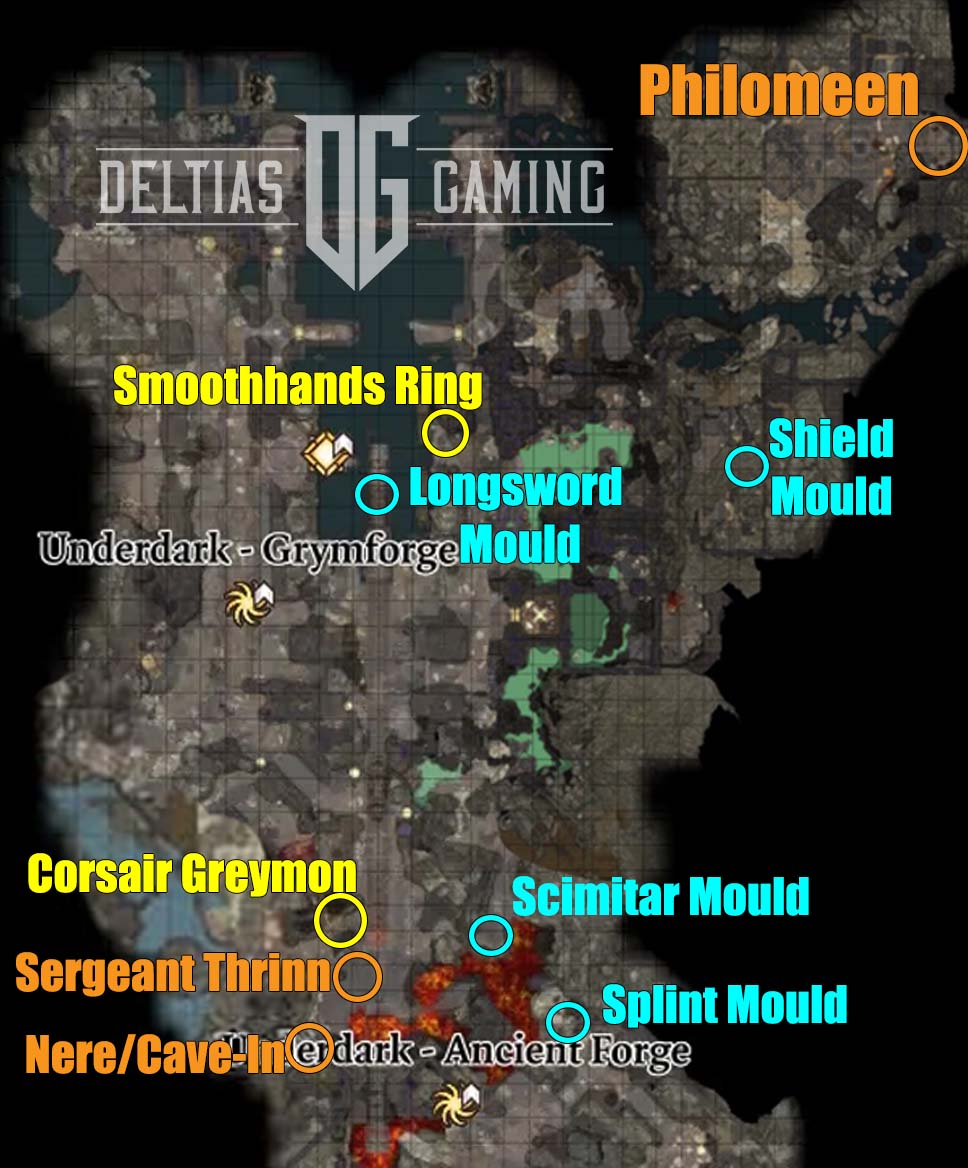
The following section of our BG3 Act 1 checklist is concerned with highlighting the valuable Grymforge location. This is an essential area all players should visit because of all the additional NPCs, quests, and powerful new gear you can find. Additionally, finding the Grymforge will eventually lead you to the Adamantine Forge, the only place in Baldur’s Gate 3 Act 1 where you can craft armour and weapons. You’ll begin your journey to the Grymforge by visiting the Decrepit Village in the Underdark. Refer to our How to Get to the Grymforge guide for a full walkthrough.
Quest
- Corsair Greymon: This Duergar will intercept your boat as you sail across Ebonlake to the Grymforge. Whatever you do, don’t push him into the water. He’ll die, but more importantly, you’ll lose all his loot. You can engage him in battle and loot pieces from his body afterward. Or you can attempt the Deception dialogue option. If successful, you’ll find him at the Grymforge as a trader and can buy weapons from him.
- Free True Soul Nere: This is the Drow that Sovereign Spaw has sent you to kill. You’ll find he’s gotten himself trapped in a cave-in, and a large group of Deep Gnome slaves have been tasked with digging him out. You can choose to side with Nere or with the Gnomes. However, you’ll want to make sure that either way you get the Disintegrating Night Walkers from him. They can be either looted or pickpocketed from him.
- Philomeen: A Deep Gnome who escaped with some smokepowder. If you find her, do everything you can to calm her down and reassure her. In return, she’ll give you a Runepowder Vial, which you can use to blast away the cave-in rubble.
- Sergeant Thrinn: Overseeing the Gnomes trying to dig Nere out. You can return the Boots of Speed taken by Thulla if you choose. However, the boots are better than the reward options. If you choose to side against Nere and the cultists, be sure to loot the Ring of Absolute Force from her.
Crafting Items
- Various Weapon and Armour Moulds: Scattered around both the Grymforge and Adamantine Forge are moulds that you can collect and use to craft two pieces of your choice. You’ll also need to collect some Mithral, but that is found much closer to the Adamantine Forge.
Gear
- Jorgoral’s Greatsword: A good Act 1 greatsword, with a unique Action that can hit multiple enemies at once. Sold by Corsair Greymon.
- Bow of the Banshee: An amazing bow for Rogue which has a chance of Frightening hit targets. Sold by Corsair Greymon.
- Fetish of Callarduran Smoothhands: Free Invisibility cast once per Long Rest. Found on dead Deep Gnome on Grymforge docks.
- Disintegrating Night Walkers: Best pair of Act 1 boots, offers fantastic mobility bonuses. Taken from True Soul Nere.
- Ring of Absolute Force: Adds Thunder damage to Thunder-based spells and attacks. Looted off of Sergeant Thrinn.
Adamantine Forge
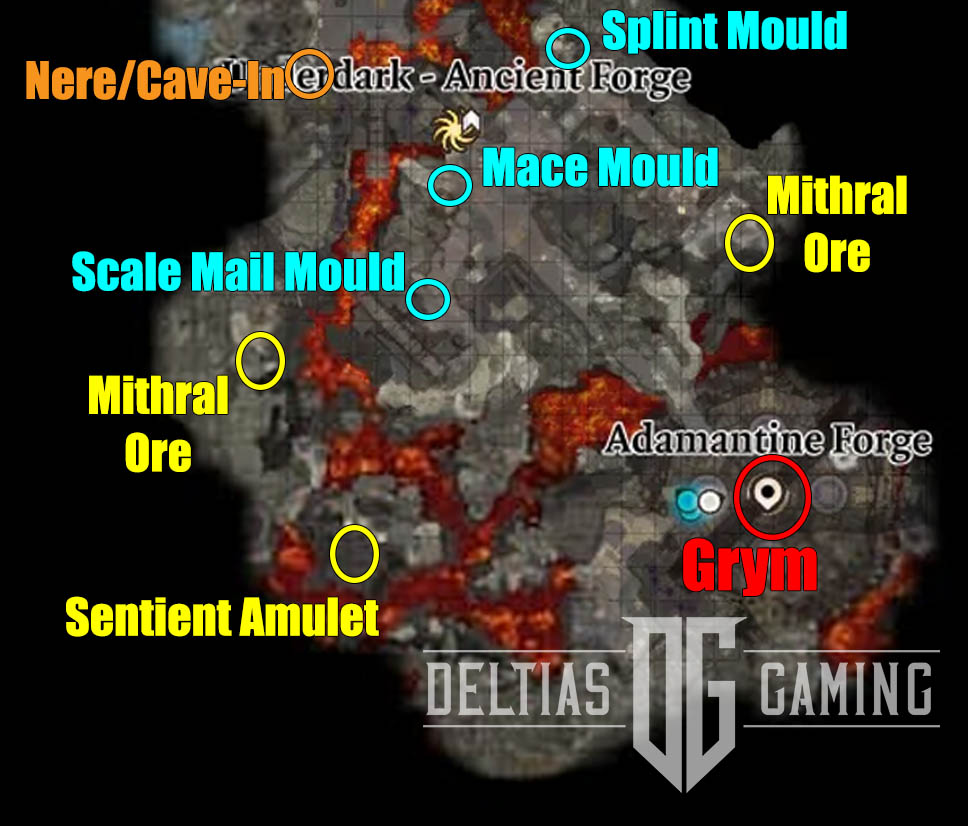
At the Adamantine Forge you’ll be able to craft armour/weapons, but only after finding all the pieces and defeating the giant Grym construct guarding the ancient forge. There are a total of six different pieces of gear you can choose from, however you will only have enough Mithral to craft just two items. You’ll need to choose wisely, and we have our recommendations in our full Adamantine Gear Tier List and Crafting guide.
Quest
The Adamantine Forge: You’ve likely discovered information pointing to the location of an ancient forge and other NPCs looking for it. You can find it by following these steps, which will take you to make your way across some hanging metal platforms. Additionally, before you can use the forge you will have to defeat Grym, the mechanical construct guarding it.
Crafting Items
- Various Weapon and Armour Moulds: There are additional moulds you can find on the way to and at the Adamantine Forge.
- Mithral Ore: You will need to find a source of this metal and mine two useable pieces before you can craft at the forge.
Gear
- Grymskull Helm: A fantastic heavy helm for Fighters, Paladins, or some Cerlic domains. Offers complete resistance to critical hits. Dropped by Grym.
- Adamantine Weapons and Armour: As mentioned previously you can choose to craft two items. If you find all the moulds you’ll have six pieces to choose from – 3 weapons, a shield and two sets of armour. We highly recommend crafting the Adamantine Scale Mail and the Adamantine Splint Armour.
Rosymorn Monastery Trail
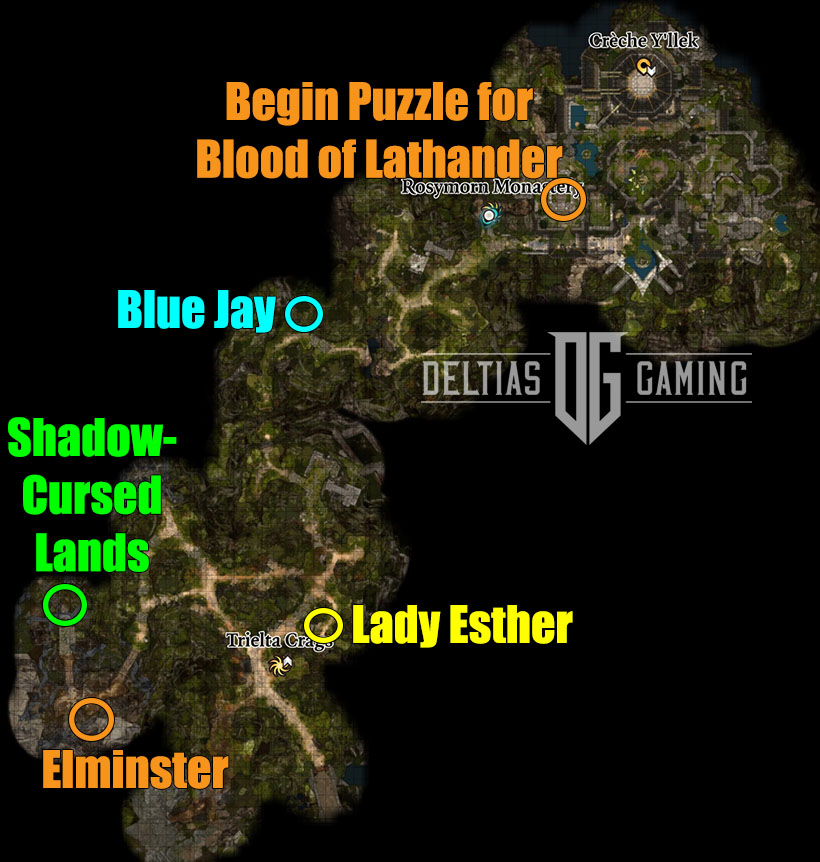
The next location on our Baldur’s Gate 3 Act 1 guide will take you west from the Mountain Pass to the Rosymorn Monastery Trail. When you click to leave the area, you’ll receive a notification that advancing could potentially lock you out of the Act 1 quest. Although the Trail is technically still a part of Act 1 and you should be able to return to other previous waypoints if you need to, spending Long Rests while in this area could conclude the Goblin Camp/Druid conflict without you if you haven’t already finished it.
Additionally, interaction with Lae’zel will encourage you to head northeast to the Creche. It’s highly recommended that you follow this track, as heading west will lead you to the Shadow-Cursed Lands. That location is the true start of Act 2 and if you click to enter, then you will no longer be able to return to any of the Act 1 maps!
Quest
- Steal a Githyanki Egg: Not too far down the trail on the right you’ll find a trader named Lady Esther. She’s working for the Society of Brilliance and she’s been to the Crèche hoping to obtain and Githyanki egg for some experimentation. The Githyanki at the Crèche turned her away, but she’s asking for your help. Morals aside, best to stay on Lady Esther’s good side temporarily, because she’s got some great items for sale.
- The Wizard of Waterdeep: When you finally do choose to head east on the trail shortly before the passage to the Shadow-Cursed Lands you will automatically run into the renowned wizard Elminster. He’s looking for Gale, and if he’s not in your party Elminster will insist on visiting him in your camp. This encounter is very important for progressing Gale’s quest.
- Reclaim the Blue Jay’s Nest: If you have Speak with Animals active, there is a Blue Jay on the trail who will ask for your help taking its nest back from some Eagles. It’s up to you to determine the veracity of its claim. Even if you choose to help the little bird out, the rewards on this quest aren’t anything special.
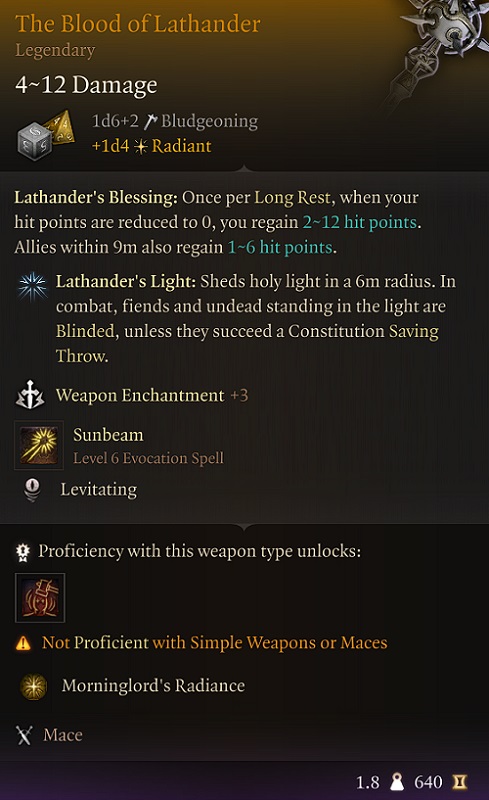
- Find The Blood of Lathander: The Blood of Lathander is a legendary mace that lies at the end of a very long puzzle in the Rosymorn Monastery/Githyanki Creche areas. It’s a must have weapon, especially good for Clerics, and the Radiant damage can be a huge help in a big Act 3 fight.
Gear
- Periapt of Wound Closure: A must-have accessory for any player attempting to run the game solo. Maximizes healing and stabilizes you when Downed. Sold by Lady Esther.
- Gloves of Cinder and Sizzle: A great pair of gloves, especially for the Monk class. Could also benefit a spellcaster. Sold by Lady Esther.
- Graceful Cloth: Best pure damage armour for Dexterity bow/ranged builds. Sold by Lady Esther.
- Blood of Lathander: One of the first legendary items you can acquire in Baldur’s Gate 3 and very worth the effort it takes to claim!
Crèche Y’llek
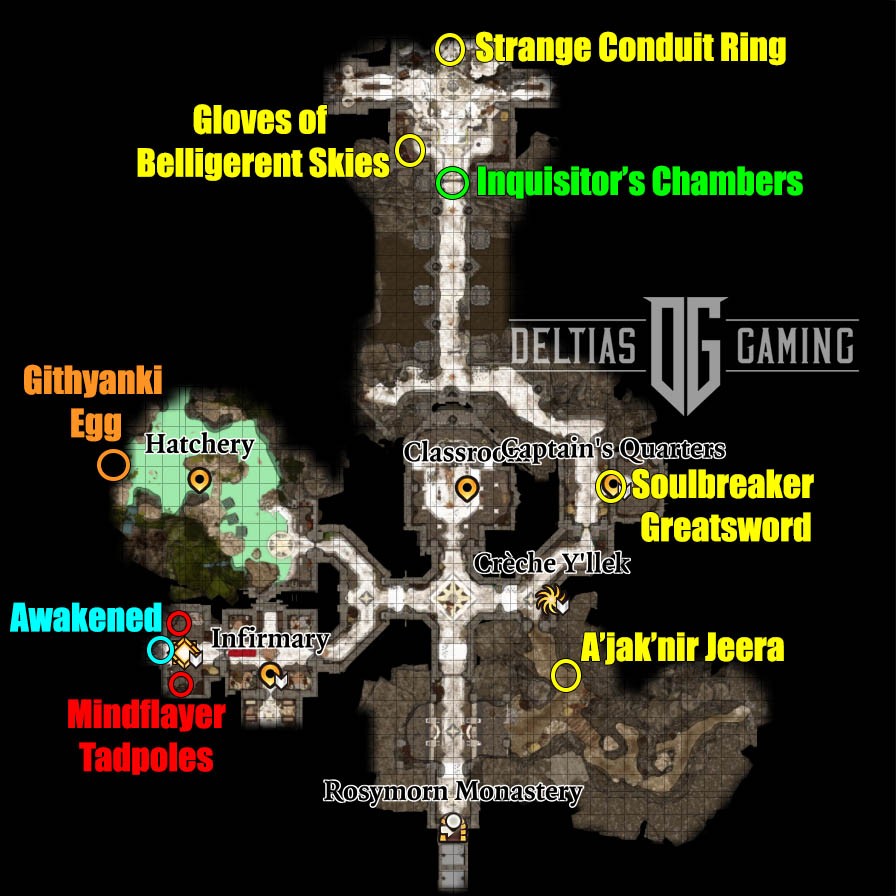
The final location in our Baldur’s Gate 3 Act 1 checklist is Crèche Y’llek. It may seem very out of the way, but has a ton of story significance, great gear and weapons to find, and a major bonus to unlock. If you recruited her, you should include Lae’zel in your party before going inside. It will make your entry easier, and the events that happen in the Crèche will play a major role in her quest.
Additionally, you’ll want to be sure to visit the Infirmary where you can speak to the Doctor about your parasite problem. You can unlock a major bonus to your Illithid powers here.
Read More- The Top 10 Best Spells
Moreover, it’s best to avoid the Inquisitor’s Chambers until you have completed everything else in the Crèche you want to do. The events here will move the story forward.
Quest
- Steal a Githyanki Egg: Once inside Crèche Y’llek you can now visit the Hatchery. (Watch out for all the traps and acid.) There is one lone egg that has not yet hatched. You can attempt to steal it for Lady Esther, but Varsh Ko’kuu is keeping a sharp eye on it.
- The Blood of Lathander: Once you’ve solved the Ceremonial Weapons and Dawnmaster’s Crest Puzzle back at the Monastery, you’ll pick up the rest of the quest inside the Inquisitor’s Chambers.
Gear
- Soulbreaker Greatsword: An amazing rare greatsword with a stunning ability. Looted from Kith’rak Therezzyn in the Captain’s Quarters.
- Strange Conduit Ring: Great accessory for builds using Concentration spells often. Found in the chest in the Inquisitor’s Chamber.
- Gloves of Belligerent Skies: Combine on a Cleric with Luminous Armour for a lot of great extra Radiant damage. Found in the chest in the Inquisitor’s Chamber.
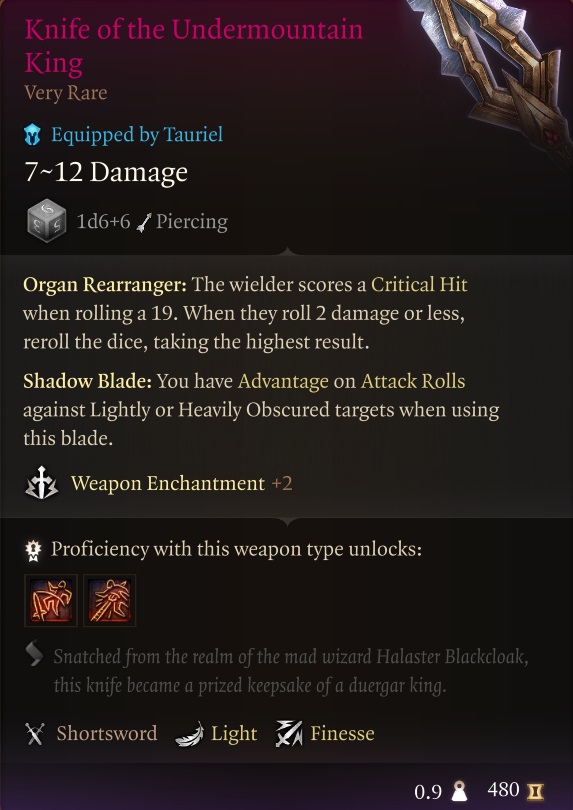
- Knife of the Undermountain King: One of the best in-game weapons for better crit. Purchased or looted from A’jak’nir Jeera.
- Gloves of Dexterity: Amazing Act 1 item for Dexterity-based builds.Purchased from A’jak’nir Jeera.
Permanent Bonuses
Awakened: The Zaith’isk Chair is a Githyanki device that is supposed to be able to remove tadpole parasites. Sit in the chair first, and if you make the right dialogue choices and are successful with rolls, you can end up with stronger Illithid powers.
Related:
Looking For More About Baldur’s Gate 3?
Thank you for reading our Baldur’s Gate 3 Act 1 Checklist: All Things to Complete guide. We provide the latest news and create guides for Baldur’s Gate 3. Also, watch me play games on Twitch or visit my YouTube channel!
 Reddit
 Email
Email
